Prusa-firmware: Higher density mesh bed leveling
This seems like a low-hanging-fruit feature request
The MK3 mesh bed leveling is quite coarse, it only probes a 3x3 pattern. I had my heatbed exchanged because my old bed has a slight bow right where the PINDA does not probe - so the printer is blind to that. Also, in order for a super consistent first layer I generally wished I could configure the amount of leveling probe points.
The Klipper firmware makes the probe pattern configurable. I wished I could do that on my MK3, which runs the Prusa firmware.
Internally, the 3x3 grid is interpolated to a 7x7 grid. So an obvious way would be to add a "fine" MBL option in the printer settings, so that the printer scans a 7x7 grid and then does not interpolate anymore. It would be even better, if the number of probing points in X and Y direction would be configurable seperately. I would think in the range of 2 to 7.
I would love that - and I am sure the number of Heatbed replacements would go down if that would solve some first layer issues.
I think I remember a video on YouTube where Josef teased a menu config option for exactly that. It was when MK3 was still in internal beta.
Best regards
 stahlfabrik
All 267 comments
Low hanging fruits are just as delicious and less chunks missing from bird bites!
The difficulty appears to be that the mainboard was already at capacity and clever work has already been done to facilitate recent development, leaving even less opportunity for increased function. Keep in mind that some like myself manually level the bed using wave washers or other methods long before we ask the mainboard to tighten up tolerances further. Given the above, it does suggest that this low hanging fruit is already on the ground rotting into worm food.
 Pathogenius
on 8 Oct 2018
Pathogenius
on 8 Oct 2018
I know what you mean but I cannot agree. The 7x7 data structure is already in place so the amount of used RAM during printing should be exactly the same. The trick would be to not fill it by calculations (interpolations) but by measurements. I am of course not sure, but optimistic, that the little code changes and additions should fit into EINSYs flash. I also know the wave washer and other methods but even then: what do you do when the "Bow" is between two screws?
The optional "second stage" - allowing other grids as 3x3 or 7x7 need some more development in the interpolation function I think - I have not looked into the code. But the first stage (aka offering a 7x7 fine MBL) would make some users happy already.
stahlfabrik
on 8 Oct 2018
This should be implemented as function for bed calibration. Taking a finer surface „snapshoot“ will also reduce the necessary points to measure in every day use if the code would be able to orientate the snapshooted surface by only scanning the 4 corners before starting a print, or even just one point?
 RacingHell
on 8 Oct 2018
RacingHell
on 8 Oct 2018
I modified the command G80 to G80 N7 to measure with 7 points. But i didn't implement saving on power failure all 7x7 points, they are interpolated when power comes back. You can try it if you want. https://github.com/mionut/Prusa-Firmware . I am using this for some time, but i have an ups, i don't use power failure detection.
The print bed surface warps with temperature change, i use 7x7 bed leveling all the time. I also wait 2 minutes in startup gcode for bed temperature to stabilize.
 mionut
on 9 Oct 2018
mionut
on 9 Oct 2018
Very nice! I also thought about using a Gcode enhancement to make that function available - so I would not have to mess with the menu etc.
Still I hope that Prusa Research themselves provide a clean and nice implementation:-)
stahlfabrik
on 9 Oct 2018
mionut it looks like you also added another pinda temp offset 28c am I seeing that correctly if yes that is great that is also another feature that is needed
could you not just go to the configuration.h file and change the // set the number of grid points per dimension
// I wouldn't see a reason to go above 3 (=9 probing points on the bed)
#define AUTO_BED_LEVELING_GRID_POINTS 2 change this to a 3?
 Crunch69
on 10 Oct 2018
Crunch69
on 10 Oct 2018
//#define ENABLE_AUTO_BED_LEVELING is commented in configuration.h , so AUTO_BED_LEVELING_GRID_POINTS is not used, also, this value is used for G29, not G80.
I will try to make a pull request with what i made for 7 points probing. Also my modifications work only with 7x7 or 3x3 points, because the internal matrix is 7x7. The current method is to measure only 3x3 points and interpolate the others.
mionut
on 10 Oct 2018
@Crunch69 The whole idea of the feature request is to go over 9 measured points - optionally of course, cause it will take longer - most easily by using the "virtual"/interpolated 49 points that are used internally anyway by doing 7x7 (49) measurements.
3x3 is way to coarse if your bed surface is not perfect. Especially if the imperfection is happeing in between screws/standoffs. And yeah, there are also just 9 screws.
Please let us not talk about PINDA temperature here!
stahlfabrik
on 10 Oct 2018
I modified the command G80 to G80 N7 to measure with 7 points. But i didn't implement saving on power failure all 7x7 points, they are interpolated when power comes back. You can try it if you want. https://github.com/mionut/Prusa-Firmware . I am using this for some time, but i have an ups, i don't use power failure detection.
The print bed surface warps with temperature change, i use 7x7 bed leveling all the time. I also wait 2 minutes in startup gcode for bed temperature to stabilize.
@mionut ..
As one who has issues with first layer consistency I was excited to try this... However, I run in to the following error when I try to compile your firmware,
sketchMarlin_main.cpp: In function 'void process_commands()':
Marlin_main.cpp:4450: error: 'verbosity_level' was not declared in this scope
 if (verbosity_level >= 1) {

     ^
Marlin_main.cpp:4500: error: 'verbosity_level' was not declared in this scope
if (verbosity_level >= 10) {

    ^
Marlin_main.cpp:4515: error: 'verbosity_level' was not declared in this scope
if (verbosity_level >= 1)

    ^
Marlin_main.cpp:4534: error: 'verbosity_level' was not declared in this scope
if (verbosity_level >= 20) {
^
exit status 1
'verbosity_level' was not declared in this scope
To ensure the error wasn't due to the operator I decided to try to compile the latest official pull and was able to do so without issue.
Thanks for effort.
 edspeds
on 11 Oct 2018
edspeds
on 11 Oct 2018
@edspeds, I remade the commits with every modification that i have locally, separated by logical function. I also fixed the compilation error. Please try now.
mionut
on 12 Oct 2018
@edspeds, I remade the commits with every modification that i have locally, separated by logical function. I also fixed the compilation error. Please try now.
It compiled without issue, thanks. I'll put this to the test this weekend.
edspeds
on 12 Oct 2018
@edspeds, I remade the commits with every modification that i have locally, separated by logical function. I also fixed the compilation error. Please try now.
All compiled well but flash failed, multiple times...
edspeds
on 15 Oct 2018
Another vote for this feature request.
 CCS86
on 15 Oct 2018
CCS86
on 15 Oct 2018
@edspeds, I remade the commits with every modification that i have locally, separated by logical function. I also fixed the compilation error. Please try now.
@mionut are you still working on your firmware? Was kind of hoping to try a fix as your code compiles but errors out during flash.
edspeds
on 25 Oct 2018
Wow, love the concept of just measuring and would like to try the G80 N7 but not sure how to get started. Is there a already compiled copy I could try. Sorry if this is a bit of a newbie question. I also have a UPS.
 Tinker999
on 8 Dec 2018
Tinker999
on 8 Dec 2018
Hi, awesome work @mionut ! I tried to implement this myself before i've seen your work, im trying right now your version, this is a must have by default imho... Interpolated 3x3 is way too bad, for those that are unable to compile the firmware, here you go:
firmware.hex.zip
Also, its possible for you to mege with the latest 3.5.0 version :) ?
Thanks !
 F0x06
on 11 Dec 2018
F0x06
on 11 Dec 2018
Decent. For noobs like me who didn't change their Start G-Code 'G80' instruction to 'G80 N7', well just go right ahead and do that!
Pathogenius
on 13 Dec 2018
Something must be up with my MK3 as the firmware posted by F0x06 still doesn't install correctly...
Any suggestions?
edspeds
on 14 Dec 2018
@edspeds You flashed it with Slic3r prusa edition?
Also ensure that any other apps using the serial communication such as pronterface are closed during flash
F0x06
on 14 Dec 2018
Yep and I get a flash failed warning same as when I compile it. I flashed stock firmware without issue after the failed flash. I guess I’ll try again this weekend
edspeds
on 14 Dec 2018
@michalxfanta Any plans to implement this ? I really need this feature :)
F0x06
on 20 Dec 2018
I would also like this feature, I've noticed that there are some areas in my print bed (on diagonals between points) that my first layer has a lot of separation. If I lower my Z adjust, then I end up hitting the print bed at the calibration points, while still being a bit too high on the low spots.
Maybe make an option in the menu with 3x3, 5x5, 7x7, etc?
 Adrian-at-CrimsonAuzre
on 24 Dec 2018
Adrian-at-CrimsonAuzre
on 24 Dec 2018
Thanks @mionut for your awesome work !, I saw that you merged the latest Prusa 3.5.1 into your repo, i tested it, this is the result:


And the pre-compiled firmware fro those with compilation issues (Don't forget to edit your start GCODE script in Slic3r to enable the 7x7 probing, G80 N7:
Prusa-Firmware-3.5.1-7x7.zip
I just have the 2 bottom one are a bit rough on bottom edges, not a problem. My bed is almost perfect.
F0x06
on 28 Dec 2018
If only Prusa would understand the problem (acknowledge it I mean) and then provide an option to the customers. I would be happy if it would be JUST an gcode enhancement to get 7x7. But an 5x5 option would also be stellar...
stahlfabrik
on 28 Dec 2018
If only Prusa would understand the problem (acknowledge it I mean) and then provide an option to the customers. I would be happy if it would be JUST an gcode enhancement to get 7x7. But an 5x5 option would also be stellar...
Totally agree ! In addition, Prusa technical support can save a lot of time and money, as many users suffer from bed-leveling issues.
F0x06
on 28 Dec 2018
Thanks @mionut for your awesome work !, I saw that you merged the latest Prusa 3.5.1 into your repo, i tested it, this is the result:
And the pre-compiled firmware fro those with compilation issues (Don't forget to edit your start GCODE script in Slic3r to enable the 7x7 probing,
G80 N7:
Prusa-Firmware-3.5.1-7x7.zipI just have the 2 bottom one are a bit rough on bottom edges, not a problem. My bed is almost perfect.
Thank you for posting the link and instructions. I’m going to give it a try this weekend. I agree an official response would be appreciated.
I have clone texture coating spring steel which I very much like but due to a slight warp the really good print surface is limited to about 7x7(must have if you print PETG). Hoping this will expand that out a bit.
Also just to save time would you consider posting your 5x5 test STL on Thingiverse.
Tinker999
on 28 Dec 2018
@Tinker999 It's an openscad modular calibration pattern, I don't remember the link, il post the file here later.
F0x06
on 28 Dec 2018
@mionut and @F0x06 Thanks a million! This updated successfully and works like a charm...
edspeds
on 28 Dec 2018
@edspeds You're welcome 👍
F0x06
on 28 Dec 2018
I found this test pattern on thingiverse not as nice as F0x06’s but it’s a good start
edspeds
on 30 Dec 2018
Sorry for the delay, this is the parametric test i used https://www.thingiverse.com/thing:3141591
And the settings
/*[printer]*/
//bed x size[210]
bed_xsize=250;
//bed y size[270]
bed_ysize=210;
//bed margin[15]
bed_margin=15;

/*[layer and line]*/
//first layer thickness[0.24]
first_layer_thick=0.20;
//line size [multiplier of nozzle size]
line_size=0.8;

/*[element shape]*/
//element shape
element_shape=0; //[0:square,1:circle]
//element size[12]
element_size=18;
//element thickness[0.84]
element_thick=first_layer_thick;

/*[array pattern]*/
//number of array x size[3]
array_xsize=5; //[2:1:5]
//number of array y size[3]
array_ysize=5; //[2:1:5]
And the pre-generated STL (same on my pictures, 5x5)
BedLevelTest-5x5.zip
F0x06
on 30 Dec 2018
Thanks @mionut for your awesome work !, I saw that you merged the latest Prusa 3.5.1 into your repo, i tested it, this is the result:
And the pre-compiled firmware fro those with compilation issues (Don't forget to edit your start GCODE script in Slic3r to enable the 7x7 probing,
G80 N7:
Prusa-Firmware-3.5.1-7x7.zipI just have the 2 bottom one are a bit rough on bottom edges, not a problem. My bed is almost perfect.
I just tried flashing my firmware on my MK3 with this and I get an error even though it shows it's updated so I tried to save the error log but command + C closed the window. I ran it again and this time it shows successful.
 codiac2600
on 30 Dec 2018
codiac2600
on 30 Dec 2018
@codiac2600 This generally happens if you have another application trying accessing the printer via serial during flash process, for ex pronterface, or repetier, octoprint etc
F0x06
on 30 Dec 2018
Am I on the wrong track here?
It seams that @minout might have taken the mesh bed leveling out:
lround((z/*+mbl.get_z(x, y)*/)*cs.axis_steps_per_unit[Z_AXIS]) :
In planner.cpp
So I wonder why you all find it to work well:-)
What does this line do? Am I wrong?
I am not a fan of all changes in his repo. I took just the 7x7 changes in my firmware. Awesome work of @minout.
stahlfabrik
on 30 Dec 2018
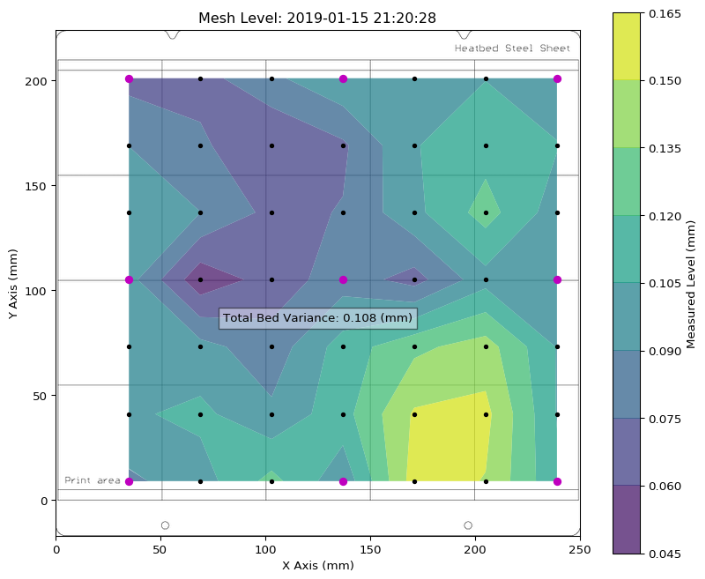
Not sure but I see a definite improvement and running the PrusaMeshMap in Octoprint shows a more detailed bed map...
@stahlfabrik mind sharing your firmware?
edspeds
on 30 Dec 2018
Prusa MeshMap with a 3x3 and 7x7 level appears to show something is being checked. I'm going to run a test print each way using my 3rd party powder coated sheet that causes me all kinds of first layer grief to see if it's real or placebo...


edspeds
on 30 Dec 2018
The mesh map output is isolated from the planner, who does the work while printing . I will soon share!
stahlfabrik
on 30 Dec 2018
much obliged. I'm testing it on my 3rd party sheet as I type, I'll post pictures of both ways. Tentatively I have to say I see a difference, though I haven't used the sheet in months due to my only being able to get a good first layer on a small portion of the sheet.
edspeds
on 30 Dec 2018
Maybe no bed leveling is better than 3x3 leveling in some cases:-)
But I still wonder about that change in planner.cpp. Please comment if you understand that!
stahlfabrik
on 30 Dec 2018
So my firmware fork is uploaded to GitHub. There is a branch "HD-MBL" were I implemented JUST the 7x7 workaround by @mionut - the rest the the current Prusa firmware 3.5.1:
https://github.com/stahlfabrik/Prusa-Firmware/tree/HD-MBL
From my commit log:
Thanks to @minout for the live-saving 7x7 gcode workaround to get 7x7 MBL
I JUST took the changes in your firmware fork that actually provide the change.
So there is no PINDA temperature filtering/smoothing and no shifting of the temperature levels of 35 to 60C.
I also did NOT overtake your changes in planner.cpp, which seem to me like you deactivated the influence of the MBL during printing?! Please care to comment:
lround((z/+mbl.get_z(x, y)/)*cs.axis_steps_per_unit[Z_AXIS]
EDIT: Here is my hex file for your convenience. Use at your own risk:
firmware.hex.zip
EDIT2: To sum up my understanding of the issue:
There are multiple parts in Prusa firmware that are hard coded to the 3x3 mesh bed leveling:
First is the XYZ calibration. Which stores MBL jitter in the EEPROM
Second is Power Panic which stores the 3x3 points in EEPROM.
These functions also work on the internal 7x7 interpolated points - so it is also not easy to change those 7x7 points.
Third is of course the MBL itself and the "upsample_3x3" function that it calls.
Also @minout was really genius in how he calculates the PINDA probing points. Stock firmware has them hardcoded which blows my mind.
One thing to point out is that stock firmware compares the MBL values taken during XYZ calibration to Gard against the nozzle crashing in the bed (if I understand that jitter business correctly). So the 7x7 workaround does NOT provide that extra security. So maybe be ready to press "reset" IF your nozzle digs into your heatbed.
So Prusa Research it is your part now to implement that in a nice way: 3x3, 5x5 and 7x7 MBL would be what I would imagine was configurable from the menu. And make the densest mesh bed leveling during XYZ calibration to get the reference points in memory so that the jitter check works. And power panic...
@edspeds
EDIT3: I also did the nyloc nut bed leveling today. My bed is really flat now.
This is with 3x3 MBL:

stahlfabrik
on 30 Dec 2018
So my firmware fork is uploaded to GitHub. There is a branch "HD-MBL" were I implemented JUST the 7x7 workaround by @mionut - the rest the the current Prusa firmware 3.5.1:
https://github.com/stahlfabrik/Prusa-Firmware/tree/HD-MBL
From my commit log:
Thanks to @minout for the live-saving 7x7 gcode workaround to get 7x7 MBL
I JUST took the changes in your firmware fork that actually provide the change.
So there is no PINDA temperature filtering/smoothing and no shifting of the temperature levels of 35 to 60C.
I also did NOT overtake your changes in planner.cpp, which seem to me like you deactivated the influence of the MBL during printing?! Please care to comment:
lround((z/_+mbl.get_z(x, y)_/)*cs.axis_steps_per_unit[Z_AXIS]
EDIT: Here is my hex file for your convenience. Use at your own risk:
firmware.hex.zipEDIT2: To sum up my understanding of the issue:
There are multiple parts in Prusa firmware that are hard coded to the 3x3 mesh bed leveling:
First is the XYZ calibration. Which stores MBL jitter in the EEPROM
Second is Power Panic which stores the 3x3 points in EEPROM.
These functions also work on the internal 7x7 interpolated points - so it is also not easy to change those 7x7 points.
Third is of course the MBL itself and the "upsample_3x3" function that it calls.
Also @minout was really genius in how he calculates the PINDA probing points. Stock firmware has them hardcoded which blows my mind.
One thing to point out is that stock firmware compares the MBL values taken during XYZ calibration to Gard against the nozzle crashing in the bed (if I understand that jitter business correctly). So the 7x7 workaround does NOT provide that extra security. So maybe be ready to press "reset" IF your nozzle digs into your heatbed.So Prusa Research it is your part now to implement that in a nice way: 3x3, 5x5 and 7x7 MBL would be what I would imagine was configurable from the menu. And make the densest mesh bed leveling during XYZ calibration to get the reference points in memory so that the jitter check works. And power panic...
@edspeds
EDIT3: I also did the nyloc nut bed leveling today. My bed is really flat now.
This is with 3x3 MBL:
After posting the initial fork and testing Josef Prusa commented that the 7x7 may be skewed base don the placement of the magnets in the bed which would throw off the Pinda.
My initial tests of the 7x7 vs 3x3 are promising. I have the clone textured bed which is very uneven and this seemed to help out quite a lot but still wasn't as good as I'd like it.
Would there be a benefit to increasing the amount mesh bed leveling corrects? I believe it's locked in at 0.05mm. Perhaps allowing correction up to 0.1mm would be better?
codiac2600
on 30 Dec 2018
It is indeed very promising! First layer has not been so consistent before:-)
I hope you can convince Jo to check this out and implement a good solution covering all aspects of the features. As mentioned above! Thanks!
Edit: Klipper users tend to use 5x5 upsampled to 12x12 or so. Anyway: it seams not to be a problem with the magnets
@codiac2600
stahlfabrik
on 30 Dec 2018
Below are my results, the 7x7 definitely makes a difference, judge for yourself from the pictures below... I'll try your firmware next. I'm with @codiac2600 I like the clone sheet but the surface is uneven as sh...
7x7


3x3


edspeds
on 30 Dec 2018
Looking forward to your test of my build:-) if my understanding is right you will then have the effect of MBL. I wonder still about the change he made in planner?!🤷♂️
stahlfabrik
on 30 Dec 2018
Am I on the wrong track here?
It seams that @minout might have taken the mesh bed leveling out:
lround((z/*+mbl.get_z(x, y)*/)*cs.axis_steps_per_unit[Z_AXIS]) :In planner.cpp
So I wonder why you all find it to work well:-)
What does this line do? Am I wrong?
I am not a fan of all changes in his repo. I took just the 7x7 changes in my firmware. Awesome work of @minout.
Apparently you're right, if i understand this piece of code, MBL is disabled because it not retrieve value from mbl.get_z(x, y)... But lol maybe it improves the print quality, I've heard about people disabled their mesh leveling and got better results.
Any inputs on this @mionut ?
F0x06
on 30 Dec 2018
Thanks for your confirmation. So my firmware should have a visible effect:-)
stahlfabrik
on 30 Dec 2018
Thanks for your confirmation. So my firmware should have a visible effect:-)
I'll load your firmware in next. I'm finishing a print first.
codiac2600
on 30 Dec 2018
It is indeed very promising! First layer has not been so consistent before:-)
I hope you can convince Jo to check this out and implement a good solution covering all aspects of the features. As mentioned above! Thanks!
Edit: Klipper users tend to use 5x5 upsampled to 12x12 or so. Anyway: it seams not to be a problem with the magnets
@codiac2600
I'll post it in the Prusa Dev chat and see if I can get anyone at prusa to test a final version of this firmware build.
codiac2600
on 30 Dec 2018
Awesome!
This firmware is just a robust workaround. Prusa developers will surely come up with an implementation covering all cases of functionality and hopefully even menu support to make the density configurable.
stahlfabrik
on 30 Dec 2018
@stahlfabrik, Just tested your firmware and it performs the similar to @mionut's, but I give a slight edge to yours... See pictures below, sorry to flood this thread with so many photos by the way, but in this case I feel a visual is in order.


edspeds
on 30 Dec 2018
IMO quite an improvement which is not surprising - giving that theory that minout has MBL deactivated in the planner:-)
stahlfabrik
on 30 Dec 2018
Has anyone checked, if the pinda temperature and it‘s calibration-curve isn‘t mixing up results between 3x3 and 7x7? Underneath 30°C probe temp the MBL is a tiny bit different for me (as already discussed, because the calibration doesn‘t recognize those lower but necessary temps) but muuuuch more solid, since manual calibration with the continuity measurement method. There could be the effect of having more warming up time for the pinda on 7x7 which could give more stable MBL as well?
RacingHell
on 30 Dec 2018
A good calibration is needed for optimal results. I guess pinda will heat maybe 5C or so doing the 49 points when printings abs:-)
You always should start the MBL with pinda temperature of at least 35C. Under that and the firmware cannot compensate the temperature shift. Another low hanging fruit for Prusa to change:-)
stahlfabrik
on 30 Dec 2018
Thanks for your confirmation. So my firmware should have a visible effect:-)
Im re-printing right now a pattern with your firmware, the only thing i can confirm is that Z-motors are moving slightly during print, this confirm that MBL is working, it can be interresting to check the same with @mionut firmware.
F0x06
on 30 Dec 2018
As far as PINDA is concerned, I have a script in my starting GCODE to bring the PINDA to 35C prior to mesh bed leveling to help with consistent first layers. In any case there's a definite improvement with the higher density MBL. As an aside I also used springs in place of the standoffs for my bed leveling. I typically have it within 0.05mm for my PEI sheet but just tossed the 3rd party sheet on to test as I my Prusa PEI sheet is pretty good and the 3rd party is scheist.
edspeds
on 30 Dec 2018
As far as PINDA is concerned, I have a script in my starting GCODE to bring the PINDA to 35C prior to mesh bed leveling to help with consistent first layers. In any case there's a definite improvement with the higher density MBL. As an aside I also used springs in place of the standoffs for my bed leveling. I typically have it within 0.05mm for my PEI sheet but just tossed the 3rd party sheet on to test as I my Prusa PEI sheet is pretty good and the 3rd party is scheist.
I also use a >35c PINDA GCODE script :).
F0x06
on 30 Dec 2018
@codiac2600 i just thought: the sheet metal SHOULD shield the magnetic forces, shouldn’t it?
So I took the pliers and moved them ontop of the sheet. I could not feel the force of the magnets. Without the sheet the pliers get attracted.
One very scientific proof that Jos fears are not warranted. ;-)
stahlfabrik
on 31 Dec 2018
@stahlfabrik
I would say this all depends on how affected a pinda us by weak magnetic fields. It should be affected some but the question is how much. We could try seeing if the map is better or worse by placing something thin enough to block any additional magnetic field but still allow the pinda to resister the surface. Or even remove magets besides the ones on the corners.
codiac2600
on 31 Dec 2018
@stahlfabrik
I was wondering and quickly loaded a magnetometer app onto my smartphone, it uses the compass sensor. Magnetic fields are there, and it seems to get higher with sheet on it. :)) But this could also be just the sheet it spots.
RacingHell
on 31 Dec 2018
Haha:-)
Great ideas:-)
Anyway 7x7 MBL imho works great (for me).
stahlfabrik
on 31 Dec 2018
Haha:-)
Great ideas:-)
Anyway 7x7 MBL imho works great (for me).
A big question left: Why prusa MBL can't manage to do his job properly without the use of "Bed level correction" ?
I got the best but not perfect results with:
Left: -47
Right: -20
Front: -4
Rear: 9
F0x06
on 31 Dec 2018
Where an how to print to test the 7x7 level?
 OopAck
on 1 Jan 2019
OopAck
on 1 Jan 2019
You install the modified firmware and change the G80 to G80 N7 in your start gcode
stahlfabrik
on 1 Jan 2019
Little update here, i reinstalled the nylock nuts manual leveling mod, this is what i get from Octoprint PrusaMeshMap when done (Bed 65c)

And right after the same with G80 N7

PS: Happy new year everyone !!!
F0x06
on 1 Jan 2019
Thank you, thank you, thank you for the best first layer I every had on my Mk3. Just flashed the new 7x7 firmware and very happy with it.
Also great top layer, I guess great bottom layer helps yields a better top layer.
Tinker999
on 3 Jan 2019
It would be awesome if someone developed a modification to mesh leveling, to blend the effect out over some number of layers.
CCS86
on 3 Jan 2019
Does anyone know if the new firmware has the nyloc bed leveling code in it? Where the center is the zero point and all other measurements are from there?
 556duckvader
on 3 Jan 2019
556duckvader
on 3 Jan 2019
Does anyone know if the new firmware has the nyloc bed leveling code in it? Where the center is the zero point and all other measurements are from there?
Nope, this is the same version but with g81-center patch :) enjoy:
firmware.zip
F0x06
on 3 Jan 2019
Is it possible to build a Mk2.5 version of this firmware? I believe it has the same bed as the MK3, so the hardware should be capable.
 alandeane
on 3 Jan 2019
alandeane
on 3 Jan 2019
LOL to the question before and the quick turnaround. Not about the 2.5 question
You might want to use the bed visulatizer plugin in octopi. There you can activate a checkbox that shows the bed centered without any firmware patch.
Another idea that i have: why not move the left edge of the mesh bed leveling more to the left? As there is a steel sheet there is no reason like hitting a special spot on the bed pcb to not measure edge to edge. On right side the bed is measured on its very edge. On the left we could basically probe at homing position on x.
Attention when implementing that tho: there are spots in mk3 firmware where the first leveling spot is used and where the machine might have no steel sheet on!? Not sure. Thinking of temperature calibration. Maybe xyz calibration too
stahlfabrik
on 3 Jan 2019
Is it possible to build a Mk2.5 version of this firmware? I believe it has the same bed as the MK3, so the hardware should be capable.
We have a copy here on our Facebook group. Check the files section.
https://www.facebook.com/groups/prusacommunity/?ref=share
codiac2600
on 3 Jan 2019
Is it possible to build a Mk2.5 version of this firmware? I believe it has the same bed as the MK3, so the hardware should be capable.
We have a copy here on our Facebook group. Check the files section.
https://www.facebook.com/groups/prusacommunity/?ref=share
Thanks, I have asked to join the group, awaiting approval.
alandeane
on 3 Jan 2019
I have a question/request.
A few months ago someone tweaked the official firmware 3.4.0 so the nozzle fan gets quieter at lower speeds. This improved sound reduction greatly, specially for night prints.
Does this release also has that feature? Or can someone/that same person add that feature to this release?
 duartemv
on 3 Jan 2019
duartemv
on 3 Jan 2019
Thank´s a lot guys! I now have a printer that isn´t only printing reliably in specific areas of the bed.
 Joelgastro
on 3 Jan 2019
Joelgastro
on 3 Jan 2019
@duartemv I would suggest to get familiar with how to compile the firmware. It is rather easy and empowers you to mod the firmware to your liking. That fan change is one line of changed “code”. If I got that correctly
Best regards
stahlfabrik
on 3 Jan 2019
Thank´s a lot guys! I now have a printer that isn´t only printing reliably in specific areas of the bed.
Which Sheet did you have ? Powder coated or Smooth PEI ? I have the Powder Coated Sheet from prusa, apparently that's normal to have some places more squished acording to Prusa support due to the variations of the coating
F0x06
on 3 Jan 2019
@stahlfabrik I can do that.
duartemv
on 3 Jan 2019
Just flashed the new 7x7 firmware, changed the G80 to G80 N7 in my start gcode. I installed on 1 of my 4 MK3s to test it... the test print came out PERFECT! This is AWESOME.... I am very happy with it... I am now flashing the other 3 !!!!
 FmrAnimalTech
on 4 Jan 2019
FmrAnimalTech
on 4 Jan 2019
I have installed the mk2.5 version, and can report it's working well, with the MMU2 unit installed.
I've only run single prints so far, but I don't see why a MMU print should have any issues.
alandeane
on 4 Jan 2019
Hello, I am glad that my code works for more people.
I commented mbl.get_z(x, y) in plan_set_position because i suspected that the distance is applied 2 times. plan_set_position is used in functions:
calibrate_z_autohome_xyhomeaxisretract (firmware)recover_machine_state_after_power_panicupdate_current_position_xyz(bed calibration)
That is in homing and calibration mostly.
The other place mbl.get_z(x, y) is in function plan_buffer_line that is the main function for moving in normal printing and here is not removed.
Is it better with mbl.get_z(x, y) removed from plan_set_position or left there ?
mionut
on 4 Jan 2019
As far as I understood one feedback above it works better in my fork where I did not touch the planner.
Personally I did not compare printing results myself. I just could not make sense of your change:-) so I left it as Prusa implementation has it.
But thank you for explaining the reasons. I think we all - especially the Prusa developers - now can think about it.
Your workaround is making quite a lot of people happy now:-)
stahlfabrik
on 4 Jan 2019
Just to inform you guys, prusa team is currently working on a fix, there is some leveling issues confirmed apparently sinze 3.5.0, IMHO it's older than that, and apparently downgrading firmware does not resolve the issue, I assume it's related to values stored on eeprom. I have these informations because I spoke with chat support yesterday.
F0x06
on 4 Jan 2019
Just to inform you guys, prusa team is currently working on a fix, there is some leveling issues confirmed apparently sinze 3.5.0, IMHO it's older than that, and apparently downgrading firmware does not resolve the issue, I assume it's related to values stored on eeprom. I have these informations because I spoke with chat support yesterday.
Could you please give a bit more details about this? Have massive problems with leveling atm on 3.5.1.
 insanity67
on 4 Jan 2019
insanity67
on 4 Jan 2019
@insanity67
I don't have more information than that sorry, this is all I got :/
F0x06
on 4 Jan 2019
I had a very strange issue the other day that might be related to that EPROMM issue.
I used the bed leveling adjustments in firmware to tweak the bed up on one side and down on the other before my planned switch to the 7x7 firmware. I had entered a value of -4 on the left and +4 on the right, everything else was zero. I then zero'd out those two settings (to go back to mechanical leveling) and spent a good hour leveling the bed (still before 7x7) with the non wave spring/nyloc nut way and I had it nailed down to an under .02 delta. I then reset the printer and on the next level check the bed was perfectly tilted to one side as if those -4/+4 values were finally reset and removed from epromm. I ran the check 5 times and the results never changed outside of slight measuring variance. I reset, checked Z, used the reset option under the firmware bed level adjustments and checked for stuff under the bed. Nothing changed, this was in fact that actual bed numbers.
So even though I set the left and right adjustments back to 0, it didn't seem to take effect until I restarted the printer. I had run about 15 G80s with it like this before restarting. This could potentially cause some serious issues if you are leveling and adjusting values, but it's not being properly updated without a reset.
If anyone else wants to try to repeat the issue:
G80, adjust the bed level through firmware, G80, then set bed level back to zero, G80 before a reset, G80 after a reset. There should result in a jump between the last two G80s without any physical adjustment to the bed.
Images are level before reset and just after reset. No other change.

 AnatomicFlack
on 4 Jan 2019
AnatomicFlack
on 4 Jan 2019
@AnatomicFlack
Thanks a lot for pointing this issue, so it means we need to restart printer between each correction before testing?
F0x06
on 4 Jan 2019
@AnatomicFlack What website, app, plugin, or file are you using there to visualize and interpret your G81? That seems incredibly useful for helping people who use the screw adjustment method to figure out what they need to do.
 zbross
on 4 Jan 2019
zbross
on 4 Jan 2019
As far as needing a reset each time, I don't think so. In the past, I've used it to adjust values and the bed and I felt it worked as expected. It may just be when resetting or going back to zero it may need a reset to clear the values for sure. I'm just guessing here though. I don't know nearly enough about the order of operations when processing the value change they are using here.
The file was created by someone named Walter Lundin and posted to the Prusa Facebook Group. It's an AMAZING tool and helped me dial in the bed quickly each time. I would only suggest making sure you have a right angle Allen key to help approximate the angles needed.
Link to the FB Post: https://www.facebook.com/groups/prusacommunity/permalink/899507453723321/
Link to my DropBox in case people aren't members of the FB Group yet: https://www.dropbox.com/s/lcp51lb4f2rw5p3/Bed%20Leveling.xlsx?dl=0
AnatomicFlack
on 4 Jan 2019
Please try the new committed pinda temperature smoothing. It uses shift with 2 instead of division.
These are some consecutive pinda temperatures from octoprint console (P: value) without smoothing:
24.8, 24.5, 24.8, 25.2, 25.1, 24.4, 25.0, 24.5, 25.1, 24.9, 24.8, 24.6
and these are with smoothing:
24.7, 24.7, 24.8, 25.1, 25.0, 24.8, 25.0, 25.1, 25.0, 25.1, 25.1, 25.1, 25.1, 25.1, 25.1, 25.1
The variation is much smaller.
Also i observed that the bed warps after the target temperature is reached so i put a 60 seconds delay with G4 S60; after waiting for heabed temperature and before mesh bed leveling.
mionut
on 4 Jan 2019
I'll also throw in an interesting issue that you may want to try and duplicate. On stock firmware 3.5.1, with no special changes to any gcode, no bed corrections, here are two different G81 outputs:

They look completely different, right? The thing is, no changes have been made between them. One was found by running G81 after G80, and the other was found by running G81 in the middle of a print that was built with Sl1c3r PE, also with no modifications. Any suggestions as to what may cause this discrepancy?
zbross
on 5 Jan 2019
The pause might be a very nice addition to my start gcode! Great idea.
If the filter is necessary I don’t know. The offset does not change that much +-0.5 degrees. But maybe it does help to get an even better bed. Possible. Great idea still!
I hope Prusa start fixing other things than MMU soon.
stahlfabrik
on 5 Jan 2019
@zbross. Your PINDA is carefully calibrated?
stahlfabrik
on 5 Jan 2019
@zbross. Your PINDA is carefully calibrated?
If you mean temperature calibration, then yes, I went through the process a while back. It wouldn't surprise me if it got lost in the myriad of resets, firmware flashing, and other attempts to fix this, so I'll revisit it, but as far as I can tell there's no issue there.
zbross
on 5 Jan 2019
Resets delete the calibration.
Anyway: you should compare MBL values at exactly the same PINDA temperature. Then it does not matter if your PINDA is calibrated:-)
stahlfabrik
on 5 Jan 2019
Resets delete the calibration.
Anyway: you should compare MBL values at exactly the same PINDA temperature. Then it does not matter if your PINDA is calibrated:-)
Thanks for letting me know! I always test at the same temp using a custom gcode to get the PINDA up, but it looks like that's different from the temp when printing, maybe? Either way, thanks again, and sorry for hijacking this thread.
zbross
on 5 Jan 2019
Can someone describe in a few words the differences between the two forks, I mean stahlfabrik or mionut version?
I´m uncertain what I should use now?!
Thanks!
insanity67
on 6 Jan 2019
Mine has just the 7x7 mesh bed leveling and is otherwise stock.
Mionut has some other parts changed: filtering of PINDA temperature and he has changed the PINDA temperature calibration ranges. Also he has done a change to the planner Logik regarding the use of mesh bed leveling values that I have not yet fully understood.
stahlfabrik
on 6 Jan 2019
I use @stahlfabrik version with @mionut PINDA smoothing, also Im not really confident about the planner.cpp change, I need to understand the code a bit more. Works really great!
F0x06
on 6 Jan 2019
This is a awesome change. Any feedback from the developers. I for one will not update my firmware without it. I now can can use the whole print bed.
Tinker999
on 9 Jan 2019

🎉🎉🎉🎉
Tinker999
on 13 Jan 2019
Great. But why communicate not here where an answer was asked and hoped for.
Anyway I am happy that this comes as requested. 👍
stahlfabrik
on 13 Jan 2019
It would be great if the grid size would be selectable within the lcd menu (so far I'm happy with my 3x3 mesh, but might need finer mesh in future}
 cimoalpacino
on 13 Jan 2019
cimoalpacino
on 13 Jan 2019
Yeah the way he released it kind of sucks. I don’t do Facebook or Twitter so wouldn’t be able to download or even know about this from Prusa’s post. Is the file on FB the same as the one here?
edspeds
on 13 Jan 2019
@edspeds I'll post my version here, I published it on Facebook, it includes stahlfabrik version of the fix, mionut PINDA smoothing
F0x06
on 13 Jan 2019
Thanks @F0x06, I guess that's the downside of being anti social media... The upside is that I can somewhat minimize data collection about my personal life and avoid the political propaganda social media seems to propagate.
edspeds
on 13 Jan 2019
@edspeds Yes agree.
My FaceBook post copy:
The true power of 7x7 mesh bed leveling, takes 3min longer than 3x3 but saves dozens of troubleshooting hours.
For people interested this is my version (MK3 with steel sheet only), it includes the following things:
- @stahlfabrik 7x7 mesh bed leveling (based on mionut work)
- @mionut pinda temperature smoothing (see: https://github.com/prusa3d/Prusa-Firmware/issues/1239#issuecomment-451588111)
Download link:
f0x06_fw_MK3_3_5_1_7x7_mionut_PINDA_smoothing.zip
Alternative version with #1193 Fast PWM patch to fix high pitch noise on low fan speeds (PETG for ex):
f0x06_fw_MK3_3_5_1_7x7_mionut_PINDA_smoothing_highpitch.zip
Instructions:
Reset your bed level corrections to 0, if your really need it adjust layer, on mine values are at 0 :)
In your slicer, change G80 command in GCODE start script to G80 N7
Try at your own risk :), i'm not responsible of any damages
F0x06
on 13 Jan 2019
@F0x06 does this also have the 9x9 mesh bed leveling?
 Graloth
on 13 Jan 2019
Graloth
on 13 Jan 2019
@F0x06 does this also have the 9x9 mesh bed leveling?
Nope, just 7x7 i wait for Prusa official fix (i wish), 7x7 is almost perfect but 9x9 will be perfect i think :)
F0x06
on 13 Jan 2019
I Wonder if probing three times each spot is really necessary. Klipper probes just once and Klipper users are happy
stahlfabrik
on 13 Jan 2019
I Wonder if probing three times each spot is really necessary. Klipper probes just ones and Klipper users are happy
I think 3 probes is overkill, PINDA repeatability is excellent, dont remeber the numbers exactly, already did the test, ill post numbers later
F0x06
on 13 Jan 2019
I wonder if 9x9 would address the couple of still wonky spots on my build sheet but am certainly happy with the 7x7 results. Out of curiosity, what does PINDA smoothing do anyway?
edspeds
on 13 Jan 2019
I wonder if 9x9 would address the couple of still wonky spots on my build sheet but am certainly happy with the 7x7 results. Out of curiosity, what does PINDA smoothing do anyway?
https://github.com/prusa3d/Prusa-Firmware/issues/1239#issuecomment-451588111
F0x06
on 13 Jan 2019
I Wonder if probing three times each spot is really necessary. Klipper probes just ones and Klipper users are happy
I think 3 probes is overkill, PINDA repeatability is excellent, dont remeber the numbers exactly, already did the test, ill post numbers later
So, i did a repeatability test, performed 30x G30 at the same spot, the std. dev is 0.0026410660515952433
F0x06
on 13 Jan 2019
Speaking of pinda repeatability, after watching the temp calibration run, it seems like it will introduce error.
It is probing the same spot on the bed to see how the pinda changes its triggering height, as the sensor changes temp. The problem is, that it is also changing the bed temp, and because of thermal expansion of all the bed/platform components, that same spot physically changes height.
My thought for a more ideal temp calibration:
raise print head to near max height and turn on bed to the highest temp needed for pinda calibration
allow a long enough dwell so that physically all bed components stabilize. Pinda is still cool.
now drop the head and probe the bed, creating a point set of height and probe temp.
wait close to the bed, as the pinda heats up, and continue probing at specified probe temps.
CCS86
on 13 Jan 2019
@CCS86 Yeah the build in temperature calibration results are really crap - they really do not work at all for me!
I would advise you to open another issue for your idea so it does not get lost or overlooked. I think your idea MIGHT result in better calibration values.
If you can program it yourself and compare the offsets you get. Maybe compare with other calibration methods the community came up with.
stahlfabrik
on 13 Jan 2019
I Wonder if probing three times each spot is really necessary. Klipper probes just ones and Klipper users are happy
I think 3 probes is overkill, PINDA repeatability is excellent, dont remeber the numbers exactly, already did the test, ill post numbers later
So, i did a repeatability test, performed 30x
G30at the same spot, the std. dev is0.0026410660515952433
Little update, i patched my firmware to probe 1 time instead of 3, didn't noticed any downsides. My bed leveling is much faster :), works great
F0x06
on 14 Jan 2019
I can now print things across my whole print bed without issues, I can't wait for it to also be added to the main branch.
Adrian-at-CrimsonAuzre
on 15 Jan 2019
@F0x06 is the single PINDA probe firmware included in the download you included a few posts back?
Texy
 Texy
on 15 Jan 2019
Texy
on 15 Jan 2019
@Texy nope, I'll post it here later :)
F0x06
on 15 Jan 2019
@F0x06 is the single PINDA probe firmware included in the download you included a few posts back?
Texy
Here you go, this version includes all patches mentioned above + Faster PINDA probing (1 iteration instead of 3), feel free to give me your feedback :)
f0x06_fw_MK3_3_5_1_7x7_mionut_PINDA_smoothing_highpitch_FASTPINDA.zip
F0x06
on 15 Jan 2019
@F0x06 - Any chance of a MK2.5 version of this please?
alandeane
on 15 Jan 2019
@F0x06 - Any chance of a MK2.5 version of this please?
I can try to do it, but i don't own an MK2.5, you want only the FASTER PINDA ? Or the whole patches ? I can only make FASTER PINDA, other patches needs more testing...
F0x06
on 15 Jan 2019
I can try to do it, but i don't own an MK2.5, you want only the FASTER PINDA ? Or the whole patches ? I can only make FASTER PINDA, other patches needs more testing...
Understand, currently have an earlier version of the 7x7 firmware. Faster PINDA would be great if possible.
alandeane
on 15 Jan 2019
I can try to do it, but i don't own an MK2.5, you want only the FASTER PINDA ? Or the whole patches ? I can only make FASTER PINDA, other patches needs more testing...
Understand, currently have an earlier version of the 7x7 firmware. Faster PINDA would be great if possible.
The changes are pretty simple actually, can you give me the sources of the version you are currently using ?
The changes are the following
in mesh_bed_calibration.h i changed de default value of n_iter
extern bool find_bed_induction_sensor_point_z(float minimum_z = -10.f, uint8_t n_iter = 3, int verbosity_level = 0);
to
extern bool find_bed_induction_sensor_point_z(float minimum_z = -10.f, uint8_t n_iter = 1, int verbosity_level = 0);
Speaking of pinda repeatability, after watching the temp calibration run, it seems like it will introduce error.
It is probing the same spot on the bed to see how the pinda changes its triggering height, as the sensor changes temp. The problem is, that it is also changing the bed temp, and because of thermal expansion of all the bed/platform components, that same spot physically changes height.
My thought for a more ideal temp calibration:
- raise print head to near max height and turn on bed to the highest temp needed for pinda calibration
- allow a long enough dwell so that physically all bed components stabilize. Pinda is still cool.
- now drop the head and probe the bed, creating a point set of height and probe temp.
- wait close to the bed, as the pinda heats up, and continue probing at specified probe temps.
This is a simple but elegant approach which could eliminate the whole need for pre heating the Pinda. Please open a ticket for this.
Tinker999
on 15 Jan 2019
CCS86
on 15 Jan 2019
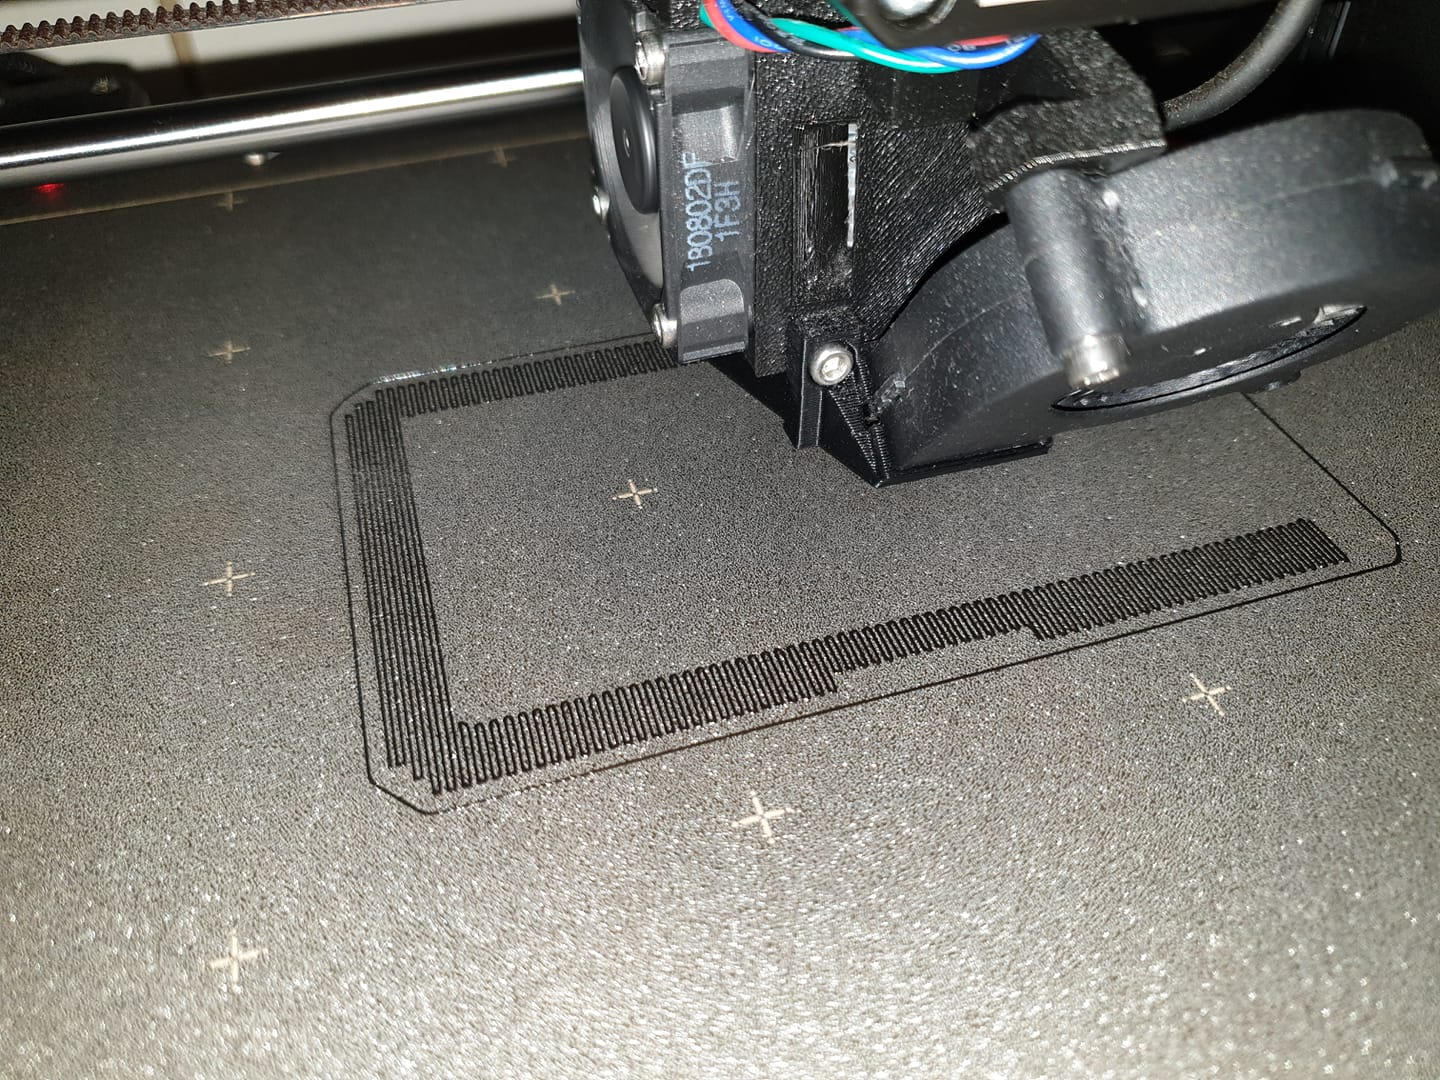
Here is an example of a bump in the bed that can not be seen in 3x3 leveling.
 Spacemarine2018
on 15 Jan 2019
Spacemarine2018
on 15 Jan 2019
https://en.wikipedia.org/wiki/Nyquist%E2%80%93Shannon_sampling_theorem
You can always find/produce a bed surface, where the defect density is higher then two times the sample density.
With tree samples you can detect a simple bow "(".
With 5, a "S"
...
The number of probed points directly determines the number and size of defects you can detect.
The quality of probing directly affects the quality of usable/sellable beds. We already see that effect. Some years ago beds used to be flat but inclined. Now a bow is no problem. Tomorrow the beds will be wavy (they already are).
At the end we can print on top of a LEGO, but will see the pattern on the top-surface (if not fading).
Never forget:
The bottom surface of the part follows the bed.
How much error do you want to accept?
Bed levelling is just a tool to make the part stick better.
 AnHardt
on 16 Jan 2019
AnHardt
on 16 Jan 2019
Exactly why I think the mesh leveling should blend out over some number of layers. Distributing the bed flatness error over something like 5 layers should be more than enough. Then, the rest of your part has planar layers, like it should.
CCS86
on 16 Jan 2019
I can try to do it, but i don't own an MK2.5, you want only the FASTER PINDA ? Or the whole patches ? I can only make FASTER PINDA, other patches needs more testing...
Understand, currently have an earlier version of the 7x7 firmware. Faster PINDA would be great if possible.
@alandeane
Would you be able to post a link to where you got the 7x7 firmware for the mk2.5?
 kayed721
on 16 Jan 2019
kayed721
on 16 Jan 2019
Hm, with the new 7x7 calibration in @F0x06's HD-MBL branch (https://github.com/F0x06/Prusa-Firmware/commit/931b0d12de4d606b39bd0506a5ee76e6ce201e29) I repeatably get the middle left and back left squares not close enough to the bed. Over a few iterations, I adjusted the bed level correction to left +0, right +30, front +30, rear +10, and tweaked my live-Z downwards, and now every square prints perfect except the middle-left, which is much better than it was.
But it's weird that this is happening in the first place, I wonder why there is still this much residual error after mesh bed levelling.
I'm hoping to print a single-layer object at 0.1mm height that covers the entire bed, so maybe I am just being a bit greedy by hoping for <<50 micron error across that whole distance.
EDIT: Oh, maybe PINDA is finding the bed perfectly but the powder-coating is just an uneven thickness... I guess that manual adjustment will always be needed to get the final bit of precision in that case.
 thenickdude
on 18 Jan 2019
thenickdude
on 18 Jan 2019
Hm, with the new 7x7 calibration in @F0x06's HD-MBL branch (F0x06@931b0d1) I repeatably get the middle left and back left squares not close enough to the bed. Over a few iterations, I adjusted the bed level correction to left +0, right +30, front +30, rear +10, and tweaked my live-Z downwards, and now every square prints perfect except the middle-left, which is much better than it was.
But it's weird that this is happening in the first place, I wonder why there is still this much residual error after mesh bed levelling.
I'm hoping to print a single-layer object at 0.1mm height that covers the entire bed, so maybe I am just being a bit greedy by hoping for <<50 micron error across that whole distance.
Hi, maybe its due to FASTER pinda probing patch, not sure ATM, ill create a branch without it, can you test it and tell me if it works without bed level correct ?
F0x06
on 18 Jan 2019
Yep, I'll drop that commit and retest, gimme a minute...
thenickdude
on 18 Jan 2019
Yep, I'll drop that commit and retest, gimme a minute...
Wait ! Take the last commit, i just pushed a revert, because one change was merged before
EDIT: Also, try to check if these sports are between 7x7 grid
F0x06
on 18 Jan 2019
@thenickdude Do you have levelled your bed mechanically as best as possible? I recommend the "nyloc method"
It is a proven method: https://github.com/PrusaOwners/prusaowners/wiki/Bed_Leveling_without_Wave_Springs
You should not compensate in software for issues you should correct mechanically. Yeah - that should be fixed in Prusa's design...
stahlfabrik
on 18 Jan 2019
I tested it at this version https://github.com/F0x06/Prusa-Firmware/commit/41310ce928cd347895d3eb822e23750eb4fbaba7 which was "7x7 gcode MBL workaround by @minout" + "@mionut PINDA temperature Smoothing" + "#1193 FAST_PWM_FAN Patch" (i.e. only dropping the fast PINDA) and it looks a lot like what I had achieved after manual adjustment (only really middle-left having problems), so maybe it's better when it takes 3 PINDA samples? Or it could just be random chance, it's hard to be certain!
@stahlfabrik that calibration procedure looks neat, but it seems like the sort of tuning that would have to be repeated each time I remove or flip the metal sheet? (I use the rear side when I'm printing PETG)
thenickdude
on 18 Jan 2019
The method is surprisingly stable
Do a 3x3 while screwing around!
stahlfabrik
on 18 Jan 2019
So are we suggesting that the single PINDA probe may not be a good thing?
If so is there a hex file for mk3 available for the latest commit?
Thanks
Texy
on 18 Jan 2019
I think it would be nice to increase the travel speed during the calibration. This could help offset the time increase of extra probing points.
Also, a lift of the head, followed by a brief dwell, would be nice to wipe all the stringers off the bed, left by probing.
CCS86
on 18 Jan 2019
So are we suggesting that the single PINDA probe may not be a good thing?
If so is there a hex file for mk3 available for the latest commit?
Thanks
Here is the latest version without the FAST PINDA patch, https://github.com/prusa3d/Prusa-Firmware/files/2753192/f0x06_fw_MK3_3_5_1_7x7_mionut_PINDA_smoothing_highpitch.zip
By latest commit you mean from prusa or my repo ?
F0x06
on 18 Jan 2019
I think it would be nice to increase the travel speed during the calibration. This could help offset the time increase of extra probing points.
Also, a lift of the head, followed by a brief dwell, would be nice to wipe all the stringers off the bed, left by probing.
To avoid stringers during calibration i use a custom start script, pretty simple, this approach is generic and works for any material, it reduces the nozzle temp by 50c during calibration process, then it moves to interline position, heat at full temp and start print
M115 U3.5.0 ; tell printer latest fw version
M83  ; extruder relative mode
M104 S{first_layer_temperature[0] - 50} ; set extruder temp minus 50 to avoid stringing during calibration
M140 S[first_layer_bed_temperature] ; set bed temp
M190 S[first_layer_bed_temperature] ; wait for bed temp
M109 S{first_layer_temperature[0] - 50} ; wait for extruder temp
G28 W ; home all without mesh bed level
G80 N7 ; mesh bed leveling
G1 Y-3.0 F1000.0 ; go outside print area
M104 S[first_layer_temperature] ; set extruder temp
M109 S[first_layer_temperature] ; wait for extruder temp
G92 E0.0
G1 X60.0 E9.0  F1000.0 ; intro line
G1 X100.0 E12.5  F1000.0 ; intro line
G92 E0.0
M221 S{if layer_height==0.05}100{else}95{endif}
Your repo F0x06 - many thanks.
I wish I could suss out how to reply to specific posts.....
Texy
on 18 Jan 2019
Your repo F0x06 - many thanks.
I wish I could suss out how to reply to specific posts.....
You shall be good with the link i posted for you, its the same version, in my repo i just tried Fast Pinda and rolled back.
And to reply to specific posts, just click the 3 dots on top right of a post (right of the emote icon), and choose quote reply :)
F0x06
on 18 Jan 2019
Thanks!
But for those 3 dots, I only have 2 options - 'copy link' and 'reference in new issue'
Texy
Texy
on 18 Jan 2019
Thanks!
But for those 3 dots, I only have 2 options - 'copy link' and 'reference in new issue'
Texy

If you still don't have the option to "Quote reply", maybe something is blocking that functionality (browser extension, if you have one that specifically does stuff with github i'd start looking there).
Otherwise you can manually quote a message my prefixing each line with > (remember the space after it) like so:

Graloth
on 18 Jan 2019
Is the probe : nozzle offset accounted for in the probing routine?
CCS86
on 22 Jan 2019
The routine is modified to read all 7x7 points from the internal structure instead of 3x3 points if the paremeter N == 7(if not present or is 3 the code ie equivalent with the old one) . Also z calibration values are not used, because in z calibration only 9 points are read, and we make now 49 measurements. As I understand z measurements are used to limit the variation from them to only 1mm. If they are not used the variation can be 10mm from the measurement position. Pinda calibration values are used in all cases.
For nozzle offset i think you are referring to the xy position of the pinda related to extruder, and they are used, i kept the old xy positions but with some macros, not the array.
Unfortunately, values for x and y used for calculating offset(mesh_bed_leveling::get_z) function are not related to the values used at entering measured points. You can check if the offset is the correct one:
- mesh bed leveling xy constants:
define X_PROBE_OFFSET_FROM_EXTRUDER 23 // Z probe to nozzle X offset: -left +right
define Y_PROBE_OFFSET_FROM_EXTRUDER 5 // Z probe to nozzle Y offset: -front +behind
define BED_ZERO_REF_X (- 22.f + X_PROBE_OFFSET_FROM_EXTRUDER) // -22 + 23 = 1
define BED_ZERO_REF_Y (- 0.6f + Y_PROBE_OFFSET_FROM_EXTRUDER + 4.f) // -0.6 + 5 + 4 = 8.4
define BED_X0 (13.f - BED_ZERO_REF_X) //13- 1 = 12
define BED_Y0 (10.4f - BED_ZERO_REF_Y) // 10.4 - 8.4 = 2
define BED_Xn (216.f - BED_ZERO_REF_X) //216 - 1 = 215
define BED_Yn (202.4f - BED_ZERO_REF_Y) //202.4 - 8.4 = 194
- reading z value constants:
define MESH_MIN_X 35
define MESH_MAX_X 238
define MESH_MIN_Y 6
define MESH_MAX_Y 202
I now spotted a difference 202 != 194 + 5, but i didn't modify those values, i kept the old ones from the array bed_ref_points.
mionut
on 22 Jan 2019
+1 to this request. Seems my PEI Steel Sheet has some strange variations that are +/- .18 mm and only for an area of ~20 mm square. Completely missed by the 3x3 bed leveling. I have some 2rd party Powder Coated Sheets that have +/- .3 mm variations. I tried the 7x7 firmware and was able to revert my bed level correction and use a sain live-z
 avirtuos
on 29 Jan 2019
avirtuos
on 29 Jan 2019
So are we suggesting that the single PINDA probe may not be a good thing?
If so is there a hex file for mk3 available for the latest commit?
ThanksHere is the latest version without the FAST PINDA patch, https://github.com/prusa3d/Prusa-Firmware/files/2753192/f0x06_fw_MK3_3_5_1_7x7_mionut_PINDA_smoothing_highpitch.zip
Do you happen to have a newer build with the timer fix implemented posted?
 Deneteus
on 31 Jan 2019
Deneteus
on 31 Jan 2019
So are we suggesting that the single PINDA probe may not be a good thing?
If so is there a hex file for mk3 available for the latest commit?
ThanksHere is the latest version without the FAST PINDA patch, https://github.com/prusa3d/Prusa-Firmware/files/2753192/f0x06_fw_MK3_3_5_1_7x7_mionut_PINDA_smoothing_highpitch.zip
Do you happen to have a newer build with the timer fix implemented posted?
The timer fix is in the master branch? If yes I'll try to merge the latest version ASAP, maybe tomorrow 👍
F0x06
on 31 Jan 2019
Thanks @mionut for your awesome work !, I saw that you merged the latest Prusa 3.5.1 into your repo, i tested it, this is the result:
And the pre-compiled firmware fro those with compilation issues (Don't forget to edit your start GCODE script in Slic3r to enable the 7x7 probing,
G80 N7:
Prusa-Firmware-3.5.1-7x7.zipI just have the 2 bottom one are a bit rough on bottom edges, not a problem. My bed is almost perfect.
Where can the gcode for this first-layer calibration pattern be found?
 chrischin478
on 31 Jan 2019
chrischin478
on 31 Jan 2019
Thanks @mionut for your awesome work !, I saw that you merged the latest Prusa 3.5.1 into your repo, i tested it, this is the result:
And the pre-compiled firmware fro those with compilation issues (Don't forget to edit your start GCODE script in Slic3r to enable the 7x7 probing,G80 N7:
Prusa-Firmware-3.5.1-7x7.zip
I just have the 2 bottom one are a bit rough on bottom edges, not a problem. My bed is almost perfect.Where can the gcode for this first-layer calibration pattern be found?
https://github.com/prusa3d/Prusa-Firmware/issues/1239#issuecomment-450537503
F0x06
on 31 Jan 2019
Hello, I also implemented saving/restoring of all 49 calibration values instead of 9, at power failure and power on, but i dind't tested it. The values are saved in another eeprom location so no value address shifting.
Just now i made a new commit for the eeprom address so that it doesn't conflict with future values from Prusa.
To test it you must see calibration values (G81), make a power failure(unpplug cord) and after power is restored you must see the the restored values(G81), and compare them. They must be the same. Also i think that for 110V power outlets the time available for saving values at power failure is shorter, i have 220V.
I also added a new parameter for retry count, if you want only 2 probings for point you use G80 N7 R1. (maybe it also works with R0, i tried only R1). R values can be from 0 to 10.
mionut
on 31 Jan 2019
@Deneteus here you go, merged with the latest MK3 branch from Prusa :)
f0x06_fw_MK3_491dbf5_7x7_mionut_PINDA_smoothing_highpitch.zip
F0x06
on 31 Jan 2019
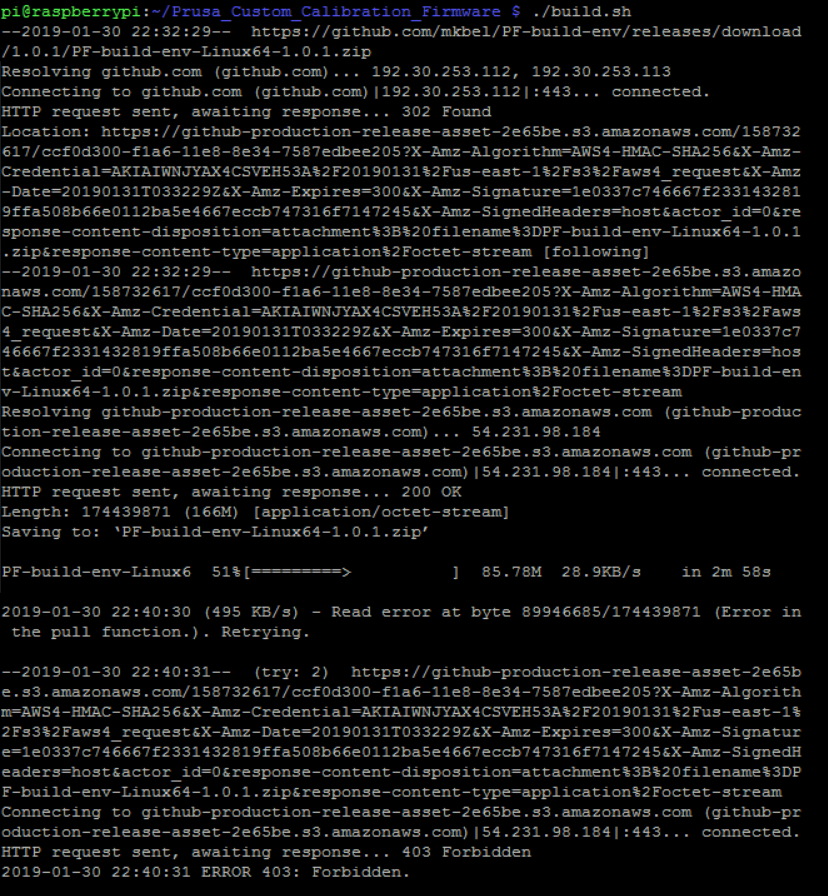
I ran build.sh on a raspberry pi and got the error below. File PF-build-env-Linux64-1.0.1.zip was created under the build-env folder after the error appeared but Raspbian is saying it's an invalid zip file when trying to unzip. What am I doing wrong?
chrischin478
on 31 Jan 2019
@Deneteus here you go, merged with the latest MK3 branch from Prusa :)
f0x06_fw_MK3_491dbf5_7x7_mionut_PINDA_smoothing_highpitch.zip
Thanks for the update. Much appreciated! Upgrading now.
Deneteus
on 31 Jan 2019
I ran build.sh on a raspberry pi and got the error below. File PF-build-env-Linux64-1.0.1.zip was created under the build-env folder after the error appeared but Raspbian is saying it's an invalid zip file when trying to unzip. What am I doing wrong?
Probably a faulty SD card, or SD card is full, can also be bad connection
F0x06
on 31 Jan 2019
Yeah the download ended at 51% then on retry you got a 403: Forbidden error. No wonder the zip file is incomplete.
To be honest though, I have not used "build.sh" yet. I just use Arduino IDE or now Microsoft Visual Studio Code with Platform.io which just rocks and leaves Arduino IDE pale
stahlfabrik
on 31 Jan 2019
Yeah the download ended at 51% then on retry you got a 403: Forbidden error. No wonder the zip file is incomplete.
To be honest though, I have not used "build.sh" yet. I just use Arduino IDE or now Microsoft Visual Studio Code with Platform.io which just rocks and leaves Arduino IDE pale
I'm building using it, on Windows i use the WSL (Windows Linux Subsystem), on my ArchLinux it's impossible to make it work, this works flawlessly on any Debian variant, the workaround on my laptop was using a Debian docker image to build it lol.
About VSCode and Platform.io totally agree !
F0x06
on 31 Jan 2019
Using the Arduino software right now but getting the error below. Config file was copied from variants into Firmware directory though. Any idea?

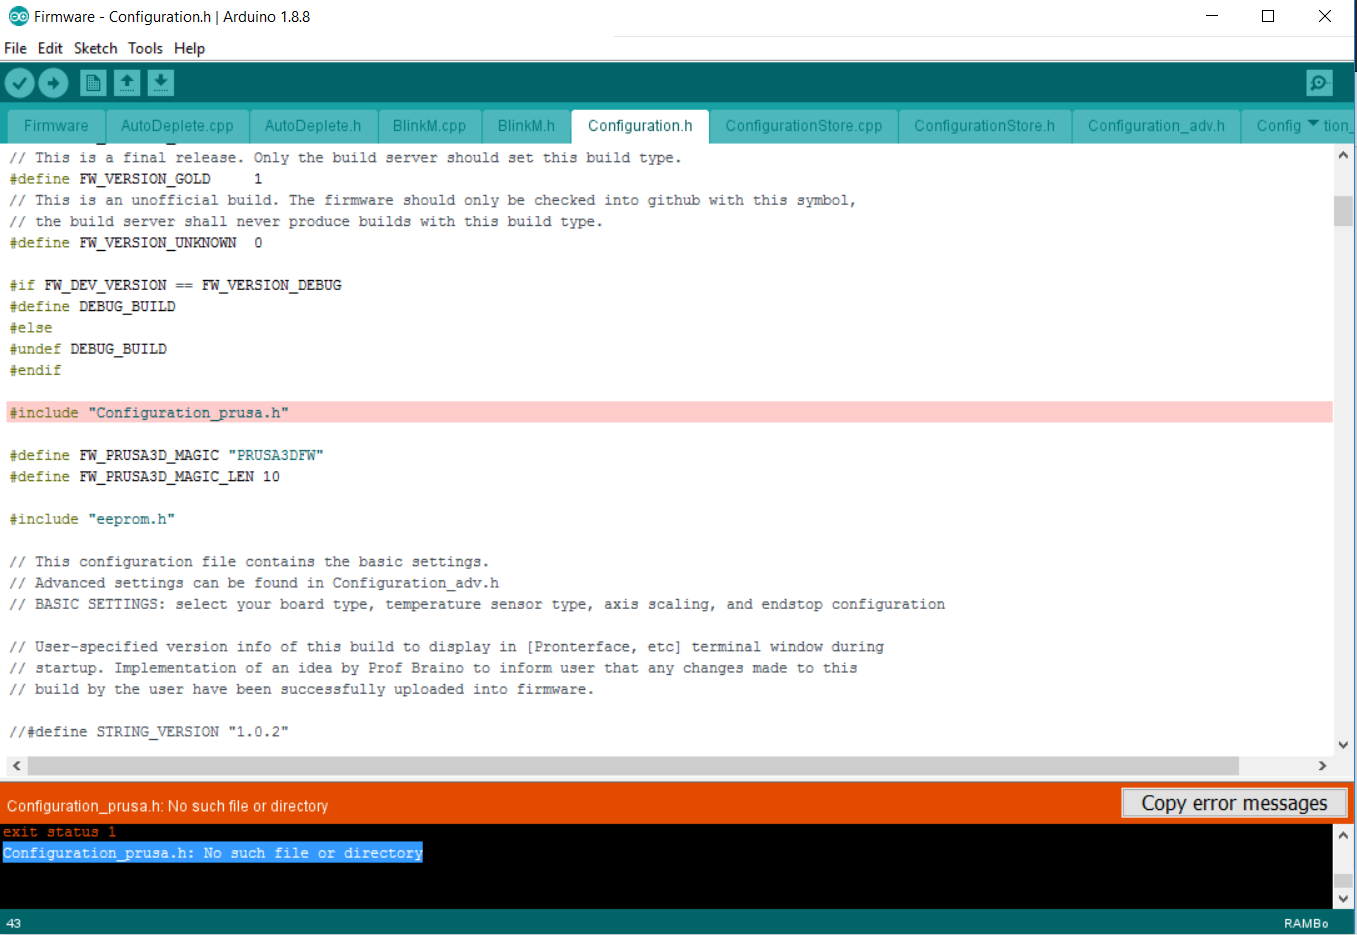
chrischin478
on 31 Jan 2019
„_prusa“
Have you forgotten that? Seems like it from your screenshots
Sorry, I just updated the screenshot. Took screenshot of the wrong file.
chrischin478
on 31 Jan 2019
Using the Arduino software right now but getting the error below. Config file was copied from variants into Firmware directory though. Any idea?
Ah, I originally renamed the variant file with ".h" in the filename so the compiler was seeing it as "Configuration_prusa.h.h"
chrischin478
on 31 Jan 2019
No offense, but this is a feature request. Could you please take questions regarding compilation and other support elsewhere? Everyone interested and subscribed to this gets spammed with every new comment.
 haarp
on 31 Jan 2019
haarp
on 31 Jan 2019
Sorry, will do.
chrischin478
on 31 Jan 2019
Is the last move after the G80 - mesh bed leveling, which leads diagonal over the print bed part of it?
Or can this be prevented in G-Code?
 rennne
on 31 Jan 2019
rennne
on 31 Jan 2019
Is the last move after the G80 - mesh bed leveling, which leads diagonal over the print bed part of it?
Or can this be prevented in G-Code?
Its the start GCODE script in Slic3r, "intro line"
F0x06
on 31 Jan 2019
@Deneteus here you go, merged with the latest MK3 branch from Prusa :)
f0x06_fw_MK3_491dbf5_7x7_mionut_PINDA_smoothing_highpitch.zip
F0x06 I tried your Start GCODE with the last 2 firmwares and it shows it's heating but the temp never goes up. Is it because of the lines you used for the negative temp? I am using S3D and not Slicer :(.
Deneteus
on 31 Jan 2019
@Deneteus here you go, merged with the latest MK3 branch from Prusa :)
f0x06_fw_MK3_491dbf5_7x7_mionut_PINDA_smoothing_highpitch.zipF0x06 I tried your Start GCODE with the last 2 firmwares and it shows it's heating but the temp never goes up. Is it because of the lines you used for the negative temp? I am using S3D and not Slicer :(.
I think no, these lines are used to heat nozzle to target temp minus 50 to avoid oozing, really strange...
F0x06
on 31 Jan 2019
I added different g-codes before and after G80 but it always seem to do that diagonal move across the printbed, resulting in additional ooze and stringing in the middle of the bed.
I am not a pro in g-code, maybe I am mistaken but I would say that move is part of the G80 procedure.
Therefore I would suggest to change that, meaning to move only via corners and not diagonal at the end of mesh bed leveling
rennne
on 31 Jan 2019
Yes, G80 does mesh bed levelling and then homes via G28.
https://github.com/prusa3d/Prusa-Firmware/blob/MK3/Firmware/Marlin_main.cpp#L4574
imho it would be sensible to separate that, especially since the default start g-code in Slic3rPE goes to the start position for the purge line immediately afterwards anyway.
haarp
on 31 Jan 2019
I added different g-codes before and after G80 but it always seem to do that diagonal move across the printbed, resulting in additional ooze and stringing in the middle of the bed.
I am not a pro in g-code, maybe I am mistaken but I would say that move is part of the G80 procedure.
Therefore I would suggest to change that, meaning to move only via corners and not diagonal at the end of mesh bed leveling
I think disabling diagonal move is not the solution, if you have oozing reduce temperature by 50c before G80, then go to intro line, then heat full temp and continue, look at my start GCODE script i poster upper.
https://github.com/prusa3d/Prusa-Firmware/issues/1239#issuecomment-455532817
F0x06
on 31 Jan 2019
I also think disabling that move would not be good, i suggest just to move via the corner.
The procedure with reducing the temperature has a lot of charme, especially that it potentially can prevent all the ooze with lot of materials.
But I think it would not work with all filament materials.
A similar approach is discussed here:
https://github.com/prusa3d/Slic3r/issues/913
I worked a bit with a PC-PBT filament, and it seams that either there sticks a quite hard piece of ooze out of the nozzle(which would disrupt the bed leveling) or it oozes or strings. If I had to guess I would say this material would have the small transition zone between hard a liquid at 160 but is printed between 220 and 255
I would prefer both solution simultaneously
rennne
on 31 Jan 2019
@Deneteus here you go, merged with the latest MK3 branch from Prusa :)
f0x06_fw_MK3_491dbf5_7x7_mionut_PINDA_smoothing_highpitch.zipF0x06 I tried your Start GCODE with the last 2 firmwares and it shows it's heating but the temp never goes up. Is it because of the lines you used for the negative temp? I am using S3D and not Slicer :(.
Removing those lines resolved the issue. Testing it out currently. So far made it through one print. I performed a factory reset and re-calibrated everything. My Live Z value changed. It's been around the same since I built the printer.
Deneteus
on 1 Feb 2019
Apparently a side effect was rapid E movement. I got one good print, 6 duds and then this.
Deneteus
on 1 Feb 2019
@Deneteus here you go, merged with the latest MK3 branch from Prusa :)
f0x06_fw_MK3_491dbf5_7x7_mionut_PINDA_smoothing_highpitch.zipF0x06 I tried your Start GCODE with the last 2 firmwares and it shows it's heating but the temp never goes up. Is it because of the lines you used for the negative temp? I am using S3D and not Slicer :(.
Removing those lines resolved the issue. Testing it out currently. So far made it through one print. I performed a factory reset and re-calibrated everything. My Live Z value changed. It's been around the same since I built the printer.
Just to be sure:
- Are you using Slic3r PE ?
- Which material are you trying to print with ?
2.a Which temp did you set for that material ?
EDIT: I missed the S3D part of your comment, this will not work with other slicers than Slic3r PE !
This script just reduces temperature before G80 like mentioned above, for example if your temp is 215c, it will perform G80 at 165, then heat at full temp before resuming.
PS: This is pretty off-topic for this issue, i posted the GCODE just as an example.
F0x06
on 1 Feb 2019
@Deneteus here you go, merged with the latest MK3 branch from Prusa :)
f0x06_fw_MK3_491dbf5_7x7_mionut_PINDA_smoothing_highpitch.zipF0x06 I tried your Start GCODE with the last 2 firmwares and it shows it's heating but the temp never goes up. Is it because of the lines you used for the negative temp? I am using S3D and not Slicer :(.
Removing those lines resolved the issue. Testing it out currently. So far made it through one print. I performed a factory reset and re-calibrated everything. My Live Z value changed. It's been around the same since I built the printer.
Just to be sure:
- Are you using Slic3r PE ?
- Which material are you trying to print with ?
2.a Which temp did you set for that material ?EDIT: I missed the S3D part of your comment, this will not work with other slicers than Slic3r PE !
This script just reduces temperature before G80 like mentioned above, for example if your temp is 215c, it will perform G80 at 165, then heat at full temp before resuming.
PS: This is pretty off-topic for this issue, i posted the GCODE just as an example.
- I was using S3Dm 41.1, now I am using Slic3r PE 1.42a4
- Esun PLA and that was at 215. The problem wasn't the temp the extruder motor was pushing out so much it stalled the print.
3, I was able to get the print out via S3D by downgrading and removing the temp hold code. I just went back to the version you posted in December. So that means this was specifically an issue in the newer firmware.
- The leveling has been way better than before with 7x7. I'm don't even have to mess with my Live Z.
This was printed at .2 layer height.
Deneteus
on 3 Feb 2019
@Deneteus here you go, merged with the latest MK3 branch from Prusa :)
f0x06_fw_MK3_491dbf5_7x7_mionut_PINDA_smoothing_highpitch.zip
Could you send me the source files? I have a Haribo modded MK2.5 with Einsy and 24V and I have to do some modifications to be able to use it (especially height, y-direction)
 FischOderAal
on 4 Feb 2019
FischOderAal
on 4 Feb 2019
@Deneteus here you go, merged with the latest MK3 branch from Prusa :)
f0x06_fw_MK3_491dbf5_7x7_mionut_PINDA_smoothing_highpitch.zipCould you send me the source files? I have a Haribo modded MK2.5 with Einsy and 24V and I have to do some modifications to be able to use it (especially height, y-direction)
Here you go :) https://github.com/F0x06/Prusa-Firmware/tree/HD-MBL
F0x06
on 4 Feb 2019
can i have a hex file of the 7x7 for my mk2.5? i just upgrade my printer for mk2s to mk2.5s. i want this because my printer doesnt in the back is printing different from the front or the center.
 lucky13hc
on 8 Feb 2019
lucky13hc
on 8 Feb 2019
Thanks @mionut for your awesome work !, I saw that you merged the latest Prusa 3.5.1 into your repo, i tested it, this is the result:
And the pre-compiled firmware fro those with compilation issues (Don't forget to edit your start GCODE script in Slic3r to enable the 7x7 probing,
G80 N7:
Prusa-Firmware-3.5.1-7x7.zipI just have the 2 bottom one are a bit rough on bottom edges, not a problem. My bed is almost perfect.
can you share this stl??
lucky13hc
on 9 Feb 2019
Thanks @mionut for your awesome work !, I saw that you merged the latest Prusa 3.5.1 into your repo, i tested it, this is the result:
And the pre-compiled firmware fro those with compilation issues (Don't forget to edit your start GCODE script in Slic3r to enable the 7x7 probing,G80 N7:
Prusa-Firmware-3.5.1-7x7.zip
I just have the 2 bottom one are a bit rough on bottom edges, not a problem. My bed is almost perfect.can you share this stl??
https://github.com/prusa3d/Prusa-Firmware/issues/1239#issuecomment-450537503
F0x06
on 9 Feb 2019
This is a fantastic thing you've done with this. I run the firmware you've created for 3.5.1 now and it's saved me from the horrifically poor print bed surface. Will these be implemented into a 3.5.2 version as well?
 SpadaEngineering
on 9 Feb 2019
SpadaEngineering
on 9 Feb 2019
Well we hope that Prusa release the official enhancement in the upcoming firmware. If not you can bet here will be a new community version. Or several different versions;-)
stahlfabrik
on 9 Feb 2019
guys and from me!!! you are awsomeeeee!! my printer is amazing nowww!!!
lucky13hc
on 9 Feb 2019
Hey guys - this is an awsome feature! Great! The leveling is much better than I ever had!
BUT
I sill have to do slighty corrections (the left side and the middle is a bit to far from the nozzle). So: does the Bed Level Correction still work? AND Have some of you tried to implement this soltution for a more different method (8 Points Bed Level Correction, than only L/R/F/B)?
https://shop.prusa3d.com/forum/assembly-and-first-prints-troubleshooting-f78/hyperfine-bed-leveling--t4330.html - If this where implemented too to your solution - one would have the perfect tuneable Bed :-) Hope for it!
Thank you!
 TomNbgDE
on 11 Feb 2019
TomNbgDE
on 11 Feb 2019
Hey guys - this is an awsome feature! Great! The leveling is much better than I ever had!
BUT
I sill have to do slighty corrections (the left side and the middle is a bit to far from the nozzle). So: does the Bed Level Correction still work? AND Have some of you tried to implement this soltution for a more different method (8 Points Bed Level Correction, than only L/R/F/B)?
https://shop.prusa3d.com/forum/assembly-and-first-prints-troubleshooting-f78/hyperfine-bed-leveling--t4330.html - If this where implemented too to your solution - one would have the perfect tuneable Bed :-) Hope for it!
Thank you!
Hi! Yes my first approach was to adapt Hyperfine Bed Leveling to 3.5.0 firmware, but I don't use any corrections since 7x7, I'll try to merge both features when I have time (7x7 + Hyperfine leveling) 👍
F0x06
on 11 Feb 2019
This would be great! Thank you!
TomNbgDE
on 11 Feb 2019
Hey guys - this is an awsome feature! Great! The leveling is much better than I ever had!
BUT
I sill have to do slighty corrections (the left side and the middle is a bit to far from the nozzle). So: does the Bed Level Correction still work? AND Have some of you tried to implement this soltution for a more different method (8 Points Bed Level Correction, than only L/R/F/B)?
https://shop.prusa3d.com/forum/assembly-and-first-prints-troubleshooting-f78/hyperfine-bed-leveling--t4330.html - If this where implemented too to your solution - one would have the perfect tuneable Bed :-) Hope for it!
Thank you!Hi! Yes my first approach was to adapt Hyperfine Bed Leveling to 3.5.0 firmware, but I don't use any corrections since 7x7, I'll try to merge both features when I have time (7x7 + Hyperfine leveling) 👍
One question more 😀 I just received my long time awaited MMU2 Upgrade... Is there also a FW for MMU2 with 7x7?
And I‘m also will upgrade my MK2s to 2.5, hopefully, there is also a 7x7 available?
Thank you !
TomNbgDE
on 11 Feb 2019
Yes my friend I have mk2.5 with 7x7
lucky13hc
on 12 Feb 2019
Any 7x7 for 3.5.2 MK3 FW?
 port513
on 13 Feb 2019
port513
on 13 Feb 2019
Hello, can someone point me in the right direction as this printer is driving me nuts.
This is how it prints after flashing the firmware provided earlier (Prusa-Firmware-3.5.1-7x7.zip).
Yes I have set the G80 N7 in the slicer, yes it does all 49 points.
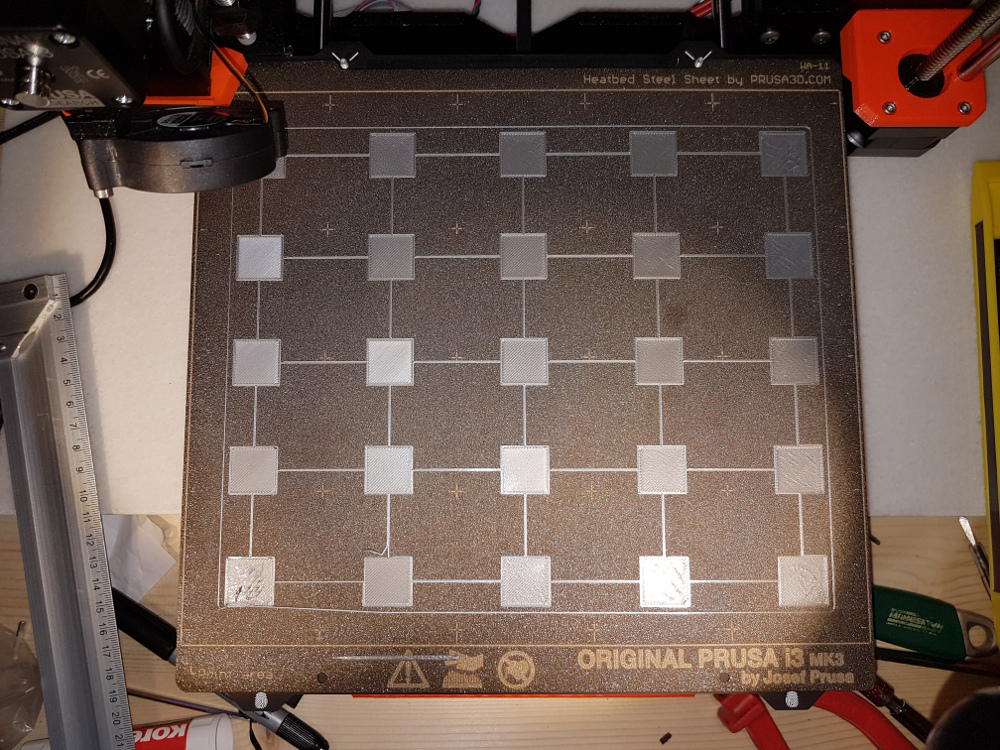
 thc0d33r
on 14 Feb 2019
thc0d33r
on 14 Feb 2019
Hello, can someone point me in the right direction as this printer is driving me nuts.
This is how it prints after flashing the firmware provided earlier (Prusa-Firmware-3.5.1-7x7.zip).
Yes I have set the G80 N7 in the slicer, yes it does all 49 points.
HI ! Do you have any bed level corrections enabled ?.
Also try to do a "Full Factory Reset" to clear any previous calibration data.
Tell me if this works, otherwise wait for Prusa's Official 7x7
F0x06
on 14 Feb 2019
Hello, can someone point me in the right direction as this printer is driving me nuts.
This is how it prints after flashing the firmware provided earlier (Prusa-Firmware-3.5.1-7x7.zip).
Yes I have set the G80 N7 in the slicer, yes it does all 49 points.
HI ! Do you have any bed level corrections enabled ?.
Also try to do a "Full Factory Reset" to clear any previous calibration data.
Tell me if this works, otherwise wait for Prusa's Official 7x7
I too still have problems with the bed. I went through the wizard again and recalibrated everything.
Everything is clean (acetone + IPA). I'm searching the web for instructions if I can adjust some screws on a MK3, but I haven't found anything yet.
 alesf
on 14 Feb 2019
alesf
on 14 Feb 2019
Here is my experience: After having done the 7x7, my bed wa nearly flat. only on the left side (most in the middle of the left) it hangs a bit deep. So I made some corrections in the menu with the bed level correction (it would be more easier with the Hyperfine Leveling (mentioned above) but now I'm receiving great results.
TomNbgDE
on 14 Feb 2019
@mionut I've looked into the new 3.5.3 FW - it looks like your 7x7 alogorithm is now implemented? I havn't tested it - but it is VERY similiar...
TomNbgDE
on 14 Feb 2019
@thc0d33r I think that your nozzle is very close to the bed. Try increasing the Z live adjustment.
 Panayiotis-git
on 14 Feb 2019
Panayiotis-git
on 14 Feb 2019
does the 3.5.3 has the 7x7 ?
lucky13hc
on 14 Feb 2019
Prusa responded there is some issue with the bed magnets that make 7x7 risky. Not sure I buy the story - any such issue would be there with the PINDA regardless of 3x3 or 7x7. I have been using the 7x7 patch here and can affirm it works so much better than stock FW.
But - moving forward, seems like 3.5.2 has real improvements like fan noise and bed heat noise reduction. What incentives will get a post of 3.5.2 / 3.5.3 with the 7x7 option?
 GWdd
on 14 Feb 2019
GWdd
on 14 Feb 2019
if someone compile the 7x7 in 3.5.2 please make both files for mk3 and mk2.5
lucky13hc
on 14 Feb 2019
if someone compile the 7x7 in 3.5.2 please make both files for mk3 and mk2.5
I wait just from prusa to release some fixes before merging 7x7, they are issues with fan speed control, if you set speed to 150 for example and carefully ear the fan, you will notice speed jumps every 10 seconds~. my latest build has the fan PWM fix already(quieter on low speeds) and working great, no real improvement to switch to 3.5.2 actually.
F0x06
on 15 Feb 2019
I am certainly happy with the way the printer works now (7x7 on and filament sensor disabled); but I expect to update to the new filament sensor soon (order is in, shipping in a month or two).
GWdd
on 15 Feb 2019
I have a little layer Swift. My x axis is ok! I don't what could cause that
lucky13hc
on 15 Feb 2019
I'll compile the new FW 3.5.2/3.5.3 by myself, but I'm not sure if for activating 7x7 it is only to replace the four mesh_bed_* files or are there other files involved which have to be configured too? Untill now I only make changes to z-level hight or small things like that and I won't shot my printer with corrupted FW... Thank you for your help!
TomNbgDE
on 15 Feb 2019
Checkout for example
https://github.com/prusa3d/Prusa-Firmware/compare/MK3...stahlfabrik:HD-MBL
So you can see all necessary changes
stahlfabrik
on 15 Feb 2019
Hello, @lucky13hc i do not see any changes for mesh bed leveling in 3.5.3.
@GWdd, there may be issues with the magnets, because pinda is an induction sensor.
Also i would like to say that implementation for mesh bed leveling was the first think i implemented after i constructed my printer, and i am using it for about 9 months. I think it should be included as it is, especially because is equivalent with the old behavior if you do not use the N7 parameter. It can be tested by much more people and if doesn't work, no problem, do not use N7 parameter.
I made a branch for pull request yesterday, but i didn't have time to put it on the printer, because i am mounting Skelestruder V1, and i also have to work. 7MBL
mionut
on 15 Feb 2019
I can test for you whatever you want but I want it to be for mk2.5 because I don't have a mk3
lucky13hc
on 15 Feb 2019
@mionut: Great, and thank you.
I got to thinking about the magnets... unless they are physically close enough for the "AC" based detector to sense their metal (within 2mm), the proximity detector design should ignore the static fields they provide to hold the sheet. I doubt they influence the calibration at all when the spring steel sheet is on; especially if you consider it acts as a transformer core to the sensor fields, limiting or shunting the fields the sensor produces; and the sensor can't "see" through the steel sheet and wouldn't know if a magnet is there, or not.
Plus, looking at the bed and images of magnet placement, the middle row of points have magnets everywhere. If those magnets don't disrupt the 3x3, they won't disrupt a 7x7.
caveat: I'm not a transformer designer... lol
GWdd
on 15 Feb 2019
ok i m waiting for your test hex when you are ready!!
lucky13hc
on 15 Feb 2019
Here is the hex for mk2.5 rambo 1.3
To be tested: xyz calibration, z calibration, homing with and without sheet, mesh bed leveling with 3 points and compare resulted values with the ones from original firmware, mesh bed leveling with 7 points, power failure in printing and recovery(only on mk3)
mionut
on 15 Feb 2019
If there is any doubt whether the magnets can be detected by the PINDA or not - simply test it.
If they can be detected they will act like the magic spots on the MK42.
Move XY to the center of a magnet. Lower Z until just triggered. Move horizontally away from the Magnet. If PINDAs LED alters the magnet is detectable. If not, go up until the LED changes state. Move horizontally back to the center of the magnet. If LED changes the magnet is detectable. If not - not.
AnHardt
on 15 Feb 2019
That is not the point.
The PINDA is an inductive sensor. Magnetic fields might change its trigger distance.
Personally I think the steelsheet blocks most of the magnetic field. Many people seem to call 7x7 successful. But I get the point Prusa makes and hope they come up with an optimal solution
stahlfabrik
on 15 Feb 2019
Sorry. Thought it would be obvious that the test has to be done with the steel sheet on the bed - covering the magnets.
AnHardt
on 15 Feb 2019
Ah - no, sorry I missed that:-)
I think that PINDA is reliably triggering everywhere over the steel sheet - the problem might just be that it MIGHT trigger at varying heights, depending on magnet presence.
stahlfabrik
on 15 Feb 2019
Exactly that is tested. (For increasing and decreasing trigger distances.)(Provided the bed is flat and level in the tested area. What also should be obvious.)
AnHardt
on 15 Feb 2019
That is not the point.
The PINDA is an inductive sensor. Magnetic fields might change its trigger distance.
Personally I think the steelsheet blocks most of the magnetic field. Many people seem to call 7x7 successful. But I get the point Prusa makes and hope they come up with an optimal solution
No - the steelsheet doesn't block magnetic fields - only a closed steel case would do this. The Problem is, that we have deviations in the field orientation and strenghts which are depending on tempearture and "outer cirumstances" (like magnetic field of the earth) and it is not homogenous equal in strenght over the whole sheet (statistic deviations).
TomNbgDE
on 15 Feb 2019
Here is the hex for mk2.5 rambo 1.3
To be tested: xyz calibration, z calibration, homing with and without sheet, mesh bed leveling with 3 points and compare resulted values with the ones from original firmware, mesh bed leveling with 7 points, power failure in printing and recovery(only on mk3)
I would do a test also on my mk3 if you would share it? I also can compile it by myself - but I'm new to github - how can I download your firmware-set? Thank you for your work - it is great!
TomNbgDE
on 15 Feb 2019
Can someone please post a 3.5.2 7x7 Hex for MK3. I would love to do some testing but having issues compiling.
 dcs3473
on 15 Feb 2019
dcs3473
on 15 Feb 2019
No - the steelsheet doesn't block magnetic fields - only a closed steel case would do this.
And only inside the case. That's not questionable.
Questionable (at least for me) is, if the static magnetic field has enough effect to make a measurable difference on the inductive probe working with an alternating magnetic field.
It might also be that the added ferromagnetic material below the probe can be detected. (steelsheet x mm vs. steelsheet + magnet x+y mm)
However. If my test detects an influence on the trigger height of the probe, depending whether the probe is above a magnet or not, a workaround is needed. Either probing only on the magnets, or probing only in between of the magnets, or we have to measure and compensate for the difference, or we could use an other kind of probe. or fixing the bed an other way, or ... .
If we can't measure an effect we can ignore it!
AnHardt
on 15 Feb 2019
i ll upload the tests tomorrow
lucky13hc
on 15 Feb 2019
Mk3 hex, 3.5.2 here
mionut
on 15 Feb 2019
@mionut : thanks for the updated 3.5.2 fw.
Actually, magnetic fields make it inside steel boxes, too. It takes a special ductile iron metal called mu-metal to effectively block / reduce fields. But blocking isn't the issue here.
The magnet produces a static field - unchanging. The detector uses an AC field that constantly changes; because it's AC, the change in field strength - in both directions - triggers the sensor. There are application warnings about using an unshielded sensor in strong AC fields (near transformers, AC motors, etc.) - but nothing about static fields.
The fact it is an induction sensor means it induces eddy currents into nearby metals. This induction increases or reduces the current inside the circuit, which is detected as proximity. A static magnetic field can't induce an AC current, and my physics may be showing but it also can't really affect or alter a nearby changing field: the sensor field peak to peak change will remain whether in a milli-Gauss (Earth's field) or 10 Gauss field.
And, I just completed an emperical test. Set the Z height where the PINDA just toggled on, then moved the extruder around the bed. The only point that registered - PINDA LED turned off - was the right front corner, which is indeed a high spot on my printer. I did not detect any of the existing magnets anywhere on the bed. Once I find my neodymium magnets I'll try it again :)
ps:
Okay - placing a one square inch high quality neodymium magnet under the bed will cause a change in height detection: about 10 motor steps, or 0.4 mm. And I was still thinking it wasn't the field that caused the change, but the mass of metal added by it; so I tried placing a chunk of metal in the same place... no observable effect. For some reason I don't understand - the static magnetic field or the magnet material itself affects the probe sensitivity. Considering steel's permeability of under 500, vs magnets around 35,000 ... it may just be the material causing the effect, and nothing to do with the field. I did notice the sensor was prone to switching only when the magnet edge was directly under the probe. And it was consistent regardless of the magnet orientation.
Conclusion is - the factory bed magnets "might" affect the probe. But the effect is pretty minimal and related to material, not field. Minor variations in the steel sheet and coating thickness are just as likely to affect the extrusion. 7x7 is good :)
GWdd
on 15 Feb 2019
I found a better explanation for how inductive sensors are affected below:
When Proximity Sensor is Placed Near to the Magnetic Field Source
http://www.omron-ap.com/service_support/FAQ/FAQ00388/index.asp
Consider All The Factors When Selecting The Proper Inductive Proximity Sensor
https://www.electronicdesign.com/components/consider-all-factors-when-selecting-proper-inductive-proximity-sensor

Omron Sensor Introduction
http://www.ia.omron.com/support/guide/41/introduction.html
Deneteus
on 16 Feb 2019
"remains to turn on while using" lol - I wonder what this actually means.
I didn't see any signs the PINDA oscillator was being quenched by the field... but I also wasn't measuring field strengths nor the PINDA frequency. The magnet I was using exceeds 200G (about 100x) -- the limit spec'd/suggested for one of the Omron detectors -- though the correlation to physical magnet edge was pretty obvious (material, not necessarily field).
I think I've beat this magnetic field horse enough; and I'll agree I don't know for sure; one way or the other. But I do know the 7x7 cal is by far superior than results obtained by the 3x3 cal with filed spacers, adjusted bed cal correction, offsets, etc.
A totally sideways note is that most of the magnets I was just looking at spec a maximum operational temperature of 175F / 80C ... hmm ... so keeping a 110c bed for ABS is problematic and will accelerate the demise of the magnets.
GWdd
on 16 Feb 2019
I finally had a chance to test this out. tldr; It has worked amazingly for my mk3.
I ran 25 iterations of the 7x7 mesh bed leveling over the course of 2 days (this was super boring). There was < 5% deviation on a p80 basis between measurements. When using the 3x3 mesh bed leveling the p80 deviation was ~4%. If the pinda is affected by the magnets, I couldn't find any practical impact from it.
I did use this procedure for mechanical bed leveling before running any of these tests though I can't see why that might affect things.
avirtuos
on 16 Feb 2019
Here is the hex for mk2.5 rambo 1.3
To be tested: xyz calibration, z calibration, homing with and without sheet, mesh bed leveling with 3 points and compare resulted values with the ones from original firmware, mesh bed leveling with 7 points, power failure in printing and recovery(only on mk3)
I made the first test!! i ll upload the first layer now
lucky13hc
on 16 Feb 2019
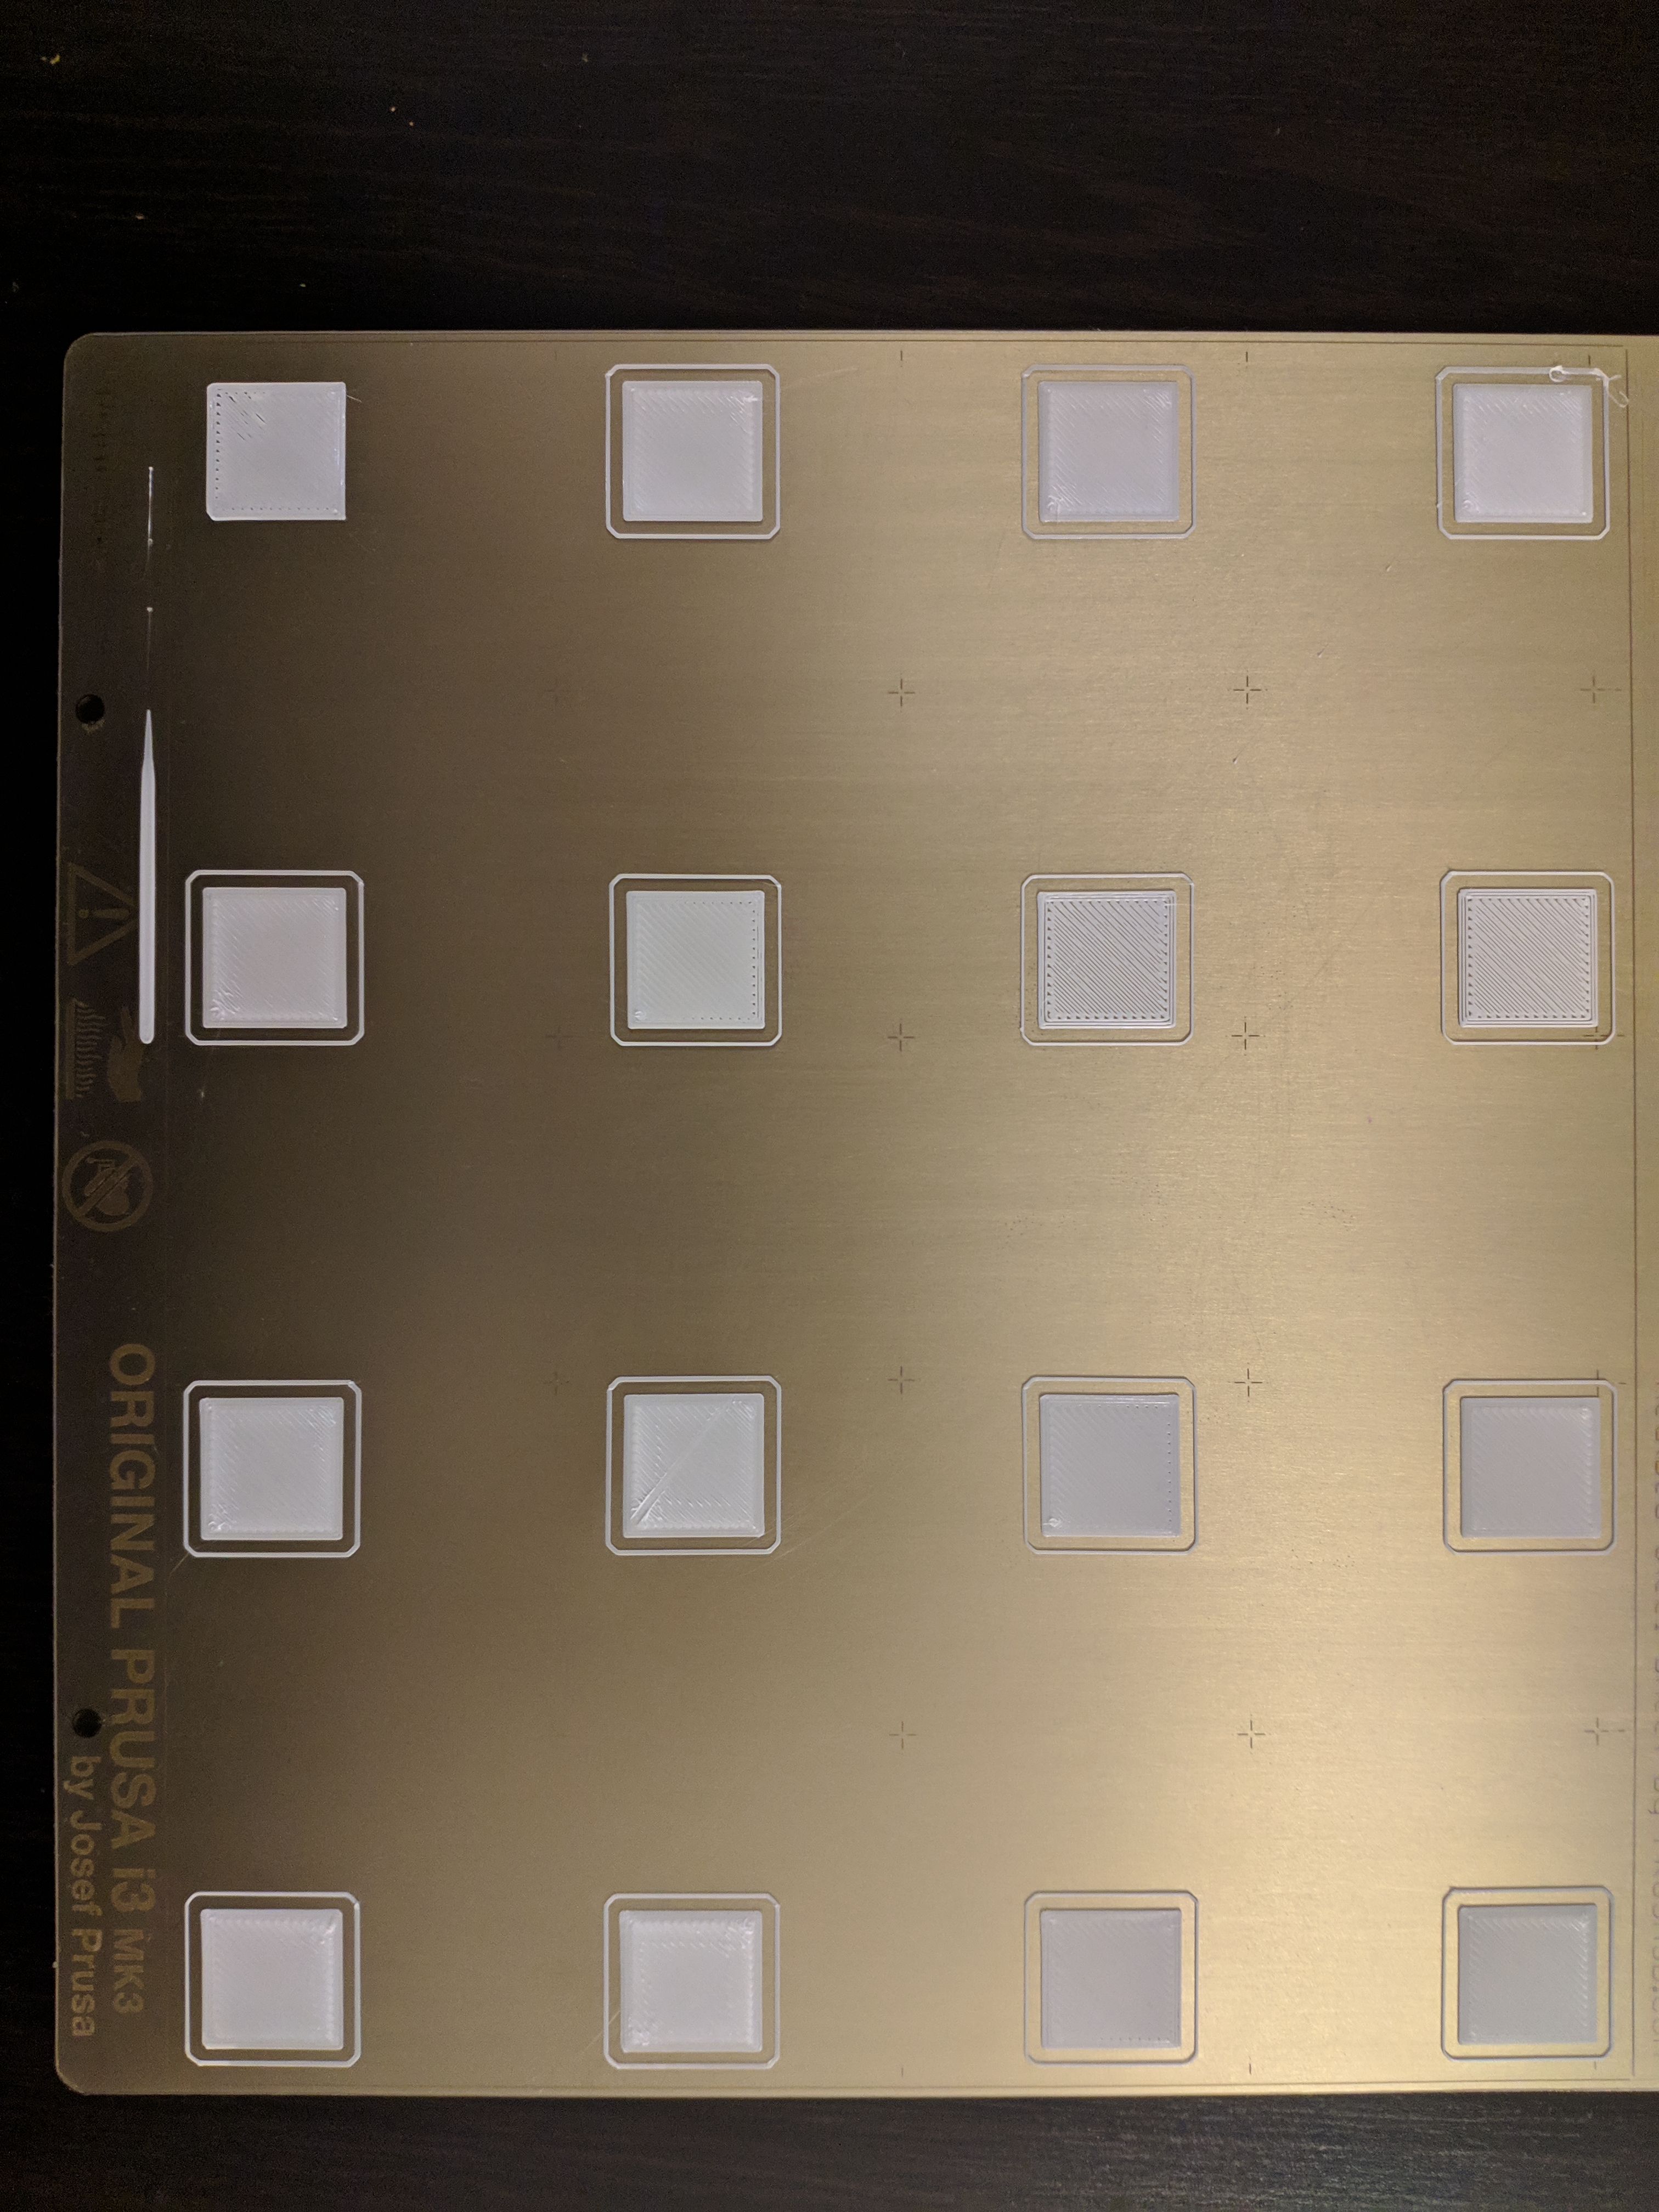
thats with prusa 3.5.2 3x3 firm
lucky13hc
on 16 Feb 2019
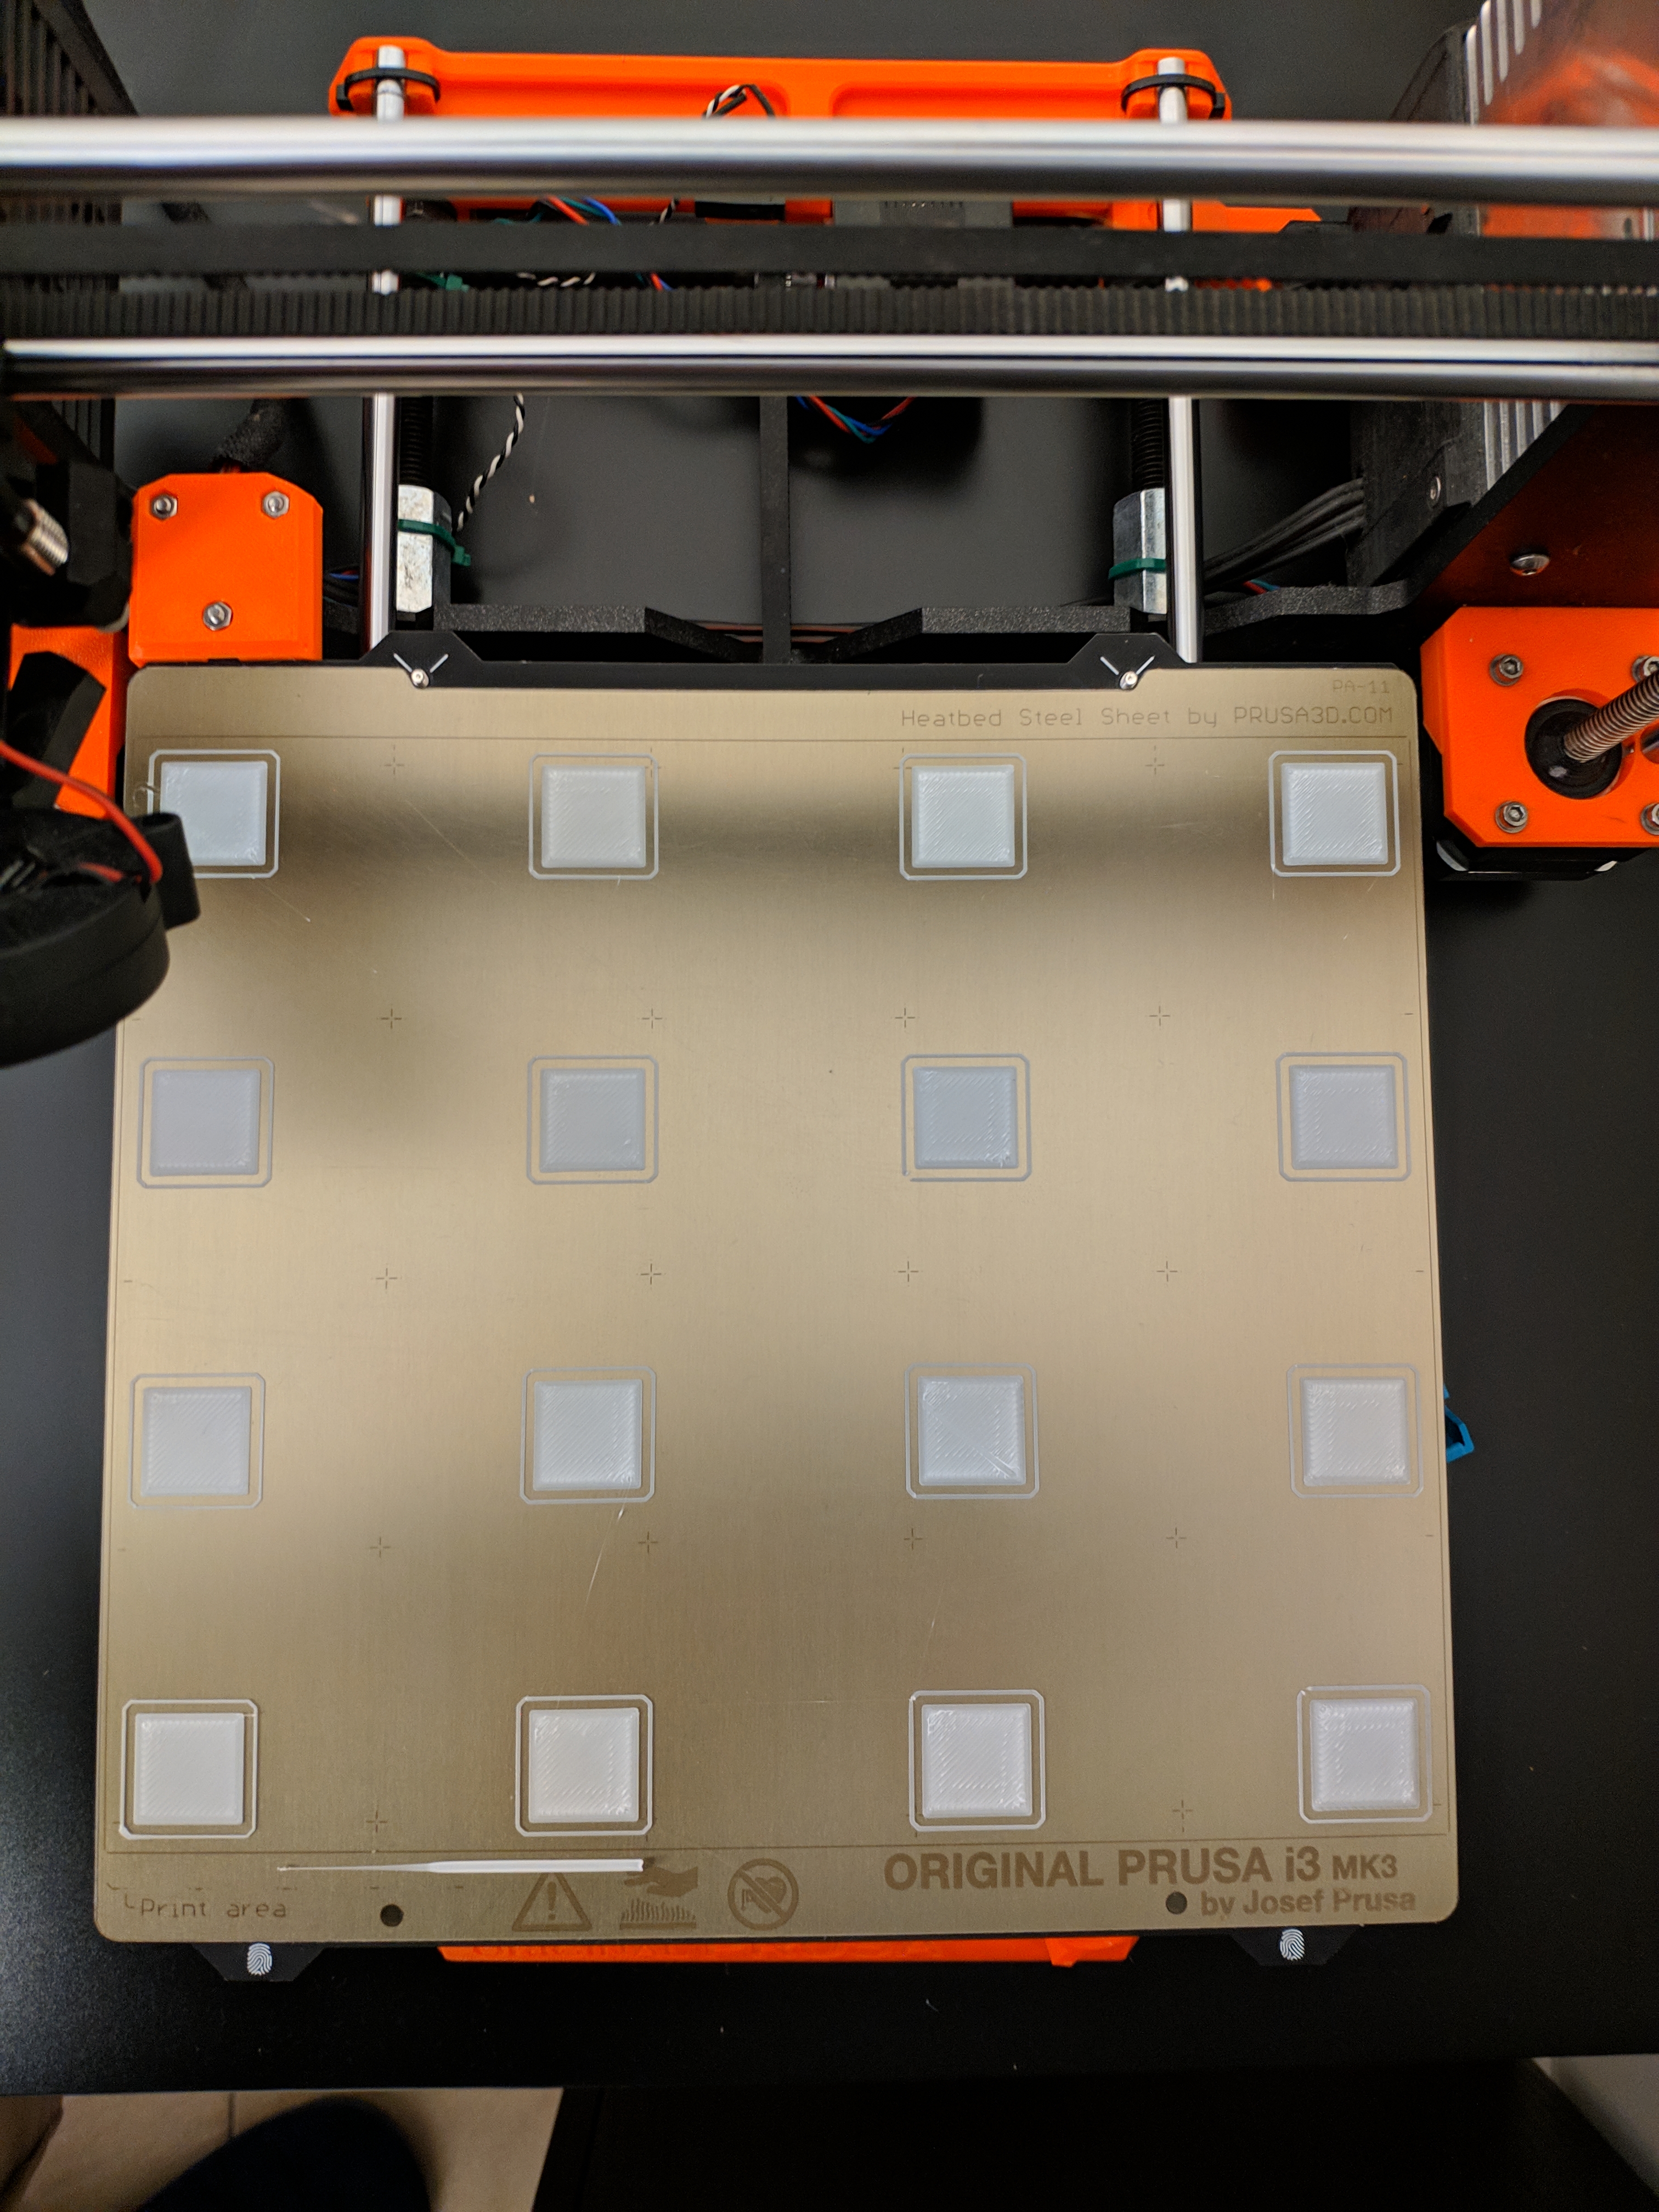
thats yours firm and its veryyyy good , both prints same settings after completly reset with each firm
lucky13hc
on 16 Feb 2019
"remains to turn on while using" lol - I wonder what this actually means.
I didn't see any signs the PINDA oscillator was being quenched by the field... but I also wasn't measuring field strengths nor the PINDA frequency. The magnet I was using exceeds 200G (about 100x) -- the limit spec'd/suggested for one of the Omron detectors -- though the correlation to physical magnet edge was pretty obvious (material, not necessarily field).
I think I've beat this magnetic field horse enough; and I'll agree I don't know for sure; one way or the other. But I do know the 7x7 cal is by far superior than results obtained by the 3x3 cal with filed spacers, adjusted bed cal correction, offsets, etc.
A totally sideways note is that most of the magnets I was just looking at spec a maximum operational temperature of 175F / 80C ... hmm ... so keeping a 110c bed for ABS is problematic and will accelerate the demise of the magnets.
It's obviously the material density transition that is affecting the sensor but it also mentions that if the sensors are not shielded that it can affect their precision. Now I want to test an unshielded sensor vs a shielded sensor. 👍 It's probably not worth the difference in price though.
http://www.omron-ap.com/service_support/FAQ/FAQ02657/index.asp
Deneteus
on 16 Feb 2019
I made a PR #1549
mionut
on 18 Feb 2019
Any update on 3.5.3 with 7x7? I have done the Mk3s upgrade but this changes the filament sensor and requires the 3.5.3 firmware.
 stevegg
on 26 Feb 2019
stevegg
on 26 Feb 2019
I am wondering if there a 3.5.2 7x7 mk3 firmware out there?
OopAck
on 27 Feb 2019
I am wondering if there a 3.5.2 7x7 mk3 firmware out there?
It is here in this post. Search for mionut and you‘ll find it (some days ago)
TomNbgDE
on 28 Feb 2019
the 3.5.2 7x7 has preheat bug
lucky13hc
on 28 Feb 2019
Can you elaborate?
On Thu, Feb 28, 2019, 11:00 AM lucky13hc notifications@github.com wrote:
the 3.5.2 7x7 has preheat bug
—
You are receiving this because you are subscribed to this thread.
Reply to this email directly, view it on GitHub
https://github.com/prusa3d/Prusa-Firmware/issues/1239#issuecomment-468328149,
or mute the thread
https://github.com/notifications/unsubscribe-auth/AOpFElBmiqxL6EGa_kRGJfwHkru2iP6gks5vR_0jgaJpZM4XMlSz
.
avirtuos
on 28 Feb 2019
Every Prusa Firmware has the preheat bug
Edit: in my humble opinion
stahlfabrik
on 28 Feb 2019
A 7x7 matrix calibration (49 points) might take longer but it would fix the issue (and maybe allow more of Prusa's yields in production to be used by bringing down the tolerence in eveness needed). I know of the solution on this thread is a version of that hex code to do this but I don't have the ability to be compiling that code with the latest firmware and I don't want to use older firmware to accomodate (& not comfortable using other than Prusa code anyway). Also I'm told that the non Prusa 7x7 code can't support power recovery as the values aren't saved and so recovery would involve interpolating the values it couldn't store and could get a print into trouble that way.
Would Prusa please implement a 7x7 update of some form for people to use at least until you are able to make textured double sided powder coated pei spring steel plate reliably so everyone can have better first layers if they want them? Make it an option not the default!
 TheShadowsix
on 28 Feb 2019
TheShadowsix
on 28 Feb 2019
https://github.com/prusa-community-forum/Prusa-Firmware/releases?fbclid=IwAR3JWitpEmNpKAjaXragFbaltJ7KYYIzaCC2iOdcGcO9P-XRVvdpn_N9noI
here you can find the 3.5.1 with 7x7 without the bug
lucky13hc
on 28 Feb 2019
Anyone can explain what this "preheat bug" is/does? Thanks
F0x06
on 28 Feb 2019
Anyone can explain what this "preheat bug" is/does? Thanks
As far as I understand, you get this error if you increase the bed temperature during print at high temperatures (100 -> 110) since the firmware expects a constant rise in temperature. At those temperatures it cannot do this and it triggers Preheat Error
 leptun
on 28 Feb 2019
leptun
on 28 Feb 2019
It is very off topic but: I also get the error when trying to print with bed at 110C. It is impossible to do since the bug was introduced
stahlfabrik
on 28 Feb 2019
mintemp err appears to me!
lucky13hc
on 2 Mar 2019
@mionut 7x7 MBL has been merged by Prusa 🎉 🎉 🎉
F0x06
on 3 Mar 2019
For those that can not wait, i have made the FW 3.6.0 with this 7x7 merged. Testet on 2 of my printers (one MK3 with MMU2 and one MK3S).
 Allram
on 3 Mar 2019
Allram
on 3 Mar 2019
For those that can not wait, i have made the FW 3.6.0 with this 7x7 merged. Testet on 2 of my printers (one MK3 with MMU2 and one MK3S).
Normaly the 3.6.0 final in release section contains 7x7
F0x06
on 3 Mar 2019
For those that can not wait, i have made the FW 3.6.0 with this 7x7 merged. Testet on 2 of my printers (one MK3 with MMU2 and one MK3S).
MK3 version
MK3S versionNormaly the 3.6.0 final in release section contains 7x7
I have installed 3.6.0 final and installed it.
I added the G80 N7 ; mesh bed leveling 7x7 to the GCode and the released 3.6.0 did not do the 7x7 but the 3x3.
What did i miss from the release 3.6.0 to get the 7x7 to work?
OopAck
on 4 Mar 2019
For those that can not wait, i have made the FW 3.6.0 with this 7x7 merged. Testet on 2 of my printers (one MK3 with MMU2 and one MK3S).
MK3 version
MK3S versionNormaly the 3.6.0 final in release section contains 7x7
I have installed 3.6.0 final and installed it.
I added the G80 N7 ; mesh bed leveling 7x7 to the GCode and the released 3.6.0 did not do the 7x7 but the 3x3.What did i miss from the release 3.6.0 to get the 7x7 to work?
Looks like it got added in just after the 3.6.0 release:
https://github.com/prusa3d/Prusa-Firmware/compare/v3.6.0...MK3
Adrian-at-CrimsonAuzre
on 4 Mar 2019
For those that can not wait, i have made the FW 3.6.0 with this 7x7 merged. Testet on 2 of my printers (one MK3 with MMU2 and one MK3S).
MK3 version
MK3S versionNormaly the 3.6.0 final in release section contains 7x7
I have installed 3.6.0 final and installed it.
I added the G80 N7 ; mesh bed leveling 7x7 to the GCode and the released 3.6.0 did not do the 7x7 but the 3x3.
What did i miss from the release 3.6.0 to get the 7x7 to work?Looks like it got added in just after the 3.6.0 release:
v3.6.0...MK3
ok now where to get the 7x7 to activate?
G80 N7 ; mesh bed leveling 7x7 in the GCode
OopAck
on 4 Mar 2019
I think it's said to be available through the lcd menu. Haven't tried it yet.
cimoalpacino
on 4 Mar 2019
I looked through the menus and didn't see anything. Anybody found it?
chrischin478
on 5 Mar 2019
I looked through the menus and didn't see anything. Anybody found it?
No implemented yet, it will in future commits. you can still use GCODE G80 N7
F0x06
on 5 Mar 2019
With 3.6.0 Passing G80 N7 from OctoPrint does 3x3 leveling, not 7x7. What am I missing?
chrischin478
on 5 Mar 2019
With 3.6.0 Passing
G80 N7from OctoPrint does 3x3 leveling, not 7x7. What am I missing?
You need to manually compile the MK3 branch, 7x7 has not been included in the latest release.
F0x06
on 5 Mar 2019
Ahh, I see. Thanks!
chrischin478
on 5 Mar 2019
3.6.0 has 7x7? and for mk2.5?
lucky13hc
on 6 Mar 2019
3.6.0 has 7x7? and for mk2.5?
No, it was merged right after the 3.6.0 release, so it will be included in the next version.
 GurliGebis
on 6 Mar 2019
GurliGebis
on 6 Mar 2019
I compiled the firmware for my MK2.5 and can confirm that the 7x7 works as intended. Haven't done a print with it yet but G80 N7 works like intended. I like it.
 Grismo
on 6 Mar 2019
Grismo
on 6 Mar 2019
Grismo can you share the file? I have mk2.5
lucky13hc
on 7 Mar 2019
Here's my version for the MK2.5. I integrated all commits after version 3.6.0 until today. No changes made from my side.
FW_MK2.5_RamBo13a_3.6.0-7x7.zip
Just uploaded it to my printer and tested G80 N7 via Pronterface. Works fine. But I haven't done any prints in the last week. Language is english. Enjoy!
Grismo
on 7 Mar 2019
Grismo the dowload doesnt work
lucky13hc
on 7 Mar 2019
Does that mean you can not download? I just tested and download of the zip-file works normal. Extracting the .hex file from the zip-file works as well.
Grismo
on 7 Mar 2019
FYI, FW_MK2.5_RamBo13a_3.6.0-7x7.zip firmware gives Min Temp Bed error. Never seen this error before I flashed to this firmware.
 lensdigital
on 10 Mar 2019
lensdigital
on 10 Mar 2019
Sorry to hear that. I've only had that kind of error ones when printer was in the basement and the room had just 16°C. But that was with a much earlier firmware. Maybe it will change when Prusa is committing that last changes to the firmware. I have no idea where it is coming from.
Grismo
on 10 Mar 2019
I have this problem too
lucky13hc
on 10 Mar 2019
Did you try the original 3.6.0 FW? Is the problem there as well?
Grismo
on 10 Mar 2019
Haven't tried 3.6.0, before that I had 3.5.x And yes it was very cold in the room, so temp difference was probably the cause that triggered this...
EDIT: just happened again :( Looks like I have to switch back. Hope Prusa will fix this...
lensdigital
on 10 Mar 2019
bonjour
je cherche la version MK3 3.6.0 7x7 en FR
merci
ps :pour rajouter les langue je c'est pas comment on fait.
 boubouexpress
on 15 Mar 2019
boubouexpress
on 15 Mar 2019
i know this is old and noob here but im building a large format prusa printer and need the bed leveling to match my increased bed size. how do i change the value to match the 350 range. thanks
 shawntexan
on 2 Sep 2019
shawntexan
on 2 Sep 2019
Related issues
 Pace17881
·
3Comments
Pace17881
·
3Comments
 sarf2k4
·
3Comments
sarf2k4
·
3Comments
 sgoll
·
3Comments
sgoll
·
3Comments
 austaquio32
·
3Comments
austaquio32
·
3Comments
 gusdleon
·
5Comments
gusdleon
·
5Comments
Most helpful comment
I made a PR #1549