Silent-hill-2-enhancements: Various environment adjustments/improvements
hp37.map
_This will be released with v1.0.3 of the "Enhanced Edition Essential Files" (not yet published)_
This one has always bugged me as there is UV/texture stretching along the top of this room's ceiling. And the coloring at the very top of the ceiling is not solid black (may only be noticeable to you if you're using an LCD monitor). This is a problem because the ending cutscene in this room looks directly up at the sides of the ceiling:
Before:

This has now been fixed by editing the texture files within the hp37.map file and will be included in the next release of the Enhanced Edition Essential Files (planned to be included in release 1.0.3).
After:

Some other shots:
Before:

After:

Additionally, there were a few 3D assets that weren't at the correct levels compared to everything else in this room. Namely, their black levels weren't strong enough so I tweaked those as well, since I was already messing around in this file anyway:
Before:

After:

 Polymega
All 92 comments
ob01.cam Adjustment
@Bigmanjapan may I ask you to adjust another .cam file for 16:9 usage? This happens if you stand around this area and use the Search button while looking up.

Polymega
on 28 Sep 2018
@Polymega
 Bigmanjapan
on 28 Sep 2018
Bigmanjapan
on 28 Sep 2018
ob01.map
_This will be released with v1.0.3 of the "Enhanced Edition Essential Files" (not yet published)_
Okay, this will surely be a touchy one for some so I'm going to explain the changes in great detail for this.
Before I begin, I'll say if you wish to NOT use this adjustment simply remove ob01.map from the \KONAMI\Silent Hill 2\sh2e\bg\ob\ folder.
One thing I'm sure any veteran fan of this game has noticed over the decade is the poorly-seamed together Toluca Lake image at the beginning of the game:


While most of these oversights are never actually seen in-game there are a few of these problem spots that are very evident while playing:
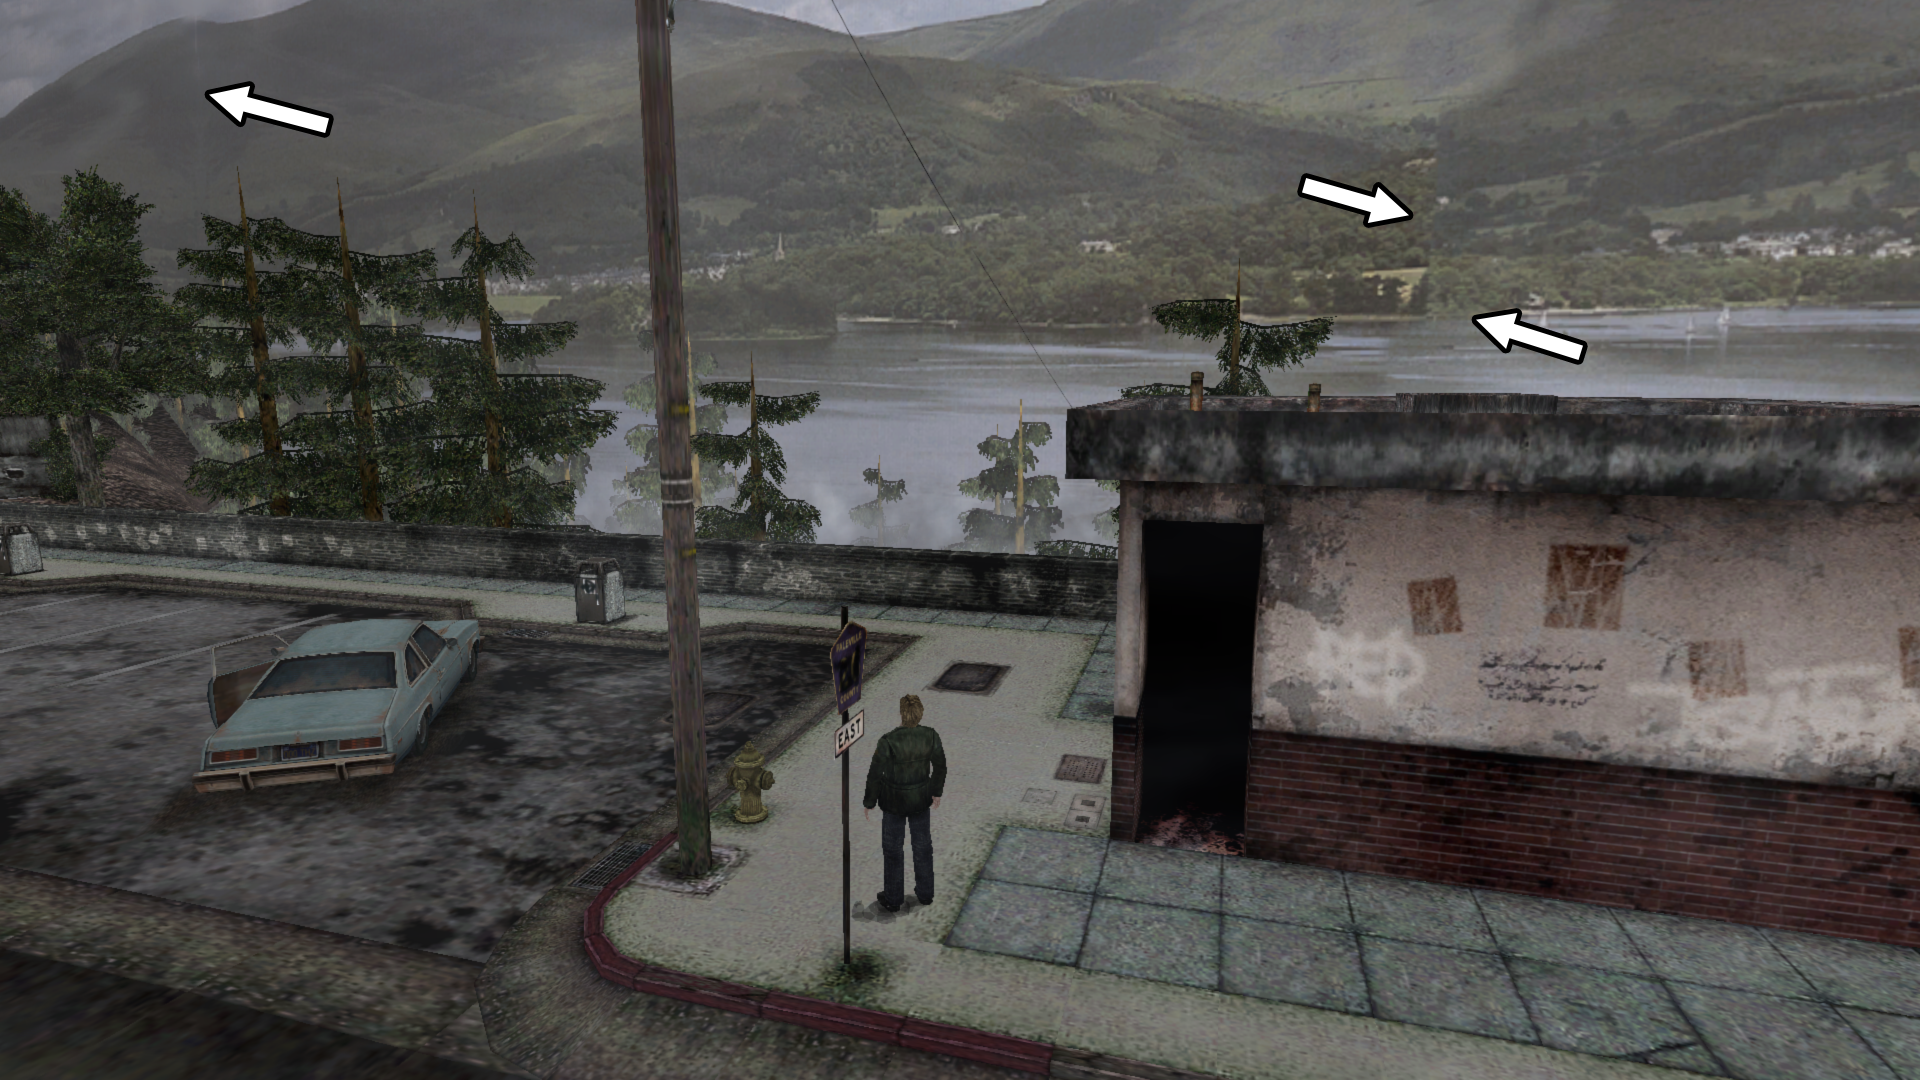
So I decided to clean up this image for a more polished presentation:
Before:
After:

A couple things worth noting:
The Toluca Lake image you see is based off a real life location. Specifically: Derwent Water in Keswisk, England:

So when creating this new image I _only_ used actual photos of Derwent Water found here:
https://stock.adobe.com/images/derwent-water-from-castlehead-viewpoint/163063267
https://stock.adobe.com/images/derwent-water-from-castlehead-viewpoint/163063113
https://stock.adobe.com/images/view-from-surprise-view-near-derwentwater/108640606
https://upload.wikimedia.org/wikipedia/commons/e/eb/Derwent_Water%2C_Keswick_-_June_2009.jpg
https://upload.wikimedia.org/wikipedia/commons/d/d0/Derwent_Water_Panorama%2C_Lake_District_-_June_2009.jpg
The next thing to note is the bottom of the image: You pretty much never see any of this in the game. In fact, here's a visual breakdown of what you actually see of this texture while playing; the red regions are what you'd see in-game:

...and so this is all you'd see in the new image as well:

Because of this, I didn't worry much about how the bottom portion looked. I honestly didn't need to design anything down there but decided to make it look consistent with the rest of the image. In summary: Don't fret over the bottom part as you'll never see it while playing.
Here are some in-game screen shots:
Before:

After:

Before:

After:

Before:

After:

Before:

After:

Before:

After:

After (In-game Panorama)

And again: If you wish to NOT use this adjustment simply remove ob01.map from the \KONAMI\Silent Hill 2\sh2e\bg\ob\ folder.
Polymega
on 29 Sep 2018
ps97.map
@Bigmanjapan would you know what causes a portion of the wall to disappear/not render in this room? Below is a snapshot of the cutscene:

If you look behind Angela the left side of the wall simply isn't there. But if we look at this room in the Level Viewer we can see that part of the wall does indeed exist:

Any clue what the cause of this might be?
Polymega
on 30 Sep 2018
ap84.map
@Bigmanjapan another question: Is it possible to detect when a camera angle has switched within a cutscene and can we then initiate code (once it detects the camera change) for the remainder of the cutscene (until it ends)?
Here's what I'm trying to fix:

This one cannot be fixed through texture editing because the floor is composed of many UV squares, so I cannot brush a black fade effect onto the texture. Because if I make a tile black for one area, it will also be black in an incorrect area as well:

I did find a solution, however. And this involves modifying addresses:
Description | Address | Type | Original Value | New Value
-- | -- | -- | -- | --
Fog Cover-up Front Line | 00942C34 | Float | 8000 | 2500
Fog Cover-up Back Line | 00942C30 | Float | 12000 | 2600
It will then look like this:


The problem is we cannot initiate these value changes for the whole cutscene, because it will ruin the visuals for the cutscene earlier on:
So we must initiate it once the camera has changed to this view:
^ Once the camera switches to that view we can leave these addresses active for the remainder of the cutscene. We would then release these values once the cutscene ends.
Polymega
on 30 Sep 2018
I understand that this is a very nitpicky things to nitpick, but I noticed that your take on Toluca panorama is a little more vibrant. Also, in the original, there is a distinct (albeit ugly) separation between land and an island on the left, while in your version it kinda blurs together by the trees.
(not gonna lie, I would prefer if you'd just fixed obvious errors of original, instead of remaking the whole thing)
 SiarMortal
on 2 Oct 2018
SiarMortal
on 2 Oct 2018
No worries at all. If you wish to not use this adjustment simply remove ob01.map from the \KONAMI\Silent Hill 2\sh2e\bg\ob\ folder if you download v1.0.3 of the Enhanced Edition Essential Files. (Not yet published.)
Polymega
on 2 Oct 2018
You can make the colors look more true to the originals by dropping vibrancy in photoshop by ~18.

 MilkManEX
on 2 Oct 2018
MilkManEX
on 2 Oct 2018
@Polymega
Regarding ps97.map. The texture is loaded fully (https://youtu.be/Es5QJJ9wAlA) but there is a crotch in form of a black wall which is coloured only on one side (https://youtu.be/RPCJR0IxzHM). Probably done to hide the red tube that would be visible from that camera angle when camera shows Angela leaving the room. I might try to disable this black wall to see if that's true.
Regarding ap84.map. It surely is possible to identify the moment of the camera angle switch but the easier solution might be to find a frames counter of the cutscene. I will look into it a bit later.
Bigmanjapan
on 2 Oct 2018
there is a crotch in form of a black wall which is coloured only on one side
Interesting. This was added in for the PC version (and maybe also the Xbox version?):
https://youtu.be/nH-cbmXymdw?t=3h23m23s
Edit: It's also on the Xbox version so this is an oversight Team Silent tried to fix when they ported the game to the Xbox version: https://youtu.be/orrtK9GdThc?t=2h17m50s
The black wall also isn't textured through an image file so I can't adjust it that way, either.
Regarding ap84.map. It surely is possible to identify the moment of the camera angle switch but the easier solution might be to find a frames counter of the cutscene. I will look into it a bit later.
Thank you, sir.
Polymega
on 2 Oct 2018
Regarding ap84.map. It surely is possible to identify the moment of the camera angle switch but the easier solution might be to find a frames counter of the cutscene. I will look into it a bit later.
Frame cutscene counter is not a unified value like it is in SH3, so I suggest using other method.
sh2pc.exe+1B7A7C4 (01F7A7C4) 4 byte — cutscene index
Angela's mirror cutscene index value is 18 (decimal).
sh2pc.exe+54E064 (0094E064) float - Angela's mirror cutscene camera X coordinate ancor point (changes with each new camera angle change)
The camera X coordinate ancor point value you would want is 59354.36328 (decimal) / 5D DA 67 47 (formatted hex). The value is not repeated throughout the cutscene, so there should be no false triggers.
Make a function that will change fog parameters when those two conditions are met (cutscene index and camera ancor point value).
Bigmanjapan
on 2 Oct 2018
@AeroWidescreen in reference to Bigmanjapan's post directly above. Address/value information is found here. Thank you for any help with this. I don't believe the values get reset upon cutscene's end if we change them so they'd need to go back to 8,000 and 12,000 afterwards.
Polymega
on 2 Oct 2018
ps97.map
_This will be released with v1.0.3 of the "Enhanced Edition Essential Files" (not yet published)_
I could paint a fake shadow-like effect on the wall that'll blend seamlessly with the black box. This may be the easiest/best solution, because either:
- Leave as-is (and it will look like part of the wall is missing because of the harsh line the black box makes)
- Remove the black-box (then you will see the red tube and piston moving where you shouldn't)
- Paint a black fade effect to blend the black box (see image below) and make it look like the door opening is casting light onto the back wall to the right (behind Angela)
Update: I painted the fade effect as it was the most practical method of making the harsh edge from the black box look better.

Polymega
on 2 Oct 2018
@Polymega
In reference to Bigmanjapan's post directly above. Address/value information is found here. Thank you for any help with this. I don't believe the values get reset upon cutscene's end if we change them so they'd need to go back to 8,000 and 12,000 afterwards.
Sounds straightforward. I'll give it a try today.
 AeroWidescreen
on 3 Oct 2018
AeroWidescreen
on 3 Oct 2018
@Polymega Try this: https://mega.nz/#!lbw13a4Y!_YSkF4Du2FTyYLQFj8BTEuJfmpPGdK91TLcZg9c6bWA
@Bigmanjapan
The camera X coordinate ancor point value you would want is 59354.36328 (decimal) / 5D DA 67 47 (formatted hex). The value is not repeated throughout the cutscene, so there should be no false triggers.
I think you got the value wrong here. The value I had to use was 59776.9. The other value was for a different camera angle. I don't know, maybe we need both of them. I'll let Polymega be the judge of that.
Edit: Never mind, read below.
AeroWidescreen
on 4 Oct 2018
Thanks, Aero! Some notes:
I think you got the value wrong here. The value I had to use was 59776.9.
Bigmanjapan's camera value is the correct one: It should activate at 59354.36328 whereas it's currently changing at 59776.9.
Also, the fog values are reverting back to the default numbers _before_ the cutscene ends (when camera X decimal changes to 60165.47266).
The new fog values we use, once activated, should stay active until the cutscene ends (its index ID is no longer called). Once the cutscene index ID is gone, we then revert the fog values back to normal.
Once the cutscene index ID is gone, we then revert the fog values back to normal.
This should also cover our bases if someone presses Esc to cancel the cutscene _after_ the new fog values were called in.
Polymega
on 4 Oct 2018
To clarify: The screenshots I used above are just one angle that the new fog values fix. The first instance of the camera switching to show the floor abruptly ending is at 59354.36328 though. The majority of the remaining camera switches will keep showing that part of the floor until the cutscene ends. So once we activate the new fog values at 59354.36328 we just keep them active until the cutscene then ends.
Polymega
on 4 Oct 2018
I see, my fault then. Try this: https://mega.nz/#!se40ySZL!DfHIPnSpalw2sEY-fDUjnDPRj_MF41mmKl6Cl8JQ0JY
AeroWidescreen
on 4 Oct 2018
No worries, and that's the ticket!! Everything worked without a hitch, even when I cancelled the cutscene early after the fog values changed. Well done, Aero!
Polymega
on 5 Oct 2018
ap72.map
@Bigmanjapan the fog parameter addresses you've found have proven to come in quite handy.
@AeroWidescreen if I may suggest another edit as well: Whenever ap72.map is loaded in (unsure of unique hex identifier) can the following occur:
Description | Address | Type | Original Value | New Value
-- | -- | -- | -- | --
Fog Cover-up Front Line | 00942C34 | Float | 3000 | 4200
This is the area in question:

Here's what the changes:
Before:

After:

Before:

After:

Polymega
on 5 Oct 2018
ap80.map
_This will be released with v1.0.3 of the "Enhanced Edition Essential Files" (not yet published)_
Since I happened to be messing around in this area for the Angela cutscene I noticed the top/bottom rims of the second lamp shade for both light fixtures in Room 109 weren't textured. I also fixed a texture seam on the lampshades while I was at it.
Before:

After:

Polymega
on 5 Oct 2018
@AeroWidescreen if I may suggest another edit as well: Whenever ap72.map is loaded in (unsure of unique hex identifier) can the following occur:
Description Address Type Original Value New Value
Fog Cover-up Front Line 00942C34 Float 3000 4200
The most I can do is change it based on the fog values, but that could easily affect other parts of the game. I need something else to identify that area; I was hoping @Bigmanjapan would have something to use, but if not then I'll check when I can.
AeroWidescreen
on 9 Oct 2018
@AeroWidescreen
sh2pc.exe+1BB7DAC (01FB7DAC) byte — room index
The room in question is 0x28.
Bigmanjapan
on 10 Oct 2018
@Bigmanjapan
Thanks! I didn't know there was a room index too. It will definitely be useful for other improvements like the code I have for the Angela cutscene. 👍
@Polymega
Download
You either have to re-enter the room, load a save with you already in the room, or toggle your flashlight from off to on again. This obviously won't be a concern when the fix is implemented.
AeroWidescreen
on 13 Oct 2018
Great timing, Aero! I just booted up my PC to play around more with the game.
You either have to re-enter the room, load a save with you already in the room, or toggle your flashlight from off to on again. This obviously won't be a concern when the fix is implemented.
Worked like a charm. :) Wonderful work once again, sir!
Thanks! I didn't know there was a room index too.
Bigmanjapan is an absolute a wealth of knowledge with these things. :)
Oh, and a heads-up, Aero: Bigmanjapan will be looking into a possible address fix for the Observation Deck, too. The two biggest areas in the game that look noticeably different than the PS2/Xbox versions are the Eddie boss rooms and the Observation Deck.
The Eddie rooms are obviously fixed up perfect now thanks to all the amazing teamwork here, but the issue with the PC's Observation Deck is that everything beyond the brick wall is too bright (namely, the Toluca Lake image and 2D trees). I was able to darken the Toluca Lake image no problem. But the trees are an entirely different story...
If you re-import the 2D tree image with SH Texture Explorer it corrupts the edges of the alpha channel. Namely, it leaves a black, "crusty" edge all along the trees. See image examples at the bottom of this post. Even if you export the 2D tree image, don't touch anything on the file, and re-import it through SH Texture Explorer it'll still leave those black crusty edges. Simply put: You _cannot touch_ the 2D tree file otherwise it'll corrupt the alpha edges.
I spent many hours trying to prevent this from happening but there must be some sort of special way the alpha channel is saved out on this particular image that is lost whenever the SH Texture Explorer exports out the file for editing.
Beyond that, thanks to Bigmanjapan's help, I've now confirmed that the levels (brightness/contrast) for both the Toluca Lake and 2D tree images are the same on all three platforms (PS2, Xbox, and PC). This tells us that there must be something that is changing these image levels after-the-fact that the PC version isn't currently doing.
Darkened Toluca Lake image, vanilla PC trees:

Darkened Toluca Lake image, darkened trees (leaves bad alpha edges):

PCSX2 image (reference):

Darkened Toluca Lake image, pure-white tree image (notice bad alpha edges, still):

Polymega
on 13 Oct 2018
are you sure that pcsx2 is completely accurate in terms of graphics?
SiarMortal
on 14 Oct 2018
PCSX2 is the best method to base adjustments off of as we can do pure digital-to-digital comparisons. Meaning, we can't fully trust for accurate visual representation off of a composite/component signal from an analog source (PS2).
To answer more specifically, yes, the trees are dark on the actual PS2 console as well: https://youtu.be/nH-cbmXymdw?t=408
Polymega
on 14 Oct 2018
@SiarMortal
are you sure that pcsx2 is completely accurate in terms of graphics?
It's a fair concern. I was going to ask the same question albeit for slightly different reasons. Hardware mode can be less visually accurate than software mode from my experience, so I was wondering how reliable these comparisons were as well.
To answer more specifically, yes, the trees are dark on the actual PS2 console as well: https://youtu.be/nH-cbmXymdw?t=408
But I guess there's nothing to worry about in this case.
@Polymega
Even if you export the 2D tree image, don't touch anything on the file, and re-import it through SH Texture Explorer it'll still leave those black crusty edges. Simply put: You cannot touch the 2D tree file otherwise it'll corrupt the alpha edges.
I'm not familiar with these textures. Which ones are you changing? Maybe I can replace them manually if you send me the dds / png.
AeroWidescreen
on 14 Oct 2018
Something to consider with the comparisons: Besides a few noticeable area differences (Eddie rooms, observation deck, etc) the PC version looks practically identical to the PCSX2 version in most areas. Same lighting, near-identical coloring, etc. Because of that, I personally feel it's a good source for reference.
You run into these types of concerns (image example below), depending on what cables you use and how you capture it, when you try and compare a lossless, digital signal (PC/PCSX2) to a lossy, analog one (PS2). With that in mind, the most safe/consistent way to compare things like coloring and light levels would be through something like PCSX2. Other's opinions will, of course, vary.
Notice differences in color and lighting levels between them all; they're not drastic, but there are differences:

I haven't played this game fully in software mode on PCSX2 but the times I've switched between hardware/software I never noticed anything different (besides the resolution, of course):
PCSX2 OpenGL hardware:

PCSX2 OpenGL software:

PCSX2 Direct3D 9 software:

I'm not familiar with these textures. Which ones are you changing? Maybe I can replace them manually if you send me the dds / png.
Sure. The main file is \SILENT HILL 2\data\bg\ob\ob01.map
If you extract the files via SH Texture Explorer it's the first one on the list:

Here's the TGA and PSD (saved as Photoshop CC 2017) of this file, with the trees darkened. The PSD simply has a solid black layer set to 35% opacity to darken the tree layer underneath: ob01.map_tex_000.zip
According to SH Texture Explorer, the image compression type for this particular file is DXT2 and, from what I can tell, the Nvidia DDS plugin will not let you save out as DXT2? Only DXT1/3/5. I've been doing a little research on this and the DXT format you choose will have an affect on the alpha channel. I'm thinking this is cause of the issue, then.
Polymega
on 14 Oct 2018
Hmm, I don't think Texture Explorer is entirely the cause of the problem here. Apparently DXT2 and DXT3 are interchangeable, and indeed, hex editing the DXT3 into the archive does work, but the results are no different. I believe this is a technical limitation that is also present in your PCSX2 screenshot.
The only workaround I'm aware of would be to color the edge of the texture the same color as the texture itself, which I'm willing to bet is what the developers did for the PC version. As for why Texture Explorer has so much trouble with this, my guess is that it's only using the alpha channel and subtracting everything outside of that. Maybe something wrong with its conversion process. Only my guess.

Results

Hex editing the texture into the .map file should be pretty simple. Save as DXT3, no mipmaps, then overwrite the .map data starting at line 0x00000070 with the .dds data starting at line 0x00000080.
AeroWidescreen
on 14 Oct 2018
Absolutely brilliant, Aero_.

I owe you a beer. I've spent hours days fiddling with this so I'm both relieved you found the solution and also frustrated with myself. You see, funny timing in that I was playing around in HxD myself and found the exact hex range for this file about an hour before you posted.
However, I stopped using the Nvidia DDS plug-in (assuming that was the issue) and moved on to using a piece of software called Compressonator. I saved the image out as DXT3 through Compressonator (after reading up more about how DXT2/3 are essentially the same via Wikipedia) and replaced the hex region in the .map file with my newly saved DDS but got the same crusty alpha edges.
It never dawned on me to duplicate the tree layer and expand/blur it out as you did. Mostly because another article said DXT2/3 uses razor-sharp alpha edges so I didn't think I'd need to do such a thing. Jeez Louise...
Many thanks again to you Aero_; another reason you're one of my heroes. @Bigmanjapan we do not need to worry about hex darkening the observation deck anymore!
Polymega
on 14 Oct 2018
ob01.map
_This will be released with v1.0.3 of the "Enhanced Edition Essential Files" (not yet published)_
Thanks to @AeroWidescreen for helping with this. Toluca Lake and the trees will have their levels lowered to be closer to the same eerie brightness as the PS2 version.
PC default:

PC adjusted:

PCSX2:

Polymega
on 14 Oct 2018
It never dawned on me to duplicate the tree layer and expand/blur it out as you did. Mostly because another article said DXT2/3 uses razor-sharp alpha edges so I didn't think I'd need to do such a thing. Jeez Louise...
Yeah, I used to spend a lot time working with textures that have transparent backgrounds, and that (black) outline is something you always have to combat when using an alpha channel. It's a shame you have to replace the texture manually though.
Are there anymore areas you need to adjust the fog cover for? The code I have right now is a little complex, so I rather get it all working together now before I post anything for Elisha.
AeroWidescreen
on 15 Oct 2018
Thanks again for your help with solving this riddle. I was able to apply your solutions for the 3D trees' alphas in this area as well.
Are there anymore areas you need to adjust the fog cover for?
No sir, I don't believe so and nothing comes to mind.
Polymega
on 15 Oct 2018
@elishacloud
Cheat Table (SH2 NA v1.0): https://mega.nz/#!sHwhgYia!Ju_gFEG0tTfZbPqTnlV6Fv_izepnAAnQLXhOiPlh9BU
This is for the fog adjustment during the Angela cutscene. The goal here is to have the new fog values active only after a certain point in the cutscene by checking the camera position. When this camera condition is met, the new fog values should remain active until the cutscene is over.
00479E52 jmp 00000000

00000000 cmp dword ptr [XXXXXXXX],01
00000001 je 00000005 // jumps to cutscene call if camera conditions were already met
00000002 cmp dword ptr [0094E064],4767DA5D
00000003 jne 00000012 // jumps if camera is not facing the door
00000004 mov [XXXXXXXX], 01 // writes 01 to code cave address to indicate that camera conditions have been met

// cutscene call

00000005 call 004A02B0 // moves cutscene ID to eax
00000006 cmp eax,12
00000007 jne 00000012 // jumps if not angela mirror cutscene

// goes here if all conditions were met

00000008 mov [00942C34],451C4000 // new fog front value; 2500 flt
00000009 mov [00942C30],45228000 // new fog back value; 2600 flt;
00000010 mov eax,[00942C34]
00000011 jmp 00479E57

// goes here if all conditions weren't met

00000012 mov [XXXXXXXX], 00 // writes 00 to code cave address to indicate that camera conditions have not been met
00000013 cmp dword ptr [00942C34],451C4000
00000014 jne 00000019 // jumps if fog front value is not 2500 flt
00000015 cmp dword ptr [00942C30],45228000
00000016 jne 00000019 // jumps if fog back value is not 2600 flt
00000017 mov [00942C34],45FA0000 // restores original fog front value; 8000 flt
00000018 mov [00942C30],463B8000 // restores original fog back value; 12000 flt
00000019 mov eax,[00942C34]
00000020 jmp 00479E57
And this part is for Blue Creek Apt Room 209.
0047BE8E jmp 00000000

00000000 cmp dword ptr [01FB7DAC], 28
00000001 jne 00000004 // jumps if not Blue Creek Apt Room 209
00000002 mov [00942C34],45834000 // new fog value; 4200 flt
00000003 jmp 0047BE98

// goes here if not room 209

00000004 mov [00942C34],453B8000 // original fog value; 3000 flt
00000005 jmp 0047BE98
er01.map
_This will be released with v1.0.3 of the "Enhanced Edition Essential Files" (not yet published)_
An extension, more or less, to the Observation Deck, the bathroom's levels have been adjusted to better match that of the PS2 version.
As far as I'm aware, this concludes adjusting the biggest environment differences between the PS2 build vs. PC/Xbox (being both the Catacomb meat cold rooms, observation deck, and beginning bathroom).
PC default:

PC adjusted:

PCSX2:

PC default:

PC adjusted:

PCSX2:

PC default:

PC adjusted:

PCSX2:

PS2 console comparison:
This is not a true comparable source for levels/colors due to it being an analog source but this is just to show the bathroom _is_ dark on the PS2 as well:
https://youtu.be/nH-cbmXymdw?t=303
Polymega
on 17 Oct 2018
ps53.map
@Bigmanjapan may I ask for your help with restoring the lights in this room?
https://youtu.be/KrIwV1ZN9GU
They should always be fully glowing (no other lighting addresses should influence them).
Polymega
on 22 Oct 2018
scu.mdl
_This will be released with v1.0.3 of the "Enhanced Edition Essential Files" (not yet published)_
Not an environment change but clumping it in here. The Lying Figure's texture now looks like the PS2 version. When out during the day this creature looks fine. It's when you shine your flashlight on it the creature becomes very dark. This is due to a wonky alpha channel that reacts badly to the blinn (shiny) shader applied to the creature when the flashlight is on.


Polymega
on 23 Oct 2018
ps45.map
_This will be released with v1.0.3 of the "Enhanced Edition Essential Files" (not yet published)_
Here's an adjustment of something that's always bothered me, even back in 2001 during the first time I played this game as a young'un:
James jumps through many holes in the prison. And while the holes are "holes" there's one hole that isn't; when James jumps in this hole you see a dirt-like texture at the bottom during the cutscene. So instead of jumping through a "hole," he's instead phasing through dirt.
PC default:

PC adjusted:

Polymega
on 24 Oct 2018
RedCrossIcon.png
_This will be released with v1.0.3 of the "Enhanced Edition Essential Files" (not yet published)_
Thanks to Aero's teachings with hex editing I was able to update the low health red cross icon without it eventually crashing the game.

The gif took away a lot of its coloring but here's a more detailed before/after:

Polymega
on 14 Nov 2018
ca25/27.map
_This will be released with v1.0.3 of the "Enhanced Edition Essential Files" (not yet published)_
While it could be easy to locate all sorts of areas such as this throughout the whole game, I only addressed this one area because it always stood out to me the most, even 10+ years ago, and I don't want to invest the time/energy to address all other similar areas throughout the rest of the game.
In any case, the harsh, harsh line that separates the walls from the ground during the beginning trek into town has been softened to make it look more natural:

Polymega
on 18 Nov 2018
Man, this stuff irritate me so much in games. And I always thought that SH games are the rare cases where it's addressed. But as you showed, it's not perfect either. I personally would very much like to see this stuff fixed.
SiarMortal
on 20 Nov 2018
If I was a millionaire and didn't have to do an 8-5 job I'd get much more serious fixing the "littler" things like that.
Although I feel like it's worth reiterating again to all whose following this post: With the exception of the Toluca Lake image (which was so bad it was easier to remake it from scratch) I have no intention on completely redoing the textures in this game. I never want to go the HD Collection route.
Any touch ups I'd aim to do would be small tweaks or adjustments, such as color/level correcting textures, making areas darker where they should be, blending out harsh lines, or filling in parts of a model that are missing texture information (examples of which are scattered above).
Polymega
on 20 Nov 2018
If I was a millionaire and didn't have to do an 8-5 job I'd get much more serious fixing the "littler" things like that.
I mean that as I'd rather help the team with other goals such as fixing missing lighting effects, assisting with fixing bad geometry normals, high res fullscreen image mod, etc. Those definitely take priority.
Polymega
on 20 Nov 2018
How exactly did you do it? On the other side of the tunnel there's seemingly the same wall with different ground texture. How does it work?
SiarMortal
on 20 Nov 2018
Sorry for double post, can't figure out how to attach pictures:
https://i.imgur.com/W0B10PR.jpg
SiarMortal
on 20 Nov 2018
I first determined what .map files I needed to edit by exploring the area with the SH Level Viewer.
After determining the .map files, I opened them in SH Texture Explorer to confirm the wall textures were there.
I then extrapolated the texture data through HxD (hex editing software) as importing/exporting through SH Texture Explorer introduces compression and artifacting.
This wall texture is used/repeated per .map file. But the texture of the wall itself may be in different locations/positions within the texture file, so each .map texture file had to be individually adjusted.
I then grabbed the dirt floor texture from the same .map files, overlaid it on top of the wall texture, used layering masks in Photoshop, and created the dirt blend for the wall.

I saved the images out as .dds format, grabbed the relevant hex data from HxD, and transplanted the data back into the appropriate .map files (to avoid importing/exporting with SH Texture Explorer).
On the other side of the tunnel there's seemingly the same wall with different ground texture. https://i.imgur.com/W0B10PR.jpg
In regards to your attached image: This would be another area that could be touched up but I'm personally not worried about that spot at this time because it meets with concrete; so the harsh line is more tolerable there. I personally didn't like the harsh line when it was over dirt: The nature of dirt means it wouldn't make a straight line like that and dirt tends to stain up walls anyways. So, using what limited polygons were there, I made the best out of the situation. It's not perfect, but better.
Polymega
on 21 Nov 2018
@Polymega
Found the black wall toggle: https://youtu.be/QuJTf7D4ESs
sh2pc.exe+4F037C (008F037C) byte
Change to 0 to disable the wall, to 5 to make it render partly.
You can hex edit sh2pc.exe at 0x4F037C to make the change permanent.
As far as I remember red flesh wall in the back of that piston is not visible to the player during the default gameplay (and during the cutscenes of that room), so it should be OK to annihilate part of the .map file resposible for the drawing of that piston's back wall, maybe lower half of the piston's tube too.
Bigmanjapan
on 27 Nov 2018
Found the black wall toggle:
Man... how do you find these things?!
As far as I remember red flesh wall in the back of that piston is not visible to the player during the default gameplay
One additional concern, the actual piston (the part that moves) can also be seen during this cutscene. The piston moves on a global timer so depending on when you activate the cutscene will determine if you see it when Angela opens the door or not: https://youtu.be/nH-cbmXymdw?t=3h23m23s
What do you think? Should we still try to remove the tube or leave as-is (with the "black fade" fix)?
Polymega
on 27 Nov 2018
piston moves on a global timer
sh2pc.exe+1983574 (01D83574) float — piston's position
When the time is right during the cutscene (when the piston is not visible to a player and when a camera angle changes (used as a condition for a function)), change the piston's position to a certain value. That will render it always traveling the same way during Angela's leaving.
Bigmanjapan
on 28 Nov 2018
Beautiful. Thank you again, Bigmanjapan. Give me some time with this. I'll surely be needing FrozenFish24's help with adjusting that particular piston's geometry as well but want to get some other things ready first before tagging him on this fix.
Polymega
on 28 Nov 2018
@FrozenFish24 could we ask for your help editing a .map file again? This would be ps97.map and we'd need to grab some vertices and pull them in for one specific piston tube.
Please refer to this video: https://youtu.be/W95_9ztN0Rk
Note: In the video the room is upside down. So when you see the room through the isometric top view on the left side of the video the tube would actually be on the other side of the door if it was flipped correctly.
What we're trying to do is hide this piston for when Angela opens the door:
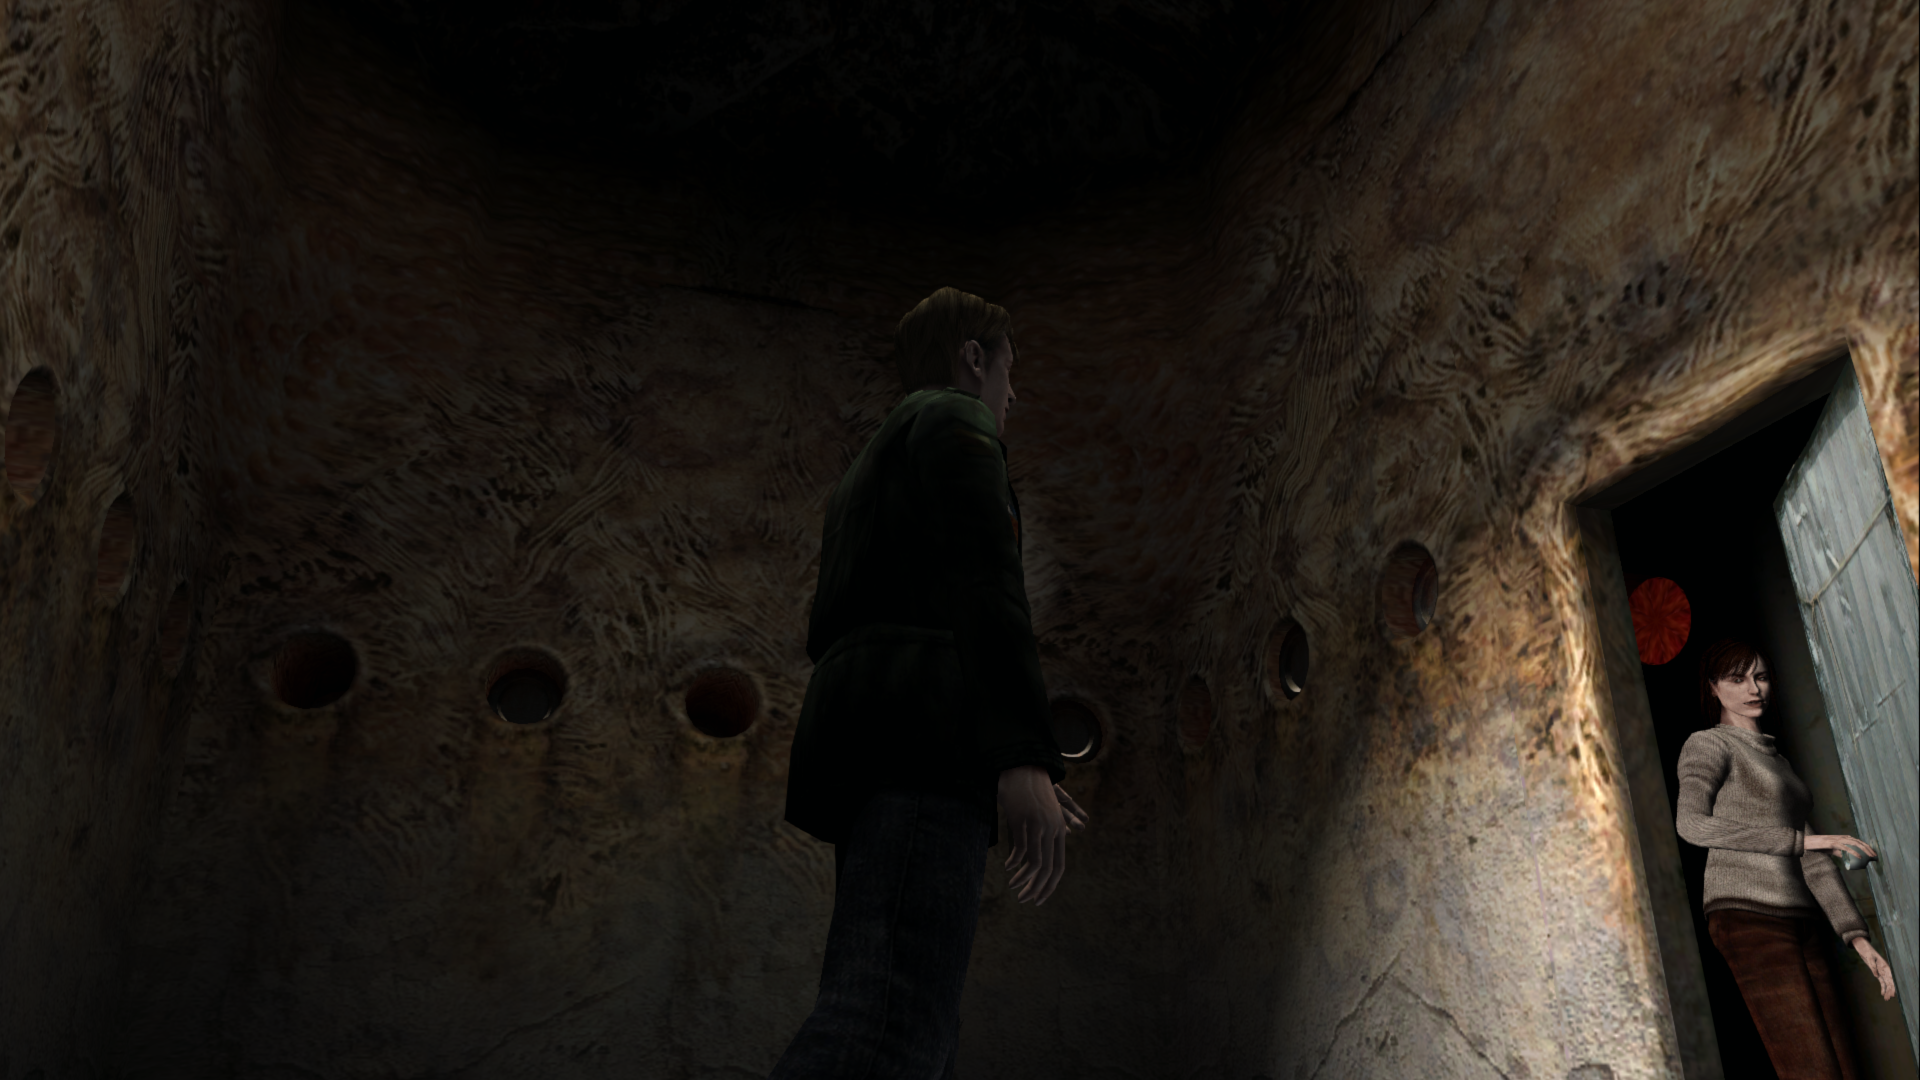
Bigmanjapan has found the address to remove the black box that typically covers this piston. He's also found the address that manipulates the piston's movement/position which will ensure the movable portion of the piston won't be in frame whenever she opens the door. The last piece of the puzzle is shortening the shaft of the piston itself.
Thanks for any help with this!
Polymega
on 29 Nov 2018
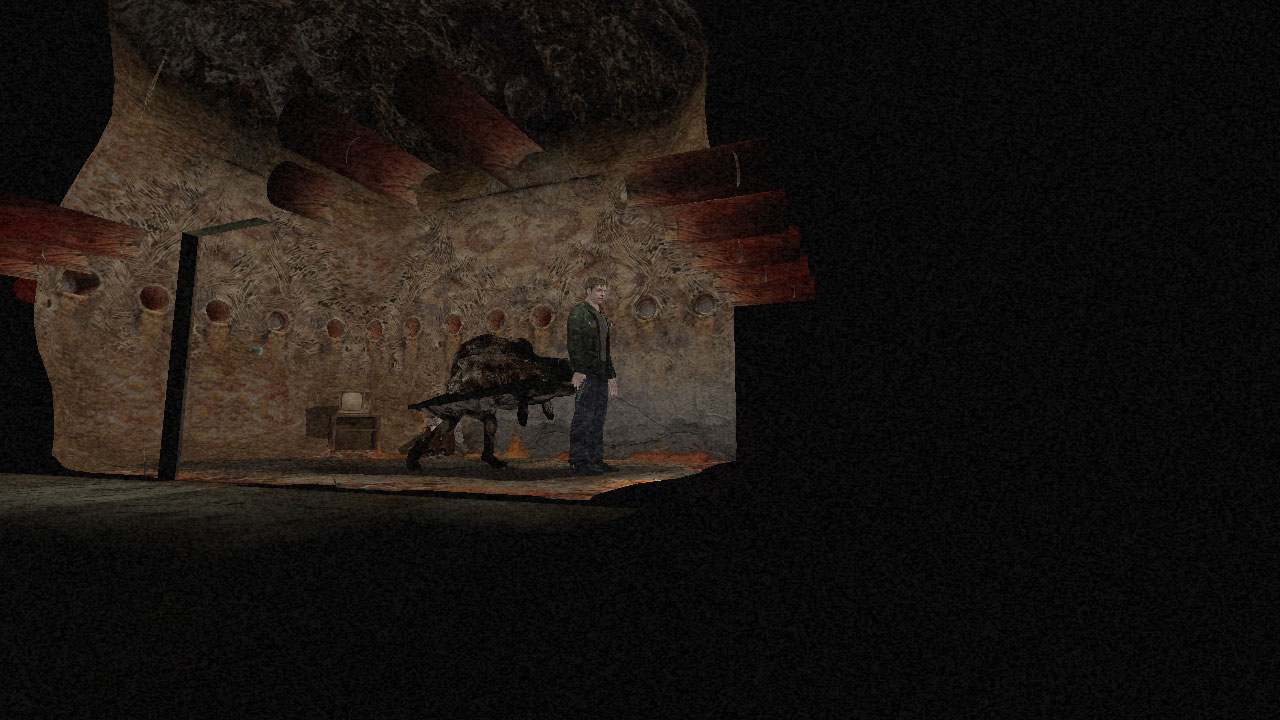
There you go, one halved flesh piston tube. I also made sure to adjust the UVs so the texture didn't get squashed forward.
Edit: Also the black box is just part of the map and could be (re)moved on my end if that would be easier?
 FrozenFish24
on 1 Dec 2018
FrozenFish24
on 1 Dec 2018
I also made sure to adjust the UVs so the texture didn't get squashed forward.
You have the ability to also adjust UVs for the .map files? That may prove invaluable in the future! Thank you for going the extra mile!
Edit: Also the black box is just part of the map and could be (re)moved on my end if that would be easier?
If it wouldn't be too much more trouble, that'd be great. The less Aero has to code in x86 ASM and Elisha in C++ (to remove the black box that way) the better for sure!
Polymega
on 1 Dec 2018
PS - I'd probably move it away and not delete it; just to play things safe.
Polymega
on 1 Dec 2018
ps97v2.zip
Here you go, I moved it below the floor where it can't be seen
You have the ability to also adjust UVs for the .map files?
Yeah, it's a bit of a pain because I've only partly automated it, but it's doable. Once they're in a better state I'll share the python scripts I've been using.
FrozenFish24
on 1 Dec 2018
Thank you again, FrozenFish24! Also, when you have a moment, would you mind sending me a message through here?: http://ratio.townofsilenthill.com/about/#contactme
@AeroWidescreen
This fix adjusts the movable part of the piston that you would normally see when Angela opens the door at the end of the cutscene in the "flesh room."
No matter what value I set the piston to (whatever you set it to it continues its movement from that point), you would inevitably see it when she opens the door. This is due to the speed/distance in which the piston travels; there's no value you can set it to and then let it continue moving from that point without it being seen on the door opening.
Because of that, the value below would need to be locked during this camera X change then released upon cutscene's end:
DURING cutscene ID [sh2pc.exe+1B7A7C4 (4 bytes)] 00000044 and
WHEN cutscene camera position X [sh2pc.exe+54E064 (float)] is 20278.41406
Description | Address | Value
-- | -- | --
Door piston location | sh2pc.exe+1983574 (float) | LOCK at 2.5
Release upon cutscene's end.
Thank you Aero!
Polymega
on 1 Dec 2018
_This will be released with v1.0.3 of the "Enhanced Edition Essential Files" (not yet published)_
ps125.map
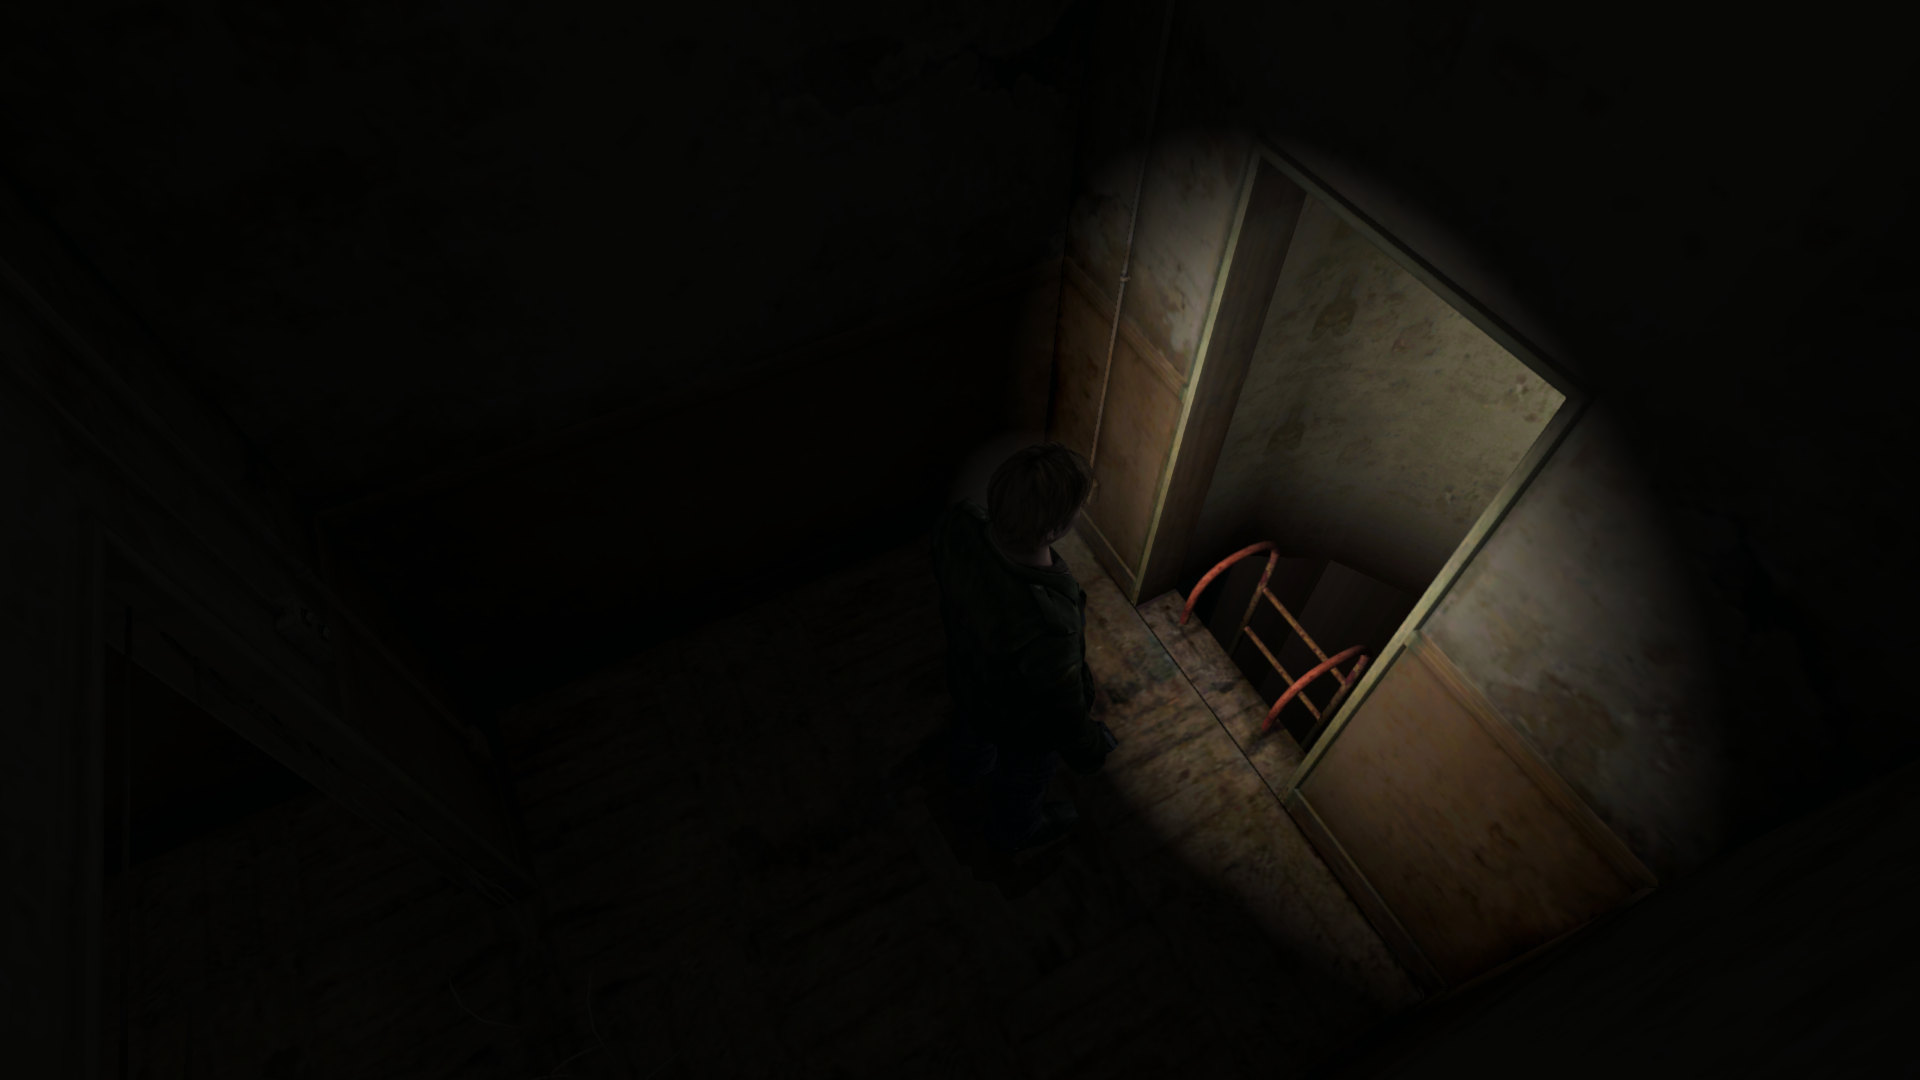
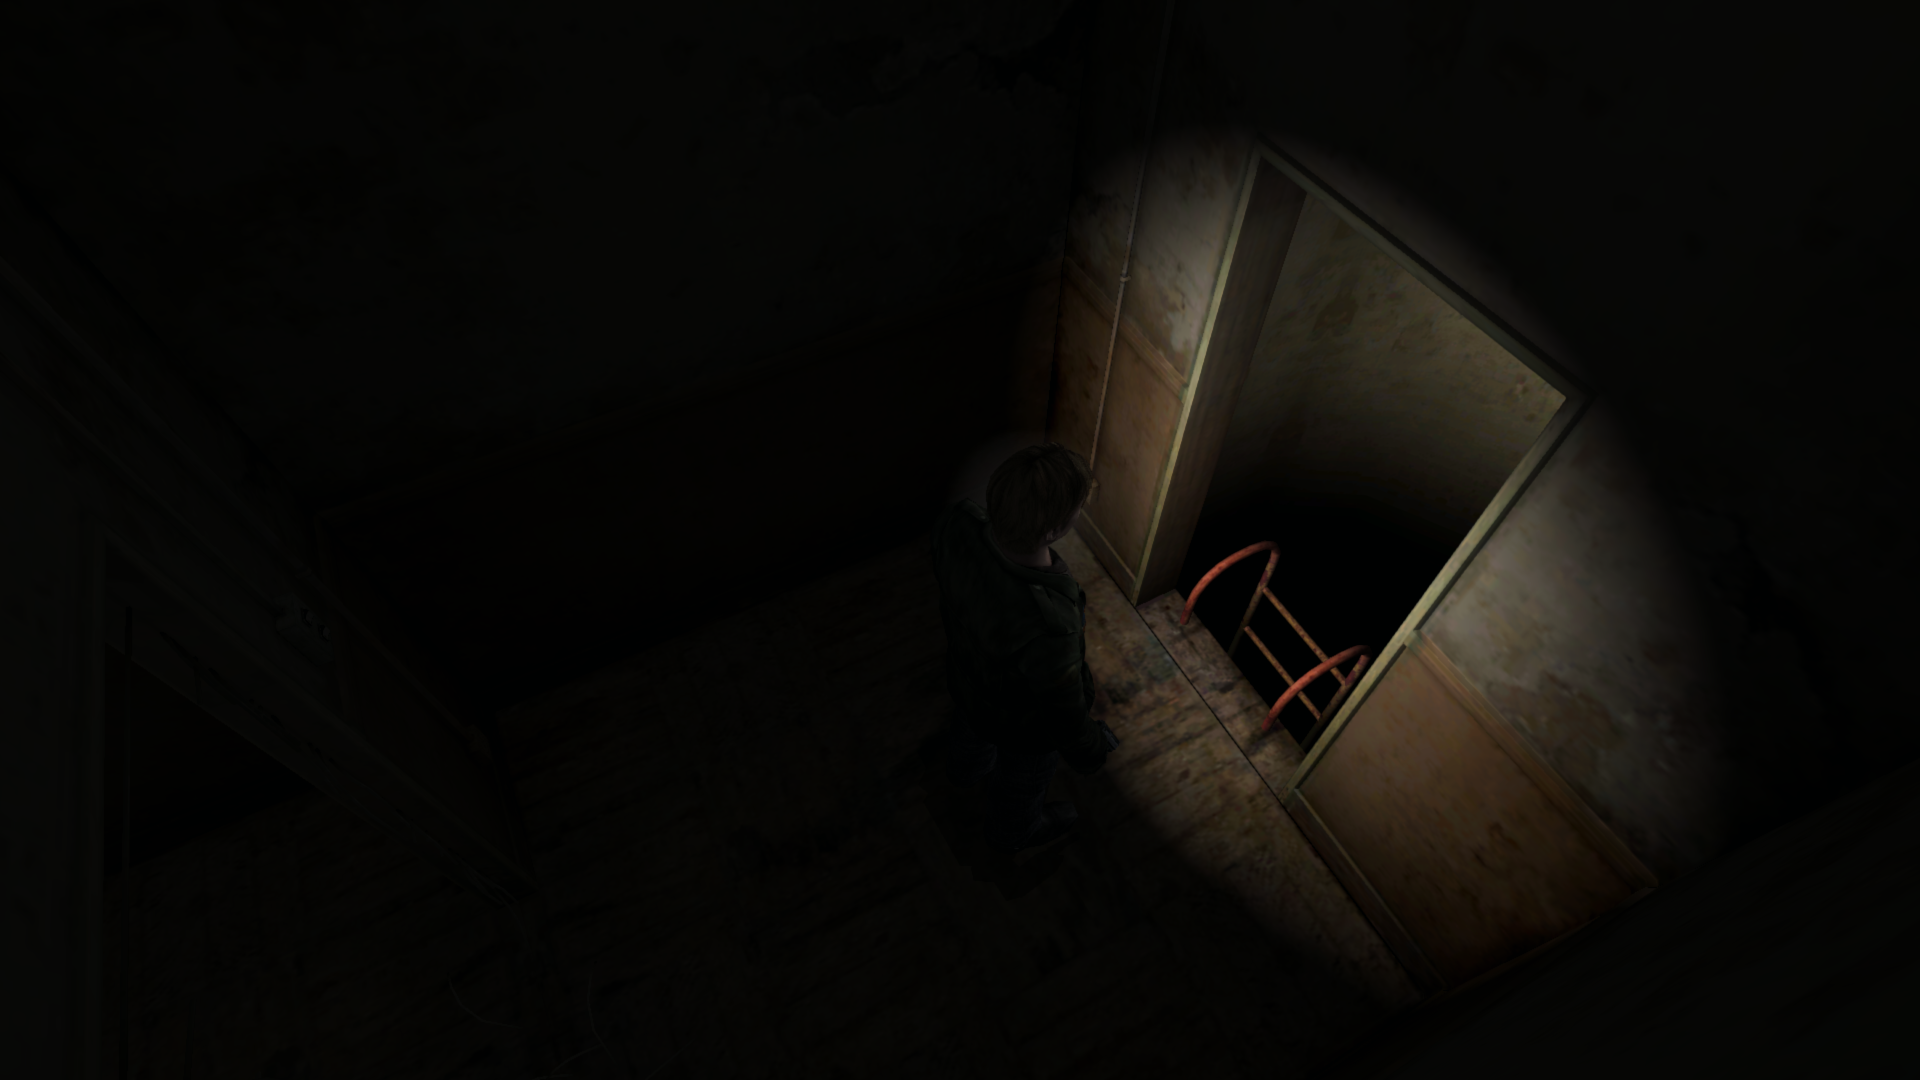
Fixed a very bad UV stretch at the bottom of the hole. To fix this, while still looking visually pleasing, I had to raise the black gradient threshold up a bit.
Before:
After:
rr41.map
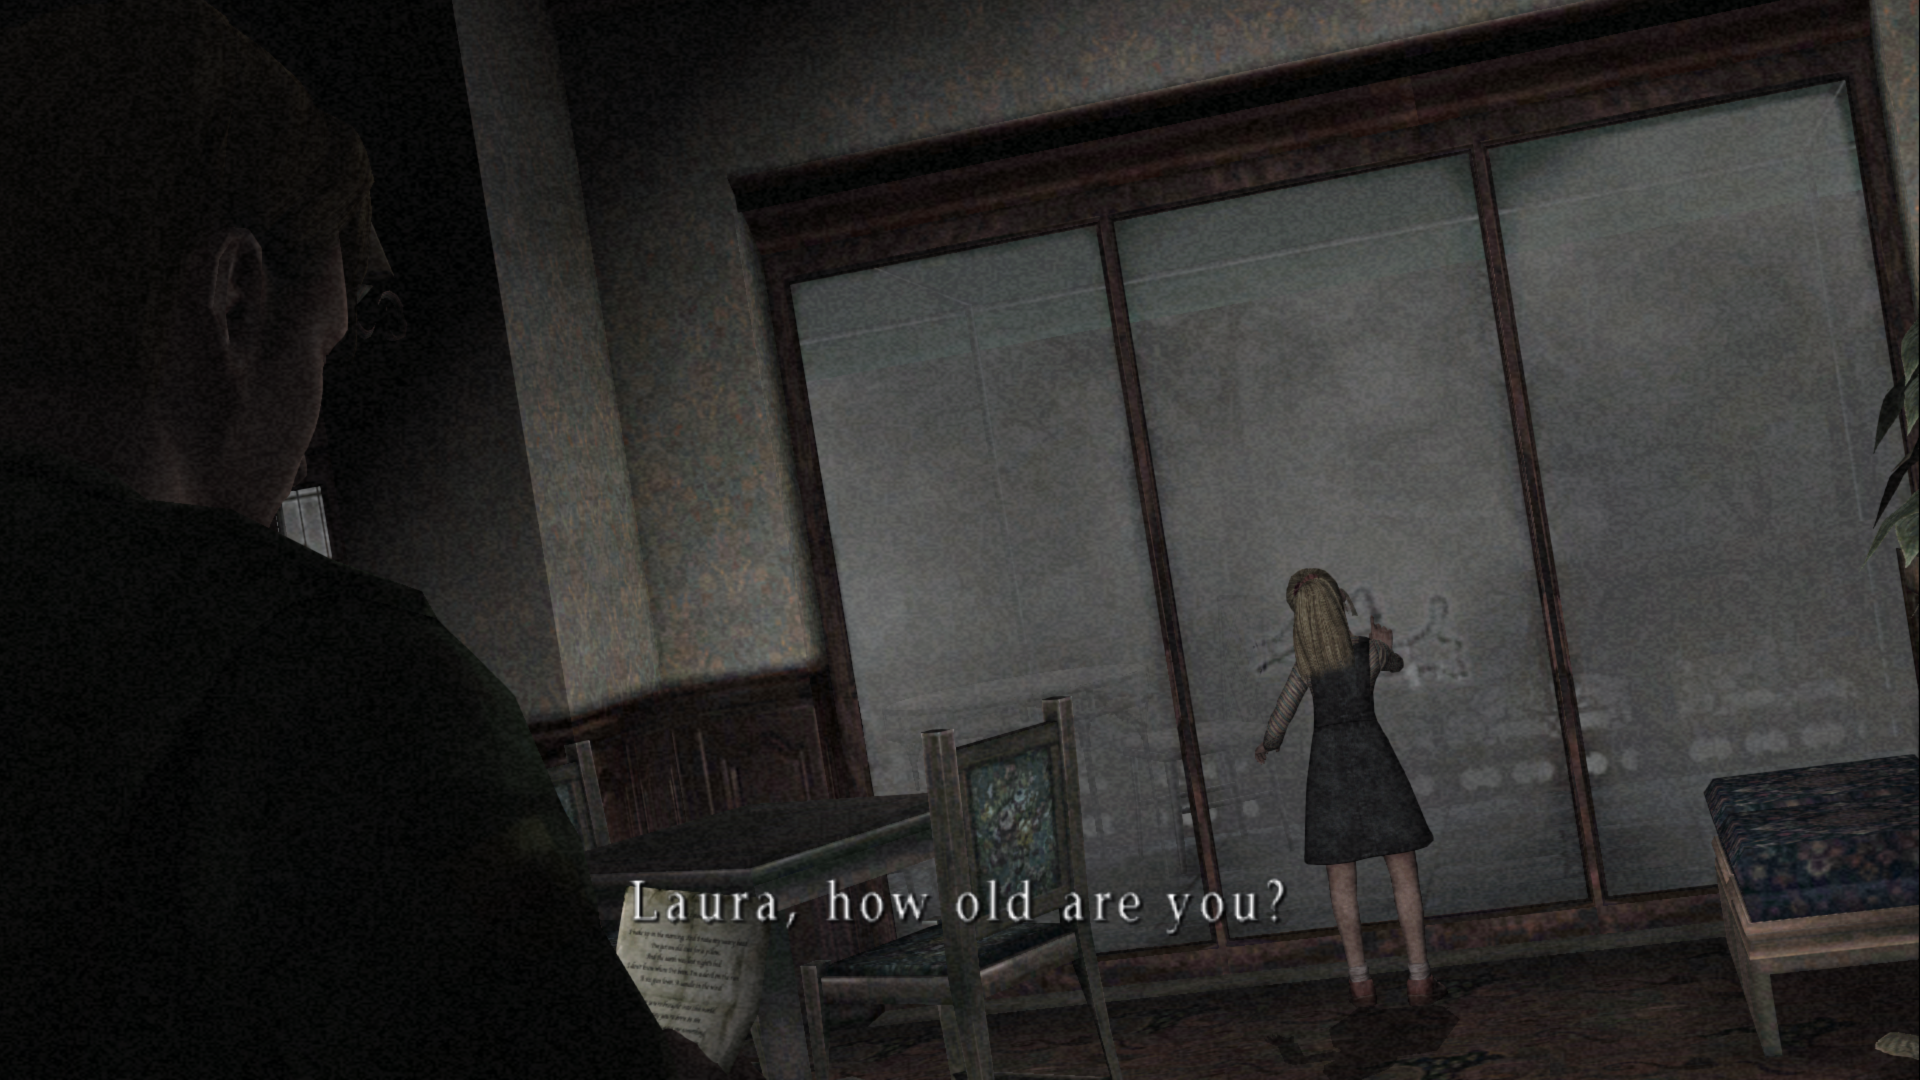
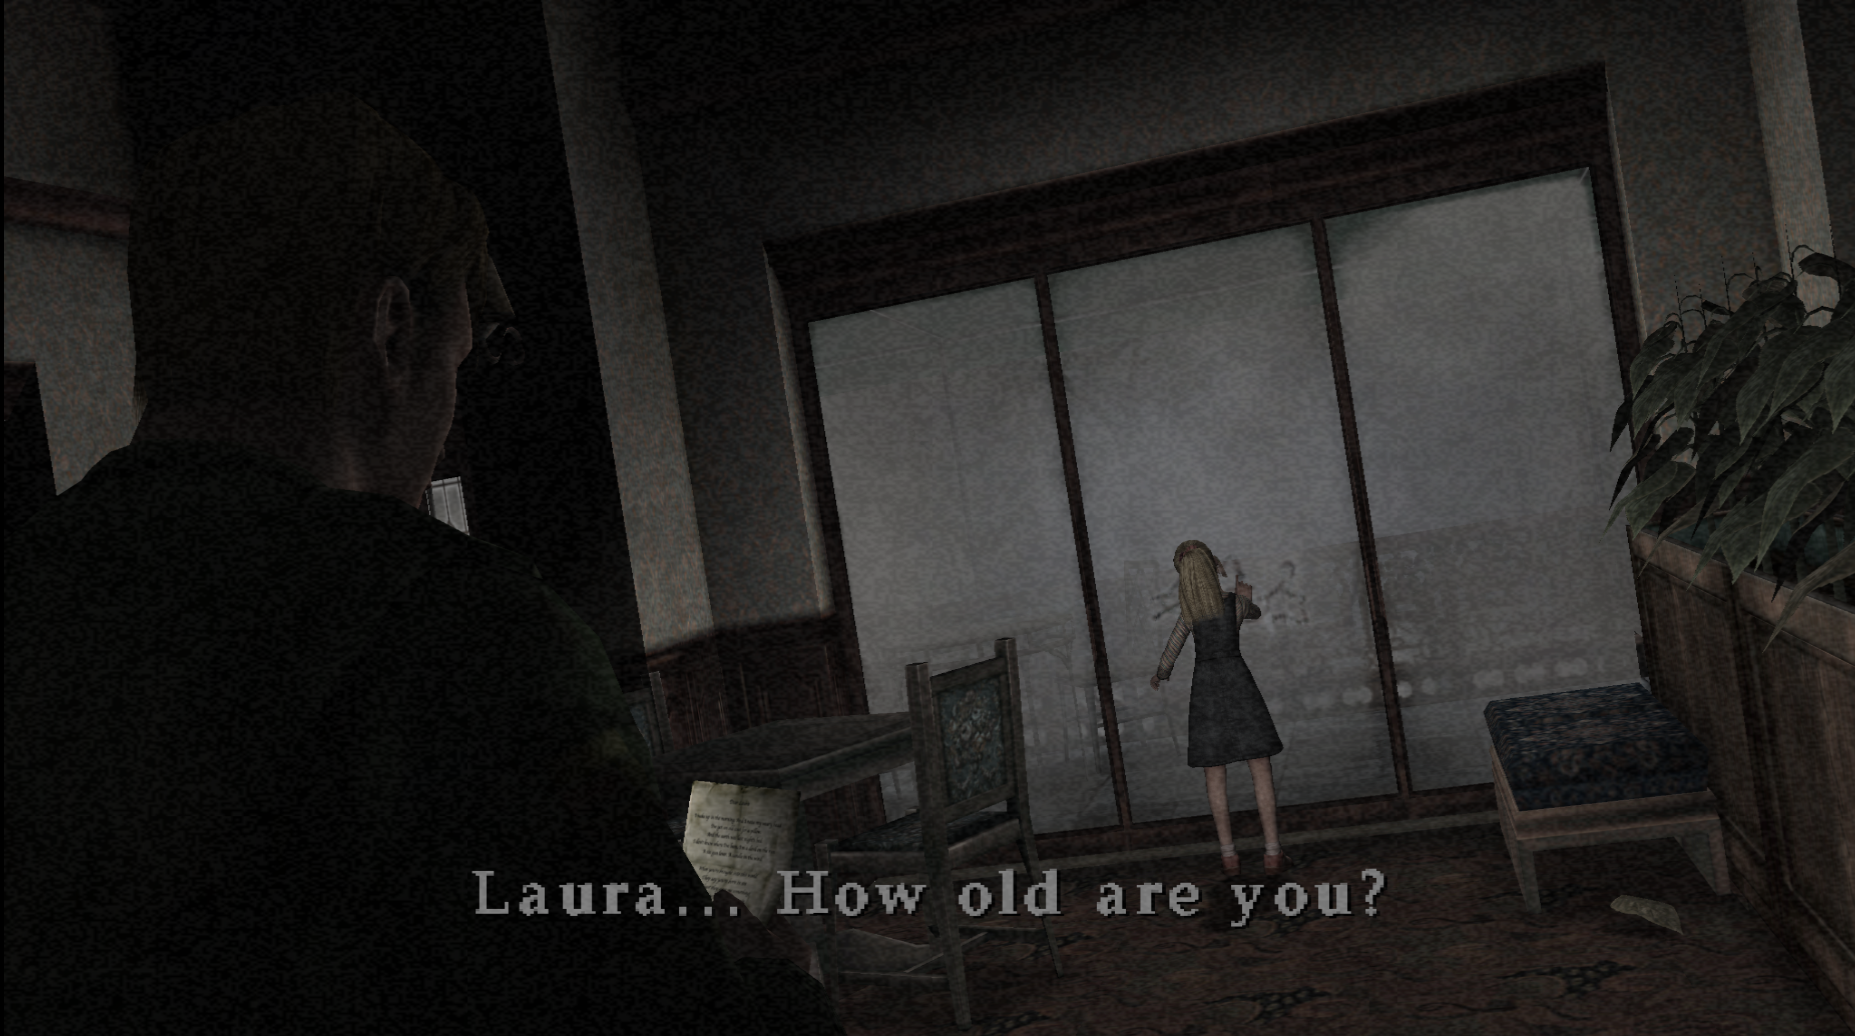
Adjusted the fogged windows to better match the PS2/PCSX2 version.
Before:
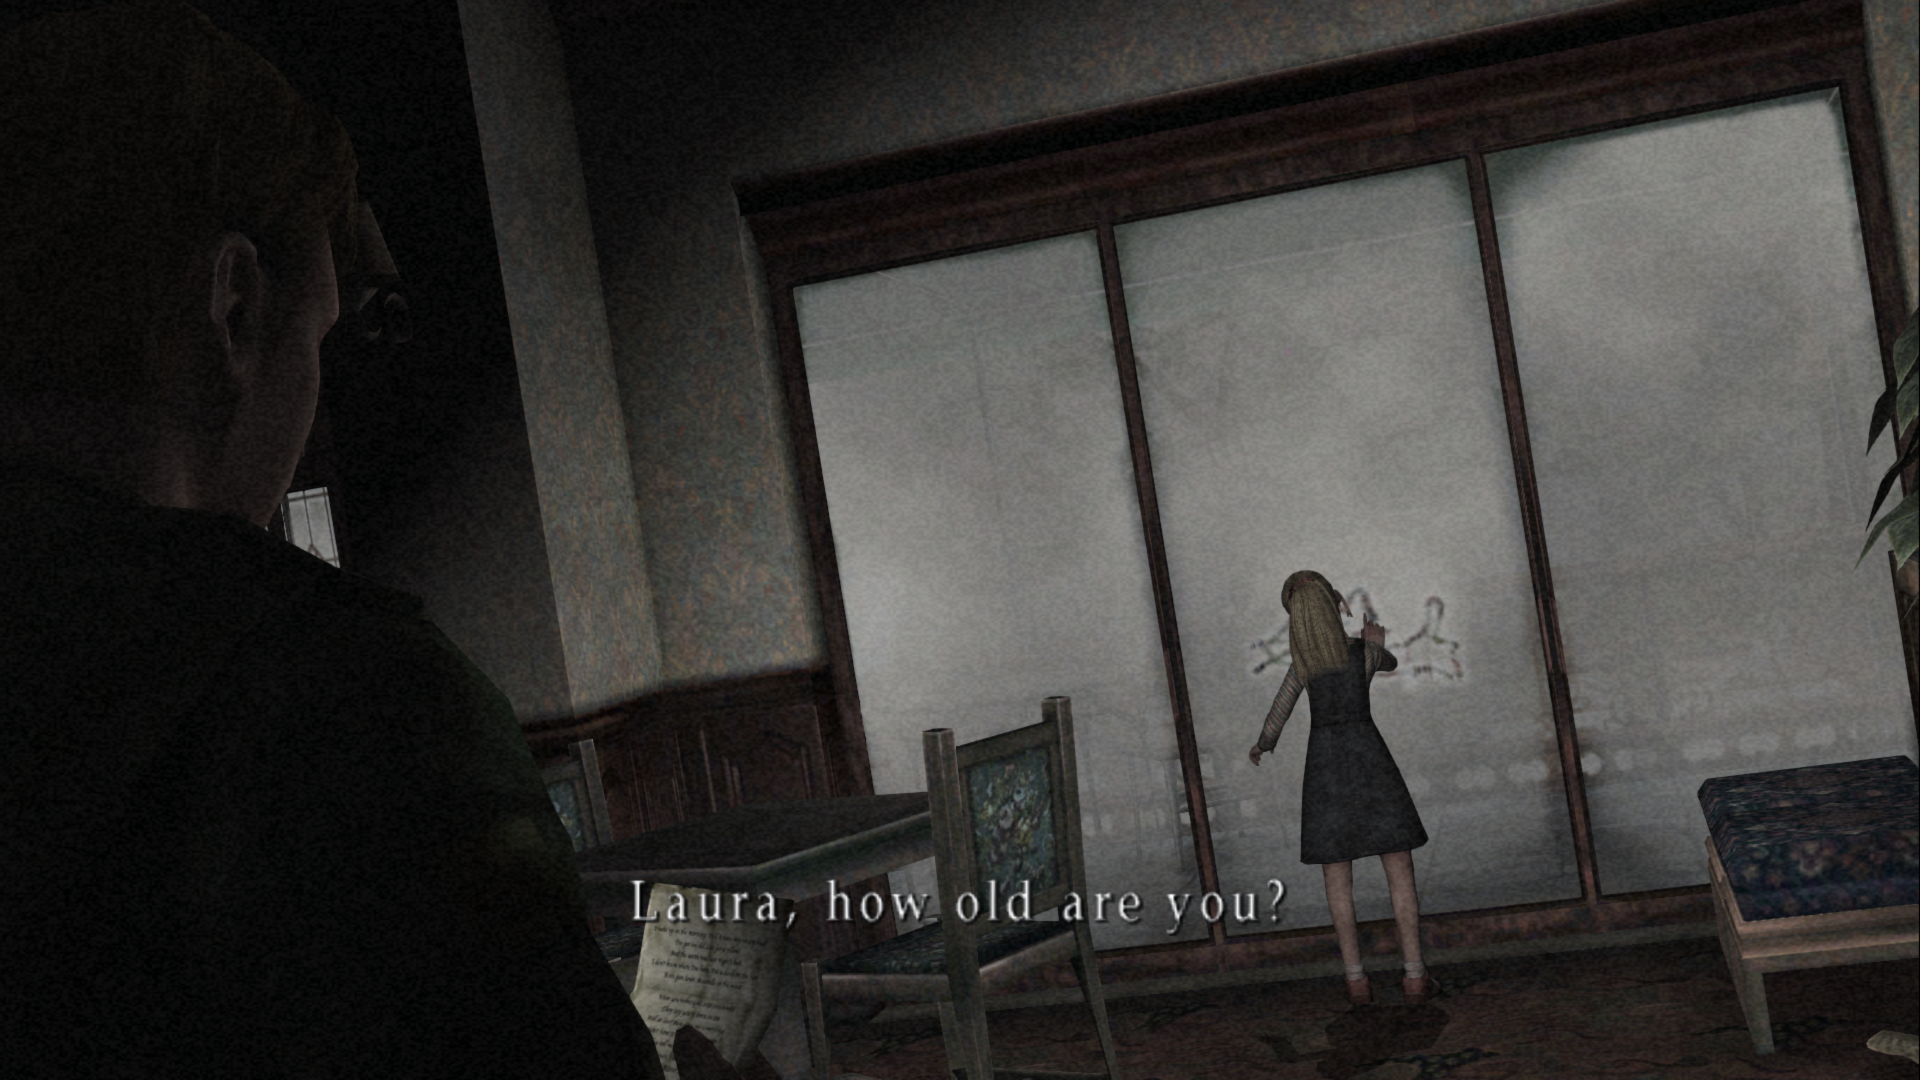
After:
PCSX2:
Polymega
on 8 Dec 2018
_This will be released with v1.0.3 of the "Enhanced Edition Essential Files" (not yet published)_
ob01.map
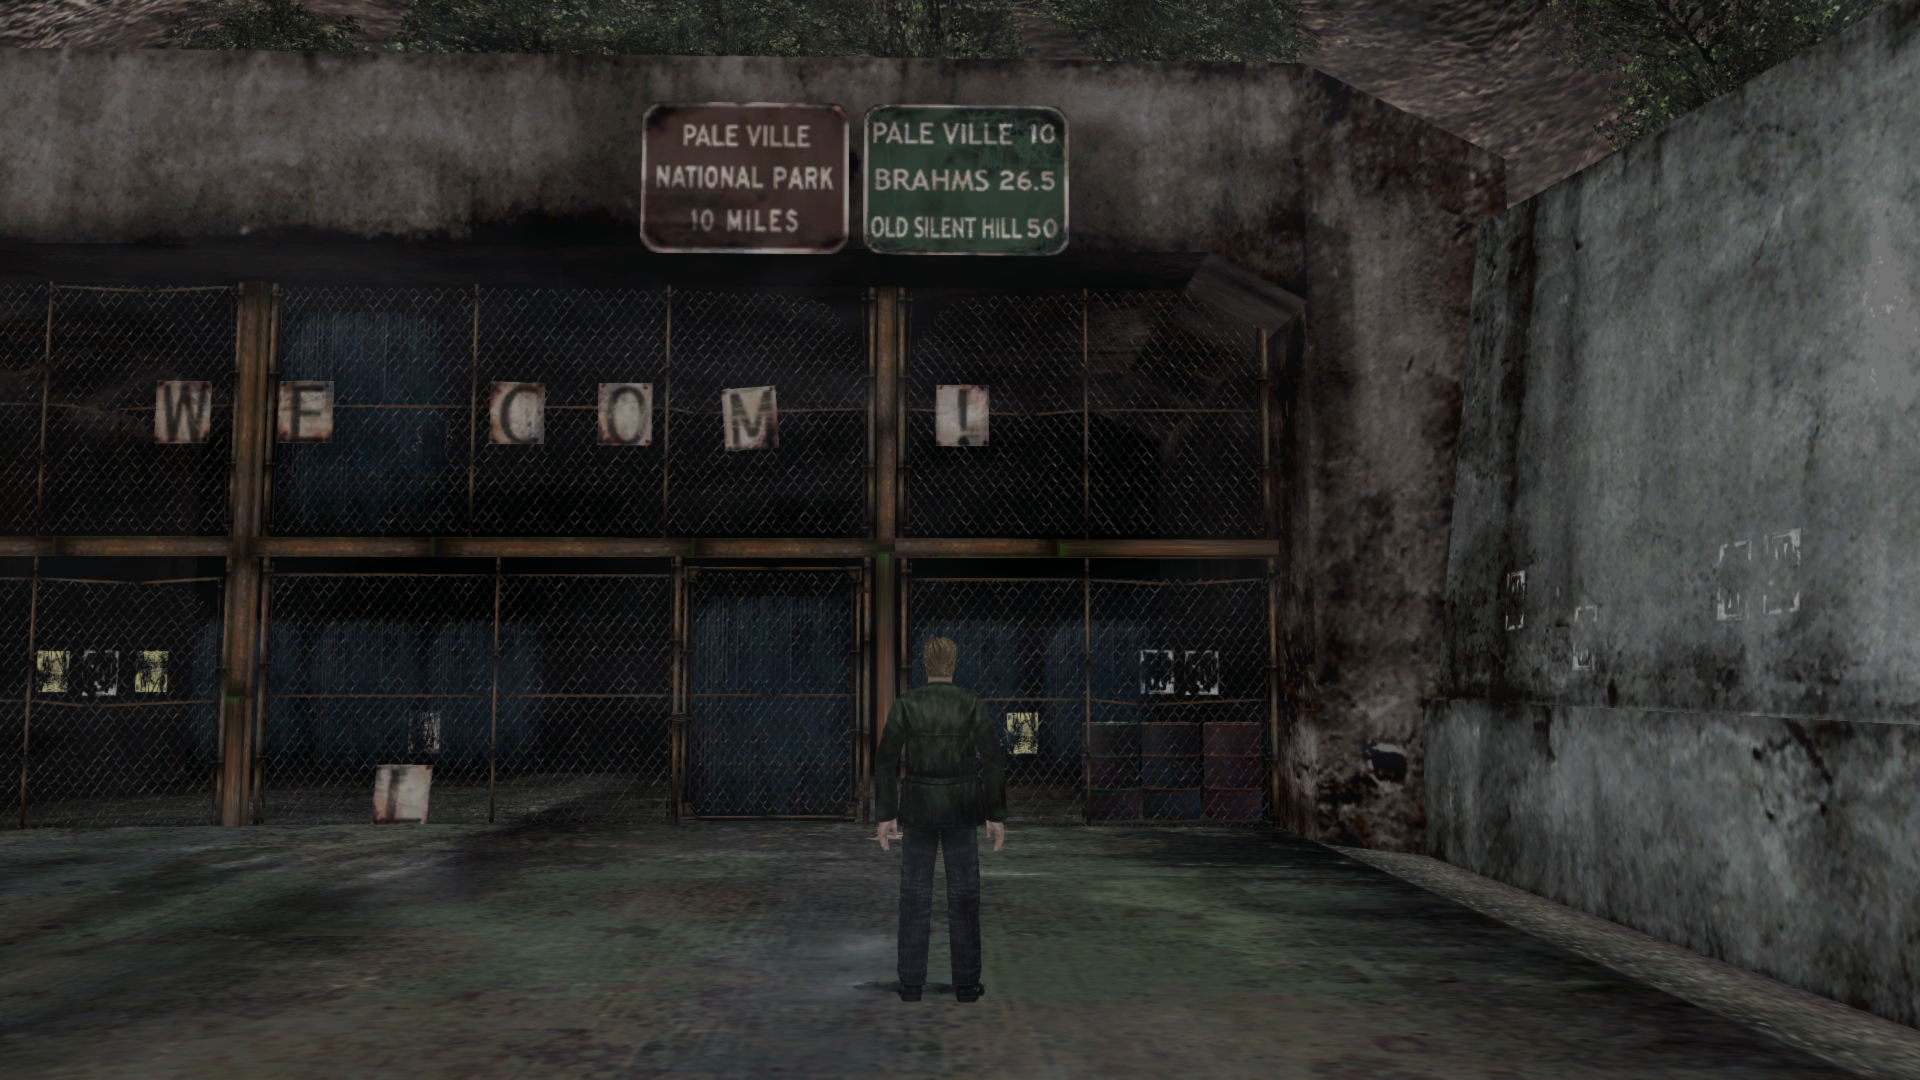
For those who aren't familiar: Thomas "The Adversary" is pretty much renowned for his encyclopedic knowledge of events and time periods for Silent Hill's history. In fact, he's made a timeline for the series that even developers themselves have used.
The Adversary has mentioned years ago that the mileage for Brahms (which, in SH2, says is 265 miles away) is incorrect and should be 26.5. Going off his reputable knowledge, I've updated the sign accordingly. Going off of DOT signage, destination distance signs are arranged top-to-bottom, closest-to-furthest, so Brahms and Old Silent Hill have been switched.
I made sure to retain specific grunge/scratch lines within the signage that went through lettering when swapping the text to keep the base texture as original as possible.
Before:
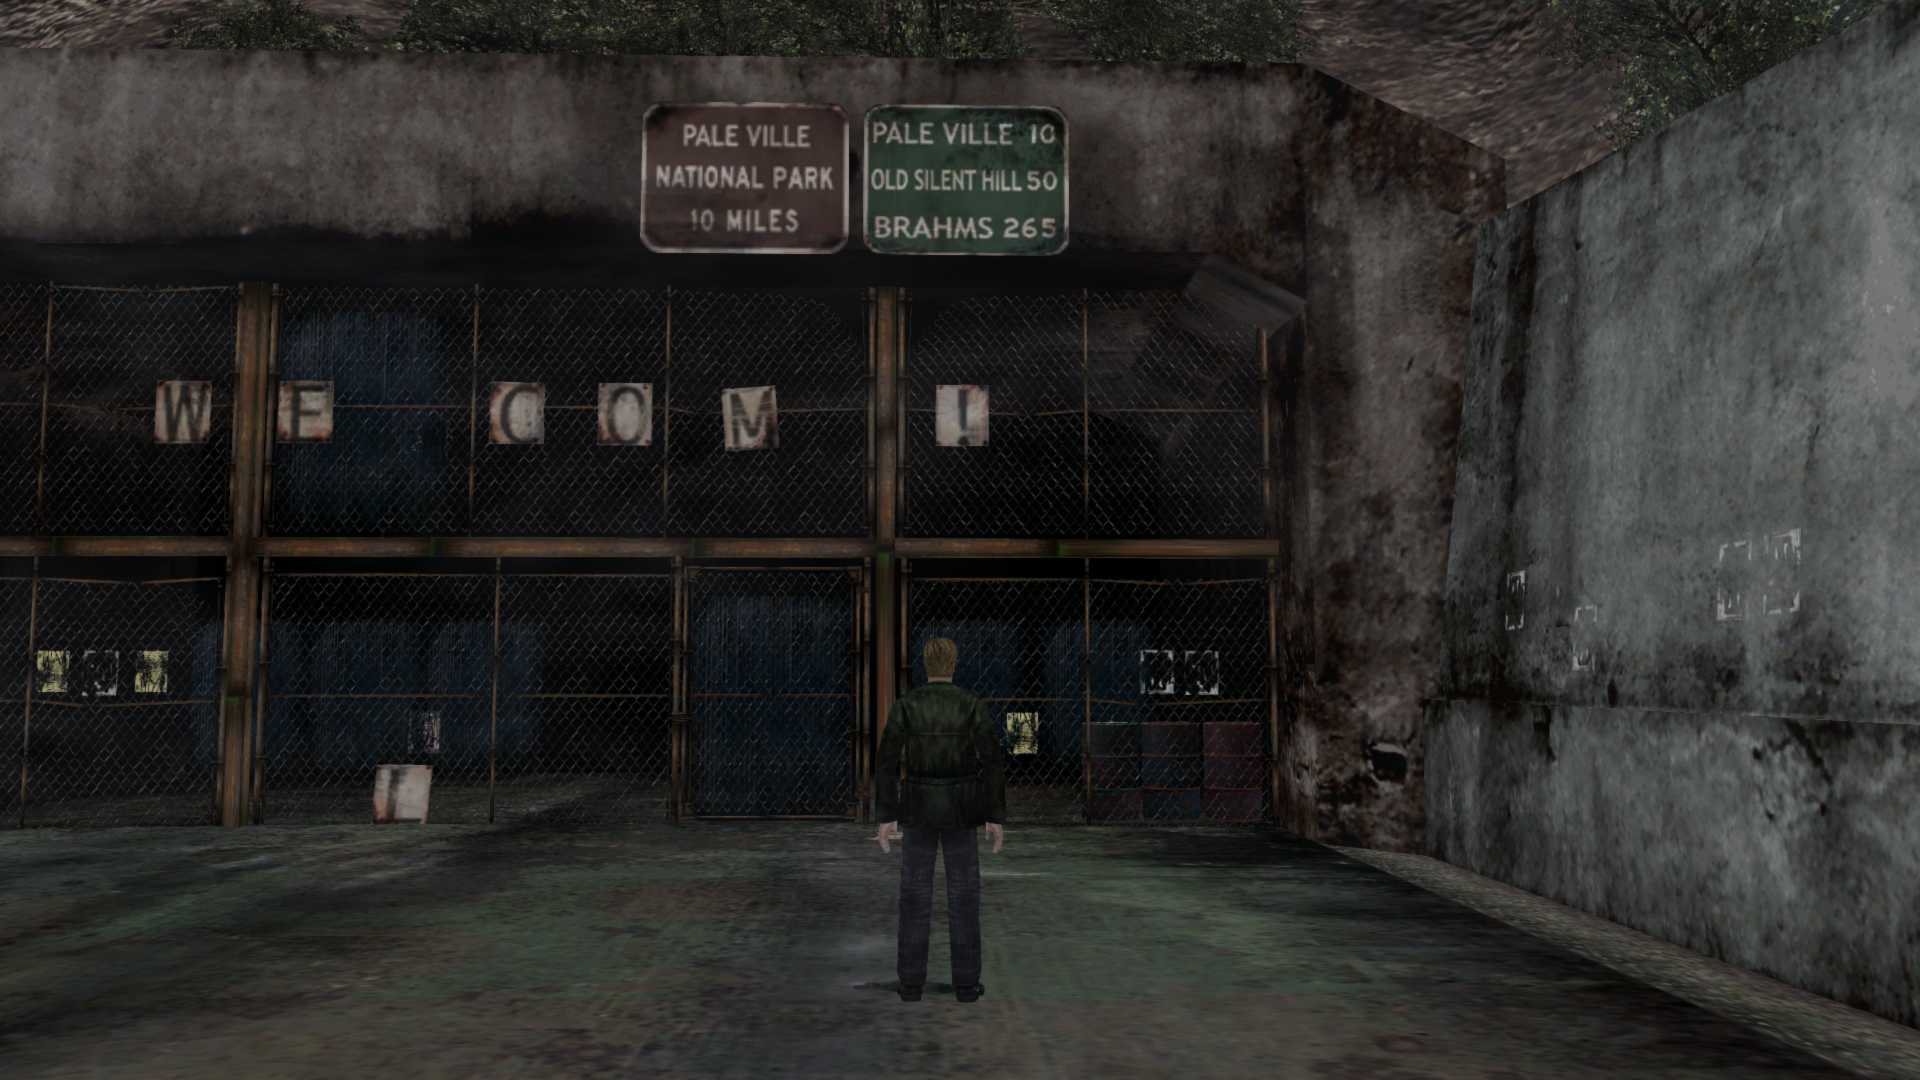
After:
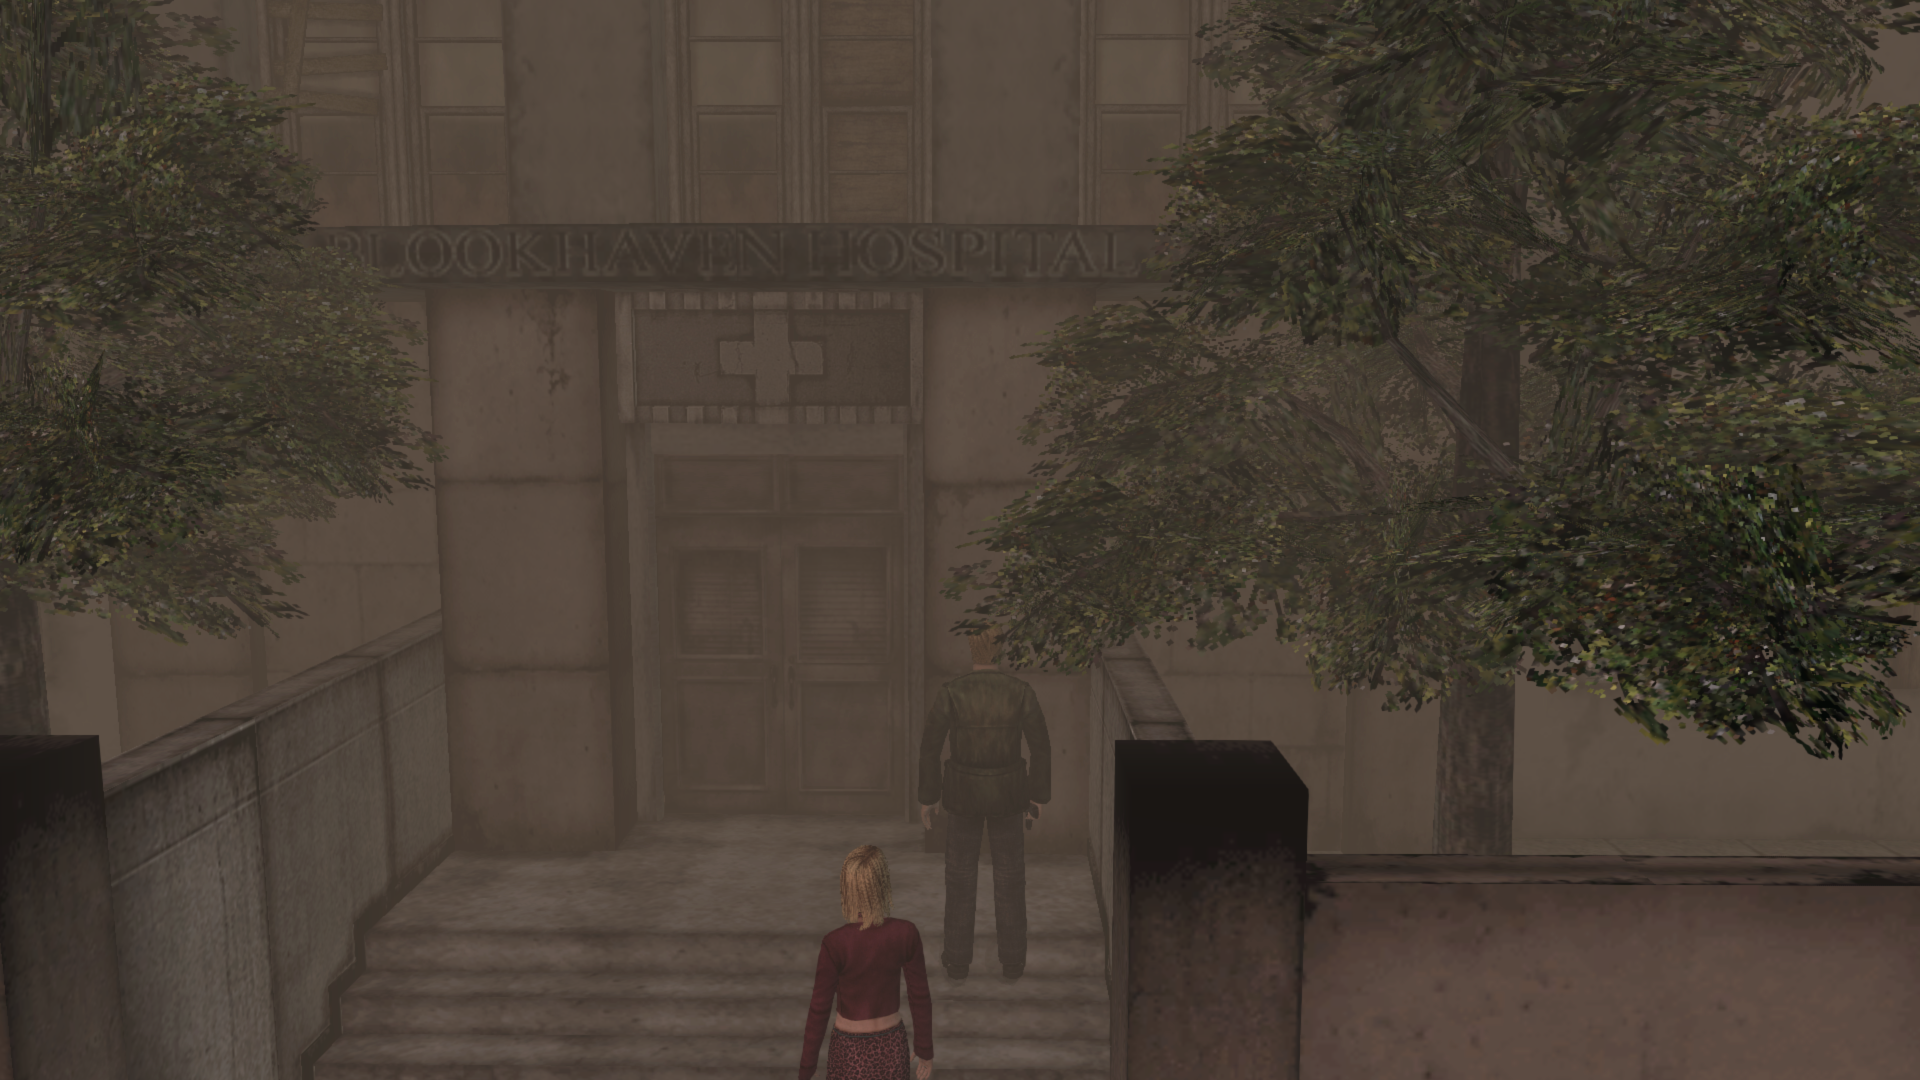
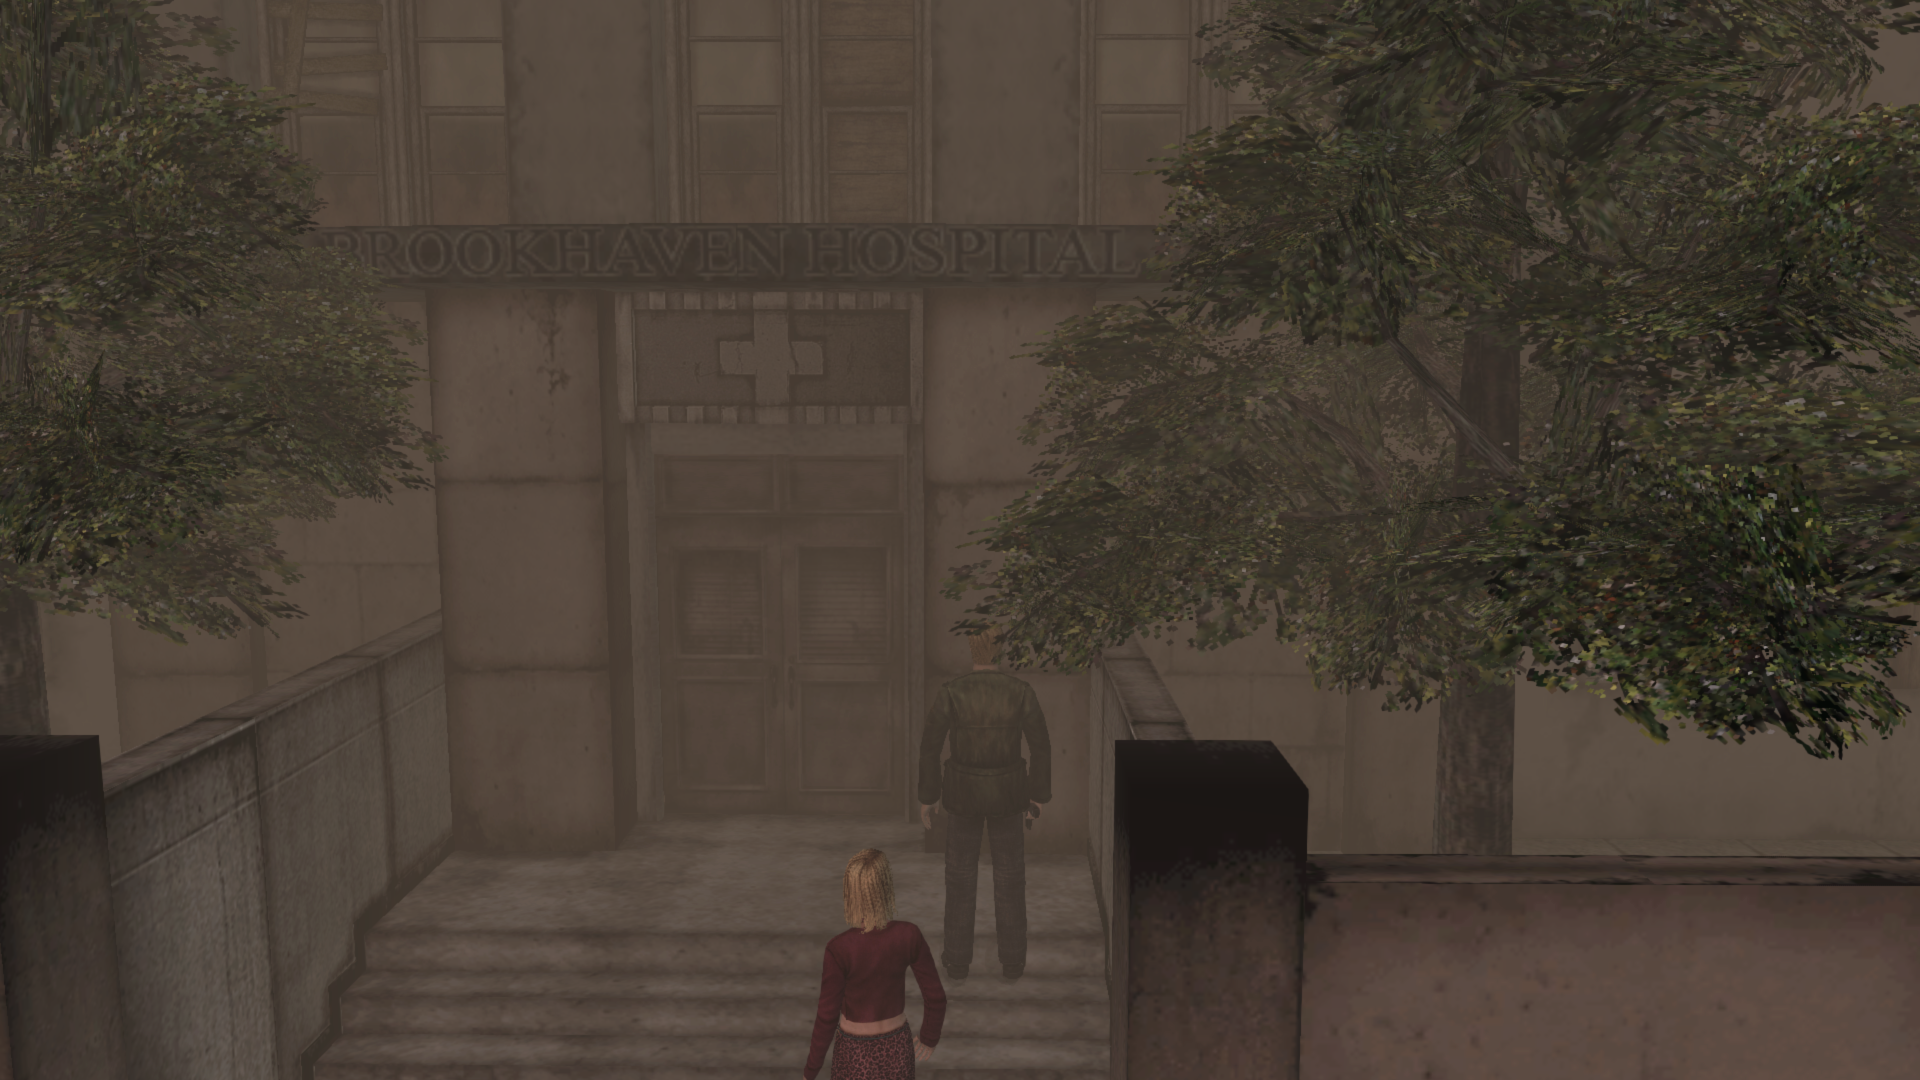
cc53.map
B L OOKHAVEN HOSPITAL now reads B R OOKHAVEN HOSPITAL
Before:
After:
Polymega
on 31 Dec 2018
Update: Bigmanjapan has found a better fix to resolve the shadow flickering by updating a memory address found here: https://github.com/elishacloud/Silent-Hill-2-Enhancements/issues/66#issuecomment-450804913
rr91.map
_This will be released with v1.0.3 of the "Enhanced Edition Essential Files" (not yet published)_
First, let's show the issue with this room. During a "Very Important" cutscene the top edge of the Hotel Room 312 canopy doors produces a flickering shadow glitch which detracts and takes you out of the scene:
SPOILERS: https://youtu.be/lfGt7oshGeI~~
You can also see this shadow glitch if you step back far enough afterwards:
PC default:
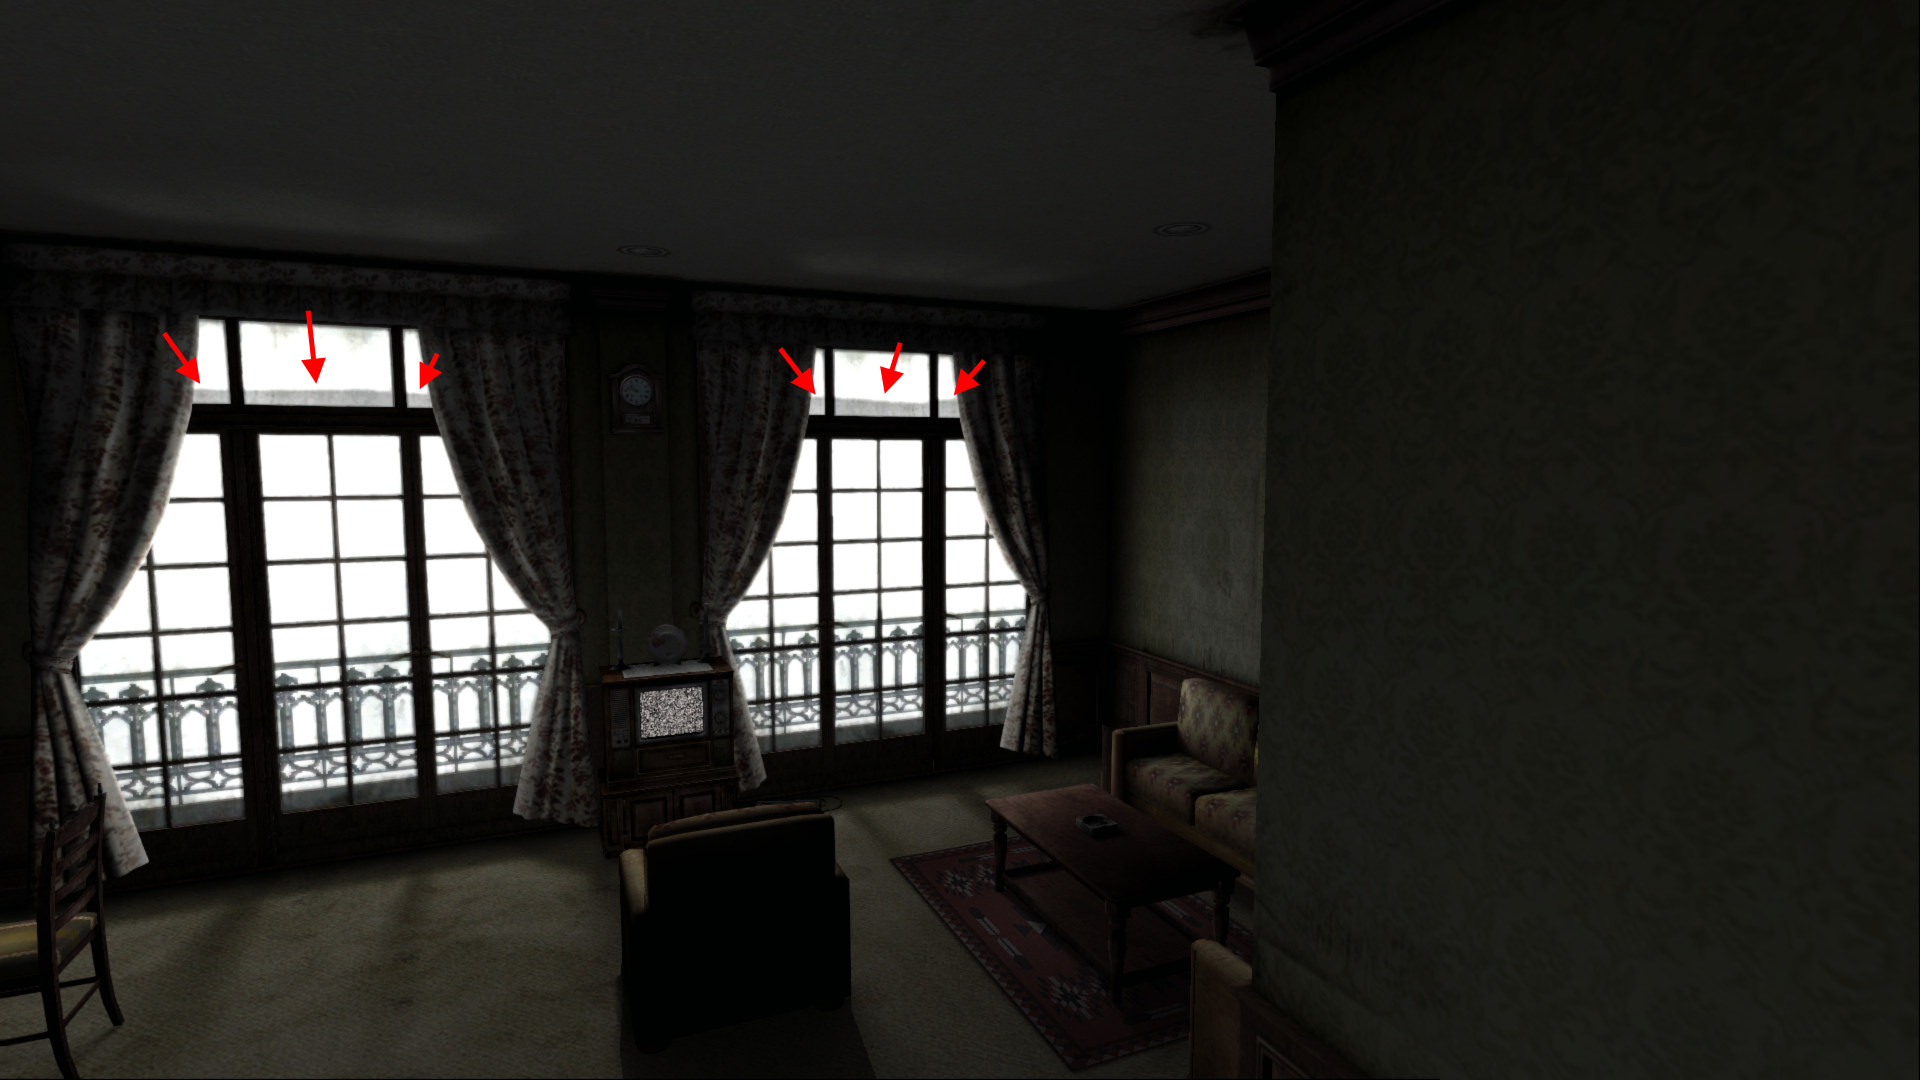
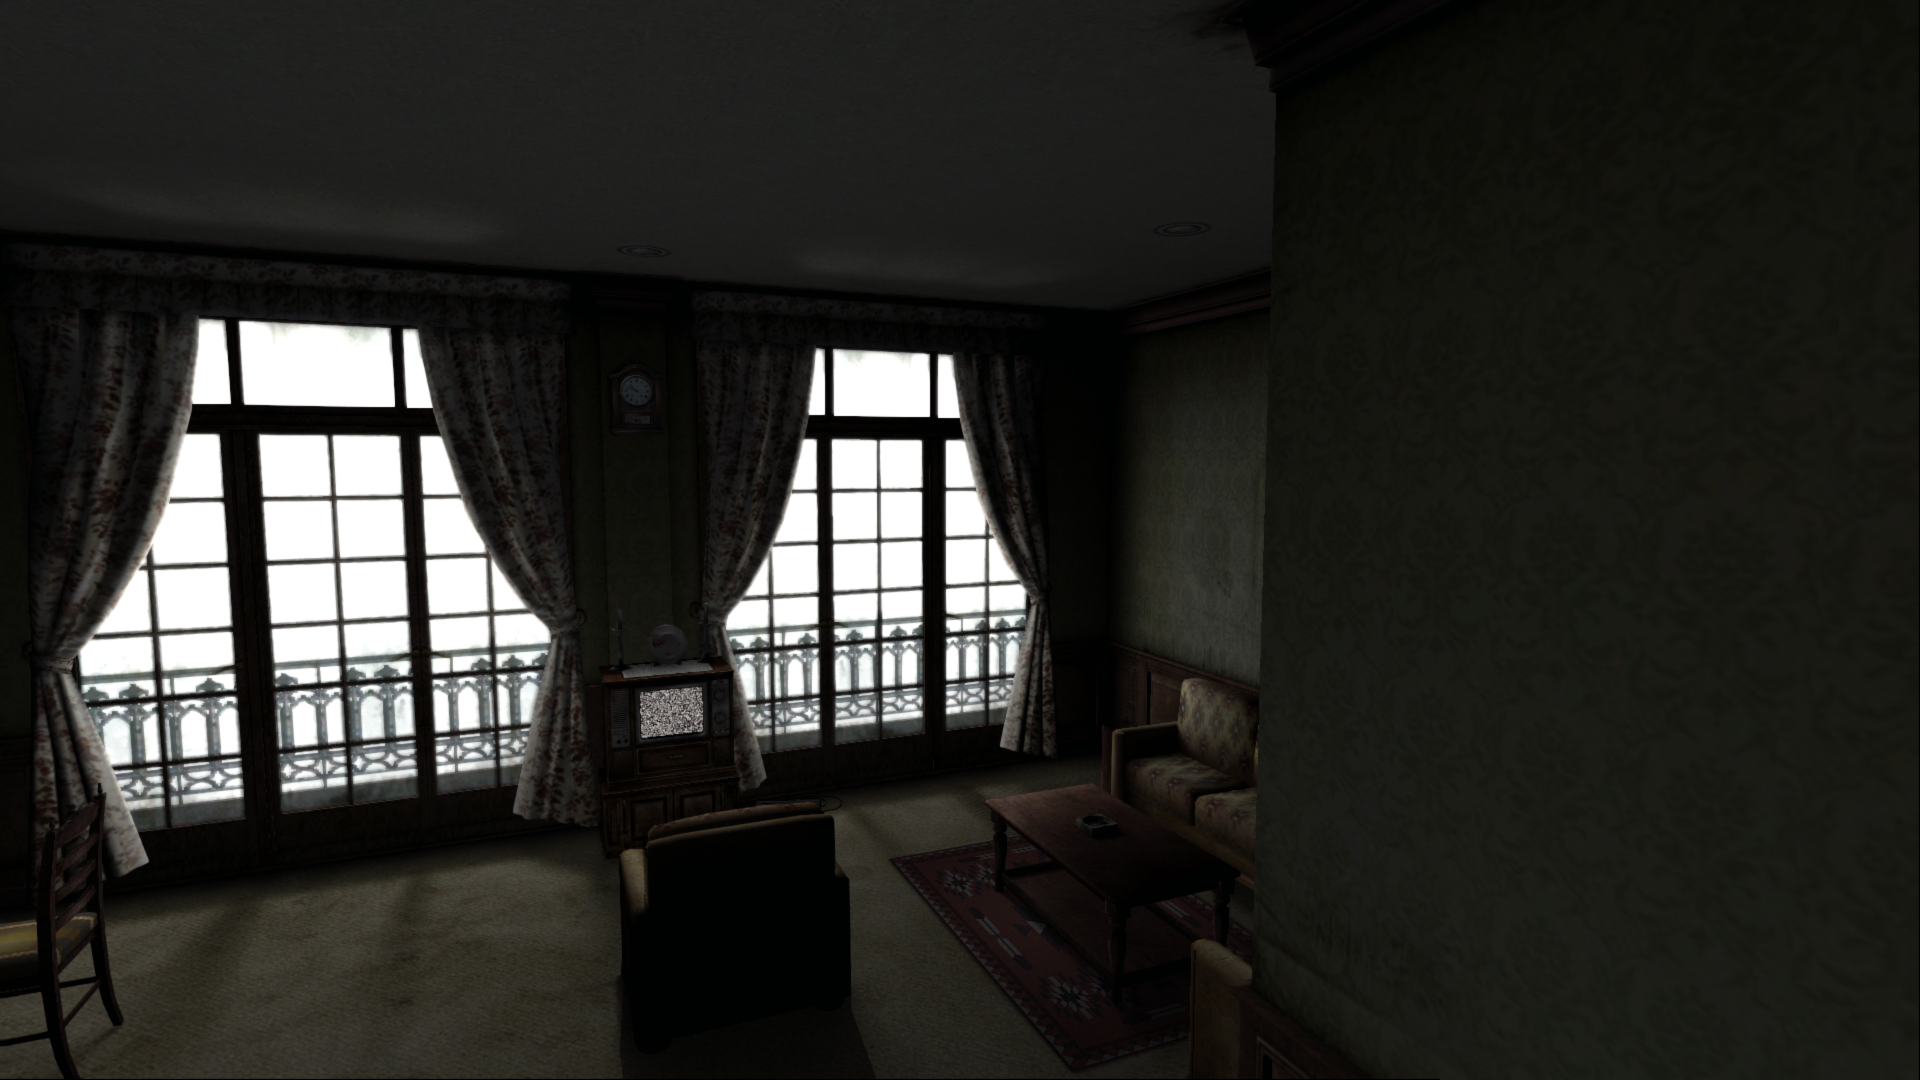
This fix involves modifying the alpha channel for the top-most glass windows to remove the shadow bug by making the bottom-half of these particular glass windows fully transparent.
PC adjusted:
Polymega
on 1 Jan 2019
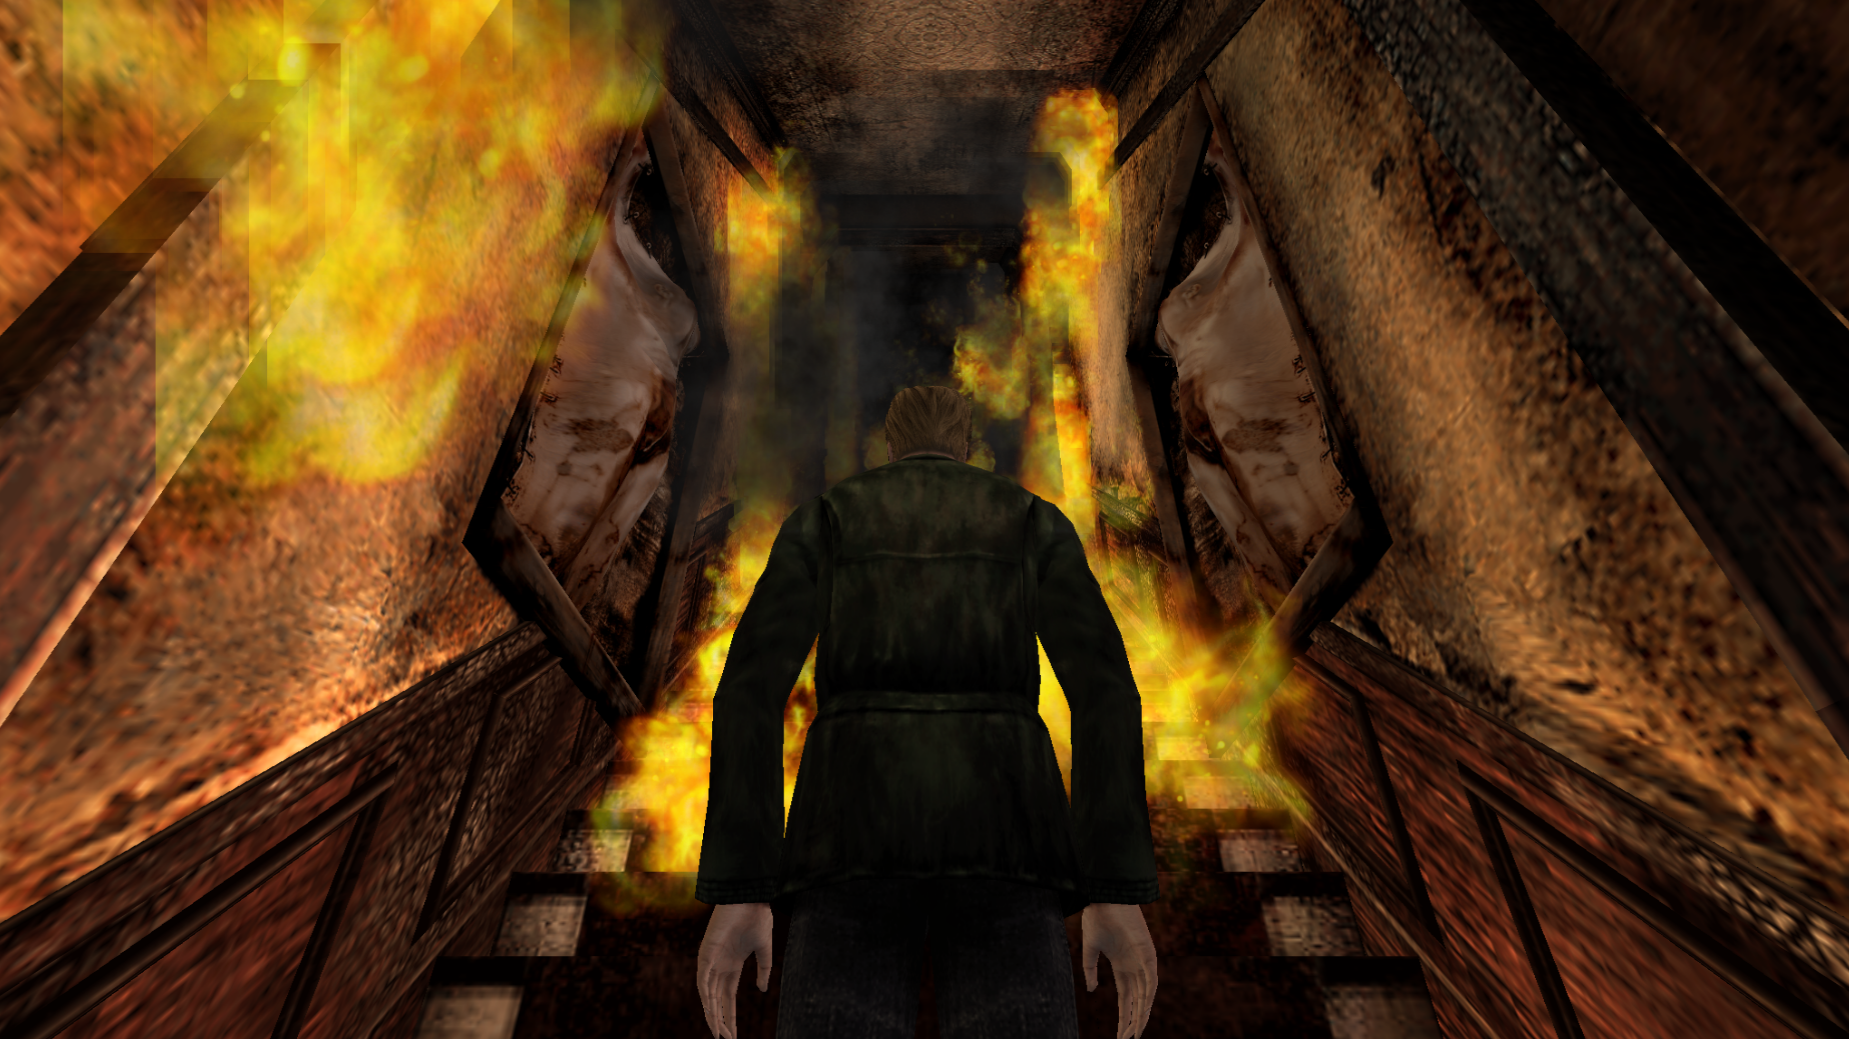
ru21.map
_This will be released with v1.0.3 of the "Enhanced Edition Essential Files" (not yet published)_
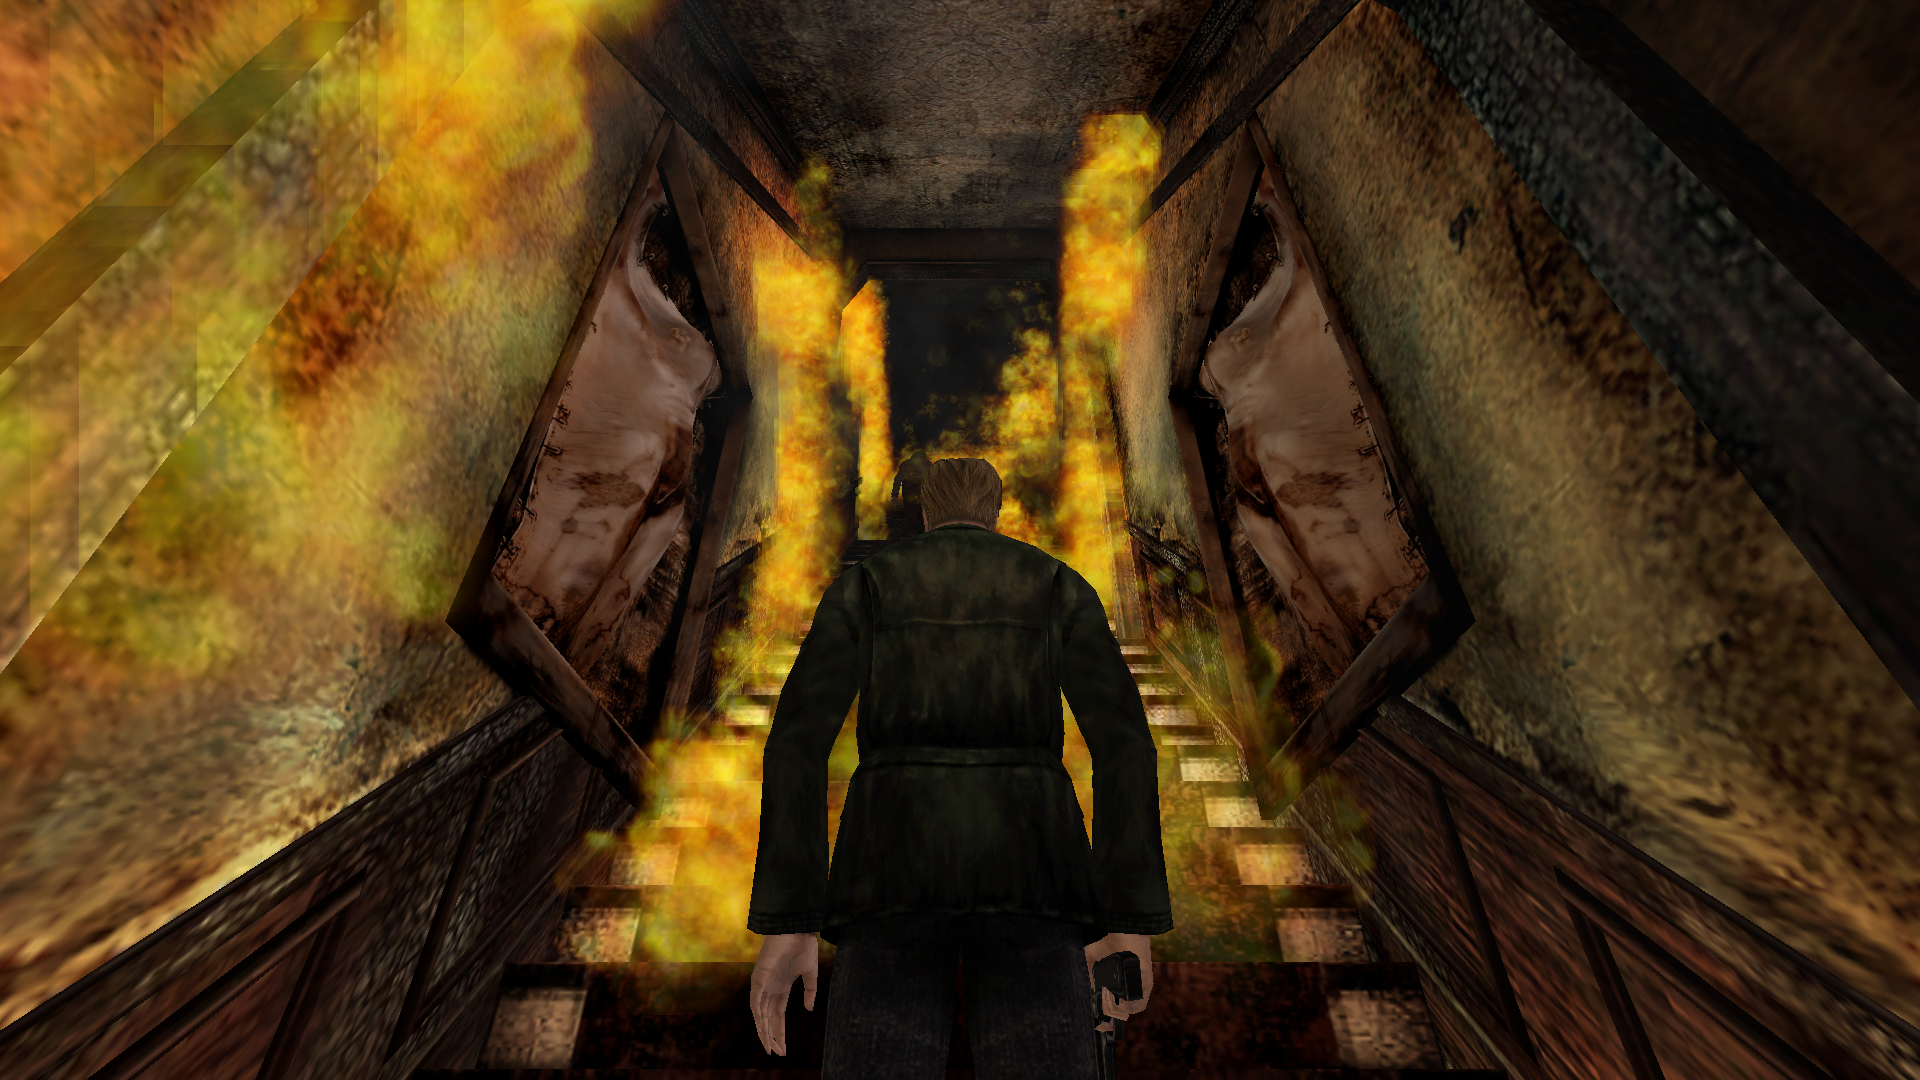
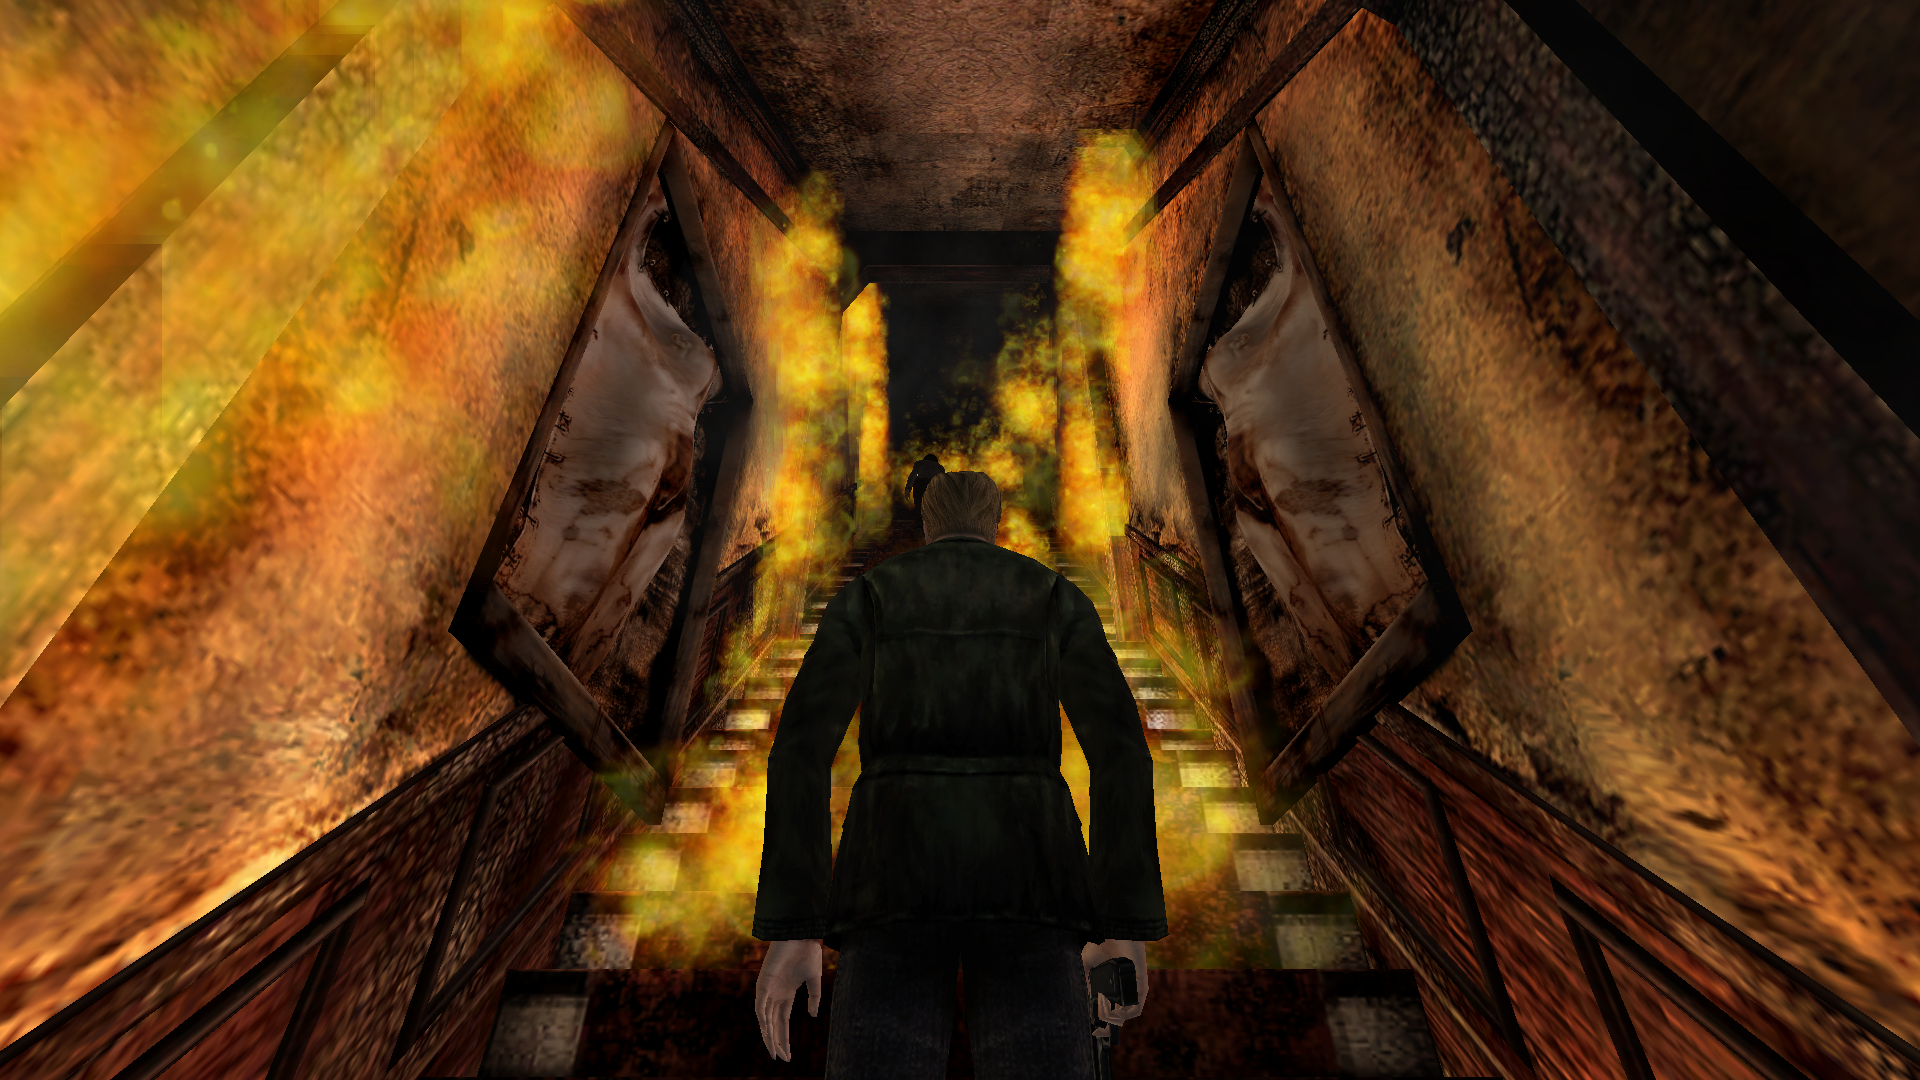
This room has been color-corrected to better match the PS2 version, which looks nicer as it is warmer in tone (which makes sense since there's a fire going on in here and all...)
Before:
After:
PCSX2:
Polymega
on 8 Jan 2019
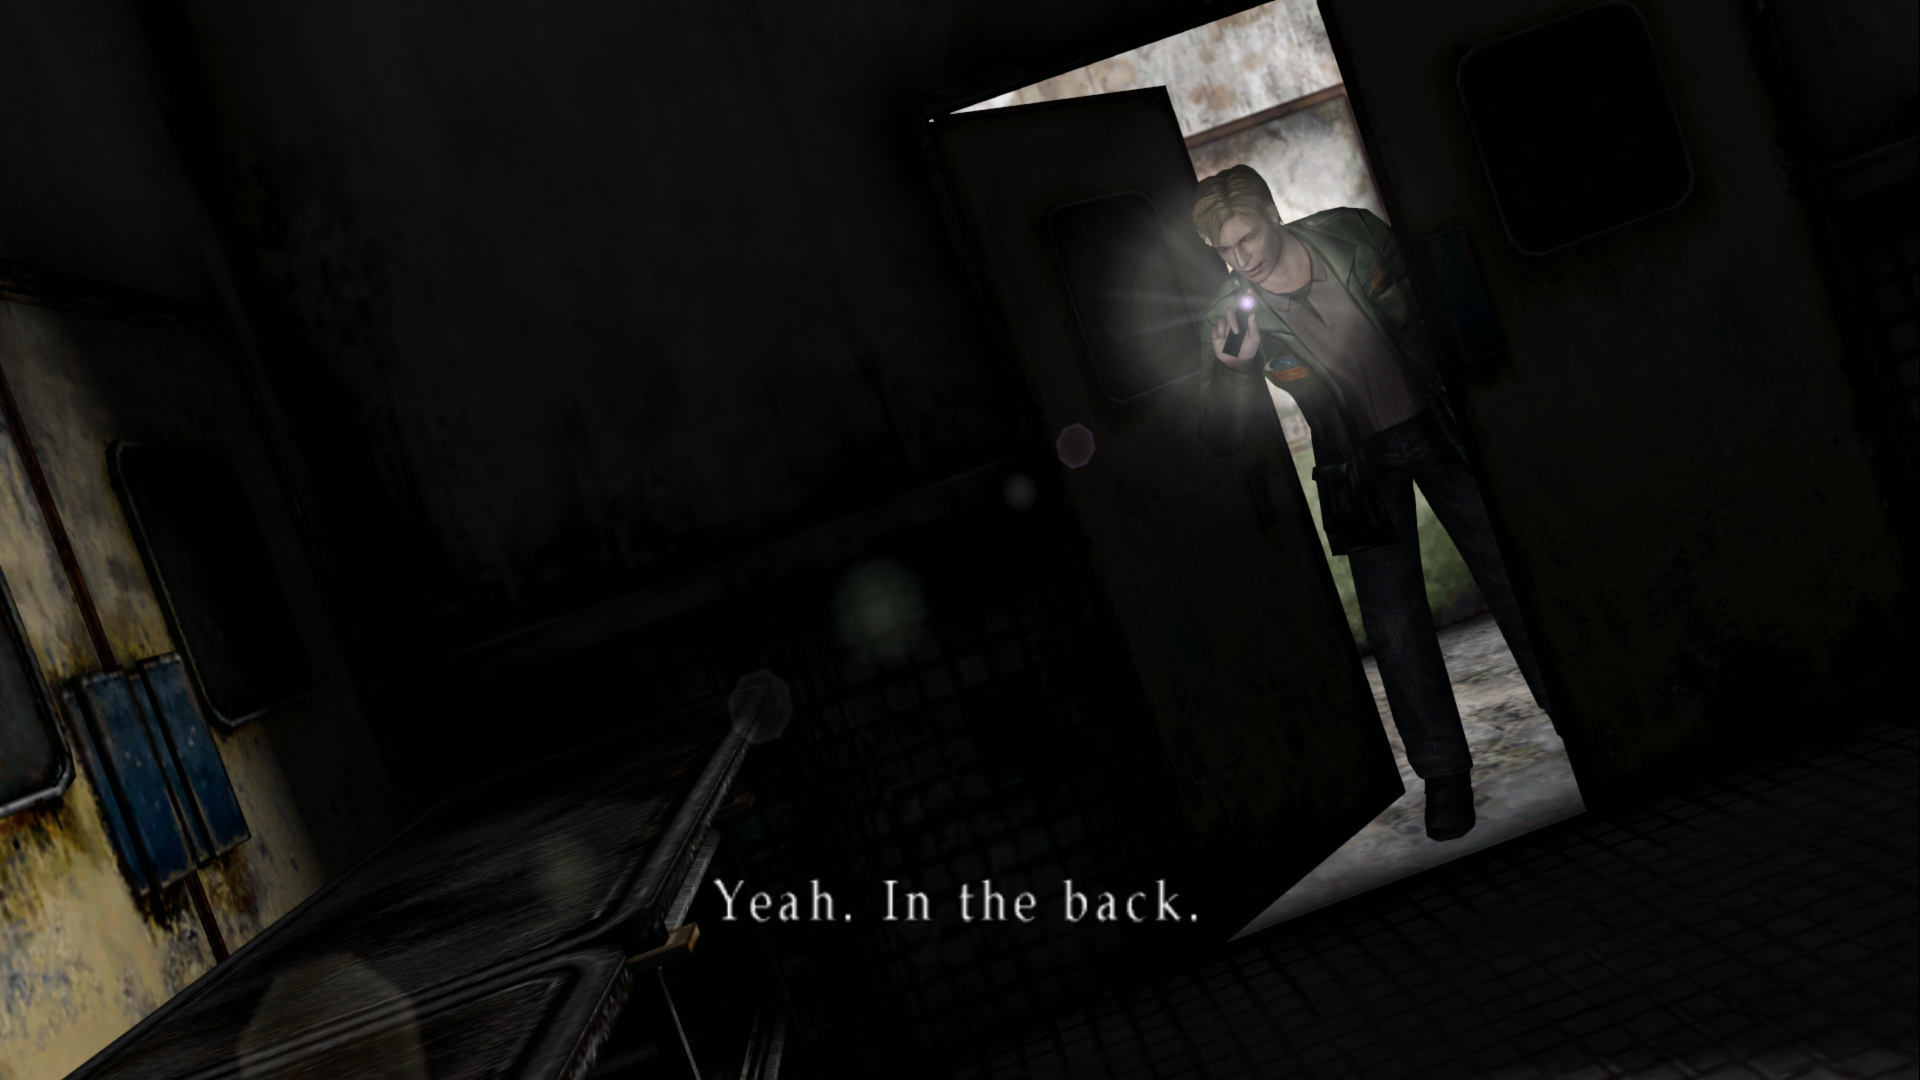
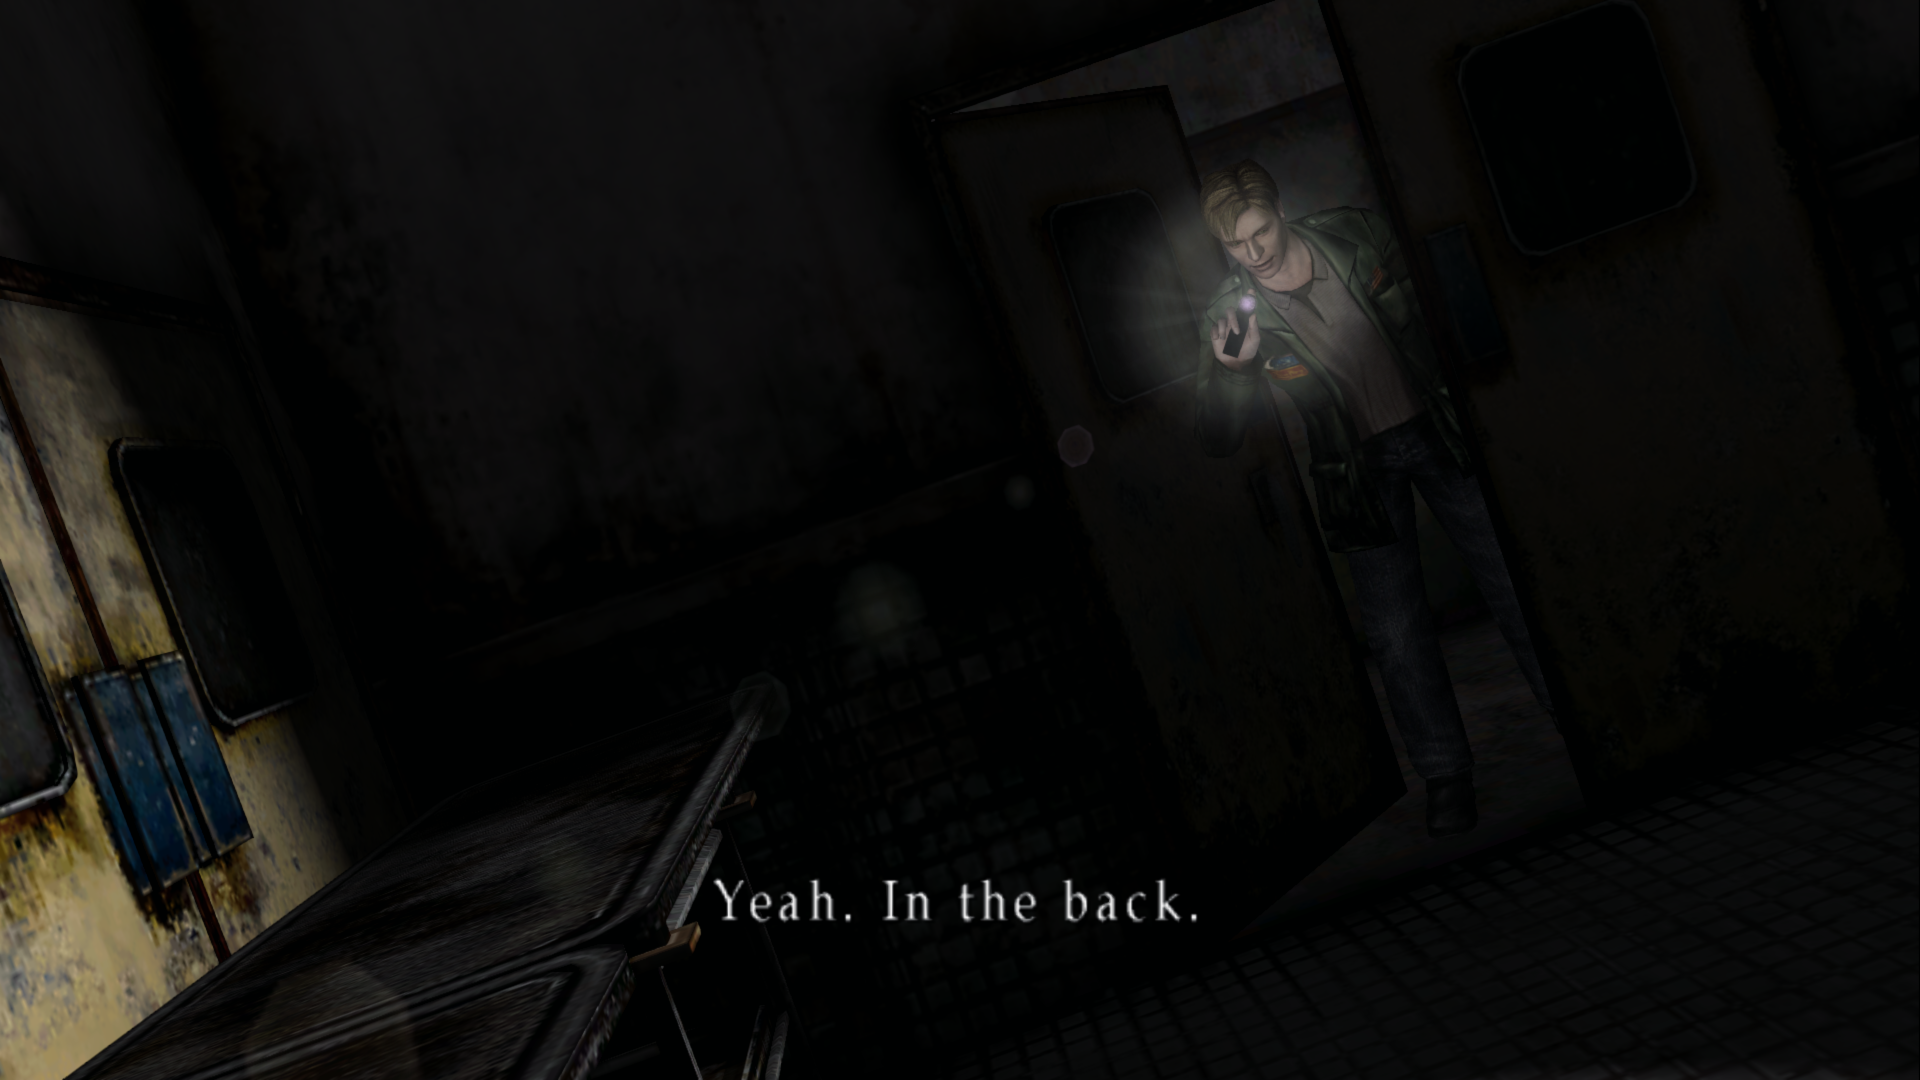
hp37.map
I also darkened the hallway outside of this room because it doesn't make sense otherwise: Laura surely didn't find a light switch and flick it on instantly after opening the door for James. Additionally, light should spill into this room otherwise which we can't achieve through the game engine:
Before:
After:
Polymega
on 8 Jan 2019
Enhanced Edition Essential Files v1.0.3 has released
You can download it here:
http://enhanced.townofsilenthill.com/SH2/#installEssentialFiles
Update video # 2:
https://youtu.be/kHkCCIiH1_Y
There are some ASM fixes left in this thread to implement. Once those are checked in I'll close this thread.
Polymega
on 13 Jan 2019
Good job @Polymega, @Bigmanjapan, @FrozenFish24 and everyone else that contributed! This new update looks great. I know you guys are waiting on me for some of those ASM fixes. I'll try to get them done as soon as I can.
AeroWidescreen
on 13 Jan 2019
@AeroWidescreen, @Bigmanjapan, the camera position during a cutscene is stored in address 0x0094E064 on the SH2 NA v1.0 version of the game. I don't know what the address is for any other versions of the game and I don't want to hard code that address. I would like to find a way to get that address dynamically. Any idea how to programmatically get that address?
I need the address for this ASM code and for the Implementation of Self Shadows.
 elishacloud
on 14 Jan 2019
elishacloud
on 14 Jan 2019
Maybe like this?
You would use the address you moved the value to as a substitute for 0094E064 in whatever code you have.
004A04E4 jmp 00000000
00000001 mov ecx,[esp+08]
00000002 mov [address],ecx // moves value of ecx (camera position x) to address of your choice
00000003 mov edx,ecx
00000004 jmp 004A04EA
I don't know how you usually handle this issue. The address can also be found here:
004A04EC 0094E064
004A0567 0094E064
AeroWidescreen
on 14 Jan 2019
Thanks to you for these particular fixes as well, Aero_! If you hadn't taught me how to hex inject the new textures and figure out how to preserve alpha edges I'd still be scratching my head over it to this day.
Polymega
on 14 Jan 2019
The address can also be found here:
004A04EC 0094E064
004A0567 0094E064
Thanks @AeroWidescreen, that is exactly what I needed. Not sure why I missed it!
elishacloud
on 14 Jan 2019
@Polymega, I finished implementing the FogParameterFix mentioned here.
Here is the test module: d3d8.zip
elishacloud
on 18 Jan 2019
Thanks, Elisha! I tested the fix on all three executable versions.
The FogParameterFix adjusts the fog-of-war for two parts of the game so far:
1) Angela in the apartment cutscene
2) Blue Creek Apt Rm 208-209
The fix is working great for the first area (Angela cutscene) but doesn't seem to be affecting the second (Blue Creek room). If it helps, for v1.0, the room ID for Blue Creek Room 208-209 is 00000028.
Lastly, after seeing the first part of the fix (the Angela in the apartment cutscene) in action, may I ask for the two float values that affect this cutscene to be changed?
- Change the 2500 value to 2200
- Change the 2600 value to 2800
This spaces out the fade effect of the fog-of-war more to look nicer but without having it "bleed" into the room still.
Thank you, sir.
Polymega
on 18 Jan 2019
Ok, try this one below. I was using cutscene ID rather than room ID.
Test module: d3d8.zip
elishacloud
on 19 Jan 2019
Ok, try this one below. I was using cutscene ID rather than room ID.
Completely perfect for both areas now! Many thanks again, Elisha!
There's one more ASM fix left in this thread that Aero_ will script out for you in the future. Once that's implemented, all fixes/adjustments for this thread will be accounted for!
Polymega
on 19 Jan 2019
Checked in the code for FogParameterFix. See 5159093.
elishacloud
on 19 Jan 2019
@elishacloud
There's one more ASM fix left in this thread that Aero_ will script out for you in the future. Once that's implemented, all fixes/adjustments for this thread will be accounted for!
01D83574 = Piston location address
esi*4+01D83570 = original pointer used by game
You're going to need to use this address multiple times throughout the code. There's no other way as far as I know.
0058312E 01D83570 (+4)
005814EB 01D83570 (+4)
00581500 01D83570 (+4)
And now for the actual code...
```
005814D9 jmp 00000000
00000000 push eax
00000001 call 004A02B0 // moves cutscene ID to eax
00000002 cmp eax,44
00000003 jne 00000016 // jumps if not final "Abstract Daddy" cutscene
00000004 lea eax,[esi*4+01D83570]
00000005 cmp eax,01D83574
00000006 jne 00000016 // jumps if not piston location address "01D83574"
00000007 cmp dword ptr [CONDITION],01
00000008 je 00000011 // jumps if all conditions have already been met
00000009 cmp [0094E064],469E6CD4
00000010 jne 00000016 // jumps if camera position x is not 20278.41
// jumps here if all conditions have been met
00000011 pop eax
00000012 mov [CONDITION],00000001 // indicates all conditions have been met
00000013 mov [PISTON],40200000 // writes 2.50 float to address of your choice
00000014 fadd dword ptr [PISTON]
00000015 jmp 005814E0
// jumps here if not all conditions have been met
00000016 pop eax
00000017 mov [CONDITION],00000000 // indicates not all conditions have been met
00000018 fadd dword ptr [esi*4+01D83570] // original pointer
00000019 jmp 005814E0
AeroWidescreen
on 20 Jan 2019
Similar to the Eddie boss room fix, naming this fix will be important to not spoil anything. My recommendation:
PistonRoomFix = 1 // Hides a piston behind a door that should not be seen during a cutscene.
Polymega
on 28 Jan 2019
@AeroWidescreen, for some reason I cannot get this ASM to work. This causes all the pistons to be frozen in place at all times while in this room. Can you take a look at my fix?
Here is the download: d3d8.zip
_Note: the addresses are hard coded for this test build so you will need to use v1.0._
elishacloud
on 19 Feb 2019
@elishacloud
This is what your code looks like:
00000000 - push ecx
00000001 - push eax
00000002 - mov eax,[650EC008]
00000003 - cmp dword ptr [eax],44
00000004 - jne 650A5EAA
00000005 - mov ecx,[650EC058]
00000006 - lea eax,[esi+ecx]
00000007 - cmp eax,[650EC058]
00000008 - jne 650A5EAA
00000009 - cmp dword ptr [650EC050],01
00000010 - je 650A5E88
00000011 - mov eax,[650EC00C]
00000012 - cmp [eax],469E6CD4
00000013 - jne 650A5EAA
00000014 - pop eax
00000015 - mov [650EC050],00000001
00000016 - mov [650EC054],40200000
00000017 - fadd dword ptr [650EC054]
00000018 - pop ecx
00000019 - jmp dword ptr [650EC05C]
00000020 - pop eax
00000021 - mov [650EC050],00000000
00000022 - mov ecx,[650EC058]
00000023 - fadd dword ptr [esi+ecx]
00000024 - pop ecx
00000025 - jmp dword ptr [650EC05C]
Line 6 and Line 23 are the main problem. You're basically doing [esi+01D83574], when it should be [esi*4+01D83570]. Here's how you can fix it:
Line 5 and Line 22 should point to 01D83570, not 01D83574. Be careful here, because those aren't the only places you've used this pointer. You only want to change this for Line 5 and Line 22.
00000005 - mov ecx,[01D83570 POINTER]
00000022 - mov ecx,[01D83570 POINTER]
Then Line 6 becomes..
00000006 - lea eax,[ecx+esi*4]
Then Line 23 becomes..
00000023 - fadd dword ptr [ecx+esi*4]
AeroWidescreen
on 19 Feb 2019
@AeroWidescreen, thanks for the comments!
I have two questions:
- What is the differnce between
[esi+01D83574]and[esi*4+01D83570]? - For line 5 and 22, shouldn't it be
mov ecx,[01D83574 POINTER]rather thanmov ecx,[01D83570 POINTER]?
elishacloud
on 19 Feb 2019
What is the difference between
[esi+01D83574]and[esi*4+01D83570]?
I believe the confusion is that you think this is what's happening: esi*(4+01D83570)
The asterisks is known as a "scaling factor". Apparently it indicates the array size. I'm not too familiar with it myself, but you can read more about it here: http://www.c-jump.com/CIS77/ASM/Addressing/lecture.html
A quote from the link in question:
- 1 for byte arrays (no scaling needed),
- 2 for word arrays,
- 4 for doubleword arrays,
- and 8 for quadword arrays.
This is how it works in our case:
esi*2
02 + 01D83570
04 + 01D83570
06 + 01D83570
08 + 01D83570
esi*4
04 + 01D83570
08 + 01D83570
0C + 01D83570
10 + 01D83570
esi*8
08 + 01D83570
10 + 01D83570
18 + 01D83570
20 + 01D83570
For line 5 and 22, shouldn't it be mov ecx,[01D83574 POINTER] rather than mov ecx,[01D83570 POINTER]?
The function uses [esi*4 + 01D83570] to get the piston addresses, so that's why we move 01D83570 to ecx.
Whereas 01D83574 is the address that controls the movement of the specific piston we're trying to change. It's one of the many addresses the game gets from that pointer I mentioned above.
We can't change this address directly due to it being overwritten constantly, so that's why we're usinglea eax,[ecx+esi*4], so we can exclude 01D83574 from the list and change its value to whatever we want without affecting the other addresses.
AeroWidescreen
on 20 Feb 2019
Thanks for the detailed explanation @AeroWidescreen! My total knowledge of ASM comes from about 2 hours of YouTube videos! :-) Anyways I think I have it fixed now.
elishacloud
on 20 Feb 2019
PistonRoomFix checked in. You can see the code for it here.
elishacloud
on 26 Feb 2019
I managed to convert the DXT1 (1 bit alpha) butterfly texture to a DXT3 (explicit alpha) texture. This now allows us to use anti-aliasing for the alpha channel:
Before:

After:

Here's what I did:
I first opened \data\pic\effect\fly1.tbn2 (the butterfly texture) with the SH Texture Explorer. It told me it's a DXT1 DDS file at 64x64 pixels.
I made a blank, dummy file in Photoshop with these requirements and saved it out. Then, I opened fly1 in a hex editor. I copied all data after the header lines and pasted it into the DDS dummy file I made, using the DXT1 header already inside it, and saved it out.
I was then able to open the DDS file in Photoshop. The RGB is a simple, flat color and here is what the alpha looks like for it:

As a quick test, I made a new alpha channel with anti-aliasing and saved this one out as a DXT3 DDS (with explicit alpha):

I then copied the header lines from fly1.tbn2:

And searched for the lines within ap.map to find out where the true butterfly texture is called for in this area.

Now that I found that, I pasted the new texture data into this area, which increased the texture data from a length of 800 to 1000 (due to bumping it up to DXT3). I ran the game and got this result:

Not so good... So I needed another texture to compare it to, because perhaps there's something in the header I need to update since I upgraded the texture to DXT3.
The butterfly texture is 64x64 pixels, uses a 1-bit alpha channel, and is saved as DXT1. The footstep texture, \data\pic\effect\footmark.tbn2 (what you see between loading screens) is 64x64, using an explicit alpha, and is DXT3.
Since the footstep texture is the same size as the butterfly texture and is already using the alpha type we want, I compared its header to fly1 (within ap.map, of course):

Next I compared each header, changing anything different in the fly1 data byte-by-byte, to what was in the footmark file, working backwards.
I changed this particular byte to 04 (same as what's in footmark) and got some positive results:


It looks buggy, of course, but it at least looks better. Now, going off that particular byte, I played with the numbers until I used 02 which gave me the correct, final result (seen in the image near the top).
I'll do a more thorough play test of this later, to make sure it won't crash anything elsewhere by adding 200 800 lines into the ap.map file, but I wanted to share with anyone else who'd be curious about this. And, of course, I'm going to go back and make the texture look a lot nicer once I know this will work without issue.
Edit: Here's the new alpha; taken from the PS2 version and slightly modified:

Polymega
on 19 Mar 2019
It's cool to see that you're getting better at this. Trial and error and data comparisons are usually how I do it as well.
I'll do a more thorough play test of this later, to make sure it won't crash anything elsewhere by adding 200 lines into the ap.map file
I know from editing the map textures that you can increase their size by a small amount, but once you go too high it'll start corrupting other textures and then completely crash. I guess it depends on how much empty space there is between each chunk of data in memory, assuming there's any space at all.
AeroWidescreen
on 20 Mar 2019
With the implementation of the XInputVibration fix the game will consistently crash when loading a save file within the apartments when using the edited .map file I made to fix the butterflies. So for now, I'll remove this file from the next update.
Hell, I don't know what's going on anymore with this one. I loaded many save files when I first improved the butterfly texture and there was no issue. Now it'll crash on an apartment save file load even using older builds of the project. So it's 100% the modified ap.map causing that and nothing else.
Polymega
on 29 Mar 2019
Hi @FrozenFish24 ,
Question for you sir: When you alter/add geometry to the .map files as you've done it must surely change the length of data? If so, how are you able to change the file length without the game crashing from these memory size adjustments? Does it just happen to work without issue or are you changing something in the overall .map header?
The reason I ask is because, if you look three posts up, I was able to restore the dynamic, flying butterflies texture back to how it should look by changing the texture type from DXT1 to DXT3. This allowed me to use an explicit alpha channel instead of a 1-bit alpha. Anyway, when I did this, it doubled the size of its texture data.
At first nothing seemed wrong from doing this in my tests but that ultimately didn't turn out to be the case. If I load a non-apartment level save file then load into a save file that's within the apartment level the game will more-often-than-not crash during that load. The culprit being the modified ap.map file I made to fix the butterflies.
Long story short: Is there a secret to changing .map data lengths while still having the game behave nicely?
Polymega
on 30 Mar 2019
@Polymega
There is a field for the total size of the MAP at the beginning of the file you'll need to update:

In addition to your change you should probably also update these two fields in the texture's header, I believe these are the length of the texture data and the length of the data + 0x10 (padding bytes):

FrozenFish24
on 31 Mar 2019
Hmm... I still get crashes when using the edited ap.map file with these adjustments. Here's how I'm triggering the crash:
- Place the edited
ap.mapfile into\sh2e\bg\ap\ - Do the following: https://www.youtube.com/watch?v=iSXPjegTBEc
(notice how it only crashes when loading a file within the apartment area)
May I ask you to look over my work? The files below have already applied your suggested header edits:
- Edited ap.map file: ap.zip
- Edited butterfly tbn2 texture: fly1.zip
- Edited butterfly DDS texture: fly1.zip
Worth mentioning that this butterfly texture is also used in one other area: An attack by the final boss in the final area of the game located in ru.map.
Polymega
on 31 Mar 2019
That's pretty strange, your map doesn't want to crash my game.
See if this change helps, it looks like this whole line might be a parent header containing another length field that needs to be increased:

FrozenFish24
on 31 Mar 2019
Nice! That seems to have fixed it. Thank you. :)
For ru.map, I obviously repeat the butterfly header for that, but do I also adjust the overall map header to the suggested edits you posted? Or should those be different for ru.map?
Polymega
on 31 Mar 2019
Great!
Yep, the overall map header value will be different, here's the new value for ru.map:

If you're wondering how I'm getting this, it's just the new total size of the MAP file (in bytes) as a little-endian 32 bit value. So 0x271600 bytes long, becomes 00 27 16 00 then flip endianess to get 00 16 27 00.
FrozenFish24
on 31 Mar 2019
Thank you again!
If you're wondering how I'm getting this, it's just the new total size of the MAP file (in bytes) as a little-endian 32 bit value. So 0x271600 bytes long, becomes 00 27 16 00 then flip endianess to get 00 16 27 00.
Excellent! Thank you for also explaining the method to finding the new overall .map header length. While I'm still very much a rookie in all of this, I like to try and understand the methodology as best I'm able. :)
Polymega
on 31 Mar 2019
This monster thread has gone on long enough. When the time comes, we can make a new one to start fresh. Beautiful work by all involved here!!
An update has been released with this fix in it. See v1.3.1340.0
Polymega
on 18 Apr 2019
Related issues
 silentdream21
·
8Comments
Polymega
·
18Comments
silentdream21
·
8Comments
Polymega
·
18Comments
 Psycho-A
·
16Comments
Polymega
·
14Comments
Psycho-A
·
16Comments
Polymega
·
14Comments
 OregonPacifist
·
15Comments
OregonPacifist
·
15Comments
Most helpful comment
ob01.map
_This will be released with v1.0.3 of the "Enhanced Edition Essential Files" (not yet published)_
Okay, this will surely be a touchy one for some so I'm going to explain the changes in great detail for this.
Before I begin, I'll say if you wish to NOT use this adjustment simply remove
ob01.mapfrom the\KONAMI\Silent Hill 2\sh2e\bg\ob\folder.One thing I'm sure any veteran fan of this game has noticed over the decade is the poorly-seamed together Toluca Lake image at the beginning of the game:
While most of these oversights are never actually seen in-game there are a few of these problem spots that are very evident while playing:
So I decided to clean up this image for a more polished presentation:
Before:
After:
A couple things worth noting:
The Toluca Lake image you see is based off a real life location. Specifically: Derwent Water in Keswisk, England:
So when creating this new image I _only_ used actual photos of Derwent Water found here:
https://stock.adobe.com/images/derwent-water-from-castlehead-viewpoint/163063267
https://stock.adobe.com/images/derwent-water-from-castlehead-viewpoint/163063113
https://stock.adobe.com/images/view-from-surprise-view-near-derwentwater/108640606
https://upload.wikimedia.org/wikipedia/commons/e/eb/Derwent_Water%2C_Keswick_-_June_2009.jpg
https://upload.wikimedia.org/wikipedia/commons/d/d0/Derwent_Water_Panorama%2C_Lake_District_-_June_2009.jpg
The next thing to note is the bottom of the image: You pretty much never see any of this in the game. In fact, here's a visual breakdown of what you actually see of this texture while playing; the red regions are what you'd see in-game:
...and so this is all you'd see in the new image as well:
Because of this, I didn't worry much about how the bottom portion looked. I honestly didn't need to design anything down there but decided to make it look consistent with the rest of the image. In summary: Don't fret over the bottom part as you'll never see it while playing.
Here are some in-game screen shots:
Before:
After:
Before:
After:
Before:
After:
Before:
After:
Before:
After:
After (In-game Panorama)
And again: If you wish to NOT use this adjustment simply remove
ob01.mapfrom the\KONAMI\Silent Hill 2\sh2e\bg\ob\folder.