Retroarch: Icon positions for Buttons A, B, X, Y do not match up with the text of the button for XBOX 360 controller
Description
Icon positions for Buttons A, B, X, Y do not match up with the text of the button for XBOX 360 controller.

Expected behavior
I would expect the buttons to match up properly, looks like someone made a mistake putting the icons to the button text.
Actual behavior
The buttons show the wrong button position for the button.
Steps to reproduce the bug
- Have an XBOX 360 controller plugged in.
- Load any core.
- Load any game.
- Go to the "Controller" settings to map buttons for the controller.
Look at buttons A, B, X, and Y and compare the red dot on the icons to where the actual button is placed on the controller, and see that the icons are all mixed up and incorrect.
Bisect Results
I don't know how long this has been an issue for, I am a new user, but having the icons visually show the incorrect button position is super annoying, and should be a super easy fix, just relink the images to correspond properly with the actual controller.
Version/Commit
You can find this information under Information/System Information
- RetroArch: [version/commit]
Git version: 8bcd74bf42
Environment information
- OS: Manjaro
- Compiler: GCC (9.3.0) 64-bit
 BugReportering
All 22 comments
Those face buttons are by default in RetroPad order, as in SNES order.
But with the proper xinput autoconfig files they show up as expected:

 sonninnos
on 29 May 2020
sonninnos
on 29 May 2020
I have autoconfig controllers option enabled. If that's not the "proper autoconfig" then where does one acquire it?
BugReportering
on 31 May 2020
Apparently they are not included in all versions, but they are on Windows build.
Running Main Menu > Online Updater > Update Joypad Profiles should do it. Or manually getting https://buildbot.libretro.com/assets/frontend/autoconfig.zip and unzipping it under autoconfig directory.
sonninnos
on 31 May 2020
I pull them direct from the repo on Mint and my labels still show up in the Nintendo layout instead of the standard one.
 Sanaki
on 31 May 2020
Sanaki
on 31 May 2020
@Sanaki what driver/profile are you using? I see the xboxgamepad (userspace driver) udev profile doesn't have button labels, but that's easy enough to add.
 hizzlekizzle
on 31 May 2020
hizzlekizzle
on 31 May 2020
That may be all it is then.
[INFO] [udev]: Plugged pad: Microsoft X-Box 360 pad (1118:654) on port #0.
[INFO] [udev]: Pad #0 (/dev/input/event22) supports force feedback.
[INFO] [udev]: Pad #0 (/dev/input/event22) supports 16 force feedback effects.
[INFO] [Joypad]: Found joypad driver: "udev".
Hmm, looks like it's using this one, which does have labels: https://github.com/libretro/retroarch-joypad-autoconfig/blob/master/udev/Microsoft%20X-Box%20360%20pad.cfg
hizzlekizzle
on 31 May 2020
Linux issue perhaps? I feel like it did work at one point, so I can attempt a bisect later and see what I see.
EDIT: Went back as far as I used retroarch (1.7.8), no change.
See my comment below.
Sanaki
on 31 May 2020
Despite the discussions, I do not feel this issue is solved.
BugReportering
on 16 Jun 2020
Your initial issue is not an issue. Google the button layout for an SNES controller, this is what the Retropad is like. So the bottom button is B (A on XBox), right is A (B on XBox), and similarly the X and Y are swapped. This is why Retroarch tells you the position of the button when you go to bind it, so that you bind the XBox controller's A button (bottom) to Retropad's B button (bottom).
 NilsBloodaxe
on 10 Nov 2020
NilsBloodaxe
on 10 Nov 2020
Ah, I never replied on this issue. So my confusion at the time came from manually overriding inputs rather than relying on an autoconfig. The labels correctly apply to autoconfig, but there's no way for them to show on manual inputs accurately, so they don't. Fixing it was as simple as resetting to default controls after a viable autoconfig was present for my controller. The same appears to be true of the original posted issue, based on lack of Auto being shown.
Sanaki
on 10 Nov 2020
Your initial issue is not an issue. Google the button layout for an SNES controller, this is what the Retropad is like. So the bottom button is B (A on XBox), right is A (B on XBox), and similarly the X and Y are swapped. This is why Retroarch tells you the position of the button when you go to bind it, so that you bind the XBox controller's A button (bottom) to Retropad's B button (bottom).
I politely disagree with your assessment.
BugReportering
on 19 Nov 2020
It should show images that are analogous to the controller you are using, not to a controller you are not using. This would make more sense.
BugReportering
on 19 Nov 2020
It does:

hizzlekizzle
on 19 Nov 2020
It does:
It doesn't. I already posted pictures.
BugReportering
on 19 Nov 2020
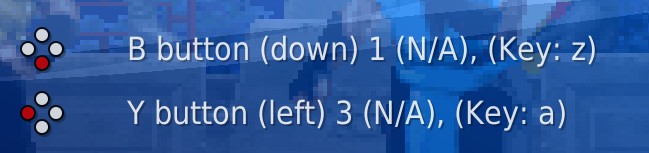
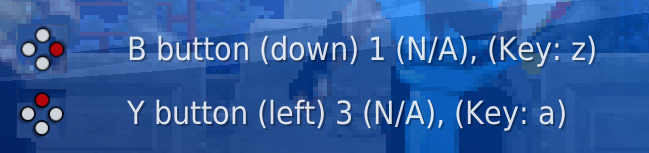
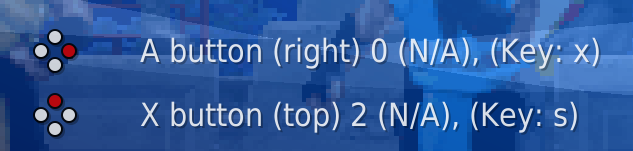
Red dot showing down in the diamond of buttons in RetroArch image shows button B, yet on XBOX360 controller is button A.
Red dot showing left in the diamond of buttons in RetroArch image shows button Y, yet on XBOX360 controller is button X.
Red dot showing to the right in the diamond of buttons in RetroArch image shows button A, yet on XBOX360 controller is button B.
Red dot showing up in the diamond of buttons in RetroArch image shows button X, yet on XBOX360 controller is button Y.

BugReportering
on 19 Nov 2020

This is what should be shown.
BugReportering
on 19 Nov 2020
"(down) (left) (right) (top)" now seem unnecessary, else if necessary should be updated as well.
BugReportering
on 19 Nov 2020
You should likely reread my last comment. You're using manually set button controls in Settings > Input, which overrides the labels that would be loaded by the autoconfig. If you clear those bindings and rely on autoconfig, it'll show correctly. This is user error, not an actual bug.
Sanaki
on 19 Nov 2020
You are misunderstanding everyone that has replied to you, including me, so let's try this again, with a much more detailed explanation. I apologize for the length, but I hope that a detailed explanation of what is going on will get you to understand why this is not a bug (hell, it's a feature, and a good one at that).
The button labels as listed in RetroArch are the button names for the RetroPad, the VIRTUAL controller, not your actual controller. This is the intended behavior as you can bind whatever you want to those virtual buttons be it buttons from a gamepad, keys on a keyboard, etc. As said before, the face buttons on the virtual RetroPad are based on the layout of the SNES controller not on the XBox controller.
Think about a DualShock controller like the PS3 or PS4. The buttons are square (left), triangle (top), circle (right), cross (down). There is no A, B, X, or Y. If you wanted to bind these buttons in the standard fashion to the Retropad virtual controller, you would bind the square on the actual controller to the Y button on the virtual Retropad controller, triangle to X, circle to A, and cross to B. Again, these virtual Retropad button labels are abstractions used to ensure proper configuration for inputs across all cores you want to use.
Now let's look at some examples of how this works. Let's say you wanted to play an SNES game in RA using your XBox controller. On the SNES controller A,B and X,Y are switched relative to the XBox controller. In order to have the proper layout corresponding to the SNES controller, the XBox A would have to be SNES B, XBox B is SNES A, XBox X is SNES Y, and XBox Y is SNES X. But your SNES core doesn't look directly at your XBox controller, it looks at the virtual RetroPad controller. And because of the way the Retropad is laid out this means that Retropad B is SNES B, Retropad A is SNES A, etc. So what you do is you bind XBox A to Retropad B which is then mapped to SNES B in your SNES core configs.
Similarly, if you were playing a Playstation game with your XBox controller, you want XBox A to be Cross, B=Circle, X=Square, Y=Triangle. But again there is the Retropad layer that sits between the controller and the Playstation core in RA. So the mapping connecting your A button to Cross would look like XBox A -> Retropad B (in RA) -> PSX Cross (in the appropriate core), at least by default (you can always change the behavior at either stage of the process either the mapping of the controller buttons to Retropad, or the mapping of the Retropad buttons to the core inputs).
The whole point of this abstraction layer of the Retropad is so that you can bind your physical controller ONCE to the virtual Retropad controller so it will work appropriately based on the per core input defaults (which are based on the Retropad layout) no matter what core you want to use, without having to rebind physical buttons per core. That is, I can switch from a SNES game to a PSX game and the buttons on the physical controller will work exactly as expected since the cores aren't looking at the physical controller buttons, but the virtual controller buttons.
We can look at your set-up as you have in these pictures and apply it to a game example:

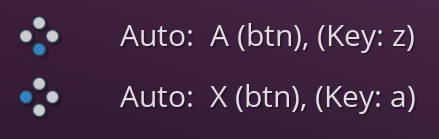
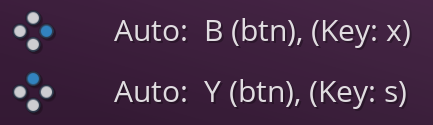
Consider the first line, "B button (down) 1(N/A), (Key:z)". The "B button (down)" part is the label for the virtual Retropad button, "1" is the number of the physical button as reported by your Xinput drivers in Linux (and button 1 in Xinput is the physical B button on the controller), and "(Key: z)" is of course the keyboard mapping (we can ignore the "(N/A)" part after the 1 for these purposes). Note that this means you have not configured your buttons "correctly" as the Retropad B button would normally be bound to button 0 (the A button on the XBox controller). You can test this by playing an SNES game like Super Mario World in RA. In SMW, the bottom button (SNES B button) is your standard jump and the right button (SNES A) is the spin jump. If you played with the controls as you have them set up in these pictures, they would be backwards. If you hit the A button on your XBox controller (down) you would spin jump and your B button (right) would do the standard jump.
Edit: Wanted to add something based on Sanaki's pictures in the previous comment. Note that in autoconfig files for controllers you can give a name to the buttons as reported by your controller drivers, like the "1 (N/A)" as reported by the controller drivers has been given the name "B (btn)" in the autoconfig for the XBox controller as seen in the pictures.
Edit 2: Removed the part about the red dot in the last paragraph. What I should have said is that the red dots in the diamond patterns are to show you what button in the diamond the RetroPad button is referring to so that you can bind the appropriate button based on your physical controller. That is, if you use a XBox controller you know to bind A to RetroPad B, if you are using a PS3 or PS4 controller you bind Cross to RetroPad B, if you are using a Switch controller you bind physical B to Retropad B, etc.
NilsBloodaxe
on 19 Nov 2020
@NilsBloodaxe Thank you for the explanation. Could you also explain then, how to revert my improper configs to proper configs so things work properly as you have suggested they can?
BugReportering
on 20 Nov 2020
You have two options. One would be to do as sonninnos said, and update your autoconfigs. This is under Main Menu, then Online Updater, then Update Controller Profiles. Then you just have to go into whichever virtual controller you want to set up (Port 1, Port 2, etc) in the Input settings, make sure it is set to use the XBox controller and then hit "Reset to Default Controls". This should load the proper autoconfig. If you go this way you should see something like "B button (down) Auto: A (btn)" for the B button (remember this B is the RetroPad B, not the XBox one), for example.
The other way is by manually binding your buttons. You can either bind them all with "Set All Controls" or bind individually for each RetroPad button. Most of the RetroPad buttons (start, select, the shoulder buttons, the triggers, and the joystick buttons), the d-pad, and both joysticks will correspond exactly with your XBox controller, so just put these in when prompted. You just have to remember to press A when it asks for the B button, B for A, X for Y, and Y for X. As mentioned before, this is the reason why the text (down), (left), (right), (up) and the diamond pattern with the red dots are added to these buttons, so you know which button it means in case you are using an XBox, DualShock, or any other controller that has the standard 4-face-button layout on the right but doesn't have the Nintendo-style labeling.
With non-standard layouts (eg, replica 6-button Sega Mega Drive/Genesis controllers) you may have to play around a bit to find the right settings for button layouts if there is no downloadable autoconfig.
One other thing to point out is that if you have multiple controllers hooked up, and you are using the autoconfig option above, you should use whichever controller is set to device #1 in Port 1, otherwise you will not be able to use the left analog stick to control the RA menu without manually rebinding the left analog stick as I reported here https://github.com/libretro/RetroArch/issues/11549#issue-740143153.
NilsBloodaxe
on 21 Nov 2020
Related issues
 sergiobenrocha2
·
4Comments
sergiobenrocha2
·
4Comments
 GoronMegaZord
·
3Comments
GoronMegaZord
·
3Comments
 hyarsan
·
4Comments
hyarsan
·
4Comments
 blackman91
·
3Comments
hyarsan
·
4Comments
blackman91
·
3Comments
hyarsan
·
4Comments