Node-red-contrib-homekit-bridged: Documentation
I've been thinking of ways I can contribute to this project - and I'm wondering if there would be much benefit to have a place to keep examples.
I'm thinking to create some example flows to share either in the docs or on the wiki page. These would include an example of each service type with inject and debug nodes on either side so users can easily see how things can be put together and what the format is for things.
I know that sending {"foo":"bar"} will list options in the debug but it's not always straightforward from there to see how things actually work. Additionally there is little information on how to use characteristic properties. Eventually this will likely be helpful for the coming combined services (I.e. adding battery level to another item).
A quick example of what I'm thinking is here - I would include a screenshot and a copyable flow for the user to then adapt to their setup.

[{"id":"ed2d8340.e1d5d8","type":"homekit-service","z":"7b43483c.39305","bridge":"d334490b.40dac","name":"Example Switch","serviceName":"Switch","topic":"","manufacturer":"Default Manufacturer","model":"Default Model","serialNo":"Default Serial Number","characteristicProperties":"{}","x":360,"y":160,"wires":[["5844674e.178708"]]},{"id":"8db975bc.c2e9d","type":"inject","z":"7b43483c.39305","name":"On","topic":"","payload":"{\"On\":\"true\"}","payloadType":"json","repeat":"","crontab":"","once":false,"onceDelay":0.1,"x":130,"y":120,"wires":[["ed2d8340.e1d5d8"]]},{"id":"5844674e.178708","type":"debug","z":"7b43483c.39305","name":"HomeKit Out","active":true,"tosidebar":true,"console":false,"tostatus":false,"complete":"payload","x":550,"y":160,"wires":[]},{"id":"629771.da7c409","type":"inject","z":"7b43483c.39305","name":"Off","topic":"","payload":"{\"On\":\"false\"}","payloadType":"json","repeat":"","crontab":"","once":false,"onceDelay":0.1,"x":130,"y":180,"wires":[["ed2d8340.e1d5d8"]]},{"id":"d334490b.40dac","type":"homekit-bridge","z":"","bridgeName":"Example Bridge","pinCode":"111-11-111","port":"","allowInsecureRequest":false,"manufacturer":"Default Manufacturer","model":"Default Model","serialNo":"Default Serial Number"}]
I don't know about everyone else but something like this would have gotten me going much quicker when I first picked up this node.
Any input about where to put this documentation or what could be added will be helpful, I'll be working on it in the coming weeks. We can use this issue as a discussion of how things should look.
 crxporter
All 134 comments
We definitely need this.
We have a wiki where you could add this.
Another thing is to add informations from official HomeKit docs. For example required and optional Characteristics and possible values.
Another thing is to write summary what you can achieve with what Service.
 Shaquu
on 4 Mar 2019
Shaquu
on 4 Mar 2019
Another thing is to add informations from official HomeKit docs. For example required and optional Characteristics and possible values.
Another thing is to write summary what you can achieve with what Service.
Both good ideas. I added these. They might be better off as two separate wiki pages, have one with the two tables (service and characteristics) then the other wiki page for examples. For now I'm just putting together some initial documentation.
I've just added a start to the wiki page on this. I'm not sure how to upload my screenshots - I believe they'll need to be added to a folder in the github repo then linked in the wiki page, is this correct?
Take a look here
Feel free to edit, add, rearrange, or tell me what you think should be changed. I'll be working on adding more examples over the next few days/weeks.
crxporter
on 5 Mar 2019
Good starting point.
Of course, it would be good to separate Servs and Chars into wiki pages.
I'm not sure if hosting everything on one bridge is a good idea. Why?
- If you host one accessory per one bridge then you can simply remove them from homekit app without touching node-red flow (on accessory can me multiple services of course for example kind of TV Pilot accessory with service to turn on/off and lightbulb to control volume)
- Second thing is that someone reported some performance issues and there is an idea that is due to many accessories on one bridge (which mean one port) but it's not checked yet
Here is example how to add images.
tldr: start creating issue and add image. github will assign url which you can copy and close issue creating
Shaquu
on 5 Mar 2019
Another idea.
Make single accessory pages. For example one per Switch and another one for Fan etc.
WIth that it would be easier to link one accessory in other places.
And it would be more compact and readable.
Shaquu
on 5 Mar 2019
By the way there is an outdated homekit document by apple for non-commercial use.
I believe that HAP-nodejs which we depend on was created using this document.
If you found newest then please share.
Shaquu
on 5 Mar 2019
I'll get things separated out into separate pages, I think I like the idea of separate pages for each accessory. Things like "switch" will be very simple while "irrigation controller" could be more complicated.
As for putting everything in one bridge - I have been running like this for months. I can simply add/delete a homebridge-service node while not touching the rest of my nodes. For example I had a StatelessProgrammableSwitch last week that was acting up so I deleted it and added a new one with a different name. New one works great.
I do see benefit in the future possibly for having a "production bridge" and a "testing bridge" - or one for switches and one for a camera. I will try to explain this better!
I'm sure things will change and get more interesting once the multiple services -> one accessory is ready (e.g. adding battery service to a motion detector)
Yes I used that homekit document to put this together. I don't have the newest version but I believe some/all of the information is available through an apple developer account. I've tried to go through it to learn more but it's way over my head.
So at this point we will have the following pages:
- Index/table of contents
- Services
- Characteristic properties
- Services (switch, lightbulb, etc)
The services should each have a table of required and optional characteristics. Also how to set characteristic properties so things show up properly in homekit, etc...
It's a start though!
crxporter
on 5 Mar 2019
I think I'm getting this wiki thing figured out a little bit. For now I'm adding examples that I have used and I know work. I have several more that I've tested and will add them soon (fan, window covering, occupancy detector, smoke detector, stateless switch, and valve)
Hopefully others come in to add their own examples.
crxporter
on 5 Mar 2019
Hello @crxporter,
I have temperature, humidity and CO2 sensor services running on my node-red implementation and can provide examples for that. All these nodes are triggered by the measures taken from the Netatmo API. I like this right now because now I can ask Siri what the temp in my garden or in a particular room is...So I the need to wait for HomeKit compatibility of Netatmo disappeared.
 djiwondee
on 6 Mar 2019
djiwondee
on 6 Mar 2019
@djiwondee thanks for examples.
I think it would be good to standardise those pages.
Shaquu
on 6 Mar 2019
@Shaquu as you may have recognized I just followed the given structure as of @crxporter assuming this is/will become _the_ standard
djiwondee
on 6 Mar 2019
@djiwondee I just adjusted your "Details" table on the CO2 detector to show the range of accepted values.
A comment on that one - the copyable node doesn't look like it would be a "functional example" for a user to click inject nodes and see the device function in their Home app. I might suggest we add an inject node for both {"CarbonDioxideDetected":0} and {"CarbonDioxideDetected":1} so they can "trigger" the alarm. Then between the inject that you have and the rest of your setup I would put a "random" generator with a range 0 to 100,000 so the user can see "oh hey that takes numbers from 0 to 100,000".
Also - for optional/required characteristics the homekit protocol document (linked above from @Shaquu) shows only "Carbon Dioxide Detected" for "required" characteristics while others are optional. This would mean the sensor is, at a minimum, true/false carbon detected - and optionally shows current and peak levels. I'm going to update your table accordingly - please correct me if I'm mistaken!
Check out the Dimmable Light example to see how I used the random.
PS- thanks for the contribution! Sometime I need to get myself some air quality sensors...
crxporter
on 6 Mar 2019
Just went back to the homekit spec - "Peak Level" is not an alarm threshold but instead the maximum level detected - this number would be saved so you can go back and see "how bad did it get" ... You could potentially have a reset button in nodered or program so it's a rolling 24-hour maximum or something.
But it is NOT an alarm threshold. The alarm is set by "CarbonDioxideDetected"
With this information, I'm going to update the tables again real quick. Should initial levels sent by characteristic property should be 0 so the user doesn't see levels from the start?
crxporter
on 6 Mar 2019
Hello @crxporter,
have applied some changes. You are right with the behavior of the peak level characteristics. I have also embedded a new flow and screen shot. Instead of using random values for injection I just chose two inject node to demonstrate the behavior of the peak level alerting as given by the Node-Red flow programming.
I struggle a little bit with the "Required" vs "Optional" characteristics. It doesn't matter how to set up this for the CO2 sensor HomeKit service. The functionality is always given and the automatically updated in Home.App. However to achieve an meaningful setup, I set only the _CarbonDioxideLevel_ to required and have added all used characteristics of my example in the characteristic properties of the node-red node.
djiwondee
on 6 Mar 2019
Looking at your newest table - the "CarbonDioxideLevel" is not required. The "CarbonDioxideDetected" is required. This makes sense because the true/false detected is the only required item to know if there's an alarm. The current and peak levels are just bonus informations. I like your new example! That will let people see the alarm or non alarm.
While you were doing that edit I came up with this. It adds a "reset" button to bring the peak level back to 0 PPM - for after an alarm event to kind of set an "all clear"...

[{"id":"b49d0ee7.6e56b8","type":"change","z":"54339415.36f384","name":"Set CarbonDioxideLevel","rules":[{"t":"move","p":"payload","pt":"msg","to":"payload.CarbonDioxideLevel","tot":"msg"}],"action":"","property":"","from":"","to":"","reg":false,"x":490,"y":160,"wires":[["d428227f.cefa7","4c34ea41.e2fdbc"]]},{"id":"8df967b3.f96ff8","type":"random","z":"54339415.36f384","name":"","low":"0","high":"100000","inte":"true","property":"payload","x":280,"y":160,"wires":[["b49d0ee7.6e56b8"]]},{"id":"d428227f.cefa7","type":"function","z":"54339415.36f384","name":"Detect Highest Value","func":"var co2 = context.get('co2')||0;\nvar NEWco2;\nif(msg.payload==\"RESET\"){\n co2=0;\n context.set('co2',co2);\n msg.payload={\"CarbonDioxidePeakLevel\":co2};\n return [msg,null];\n}\nvar alarm={};\nalarm.payload={\"CarbonDioxideDetected\":1};\n\nif(msg.payload.CarbonDioxideLevel){\n NEWco2=msg.payload.CarbonDioxideLevel;\n msg.payload={\"CarbonDioxidePeakLevel\":NEWco2};\n if(NEWco2>co2){\n co2=NEWco2;\n context.set('co2',co2);\n msg.payload={\"CarbonDioxidePeakLevel\":co2};\n }\n if(NEWco2>10000){\n return [msg,alarm];\n } else {\n return [msg,null];\n }\n}","outputs":2,"noerr":0,"x":360,"y":220,"wires":[["4c34ea41.e2fdbc"],["e2a31cb0.c4b918"]]},{"id":"4c34ea41.e2fdbc","type":"homekit-service","z":"54339415.36f384","bridge":"b070e578.4eca1","name":"CO2 Livingroom","serviceName":"CarbonDioxideSensor","topic":"","manufacturer":"Default Manufacturer","model":"Default Model","serialNo":"Default Serial Number","characteristicProperties":"{}","x":900,"y":180,"wires":[["22d2e39c.5492ac"]]},{"id":"2822beaf.7689e2","type":"inject","z":"54339415.36f384","name":"Inject CO2","topic":"","payload":"","payloadType":"date","repeat":"","crontab":"","once":false,"onceDelay":0.1,"x":120,"y":160,"wires":[["8df967b3.f96ff8"]]},{"id":"ad7aa107.8aa7c","type":"inject","z":"54339415.36f384","name":"Reset Peak","topic":"","payload":"RESET","payloadType":"str","repeat":"","crontab":"","once":false,"onceDelay":0.1,"x":130,"y":220,"wires":[["d428227f.cefa7"]]},{"id":"e2a31cb0.c4b918","type":"trigger","z":"54339415.36f384","op1":"","op2":"{\"CarbonDioxideDetected\":0}","op1type":"pay","op2type":"json","duration":"30","extend":true,"units":"s","reset":"","bytopic":"all","name":"30 second alarm","x":650,"y":240,"wires":[["4c34ea41.e2fdbc"]]},{"id":"22d2e39c.5492ac","type":"debug","z":"54339415.36f384","name":"CO2 Debug","active":true,"tosidebar":true,"console":false,"tostatus":false,"complete":"payload","x":1090,"y":180,"wires":[]},{"id":"b070e578.4eca1","type":"homekit-bridge","z":"","bridgeName":"Node-Red-Homekit-Bridge","pinCode":"270-21-969","port":"34567","allowInsecureRequest":false,"manufacturer":"Default Manufacturer","model":"Default Model","serialNo":"Default Serial Number"}]
It takes an "inject" button - picks a random value between 0 and 100,000 (range of accepted values) then sends it as current level. There's also a function that checks whether that level is higher than the previous - and whether it's an alarm (I set the alarm level to be over 10,000). If it's an alarm it sends the alarm to HomeKit for 30 seconds. Additionally there is a button to reset the peak level.
Edit: tweaked the function node a little.
Edit 2: changed again. Added another random so it can be sent "alarm level" or "non alarm level"

Copyable:
[{"id":"d428227f.cefa7","type":"function","z":"54339415.36f384","name":"Detect Highest Value","func":"var co2 = context.get('co2')||0;\nvar NEWco2;\nif(msg.payload==\"RESET\"){\n co2=0;\n context.set('co2',co2);\n msg.payload={\"CarbonDioxidePeakLevel\":co2};\n return [msg,null];\n}\nvar alarm={};\nalarm.payload={\"CarbonDioxideDetected\":1};\n\nif(msg.payload.CarbonDioxideLevel){\n NEWco2=msg.payload.CarbonDioxideLevel;\n// msg.payload={\"CarbonDioxidePeakLevel\":co2};\n if(NEWco2>co2){\n co2=NEWco2;\n context.set('co2',co2);\n msg.payload={\"CarbonDioxidePeakLevel\":co2};\n }\n if(NEWco2>10000){\n return [msg,alarm];\n } else {\n return [msg,null];\n }\n}","outputs":2,"noerr":0,"x":360,"y":220,"wires":[["4c34ea41.e2fdbc"],["e2a31cb0.c4b918"]]},{"id":"4c34ea41.e2fdbc","type":"homekit-service","z":"54339415.36f384","bridge":"b070e578.4eca1","name":"CO2 Livingroom","serviceName":"CarbonDioxideSensor","topic":"","manufacturer":"Default Manufacturer","model":"Default Model","serialNo":"Default Serial Number","characteristicProperties":"{}","x":900,"y":180,"wires":[["22d2e39c.5492ac"]]},{"id":"e2a31cb0.c4b918","type":"trigger","z":"54339415.36f384","op1":"","op2":"{\"CarbonDioxideDetected\":0}","op1type":"pay","op2type":"json","duration":"30","extend":true,"units":"s","reset":"","bytopic":"all","name":"30 second alarm","x":650,"y":240,"wires":[["4c34ea41.e2fdbc"]]},{"id":"ad7aa107.8aa7c","type":"inject","z":"54339415.36f384","name":"Reset Peak","topic":"","payload":"RESET","payloadType":"str","repeat":"","crontab":"","once":false,"onceDelay":0.1,"x":130,"y":220,"wires":[["d428227f.cefa7"]]},{"id":"b49d0ee7.6e56b8","type":"change","z":"54339415.36f384","name":"Set CarbonDioxideLevel","rules":[{"t":"move","p":"payload","pt":"msg","to":"payload.CarbonDioxideLevel","tot":"msg"}],"action":"","property":"","from":"","to":"","reg":false,"x":490,"y":160,"wires":[["d428227f.cefa7","4c34ea41.e2fdbc"]]},{"id":"22d2e39c.5492ac","type":"debug","z":"54339415.36f384","name":"CO2 Debug","active":true,"tosidebar":true,"console":false,"tostatus":false,"complete":"payload","x":1090,"y":180,"wires":[]},{"id":"8df967b3.f96ff8","type":"random","z":"54339415.36f384","name":"Safe","low":"0","high":"10000","inte":"true","property":"payload","x":270,"y":160,"wires":[["b49d0ee7.6e56b8"]]},{"id":"6ec90967.3f9838","type":"random","z":"54339415.36f384","name":"Alarm","low":"10001","high":"100000","inte":"true","property":"payload","x":270,"y":100,"wires":[["b49d0ee7.6e56b8"]]},{"id":"2822beaf.7689e2","type":"inject","z":"54339415.36f384","name":"","topic":"","payload":"Non Alarm","payloadType":"str","repeat":"","crontab":"","once":false,"onceDelay":0.1,"x":120,"y":160,"wires":[["8df967b3.f96ff8"]]},{"id":"31512ba1.ebc87c","type":"inject","z":"54339415.36f384","name":"","topic":"","payload":"Alarm","payloadType":"str","repeat":"","crontab":"","once":false,"onceDelay":0.1,"x":110,"y":100,"wires":[["6ec90967.3f9838"]]},{"id":"b070e578.4eca1","type":"homekit-bridge","z":"","bridgeName":"Node-Red-Homekit-Bridge","pinCode":"270-21-969","port":"34567","allowInsecureRequest":false,"manufacturer":"Default Manufacturer","model":"Default Model","serialNo":"Default Serial Number"}]
Note - we don't necessarily have to change your example, I think it is pretty good as it is. I've been trying to learn more about this because the carbon monoxide detector will eventually use nearly the same code. I plan to let you do the "Full Featured" example on CO2 - but am getting ready to do the examples for CO.
Edit 3: just added Carbon Monoxide
crxporter
on 6 Mar 2019
@Shaquu I don't know what is the best idea regarding the bridge... I have read on several forums, that the hard maximum for a bridge is 150 accessory (but due to hardware limitations - like RPi), you will experience problems much before that limit.
I don't know what NODE-RED can do, but at least we have to indicate that in the Wiki pages (or add some logic to notify the user when he wants to add the 151st Item to that Bridge).
Also if you can, please update the README page to include a link to the Wiki pages. If we can solve these things out, then this will become one of the many (unrealiable) HomeKit controllers.
 radokristof
on 6 Mar 2019
radokristof
on 6 Mar 2019
Also an ever growing documentation would be great.
For example, I have an AirPurifier Item in HomeKit. And I couldn't get around myself, how I should properly control it. Everything works fine, except that when I turn ON or OFF it sometimes just spins around forever that it is turning on and off. I don't know if this a bug or I just configured it incorrectly (when the Active characteristics should be changed - what does that mean if a device in HomeKit is Active or not?). So a Wiki for these would be awesome, if someone knows the answers for these kind of problems.
radokristof
on 6 Mar 2019
Im planning to get to most of the services eventually! Carbon dioxide came up today so I tried it, adjusted some things, and then did the carbon monoxide. I was planning to knock out the ones I have first but I’ve got a few minutes now- I’ll go check out AirPurifier to see what I can do!
crxporter
on 6 Mar 2019
Thanks!
What I got so far which might help you: Active 0-1 doesn't seem to affect this Turning ON-OFF thing (it just shows the device is Active or not). Secondly, the CurrentAirPurifierState toggles the ON-OFF state of this device. I have tried to have 0 and 1 as a turned off state (no is not purifing air and the second is inactive or something like this), but neither one worked...
radokristof
on 6 Mar 2019
For addition, SecuritySystem works as the TargetState shows what the state should be (like when you are turning on the your alarm system and you have a little turn on delay - time to leave your house) and if a CurrentState is set, then it will stop the spinning (the Characteristics are not named like this, but something similar... I'm not in front of NODE-RED so I can't provide detailed info)
radokristof
on 6 Mar 2019
Check here you will see that there are 3 required characteristics. Check here and you will see descriptions of these 3 items.
- Active true/false
- Current state (0=off, 1=idle, 2=on)
- Target state (0=manual mode, 1=automatic mode
"flipping the switch" in homekit changes active true/false.
changing between manual and auto mode in homekit changes the target state
The "current state" can't be changed from the Home app - the "current state" has to be sent from node red.
Here is a quick and dirty sample. The buttons should be labeled properly. You need to send target state FIRST then current state.
- if you send "target on" when the current state is off - it will show "turning on" until you send current state idle or on
- if you send "target off" while the current state is idle or on, home app will show "turning off" until you send "current state off"
NOTE!! this is a confusing item. It almost looks like "target state" and "active" are switched for this item. Looking at your comment a few minutes ago it appears you are missing the "Active true/false"

[{"id":"23658c6b.4bf7fc","type":"debug","z":"3e0d11cf.29e996","name":"Output","active":true,"tosidebar":true,"console":false,"tostatus":false,"complete":"payload","x":570,"y":220,"wires":[]},{"id":"48715e2b.edde4","type":"inject","z":"3e0d11cf.29e996","name":"Target state: on","topic":"","payload":"{\"Active\":true}","payloadType":"json","repeat":"","crontab":"","once":false,"onceDelay":0.1,"x":180,"y":280,"wires":[["b76a15e.cbd98e8"]]},{"id":"6c58b865.cbe098","type":"inject","z":"3e0d11cf.29e996","name":"Target state: off","topic":"","payload":"{\"Active\":false}","payloadType":"json","repeat":"","crontab":"","once":false,"onceDelay":0.1,"x":180,"y":320,"wires":[["b76a15e.cbd98e8"]]},{"id":"c80db304.c4e","type":"inject","z":"3e0d11cf.29e996","name":"Auto mode","topic":"","payload":"{\"TargetAirPurifierState\":1}","payloadType":"json","repeat":"","crontab":"","once":false,"onceDelay":0.1,"x":440,"y":100,"wires":[["b76a15e.cbd98e8"]]},{"id":"2188d196.d711e6","type":"inject","z":"3e0d11cf.29e996","name":"Current State: ON","topic":"","payload":"{\"CurrentAirPurifierState\":2}","payloadType":"json","repeat":"","crontab":"","once":false,"onceDelay":0.1,"x":410,"y":500,"wires":[["b76a15e.cbd98e8"]]},{"id":"b76a15e.cbd98e8","type":"homekit-service","z":"3e0d11cf.29e996","bridge":"f0825aeb.9064a8","name":"Pure 2","serviceName":"AirPurifier","topic":"","filter":false,"manufacturer":"Default Manufacturer","model":"Default Model","serialNo":"Default Serial Number","characteristicProperties":"{}","x":430,"y":220,"wires":[["23658c6b.4bf7fc"]]},{"id":"5c80309d.22e278","type":"inject","z":"3e0d11cf.29e996","name":"Manual Mode","topic":"","payload":"{\"TargetAirPurifierState\":0}","payloadType":"json","repeat":"","crontab":"","once":false,"onceDelay":0.1,"x":430,"y":140,"wires":[["b76a15e.cbd98e8"]]},{"id":"44a8a93d.b0b51","type":"inject","z":"3e0d11cf.29e996","name":"Current State: OFF","topic":"","payload":"{\"CurrentAirPurifierState\":0}","payloadType":"json","repeat":"","crontab":"","once":false,"onceDelay":0.1,"x":410,"y":420,"wires":[["b76a15e.cbd98e8"]]},{"id":"e090d2b0.110df8","type":"inject","z":"3e0d11cf.29e996","name":"Current State: IDLE","topic":"","payload":"{\"CurrentAirPurifierState\":1}","payloadType":"json","repeat":"","crontab":"","once":false,"onceDelay":0.1,"x":410,"y":460,"wires":[["b76a15e.cbd98e8"]]},{"id":"633c58dd.2f2dc8","type":"comment","z":"3e0d11cf.29e996","name":"Auto/Manual mode","info":"","x":250,"y":100,"wires":[]},{"id":"9a55b755.665a2","type":"comment","z":"3e0d11cf.29e996","name":"Set target state","info":"","x":160,"y":240,"wires":[]},{"id":"6d243594.778f14","type":"comment","z":"3e0d11cf.29e996","name":"Set actual state off/idle/on","info":"","x":410,"y":380,"wires":[]},{"id":"f0825aeb.9064a8","type":"homekit-bridge","z":"","bridgeName":"Dev","pinCode":"111-11-111","port":"","allowInsecureRequest":false,"manufacturer":"Default Manufacturer","model":"Default Model","serialNo":"Default Serial Number"}]
Thanks! I think I have tried this before, but now I'm trying again. What I basically did now, is connected my openHAB node to a function which will trigger the targetState when turning on, and then after 1 sec delay sending a CurrentState. And for the outcoming value I'm using the Active value here, and if the AirPurifier is turned off, I'm sending a CurrentState 0 to the AirPurifier.
This should be right?
radokristof
on 7 Mar 2019
It seems for this item “TargetState” is for automatic/manual operation.
Whether the purifier is on or off is actually {“Active”:true/false}
crxporter
on 7 Mar 2019
And in which order what do you think? First Active and then CurrentState?
radokristof
on 7 Mar 2019
Yes. Active then current.
Active is what “comes out” of homekit when you flip it on or off. If you switch it on in the home app then a payload {“Active”:1} will come out of the node. The home app will then show “turning on” until you send back to homekit either {“CurrentAirPurifierState”:1} for idle or {“CurrentAirPurifierState”:2} of on.
Hopefully you get it - try it then post your node red code here if it’s not working. I should be able to look tonight.
crxporter
on 7 Mar 2019
Here is a list of all 6 possible combinations for airpurifier.
Active value, CurrentAirPurifierState value -> Home app display
Active 0, current 0 -> Off
Active 0, current 1 -> turning off
Active 0, current 2 -> turning off
Active 1, current 0 -> turning on
Active 1, current 1 -> idle
Active 1, current 2 -> on
crxporter
on 7 Mar 2019
crxporter
on 7 Mar 2019
Thanks I’ll try this and report it.
One other thing which should be in the docs: how can I control an RGBW LED from HomeKit?
Because it seems if you enable brightness and hue it will only have 3 attributes. So I can’t distinguish which brightness should be changed. The brightness of the RGB LED or the White LED brightness. And also it will only give back the attributes which have changed not all 3. This adds extra complexity in the function mode. Or am I missing something?
radokristof
on 7 Mar 2019
@radokristof
I think that way:
- Use Hue and Saturation for RGB LED.
- Use Color Temperature for White LED.
So Color Temperature can be a "color" of white (from yellow to white).
Remember that Color Temperature should not be used together with Saturation and Hue.
There are indeed many options. It depends on your needs.
By the way guys. I would be grateful for test and documentation regarding #44
Shaquu
on 7 Mar 2019
But I need a Brigtness item (0-100%) for the separate White channel.
Also I think I need 3 Items for the colored LEDs (Brightness, Hue, Saturation). Or I might don’t understand your point 😕
radokristof
on 7 Mar 2019
@crxporter
The AirPurifier seems working, but it needs a further testing. Thanks!
radokristof
on 7 Mar 2019
@radokristof first tell me what is your set, how many lights etc.
And what you would like to achieve?
Shaquu
on 7 Mar 2019
Ok, so here is one of my flow.

So basically I have 3 nodes, which sends it's current state to that one HomeKit Item.
Switching state (through wifiled2_power) works, setting brightness (through wifiled2_white) works.
But, the color channel have 3 attribute. Hue, Saturation, Brightness (HSB). It is an RGBW LED so it has a colored LED and a White one. HomeKit only reports 3 state: Hue Saturation Brightness. But I should seperate them when just setting Brightness, or changing color. But the other problem is that HomeKit doesn't report back the full state (HSB), but just the attributes which have changed. Like if you selected a color, and you just a select a same color, but a little different in Brightness, it just only sends Brightness. So I also need to know the other 2 states, so I can send a HSB 'object' back to openHAB.
Hope now it is clear.
What I thought that might work:
- Sending the brightness to the two channels together. If the message contains not just Brightness but other states, than only the color channel should react to that.
- Node-RED has a method to save states into variables inside a flow. I think that I will save the state to that variables when one of them changes, so that I can access it when sending back the new state
radokristof
on 7 Mar 2019
You can always retrieve values from openHab before sending new ones:
Home.app action (Brigthness:10) -> get openHab object (Brigthness:2, Hue: 5) -> merge object (Brigthness:10, Hue: 5) -> send object to openHab
Other way is to save it like you said.
I practiced naming variables in flow using node id.
node-id 6115be82.9eea4
It create json array, dots are level lower
flow.set("6115be82.9eea4.Brigthness", 10);
flow.set("6115be82.9eea4.Hue", 5);
flow.get("6115be82.9eea4.Brigthness");
flow.get("6115be82.9eea4.Hue");
Thanks. The bigger problem is that I don’t know how should I map it. If I map the white LED to the Brightness also, it will not produce the same color as you selected in HomeKit.
radokristof
on 7 Mar 2019
Give what you got. (raw data). What you receive from openHab and what you need to send.
We will figure it out.
Should we move to a new issue?
Shaquu
on 7 Mar 2019
Whatever you come up with on the bulb - let's have it end up as another example on the wiki light bulb.
I don't have any colored bulbs so I haven't tried that one.
crxporter
on 7 Mar 2019
@crxporter Yes that's why I thought mentioning this here.
@Shaquu I will create a new issue.
radokristof
on 7 Mar 2019
radokristof
on 7 Mar 2019
@Shaquu - regarding characteristic properties and ValveType...
I'm currently using an inject node to send the payload {"ValveType":1} to my valves (change them from faucet to sprinkler). This node triggers something like 5 seconds after node red starts up.
Can you give me a quick rundown of how this would look in Characteristic Properties? Is it possible to do this?
I saw a comment around here yesterday about characteristic properties and I think I'm missing out on how that works a bit...
crxporter
on 8 Mar 2019
I think it should work the same like you already did.
As it is said:
Characteristic.ValveType.GENERIC_VALVE = 0;
Characteristic.ValveType.IRRIGATION = 1;
Characteristic.ValveType.SHOWER_HEAD = 2;
Characteristic.ValveType.WATER_FAUCET = 3;
So Characteristic Properties should look like this
{
"ValveType": 1
}
You just take Charactersictic name and values from here and put it into json in Chars Properties.
If its not working then answer and I will look at this at home.
Shaquu
on 8 Mar 2019
I also thought that would work - and that's how I've tried it - but it comes up as "generic valve"
I've had to actually inject a valve type payload to get it to make the change.
It seems like the characteristic properties are telling the home app "hey you might see this property, leave a spot for it" but not actually sending the value to the item
For example: make a new dimmer item. Characteristic properties like:
{"Brightness":50}
This makes the item show in homekit as a dimmer - but never actually sets the level to 50%.
Essentially it's telling homekit which optional characteristics may be used?
Fast forware to valve type - and I'm unable to get it to show as a "sprinkler" unless I inject the {"ValveType":1} payload.
crxporter
on 8 Mar 2019
@crxporter I checked and Characteristic properties is not about injecting...
You just set props using that. For example validValues etc.
These are props for ValveType:
format: Characteristic.Formats.UINT8,
maxValue: 3,
minValue: 0,
validValues: [0,1,2,3],
perms: [Characteristic.Perms.READ, Characteristic.Perms.NOTIFY]
While creating Service we set this to default value which is 0
switch (this.props.format) {
case Characteristic.Formats.BOOL: return false;
case Characteristic.Formats.STRING: return "";
case Characteristic.Formats.DATA: return null; // who knows!
case Characteristic.Formats.TLV8: return null; // who knows!
case Characteristic.Formats.DICTIONARY: return {};
case Characteristic.Formats.ARRAY: return [];
default: return this.props.minValue || 0;
}
We could have add new window editor to inject values...
Shaquu
on 8 Mar 2019
Your explanation is much more concise and clear than mine. Yes.
How many items are there like this? I can only think of valve...
Essentially this would be a permanent setting then if it's in the setup. Saying something like: this valve is always a sprinkler/shower/faucet.
I just read through your link above listing all characteristics. It seems like valve type is the only thing that isn't meant to change on a regular basis...
crxporter
on 8 Mar 2019
PS- this is the easy way that has yet to fail.

crxporter
on 8 Mar 2019
Hello @crxporter,
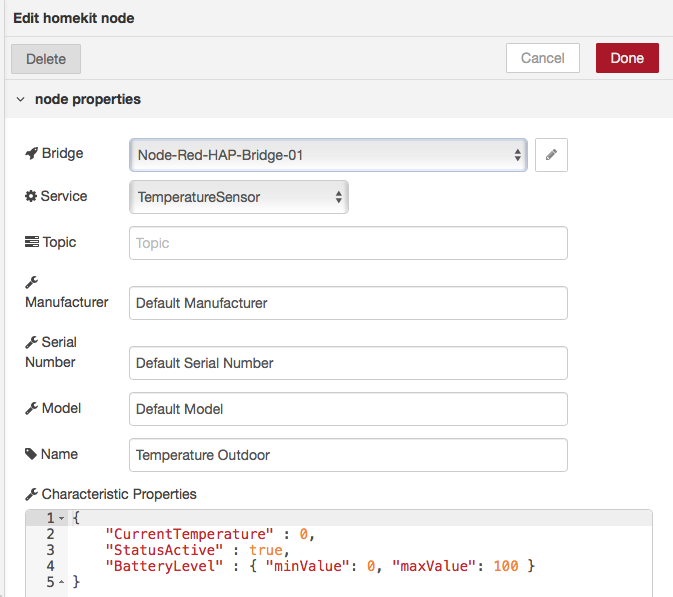
FYI: I'm just dealing a little bit with some of the so called General Characteristics as described in the Wiki. I tried to add BatteryLevel and StatusLowBattery on my Humidity and Temperature sensor. No effect in the Home.app. Node-red is showing the following message in the log:
HAP Warning: Characteristic 00000068-0000-1000-8000-0026BB765291 not in required or optional characteristics for service 0000008A-0000-1000-8000-0026BB765291. Adding anyway.
Think it works as designed in the HomeApp by Apple. Maybe it is worth to add a note in the Wiki.
I've found an interesting app in the app store Controller for HomeKit shows much more information in the pro-version about whats deployed in HomeKit. Interesting to see the Characteristics mentioned above appear in that app with the right values...
djiwondee
on 9 Mar 2019
@djiwondee, are you running the 0.5 release or the dev branch? Battery status is a little different (uses a linked service) and is almost ready, should be in the next release.
Wiki examples will follow shortly.
crxporter
on 9 Mar 2019
Looking at the general characteristics table- I probably shouldn’t have put battery on there.
crxporter
on 9 Mar 2019
Hello @crxporter, I'm running 0.5.1 (the current official release I guess). As I wrote above, other HomeKit apps on iOS showing the battery data for my temperature, co2 and humidity sensors. The following example is from a temperature sensor:

Same sensor in iOS Home.app:

And this is set setup of the characteristics:

djiwondee
on 9 Mar 2019
This is cool- I’ve known some apps support additional stuff but I’ve never tried them.
The next release will allow us to add battery level % as well as low battery alerts from homekit. It’ll show rightnin the home app!
(tried to upload a picture, it's not working)
crxporter
on 9 Mar 2019
@djiwondee actaully me and @crxporter figure it out few days ago that Characteristic Properties is not about initializing Characteristic itself but about their Properties.
So you can make some adjustments here regarding required and optional Characteristics of a Service like validValues, minValue or maxValue.
@crxporter could you update wiki following our arrangements?
This is Characteristics Properties flow in our code:
Available Properties we can set in Characteristics Properties:
this.props = props || {
format: null,
unit: null,
minValue: null,
maxValue: null,
minStep: null,
perms: []
};
Plus:
validValues
validValueRanges
maxLen
maxDataLen
I’m not sure if I fully understand this yet.
I’m planning to continue updating the wiki as I have time. Currently most of the services and characteristics pages are based on the apple protocol document.
I will experiment with minValue, maxValue, etc. and update based on my findings.
crxporter
on 11 Mar 2019
Read 5.3.3 in docs.
Shaquu
on 11 Mar 2019
Thanks.
I also need to see if minValue, maxValue, etc have any changes to the Home app when used in the "Characteristic Properties" field.
crxporter
on 11 Mar 2019
@Shaquu - we are on to something!
That's what the values in characteristic properties do - my first test of this was to make a security system with no "night" mode:
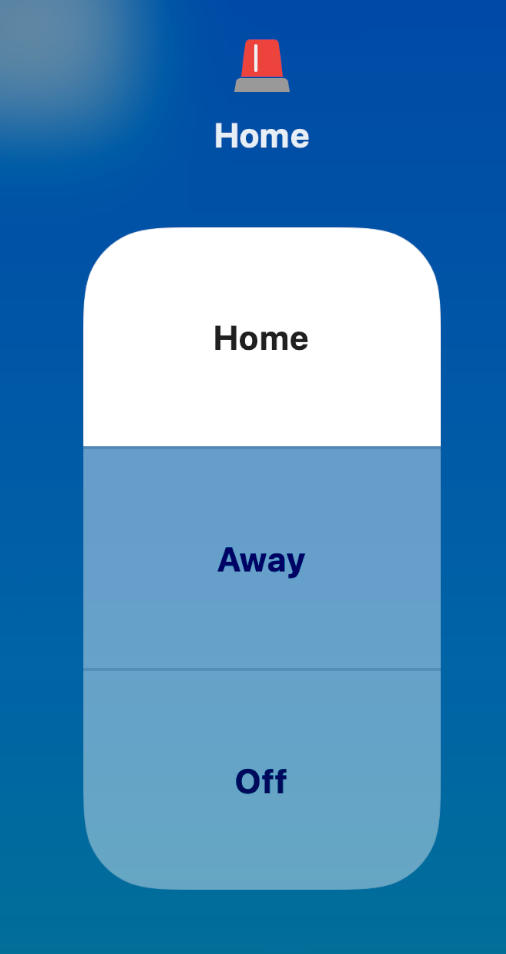
Characteristic properties looks like:
{
"SecuritySystemCurrentState":
{
"validValues": [0,1,3,4]
},
"SecuritySystemTargetState":
{
"validValues": [0,1,3,4]
}
}
I need to look into it more but this is how one could make:
- a heat-only thermostat limited to 10-40 degrees Celsius
- an alarm with only "home", "off", and alarm states
Probably many more. Now I know what I'll be doing in my free time this week.
crxporter
on 11 Mar 2019
I hope you have a lot of free time :)
There was an issue regarding this here #34
Sent with GitHawk
Shaquu
on 11 Mar 2019
@Shaquu - It's not a "default" or "start value" but I can make new valves appear as sprinklers now without injecting "ValveType"
{
"ValveType":
{
"minValue":1,
"maxValue":1
}
}
Some more progress:
Light bulb default color-changing with 5% increments on brightness:
{
"Brightness":{
"minStep":5
},
"Hue":true,
"Saturation":true
}
I need some help on this one. It's a 6-button stateless programmable switch. This is one I've wanted for a long time - so I can send automations into homekit - as in use node red to trigger homekit scenes. 3 is easy - you have single press, double press, and long press. I can do 6 but the extra 3 buttons show as name being "unknown" in the Home app.
See also recent discussion here - I'm hoping you can make sense of that discussion and help formulate the correct JSON to label the buttons.
Properties:
{
"ProgrammableSwitchEvent":
{
"minValue":0,
"maxValue":5,
"validValues":[0,1,2,3,4,5]
}
}
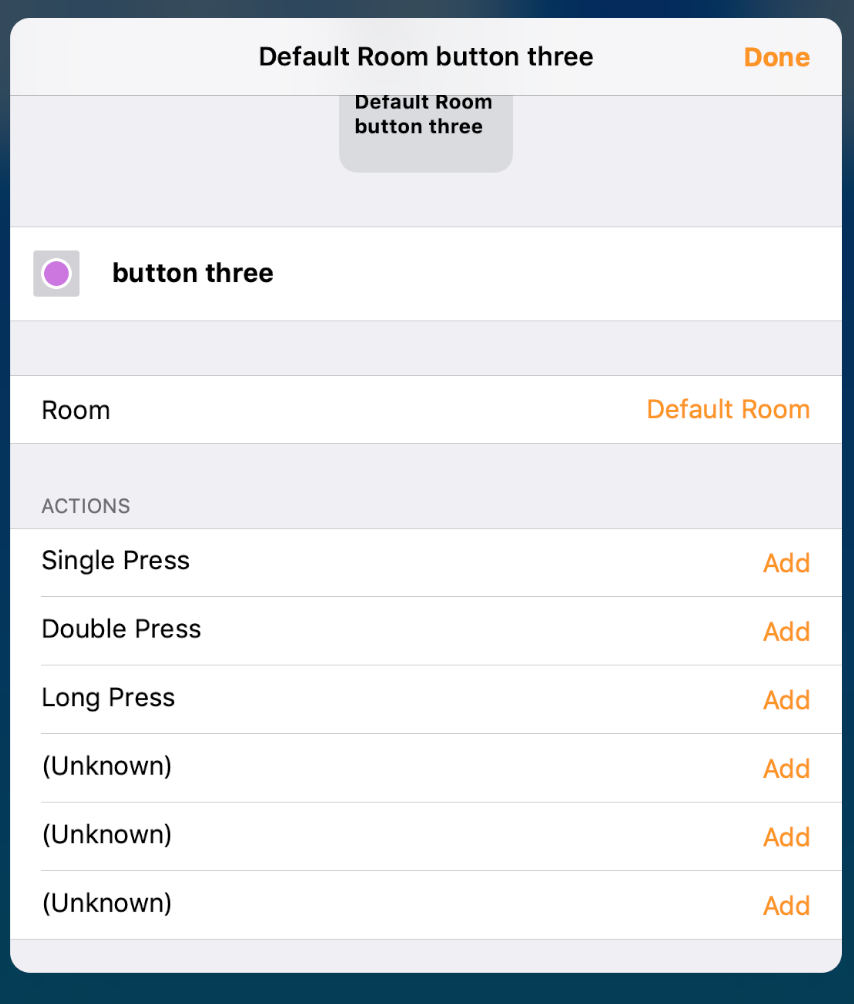
Edit:
I read the above linked page again and got some more interesting results. Apparently if we make a "ServiceLabel" parent service then we can add buttons as child services.
I don't know how to name the buttons - by default they are showing as "BUTTON 1" and "BUTTON 2" - and I set each to have single- and double-press.
It's progress but I've got a hunch even more is possible with the right JSON.
[{"id":"de9b47f8.794118","type":"inject","z":"8508dd8e.e8afe8","name":"1","topic":"","payload":"{\"ProgrammableSwitchEvent\":1}","payloadType":"json","repeat":"","crontab":"","once":false,"onceDelay":0.1,"x":270,"y":420,"wires":[["857a8e09.509f58"]]},{"id":"5b032b11.3fc14c","type":"inject","z":"8508dd8e.e8afe8","name":"0","topic":"","payload":"{\"ProgrammableSwitchEvent\":0}","payloadType":"json","repeat":"","crontab":"","once":false,"onceDelay":0.1,"x":270,"y":380,"wires":[["857a8e09.509f58"]]},{"id":"857a8e09.509f58","type":"homekit-service","z":"8508dd8e.e8afe8","isParent":false,"bridge":"","parentService":"3c95482a.4394d","name":"Pair 2","serviceName":"StatelessProgrammableSwitch","topic":"","filter":false,"manufacturer":"Default Manufacturer","model":"Default Model","serialNo":"Default Serial Number","characteristicProperties":"{\n \"ProgrammableSwitchEvent\":{\n \"minValue\":0,\n \"maxValue\":1\n }\n}","x":430,"y":340,"wires":[[]]},{"id":"3c95482a.4394d","type":"homekit-service","z":"8508dd8e.e8afe8","isParent":true,"bridge":"4adad17b.3ee4a8","parentService":"","name":"Master Button","serviceName":"ServiceLabel","topic":"","filter":false,"manufacturer":"Default Manufacturer","model":"Default Model","serialNo":"Default Serial Number","characteristicProperties":"{}","x":380,"y":280,"wires":[[]]},{"id":"6c156d6.67dce94","type":"homekit-service","z":"8508dd8e.e8afe8","isParent":false,"bridge":"","parentService":"3c95482a.4394d","name":"Pair 1","serviceName":"StatelessProgrammableSwitch","topic":"","filter":false,"manufacturer":"Default Manufacturer","model":"Default Model","serialNo":"Default Serial Number","characteristicProperties":"{\n \"ProgrammableSwitchEvent\":{\n \"minValue\":0,\n \"maxValue\":1\n }\n}","x":250,"y":340,"wires":[[]]},{"id":"c2130e3d.581308","type":"inject","z":"8508dd8e.e8afe8","name":"1","topic":"","payload":"{\"ProgrammableSwitchEvent\":1}","payloadType":"json","repeat":"","crontab":"","once":false,"onceDelay":0.1,"x":90,"y":320,"wires":[["6c156d6.67dce94"]]},{"id":"59a88161.18008","type":"inject","z":"8508dd8e.e8afe8","name":"0","topic":"","payload":"{\"ProgrammableSwitchEvent\":0}","payloadType":"json","repeat":"","crontab":"","once":false,"onceDelay":0.1,"x":90,"y":280,"wires":[["6c156d6.67dce94"]]},{"id":"4adad17b.3ee4a8","type":"homekit-bridge","z":"","bridgeName":"release 05","pinCode":"111-11-111","port":"","allowInsecureRequest":false,"manufacturer":"Default Manufacturer","model":"Default Model","serialNo":"Default Serial Number"}]
Upon further reading, it appears the service label has 2 options for labels:
{"ServiceLabelNamespace":0} shows names like "ONE DOT", "TWO DOT", etc.
{"ServiceLabelNamespace":1} shows names like "BUTTON 1", "BUTTON 2", etc.
Note the "ServiceLabelIndex" range starts at 1 - not 0 like a typical javascript array.
Configured a bit it looks like:
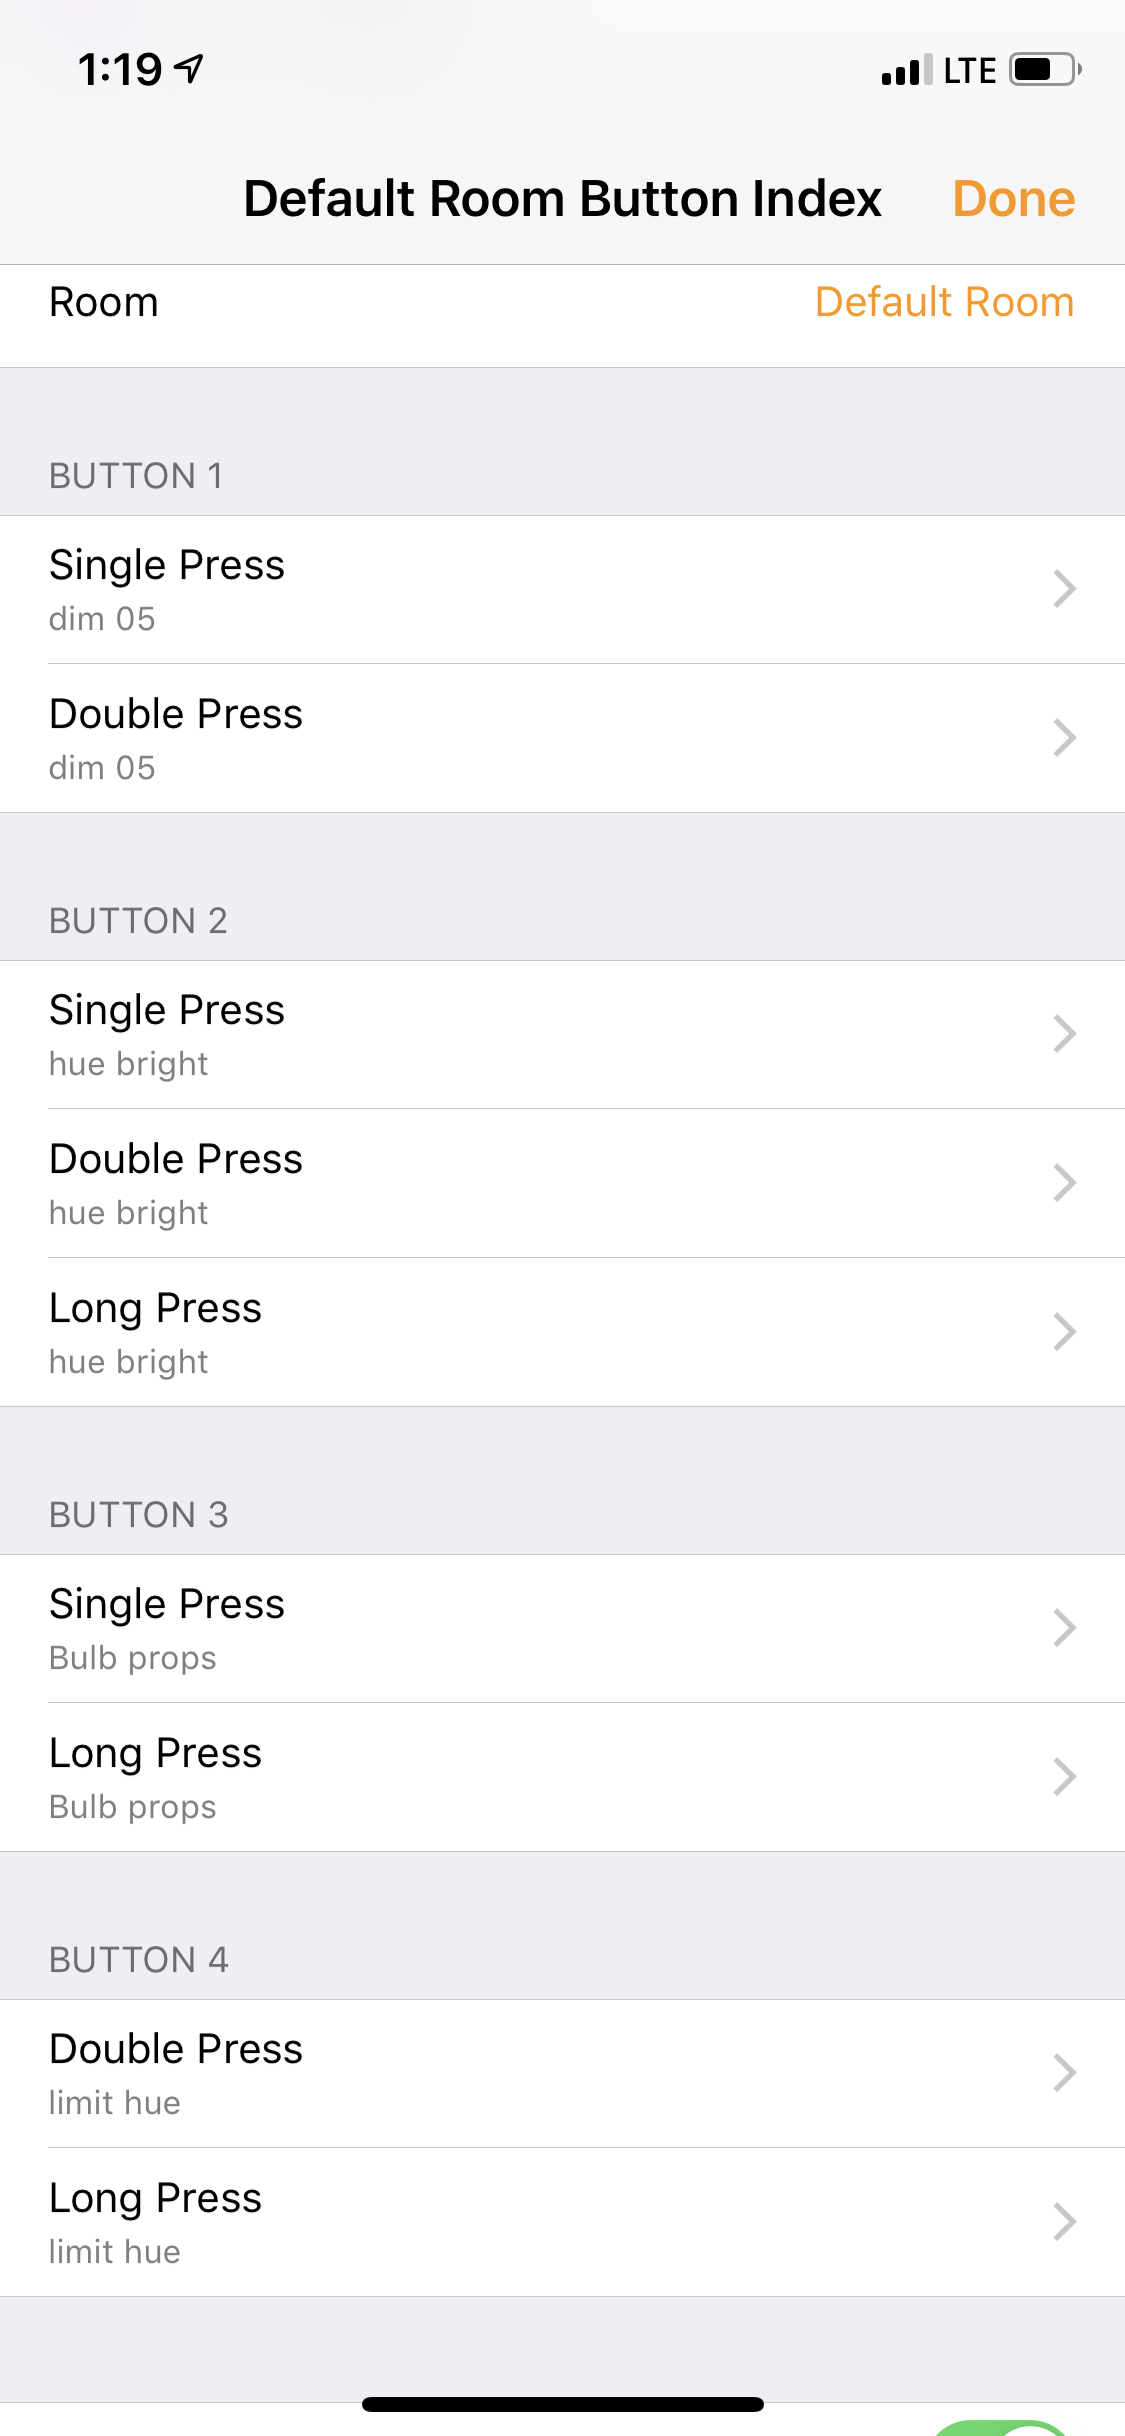
We can use the inject nodes next to "Button Index" to change between "dot" and "button" names.
Questions:
- Is it possible to add new arrays for custom button names?
- Is it possible to change the names of Single, Double, or Long Press?
(neither of these are super important, just want to learn everything possible about the characteristic properties)
If you would like to see it - note it's a little bit fidgety but that might also be due to my attempt to do it all over VPN connection and slow hotel internet...
[{"id":"59a88161.18008","type":"inject","z":"8508dd8e.e8afe8","name":"Single press","topic":"","payload":"{\"ProgrammableSwitchEvent\":0}","payloadType":"json","repeat":"","crontab":"","once":false,"onceDelay":0.1,"x":110,"y":360,"wires":[["956bcb59.f2dcb"]]},{"id":"c2130e3d.581308","type":"inject","z":"8508dd8e.e8afe8","name":"Double press","topic":"","payload":"{\"ProgrammableSwitchEvent\":2}","payloadType":"json","repeat":"","crontab":"","once":false,"onceDelay":0.1,"x":110,"y":400,"wires":[["956bcb59.f2dcb"]]},{"id":"68b54fb0.84e82","type":"inject","z":"8508dd8e.e8afe8","name":"1","topic":"","payload":"{\"ServiceLabelIndex\":1}","payloadType":"json","repeat":"","crontab":"","once":true,"onceDelay":"1","x":490,"y":220,"wires":[["956bcb59.f2dcb"]]},{"id":"27938946.aef2d6","type":"inject","z":"8508dd8e.e8afe8","name":"Dot names","topic":"","payload":"{\"ServiceLabelNamespace\":0}","payloadType":"json","repeat":"","crontab":"","once":false,"onceDelay":0.1,"x":100,"y":240,"wires":[["ee1b8e8.ae6997"]]},{"id":"988f3f2c.2d4c18","type":"inject","z":"8508dd8e.e8afe8","name":"Single press","topic":"","payload":"{\"ProgrammableSwitchEvent\":0}","payloadType":"json","repeat":"","crontab":"","once":false,"onceDelay":0.1,"x":110,"y":500,"wires":[["34ac0777.61862"]]},{"id":"abce49c8.ba6fc","type":"inject","z":"8508dd8e.e8afe8","name":"Double press","topic":"","payload":"{\"ProgrammableSwitchEvent\":1}","payloadType":"json","repeat":"","crontab":"","once":false,"onceDelay":0.1,"x":110,"y":540,"wires":[["34ac0777.61862"]]},{"id":"e73b9260.10c588","type":"inject","z":"8508dd8e.e8afe8","name":"Long press","topic":"","payload":"{\"ProgrammableSwitchEvent\":2}","payloadType":"json","repeat":"","crontab":"","once":false,"onceDelay":0.1,"x":100,"y":580,"wires":[["34ac0777.61862"]]},{"id":"9ee6e3d9.8e3cb8","type":"inject","z":"8508dd8e.e8afe8","name":"Single press","topic":"","payload":"{\"ProgrammableSwitchEvent\":0}","payloadType":"json","repeat":"","crontab":"","once":false,"onceDelay":0.1,"x":450,"y":380,"wires":[["4dc3e3b.cb9bb1c"]]},{"id":"919dbd9e.b7797","type":"inject","z":"8508dd8e.e8afe8","name":"Long press","topic":"","payload":"{\"ProgrammableSwitchEvent\":2}","payloadType":"json","repeat":"","crontab":"","once":false,"onceDelay":0.1,"x":440,"y":420,"wires":[["4dc3e3b.cb9bb1c"]]},{"id":"fef07c04.459f68","type":"inject","z":"8508dd8e.e8afe8","name":"Double press","topic":"","payload":"{\"ProgrammableSwitchEvent\":1}","payloadType":"json","repeat":"","crontab":"","once":false,"onceDelay":0.1,"x":470,"y":500,"wires":[["99b5f9a7.6cbfe8"]]},{"id":"772a9551.a007fc","type":"inject","z":"8508dd8e.e8afe8","name":"Long press","topic":"","payload":"{\"ProgrammableSwitchEvent\":2}","payloadType":"json","repeat":"","crontab":"","once":false,"onceDelay":0.1,"x":460,"y":540,"wires":[["99b5f9a7.6cbfe8"]]},{"id":"ee1b8e8.ae6997","type":"homekit-service","z":"8508dd8e.e8afe8","isParent":true,"bridge":"4adad17b.3ee4a8","parentService":"","name":"Button Index","serviceName":"ServiceLabel","topic":"","filter":false,"manufacturer":"Default Manufacturer","model":"Default Model","serialNo":"Default Serial Number","characteristicProperties":"{\n \"ServiceLabelNamespace\":{\n \"minValue\":0,\n \"maxValue\":1\n }\n}","x":290,"y":260,"wires":[[]]},{"id":"956bcb59.f2dcb","type":"homekit-service","z":"8508dd8e.e8afe8","isParent":false,"bridge":"","parentService":"ee1b8e8.ae6997","name":"But 1","serviceName":"StatelessProgrammableSwitch","topic":"","filter":false,"manufacturer":"Default Manufacturer","model":"Default Model","serialNo":"Default Serial Number","characteristicProperties":"{\n \"ProgrammableSwitchEvent\":{\n \"minValue\":0,\n \"maxValue\":1\n },\n \"ServiceLabelIndex\":{\n \"minValue\":1,\n \"maxValue\":1\n }\n}","x":270,"y":380,"wires":[[]]},{"id":"34ac0777.61862","type":"homekit-service","z":"8508dd8e.e8afe8","isParent":false,"bridge":"","parentService":"ee1b8e8.ae6997","name":"But 2","serviceName":"StatelessProgrammableSwitch","topic":"","filter":false,"manufacturer":"Default Manufacturer","model":"Default Model","serialNo":"Default Serial Number","characteristicProperties":"{\n \"ProgrammableSwitchEvent\":{\n \"minValue\":0,\n \"maxValue\":2\n },\n \"ServiceLabelIndex\":{\n \"minValue\":2,\n \"maxValue\":2\n }\n}","x":270,"y":500,"wires":[[]]},{"id":"4dc3e3b.cb9bb1c","type":"homekit-service","z":"8508dd8e.e8afe8","isParent":false,"bridge":"","parentService":"ee1b8e8.ae6997","name":"But 3","serviceName":"StatelessProgrammableSwitch","topic":"","filter":false,"manufacturer":"Default Manufacturer","model":"Default Model","serialNo":"Default Serial Number","characteristicProperties":"{\n \"ProgrammableSwitchEvent\":{\n \"validValues\":[0,2]\n },\n \"ServiceLabelIndex\":{\n \"minValue\":3,\n \"maxValue\":3\n }\n}","x":610,"y":400,"wires":[[]]},{"id":"99b5f9a7.6cbfe8","type":"homekit-service","z":"8508dd8e.e8afe8","isParent":false,"bridge":"","parentService":"ee1b8e8.ae6997","name":"But 4","serviceName":"StatelessProgrammableSwitch","topic":"","filter":false,"manufacturer":"Default Manufacturer","model":"Default Model","serialNo":"Default Serial Number","characteristicProperties":"{\n \"ProgrammableSwitchEvent\":{\n \"minValue\":1,\n \"maxValue\":2\n },\n \"ServiceLabelIndex\":{\n \"minValue\":4,\n \"maxValue\":4\n }\n}","x":650,"y":520,"wires":[[]]},{"id":"2afa51d7.4b9c3e","type":"inject","z":"8508dd8e.e8afe8","name":"2","topic":"","payload":"{\"ServiceLabelIndex\":2}","payloadType":"json","repeat":"","crontab":"","once":true,"onceDelay":"1","x":490,"y":260,"wires":[["34ac0777.61862"]]},{"id":"244c3784.83e4a","type":"inject","z":"8508dd8e.e8afe8","name":"3","topic":"","payload":"{\"ServiceLabelIndex\":3}","payloadType":"json","repeat":"","crontab":"","once":true,"onceDelay":"1","x":490,"y":300,"wires":[["4dc3e3b.cb9bb1c"]]},{"id":"2d844dd3.702102","type":"inject","z":"8508dd8e.e8afe8","name":"4","topic":"","payload":"{\"ServiceLabelIndex\":4}","payloadType":"json","repeat":"","crontab":"","once":true,"onceDelay":"1","x":490,"y":340,"wires":[["99b5f9a7.6cbfe8"]]},{"id":"c0af67b4.75c0a","type":"inject","z":"8508dd8e.e8afe8","name":"Button names","topic":"","payload":"{\"ServiceLabelNamespace\":1}","payloadType":"json","repeat":"","crontab":"","once":false,"onceDelay":0.1,"x":110,"y":280,"wires":[["ee1b8e8.ae6997"]]},{"id":"4adad17b.3ee4a8","type":"homekit-bridge","z":"","bridgeName":"release 05","pinCode":"111-11-111","port":"","allowInsecureRequest":false,"manufacturer":"Default Manufacturer","model":"Default Model","serialNo":"Default Serial Number"}]
PS - it seems I do have a bit of free time this week. More to come after work tomorrow.
crxporter
on 12 Mar 2019
Can I use minValue and maxValue in other properties as well?
Like I have a lamp with Color Temp, but I can select a temperature in HomeKit which the lamp can't represent. Can I set a min and max value for this as well?
radokristof
on 12 Mar 2019
@radokristof I think yes.
Default are:
Characteristic.ColorTemperature = function() {
Characteristic.call(this, 'Color Temperature', '000000CE-0000-1000-8000-0026BB765291');
this.setProps({
format: Characteristic.Formats.UINT32,
maxValue: 500,
minValue: 140,
minStep: 1,
perms: [Characteristic.Perms.READ, Characteristic.Perms.WRITE, Characteristic.Perms.NOTIFY]
});
this.value = this.getDefaultValue();
};
Yes it works!!
"ColorTemperature" : {
"minValue": 154,
"maxValue": 370
}
In the near future, everything will be like in a native HomeKit. Great! I will add this to the documentation.
radokristof
on 12 Mar 2019
Guess it works on a dev branch, right? Because in my Home.App I still don't see the battery level in the service characteristics:
djiwondee
on 12 Mar 2019
Guess it works on a dev branch, right?
Yes battery is on dev branch.
However the battery information is another service - not a characteristic property.
I will do a battery+temp sensor example tonight - it needs to be done as a linked service.
crxporter
on 12 Mar 2019
@radokristof - limiting color temperature was going to be one of my first examples on this!
I'm happy to let you make that example on the wiki, please add it as a new "Color Temperature Bulb" example!
crxporter
on 12 Mar 2019
@crxporter Ready. Also added little format to the texts.
radokristof
on 12 Mar 2019
@radokristof awesome! I’ll check it out after work!
@shaquu I see you’re around right now, do you have any comments on my questions a few posts up? Mostly on the service label namespace. I’m hoping to have as much information as possible to continue my wiki work!
crxporter
on 12 Mar 2019
@crxporter Ups you got me :) But actaully I am not at home and your questions are not easy for me to answer. I don't own Homekit Hub so I assume I cannot work with Stateless Programmable Switch.
Is it possible to add new arrays for custom button names?
If it's about ServiceLabelNamespace then we can try to send value other then 0-dots or 1-arabic (2? 3?).
2 to 255 are reserved but maybe current Homekit already use it but we don't know this?
Is it possible to change the names of Single, Double, or Long Press?
(neither of these are super important, just want to learn everything possible about the characteristic properties)
I think not. But I don't have experience with that. Yet.
Shaquu
on 12 Mar 2019
I came up with the same as you. It seems we just have 2 options (0,1) for service namespace choosing one dot, two dots, etc OR button 1, button 2, etc. The undefined values are just that - undefined and reserved. I don’t see anyone else who has added names to these.
The button (single double long) press names seem similar. (0,1,2) are defined - 3-255 are reserved.
I haven’t seen anyone else around who has figured out how to change these names, it is ultimately unimportant as I said yesterday but always cool to know all the features.
Also our leader has no hub?! We better do something about that...
crxporter
on 12 Mar 2019
@djiwondee - the battery example just landed on the wiki.
I took your temp sensor example and added battery service. Requires dev branch today.
The appearance in the Home app is the same as my official homekit compatible door lock.
crxporter
on 13 Mar 2019
Helle @crxporter,
Looks good even I would not expect that it has to work in this way. On an abstract level BatteryStatus and/or charging level is not different form StatusActive or any other property. But if this is they way how to design it, I’m ok with that and thanks for the work on that.
I‘m still wondering why other apps showing that property if it is set in the characteristics in the node see here even this don’t raises alarm
djiwondee
on 13 Mar 2019
@djiwondee, all I can tell you is the wiki example is exactly how a genuine official Apple certified homekit device will look and act.
We know other apps can show all kinds of characteristics, even custom ones... I tried to get the StatusLowBattery to show up in homekit but it just won’t. I will read up on it in the homekit protocol again tonight to see if I missed anything...
PS did you see I got the doorbell to work?!
crxporter
on 13 Mar 2019
Hello @crxporter,
yes I saw your doorbell example. Was it with release 0.5.1? If yes I would give that another try in the next couple of days. Otherwise I would wait for 0.6.0. However there recent work on the development looks promising anyway. I'm really happy to see that this repo is not about to get abandoned. Since ether is so much change on smart home tech it is good to see there is a community for the current available stuff!
djiwondee
on 13 Mar 2019
@djiwondee - On the doorbell I don’t know of any changes to 0.6 that would have made this work if it didn’t work in 0.5. I put the comment because I don’t think my 0.6 code can be pasted into 0.5. Try it out and let us know!
crxporter
on 13 Mar 2019
@crxporter - for
@djiwondee - On the doorbell I don’t know of any changes to 0.6 that would have made this work if it didn’t work in 0.5. I put the comment because I don’t think my 0.6 code can be pasted into 0.5. Try it out and let us know!
please see the initial thread with my test on 0.5.1.
djiwondee
on 13 Mar 2019
I added documentation on Window Covering.
 oliverrahner
on 18 Mar 2019
oliverrahner
on 18 Mar 2019
Hello @crxporter , I just dealing a little bit with the _BatteryLevel_ charachteristics using the linked services feature introduced in 0.6.0. I found out the Battery Serviceseems not be able to work as a primary service. According to the _HomeKit Accessory Protocol Specification_,

I think it make sense to mark those services in the doc wiki as e. g. "Only available as Linked services".
The _HomeKit Accessory Protocol Specification_ doesn't mention anything about that, but according to that doc:
2.3.2.3 Primary Service
Accessories should list one of its services as the primary service. The primary service must match the primary function of the accessory and must also match with the accessory category. An accessory must expose only one primary service from its list of available services.
2.3.2.5 Linked Service
Linked services allows accessories to specify logical relationship between services. A service can link to one or more services. A service must not link to itself. Service links have context and meaning only to the first level of services that it links to.
since there is no stand alone "Battery Service Accessory" available for homekit, I would assume that.
djiwondee
on 18 Mar 2019
@djiwondee So if you create Battery Service as Parent Service it won't work? I can't check it myself right now.
Shaquu
on 18 Mar 2019
@Shaquu Exactly, in the HomeApp on iOS a new accessory appears with label "non certified bla bla bla" and it doesn't work. My idea was to display just a battery level sensor for an equipment "Rain sensor in my garden", for which there is no Apple specified accessory nor service type. But I would like to watch on the battery level of that device.
I tried to "mis-use" leak sensor for that but rain is no leak and the measure coming from the rain sensor is a value for rain in mm/hrs.
djiwondee
on 18 Mar 2019
But can you open settings of this „non certified” Accessory?
Wiadomość napisana przez Roland B. notifications@github.com w dniu 18.03.2019, o godz. 17:26:
@Shaquu Exactly, in the HomeApp on iOS a new accessory appears with label "non certified bla bla bla" and it doesn't work. My idea was to display just a battery level sensor for an equipment "Rain sensor in my garden", for which there is no Apple specified accessory nor service type. But I would like to watch on the battery level of that device.
I tried to "mis-use" leak sensor for that but rain is no leak and the measure coming from the rain sensor is a value for rain in mm/hrs.
—
You are receiving this because you were mentioned.
Reply to this email directly, view it on GitHub, or mute the thread.
Shaquu
on 18 Mar 2019
Haven’t tried this unfortunately. Since it looks ugly to see the „not certified“ label on the Home.app, I decide not to follow that approach
djiwondee
on 18 Mar 2019
Added docs for thermostat. The example flow probably got a bit out of hand :'-O
oliverrahner
on 18 Mar 2019
@oliverrahner yes once you add all available features it gets quite exciting. Next step will be to add a filter maintenance linked item :-P
It’s a good idea to test which works as a parent/linked service so we can document which can work where. I don’t know if there are limits on linked services? For example I would think light bulb would be parent but what if someone has an air filter with an ambient light (something I know exists) then these may need to be linked.
I believe at a minimum “irrigation system” would never be anything but parent service.
HomeKit may only be able to show battery as a linked service - but what if someone wants to just show the power level of their solar system battery?
There are so many combinations. I think the best course of action is to test each thing individually and see how the home app reacts. @djiwondee let us know what you find with stand alone battery service. We should continue along this thought process to decide if we need to separate the tables.
crxporter
on 18 Mar 2019
@djiwondee So I think it works like it supposed to work. I assume Battery Service doesn’t have visual representation as Accessory.
You can always use another Service for your need. For example display battery percentage using Light Brightness.
Sent with GitHawk
Shaquu
on 19 Mar 2019
@Shaquu I partly agree. Selecting a accessory supported as primary depends to me also a little bit on how it the service exposed in Home.App. If it really looks like a workaround I won’t like it. However I will at least give it a chance.
djiwondee
on 19 Mar 2019
Unfortunately we don’t have this flexibility to create whatever we want. For example I currently use Brightness on Lightbulb to control volume of my TV.
Sent with GitHawk
Shaquu
on 19 Mar 2019
@oliverrahner glad to have you back here :)
And your thermostat example is crazy!
Shaquu
on 19 Mar 2019
Battery on its own does work. But it is "not supported" - the icon will be a little house and will always say "not supported" in the Home app. But if you click into "settings" you will see battery level, charge state, and low battery warnings just like everything using linked service battery state.
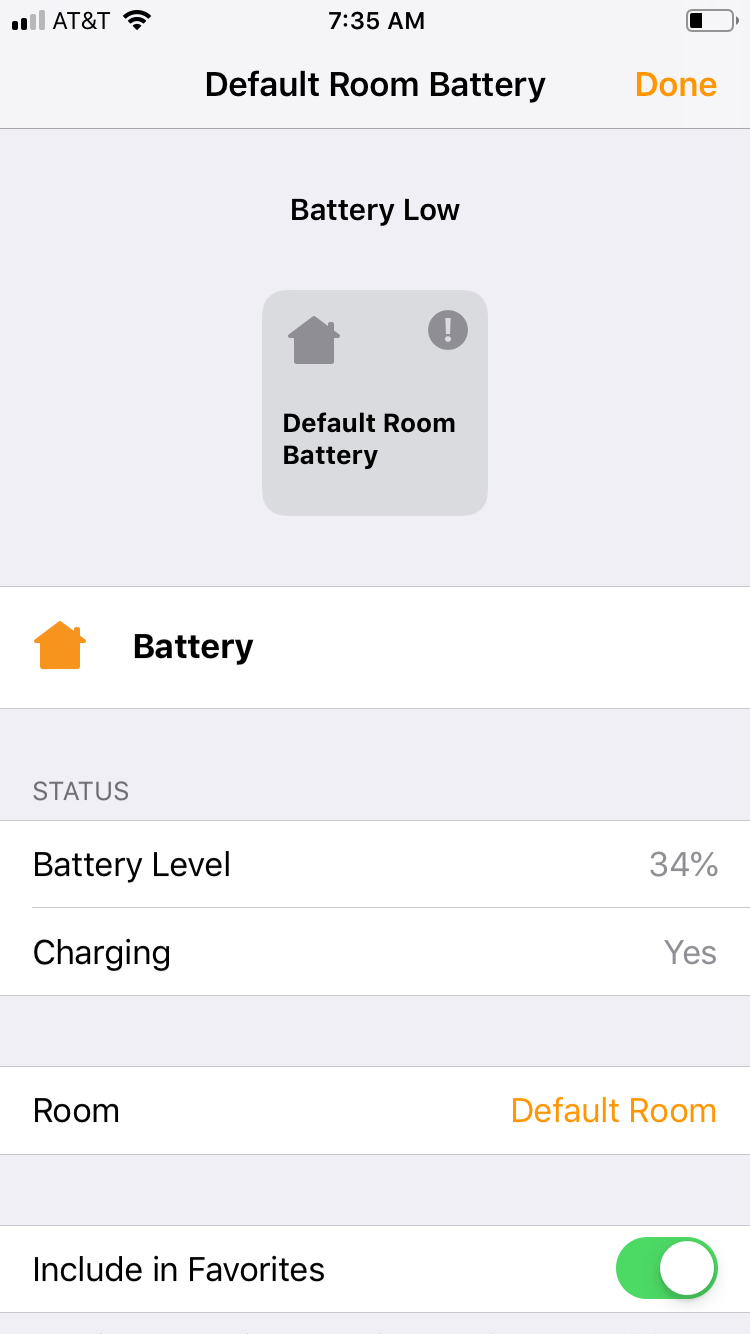
This is about what I would have expected. Interestingly - unlike many "unsupported" items, this one does not show in the elgato eve app.
crxporter
on 19 Mar 2019
No contradiction from my side. Again a small finger pointing to apple. It doesn't look like very nice:
- the house icon w/o any context
- the "non certified" msg on the icon itself
- the exclamation point in the icon
I've withdraw from this "workaround" - nothing to do with your valuable work on that stuff!!!
djiwondee
on 19 Mar 2019
Agree on 2 of your 3 comments.
the exclamation point in the icon
Exclamation point is because the current state is "low battery" not because of unsupported...
crxporter
on 19 Mar 2019
Ahh - again something learnt from HomeKit, thanks! Btw.: Do you have a definition on what threshold Status Low Battery should be raised?
djiwondee
on 19 Mar 2019
Do you have a definition on what threshold Status Low Battery should be raised?
Completely up to the user. Depends how early of a warning you want on your low battery items...
crxporter
on 19 Mar 2019
For me Status Low Battery should fire just in time so you will be able to charge it or react elseway - so can be 30% or less depending on situtation and requirements.
Shaquu
on 19 Mar 2019
Looking at Apple battery mgmt on iOS is 20% threshold. But not so important, it is more an academic discussion ;-)
djiwondee
on 19 Mar 2019
Looking at Apple battery mgmt on iOS is 20% threshold. But not so important, it is more an academic discussion ;-)
Yes - for a phone that lasts, say, 10 hours on a full charge, this will give you a 2 hour warning.
If your battery in your door lock lasts 10 months - then the 20% threshold gives you a 2 MONTH warning. Hopefully it doesn't take you 2 months before you get around to changing the battery?
It will always depend on how long the battery lasts and how long the user wants to be warned before getting round to changing/charging. The beauty of this plugin is that the user is in complete control!
crxporter
on 19 Mar 2019
Is it possible to send an alert to phones through HomeKit when the security system is in alarm (ie.: is there a characteristics for alarm type?)
radokristof
on 19 Mar 2019
Is it possible to send an alert to phones through HomeKit when the security system is in alarm (ie.: is there a characteristics for alarm type?)
That'll be {"SecuritySystemCurrentState":4}
crxporter
on 19 Mar 2019
Thanks, I was unable to find it...
@crxporter Should we add/extend the NO_RESPONE usage in README/Wiki? Right now I also didn't know what is the best use-case of this with openHAB. Now I just set some of my lamps to send NO_RESPONE when the state (payload) is NULL, but this is almost never happen in openHAB.... how you use it?
radokristof
on 20 Mar 2019
That’s how I plan to use it in openhab - if I get a null state, send NO_RESPONSE to homekit.
Other reasons I can think of:
- sprinkler http call returns 404 error
- mqtt heartbeat not received
- network ping timed out
Etc.
There is a comment about no response in readme, which is the first thing in the wiki home page I believe. But yes we should have some examples on it.
I’m adding to the wiki as I can, my next will be the rgb example I put together for you earlier!
crxporter
on 20 Mar 2019
Thank you!
radokristof
on 20 Mar 2019
@crxporter some pages need fixing related to Characteristic Properties
As Characteristic Properties are used to set properties and not initial values or so.
Regarding to #76 and Light Bulb wiki
Shaquu
on 24 Mar 2019
Added valve page with OpenSprinkler example.
I just finished building my OpenSprinkler, finally moved on from SkyDrop - I'm enjoying the change so far.
crxporter
on 23 Apr 2019
I don't see any good place to write that so I will state it here.
@crxporter I want to thank you very much for your effort in work on documentation and help with Issues created by newcomers. I am really happy to see your activity 🥇
Shaquu
on 25 Apr 2019
@shaquu thanks I’m happy to be here!
I’ve been pretty busy lately with business travel and on other projects and haven’t had as much time as I would like to fiddle and test things...
If anyone is following this thread hoping for something new to land in the docs, make a post below or a new issue.
My next plans are:
-TV (I might go as far as to build a complete setup with vizio http calls!)
-AV receiver #94 (again, a pretty full setup with onkyo connection)
-I want to look at #33 ... seems like a door sensor (reed switch and magnet) could help
-Camera/doorbell I’ll be on it as soon as I get some guidance on setting it up!
Additional documentation requests are welcome!
crxporter
on 25 Apr 2019
Hello @crxporter,
-AV receiver #94 (again, a pretty full setup with onkyo connection)
if you like let's discuss the on this topic. The setup I've right now isn't really optimised. I'm calling python scripts from Node-red what causes a strong latency up to 20 sec or more but there is node.js library with the EISCP framework available.
A setup what I would like to see is
- AVR discovery
- on/off
- select input channel
- volume control
- select radio stations
- soft wake-up
With that EISCP framework I've made some learnings. If you are interested in lets share.
djiwondee
on 29 Apr 2019
Hello @crxporter,
-Camera/doorbell I’ll be on it as soon as I get some guidance on setting it up!
just an idea came to my mind related to the Doorbell service not working resp. showing the _non-certified_ message in the home.app. Have you ever tried to setup Doorbellas a secondary service for Door? Don't know whether this is a setup that makes sense but may be it could solve the disturbing non-certified message...
djiwondee
on 29 Apr 2019
@djiwondee have you tried the doorbell as a linked service attached to door? I just tried it and it looks functional. HomeKit shows only the door item. The notifications aren't "rich" though-they don't give the option to unlock, open, turn on lights, etc.
It really seems like the best situation for Doorbell is attached to a camera as discussed in #16 and #38.
The door item is very similar to a garage door how it works in Home app but the icon is a typical home door. Kind of a different item, I've never seen a house with a motorized front door?
crxporter
on 29 Apr 2019
Hello @crxporter ,
have you tried the doorbell as a linked service attached to door?
No, I don't. The idea came just into my mind when I was reading the HAP Specification (Non-Commercial Version) recently. Key intention is/was more or less to find a way how to suppress the "non certified accessory message" in the home.app.
I agree with you, I've also not seen a motorised front door but I thought by equipping the front door with a sensor detection open/close status as parent and door bell as linked secondary service may solve that particular problem. In addition to that a simple security related use case could be applied with that as well: was the door opened after somebody pressed the door bell button - _friendly opened_?
djiwondee
on 29 Apr 2019
Hello @radokristof ,
on my research for description of characteristics I found this. I haven't checked/compared it with your non exhaustive list in the Wiki. But may be it is helpful for further investigations as along as Apple doesn't publish a new/update doc like the well known linked here.
djiwondee
on 28 May 2019
Yes it seems that newer accesories will not be updated by Apple so it's characteristics should be reverse engineered. However this project uses the HAP-NodeJS implementation, so what is there it should work here also (and this is true vice versa - which is not implemented in that lib, but supported by Apple, will not work). But as I know, as today most of the accesories work, only few Linked services not working...
radokristof
on 28 May 2019
@djiwondee what is this document?!
If this is auto-generated like it says, it could be really helpful to have an up-to-date list of device types, characteristic properties, and what each value means!
Like @radokristof says whatever is in the HAP-NodeJS should work over here... very cool. I don't know how it would work but (someone smarter than me) could use the HAP-NodeJS JSON file where things are actually "built" in the programming then create a human readable document defining everything?
crxporter
on 28 May 2019
Hmm, right now it seems that manually overviewing the code is easier than making sth for this... There are not so much accessory yet and most of them are already defined/explained here. Over the next weeks I will have some time to work with this, I will try to add every documentation I can (I also got working the TV accessory with inputs), so we can prepare for new device types (hope that Apple will add new ones in the upcoming iOS release).
Ps.: What JSON files are you referring to? I might miss something, but I don't see any file where are the constants/characteristics are stored, it seems that every Characteristics is hard-coded in it's code.
radokristof
on 28 May 2019
@crxporter
what is this document?!
If this is auto-generated like it says, it could be really helpful to have an up-to-date list of device types, characteristic properties, and what each value means!
To be honest, I don't know. As I said I've found while researching for characteristics setting especially for the new types. I guess it is auto generated by godoc.org and probably linked by other volunteer programmers like you who working and spending free time with HomeKit and HAP for all the others.
djiwondee
on 29 May 2019
All:
Are there any new requests? I need a break from my other automation projects this week so I think I’ll work on documentation some more.
crxporter
on 25 Jun 2019
@crxporter I've added an example for Window service in the recent past. Don't know whether you have found time for review? Since Window-service is for motorised windows, I only use it in my setup to check whether the window is open or or not to trigger window blind. For that reason I've implemented a automated reset of the state of the accessory displayed in the home.app.
Me in person would be interested in an example/use case for Stateful Programmable Switch
I also recognised on the Wiki the site link list on the right is not in sync with the main page anymore.
djiwondee
on 25 Jun 2019
Me in person wold be interested in an example/use case for
Stateful Programmable Switch
Great! I need to build a few of these anyway. There are a couple ways to do it - one button with 3 presses (single/double/long) or multi-button with 1, 2, or 3 presses per button (think hue remote with 3 buttons, each of the 3 can do single/double/long).
My use case is to trigger automations from node red into my native homekit items (thermostat, garage door, and door lock for me).
As for the rest of the page, I’ll plan on reviewing everything and cleaning up where I can. Thanks!
Edit: I might be thinking of stateless programmable switch, similar to doorbell with the payload being {"ProgrammableSwitchEvent":0/1/2} I’ll check out both and see what I learn
crxporter
on 25 Jun 2019
@djiwondee - I finally got some time to put together stateless switch. Note the "stateful switch" shows up in homekit as "not supported" so I'm not sure what to do with that.
Stateless switch is cool for setting scenes though, I like to use it for setting my homekit native thermostat based on my node-red presence detection.
Also cleaned up the table of contents on the home page and in the sidebar.
As always comments and edits are welcome!
crxporter
on 29 Jun 2019
@crxporter ,
so I'm not sure what to do with that.
So I may be wrong what stateless switch means at all. I thought it could represent a kind of accessory not really existing as a real hardware. I'm looking for a simple button in the Home.app that can be used to acknowledge an event happened somewhere else trigged by a sensor.
djiwondee
on 30 Jun 2019
@crxporter thanks for another great article!
I will look into stateful switch.
I was thinking that it would be cool to record a screen on iOS showing how it works and sharing it on YouTube with some standardised tags and titles and link it on wiki article. Thanks to that people would see what is it really about - in my case it sometimes difficult to understand for me what one Service can do and how I can interact with this by only reading docs or wiki. It’s concerns all articles. What do you think?
Sent with GitHawk
Shaquu
on 30 Jun 2019
I'm looking for a simple button in the Home.app that can be used to acknowledge an event happened somewhere else trigged by a sensor.
I use the “switch” service and “dimmer” for some of these things.
Examples:
-I have a switch in homekit that turns on and off with my node red presence detection. (Sends presence information from node red to
-I have a dimmer that can be set at certain levels to set light scenes in node red. Example: 45% brightness is lights out for sleep, 40% is upstairs light off, etc. node red resets it back to 50% after a delay
-I have a homekit official motion detector. I set homekit automations to turn on/off a switch item when there is or is not motion.
Each of these things is used to kind of trick node red and homekit into working happily together.
The stateless switch is a trigger going into homekit, used to trigger scenes in homekit.
I was thinking that it would be cool to record a screen on iOS showing how it works and sharing it on YouTube
This is a great idea. I will need to learn how to record screens and upload to YouTube.
Probably should do it on my computer so we can show off both homekit and node red together.
crxporter
on 30 Jun 2019
@crxporter I'm starting to use this node with my Sonoff-tasmota devices, and am wondering if we should also include these examples as well?
They end up being a little bit complex, with the need to convert Sonoff commands to HomeKit and vice versa. To do this required a bit of javascript in the function object.
ie this is my fireplace fan speed control ( which is a on/off/rotation speed control)
[{"id":"3fa77466.89e16c","type":"homekit-service","z":"76e81a66.3288fc","isParent":true,"bridge":"6962b7ae.38d428","parentService":"","name":"Fireplace","serviceName":"Fan","topic":"cmnd/sonoff-5533/","filter":false,"manufacturer":"NorthernMan54","model":"Tuya WiFi Dimmer","serialNo":"sonoff-5533.local","characteristicProperties":"{\"RotationSpeed\":true}","x":440,"y":140,"wires":[["85d01691.b7281","5ff694f0.04a28c"]]},{"id":"e08e07a9.2a1c3","type":"mqtt out","z":"76e81a66.3288fc","name":"Raj","topic":"","qos":"0","retain":"","broker":"3bafab93.2383b4","x":790,"y":140,"wires":[]},{"id":"85d01691.b7281","type":"function","z":"76e81a66.3288fc","name":"HB to Tasmota","func":"var result;\nfor (var characteristic in msg.payload) {\n console.log(\"characteristic\", characteristic, msg.payload[characteristic]);\n switch (characteristic.toLowerCase()) {\n case \"rotationspeed\":\n // result[\"RotationSpeed\"] = msg.payload[characteristic];\n result = msg.payload[characteristic];\n msg.topic = msg.topic + \"DIMMER\";\n break;\n case \"on\":\n // msg.payload = ( msg.payload.On ? \"ON\" : \"OFF\" );\n result = (msg.payload.On ? \"ON\" : \"OFF\");\n msg.topic = msg.topic + \"POWER\";\n break;\n default:\n console.log(\"Unhandled characteristic\", characteristic);\n }\n}\nmsg.payload = result;\nreturn msg;","outputs":1,"noerr":0,"x":620,"y":140,"wires":[["e08e07a9.2a1c3","2456a64f.82ff82"]]},{"id":"5ff694f0.04a28c","type":"debug","z":"76e81a66.3288fc","name":"Output","active":true,"tosidebar":true,"console":false,"tostatus":true,"complete":"true","targetType":"full","x":590,"y":220,"wires":[]},{"id":"93ee5923.3f15","type":"mqtt in","z":"76e81a66.3288fc","name":"Fireplace","topic":"stat/sonoff-5533/RESULT","qos":"0","datatype":"auto","broker":"3bafab93.2383b4","x":80,"y":140,"wires":[["bce5928f.5ac08","a2f2f7bd.529258"]]},{"id":"bce5928f.5ac08","type":"function","z":"76e81a66.3288fc","name":"Tasmota to HB","func":"var result = {};\nvar input = JSON.parse(msg.payload);\nfor (var characteristic in input) {\n // console.log(\"characteristic\", characteristic, msg.payload[characteristic]);\n switch (characteristic.toLowerCase()) {\n case \"dimmer\":\n result[\"RotationSpeed\"] = input[characteristic];\n break;\n case \"power\":\n // ( msg.payload === \"ON\" ? { \"On\": 1 } : { \"On\": 0 } );\n result[\"On\"] = (input[characteristic] === \"ON\" ? 1 : 0);\n break;\n default:\n console.log(\"Unhandled characteristic\", characteristic);\n }\n}\nmsg.payload = result;\nreturn msg;","outputs":1,"noerr":0,"x":260,"y":140,"wires":[["3fa77466.89e16c","845c8b0c.16ce28"]]},{"id":"a2f2f7bd.529258","type":"debug","z":"76e81a66.3288fc","name":"Input","active":true,"tosidebar":true,"console":false,"tostatus":true,"complete":"true","targetType":"full","x":230,"y":220,"wires":[]},{"id":"845c8b0c.16ce28","type":"debug","z":"76e81a66.3288fc","name":"HomeKit","active":true,"tosidebar":true,"console":false,"tostatus":true,"complete":"payload","targetType":"msg","x":420,"y":220,"wires":[]},{"id":"2456a64f.82ff82","type":"debug","z":"76e81a66.3288fc","name":"sonoff","active":true,"tosidebar":true,"console":false,"tostatus":true,"complete":"payload","targetType":"msg","x":790,"y":220,"wires":[]},{"id":"9462141a.57b388","type":"inject","z":"76e81a66.3288fc","name":"power","topic":"cmnd/sonoff-5533/power","payload":"","payloadType":"str","repeat":"","crontab":"","once":true,"onceDelay":"1","x":650,"y":60,"wires":[["e08e07a9.2a1c3"]]},{"id":"13b4e6cf.273b11","type":"inject","z":"76e81a66.3288fc","name":"dimmer","topic":"cmnd/sonoff-5533/dimmer","payload":"","payloadType":"str","repeat":"","crontab":"","once":true,"onceDelay":"1","x":640,"y":100,"wires":[["e08e07a9.2a1c3"]]},{"id":"6962b7ae.38d428","type":"homekit-bridge","z":"","bridgeName":"Raj-NodeRed","pinCode":"031-45-154","port":"51830","allowInsecureRequest":true,"manufacturer":"Default Manufacturer","model":"Default Model","serialNo":"Default Serial Number","customMdnsConfig":false,"mdnsMulticast":true,"mdnsInterface":"","mdnsPort":"","mdnsIp":"","mdnsTtl":"","mdnsLoopback":true,"mdnsReuseAddr":true},{"id":"3bafab93.2383b4","type":"mqtt-broker","z":"","name":"","broker":"raj.local","port":"1883","clientid":"","usetls":false,"compatmode":true,"keepalive":"60","cleansession":true,"birthTopic":"","birthQos":"0","birthRetain":"false","birthPayload":"","closeTopic":"","closeQos":"0","closeRetain":"false","closePayload":"","willTopic":"","willQos":"0","willRetain":"false","willPayload":""}]

 NorthernMan54
on 10 Nov 2019
NorthernMan54
on 10 Nov 2019
wondering if we should also include these examples as well?
Yes. Always yes. Whatever example you or anyone else is willing to take the time to document in the wiki is welcome and encouraged!
crxporter
on 11 Nov 2019
This is my Sample, does it fit in ?
https://github.com/NRCHKB/node-red-contrib-homekit-bridged/wiki/Sample-Sonoff-Dimmer

NorthernMan54
on 12 Nov 2019
@NorthernMan54 - since this is a "dimmer" I would recommend adding it to the light bulb wiki page found here
While you're there, consider changing the name of that page from "Light Bulb" to "Light Bulb/Dimmer" since dimmers are more comprehensive than just light bulbs.
The way the wiki has been set up so far is to have each example under its item type. If we want to add an examples section somewhere else than we ought to rearrange the whole wiki to be set up as such.
Edit: PS- Thanks for the contribution!
crxporter
on 12 Nov 2019
@crxporter I moved things around, take a look
NorthernMan54
on 13 Nov 2019
I wrote this, http://auto.caitken.com/posts/2018/09/09/nodered-homekit-reference, last year for the original node-red homekit plugin. It documents Services and their required or optional Characteristics. I'd be happy to contribute the missing docs here?
 caitken-com
on 23 Dec 2019
caitken-com
on 23 Dec 2019
I have edited Example Switch page.
Changes:
- Reimported node-red flow with new version (new version means latest dev but it's our release candidate so we can consider it 99% release version)
- Updated node-red screenshot for a new version
- node-red flow now is in collapsible block and code is beautified (node-red export allows it)
- Added YouTube demo
- Changed layout a little
So main purpose of my change was to allow user who reads a page to immediately see how it will look and behave. I recently caught myself looking through wiki to see which Service would allow me to make computer desk automation (to move desk up and down) and found out that screenshots and video would be usefull.
Anyway, @crxporter and others please comment what do you think about the change and what would be tweaked. Switch is smallest Service so it is easier to test changes here.
@caitken-com are you still planning to contribute to our wiki?
Shaquu
on 25 Jan 2020
@Shaquu Nice work on the Switch page, very useful!
I've updated the few pages that were missing the required and optional Characteristics; BatteryService, CameraRTPStreamManagement, ContactSensor, Door, Doorbell, GarageDoorOpener, HumiditySensor, LeakSensor, LightSensor, LockMechanism, Microphone, MotionSensor, Outlet, Speaker, SmokeSensor.
Can expand on these as you have with the switch page, but I thought if at least the characteristics were documented users would have a starting point :)
caitken-com
on 27 Jan 2020
It would be very helpful to replace the readme:
Hint: to find out what Characteristics you can address, just send {"foo":"bar"} and watch the debug tab ;)
With:
View the Wiki for list of required and optional Characteristics you can address per Accessory.
caitken-com
on 27 Jan 2020
@caitken-com maybe instead replacing change it to something like (just sketch):
View the Wiki for list of required and optional Characteristics you can address per Accessory.
Alternative: to find out what Characteristics you can address, just send {"foo":"bar"} and watch the debug tab
Shaquu
on 28 Jan 2020
@NRCHKB/documentation
This page should be fixed to contain example without need to install additional node-red nodes. Right now it requires some ccu nodes which I think are not defaults.
https://github.com/NRCHKB/node-red-contrib-homekit-bridged/wiki/Example-Window
Shaquu
on 28 Jan 2020
I'm playing around a little bit with NRCHKB 1.0.0-dev.7 and camera feature:

My camera is connected to a raspi using motion for the streaming and this works quite well:

Since motion allows various movie codecs I would like to know what the parameters values especially for Video Processor are. So far I was not able to bring up a video on the Home.app. Were did you find the _ffmpeg_ value? What are allowed alternatives?

I saw a couple of threads about camera here in this repo. May be it was already mentioned somewhere else. So I would be happy of you could point me to the right post. Thanks!
djiwondee
on 13 Feb 2020
@djiwondee please read story in #16
And here you can find some configuration tips.
Shaquu
on 13 Feb 2020
Hello all. I discovered something interesting today.
For a long time I've been scaling insteon values (brightness range 1-255) over to homekit values (brightness 0-100) and back.
I learned today that if your characteristic properties looks like:
{
    "Brightness": {
        "maxValue":255
    }
}
That homekit will use the 0-255 values.
Similarly for my new zwave devices, the scale is 0-99 where 0 is off and 99 is full bright.
Properties look like:
{
    "Brightness": {
        "maxValue":99
    }
}
This also works for minvalue. Hopefully this will be useful to someone, my next examples in the wiki page will include this once I've got things settled on my zwave setup.
crxporter
on 3 Mar 2020
Interesting info regarding rich notifications and doorbell service: while putting just a doorbell in a room with a camera and other devices (locks, lights) doesn't product rich notifications any more, combining just the camera and doorbell into one accessory _does_ result in rich notifications also including locks and lights. That is: doorbell alone -- notification is only that it rang; doorbell and camera in same accessory -- notification includes camera feed and lock/light controls in the same room
 mishakim
on 9 Mar 2020
mishakim
on 9 Mar 2020
Thank you all for the help getting the docs to where they are today!!
Please continue contributing wherever you are able!
I'm closing this one down in favor of the new demo setup, #301 - please check it out and share ideas!
crxporter
on 13 Jul 2020
Related issues
 MartiMan79
·
8Comments
djiwondee
·
7Comments
MartiMan79
·
8Comments
djiwondee
·
7Comments
 Delphius7
·
5Comments
Delphius7
·
5Comments
 Kowy54
·
3Comments
djiwondee
·
11Comments
Kowy54
·
3Comments
djiwondee
·
11Comments
Most helpful comment
Hello all. I discovered something interesting today.
For a long time I've been scaling insteon values (brightness range 1-255) over to homekit values (brightness 0-100) and back.
I learned today that if your characteristic properties looks like:
That homekit will use the 0-255 values.
Similarly for my new zwave devices, the scale is 0-99 where 0 is off and 99 is full bright.
Properties look like:
This also works for minvalue. Hopefully this will be useful to someone, my next examples in the wiki page will include this once I've got things settled on my zwave setup.