Yolov3: SINGLE-CLASS TRAINING EXAMPLE
This guide explains how to train your own single-class dataset with YOLOv3.
Before You Start
- Update (Python >= 3.7, PyTorch >= 1.3, etc.) and install requirements.txt dependencies.
- Clone repo:
git clone https://github.com/ultralytics/yolov3 - Download COCO:
bash yolov3/data/get_coco2017.sh
Train On Custom Data
1. Label your data in Darknet format. After using a tool like Labelbox to label your images, you'll need to export your data to darknet format. Your data should follow the example created by get_coco2017.sh, with images and labels in separate parallel folders, and one label file per image (if no objects in image, no label file is required). The label file specifications are:
- One row per object
- Each row is
class x_center y_center width heightformat. - Box coordinates must be in normalized xywh format (from 0 - 1). If your boxes are in pixels, divide
x_centerandwidthby image width, andy_centerandheightby image height. - Class numbers are zero-indexed (start from 0).
Each image's label file must be locatable by simply replacing /images/*.jpg with /labels/*.txt in its pathname. An example image and label pair would be:
../coco/images/train2017/000000109622.jpg  # image
../coco/labels/train2017/000000109622.txt  # label
An example label file with 4 persons (all class 0):

2. Create train and test *.txt files. Here we create data/coco_1cls.txt, which contains 5 images with only persons from the coco 2014 trainval dataset. We will use this small dataset for both training and testing. Each row contains a path to an image, and remember one label must also exist in a corresponding /labels folder for each image that has targets.

3. Create new *.names file listing all of the names for the classes in our dataset. Here we use the existing data/coco.names file. Classes are zero indexed, so person is class 0.

4. Update data/coco.data lines 2 and 3 to point to our new text file for training and validation (in your own data you would likely want to use separate train and test sets). Also update line 1 to our new class count, if not 80, and lastly update line 4 to point to our new *.names file, if you created one. Save the modified file as data/coco_1cls.data.

5. Update *.cfg file (optional). Each YOLO layer has 255 outputs: 85 outputs per anchor [4 box coordinates + 1 object confidence + 80 class confidences], times 3 anchors. If you use fewer classes, reduce filters to filters=[4 + 1 + n] * 3, where n is your class count. This modification should be made to the layer preceding each of the 3 YOLO layers. Also modify classes=80 to classes=n in each YOLO layer, where n is your class count (for single class training, n=1).

6. (OPTIONAL) Update hyperparameters such as LR, LR scheduler, optimizer, augmentation settings, multi_scale settings, etc in train.py for your particular task. We recommend you start with all-default settings first updating anything.
7. Train. Run python3 train.py --data data/coco_1cls.data to train using your custom data. If you created a custom *.cfg file as well, specify it using --cfg cfg/my_new_file.cfg.
Visualize Results
Run from utils import utils; utils.plot_results() to see your training losses and performance metrics vs epoch. If you don't see acceptable performance, try hyperparameter tuning and re-training. Multiple results.txt files are overlaid automatically to compare performance.
Here we see results from training on coco_1cls.data using the default yolov3-spp.cfg and also a single-class yolov3-spp-1cls.cfg, available in the data/ and cfg/ folders.

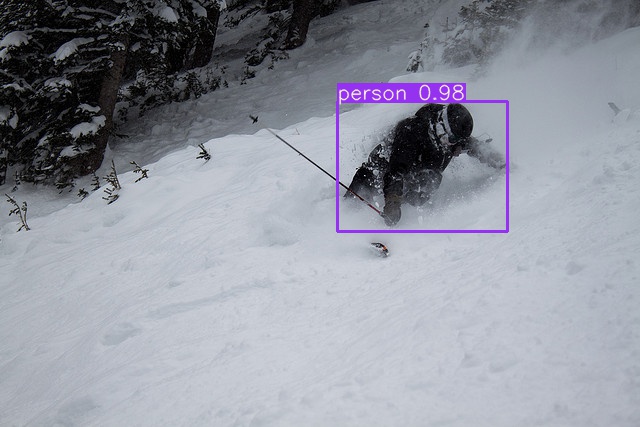
Evaluate your trained model: copy COCO_val2014_000000001464.jpg to data/samples folder and run python3 detect.py --weights weights/last.pt
Reproduce Our Results
To reproduce this tutorial, simply run the following code. This trains all the various tutorials, saves each results*.txt file separately, and plots them together as results.png. It all takes less than 30 minutes on a 2080Ti.
git clone https://github.com/ultralytics/yolov3
python3 -c "from yolov3.utils.google_utils import gdrive_download; gdrive_download('1h0Id-7GUyuAmyc9Pwo2c3IZ17uExPvOA','coco2017demos.zip')"  # datasets (20 Mb)
cd yolov3
python3 train.py --data coco64.data --batch 16 --accum 1 --epochs 300 --nosave --cache --weights '' --name from_scratch
python3 train.py --data coco64.data --batch 16 --accum 1 --epochs 300 --nosave --cache --weights yolov3-spp-ultralytics.pt --name from_yolov3-spp-ultralytics
python3 train.py --data coco64.data --batch 16 --accum 1 --epochs 300 --nosave --cache --weights darknet53.conv.74 --name from_darknet53.conv.74
python3 train.py --data coco1.data --batch 1 --accum 1 --epochs 300 --nosave --cache --weights darknet53.conv.74 --name 1img
python3 train.py --data coco1cls.data --batch 16 --accum 1 --epochs 300 --nosave --cache --weights darknet53.conv.74 --cfg yolov3-spp-1cls.cfg --name 1cls
Reproduce Our Environment
To access an up-to-date working environment (with all dependencies including CUDA/CUDNN, Python and PyTorch preinstalled), consider a:
- GCP Deep Learning VM with $300 free credit offer: See our GCP Quickstart Guide
- Google Colab Notebook with 12 hours of free GPU time: Google Colab Notebook
- Docker Image from https://hub.docker.com/r/ultralytics/yolov3. See Docker Quickstart Guide
 glenn-jocher
All 70 comments
This is a great thing!
However scrolling over the code, I was able to figure these things out even before, but I would suggest You also explaining or showing what kind of modifications are required for the yolov3.cfg file (number of classes and the filter numbers on last layers before the yolo layers).
 tamasbalassa
on 21 Feb 2019
tamasbalassa
on 21 Feb 2019
@tamasbalassa yes good idea. All done!
glenn-jocher
on 21 Feb 2019
To be complete, don't forget to add the modifications of the class numbers (classesfrom 80 to 1). I know it's very obvious, but that one is still missing from the guide. (: 💯
tamasbalassa
on 21 Feb 2019
@glenn-jocher I have a question regarding your normalized labels. I have no problem with w and h, but how did you get the normalized x and y?
Take as example an object from one image (image_id: 574200; COCO_val2014_000000574200.txt; category_id: 13) in the COCO validation set--
Relevant information from instances_val2014.json:
{"license": 6, "file_name": "COCO_val2014_000000574200.jpg", "coco_url": "http://mscoco.org/images/574200", "height": 427, "width": 640, "date_captured": "2013-11-16 18:56:50", "flickr_url": "http://farm5.staticflickr.com/4018/4527879508_8f69659291_z.jpg", "id": 574200}
{"segmentation": [[239.27, 139.42, 236.98, 140.04, 236.35, 159.03, 237.19, 171.97, 241.15, 186.58, 243.24, 186.37, 244.91, 165.5, 242.61, 149.02, 240.11, 140.04]], "area": 277.9082500000005, "iscrowd": 0, "image_id": 574200, "bbox": [236.35, 139.42, 8.56, 47.16], "category_id": 13, "id": 1388638}
I assume that the width/height of this image are respectively 640 and 427, and the raw COCO xywh is [236.35, 139.42, 8.56, 47.16].
The corresponding normalized coordinates in your labels, as I see, are:
11 0.375984 0.381733 0.013375 0.110445
While 0.013375=8.56/640 and 0.110445=47.16/427, I don't know how the normalized x and y, i.e., 0.375984 and 0.381733 were obtained. Could you please elaborate on this point?
Many thanks!
 graftedlife
on 22 Feb 2019
graftedlife
on 22 Feb 2019
@graftedlife according to http://cocodataset.org/#format-data, the COCO "bbox" is already in xywh, so to transform this to darknet format we should just need to divide by the image width and height.
If we divide x and w by the image width 640, and y and h by the image height 427 we get:
[0.3692, 0.3265, 0.0133, 0.1104] =
[236.35 / 640, 139.42 / 427, 8.56 / 640, 47.16 / 427]
Which does not match our darknet labels. So the COCO xy coordinates must then represent the bottom corner point of the bounding box rather than its center. If we correct for this offset then the results match. And in the COCO link above you can see it says "box coordinates are measured from the top left image corner".
[0.3759, 0.3817, 0.0133, 0.1104] =
[(236.35 + 8.56/2) / 640, (139.42 + 47.16/2) / 427, 8.56 / 640, 47.16 / 427]
@glenn-jocher
I have trained on my own dataset which contains 1000 images of 2 classes, using 1080Ti , batch = 16, train one epoch cost approximate 30s, but at the end of each eopch, it's very slow when running the val code. I found that it takes 46s at NMS eatch batch(16 images), and compute average precision for each sample cost 0.8s. In eval step, the gpu utilization rate is 16%,and only use 1-core cpu
 cy0616
on 22 Feb 2019
cy0616
on 22 Feb 2019
@cy0616 can you run a line profiler to find the slow areas? Yes, NMS is very slow, it is not run during training, only at inference time.
COCO validation takes about 2-3 minutes for 5000 images on a P100. If you see similar time ranges on COCO training then the problem is specific to your dataset.
If you find ways to speed up the code, PR’s are welcome!
glenn-jocher
on 22 Feb 2019
@graftedlife I've just read your question this morning, so quickly implemented a code to test out both coco and kitti type of data. This is not for converting, only for testing the bounding box coordinates if they are correct or not.
import os
import numpy as np
import cv2
import matplotlib.pyplot as plt

###############################################################################################################
# CONST
img_ext = ".jpg"
test_kitti = True
test_coco = True
###############################################################################################################
# PATHS
kitti_dirpath = "path/to/your/directory/"
kitti_labels_dirname = "name_of_your_label_dir_in_kitti_dirpath"
kitti_images_dirname = "name_of_your_image_dir_in_kitti_dirpath"

coco_dirpath = "path/to/your/directory/"
coco_labels_dirname = "name_of_your_label_dir_in_coco_dirpath"
coco_images_dirname = "name_of_your_image_dir_in_coco_dirpath"
###############################################################################################################

dlist = os.listdir(os.path.join(kitti_dirpath, kitti_labels_dirname))
for dl in dlist:
    img_name = dl.split('.')

    if test_kitti:
    ###########################################################################################################
    # KITTI PART
    ###########################################################################################################

        kitti_label_path = os.path.join(kitti_dirpath, kitti_labels_dirname, dl)

        with open(kitti_label_path) as f:
            kitti_content = f.readlines()
        kitti_content = [x.strip('\n') for x in kitti_content]

        kitti_image_path = os.path.join(kitti_dirpath, kitti_images_dirname, img_name[0] + img_ext)
        kitti_img = cv2.imread(kitti_image_path)

        for word in kitti_content:
            params = word.split()
            x1 = int(params[4])
            x2 = int(params[6])
            y1 = int(params[5])
            y2 = int(params[7])

            cv2.rectangle(kitti_img, (x1, y1), (x2, y2), (0, 255, 0), 3)

        # plt.imshow(kitti_img)
        # plt.show()

    if test_coco:
    ###########################################################################################################
    # coco PART
    ###########################################################################################################

        coco_label_path = os.path.join(coco_dirpath, coco_labels_dirname, dl)

        with open(coco_label_path) as f:
            coco_content = f.readlines()
        coco_content = [x.strip('\n') for x in coco_content]

        coco_image_path = os.path.join(coco_dirpath, coco_images_dirname, img_name[0] + img_ext)
        coco_img = cv2.imread(coco_image_path)
        coco_img_shape = coco_img.shape

        for word in coco_content:
            params = word.split()

            w = float(params[3]) * coco_img_shape[1]
            h = float(params[4]) * coco_img_shape[0]
            x_center = float(params[1]) * coco_img_shape[1]
            y_center = float(params[2]) * coco_img_shape[0]
            x1 = int(x_center - w/2)
            if x1 < 0: x1 = 0
            x2 = int(x_center + w/2)
            y1 = int(y_center - w/2)
            if y1 < 0: y1 = 0
            y2 = int(y_center + w/2)

            cv2.rectangle(coco_img, (x1, y1), (x2, y2), (0, 255, 0), 3)

        # plt.imshow(coco_img)
        # plt.show()
PS: it's just a quick solution, not extensively tested. The aim was to be easy to understand for everyone.
tamasbalassa
on 25 Feb 2019
Hi, I have a question about using the validation set. In my opinion, we should use a validation set to decide the performance of the training model. But I have found we only use the training set to make a decision. Thus, I suggest you add the validation set in the train.py.
 YanLu-nyu
on 26 Feb 2019
YanLu-nyu
on 26 Feb 2019
@jacksonly the validation set is already used during training to compute mAP after each epoch. This is done by calling test.py to evaluate latest.pt on the validation set pointed to by coco.data: valid=../coco/5k.txt
https://github.com/ultralytics/yolov3/blob/eb6a4b5b84f177697693a4de4e98ca4c2539cc11/train.py#L169-L171
glenn-jocher
on 26 Feb 2019
@jacksonly the validation set is already used during training to compute mAP after each epoch. This is done by calling test.py to evaluate
latest.pton the validation set pointed to by coco.data:valid=../coco/5k.txt
yolov3/train.pyLines 169 to 171 in eb6a4b5
# Calculate mAP
with torch.no_grad():
mAP, R, P = test.test(cfg, data_cfg, weights=latest, batch_size=batch_size, img_size=img_size)
Thanks for your reply, I have understood this flow. I found the many people need training customized model with pre-trained model from coco. Thus, I added some code to the train.py (line: 70~90) as follows:
    elif resume and customized:
        # load pretrain model (yolov3 from coco)
        model_pretrain = Darknet('cfg/yolov3_raw.cfg', 416)
        checkpoint = torch.load(latest, map_location='cpu')
        model_pretrain.load_state_dict(checkpoint['model'])
        # load customized model (from yolov3.cfg)
        new_model = Darknet('cfg/yolov3.cfg', 416)

        params1 = new_model.state_dict()
        params2 = model_pretrain.state_dict()

        # modelB = copy.deepcopy(modelA)
        dict_params1 = dict(params1)
        dict_params1 = dict(copy.deepcopy(dict_params1))
        dict_params2 = dict(params2)
        dict_params2 = dict(copy.deepcopy(dict_params2))

        for name, param in dict_params2.items():
            if name in dict_params1 and len(np.array(param.size())) != 0:
                if param.shape[0] != 255:
                    dict_params1[name] = dict_params2[name]
        # load pretrain-parameters to customized model
        new_model.load_state_dict(dict_params1)
I have tested this code on retraining the customized dataset and hope this can helpful.
YanLu-nyu
on 27 Feb 2019
when train this single-class model,the question is :
Is it faster to use a single-class of models than the original author's yolov3-tiny multiple-classes models?
I found my training model is a little faster( ~13 fps) than original yolov3-tiny model?
envionments : win10+ opencv4.0 DNN+VisualStudio2015
 cuixing158
on 12 Mar 2019
cuixing158
on 12 Mar 2019
@glenn-jocher Hi bro, thanks for your awesome work.
I am training with my dataset under your repo according to this guide,
While training, the output value 'cls' is always 0. Is that common?
 WannaSeaU
on 20 Mar 2019
WannaSeaU
on 20 Mar 2019
@WannaSeaU yes this is expected. If there is only a single class, how can the network guess the wrong class? Imagine if I asked you to guess a random number between zero and zero... you'd probably be correct every time as well no?
glenn-jocher
on 20 Mar 2019
@glenn-jocher Thank you for replying to such a basic question.
WannaSeaU
on 20 Mar 2019
@glenn-jocher hi, as the following picture shows, if I train one class and a picture dosen't have object in it, so i don't need create a label file of this picture or i should create a label file which contains nothing?

 XiaoJiNu
on 15 Apr 2019
XiaoJiNu
on 15 Apr 2019
@XiaoJiNu if there are not objects in your training image you don't need to supply a label file. Empty may work as well, try it out.
glenn-jocher
on 15 Apr 2019
thank you @glenn-jocher , i will try it
XiaoJiNu
on 16 Apr 2019
@glenn-jocher Hi, I was following your tutorial and it works great and also Thanks for the tutorial
I have several questions regarding training with our own dataset :
Create train and test *.txt files. Here we create data/coco_1cls.txt, which contains 5 images with only persons from the coco 2014 trainval dataset. We will use this small dataset for both training and testing. Each row contains a path to an image, and remember one label must also exist in a corresponding /labels folder for each image that has targets

is this mean I can use any random picture as long as related to the class?
and also if I would like to have 5 classes to train is this mean im going to have
data/coco_1cls.txt
data/coco_2cls.txt
data/coco_3cls.txt
data/coco_4cls.txt
data/coco_5cls.txt
where each of them has pics for training purposes?
 Jriandono
on 30 Apr 2019
Jriandono
on 30 Apr 2019
@Jriandono you're welcome! Regarding your question, no this is not correct. You only use one *.txt file for your training set and one *.txt file for your test set (they can be the same, as in the demo). This is the same no matter now many classes you have. For multiple class training on custom data please see https://github.com/ultralytics/yolov3/wiki/Train-Custom-Data
glenn-jocher
on 30 Apr 2019
Got another question. You mentioned that you created a txt file from first 10 images of coco and use it for both training and testing. I only have one txt file for images should I duplicate it as test as well. I didn’t understand what you mean by that. Did you split data first and then make txt file for them or you use one txt file for testing and training.
 sanazss
on 13 Jul 2019
sanazss
on 13 Jul 2019
@sanazss your question about how to split your data among train and test sets are basic machine learning questions, not specific to this repo, I suggest you simply google this.
For single channel images you can modify the *.cfg file from channels=3 to channels=1.
https://github.com/ultralytics/yolov3/blob/831b6e39b6ae839037469e7bfd3170e42050fa2c/cfg/yolov3-spp.cfg#L10
glenn-jocher
on 13 Jul 2019
Hi Glenn, regarding normalizing x and y of center coordinates. The way that you explained to @graftedlife should be applied for custom data as well? center coordinates should be first multiplied by width and hight and then be divided by image size? or is different for custom data and this is only for coco dataset
sanazss
on 30 Jul 2019
@sanazss all data is handles identically by the repo. All data must be in the darknet format. The coco dataset you use for the tutorials is provided in darknet format.
glenn-jocher
on 2 Aug 2019
Hi Guys
I just need some help, I am training with a single class with my custom data. Perfectly followed the example, but am experiencing the following.
Traceback (most recent call last):
  File "train.py", line 420, in <module>
    train()  # train normally
  File "train.py", line 269, in train
    loss, loss_items = compute_loss(pred, targets, model)
  File "/Users/user/Desktop/user/yolov3/utils/utils.py", line 320, in compute_loss
    tcls, tbox, indices, anchor_vec = build_targets(model, targets)
  File "/Users/user/Desktop/user/yolov3/utils/utils.py", line 438, in build_targets
    assert c.max() <= model.nc, 'Target classes exceed model classes'
AssertionError: Target classes exceed model classes
I have changed the classes to "1", on the file.data and yolo3.cfg
 sip-ops
on 22 Sep 2019
sip-ops
on 22 Sep 2019
@sip-ops your data has class numbers that exceed 0. If you are training a single class model then all the classes must be 0.
glenn-jocher
on 22 Sep 2019
@glenn-jocher you are absolutely correct, I had to change it in all labels, thanks it works now.
sip-ops
on 22 Sep 2019
@glenn-jocher after correcting my data I am getting this issue now.
`Traceback (most recent call last):
File "train.py", line 420, in
train() # train normally
File "train.py", line 233, in train
for i, (imgs, targets, paths, _) in pbar: # batch -------------------------------------------------------------
File "/Users/user/anaconda3/envs/user_env/lib/python3.7/site-packages/tqdm/std.py", line 1081, in __iter__
for obj in iterable:
File "/Users/user/anaconda3/envs/user_env/lib/python3.7/site-packages/torch/utils/data/dataloader.py", line 801, in __next__
return self._process_data(data)
File "/Users/user/anaconda3/envs/user_env/lib/python3.7/site-packages/torch/utils/data/dataloader.py", line 846, in _process_data
data.reraise()
File "/Users/user/anaconda3/envs/user_env/lib/python3.7/site-packages/torch/_utils.py", line 369, in reraise
raise self.exc_type(msg)
TypeError: Caught TypeError in DataLoader worker process 2.
Original Traceback (most recent call last):
File "/Users/user/anaconda3/envs/user_env/lib/python3.7/site-packages/torch/utils/data/_utils/worker.py", line 178, in _worker_loop
data = fetcher.fetch(index)
File "/Users/user/anaconda3/envs/user_env/lib/python3.7/site-packages/torch/utils/data/_utils/fetch.py", line 44, in fetch
data = [self.dataset[idx] for idx in possibly_batched_index]
File "/Users/user/anaconda3/envs/user/lib/python3.7/site-packages/torch/utils/data/_utils/fetch.py", line 44, in
data = [self.dataset[idx] for idx in possibly_batched_index]
File "/Users/user/Desktop/user/yolov3/utils/datasets.py", line 466, in __getitem__
labels = cutout(img, labels)
File "/Users/user/Desktop/user/yolov3/utils/datasets.py", line 661, in cutout
ioa = bbox_ioa(box, labels[:, 1:5]) # intersection over area
TypeError: list indices must be integers or slices, not tuple
0/272 0G 3.84 1.82 0 5.66 29 416: 40%|████████████████████████████████████████████████ | 2/5 [04:22<06:33, 131.28s/it]`
@sip-ops yes this error was caused by negative samples passing through the cutout augmentation function. This should be fixed now. Git pull and try again.
glenn-jocher
on 22 Sep 2019
@glenn-jocher thanks that worked
am receiving this issue, sorry to bother you on this.
`Reading image shapes: 100%|████████████████████████████████████████████████████████████████████████████████████████████████████████████████████████████████████████████████████████████████████████████████| 138/138 [00:00<00:00, 553.47it/s]
Class Images Targets P R mAP F1: 40%|████████████████████████████████████████████████▍ | 2/5 [00:43<01:07, 22.40s/it]Traceback (most recent call last):
File "train.py", line 420, in
train() # train normally
File "train.py", line 315, in train
save_json=final_epoch and epoch > 0 and 'custom_data.data' in data)
File "/Users/user/Desktop/user/yolov3/test.py", line 63, in test
for batch_i, (imgs, targets, paths, shapes) in enumerate(tqdm(dataloader, desc=s)):
File "/Users/user/anaconda3/envs/user_env/lib/python3.7/site-packages/tqdm/std.py", line 1081, in __iter__
for obj in iterable:
File "/Users/user/anaconda3/envs/user_env/lib/python3.7/site-packages/torch/utils/data/dataloader.py", line 801, in __next__
return self._process_data(data)
File "/Users/user/anaconda3/envs/user_env/lib/python3.7/site-packages/torch/utils/data/dataloader.py", line 846, in _process_data
data.reraise()
File "/Users/user/anaconda3/envs/user_env/lib/python3.7/site-packages/torch/_utils.py", line 369, in reraise
raise self.exc_type(msg)
ValueError: Caught ValueError in DataLoader worker process 2.
Original Traceback (most recent call last):
File "/Users/user/anaconda3/envs/user_env/lib/python3.7/site-packages/torch/utils/data/_utils/worker.py", line 178, in _worker_loop
data = fetcher.fetch(index)
File "/Users/user/anaconda3/envs/user_env/lib/python3.7/site-packages/torch/utils/data/_utils/fetch.py", line 44, in fetch
data = [self.dataset[idx] for idx in possibly_batched_index]
File "/Users/user/anaconda3/envs/user_env/lib/python3.7/site-packages/torch/utils/data/_utils/fetch.py", line 44, in
data = [self.dataset[idx] for idx in possibly_batched_index]
File "/Users/user/Desktop/user/yolov3/utils/datasets.py", line 446, in __getitem__
x = np.array([x.split() for x in f.read().splitlines()], dtype=np.float32)
ValueError: setting an array element with a sequence.
Class Images Targets P R mAP F1: 40%|████████████████████████████████████████████████▍ | 2/5 [00:43<01:05, 21.87s/it]`
@sip-ops your custom dataset may not be formatted correctly.
glenn-jocher
on 25 Sep 2019
if we are training for a single class do we need to change the already existing anchor box dimensions (using k means clustering). while training i got all the accuracy measures mAP, precision, recall as 0 can you please explain what might have caused this.
 aiwithshekhar
on 26 Sep 2019
aiwithshekhar
on 26 Sep 2019
@aiwithshekhar you should check your batch jpgs to make sure your data is formatted correctly. If your data is formatted correctly you can increase your training data, increase your training epochs, increase your batch size, and tune your hyperparameters.
glenn-jocher
on 27 Sep 2019
@glenn-jocher I managed to correct my dataset format, but I changed the epoch to 10, am not getting any classification after training is complete. does this affect the model?
sip-ops
on 1 Oct 2019
@sip-ops I don't understand your question, but 10 epochs is useless. YOLOv3 trains to 273.
glenn-jocher
on 1 Oct 2019
@glenn-jocher while training, classification is zero
Reading labels (71 found, 0 missing, 0 empty for 71 images): 100%|██████████████████████████████████████████████████████████| 71/71 [00:00<00:00, 9766.35it/s]
Model Summary: 225 layers, 6.29987e+07 parameters, 6.29987e+07 gradients
Starting training for 273 epochs...
 Epoch   gpu_mem      GIoU       obj       cls     total   targets  img_size
 0/272     4.46G      2.59      2.05         0      4.64         7       416: 100%|█████████████████████████████████████████| 9/9 [00:10<00:00,  1.14s/it]
           Class    Images   Targets         P         R       mAP        F1: 100%|█████████████████████████████████████████| 9/9 [00:04<00:00,  2.22it/s]
             all        71        71         0         0         0         0

 Epoch   gpu_mem      GIoU       obj       cls     total   targets  img_size
 1/272     4.46G      2.42      1.94         0      4.35         7       416: 100%|█████████████████████████████████████████| 9/9 [00:07<00:00,  1.25it/s]
           Class    Images   Targets         P         R       mAP        F1: 100%|█████████████████████████████████████████| 9/9 [00:03<00:00,  2.99it/s]
             all        71        71         0         0         0         0

 Epoch   gpu_mem      GIoU       obj       cls     total   targets  img_size
 2/272     4.46G      2.31      1.84         0      4.15         7       416: 100%|█████████████████████████████████████████| 9/9 [00:07<00:00,  1.28it/s]
           Class    Images   Targets         P         R       mAP        F1: 100%|█████████████████████████████████████████| 9/9 [00:02<00:00,  3.25it/s]
             all        71        71         0         0         0         0

 Epoch   gpu_mem      GIoU       obj       cls     total   targets  img_size
 3/272     4.46G      1.85      1.71         0      3.56         7       416: 100%|█████████████████████████████████████████| 9/9 [00:07<00:00,  1.26it/s]
           Class    Images   Targets         P         R       mAP        F1: 100%|█████████████████████████████████████████| 9/9 [00:02<00:00,  3.27it/s]
             all        71        71         0         0         0         0

 Epoch   gpu_mem      GIoU       obj       cls     total   targets  img_size
 4/272     4.46G      2.15      1.63         0      3.78         7       416: 100%|█████████████████████████████████████████| 9/9 [00:07<00:00,  1.27it/s]
           Class    Images   Targets         P         R       mAP        F1: 100%|█████████████████████████████████████████| 9/9 [00:03<00:00,  2.96it/s]
             all        71        71         0         0         0         0

 Epoch   gpu_mem      GIoU       obj       cls     total   targets  img_size
 5/272     4.46G      2.14      1.52         0      3.66         6       416: 100%|█████████████████████████████████████████| 9/9 [00:07<00:00,  1.23it/s]
           Class    Images   Targets         P         R       mAP        F1: 100%|█████████████████████████████████████████| 9/9 [00:03<00:00,  2.77it/s]
             all        71        71         0         0         0         0

 Epoch   gpu_mem      GIoU       obj       cls     total   targets  img_size
 6/272     4.46G      2.05      1.44         0      3.49         7       416: 100%|█████████████████████████████████████████| 9/9 [00:07<00:00,  1.28it/s]
           Class    Images   Targets         P         R       mAP        F1: 100%|█████████████████████████████████████████| 9/9 [00:03<00:00,  2.66it/s]
             all        71        71         0         0         0         0

 Epoch   gpu_mem      GIoU       obj       cls     total   targets  img_size
 7/272     4.46G      1.96      1.42         0      3.37         7       416: 100%|█████████████████████████████████████████| 9/9 [00:07<00:00,  1.26it/s]
           Class    Images   Targets         P         R       mAP        F1: 100%|█████████████████████████████████████████| 9/9 [00:02<00:00,  3.17it/s]
             all        71        71         0         0         0         0
@sip-ops great. Train longer.
glenn-jocher
on 9 Oct 2019
@glenn-jocher when I change classes=1 and filters=18 based on my custom data in yolov3-spp.cfg I am getting the below error:
Traceback (most recent call last):
File "train.py", line 421, in
train() # train normally
File "train.py", line 316, in train
save_json=final_epoch and epoch > 0 and 'coco.data' in data)
File "/cluster/user/yolov3/test.py", line 73, in test
inf_out, train_out = model(imgs) # inference and training outputs
File "/cluster/user/.local/lib/python3.6/site-packages/torch/nn/modules/module.py", line 547, in __call__
result = self.forward(input, *kwargs)
File "/cluster/user/yolov3/models.py", line 252, in forward
return torch.cat(io, 1), p
RuntimeError: invalid argument 0: Sizes of tensors must match except in dimension 1. Got 6 and 85 in dimension 2 at /pytorch/aten/src/THC/generic/THCTensorMath.cu:71
sip-ops
on 10 Oct 2019
@glenn-jocher when I change classes=1 and filters=18 based on my custom data in yolov3-spp.cfg I am getting the below error:
Traceback (most recent call last):
File "train.py", line 421, in
train() # train normally
File "train.py", line 316, in train
save_json=final_epoch and epoch > 0 and 'coco.data' in data)
File "/cluster/user/yolov3/test.py", line 73, in test
inf_out, train_out = model(imgs) # inference and training outputs
File "/cluster/user/.local/lib/python3.6/site-packages/torch/nn/modules/module.py", line 547, in call
result = self.forward(input, *kwargs)
File "/cluster/user/yolov3/models.py", line 252, in forward
return torch.cat(io, 1), p
RuntimeError: invalid argument 0: Sizes of tensors must match except in dimension 1. Got 6 and 85 in dimension 2 at /pytorch/aten/src/THC/generic/THCTensorMath.cu:71
Same Error with you
 wangteng1111
on 24 Oct 2019
wangteng1111
on 24 Oct 2019
thanks for your tutorial... I want get a yolo-spp single-class model with more accurate location...how many images I need to gain on the model's limitation?
 PointCloudNiphon
on 4 Nov 2019
PointCloudNiphon
on 4 Nov 2019
@sip-ops @wangteng1111 you can try using the premade single class cfg file: https://github.com/ultralytics/yolov3/blob/master/cfg/yolov3-spp-1cls.cfg
@PointCloudNiphon I don't understand your question, but in general the more images the better. COCO-like results come from 1Million boxes over 100,000 images for 80 classes. So you should aim for at least 1000 images (or 10,000 instances) per class.
glenn-jocher
on 5 Nov 2019
thanks for your answer... I mean, how many images I need to get the best performance of the model? as you know I want to train and detect only one class and you tell me the "at least" num...
PointCloudNiphon
on 5 Nov 2019
Could you please help check this sh and see if it works? Cuz I can't pull the dataset from it.
Download COCO dataset: bash yolov3/data/get_coco_dataset_gdrive.sh
And also, how can I get labels if I can't download from the command above?
 SiyangXie
on 20 Nov 2019
SiyangXie
on 20 Nov 2019
@SiyangXie yes this happens if too many people download in a short time. You should wait a few hours and try again, sorry. If that doesn't work the alternative command downloads the data from pjreddie's site: bash yolov3/data/get_coco_dataset.sh
glenn-jocher
on 20 Nov 2019
@PointCloudNiphon there's no hard answers to how many images to use. COCO uses 120k images with 1M instances over 80 classes, so if in doubt use that as a guideline (i.e. for 1 class divide the above values by 80).
glenn-jocher
on 20 Nov 2019
@PointCloudNiphon there's no hard answers to how many images to use. COCO uses 120k images with 1M instances over 80 classes, so if in doubt use that as a guideline (i.e. for 1 class divide the above values by 80).
Let's say if I want to train a single class that contains only persons, how do I pull all the images and labels of persons from COCO? Manually?
SiyangXie
on 21 Nov 2019
@SiyangXie good question. Yes, you would have to do this manually, or we could also do this for you. Ultralytics provide AI services ranging from simple advice up to delivery of fully customized, end-to-end AI solutions for our clients.
https://www.ultralytics.com/
glenn-jocher
on 21 Nov 2019
@glenn-jocher I want to use your new yolov3 on xview, and compare with your results of xview-yolov3, could you tell me how did you split your training data and validation data on the xview-yolov3 repo?
 yangxu351
on 4 Jan 2020
yangxu351
on 4 Jan 2020
@yangxu351 I don't recall exactly, but the COCO breakdown is 120k training images and 5k validation images, so I'd use similar proportions in xview (i.e. 95%-5%).
glenn-jocher
on 4 Jan 2020
Thank You for this great guide! I seem to have a problem with I think paths here. What am I doing wrong? I work in Jupyter with Pytorch on Windows 10. Thnx a lot in advance for taking a look!
RuntimeError Traceback (most recent call last)
6 optimizer.zero_grad()
7
----> 8 loss = model(imgs, targets)
9
10 loss.backward()
...
RuntimeError: cannot perform reduction function max on tensor with no elements because the operation does not have an identity
coco.data:
classes=1
train=data/artifacts/train.txt
valid=data/artifacts/val.txt
names=config/coco.names
backup=backup/
coco.names:
NUMMER
yolov3.cfg: (changes)
batch=2
3 x classes=1 / filters=18
data has the structure data/artifacts/images (dir), labels (dir), train.txt, val.txt
any label file is a single line like "0 0.347166 0.936526 0.338057 0.113586"
and an example for a line in train.txt or test.txt is
"C:/Users/andre/Documents/Program/CV_Train/custom/data/artifacts/images/pic1.JPG"
the params are:
epochs=20;image_folder="data/artifacts/images";batch_size=2;
model_config_path="config/yolov3.cfg";data_config_path="config/coco.data";
weights_path="config/yolov3.weights";class_path="config/coco.names";
conf_thres=0.8;nms_thres=0.4;n_cpu=0;img_size=416;checkpoint_interval=1;
checkpoint_dir="checkpoints";use_cuda=True;
The dataloader delivers with (if tested just before the training loop)
a,b,c=next(iter(dataloader))
print(a[0],b[0],c[0]):
C:/Users/andre/Documents/Program/CV_Train/custom/data/artifacts/images/pic1.JPG tensor([[[0.5020, 0.5020, 0.5020, ..., 0.5020, 0.5020, 0.5020],
[0.5020, 0.5020, 0.5020, ..., 0.5020, 0.5020, 0.5020],
[0.5020, 0.5020, 0.5020, ..., 0.5020, 0.5020, 0.5020],
...,
[0.5020, 0.5020, 0.5020, ..., 0.5020, 0.5020, 0.5020],
[0.5020, 0.5020, 0.5020, ..., 0.5020, 0.5020, 0.5020],
[0.5020, 0.5020, 0.5020, ..., 0.5020, 0.5020, 0.5020]]]) tensor([[0., 0., 0., 0., 0.]], dtype=torch.float64)
Thnx a lot for any suggestion!
 Andy7775
on 5 Mar 2020
Andy7775
on 5 Mar 2020
@Andy7775 you might want to start from a working environment, like a colab instance and inspect the paths there for the tutorial *.data files. If you are doing single class, you can use yolov3-spp-1cls.cfg.
Google Colab Notebook
Note I've updated the tutorial to reflect the latest code for reproducing our results. Run those lines and start from there.
glenn-jocher
on 5 Mar 2020
Thnx, I got it.
My problem was a local class not loaded so the dataloader stayed empty. Additionally the labels had a wrong path.
The tutorial helped a lot with its different examples for bug hunting, thank You!
And its great to get an answer so fast, thnx again!
BR Andy
Andy7775
on 7 Mar 2020
@Andy7775 great!
glenn-jocher
on 7 Mar 2020
Hi,I have some problems about my training result.when I seted epoch=1000.I found the map, f1, and precesion were zeros .It confused me .could you give me some advices?thank you very much !

 claire-0702
on 14 Apr 2020
claire-0702
on 14 Apr 2020
@claire-0702 you likely have no labels in your test set. Start from the tutorial.
glenn-jocher
on 14 Apr 2020
@glenn-jocher hi,I have changed my dataset about train.txt and test.txt. the images and the lables were seted as same as your tutorial.the figure one shows my dataset.


the figure two shows train.txt and test.txt


when I startet to train my dataset.the result shows that

How can i da somethings to make it better? Thank you very much !
claire-0702
on 15 Apr 2020
@claire-0702 upload your train_batch0.png and test_batch0.png images here please.
glenn-jocher
on 15 Apr 2020
@glenn-jocher train_batch0.png and test_batch0.png


claire-0702
on 16 Apr 2020
@glenn-jocher I have the same problem just like @claire-0702, the values of P, R, GIoU loss, cls_loss are always zero, the following images are
- my training process snapshot
- train_batch0.png & test_batch0.png
I follow your tutorial https://github.com/ultralytics/yolov3/wiki/Example:-Train-Single-Class, run the command down below to strat training process eventually, and I use the weight until 100 Epoch to test my data, but there is no result in the output images. How can I fix it?
python3.7 train.py --data data/track_1cls.data --cfg cfg/yolov3-spp-1cls.cfg --batch-size 12


 AndyTaiwan
on 16 Apr 2020
AndyTaiwan
on 16 Apr 2020
@AndyTaiwan if GIoU loss is zero then no anchors are above the iou threshold. You can reduce the iou threshold here:
https://github.com/ultralytics/yolov3/blob/9ea856242f4ccf320c5f3c448c393275df4b5b2f/train.py#L31
You should also replace the default anchors in the cfg with kmeans anchors for your specific dataset. @claire-0702 this may help you as well:
https://github.com/ultralytics/yolov3/blob/9ea856242f4ccf320c5f3c448c393275df4b5b2f/utils/utils.py#L691-L696
Also, since the repo is updated often, git pull to get the latest updates.
glenn-jocher
on 16 Apr 2020
I have same problem. After adding a lot more data, the gIOU is now non-zero, but the Cls is still all 0. What can cause this issue?
 wjtan99
on 16 Jul 2020
wjtan99
on 16 Jul 2020
From the visual results you posted above, I just realized that the Cls loss, P, R, mAP are all 0 if a single class cfg file is used. Is that what you intend to do?
wjtan99
on 16 Jul 2020
Ultralytics has open-sourced YOLOv5 at https://github.com/ultralytics/yolov5, featuring faster, lighter and more accurate object detection. YOLOv5 is recommended for all new projects.

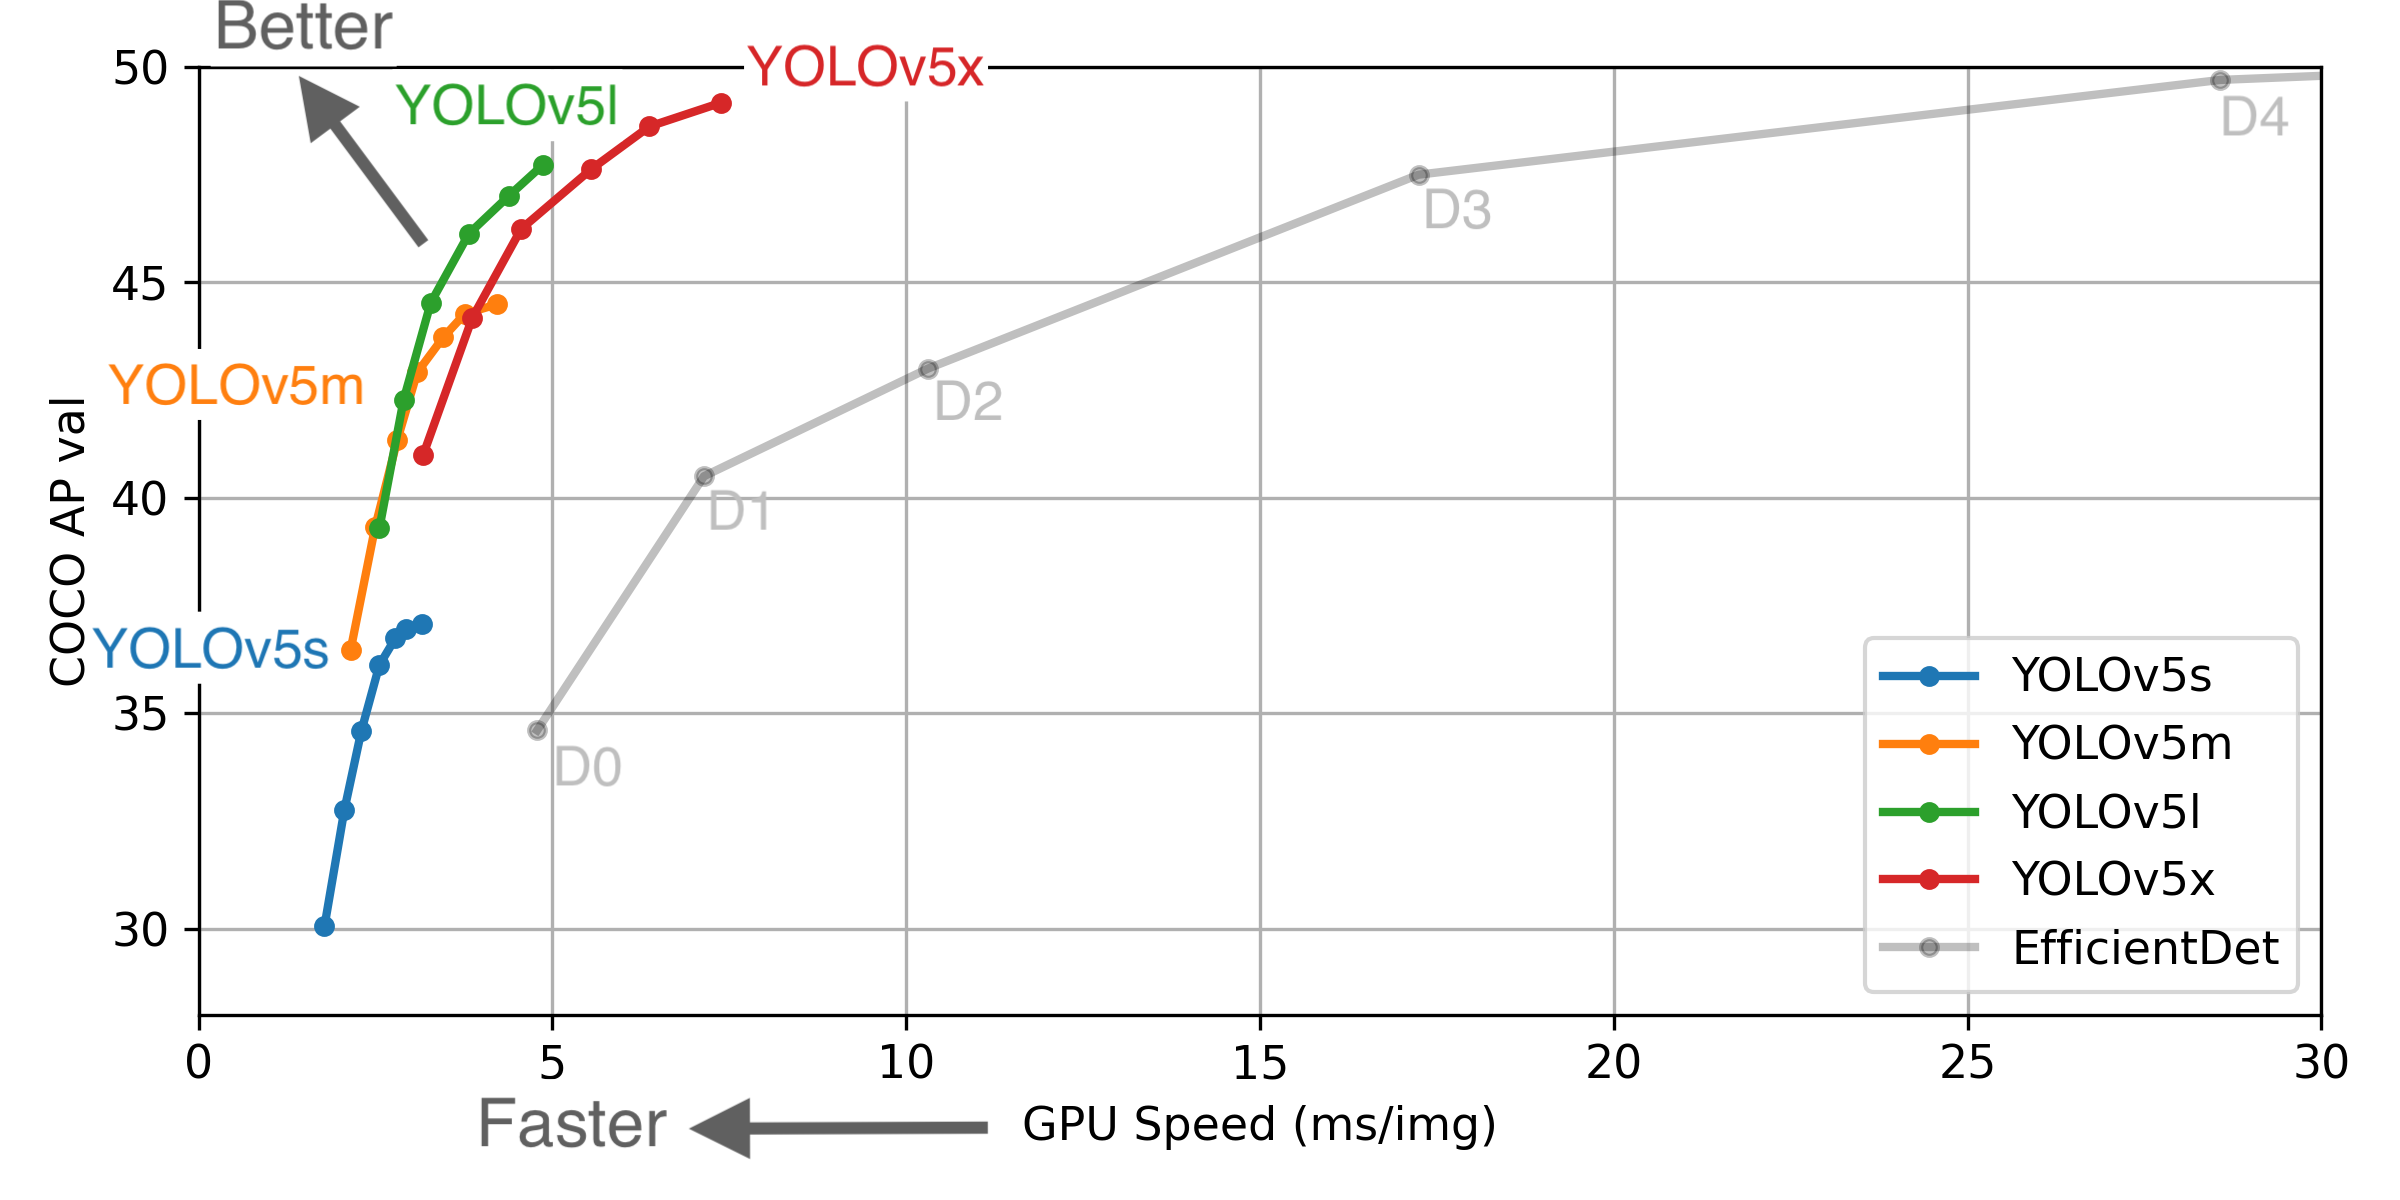 ** GPU Speed measures end-to-end time per image averaged over 5000 COCO val2017 images using a V100 GPU with batch size 32, and includes image preprocessing, PyTorch FP16 inference, postprocessing and NMS. EfficientDet data from google/automl at batch size 8.
- August 13, 2020: v3.0 release: nn.Hardswish() activations, data autodownload, native AMP.
- July 23, 2020: v2.0 release: improved model definition, training and mAP.
- June 22, 2020: PANet updates: new heads, reduced parameters, improved speed and mAP 364fcfd.
- June 19, 2020: FP16 as new default for smaller checkpoints and faster inference d4c6674.
- June 9, 2020: CSP updates: improved speed, size, and accuracy (credit to @WongKinYiu for CSP).
- May 27, 2020: Public release. YOLOv5 models are SOTA among all known YOLO implementations.
- April 1, 2020: Start development of future compound-scaled YOLOv3/YOLOv4-based PyTorch models.
Pretrained Checkpoints
| Model | APval | APtest | AP50 | SpeedGPU | FPSGPU || params | FLOPS |
|---------- |------ |------ |------ | -------- | ------| ------ |------ | :------: |
| YOLOv5s | 37.0 | 37.0 | 56.2 | 2.4ms | 416 || 7.5M | 13.2B
| YOLOv5m | 44.3 | 44.3 | 63.2 | 3.4ms | 294 || 21.8M | 39.4B
| YOLOv5l | 47.7 | 47.7 | 66.5 | 4.4ms | 227 || 47.8M | 88.1B
| YOLOv5x | 49.2 | 49.2 | 67.7 | 6.9ms | 145 || 89.0M | 166.4B
| | | | | | || |
| YOLOv5x + TTA|50.8| 50.8 | 68.9 | 25.5ms | 39 || 89.0M | 354.3B
| | | | | | || |
| YOLOv3-SPP | 45.6 | 45.5 | 65.2 | 4.5ms | 222 || 63.0M | 118.0B
* APtest denotes COCO test-dev2017 server results, all other AP results in the table denote val2017 accuracy.
* All AP numbers are for single-model single-scale without ensemble or test-time augmentation. Reproduce by python test.py --data coco.yaml --img 640 --conf 0.001
* SpeedGPU measures end-to-end time per image averaged over 5000 COCO val2017 images using a GCP n1-standard-16 instance with one V100 GPU, and includes image preprocessing, PyTorch FP16 image inference at --batch-size 32 --img-size 640, postprocessing and NMS. Average NMS time included in this chart is 1-2ms/img. Reproduce by python test.py --data coco.yaml --img 640 --conf 0.1
* All checkpoints are trained to 300 epochs with default settings and hyperparameters (no autoaugmentation).
** Test Time Augmentation (TTA) runs at 3 image sizes. Reproduce by python test.py --data coco.yaml --img 832 --augment
For more information and to get started with YOLOv5 please visit https://github.com/ultralytics/yolov5. Thank you!
glenn-jocher
on 16 Jul 2020
hi, guy's. I got problem with single class detection with yolov3. I mean no problem while training it works well. but while detecting object from video. I got problem with class_number which is 1 in my case. if i change class_number to 2 or other number and update the obj.names to 2 or other list of object names it work. but for only one object it gives me below error: please any help?
Traceback (most recent call last):
File "video.py", line 162, in
list(map(lambda x: write(x, frame), output))
File "video.py", line 162, in
list(map(lambda x: write(x, frame), output))
File "video.py", line 81, in write
label = "{0}".format(classes[cls])
IndexError: list index out of range
 bedada2
on 12 Aug 2020
bedada2
on 12 Aug 2020
@glenn-jocher
- In your tutorial coco.data How is the training path the same as the test path? Is it wrong?
- Test p, R, map, F1 in training is inconsistent with P, R, map, F1 in test, conf_ The thres parameter is 0.001
 hande6688
on 17 Aug 2020
hande6688
on 17 Aug 2020
@glenn-jocher
- in coco.data path for train and validation is look like this: train = data/train.txt valid = data/valid.txt
- I used same yolov3.cfg for both training and testing except commenting the batch and subdivisions for training while testing
Again it works for any other class_number except for class_number=1. I train the weight on alexes/darknet on colab.
bedada2
on 17 Aug 2020
This guide explains how to train your own single-class dataset with YOLOv3.
Before You Start
- Update (Python >= 3.7, PyTorch >= 1.3, etc.) and install requirements.txt dependencies.
- Clone repo:
git clone https://github.com/ultralytics/yolov3- Download COCO:
bash yolov3/data/get_coco2017.shTrain On Custom Data
1. Label your data in Darknet format. After using a tool like Labelbox to label your images, you'll need to export your data to darknet format. Your data should follow the example created by
get_coco2017.sh, with images and labels in separate parallel folders, and one label file per image (if no objects in image, no label file is required). The label file specifications are:
- One row per object
- Each row is
class x_center y_center width heightformat.- Box coordinates must be in normalized xywh format (from 0 - 1). If your boxes are in pixels, divide
x_centerandwidthby image width, andy_centerandheightby image height.- Class numbers are zero-indexed (start from 0).
Each image's label file must be locatable by simply replacing
/images/*.jpgwith/labels/*.txtin its pathname. An example image and label pair would be:../coco/images/train2017/000000109622.jpg # image ../coco/labels/train2017/000000109622.txt # labelAn example label file with 4 persons (all class
0):
2. Create train and test
*.txtfiles. Here we createdata/coco_1cls.txt, which contains 5 images with only persons from the coco 2014 trainval dataset. We will use this small dataset for both training and testing. Each row contains a path to an image, and remember one label must also exist in a corresponding/labelsfolder for each image that has targets.
3. Create new
*.names filelisting all of the names for the classes in our dataset. Here we use the existingdata/coco.namesfile. Classes are zero indexed, sopersonis class0.
4. Update
data/coco.datalines 2 and 3 to point to our new text file for training and validation (in your own data you would likely want to use separate train and test sets). Also update line 1 to our new class count, if not 80, and lastly update line 4 to point to our new*.namesfile, if you created one. Save the modified file asdata/coco_1cls.data.
5. Update
*.cfgfile (optional). Each YOLO layer has 255 outputs: 85 outputs per anchor [4 box coordinates + 1 object confidence + 80 class confidences], times 3 anchors. If you use fewer classes, reduce filters tofilters=[4 + 1 + n] * 3, wherenis your class count. This modification should be made to the layer preceding each of the 3 YOLO layers. Also modifyclasses=80toclasses=nin each YOLO layer, wherenis your class count (for single class training,n=1).
6. (OPTIONAL) Update hyperparameters such as LR, LR scheduler, optimizer, augmentation settings, multi_scale settings, etc in
train.pyfor your particular task. We recommend you start with all-default settings first updating anything.7. Train. Run
python3 train.py --data data/coco_1cls.datato train using your custom data. If you created a custom*.cfgfile as well, specify it using--cfg cfg/my_new_file.cfg.Visualize Results
Run
from utils import utils; utils.plot_results()to see your training losses and performance metrics vs epoch. If you don't see acceptable performance, try hyperparameter tuning and re-training. Multipleresults.txtfiles are overlaid automatically to compare performance.Here we see results from training on
coco_1cls.datausing the defaultyolov3-spp.cfgand also a single-classyolov3-spp-1cls.cfg, available in thedata/andcfg/folders.
Evaluate your trained model: copy
COCO_val2014_000000001464.jpgtodata/samplesfolder and runpython3 detect.py --weights weights/last.pt
Reproduce Our Results
To reproduce this tutorial, simply run the following code. This trains all the various tutorials, saves each results*.txt file separately, and plots them together as
results.png. It all takes less than 30 minutes on a 2080Ti.git clone https://github.com/ultralytics/yolov3 python3 -c "from yolov3.utils.google_utils import gdrive_download; gdrive_download('1h0Id-7GUyuAmyc9Pwo2c3IZ17uExPvOA','coco2017demos.zip')" # datasets (20 Mb) cd yolov3 python3 train.py --data coco64.data --batch 16 --accum 1 --epochs 300 --nosave --cache --weights '' --name from_scratch python3 train.py --data coco64.data --batch 16 --accum 1 --epochs 300 --nosave --cache --weights yolov3-spp-ultralytics.pt --name from_yolov3-spp-ultralytics python3 train.py --data coco64.data --batch 16 --accum 1 --epochs 300 --nosave --cache --weights darknet53.conv.74 --name from_darknet53.conv.74 python3 train.py --data coco1.data --batch 1 --accum 1 --epochs 300 --nosave --cache --weights darknet53.conv.74 --name 1img python3 train.py --data coco1cls.data --batch 16 --accum 1 --epochs 300 --nosave --cache --weights darknet53.conv.74 --cfg yolov3-spp-1cls.cfg --name 1clsReproduce Our Environment
To access an up-to-date working environment (with all dependencies including CUDA/CUDNN, Python and PyTorch preinstalled), consider a:
- GCP Deep Learning VM with $300 free credit offer: See our GCP Quickstart Guide
- Google Colab Notebook with 12 hours of free GPU time: Google Colab Notebook
- Docker Image from https://hub.docker.com/r/ultralytics/yolov3. See Docker Quickstart Guide
Hey @glenn-jocher
Currently I am working on person detection!! Right now I am using pretrained model of yolov3. Do I get better accuracy if I train the custom model with the separated person class from the ms coco dataset which contains 65k images of person only??
Can you suggest any hyper parameter to change before training? I am getting mAP @ 0.5 is 0.339 and GIoU 2.91!
 Mayur2992
on 26 Aug 2020
Mayur2992
on 26 Aug 2020
thank you guy's
bedada2
on 22 Sep 2020
why i need to download coco dataset when i have to train it on my custom dataset.
And how i can get .shapes file for my dataset.
Cant get how to modify get_coco17.sh file for my own dataset.
 zunairaR
on 6 Oct 2020
zunairaR
on 6 Oct 2020
This issue has been automatically marked as stale because it has not had recent activity. It will be closed if no further activity occurs. Thank you for your contributions.
![github-actions[bot] picture](https://avatars.githubusercontent.com/in/15368?v=4&s=40) github-actions[bot]
on 6 Nov 2020
github-actions[bot]
on 6 Nov 2020
Related issues
 JungminChung
·
3Comments
JungminChung
·
3Comments
 acburigo
·
4Comments
acburigo
·
4Comments
 Blddwkb
·
4Comments
Blddwkb
·
4Comments
 JiahongXue
·
5Comments
JiahongXue
·
5Comments
 aluds123
·
4Comments
aluds123
·
4Comments
Most helpful comment
@graftedlife according to http://cocodataset.org/#format-data, the COCO "bbox" is already in xywh, so to transform this to darknet format we should just need to divide by the image width and height.
If we divide x and w by the image width 640, and y and h by the image height 427 we get:
Which does not match our darknet labels. So the COCO xy coordinates must then represent the bottom corner point of the bounding box rather than its center. If we correct for this offset then the results match. And in the COCO link above you can see it says "box coordinates are measured from the top left image corner".