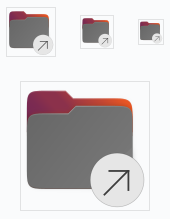
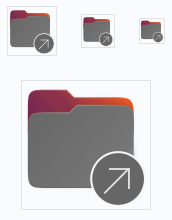
Yaru: Symlink folder badge has the same color of the folder
As in below picture, the symlink badge color is too similar to the new folder color and it's hard to see the difference

Since the new folders are in an experimental phase, there is no need to work on this immediatly.
 clobrano
All 27 comments
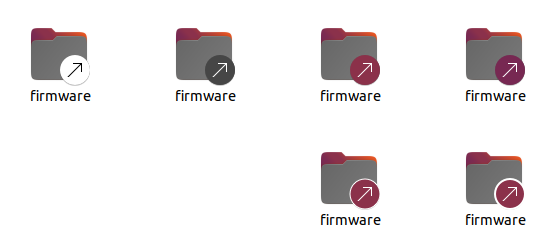
Tried " Stroke "


 meetdilip
on 15 Jan 2020
meetdilip
on 15 Jan 2020
Tried " Stroke "
🤔
clobrano
on 15 Jan 2020
Confused ?
meetdilip
on 15 Jan 2020
It is a good solution, but I think then all badges should have the white ring @meetdilip :)
Alternatively - if we keep the gray folders - we could invert the symlink icon to be a dark arrow on a almost white disk

That's #3d3d3d on #f7f7f7
 Feichtmeier
on 15 Jan 2020
Feichtmeier
on 15 Jan 2020
Looks nice.
meetdilip
on 15 Jan 2020
Confused ?
Thinking about it. It seemed very nice :+1:
clobrano
on 15 Jan 2020
Thanks. Tried the @Feichtmeier version as well
meetdilip
on 15 Jan 2020
Oookay that looks weird :D Thanks for the mockup
Shall we get those badges in line with the vanilla badges? @madsrh @ubuntujaggers
Feichtmeier
on 15 Jan 2020
The white border might be the best idea 👍Would be awesome if you could create a PR with this @meetdilip ?
I didn't try this, so maybe just a brain fart:

 madsrh
on 15 Jan 2020
madsrh
on 15 Jan 2020
Thanks @madsrh . How can I do a PR ? I consider it an honour.
Do you want me to change the badge to Aubergine ? If yes, share the hex code, please.
meetdilip
on 15 Jan 2020
I consider it an honour.
We love new contributors 💪
Do you want me to change the badge to Aubergine ?
I doubt that the 👍from @Feichtmeier was because of the color 🤷♂ so let's just keep the current color and add the white border.
I'm not a dev but you need to download the repository from github (there's a guide here)
git clone https://github.com/ubuntu/yaru.git
and change the .SVG files ofc.
I'm sure one of the other guys (@Feichtmeier @ubuntujaggers ) will jump in here with the best way to create a PR for this.
madsrh
on 15 Jan 2020
Hi @meetdilip
Great news! I think you will need to fork Yaru first, like I used to. You can do that in the web interface for Github.
Then use @madsrh's command on your own fork to download it to your local laptop.
The emblems and the folders are separate svgs that are superimposed. The file you want to edit on your laptop will be /yaru/icons/src/fullcolor/emblems/emblem-symbolic-link.svg.
It's important not to go out of the bounds of each icon, which you can see if you view the layers and make the baseplate layer visible. It's also important that the small sizes are aligned to pixels (using the grid) so they render clearly on screen. I would personally keep the existing arrows if possible, and work around them, because they're pixel-fitted to be clear.
Warning: if you just add a 1px stroke to the existing circles then the circles will start and end halfway through a pixel (because the stroke will overspill the existing circle by 0.5px) and be blurry, so there's a "gotcha" there (apologies if you already know all this!).
Once you've edited the svg we can then talk you through the script to export the individual pngs from it and then the build process to test it 👍 and then you can push your changes to github and open the PR.
Alternatively, happy to do this myself according to your mockup, but it would be really cool to have more contributors :)
 ubuntujaggers
on 15 Jan 2020
ubuntujaggers
on 15 Jan 2020
And I quite like the aubergine 👍 but the grey is also fine.
ubuntujaggers
on 15 Jan 2020
For the PR part, how much are you familiar with git and github?
clobrano
on 15 Jan 2020
Are borders really necessary? I did some tests and I think it's better without (I only use the shadow already present on the icon).
 ghost
on 15 Jan 2020
ghost
on 15 Jan 2020
Thank you @ubuntujaggers . I will try to read your posts a couple of times and make sure that I understand it
For the PR part, how much are you familiar with git and github?
Very less. What I normally do is fork through Github client, make changes and click or some button to merge ( I used to use SmartGit ). I have done this only a couple of times and now use mostly web interface. To be honest, I haven't used Github much.
meetdilip
on 15 Jan 2020
Alternatively, happy to do this myself according to your mockup, but it would be really cool to have more contributors :)
I think I will try this myself locally to learn but leave it to you for PR. It might take some time for me to understand how it really works. I haven't used templates much. Thanks.
PS : It will be great if you can teach me how to prepare the icon for PR ( looks like you already did ) so that I can do it myself next time.
I am attaching the SVG which I have corrected for pixels based on the grid. I took the source from src > folder.svg from the master branch.
It would be great if someone can tell me how close/far it is from doing a PR. Thanks.
meetdilip
on 15 Jan 2020
It would be great to have you on board, we can help ironing out the problems. I don't have the GitHub application, but can help with the git command line, which is usually quite easy as well ;)
clobrano
on 15 Jan 2020
Kind words, thank you :)
meetdilip
on 15 Jan 2020
No rush but @clobrano (or anyone else) could you write a few terminal commands for creating the PR? I would also like to know 😄 I was considering creating a short video 📹
madsrh
on 16 Jan 2020
Good Idea ;)
clobrano
on 16 Jan 2020
I am updating the README, so that everyone can use it
clobrano
on 16 Jan 2020
Okay, maybe the PR will take some time to be accepted. The guide is this one, let me know if I can improve it somehow
Get your copy of Yaru and make a Pull Request (PR)
On our GitHub page (where you are probably reading this), fork the Yaru repository, then clone your copy locally on your computer and build it for the first time to verify that everyting is in place.
git clone https://github.com/yourusername/yaru.git
cd yaru
meson build
sudo -i -H ninja install -C build
now create a feature branch for development
git checkout -b branch-name
A good branch name should recall the intended change; if it is a fix for a bug with number 1234 a good name could be something like issue1234/fix-for-something
Once you are done with your work, use git status to see the list of changed (and eventually new) files and stage them with git add and commit your work with git commit
$ git status
On branch issue1234/fix-for-something
Changes not staged for commit:
  (use "git add <file>..." to update what will be committed)
  (use "git checkout -- <file>..." to discard changes in working directory)

        modified:   CONTRIBUTING.md
...
$ git add CONTRIBUTING.md
```$bash
$ git commit
Now think about a good *commit message*. The expected format is like the following

> short explaination of the commit
>
> A more detailed explaination, possibly explaining the current state,
> why a change is needed and how you implemented the change. Try to find
> a good compromise between too short and too long.
>
> if it is a fix for a bug numbered 1234 inform GitHub system so that it
> can close it automatically when the PR is merged.
>
> closes #1234

Finally, make a Pull Request (PR) from *branch-name*

```bash
git push --set-upstream origin add-git-workflow
Open Yaru GitHub repository page, a link to "Create your Pull request" should appear on the main page
clobrano
on 16 Jan 2020
Thanks. I want to ask something. I am using 18.04. Considering the latest Yaru is for 20.04, will it be feasible to use the above procedure ?
meetdilip
on 17 Jan 2020
They have a different gtk version, so there might be some differences (probably not in icons). The best would be to have 19.10, even on a virtual machine, but if not possible, you can try as well at first and we'll try the PR in 19.10/20.04
clobrano
on 17 Jan 2020
Ok. I will skip the PR attempt at the moment. Thanks for taking time explaining :)
meetdilip
on 17 Jan 2020
I'll do the branch this weekend 👍
ubuntujaggers
on 17 Jan 2020
Related issues
Feichtmeier
·
3Comments
 chrisjbillington
·
3Comments
chrisjbillington
·
3Comments
 mivoligo
·
3Comments
mivoligo
·
3Comments
 matthewpaulthomas
·
3Comments
matthewpaulthomas
·
3Comments
 snydox
·
3Comments
snydox
·
3Comments
Most helpful comment
Okay, maybe the PR will take some time to be accepted. The guide is this one, let me know if I can improve it somehow
Get your copy of Yaru and make a Pull Request (PR)
On our GitHub page (where you are probably reading this), fork the Yaru repository, then clone your copy locally on your computer and build it for the first time to verify that everyting is in place.
now create a feature branch for development
A good branch name should recall the intended change; if it is a fix for a bug with number 1234 a good name could be something like
issue1234/fix-for-somethingOnce you are done with your work, use
git statusto see the list of changed (and eventually new) files and stage them withgit addand commit your work withgit commit```$bash
$ git commit
Open Yaru GitHub repository page, a link to "Create your Pull request" should appear on the main page