There have been release of new ifan03. It is an improved version from ifan02. Do some of you guys have it? Will there be support in tasmota?
 ghost
ghost
All 168 comments
The ifan03 has RF support and the remote can be paired with the RF bridge, makes it an interesting device as tasmota already has support for the RF bridge.
 bakman2
on 29 Jun 2019
bakman2
on 29 Jun 2019
I have a couple of ifan03. Good news is I can flash it with a RPI w/o needing an external power source, or jumpering TP16 to GND, simply hold down the button while powering up the RPI.
It appears the ifan02 template doesn't work. When I swap the module to ifan02, it will do a hard reset in about 30 seconds and revert back to factory default where I have to put in the wifi info again and it is back to basic. Keeping it on basic never reset the device.
When I swap to ifan02 and use the web interface to turn off/on, I can hear the relays click for Light, Speed 3 and when I press off, I heard the relays go off. I don't hear the relay on setting 1 or 2.
 dwest576
on 29 Jun 2019
dwest576
on 29 Jun 2019
I have ifan03 on the way. Once arrived I will (try to) implement in Tasmota.
 arendst
on 1 Jul 2019
arendst
on 1 Jul 2019
I'm waiting too for the arrival of my ifan03 :D
 patoroco
on 1 Jul 2019
patoroco
on 1 Jul 2019
iFan02 on tasmota had served me well for a year, now cool looking iFan03 arrives just in time....all we need is tasmota.
@arendst I don't know how we'd have survived without you, keep up your good work!
 anuadu
on 3 Jul 2019
anuadu
on 3 Jul 2019
iFan03 has identical exterior dimensions as iFan02. I could not even force fit into standard (US - Hampton Bay) mounting bracket. A millimeter less width and this would be perfect.
 bertmagin
on 3 Jul 2019
bertmagin
on 3 Jul 2019
This is the Serial Info from an Ifan03 after connected and configured with template for Ifan02. It take about 3 minutes and a Reset is issued:
00:00:04 WIF: Connected
00:00:04 HTP: Web server active on sonoff-4257 with IP address 192.168.123.172
23:43:09 RSL: stat/sonoff/RESULT = {"Reset":"Reset and Restarting"}
23:43:09 CFG: Use defaults
23:43:11 APP: Restarting
ets Jan 8 2013,rst cause:1, boot mode:(3,7)
load 0x4010f000, len 1384, room 16
tail 8
chksum 0x2d
csum 0x2d
v60000608
~ld
00:00:00 CFG: Loaded from flash at F9, Count 3
00:00:00 Project sonoff Sonoff Version 6.6.0(release-sonoff)-2_3_0
00:00:00 WIF: WifiManager active for 3 minutes
00:00:00 HTP: Web server active on sonoff-4257 with IP address 192.168.4.1
Above was with wificonfig set to 0. Have tried 1 and 2 with same result.
 Sawadee2u
on 10 Jul 2019
Sawadee2u
on 10 Jul 2019
I’ve received my ifan03 to replace all my ifan02, the new remote is clearly a great benefit over the previous one, installed one and waiting for tasmota implementation to flash them.
 matsube11
on 10 Jul 2019
matsube11
on 10 Jul 2019
I know there is a lot more work to do but: (Using Ifan02 Template)
Changed GPIO14 from Button4 (20) to Button4i (125) and resetting stopped.
Setting to Button4n resets as before
Setting to None(0) stops resetting also.
Sawadee2u
on 10 Jul 2019
Also. After installing tasmota 6.6.0. can't connect remote.
Sawadee2u
on 10 Jul 2019
Pics of Ifan03 if interested:


Sawadee2u
on 10 Jul 2019
I have the ifan03 too and can confirm the ifan02 template doesn't work. ITo me i seems the relays are not all controlled by the esp8266 but as I don't have schematics it's a wild guess.
If someone wants to look under the shield to see if the same microcontroller (as on ifan02) is there would make it easier.
For now implementing will be a challenge.
BTW even with the original firmware pairing the remote is/was a challenge too; I only managed to pair it once. After a power cycle the pairing was gone.
arendst
on 11 Jul 2019
Will have pics shortly
Removing shield
Sawadee2u
on 11 Jul 2019
Removed shield with heat gun narrow snout at 650f. Removed plastic push button first.
Hopefully not destructive.
These are quick pics. Let me know if you need better views or anything else at all. Really would like to get this working. Thanks


Sawadee2u
on 11 Jul 2019
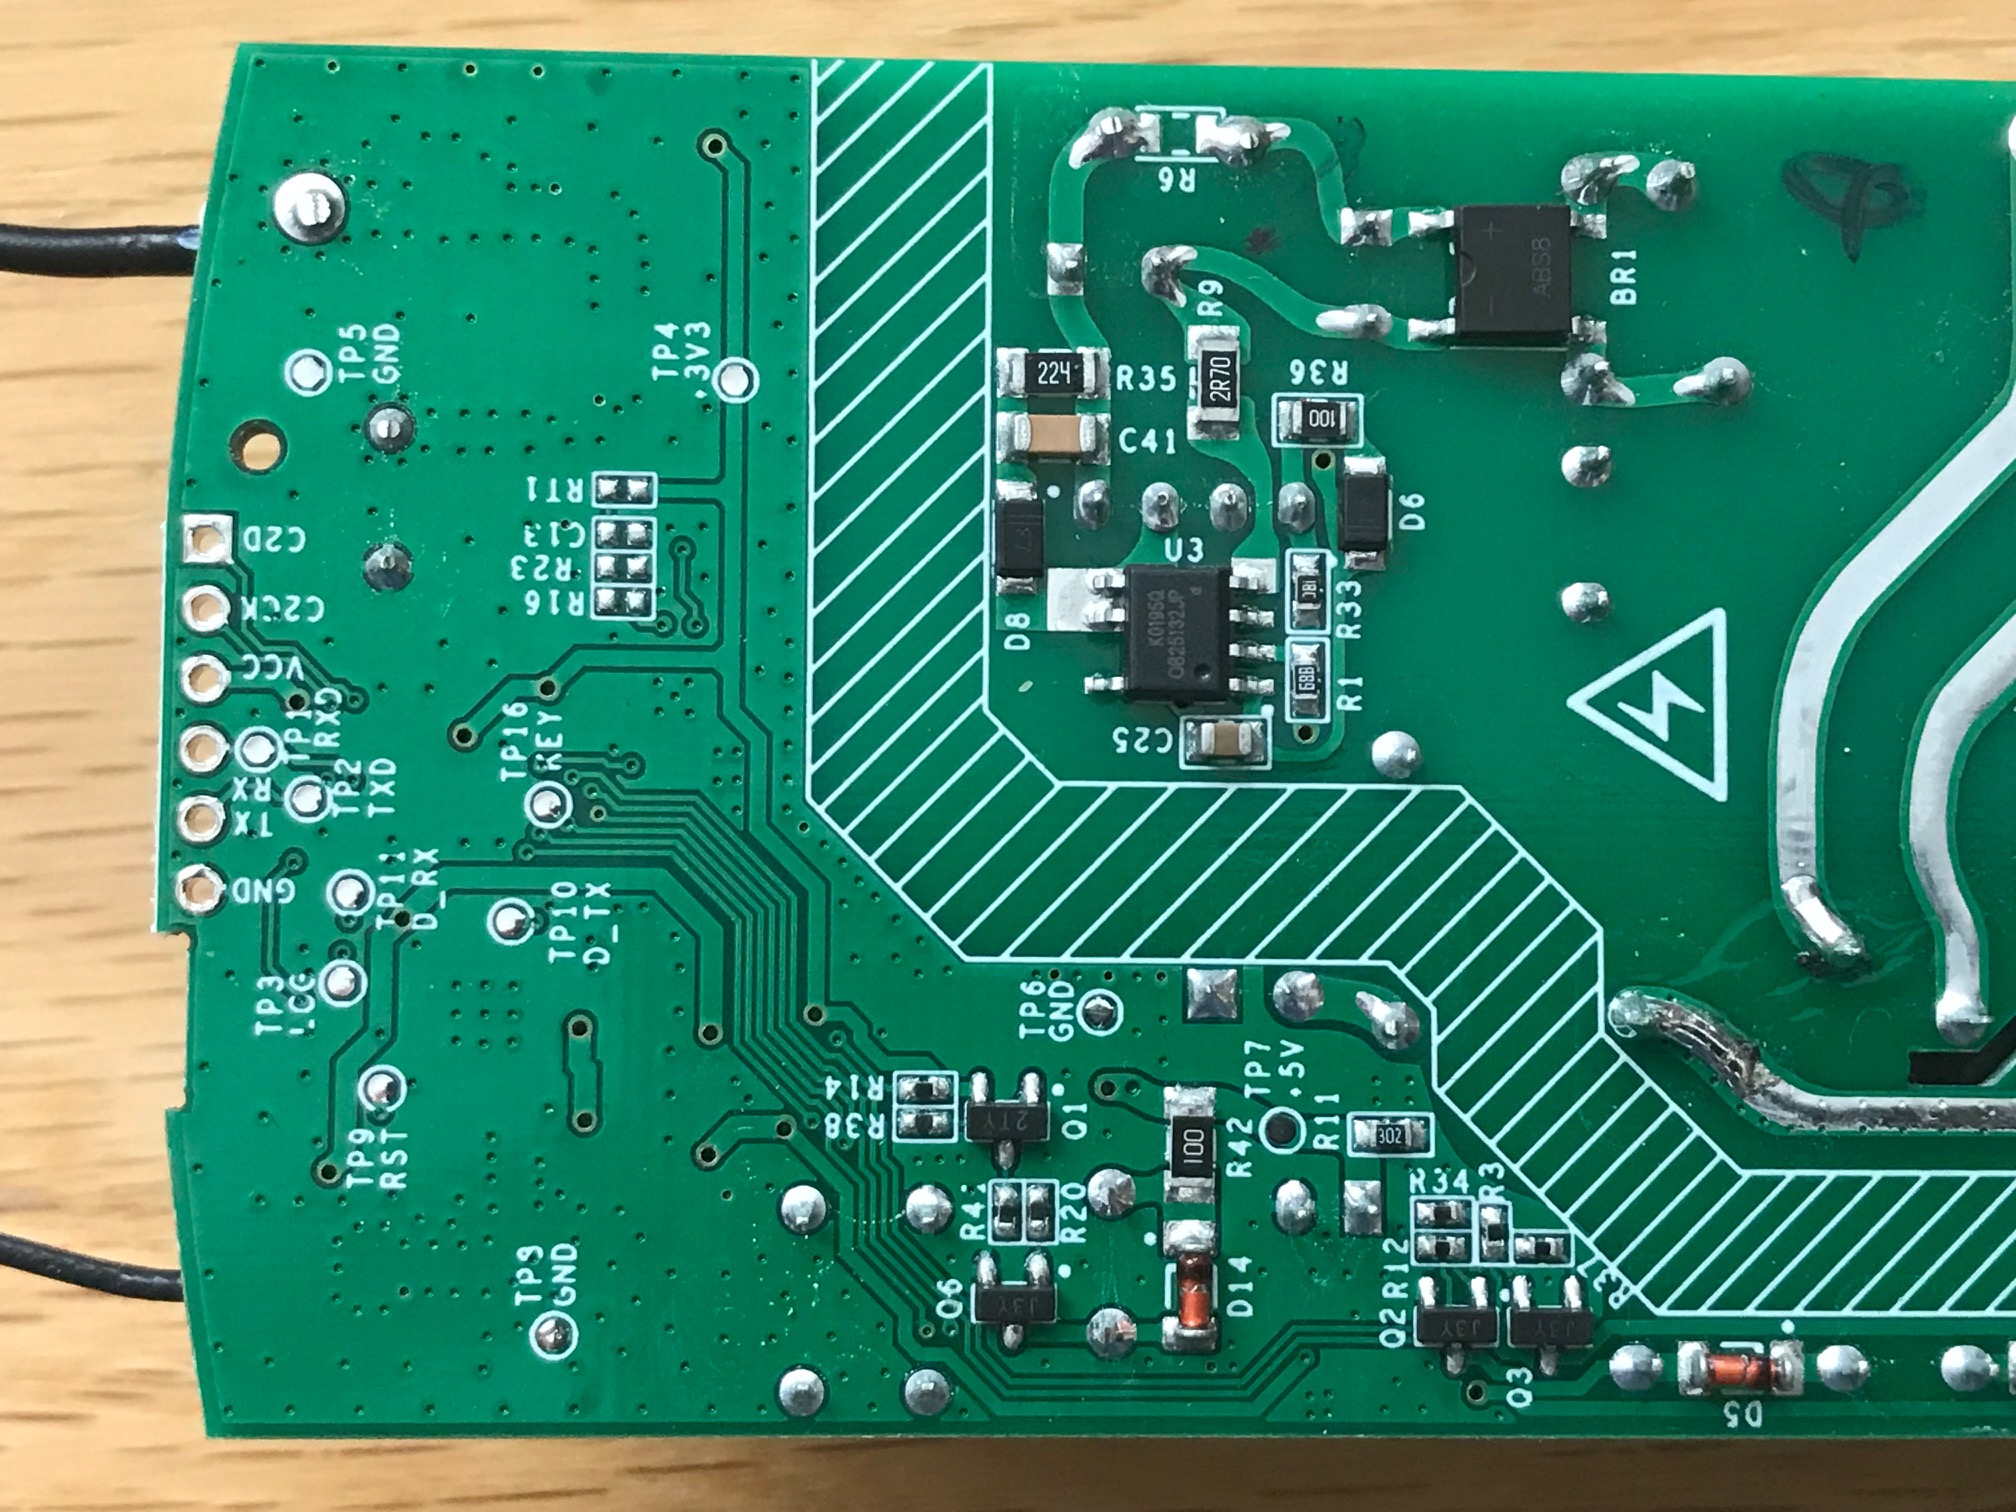
Pics are fine. Pictures show a much smaller microcontroller than the ifan02 so things have definitly changed around button and relay control.
arendst
on 11 Jul 2019
Here's one with better contrast and focus.

Sawadee2u
on 11 Jul 2019
I think this is the controller chip BB10F8G
https://www.silabs.com/documents/public/data-sheets/efm8bb1-datasheet.pdf
Sawadee2u
on 11 Jul 2019
@Sawadee2u does the ifan03 remote talk to the sonoff rf bridge (if you have one) ?
bakman2
on 11 Jul 2019
I have one but haven't tried yet. Just go it. Same freq so should with the correct codes set.
Sawadee2u
on 11 Jul 2019
@bakman2 Yes the bridge perfectly sees all switches from the remote.
@Sawadee2u Yes probably is as iTead uses it often. No need to investigate the chip or code; all we need is how it communicates with the esp8266 and how are the buttons and relays connected.
In iFan02 all are connected to the microcontroller and the esp8266 also has eight connections to the microcontroller (See logic ifan02). I see those same connections coming from the esp8285 this time too.
arendst
on 11 Jul 2019
You might want to try the below template:
{"NAME":"Sonoff iFan03","GPIO":[17,255,0,255,0,0,29,33,23,56,22,24,0],"FLAG":0,"BASE":44}
Edit: latest template
arendst
on 11 Jul 2019
Lookin' better. Light relay and all three fan speed relays working.
Sorry or the delay, was repairing a fridge for daughter.
Sawadee2u
on 11 Jul 2019
By using the template shown above the microcontroller is bypassed. This is not the end goal so I will need more time to investigate a final solution.
arendst
on 12 Jul 2019
This is great. Thank you again for all your hard work. If I can be of any use please let me know.
Sawadee2u
on 12 Jul 2019
You might want to try the below template:
{"NAME":"Sonoff iFan03","GPIO":[17,255,0,255,0,0,21,33,31,56,30,32,0],"FLAG":0,"BASE":44}
Hi all
I just tried this template with Tasmota 6.6.0 freshly flashed on an ifan03 and got everything mixed up.
light shows OFF when ON, and fan speed 3 is 1, 1 is 3, 2 is 2 and 0 (OFF) is 3 so not possible to turn off the fan.
Any clue about why ?
I'll flash back the original firmware in the meantime
matsube11
on 13 Jul 2019
Then try this:
{"NAME":"Sonoff iFan03","GPIO":[17,255,0,255,0,0,29,33,23,56,22,24,0],"FLAG":0,"BASE":44}
Edit: latest template
arendst
on 13 Jul 2019
iFan03 info so far:
- Where the ifan02 was controlled by the second microcontroller all control for the ifan03 has been moved to the esp8285; the microcontroller is only used for RF decoding.
- The microcontroller interfaces with esp8285 using the serial interface 9600 bps 8N1. I managed to trace all codes from the remote with handshaking between the two.
- As the esp8285 does the fan relay sequencing I have to implement this in Tasmota too.
- The buzzer is now controlled by the esp8285 where it can easily be enabled/disabled (GPIO10)
So it will take some time before I have it all put together but at least I think I have the info I need.
Stay tuned.
arendst
on 13 Jul 2019
Latest template:
{"NAME":"Sonoff iFan03","GPIO":[17,255,0,255,0,0,29,33,23,56,22,24,0],"FLAG":0,"BASE":44}
Thanks,
All is good now with latest template, light and fan speed are correct :)
Just have to find a way to make the remote paired again with Tasmota, worked fine with the original firmware
matsube11
on 13 Jul 2019
I have to find time and write code for the remote to make it functional again.
arendst
on 13 Jul 2019
@arendst Can it be powered via FTDI for flashing or does it require more power ?
bakman2
on 13 Jul 2019
Yes, as long as you do not toggle relays.
arendst
on 13 Jul 2019
Yes, as long as you do not toggle relays.
Thanks I was able to flash it, in order to see it coming up does it need to be connect to mains as I don't see it when powered from usb.
bakman2
on 14 Jul 2019
Mine came up just fine when connected to USB.
arendst
on 14 Jul 2019
Mine came up just fine when connected to USB.
Got it, used incorrect flash mode option (DIO) during flash.
Template appears to be working, nice!
bakman2
on 14 Jul 2019
Try the latest dev release. Pre-compiled will be downloadable in a few hours.
- It should support all features of the iFan03 when module 71 is selected.
- No need for the template as shown earlier.
- Pairing remote works stable when iFan03 is powered off, remote button is pressed and held, iFan03 is powered on, remote button is released after a few seconds.
- Make sure to keep seriallogging disabled as it is used by the RF remote.
- Disable buzzer with command
SetOption67 0or use RF remote to toggle
Give it a go.
arendst
on 14 Jul 2019
Wow, This is great. Thanks for this. Really wanted the remotes. Wife not an ‘automation’ fan....
Great work.
Sawadee2u
on 14 Jul 2019
Re-soldered the shield I removed a few day ago for pics and loaded 6.6.0.2-2.3.0. with ifan03 not plugged in. Held fan speed III down (any button should work) and plugged in power for ifan03. Kept button pressed for 15 seconds after powering on and all paired great.
Thanks again for your work and time spent on this. Much appreciated as always.
Sawadee2u
on 14 Jul 2019
I could not detect the remote in the RF bridge (running with portish in rfraw 1), is this due to the portisch firmware? (Not a big deal if the remote is detected by the ifan03)
bakman2
on 14 Jul 2019
I have a portisch fw too and it detects just fine:
20:56:09 CMD: rfraw
20:56:09 MQT: stat/bridge2/RESULT = {"RfRaw":"OFF"}
20:56:44 MQT: tele/bridge2/RESULT = {"RfReceived":{"Sync":12060,"Low":340,"High":1130,"Data":5147988,"RfKey":"None"}}
20:56:52 MQT: tele/bridge2/RESULT = {"RfReceived":{"Sync":12100,"Low":380,"High":1150,"Data":5147986,"RfKey":"None"}}
@Sawadee2u glad it works. I'll close this issue.
arendst
on 14 Jul 2019
- Pairing remote works stable when iFan03 is powered off, remote button is pres
can we use the buzzer in this ifan03 , as a saperate entity ?
so that we can use the buzzer for other activity ?
 bpmittal
on 21 Jul 2019
bpmittal
on 21 Jul 2019
Yep
arendst
on 21 Jul 2019
Hi Guy, Can you point out the GPIO0 pin for me, is it available on PCB or do we have to solder directly on the esp chip legs?
anuadu
on 22 Jul 2019
No need as the button is connected to GPIO00. Just keep the button pressed during flashing procedure.
arendst
on 22 Jul 2019
@arendst too easy, thanks
anuadu
on 22 Jul 2019
You mentioned precompiled available. Can you point me to where that is? Can't see module 71 in the latest release sonoff.bin. Or do I just need to wait (or compile it myself). Thanks
 geejayem99
on 22 Jul 2019
geejayem99
on 22 Jul 2019
See README.md and this http://thehackbox.org/tasmota/
arendst
on 22 Jul 2019
if the buzzer can be used as a separate entity then how to get that entity in HA ,
i only get 5 entities in my HA when auto discovered,
1 is light switch
2 is fan switch
3 is fan switch
4 is fan switch
5 is wifi rssi sensor
one fan switch entity is missing and one buzzer entity is missing , how to get those ?
bpmittal
on 22 Jul 2019
For anyone that has one of these that is in the US, can you say whether the speeds of the fan correspond to the usual speeds of the usual US fan speeds?
There was an issue with the iFan02 where the fan speeds for medium and low were a lot slower than the normal US fan speeds requiring a new capacitor to be installed to get the speeds better.
 finity69x2
on 23 Jul 2019
finity69x2
on 23 Jul 2019
As far as I know the capacitors are the same value as in the iFan02 so no change.
arendst
on 23 Jul 2019
how to configure ifan03 with Home assistant ?
i am unable to configure it with my HA .
bpmittal
on 23 Jul 2019
Won't you use MQTT like other Tasmota devices?
dwest576
on 23 Jul 2019
my two other tasmota nodes are working well with same HA ,
but after flashing tasmota in this ifan03 all works well within tasmota web server, but the entities which are auto discovered in HA does not works perfectly .
bpmittal
on 23 Jul 2019
@bpmittal , not sure about auto discovery. but if you are using MQTT and assuming you have topic setup as 'sonoff_fan', use the following configuration in https://github.com/arendst/Sonoff-Tasmota/wiki/Home-Assistant-%E2%80%90-Manual-Config#configure-ifan02
I used code from Example 1 for Fan and the bit from Example 2 for light component.
and bit of lovelace tweaking it looks like this
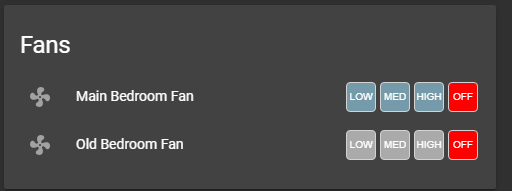
anuadu
on 24 Jul 2019
As far as I know the capacitors are the same value as in the iFan02 so no change.
Thanks for the info.
finity69x2
on 24 Jul 2019
I can confirm, the capacitors are the same and will have to be replaced for use with fans in the USA. The new ifan03 is a whole lot easier to flash and the prerelease tasmota firmware is a must. no more rubber underwear for anyone!
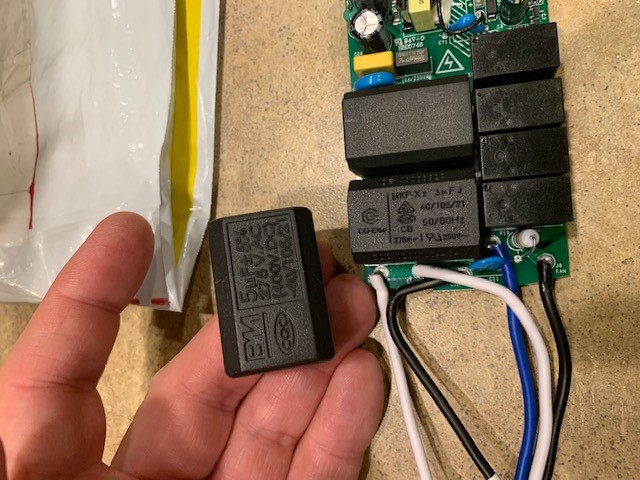
on another note, I bought some of these capacitors to replace the stock. Hopefully, they fit and I won't have to have them hanging out of the case.
(https://www.electroncomponents.com/MKP-X2-5UF-J-275V-AC-400V-DC-capacitor?filter_name=MKP%20X2%205UF%20J%20275V%20AC%20400V%20DC%20capacitor)
 AnthonyD42
on 28 Jul 2019
AnthonyD42
on 28 Jul 2019
Can someone post a link to details/procedure for replacing the capacitors for 60Hz use? Thanks!
 DonnyBahama
on 5 Aug 2019
DonnyBahama
on 5 Aug 2019
I do not get the remote control connected ...
I have the iFan03 (with the fan connected) disconnected via a switch from the mains and hold the III or the wireless link Tate -> turn on iFan03 and count to 15, release the button, but no function of the remote control
 RoboCop0815
on 8 Aug 2019
RoboCop0815
on 8 Aug 2019
I do not get the remote control connected ...
I have the iFan03 (with the fan connected) disconnected via a switch from the mains and hold the III or the wireless link Tate -> turn on iFan03 and count to 15, release the button, but no function of the remote control
You need the last precomplied tasmota (mine is 6.6.0.3) and be sure not to use the old profile.
With that setup, i paired the remote just like you said.
 tulkas84
on 8 Aug 2019
tulkas84
on 8 Aug 2019
@tulkas84 where can I find the 6.6.0.3 or is the download already 6.6.0.3 or larger?
RoboCop0815
on 8 Aug 2019
http://thehackbox.org/tasmota/release/
“Beer is Proof that God Loves Us and Wants Us to Be Happy" Benjamin Franklin
On Aug 8, 2019, at 8:52 AM, RoboCop0815 notifications@github.com wrote:
@tulkas84 where can I find the 6.6.0.3 or is the download already 6.6.0.3 or larger?
—
You are receiving this because you were mentioned.
Reply to this email directly, view it on GitHub, or mute the thread.
Sawadee2u
on 8 Aug 2019
http://thehackbox.org/tasmota/release/ * * * * * * * * * * * * * * * * * * * * * * * “Beer is Proof that God Loves Us and Wants Us to Be Happy" Benjamin Franklin * * * * * * * * * * * * * * * * * * * * * * *
…
On Aug 8, 2019, at 8:52 AM, RoboCop0815 @.*> wrote: @tulkas84 where can I find the 6.6.0.3 or is the download already 6.6.0.3 or larger? — You are receiving this because you were mentioned. Reply to this email directly, view it on GitHub, or mute the thread.
find on ttp: //thehackbox.org/tasmota/release/ only the 6.6.0 ... sorry or am I just blind ....
RoboCop0815
on 8 Aug 2019
no, not blind. You got the link to the latest release (3 numbers).
Use http://thehackbox.org/tasmota/ to get the latest dev version (4 numbers)
 joba-1
on 8 Aug 2019
joba-1
on 8 Aug 2019
Yes sorry, I always remove the ‘release’ to get to the daily releases
Also select the core you want.
“Beer is Proof that God Loves Us and Wants Us to Be Happy" Benjamin Franklin
On Aug 8, 2019, at 9:24 AM, RoboCop0815 notifications@github.com wrote:
http://thehackbox.org/tasmota/release/ * * * * * * * * * * * * * * * * * * * * * * * “Beer is Proof that God Loves Us and Wants Us to Be Happy" Benjamin Franklin * * * * * * * * * * * * * * * * * * * * * * *
…
On Aug 8, 2019, at 8:52 AM, RoboCop0815 @.*> wrote: @tulkas84 where can I find the 6.6.0.3 or is the download already 6.6.0.3 or larger? — You are receiving this because you were mentioned. Reply to this email directly, view it on GitHub, or mute the thread.find on ttp: //thehackbox.org/tasmota/release/ only the 6.6.0 ... sorry or am I just blind ....
—
You are receiving this because you were mentioned.
Reply to this email directly, view it on GitHub, or mute the thread.
Sawadee2u
on 8 Aug 2019
Can someone please post a link to info re: replacing the capacitors for 60Hz use? Which capacitor(s) need to be replaced? With what value(s)? I don’t mean to hijack this thread, but it’s the only place I’ve seen this discussed. Thanks!
DonnyBahama
on 8 Aug 2019
@DonnyBahama
I saw @DrZzs mention that the issue is that the iFan03 doesn't expect the fan to have capacitors. It's the combination of the capacitors in the iFan03 and the capacitors in then fan than causes the incompatibility. If this is the case, then perhaps bypassing or removing the capacitor block in the fan will take care of the issue.
 meingraham
on 8 Aug 2019
meingraham
on 8 Aug 2019
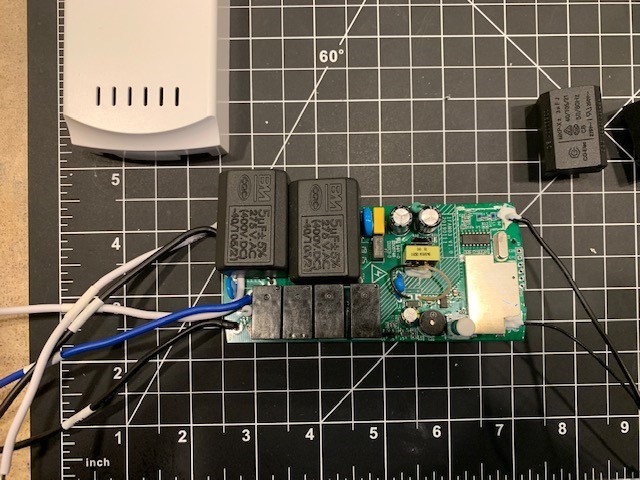
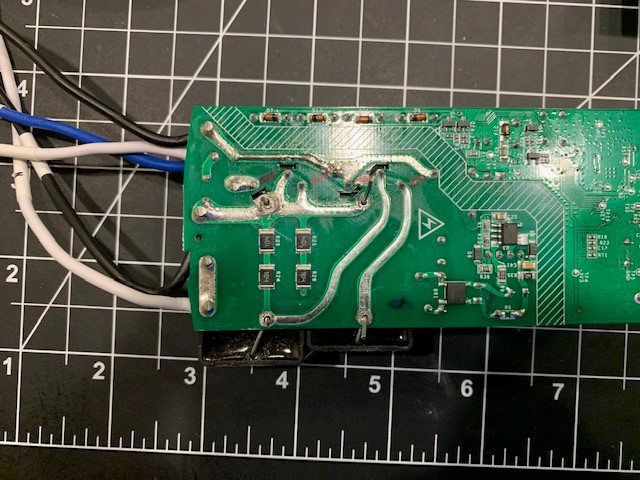
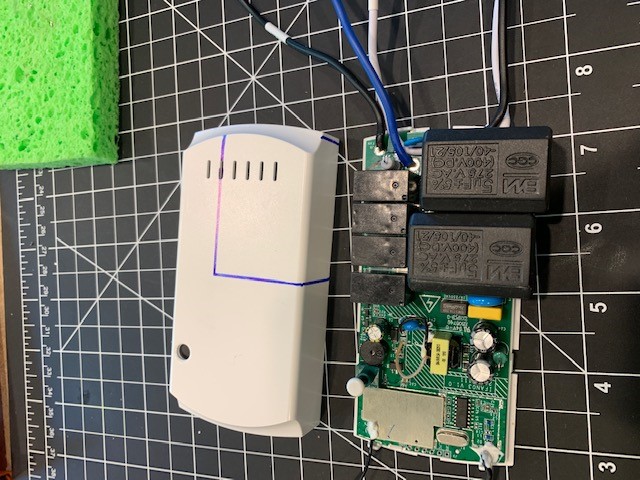
@meingraham, I do not believe that's the issue. You have to set the fan to it's highest speed setting and let the capacitors in the iFan module to reduce the speed at medium and low speed. The capacitors in the iFan03 module are about half of what is needed in fans in the USA for example. I unsoldered the original capacitors out and soldered two 5uf capacitors in their place. The 5uf are larger so I had to cut out the case to make them fit. This was my first attempt at soldering, and the biggest issue I had was trying to solder with an untinned tip. Once I tinned the tip (thanks for the hint @digiblur), I was able to melt the solder and pull them out and get the new ones in. The iFan03 works great now.
Below are some of the pictures I took (when I remembered) to show how it looks.

AnthonyD42
on 8 Aug 2019
@DonnyBahama
I bought and used capacitors from this provider:
https://www.electroncomponents.com/MKP-X2-5UF-J-275V-AC-400V-DC-capacitor?filter_name=MKP%20X2%205UF%20J%20275V%20AC%20400V%20DC%20capacitor
This is what they shipped and how they compare to the stock capacitors.
AnthonyD42
on 8 Aug 2019
Thanks, to all who helped me ... everything works after I've flashed 6.6.0.4 2.5.2 ... once reset and ifan03 (71) set,
in iobroker re-read and runs ... even with the remote control ....
RoboCop0815
on 8 Aug 2019
@nonecool Thanks for the information!
You have to set the fan to it's highest speed setting - this is usually when no capacitors in the fan speed wiring are in the electrical circuit (i.e., the line & neutral are switched together directly).
Someone needs to compile all the iFan03 information (flashing, configuration, modifications) into the template entry in detail. I would, but since I don't own one of these, I'd be stumbling blind to have the process be accurately represented.
meingraham
on 8 Aug 2019
@meingraham can you send me an email so I can update you on wiki issues I have.
arendst
on 9 Aug 2019
How can I sound the buzzer from the command line? I want to be able to Have the buzzer sound For 2 seconds when the fan is turned off and one beep for each speed. ie 1 for speed 1, 2 for speed 2, etc..
 damondins
on 11 Aug 2019
damondins
on 11 Aug 2019
Currently you can't, it's only in response to certain Ifan events.
@arendst Would it make sense to add a Buzzer<x> like command?
 s-hadinger
on 11 Aug 2019
s-hadinger
on 11 Aug 2019
Sounds like a good idea. I'll check it out.
arendst
on 11 Aug 2019
From the source file xdrv_24_buzzer.ino:
  // Buzzer <number of beeps>,<duration of beep in 100mS steps>,<duration of silence in 100mS steps>
  // All parameters are optional
  //
  // Buzzer        = Buzzer 1,1,1 = Beep once with both duration and pause set to 100mS
  // Buzzer 2      = Beep twice with duration 200mS and pause 100mS
  // Buzzer 2,3    = Beep twice with duration 300mS and pause 100mS
  // Buzzer 2,3,4  = Beep twice with duration 300mS and pause 400mS
@arendst
If one uses the Buzzer component (160/161) for any device, do you have to use SetOption67 to control it? In other words, if I connect a "buzzer peripheral" (I'm sure there are many peripheral options) to a D1 and configure component 160, does it need to be enabled to function? In addition, a user could take advantage of the option to use it as a "mute" function, say during nighttime. Or is SetOption67 only applicable to the iFan03?
Mike
meingraham
on 12 Aug 2019
As it stands the command does not care about the setting of SetOption67. This way, when the option on the ifan has been disabled control over the buzzer is still posible using commands and rules.
So for now there is no way to disable buzzer.
arendst
on 12 Aug 2019
@arendst
Compiled, Tested and working for me. That is exactly what I was looking for. Thank you!
damondins
on 12 Aug 2019
@arendst
Where can I get more information on setting the Tune parameter?
Also Buzzer 2,3,4,0xF54 = Beep a sequence once indicated by 0xF54 = 1111 0101 01 with duration 300mS and pause 400mS - in the driver, 0xF54 = 1111 0101 01? Tune is uint32_t.
Mike
meingraham
on 13 Aug 2019
You found all the info I released ;-)
The idea behind tune is that a user can make the buzzer sound with long and short beeps within the 32-bits of a uint32_t variable. When tune is not zero the count parameter is discarded and tune will be executed only once.
In the case of the example where beeptime = 3, beeppause = 4 and tune is set to 0xF54 (which equals binary 111101010100) the buzzer will always beep on 1's and pause on 0's like:
- beep 4x3x100ms
- pause 1x4x100ms
- beep 1x3x100ms
- pause 1x4x100ms
- beep 1x3x100ms
- pause 1x4x100ms
- beep 1x3x100ms,
- Silence
The remaining zeros are discarded and the buzzer will silence.
I hope that makes sense...
arendst
on 13 Aug 2019
@arendst
Thanks. I got it... eventually.
Each 1 bit is "played" for the beep duration parameter. Each 0 is silence for the silence parameter setting. The beeps parameter repeats the entire tune.
In your wiki update you state that the tune parameter default is 0. But if that's the case, then the tune mask is all zeroes (all silence). So, all parameters are 1 by default?
I'll add that to the wiki (somehow :wink:)
P.S. The bitmask in the driver comment is not correct :wink:
meingraham
on 13 Aug 2019
tune by default is all 0. In that case the tune information is not used and the count field is used to sound the buzzer count times.
As soon as tune is not zero, ie one or more bits set, the count field is discarded and the tune is executed only once starting with the first bit set. So to confuse matter even more a tune of 0x00F520 discards all leading and trailing zeros resulting in 11110101001.
The bitmask in the driver represents the functional bits, the last two zero bits (not written) are discarded so the working bits are indeed 1111 0101 01.
I wish you had a buzzer than you could hear what I mean ;-)
arendst
on 13 Aug 2019
OK, I understand why the comment drops the final two zeroes. I think showing the trailing zeroes in the wiki will be clearer. Yes, they are silence so in essence they are "ignored". But for the sake of keeping the 1/0 beep/silence correspondence clearer I think I'll state it in the wiki (probably a separately linked wiki article).
But further clarification so I get it right...
- If
tuneis not specified then only the first three parameters are taken into consideration. If you pass the fourth parameter as0, is it also ignored? - If all four parameters are specified, the first parameter is a
count(I'm changing the name of the first parameter in the wiki) of the number of times the entire tune is played?
meingraham
on 13 Aug 2019
Good idea.
Clarification:
- Yes, it's ignored
- Yes and No. The first parameter is a
countbut is ignored; the tune is only played once.
BTW you can also configure a led as buzzer and see what the tune does...
arendst
on 13 Aug 2019
I think I'm going to give it a try without the detailed example or secondary article :wink: Take a look at what I have now.
I'm not even going to mention Buzzeri :wink:
P.S. Since tune is 32 bits, can the bitmask be 32 bits?
meingraham
on 13 Aug 2019
Yes the bitmask can be 32 bits.
Buzzeri is like ledi or relayi which aren't mentioned in the wiki command list either.
Just checked your update. Looks fine to me.
arendst
on 13 Aug 2019
can i configure and use this buzzer in ifan03 as a doorbell ?
bpmittal
on 13 Aug 2019
Trust yourself. You can do it. I put my trust in you.
arendst
on 13 Aug 2019
Thanks, to all who helped me ... everything works after I've flashed 6.6.0.4 2.5.2 ... once reset and ifan03 (71) set,
in iobroker re-read and runs ... even with the remote control ....
How did you managed to pair the remote? 6.6.0.5, 2.5.2 and I can't seem to get any response from the iFan03 to any buttons
 fishbone-git
on 17 Aug 2019
fishbone-git
on 17 Aug 2019
I finally got around to trying to flash the iFan03 and I'm apparently doing something wrong since I'm not getting the wifi AP coming up when I power it up after flashing to continue set up.
I flashed the sonoff.bin file from thehackbox.org/tasmota using the 2.3.0 core that was compiled on 20190818 so I'm assuming that's the latest version and the ifan03 should be supported in it.
I then flash the board using NodeMCU-pyflasher-4.0 and selected auto port selection.
The log readout says that the device was successfully flashed.
But there was one confusing part.
The first time I flashed it I held the button down until I plugged it in and then released it. Then I proceeded to flash it and the log showed a successful flash.
Then I read that you have to hold the button down the whole time you are flashing it. I repeated the flashing with the button held down the whole time and the log said the flash was successful then too.
Which one am I supposed to do?
Neither way provided me with the wifi AP to continue the set up so I'm not sure what I'm doing wrong.
finity69x2
on 18 Aug 2019
I flashed mine today with 6.6.0.5 and had no issues. Powering with the FDTI for flashing. and pressing the button to enable flash mode whilst powering.
Everything works as advertised. Thanks!
Paring the remove was easy. I did it after flashing. I powered the device and straighaway pressed the top left button on the remote until the relay came on. It took about 5 seconds.
Now, I have a couple of questions:
What is the Test Point "KEY? I found it on other sonoff devices, sometimes with a through hole. What is it for and what is it connected to?
Is there a spare gpio on the ifan03 to connect a switch for the light? I would like to replace the original wall switch with a push button and have a single press toggle the light and a HOLD press circle through the fan positions.
 vzorglub
on 18 Aug 2019
vzorglub
on 18 Aug 2019
I then flash the board using NodeMCU-pyflasher-4.0 and selected auto port selection.
Did you select Flash mode DOUT ? This is a MUST on the ESP8285
vzorglub
on 18 Aug 2019
KEY - I believe this is GPIO0... or the device button. __Sometimes__ one and the same. But on the iFan03, the button is connected to GPIO0 so not sure KEY is of any use regardless.
meingraham
on 18 Aug 2019
I've just received an iFan03 and seem to have got it flashed using a Pi.
One question though - will the bundled RF remote work with Tasmota installed - or it can it only be used if I also have a Sonoff RF Bridge?
 wiredworm
on 19 Aug 2019
wiredworm
on 19 Aug 2019
The Sonoff RF Bridge is not required. The remote pairs to the iFan03 directly.
Tasmota is only on the Wi-Fi side of things. The RF is handled by the RF MCU which is not part of the ESP chip.
The confusion with the Sonoff RF Bridge when it comes to Tasmota conversations is that both the ESP and the RF chips on the Sonoff Rf Bridge can be flashed with custom firmware - Tasmota for the ESP and Portisch for the RF. Tasmota supports both the Itead RF firmware as well as the optional Portisch firmware with its additional commands. Also, once Tasmota is flashed on the ESP, it can be used to flash the Portisch software onto the Sonoff Bridge RF chip.
Mike
meingraham
on 19 Aug 2019
One question though - will the bundled RF remote work with Tasmota installed
Yes.
Paring the remove was easy. I did it after flashing. I powered the device and straighaway pressed the top left button on the remote until the relay came on. It took about 5 seconds.
vzorglub
on 19 Aug 2019
So power on the iFan03 and then hold the top left button on the remote?
Were you running it off mains when you did this or using the ground and VCC points on the board please?
Top left button according to the manual is On/Off (Light) - is that the one?
wiredworm
on 19 Aug 2019
Yes running of mains.
That's the one
vzorglub
on 19 Aug 2019
Ok, then maybe that's why mine won't pair. I'll hook it up and try it. Thanks.
wiredworm
on 19 Aug 2019
No luck running on mains either.
Could you confirm the exact procedure please? Do I need to hold the button in on the remote after powering the iFan03 on?
Also, could you please take a look at this PDF and confirm which remote button it is that you have to press or hold? http://dl.itead.cc/ifan03/iFan03-user-manual%20V1.0.pdf
Thanks
wiredworm
on 19 Aug 2019
I was pressing the top left button. The one labeled On/Off (Light) on the manual.
Try pressing the button on the remote and whilst pressed then power the device.
I had the sonoff powered from a test socket. I pressed the remote button and and kept pressed. At the same time I powered the sonoff. After few seconds the relay turned on. I have a test lamp I use for these purposes.
vzorglub
on 19 Aug 2019
Thanks for the detailed explanation vzorglub.
Unfortunately no dice for me - that doesn't work either. I've hooked up a plug to power the iFan03 and although i've not connected anything to the output it should be possible to see if it's working because the relay willl make a clicking noise, and that's not happening.
I don't know if the version of Tasmota would make a difference? I'm using the latest build and flashed the Sonoff.bin file. I then configured a template using the values shown earlier in this thread.
wiredworm
on 19 Aug 2019
vzorglub
on 19 Aug 2019
And in the config panel select device ifan03 (71)
Note the version number: 6.6.0.5
vzorglub
on 19 Aug 2019
I'm only on 6.6.0 so looks like an update is needed.
I'll take care of that first and then check the config again.
Edit: I see 6.6.0 is the most current version. Do I need to download the dev version to get 6.6.0.5?
wiredworm
on 19 Aug 2019
Hmmm, just downloaded the dev version but still showing 6.6.0 in the web ui?
Could some kind soul provide a link to the FW file I need to flash please just so i'm sure i'm using the right one?
wiredworm
on 19 Aug 2019
vzorglub
on 19 Aug 2019
Did an OTA update using that link vzorglub and then updated the module as you showed in your screenshot.
Works perfectly now. :-)
Huge thanks for your help - that is super awesome.
wiredworm
on 19 Aug 2019
I just noticed the status (in Developer tools -> states) of the light in Home Assistant is always set to off, even when the light actually is turned on.
From the GUI, I can turn on the light, but cannot switch it off either. light.toggle also is only able to turn on the light, but not turn in off.
Looks to me Home Assistant currently isn't able to monitor the status of the light correctly. Could this be a Tasmota issue or should this be addressed in Home Assistant?
 BarBaar44
on 19 Aug 2019
BarBaar44
on 19 Aug 2019
@barbaar44
Your issue is that your config in home assistant is wrong. Check if you are using indexes for power command like power1 power2 etc.
If you need further assistant, please address this to the Tasmota support chat.
 ascillato
on 19 Aug 2019
BarBaar44
on 19 Aug 2019
ascillato
on 19 Aug 2019
BarBaar44
on 19 Aug 2019
Noob question here. Just got an ifan03. Does anyone have a diagram of what you need to solder to flash Tasmota onto an ifan03? Pics would be great, I searched and cannot find any info. The board is quite different from the ifan02 info i can find. I have flashed many sonoff basics in the past. Don't wanna fry my new ifan03.
 ginjac
on 20 Aug 2019
ginjac
on 20 Aug 2019
What are you using to flash it?
I've got an FTDI but decided against using it to flash the iFan03 because so far as i'm aware it doesn't provide sufficient voltage to power the iFan up. I ended up using a Raspberry Pi instead. Took a bit of setting up but worked like a charm.
wiredworm
on 20 Aug 2019
@ginjac don't solder anything. Flip it over. The pins are labeled. Take an empty pin header and put 4 jumpers in it. Shove it in the hole. Make sure you are on 3v3 volts. Hold the button while applying power for a few seconds. Flash away.
 digiblur
on 20 Aug 2019
digiblur
on 20 Aug 2019
Yeah, no need to solder. I just bought some pre-made jumper wires which came as a mixture of male to female, male to male and female to female. Just used female to male cables and shoved the prongs into the appropriate holes.
Does an FTDI provide enough power to flash this thing? I read in one of the guides that it doesn't?
wiredworm
on 20 Aug 2019
Thanks! worked like a champ!
ginjac
on 20 Aug 2019
I flashed mine with an FDTI and I had no issues
vzorglub
on 20 Aug 2019
It's hopeful (and frustrating) to see so many people successfully flash their ifan03. I've unfortunately so far not managed. Can anyone help me out?
This is my first time flashing a sonoff device so can't build on past experience. I've so far done a few tuya lights. Needed a fan controller and this was the best one out there.
I've used an FTDI usb serial adapter but it failed. Thinking mine was a fake, I decided to buy a CH340g, but that also didn't work either. Am using a mac, tried NodeMCU Py Flasher and then esptool.py, then Arduino but the dev port just doesn't show up!
At first, I tried without soldering and simply pushing the wires inside the holes. Now i've even soldered. Made sure Rx-Tx and vice versa, using 3.3V... I press the only button available on iFan03 when i connect it via USB, but nothing happens.
Any advice or suggestion?
(sorry for the long comment)
 mudit182
on 20 Aug 2019
mudit182
on 20 Aug 2019
@mudit182
First question: does it still work?
vzorglub
on 20 Aug 2019
lol I haven't actually tried that yet. I ordered 3, wanted to use Tasmota directly...
Am planning to test out with the ewelink app in a couple of hours. Noob question, do I need to connect the sonoff iFan03 output wires to a fan? Or simply pushing the input wires of iFan03 inside an electrical outlet work?
mudit182
on 20 Aug 2019
You don't need to connect the output wires to anything. Just make sure they don't touch each other. Just powering the device should suffice.
Test one you haven't touched yet. Then try the one you tried to flash.
vzorglub
on 20 Aug 2019
Checked! They are all working. All paired with phone, and i could hear the relays click when i press the light and fan buttons.
mudit182
on 20 Aug 2019
Hi,
Can someone share their home assistant config please. The status of "fan" do get updated but i cannot control/change anything from home assistant. Here is my config. I did try updating the state topic to Power1 but that did not help
  - platform: mqtt
    name: "Bedroom Fan"
    command_topic: "Fans/Bedroom_Fan/FanSpeed"
    speed_command_topic: "Fans/Bedroom_Fan/FanSpeed"
    state_topic: "Fans/Bedroom_Fan/RESULT"
    speed_state_topic: "Fans/Bedroom_Fan/RESULT"
    state_value_template: >
      {% if value_json.FanSpeed is defined %}
        {% if value_json.FanSpeed == 0 -%}0{%- elif value_json.FanSpeed > 0 -%}4{%- endif %}
      {% else %}
        {% if states.fan.bedroom_fan.state == 'off' -%}0{%- elif states.fan.bedroom_fan.state == 'on' -%}4{%- endif %}
      {% endif %}
    speed_value_template: "{{ value_json.FanSpeed }}"
    availability_topic: "Fans/Bedroom_Fan/LWT"
    payload_off: "0"
    payload_on: "4"
    payload_low_speed: "1"
    payload_medium_speed: "2"
    payload_high_speed: "3"
    payload_available: Online
    payload_not_available: Offline
    speeds:
      - off
      - low
      - medium
      - high
 UmerFraz
on 20 Aug 2019
UmerFraz
on 20 Aug 2019
Does anyone have a link to the schematics for this yet?
finity69x2
on 25 Aug 2019
@UmerFraz
There are two different configurations that are needed depending on how you will be using the fan in Home Assistant.
First if you want to use the original way with just a toggle switch displayed on the frontend and requiring you to use the "more info" popup box to change the speeds then this is the config:
(in both examples my topic is defined as "iFan03-1")
  - platform: mqtt
    name: "iFan03-1 Test Fan Popup"
    command_topic: "cmnd/iFan03-1/FanSpeed"
    speed_command_topic: "cmnd/iFan03-1/FanSpeed"
    state_topic: "stat/iFan03-1/RESULT"
    speed_state_topic: "stat/iFan03-1/RESULT"
    state_value_template: >
      {% if value_json.FanSpeed is defined %}
        {% if value_json.FanSpeed == 0 -%}0{%- elif value_json.FanSpeed > 0 -%}ON{%- endif %}
      {% else %}
        {% if states.fan.ifan03_1_test_fan_popup.state == 'off' -%}0{%- elif states.fan.ifan03_1_test_fan_popup.state == 'on' -%}ON{%- endif %}
      {% endif %}
    speed_value_template: "{{ value_json.FanSpeed }}"
    availability_topic: tele/iFan03-1/LWT
    payload_off: "0"
    payload_on: "ON"
    payload_low_speed: "1"
    payload_medium_speed: "2"
    payload_high_speed: "3"
    payload_available: Online
    payload_not_available: Offline
    speeds:
      - off
      - low
      - medium
      - high
If, however you want to use the fan control entity row I created to display all of the controls in-line (https://github.com/finity69x2/fan-control-entity-row) then this is the required config:
  - platform: mqtt
    name: "iFan03-1 Test Fan"
    command_topic: "cmnd/iFan03-1/FanSpeed"
    speed_command_topic: "cmnd/iFan03-1/FanSpeed"
    state_topic: "stat/iFan03-1/RESULT"
    speed_state_topic: "stat/iFan03-1/RESULT"
    state_value_template: >
      {% if value_json.FanSpeed is defined %}
        {% if value_json.FanSpeed == 0 -%}0{%- elif value_json.FanSpeed > 0 -%}4{%- endif %}
      {% else %}
        {% if states.fan.ifan03_1_test_fan.state == 'off' -%}0{%- elif states.fan.ifan03_1_test_fan.state == 'on' -%}4{%- endif %}
      {% endif %}
    speed_value_template: "{{ value_json.FanSpeed }}"
    availability_topic: tele/iFan03-1/LWT
    payload_off: "0"
    payload_on: "4"
    payload_low_speed: "1"
    payload_medium_speed: "2"
    payload_high_speed: "3"
    payload_available: Online
    payload_not_available: Offline
    speeds:
      - off
      - low
      - medium
      - high
@finity69x2
Thanks very much. Your config saved the day. The only change I had to make was to add "cmnd" after the topic instead of before
i.e. "Fans/Bedroom_Fan/cmnd/FanSpeed" (for my full topic "Fans/Bedroom_Fan") in both the command topics.
Next, I will try using your custom card though i have no prior exprience with customising lovelace.
UmerFraz
on 26 Aug 2019
@UmerFraz
Well, isn't that strange, unless you changed the full topic setting at some point?
All of my Tasmota devices use the same topic structure as I posted above.
As far as customizing Lovelace, if you are on the HA forum you could post in the relevant topic there if you get stuck and I can help you out.
https://community.home-assistant.io/t/lovelace-fan-control-entity-row/102952
finity69x2
on 26 Aug 2019
THANKS GUYS ALSUM JOB
just got 2 fan03 and everything working ONE HAPPY CAMPER
 MYLE-01
on 26 Aug 2019
MYLE-01
on 26 Aug 2019
@meingraham
Do you mind me asking where is the wiki that you are referring to?
I only see this one:
https://github.com/arendst/Sonoff-Tasmota/wiki/Sonoff-iFan03
and it's a little sparse.
I was going to contribute to it but it seems you guys are talking about a different wiki page that has more info in it and I don't want to potentially duplicate any effort.
finity69x2
on 26 Aug 2019
@finity69x2
Yes, it is sparse
Someone needs to compile all the iFan03 information (flashing, configuration, modifications) ... I would, but since I don't own one of these, I'd be stumbling blind to have the process be accurately represented.
https://github.com/arendst/Sonoff-Tasmota/issues/5988#issuecomment-519599456
meingraham
on 26 Aug 2019
@meingraham
So is that the only one?
Which wiki are you and Theo discussing in this post?:
Yes the bitmask can be 32 bits.
Buzzeri is like ledi or relayi which aren't mentioned in the wiki command list either.
Just checked your update. Looks fine to me.
finity69x2
on 26 Aug 2019
@finity69x2
Yes i did change the full topic actually. Just trying to keep topics organised (i think).
Thanks once again. I found your repository on HACS (HA community store for custom lovelace) and the rest was much easier than what I expected. I have the custom card working beautifully.
Also kudos to those whom are trying to actually contribute unlike me just raising trivial problems.
UmerFraz
on 26 Aug 2019
@finity69x2
meingraham
on 26 Aug 2019
I made some additions to the newly created iFan03 support page.
https://github.com/arendst/Sonoff-Tasmota/wiki/Sonoff-iFan03
Feel free to correct any errors.
finity69x2
on 27 Aug 2019
Thx.
arendst
on 27 Aug 2019
I made some additions to the newly created iFan03 support page.
https://github.com/arendst/Sonoff-Tasmota/wiki/Sonoff-iFan03
Feel free to correct any errors.
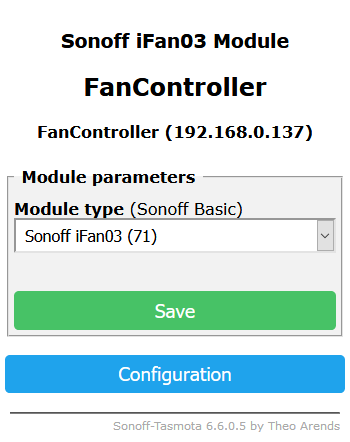
Maybe I'm blind but I don't find this in the dropdown menu?
"Find the IP address of the iFan03 and navigate to that IP address in any browser. Select "Configure Module" from the "Configuration" menu and select Sonoff iFan03 (71) from the drop down list."
Downloaded and using 6.6.0 Release from here - http://thehackbox.org/tasmota/release/
 SauRoNZA
on 6 Sep 2019
SauRoNZA
on 6 Sep 2019
You need to use latest Tasmota from development (6.6.0.10) from http://thehackbox.org/tasmota
ascillato
on 6 Sep 2019
You need to use latest Tasmota from development (6.6.0.10) from http://thehackbox.org/tasmota
You are a legend and a scholar!
Might be worth a mention in the Wiki.
Also don't know why it states one has to hold the button in throughout the flashing process, mine flashed just fine the conventional way with holding on startup and then releasing.
SauRoNZA
on 6 Sep 2019
I can confirm, there is no need to hold the button down for the duration of the flashing process. Just when powering up is sufficient.
vzorglub
on 6 Sep 2019
@SauRoNZA
Versioning is a difficult task to say the least. For this reason, the wiki is geared toward the latest stable development release. Mentioning which features are available in which particular commit (with over 4000 and counting) would not be feasible. Thus, first recommendation we usually give is to flash the most current version.
Cheers!
Mike
meingraham
on 6 Sep 2019
Sorry, about the button thing. I tried to flash it a couple if times and got varied results. Then I saw someone mention to hold the button the whole time and it worked perfectly bithbtimes in a row that I flashed two different devices. So I thought it was necessary. I'll update the wiki. Or someone else can if they want.
finity69x2
on 6 Sep 2019
@SauRoNZA
Versioning is a difficult task to say the least. For this reason, the wiki is geared toward the latest stable development release. Mentioning which features are available in which particular commit (with over 4000 and counting) would not be feasible. Thus, first recommendation we usually give is to flash the most current version.
Cheers!
Mike
Absolutely, I get that.
Problem is that because this feature is missing from the latest release the Wiki is in fact wrong and that leads to confusion.
So for now I went to add the entry to state that it only works on Dev versions and provided the link.
Once it's in stable it can be removed.
SauRoNZA
on 9 Sep 2019
I have my ifan03 working perfect. Looking to use "hold" button state. I changed the "SwitchMode1 5", but when i long process the button, it just turns off/on. No HOLD message on mqtt. Anyone got the hold button feature to work?
 tim-dcl
on 13 Sep 2019
tim-dcl
on 13 Sep 2019
I would really like to be able to use GPIO 1 (TX) and 3 (RX) as switches as I did on the ifan02. I am not concerned about breaking the remote. My ifan02 setup has two bell press Clipsal Saturn mechs one for the light and the other to step through the fan speed in reverse. off high, medium, low, off. I would love to be able to replicate this using the ifan03.
 angyp
on 21 Sep 2019
angyp
on 21 Sep 2019
has anyone had issues with being unable to unpair remote controls? (long press of 'link' button at lower right of remote should make ifan03 beep twice and unpair remote). I get no beeps, and no unpairing. Wife has inadvertently been moving remotes around and paired multiple fans to same remotes, which is causing havoc as several fans are all within range and one remote turns on 3 fans now! I might just have to scrap the old remotes. Not sure if this is tasmota related or just ifan03 in general. Could someone please try and unpair their remote for me? I've opened up the remotes looking for 'hidden' buttons but nothing. would a reflash of tasmota help?
 minidriverau
on 21 Oct 2019
minidriverau
on 21 Oct 2019
I would really like to be able to use GPIO 1 (TX) and 3 (RX) as switches as I did on the ifan02. I am not concerned about breaking the remote. My ifan02 setup has two bell press Clipsal Saturn mechs one for the light and the other to step through the fan speed in reverse. off high, medium, low, off. I would love to be able to replicate this using the ifan03.
Has anyone been able to work out how to connect inputs to the ifan03 as you could with the ifan02. I have tried to set them up as inputs only to find that it locks up the ifan03 requiring a re-flash of tasmota.
 richcarnell
on 15 Nov 2019
richcarnell
on 15 Nov 2019
Yeah, it's interesting. From above the remote control microcontroller interfaces with esp8285 using the serial interface and that's why you can't use the TX RX as inputs from what I understand. However, If you are prepared to lose the remote control you can use a template-based off ifan02. This is what I am using
{"NAME":"ifan03new","GPIO":[17,255,0,255,0,0,29,33,23,56,22,24,0],"FLAG":0,"BASE":44}
Then in the module configuration, you can configure GPIO1 & 3 as switches or buttons as required. I would love a solution where the remote and external buttons switches could be used together. Hope this helps.
angyp
on 15 Nov 2019
@angyp
Thanks heaps. I have a sonoff RF bridge and new remotes for my other ifan02's so I might just have to do it that way. Thanks again.
richcarnell
on 15 Nov 2019
Does anyone know how many GPIO pins can be used? I'd love it if 5 could be used, including the rx and tx.
 Apogee19832312
on 25 Nov 2019
Apogee19832312
on 25 Nov 2019
Someone know how to remove the buzzer to use GPIO10?
I don't understand the buzzer circuit.
Thank you
 adriansanchis87
on 11 Feb 2020
adriansanchis87
on 11 Feb 2020
(not tasmota related, i know...)
has anyone used the ifan03 to control a fancoil heating/cooling unit?
These units have 3 speeds on their motor by different coils so speed is just a multi switch on 240V
I am thinking about connecting the iFan motor wire on the max speed wire on the fancoil and the light switch wire of the iFan to the thermostatic valve (also 240V).
Ultimately i just want to replace this thermostat.

i know this can be done with a Sonoff 4ch but its way bulkier than the iFan!
 ngalfas
on 22 Mar 2020
ngalfas
on 22 Mar 2020
has anyone had issues with being unable to unpair remote controls? (long press of 'link' button at lower right of remote should make ifan03 beep twice and unpair remote). I get no beeps, and no unpairing. Wife has inadvertently been moving remotes around and paired multiple fans to same remotes, which is causing havoc as several fans are all within range and one remote turns on 3 fans now! I might just have to scrap the old remotes. Not sure if this is tasmota related or just ifan03 in general. Could someone please try and unpair their remote for me? I've opened up the remotes looking for 'hidden' buttons but nothing. would a reflash of tasmota help?
For anyone looking for an answer to this question of how to unpair a remote. What worked for me was to hold the button down on the Fan3 (GPIO0) while at the same time holding the bottom left button on the remote. a series of beeps are then emitted.
 Hobohome
on 24 Mar 2020
Hobohome
on 24 Mar 2020
@angyp
Thanks heaps. I have a sonoff RF bridge and new remotes for my other ifan02's so I might just have to do it that way. Thanks again.
where did you manage to get new remotes for iFan02?
 rishabmehta7
on 10 Apr 2020
rishabmehta7
on 10 Apr 2020
Hi, finally somebody have could add wall swtich to turn light has work ifan02 without less the rf controller?
 ALSACSA
on 26 May 2020
ALSACSA
on 26 May 2020
Hey everyone.
I have been having trouble flashing the ifan03. I have tried multiple programmers (confirmed to work on sonoff basic), driven with 3v and also by soldering on the 5v test pad. I can power the device and control via the ewilink app when using the programmer, including using the relays with no issue.
No matter what I try with the programmer headers (trying rx/tx both ways), using the button to enter prog mode, even solder to the KEY testpoint and connecting to ground. When I do this, the device does not boot, so I can only assume it is in programming mode. I have even removed the shield to check it is still an esp.. Has anyone faced issues with this, or have any ideas what I could try. I was suspecting the shared serial bus with the secondary chip, but from reading around no one seems to have had any issues. Totally lost here and would appreciate any help.
I have tried tasmotizer, arduino ide, vscode/platformio. I also don't see any output when booting at different baud rates. I used a header, and used a multimeter to trace the connections to the esp8285 chip, so I know I have continuity. Just... lost.
 sparkplug23
on 11 Sep 2020
sparkplug23
on 11 Sep 2020
Hi @sparkplug23 ,
ifan03 should be super simple to flash compared to ifan02.
I just flashed Tasmota v8.5.0 Hannah one using ESPHome-flasher on ifan03 using this `FTDI dongle .
Set FTDI adaptor to 3.3v->
Connect FTDI adapter to iFan03 (RX,TX, Gnd & Vcc)->
Pulled GPIO0 to ground by pressing the push button on iFan03 and power up by connecting FTDI adapter to PC via USB->
Fired up ESPhome flasher, set the right com port & selected the new tasmota bin file->
Clicked flash->
And D O N E

anuadu
on 11 Sep 2020
Hey @anuadu ,
This is exactly what I have been doing. I would call myself experienced in this area and the darn thing just won't flash. I just now ordered another programmer to test, so I will see tomorrow. Many thanks on the detailed reply, it has proven to me that what I am doing is correct and it can be done... I just need to find out why I am unable to. I will report back when I get this going so anyone in the future will know.
sparkplug23
on 11 Sep 2020
Hi @sparkplug23,
I have a few ifan03's and never had a problem flashing them however I had a very similar issue you trying to flash a Sonoff RE5V1C-5V. After many hours of frustration and testing, I was about to give up when I finally took my magnifying glass and found that pins 25 and 26 of the ESP8285 were shorted together. I reflowed the solder in the area and that resolved the issue. I am confident that this was a factory defect, not something I did accidentally. This may not be the case for you but worth checking. I tested my programmer using putty and shorting the TX RX wires and made sure I could see the characters I type being echoed.
angyp
on 11 Sep 2020
Hi @anuadu,
I will take a closer look, I already have the shield off. I did test my programmer already and it does echo. Can you remember the baud rate that esp outputs its standard debug out? I briefly was seeing it at 74480, but it was only every other character which adds credence to a comms issue.
sparkplug23
on 11 Sep 2020
@sparkplug23
I was using 74480 when debugging but I believe it depends on the external crystal frequency. Section 4.6 of this document explains it.
https://www.espressif.com/sites/default/files/documentation/0a-esp8285_datasheet_en.pdf
angyp
on 11 Sep 2020
Someone know how to remove the buzzer to use GPIO10?
I don't understand the buzzer circuit.
Thank you
Removing the buzzer itself is relatively easy (ie: de-solder). As for accessing GPIO10 directyly; I've taken a look at all of the pictures of the PCB board and have traced down GPIO10's first easily accessible exposure to R14 (you can access it faster if you remove the shield, but that's a mess to get into). Otherwise said, you should be able to read 0v on the side of R14 that's closest to the shield when the buzzer is on and 3.3v when the buzzer is off (yes the logic is reversed). I've verified that I can read these values by testing it in the console. In case you're interested with the actual circuitry if the buzzer (at a high level), the diagram posted from the iFan02 https://user-images.githubusercontent.com/11044339/46612135-fcbd1c00-cb0f-11e8-87a4-cb83547dc08c.png is mostly similar except U8 doesn't exist and a bunch of components before the true GPIO is accessed isn't illustrated there. The rest of the circuitry past R14 is used to oscillate the buzzer and up-convert to 5v (since that's the voltage used by the buzzer).
FYI: I've confirmed that if you remove R14 & R36 from the PCB (ie: de-soldering both tiny resistors), you can then connect a DS18B20 and Tasmota reads it properly if you redefine the GPIO10 template to be whatever module you plan to connect to it.
 tichris0
on 26 Sep 2020
tichris0
on 26 Sep 2020
I am wondering if somebody can help me.
I have had ifan03's working for a while now however I have always wondered why the medium speed (2) was so fast not much slower than high speed (3).
My original wall controller on medium speed would switch in a 3uf capacitor. So I thought because the ifan03 has a 3uf and 2.5uf capacitor that should be all good. 3uf for medium and 2.5uf for low. However, what I have found is that the ifan03 actually switches both the medium relay and the low relay which the medium speed is selected. Since this puts both capacitors in parallel I end up with 5.5uf being switched in on medium which is why the speed is so fast on medium.
So since the relays are controlled by the esp in the ifan03 I need help in changing tasmota's behaviour so that only the medium, the relay is on when the speed is set to medium. Could this be achieved with a rule? Or does something deeper need to change?
Thanks in advance
angyp
on 14 Nov 2020
Does the RM433 remote control work with a tasmotized ifan03?
 bilogic
on 7 Dec 2020
bilogic
on 7 Dec 2020
Yes
arendst
on 7 Dec 2020
@arendst Thank you! Sorry 1 more question, can I pair multiple 433 Mhz remote? I use multiple 433 Mhz today, e.g. 1 at the table, 1 at the door etc.
bilogic
on 7 Dec 2020
RF is not under control of Tasmota.
I think you can only pair one remote. Give it a try.
arendst
on 7 Dec 2020
Ok, thanks for the info!
bilogic
on 7 Dec 2020
Related issues
 JoergZ2
·
3Comments
JoergZ2
·
3Comments
 esp32x
·
3Comments
esp32x
·
3Comments
 luisfpinto
·
3Comments
luisfpinto
·
3Comments
 Joeyhza
·
3Comments
Joeyhza
·
3Comments
 TylerDurden23
·
3Comments
TylerDurden23
·
3Comments
Most helpful comment
From the source file xdrv_24_buzzer.ino: