Tasmota: RF Bridge: new layout - where to flash?
I just received a new(?) Sonoff RF Bridge 433 and I'm wondering, where to Flash this one:

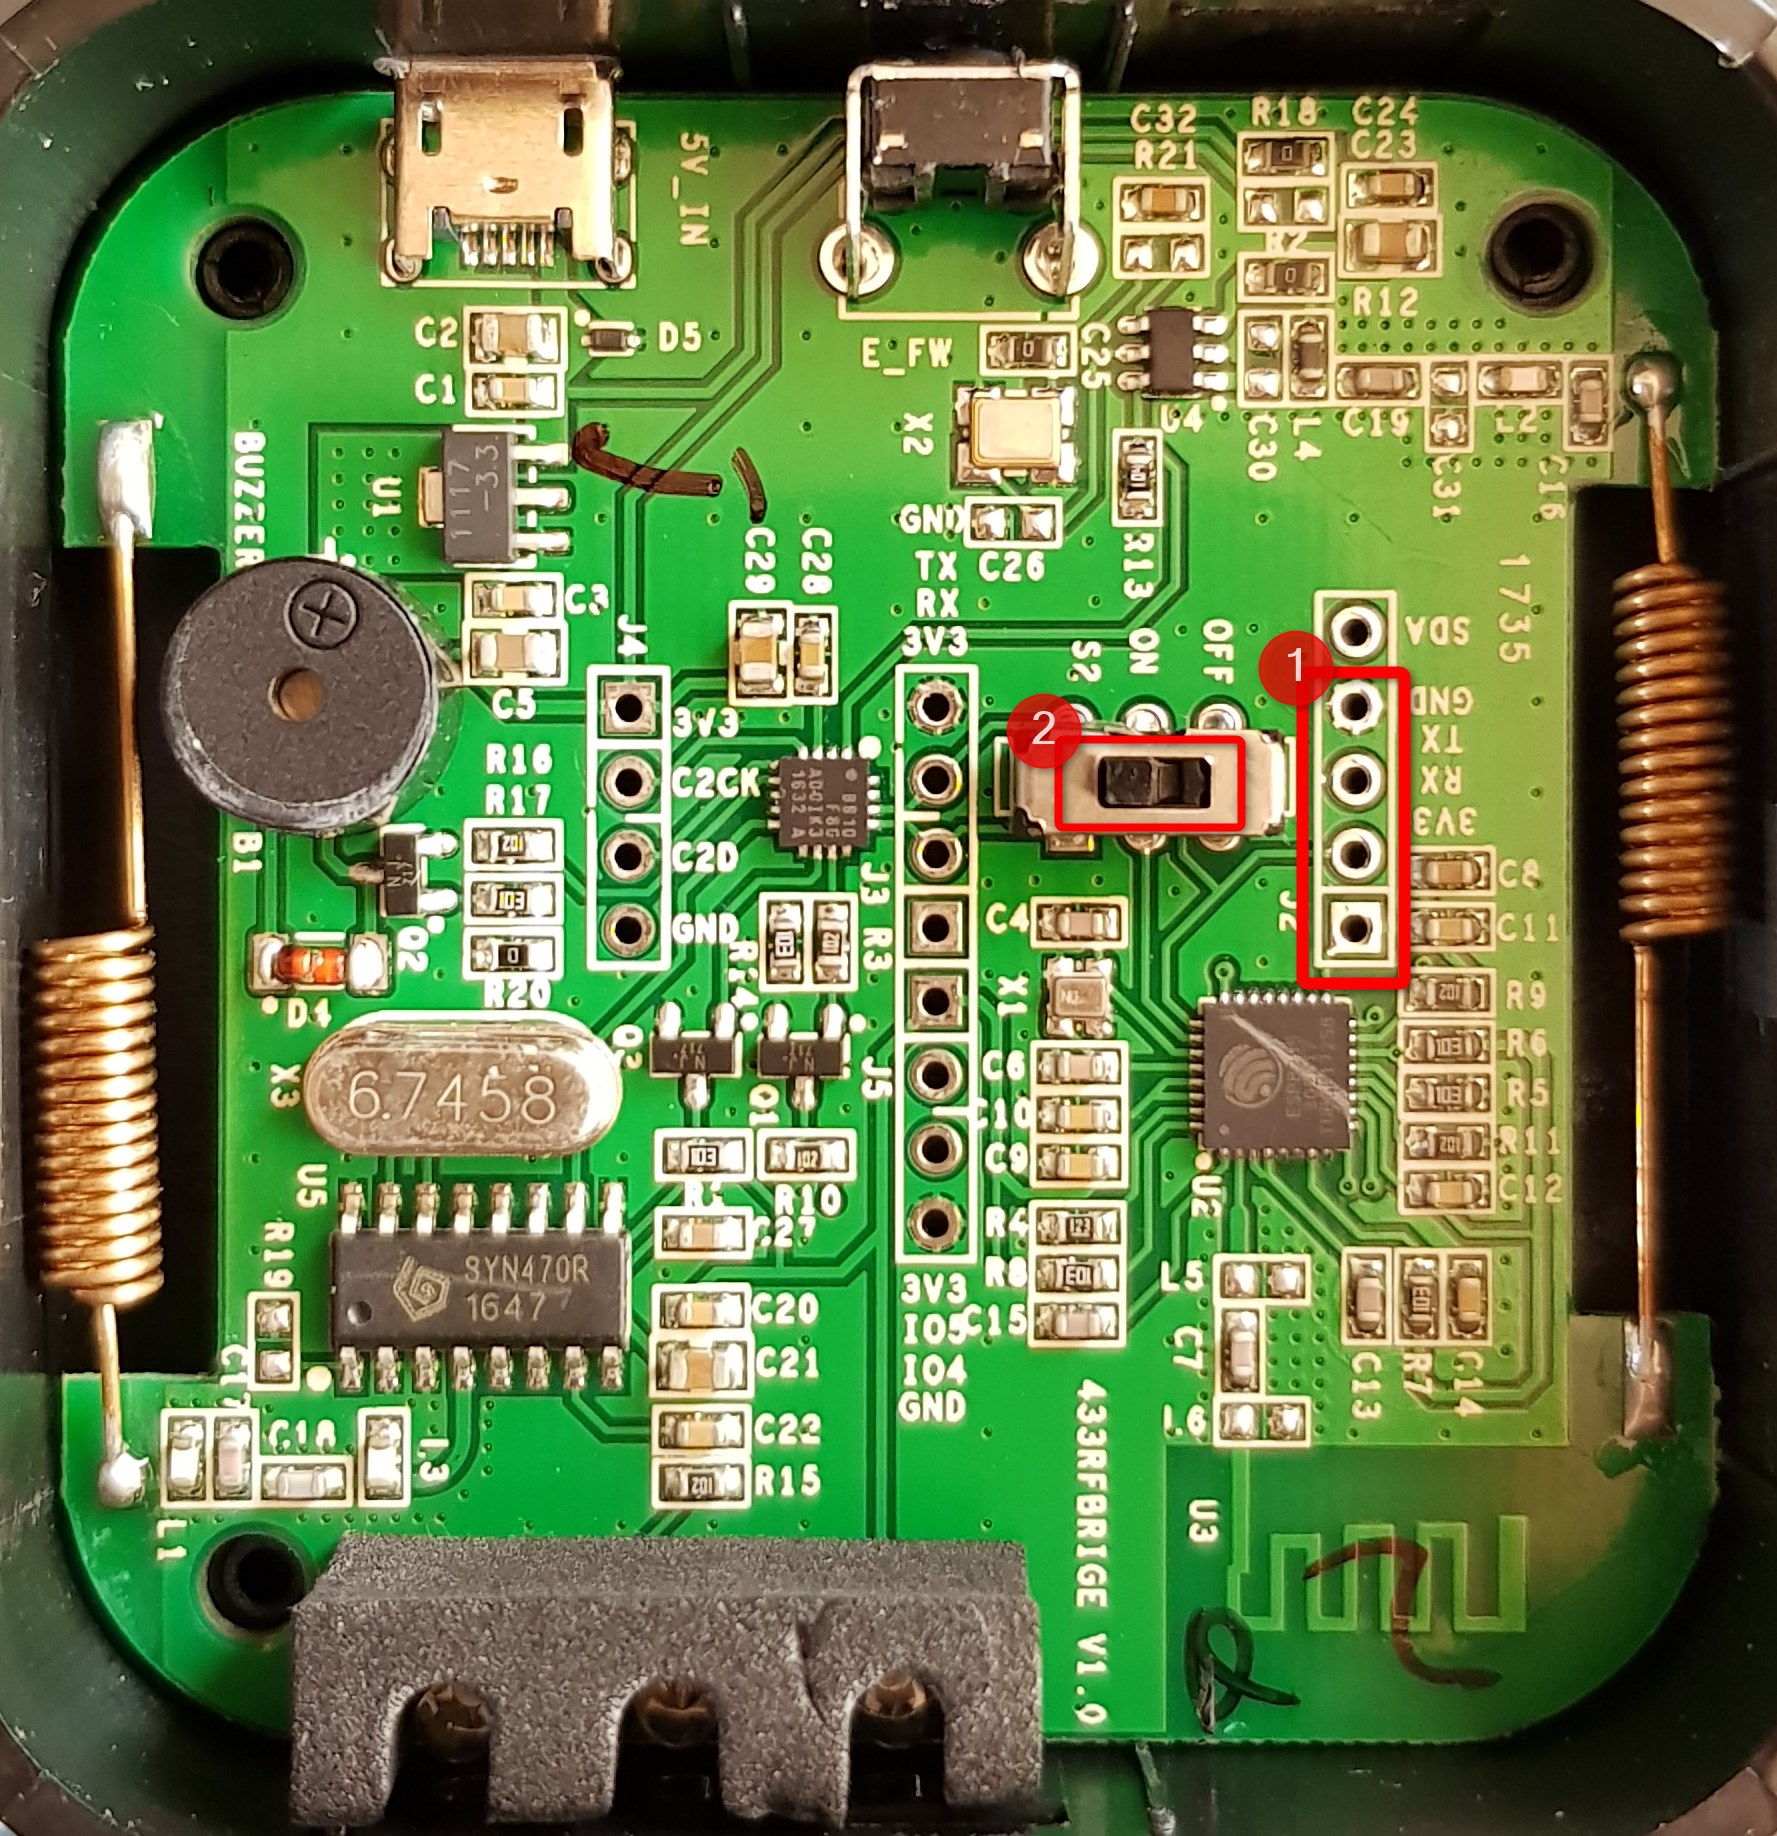
The Layout looks different than those pictured here in the Wiki.
What I did:
1) connected GND, TX, RX und 3v3 at the markings (1)
2) pressed the Pairing button
3) connected the USB
4) Started flashing
5) but while trying to Flash Atom throws an error.
There are another inputs at (2), but without GND... Should I use those?
Atom - log:
[11/04/17 15:44:37] Processing sonoff (build_flags: -Wl,-Tesp8266.flash.1m0.ld -DMQTT_MAX_PACKET_SIZE=512; lib_deps: PubSubClient, NeoPixelBus, IRremoteESP8266, ArduinoJSON; platform: espressif8266; boa
rd: esp01_1m; framework: arduino; monitor_baud: 115200; board_flash_mode: dout)

Verbose mode can be enabled via `-v, --verbose` option
Converting sonoff.ino
Collected 32 compatible libraries
Looking for dependencies...

Library Dependency Graph
|-- <PubSubClient> v2.6
|-- <NeoPixelBus> v2.2.6
|   |-- <SPI> v1.0
|-- <IRremoteESP8266> v1.0.2
|-- <ESP8266HTTPClient> v1.1
|   |-- <ESP8266WiFi> v1.0
|-- <DNSServer> v1.1.0
|   |-- <ESP8266WiFi> v1.0
|-- <ESP8266mDNS>
|   |-- <ESP8266WiFi> v1.0
|-- <ESP8266WiFi> v1.0
|-- <SPI> v1.0
|-- <ArduinoJson> v5.8.3
|-- <Ticker> v1.0
|-- <ESP8266WebServer> v1.0
|   |-- <ESP8266WiFi> v1.0
|-- <OneWire> v2.3.2
|-- <Wire> v1.0
|-- <ESP8266httpUpdate> v1.1
|   |-- <ESP8266HTTPClient> v1.1
|   |   |-- <ESP8266WiFi> v1.0
|   |-- <ESP8266WiFi> v1.0
Compiling .pioenvs\sonoff\src\sonoff.ino.o
Linking .pioenvs\sonoff\firmware.elf
Checking program size
text       data     bss     dec     hex filename
447287     8500   35568  491355   77f5b .pioenvs\sonoff\firmware.elf
Building .pioenvs\sonoff\firmware.bin
Looking for upload port...
Auto-detected: COM5
Uploading .pioenvs\sonoff\firmware.bin
warning: espcomm_sync failed
error: espcomm_open failed
error: espcomm_upload_mem failed
*** [upload] Error -1

 [SUMMARY]
Environment sonoff-NL           [SKIP]
Environment sonoff-minimal      [SKIP]
Environment sonoff-ds18x20      [SKIP]
 [ERROR] Took 10.23 seconds
Environment sonoff              [ERROR]
 [ERROR] Took 10.23 seconds
 binderth
All 11 comments
Use 1 and turn switch off during programming.
 arendst
on 4 Nov 2017
arendst
on 4 Nov 2017
Have a look at your marking. I think you marked "SDA GND RX TX".
The last pin, that you have not marked should be the 3V3 pin.
 tom211
on 4 Nov 2017
tom211
on 4 Nov 2017
Thanks! At least I got a step further. going down one pin I get at least the green LED (labelled PWR) lighting. But there's still an error.
What I tried:
1) connect the pins one further down to match @tom211's description
2) trying to get the Bridge into flash mode
2.1) Holding the "Pairing"-Switch closed the whole procedure
2.2) Holding the "Pairing"-Switch for 10secs, starting uploading afterwards
3) got the same error in both Scenarios
I got the second blue LED (labelled WiFi) lighting at some point - but that didn't do the trick either...
_edit: It seems, if that happens, the Bridge just started "Normally", so it connects with my WiFi and boots the original firmware._
some ideas for flash mode on this platine layout?
[platformio]
src_dir = sonoff

; Uncomment one of the lines below to build/upload only one environment
env_default = sonoff
;env_default = sonoff-NL
;env_default = sonoff-minimal
;env_default = sonoff-ds18x20


28.6 s
platformio run --target upload
|   |-- <ESP8266WiFi> v1.0
|-- <OneWire> v2.3.2
|-- <Wire> v1.0
|-- <ESP8266httpUpdate> v1.1
|   |-- <ESP8266HTTPClient> v1.1
|   |   |-- <ESP8266WiFi> v1.0
|   |-- <ESP8266WiFi> v1.0

Compiling .pioenvs\sonoff\src\sonoff.ino.o
Linking .pioenvs\sonoff\firmware.elf
Checking program size
text       data     bss     dec     hex filename
447287     8500   35568  491355   77f5b .pioenvs\sonoff\firmware.elf
Building .pioenvs\sonoff\firmware.bin
Looking for upload port...
Auto-detected: COM5
Uploading .pioenvs\sonoff\firmware.bin
warning: espcomm_sync failed
error: espcomm_open failed
error: espcomm_upload_mem failed
*** [upload] Error -1
 [ERROR] Took 27.21 seconds

 [SUMMARY]
Environment sonoff-NL           [SKIP]
Environment sonoff-minimal      [SKIP]
Environment sonoff-ds18x20      [SKIP]
Environment sonoff              [ERROR]
 [ERROR] Took 27.21 seconds
GOT IT!
I didn't understand @arendst's comment fully at first, but "turn Switch off" was __not__ meant to release the Pairing-Switch - but the OFF / ON Switch on the platine. after turning that to OFF, I could Flash now.
_Hint: no need to press the pairing Switch the whole time, just as usual after connecting the USB writer_
ToDo:
1) connect those Pins
2) turn Switch to OFF
3) connect USB writer while Holding down the Pairing-button
4) flashing - and enjoy!
binderth
on 5 Nov 2017
Another version of RF Bridge R2?:


It is necessary to peel the big flat LED off, switch (2) and pin header (1) is located under it.
Flashing procedure is the same.
 kajmaj
on 12 Oct 2018
kajmaj
on 12 Oct 2018
I have the version labelled "R2 v1.0" and "2017.11.23", but I have been unable to get it to flash. I have the switch off, holding the button down when I connect the wires, then nothing. Are there any further instructions or steps for this version of the board?
 SteveDinn
on 30 Nov 2018
SteveDinn
on 30 Nov 2018
Try to change RX and TX
kajmaj
on 1 Dec 2018
I have the version labelled "R2 v1.0" and "2017.11.23", but I have been unable to get it to flash. I have the switch off, holding the button down when I connect the wires, then nothing. Are there any further instructions or steps for this version of the board?
could you flash ?? and how did it ??
 Kobo2002
on 12 Dec 2018
Kobo2002
on 12 Dec 2018
Nope, I have not as yet been able to even get it into programming mode. It just doesn't want to do it.
SteveDinn
on 12 Dec 2018
Nope, I have not as yet been able to even get it into programming mode. It just doesn't want to do it.
I reflash yesterday after many attempts
Kobo2002
on 13 Dec 2018
Good news (well, bad news for me). I now believe that my FTDI adapter has stopped working, so it may not be the fault of the Sonoff RF Bridge at all. I went back to re-flash an old Sonoff Basic, and I saw the same behaviour. I've ordered a couple of new FTDI adapters, so I'll try to flash it again once they arrive.
SteveDinn
on 13 Dec 2018
Related issues
 ximonline
·
3Comments
ximonline
·
3Comments
 TylerDurden23
·
3Comments
TylerDurden23
·
3Comments
 renne
·
3Comments
renne
·
3Comments
 kckepz
·
3Comments
kckepz
·
3Comments
 jensuffhaus
·
3Comments
jensuffhaus
·
3Comments
Most helpful comment
Have a look at your marking. I think you marked "SDA GND RX TX".
The last pin, that you have not marked should be the 3V3 pin.