Rawtherapee: Auto-calculate dual-demosaic contrast threshold
When using dual demosaic, finding a good contrast threshold is not automated.
Currently the user has to change the threshold and verify the result until a good threshold is found.
This takes a lot of time because for each change the image has to be demosaiced again.
I'm just working on an auto-calculation of dual-demosaic contrast threshold to find a good value.
First results are promising, as is the processing time to find a good value (for example ~15 ms for a 12MP raw)
I will create a branch soon.
 heckflosse
All 39 comments
Before I create the branch I will tell you what it does:
1) it uses the demosaiced output of the low contrast demosaicer (vng4 for bayer and fast for xtrans) to determine the most flat 80x80 px region of the demosaiced raw file
2) then it uses that region to calculate the contrast threshold
That works very very well if a flat region exists. In my tests the calculated threshold is off by +-1 at maximum for this cases. It's also very fast (~15 ms at my machine even for a 36 Mp file) while manually detecting a good dual demosaic contrast threshold will need about ~1000x more time because you need to change the contrast threshold adjuster, wait for the result (dual demosaic is not really fast), evaluate by eyball and again..... until a good value is found
If there is no flat region (e.g. subject is sharp over the whole region) the automated contrast threshold detection doesn't work so good, but still reasonable. Also, for this cases dual-demosaic is not the right choice because without flat regions in the image there is no need for dual demosaic.
Currently I'm not sure if it's worth to expose the automatically detected dual demosaic threshold to the gui. I'm also not sure, wether the current dual demosaic contrast threshold adjuster is needed anymore.
In first step I would like to create a branch which only spits out the auto value to console, so you can test whether it works well by using the value in gui. If that works fine, there will be no need for the dual demosaic contrast threshold adjuster in gui anymore and I will remove it.
Opinions?
Ingo
heckflosse
on 16 Oct 2018
:+1: , the less parameters to tweak the better :-)
 agriggio
on 16 Oct 2018
agriggio
on 16 Oct 2018
Agreed with @agriggio here. Just call it "Ingo's Magic Dual Demosaic" and feel proud of it :smile:
 Thanatomanic
on 17 Oct 2018
Thanatomanic
on 17 Oct 2018
I just created a branch which calculates the dual demosaic contrast threshold when a dual demosaicer is used and logs the value in console output. It does not use the value yet, You have to look up the value from console and use it in gui. Feel free to test.
heckflosse
on 17 Oct 2018
I gave it a try. And it seems to work quite well with my 16 MP mFT RAWs. :+1:
For some higher-ISO-shots I first thought the threshold was too high as it also rendered my main subject with VNG4 instead of AMAZE. But after playing with NR and sharpening a bit it actually didn't really affect detail but resulted in an overall cleaner image.
Another observation: I use amaze+vng4 since quite a while. After adjusting threshold to the auto-generated value I started from scratch with neutral profile. And for some images this resulted in an off-by-one threshold. (not a real issue IMO)
I'm really looking forward to getting the threshold auto-selected and the changes merged to dev!
 ff2000
on 17 Oct 2018
ff2000
on 17 Oct 2018
I gave it a brief test. I was worried that some VNG4 artifacts may be introduced on fine patterns if Your algorithm was setting the treshold too high, but it seems to be quite conservative. I've noticed no problems. Good work.
Still I am a fan of keeping the slider, in case of some rare problems (or for creative purposes).
 cuniek
on 17 Oct 2018
cuniek
on 17 Oct 2018
When the automatic detection fails because the image is overall too sharp or too noisy, that's a good automatic indication that demosaicing should switch from dual to single because there is nothing to gain from dual on that image and it would just waste time.
 Beep6581
on 17 Oct 2018
Beep6581
on 17 Oct 2018
When the automatic detection fails because the image is overall too sharp or too noisy, that's a good automatic indication that demosaicing should switch from dual to single because there is nothing to gain from dual on that image and it would just waste time.
That is true only if all the photographers have the same taste and goal and agree on how the final image should look like. Isn't it?
As I wrote I was surprised to see how well the auto settings works. At the same time there were situations where I had to use green equilibration tool to get rid of some artifacts, altough my camera has a typical bayer color filter (the same green pixels across the frame). So I am happy that this option is available manually and noone restricted it to 4/3 system claiming that using it elswhere would be a waste of time.
Just my 2 cents.
[EDIT]
I didn't mean that I had to use green equilibration to get rid of some of dual demosaicing artifacts. That was just a point about claiming that noone should ever use this or that option.
cuniek
on 17 Oct 2018
Another observation: I use amaze+vng4 since quite a while. After adjusting threshold to the auto-generated value I started from scratch with neutral profile. And for some images this resulted in an off-by-one threshold.
I guess you had enabled raw ca-correction before but not when starting from neutral profile.
heckflosse
on 17 Oct 2018
@heckflosse Yes, seems you are right. Toggling Auto CA Correction increments/decrements threshold by 1.
ff2000
on 17 Oct 2018
I just tested the branch on X-trans files, works great, very useful (I didn't really know how to find the best threshold value).
 sguyader
on 17 Oct 2018
sguyader
on 17 Oct 2018
Thanks for testing @cuniek @ff2000 @sguyader :smile:
There seems to be a consensus that the auto calculation mostly works fine.
Though I also had cases (very high ISO or overall sharp images) where the calculation was wrong.
For this cases we need a fallback to the more contrasty demosaicer to avoid artifacts caused by the low contrast demosaicer working on high ISO/overall Sharp images.
There are at least two possibilities for this:
1) Fall back to more contrasty demosaicer if the variance calculated by the auto-method is larger than a certain hard-coded threshold (e.g. variance > 100 leads to wrong results in my tests)
or
2) Fall back to more contrasty demosaicer if the calculated threshold is larger than a certain value
heckflosse
on 17 Oct 2018
- let the user handle this "by hand". why is this not an option? how is this different from e.g. using amaze on very noisy images? (not to discourage you, by all means if you have a good idea go for it, but IMHO a manual intervention is totally acceptable in this case)
agriggio
on 17 Oct 2018
@agriggio The difference is, that it may fail not only on very noisy images, but also on low-iso images which don't have a flat region. Of course, there's no reason to dual-demosaic those images, but when applying dual-demosaic in batch for a bunch of low-iso images, a fallback would be better than using the dual-demosaic
heckflosse
on 17 Oct 2018
@agriggio Alberto, I'm still with you about eliminating the contrast threshold adjuster for dual demosaic!
heckflosse
on 17 Oct 2018
I improved the detection a bit:
If there is no flat 80x80 region with <=1 variance now an additional pass is made which checks 40x40 regions. That leads to an improvement if there is no large flat area. Still the threshold is only spit out to stdout. You have to apply it yourself. But that's indented currently.
heckflosse
on 18 Oct 2018
I thought again about whether we still need the threshold adjuster when auto threshold is available.
Reasons to keep it:
1) You may want to use the same threshold for all images of a stitch.
2) When there are no flat regions in the image, the auto calculated threshold will be wrong.
3) You may want to set the value manually because you don't like the auto calculated value.
Reasons to remove it:
1) each new adjuster increases compexity
Feel free to add points to that list I didn't thought about.
Imho the reason to keep 1. is a very strong argument
heckflosse
on 19 Oct 2018
Agreed, I just stitched an image today and I was glad to have the slider to give the same threshold to all the image.
sguyader
on 19 Oct 2018
In case the auto calculations leads to a wrong value (that's detectable at runtime if the variance is larger than a value I still have to determine), we need a fallback.
Possibilities:
1) fall back to first demosaicer
2) fall back to second demosaicer
3) use value from adjuster as fallback value
4) use value from adjuster as upper limit for the auto calculated value
I added 4. to the list of possibilities
I prefer 4. because it's the easiest way to use auto calculation in comibination with dynamic profiles where you may want to use different upper limits for different ISO values
heckflosse
on 19 Oct 2018
@heckflosse
I just tested and results are very good
And I think choice 4 is good :)
jacques
 Desmis
on 20 Oct 2018
Desmis
on 20 Oct 2018
I just pushed a new version for dual demosaic auto contrast threshold.
If auto threshold is enabled, it calculates the threshold and uses the value of the adjuster as an upper limit for the the auto-calculated value. The used value is shown above the adjuster value.
If auto threshold is disabled, it uses the value of the adjuster as contrast threshold.
ui is still a bit ugly, and, as usual, I surely forgot some things...
heckflosse
on 21 Oct 2018
@heckflosse
Ingo
I tested this new version.
For me, the result and also the GUI is good. I like the calculate value of contrast threshold
Perhaps auto threshold must be by default to enable ?
Good work
Jacques
Desmis
on 22 Oct 2018
@heckflosse
Ingo
I tested this new version
For me, algorithm and GUI are good :)
I like the value calculated shown above the adjuster value
Perhaps, "auto threshold" must be enabled by default
Jacques
oh, I suppose something wrong on my computer...My first message was not displayed ???
Desmis
on 22 Oct 2018
In case the auto calculations leads to a wrong value (that's detectable at runtime if the variance is larger than a value I still have to determine), we need a fallback.
If auto threshold is enabled, it calculates the threshold and uses the value of the adjuster as an upper limit for the the auto-calculated value. The used value is shown above the adjuster value.
Hey
I haven't had a chance to test this yet, so I'm just going by what is written here. If auto-threshold (AT) uses the value of the adjuster as the upper limit, that means the user can unknowingly break the auto-detection if they set the adjuster to some random value before running auto-detection. Knowing this will require reading the documentation, and I was under the impression that the purpose of AT is to reduce that need. Furthermore, copy-pasting the PP3 to other photos might also unintentionally break the auto-detection due to a wrong upper limit being set (an upper limit which makes sense on one photo may make no sense on a different photo), no? So, going only by this description, it sounds like this solution could lead to issues where RT appears to behave oddly or inconsistently if one doesn't know where to look.
Beep6581
on 22 Oct 2018
@Beep6581
The upper limit is an attempt to solve the cases where there is no flat area in the image, which leads to a too large AT value.
Usually an upper limit can be set per camera and ISO. That can be done with dynamic profiles.
For example I would set the upper limit for D700 ISO200 to 15 to avoid loss of details when there is no (or too small) flat region in the image.
I see your point about using one adjuster for two functions. That is indeed confusing and can be solved only by an additional adjuster to set the upper limit for AT.
Above I presented 4 possible solutions.
Solution 1. (completely automatic) is easy for low ISO, but not for high ISO shots.
Checking the variance and fallback to more detailed demosaicer if it is > 1 works fine for low ISO shots.
For medium ISO shots a higher variance is still acceptable, but this can be solved only by adding camera/ISO specific variance thresholds to camconst.json which I wanted to avoid at least in first step.
The easiest solution would be 1. and document that AT works only for low ISO.
heckflosse
on 22 Oct 2018
Hi,
My two cents -- keeping in mind that I also haven't tested this yet.
The easiest solution would be 1. and document that AT works only for low ISO.
:+1: to this, with the following (maybe too simplistic?) motivation: dual demosaic is about extracting the max detail possible while preserving smoothness in uniform areas, right? If so, high ISO/high noise shots have neither to begin with...
agriggio
on 22 Oct 2018
With last commit I switched to solution 1. (fallback to more detailed demosaicer if no flat region was found).
This was possible by improving the detection of flat regions.
heckflosse
on 22 Oct 2018
@agriggio
dual demosaic is about extracting the max detail possible while preserving smoothness in uniform areas, right?
exactly
heckflosse
on 22 Oct 2018
@heckflosse
It seems to me obvious (??) that dual-demosaic is for image with low iso (or with less noise)
And so I think "auto" mode should be prefered.... in most cases where there are flat areas (sky...)
Desmis
on 22 Oct 2018
oh, I suppose something wrong on my computer...My first message was not displayed ???
I tried to write a comment a few hours ago, and it was also eaten by Microsoft.
Beep6581
on 22 Oct 2018
@Desmis Jacques, "auto" mode is default for new images (which don't have a pp3 file). For images with "old" pp3 files I set it to off for backwards compatibility.
heckflosse
on 22 Oct 2018
Err, weird, I just replied to @Desmis about Microsoft also eating my previous comment, and when I hit the green "Comment" button GitHub now showed my previous comment from a few hours ago, but ate this most-recent comment...
Heads-up that if weird things happen in GitHub, it's not your browser.
Beep6581
on 22 Oct 2018
@heckflosse
Ingo
OK thank you :)
Desmis
on 22 Oct 2018
There have been server problems: https://status.github.com/messages
Thanatomanic
on 22 Oct 2018
I need some help from more experienced gui developers to beautify this part:

heckflosse
on 22 Oct 2018
This is how CIECAM02 handles it:

Whatever we choose should be consistent.
Beep6581
on 23 Oct 2018
@heckflosse @Beep6581 FYI (in rtgui/adjuster.h):
    Adjuster (Glib::ustring vlabel, double vmin, double vmax, double vstep, double vdefault, Gtk::Image *imgIcon1 = nullptr, Gtk::Image *imgIcon2 = nullptr, double2double_fun slider2value = nullptr, double2double_fun value2slider = nullptr);
    virtual ~Adjuster ();

    // Add an "Automatic" checkbox next to the reset button.
    void addAutoButton(Glib::ustring tooltip = "");
    // Remove the "Automatic" checkbox next to the reset button.
    void delAutoButton();
    // Send back the value of og the Auto checkbox
    bool getAutoValue ()
    {
        return automatic != nullptr ? automatic->get_active () : false;
    }
    void setAutoValue (bool a);
    bool notifyListenerAutoToggled ();
    void autoToggled ();
@agriggio Thanks for the hint. I will try that now.
heckflosse
on 23 Oct 2018
Now it looks so:
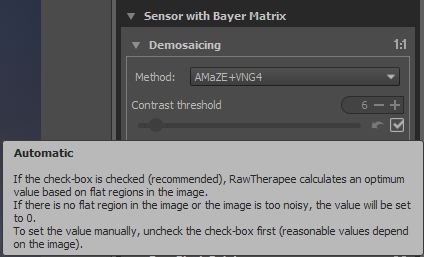
heckflosse
on 23 Oct 2018
Related issues
heckflosse
·
5Comments
agriggio
·
4Comments
heckflosse
·
5Comments
heckflosse
·
4Comments
Thanatomanic
·
4Comments
Most helpful comment
:+1: , the less parameters to tweak the better :-)