Esp8266_deauther: dstike "v1.6" board does not detect via USB port
I'd like to make some changes to the UI
I plan to upload my code via the Arduino IDE interface.
Unfortunately, neither of the two boards I purchased detect when I plug them into a Windows system.
I've tried multiple USB cables and Windows 7, 8 and 10.
Am I missing something basic about how to upload code into this device...?
Thank you for any insights....
Mike
UPDATE: To save future visitors a lot of reading, the issue behind the board not detecting was USB cable(s) that do NOT have data lines in them. The moral here is to make sure that you are using a "real" USB cable - with full data/sync capabilities - and not just a charging cable (that only has power lines and NO data lines).
2nd Update: The nodemcu-flasher program is a little flaky... that is, while it appears to work, it doesn't actually program successfully every time. Persistence and consecutive repeated attempts will eventually result in success and you will be able to load a BIN file directly into the board using this program.
3rd Update: Here are the Arduino IDE settings that allow me to update the device:
Here are the settings that allow me to update the device via the Arduino IDE :

 MMushovic
All 39 comments
maybe a missing driver ? http://www.ftdichip.com/FTDrivers.htm
[edit]
whoops just read the FAQ and FTDI is for Arduino Uno, you'd be more looking for cp2102 or CH340G drivers.
 tobozo
on 20 Sep 2017
tobozo
on 20 Sep 2017
I don't think it's a driver issue as NOTHING gets detected when the boards are plugged in to the USB ports.
In the spirit of giving anything a try, however, I'm downloading drivers and trying them now....
Update: As I feared, (pre)installing these drivers did not make a difference. The boards are just not detected when plugged into a USB port making me believe the data lines are disconnected via de-popped components or missing jumper. I recall reading somewhere that the F(LASH) button needed to be held down for programming but that made no difference either.
Any other ideas..?
MMushovic
on 20 Sep 2017
Not sure if this will help as mine is a v1 and I used the binary releases rather than building and flashing in the Arduino IDE but i've found it is very fussy about the s/w & speed used to flash with and at. the only program I could get to successfully flash the board was the nodemcu flasher & I had to flash at 56k or slower. when I was having the problem I asked Travis about the flash button and he said it didn't need to be pressed and it didn't seem to be needed when I used nodemcu flasher
 ukscone
on 21 Sep 2017
ukscone
on 21 Sep 2017
The dstike builds are no more than a development board with extra buttons and OLED.
While you will find help to use and debug the deauther on this forum, I'm not sure it's the best place to troubleshoot issues with the Arduino IDE and Windows.
Do you have an Arduino board, an NodeMCU / Wemos or another ESP8266 that is correctly detected by Windows ?
- NO => check the driver link in this tutotrial https://www.marginallyclever.com/2017/02/setup-nodemcu-drivers-arduino-ide/
- YES => we'll need more tests (i.e. if possible try with linux, macos) in order to find out if it's a software problem (90% probability) or a hardware problem.
tobozo
on 21 Sep 2017
tobozo> Do you have an Arduino board, an NodeMCU / Wemos or another ESP8266 that is correctly detected by Windows ?
_Yes, I have an Arduino setup with ESP8266 that detects and works with no issues._
tobozo> The dstike builds are no more than a development board with extra buttons and OLED.
_OK, but shouldn't they still detect when plugged into a USB port? If not, I'll try the NodeMCU programming interface (my) tonight; I live in the US Pacific timezone._
tobozo> While you will find help to use and debug the deauther on this forum, I'm not sure it's the best place to troubleshoot issues with the Arduino IDE and Windows.
_Respectfully, why do you think that? The deauther Github page provide both the source code and instructions to load it via the Arduino IDE? I'm not seeing that process work. If not here, where would I report a problem with the Github content, ask for help and look for more detail?
If there's a better place, let me know and I will check it out..._
MMushovic
on 21 Sep 2017
tobozo> Do you have an Arduino board, an NodeMCU / Wemos or another ESP8266 that is correctly detected by Windows ? (if no), check the driver link in this tutotrial https://www.marginallyclever.com/2017/02/setup-nodemcu-drivers-arduino-ide/
UPDATE: Installing the drivers found at the link above made no difference... the board is still not detected when plugged in and powered by USB.
Wording from the tutorial:
_"...when I plug a brand new NodeMCU into a new Windows 10 installation with a micro USB cable I get a warning message that says 'USB Device Not Recognized – Device Descriptor Request Failed'. (This is because) Windows doesn’t know how to talk to the USB driver on the NodeMCU so it can’t figure out that the board is a NodeMCU and proceed normally. You’ll need to download the official driver and install it yourself."_
This tells me that a NodeMCU should at least be detected when plugged into a USB port.
tobozo, by stating that "The dstike builds are no more than a development board with extra buttons and OLED", do you mean that the dstike board should NOT be detected when plugged into a USB port...?
I'm just trying to make sure I understand your point... :^)
MMushovic
on 21 Sep 2017
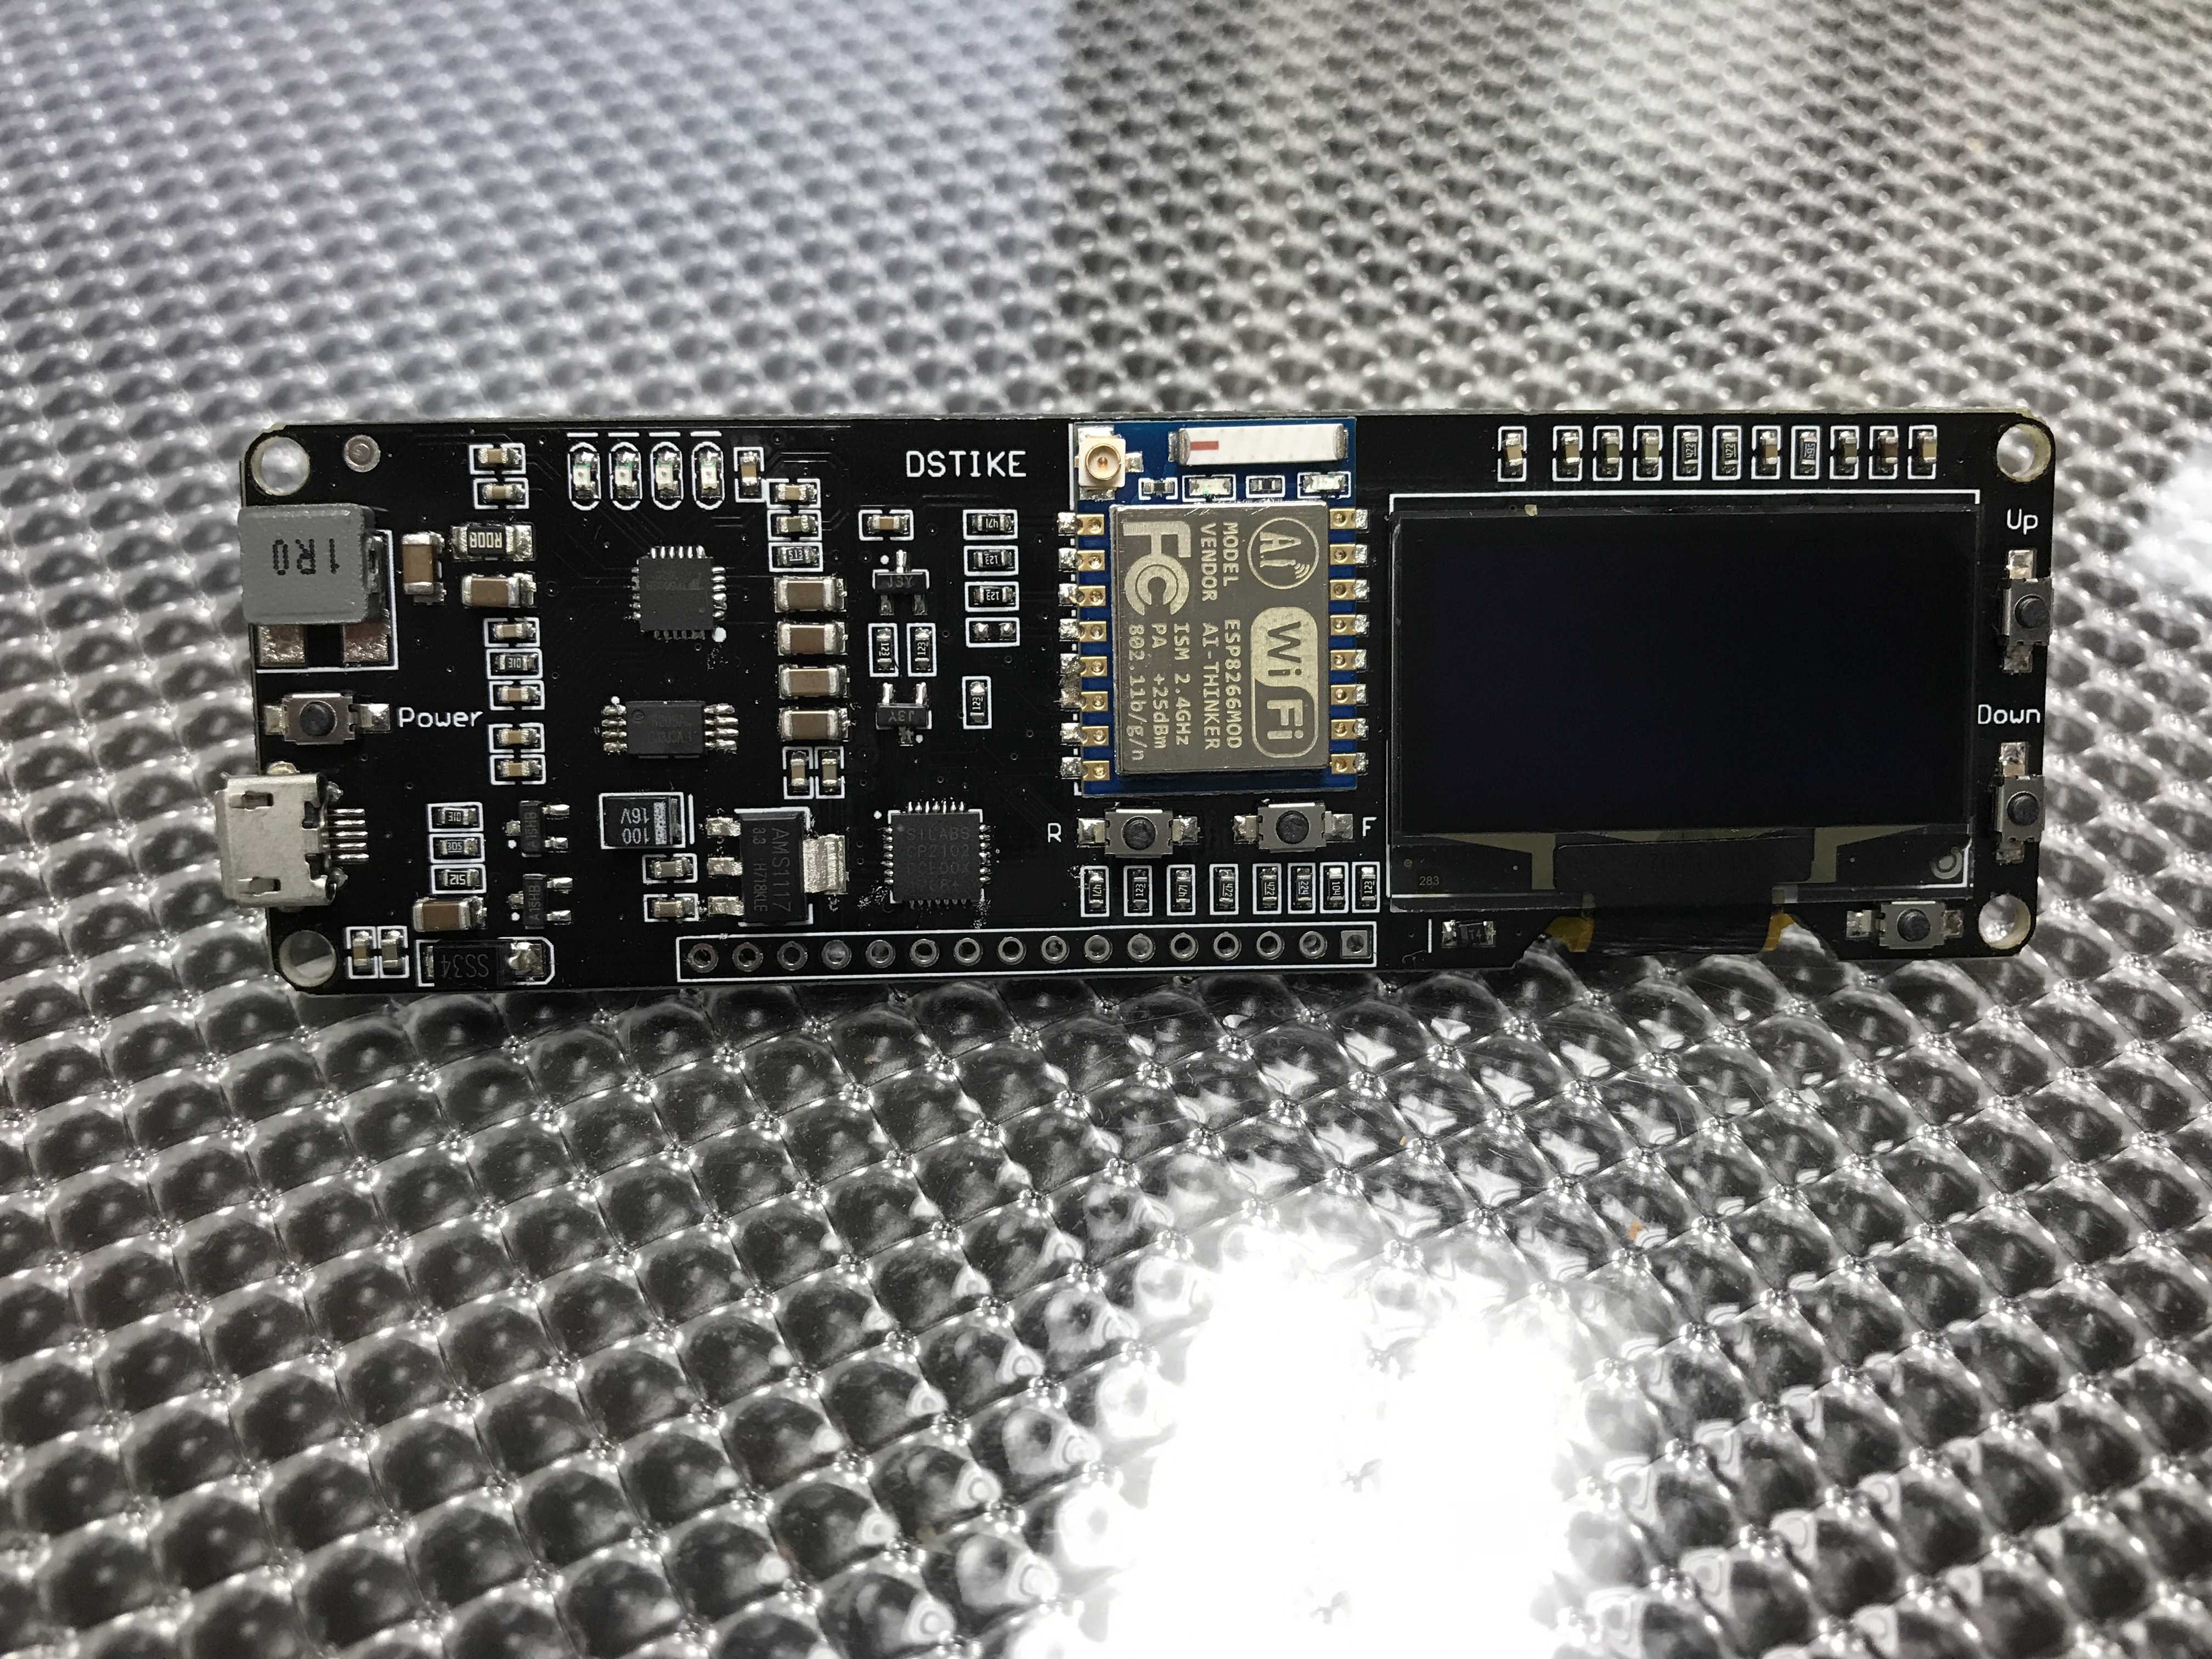
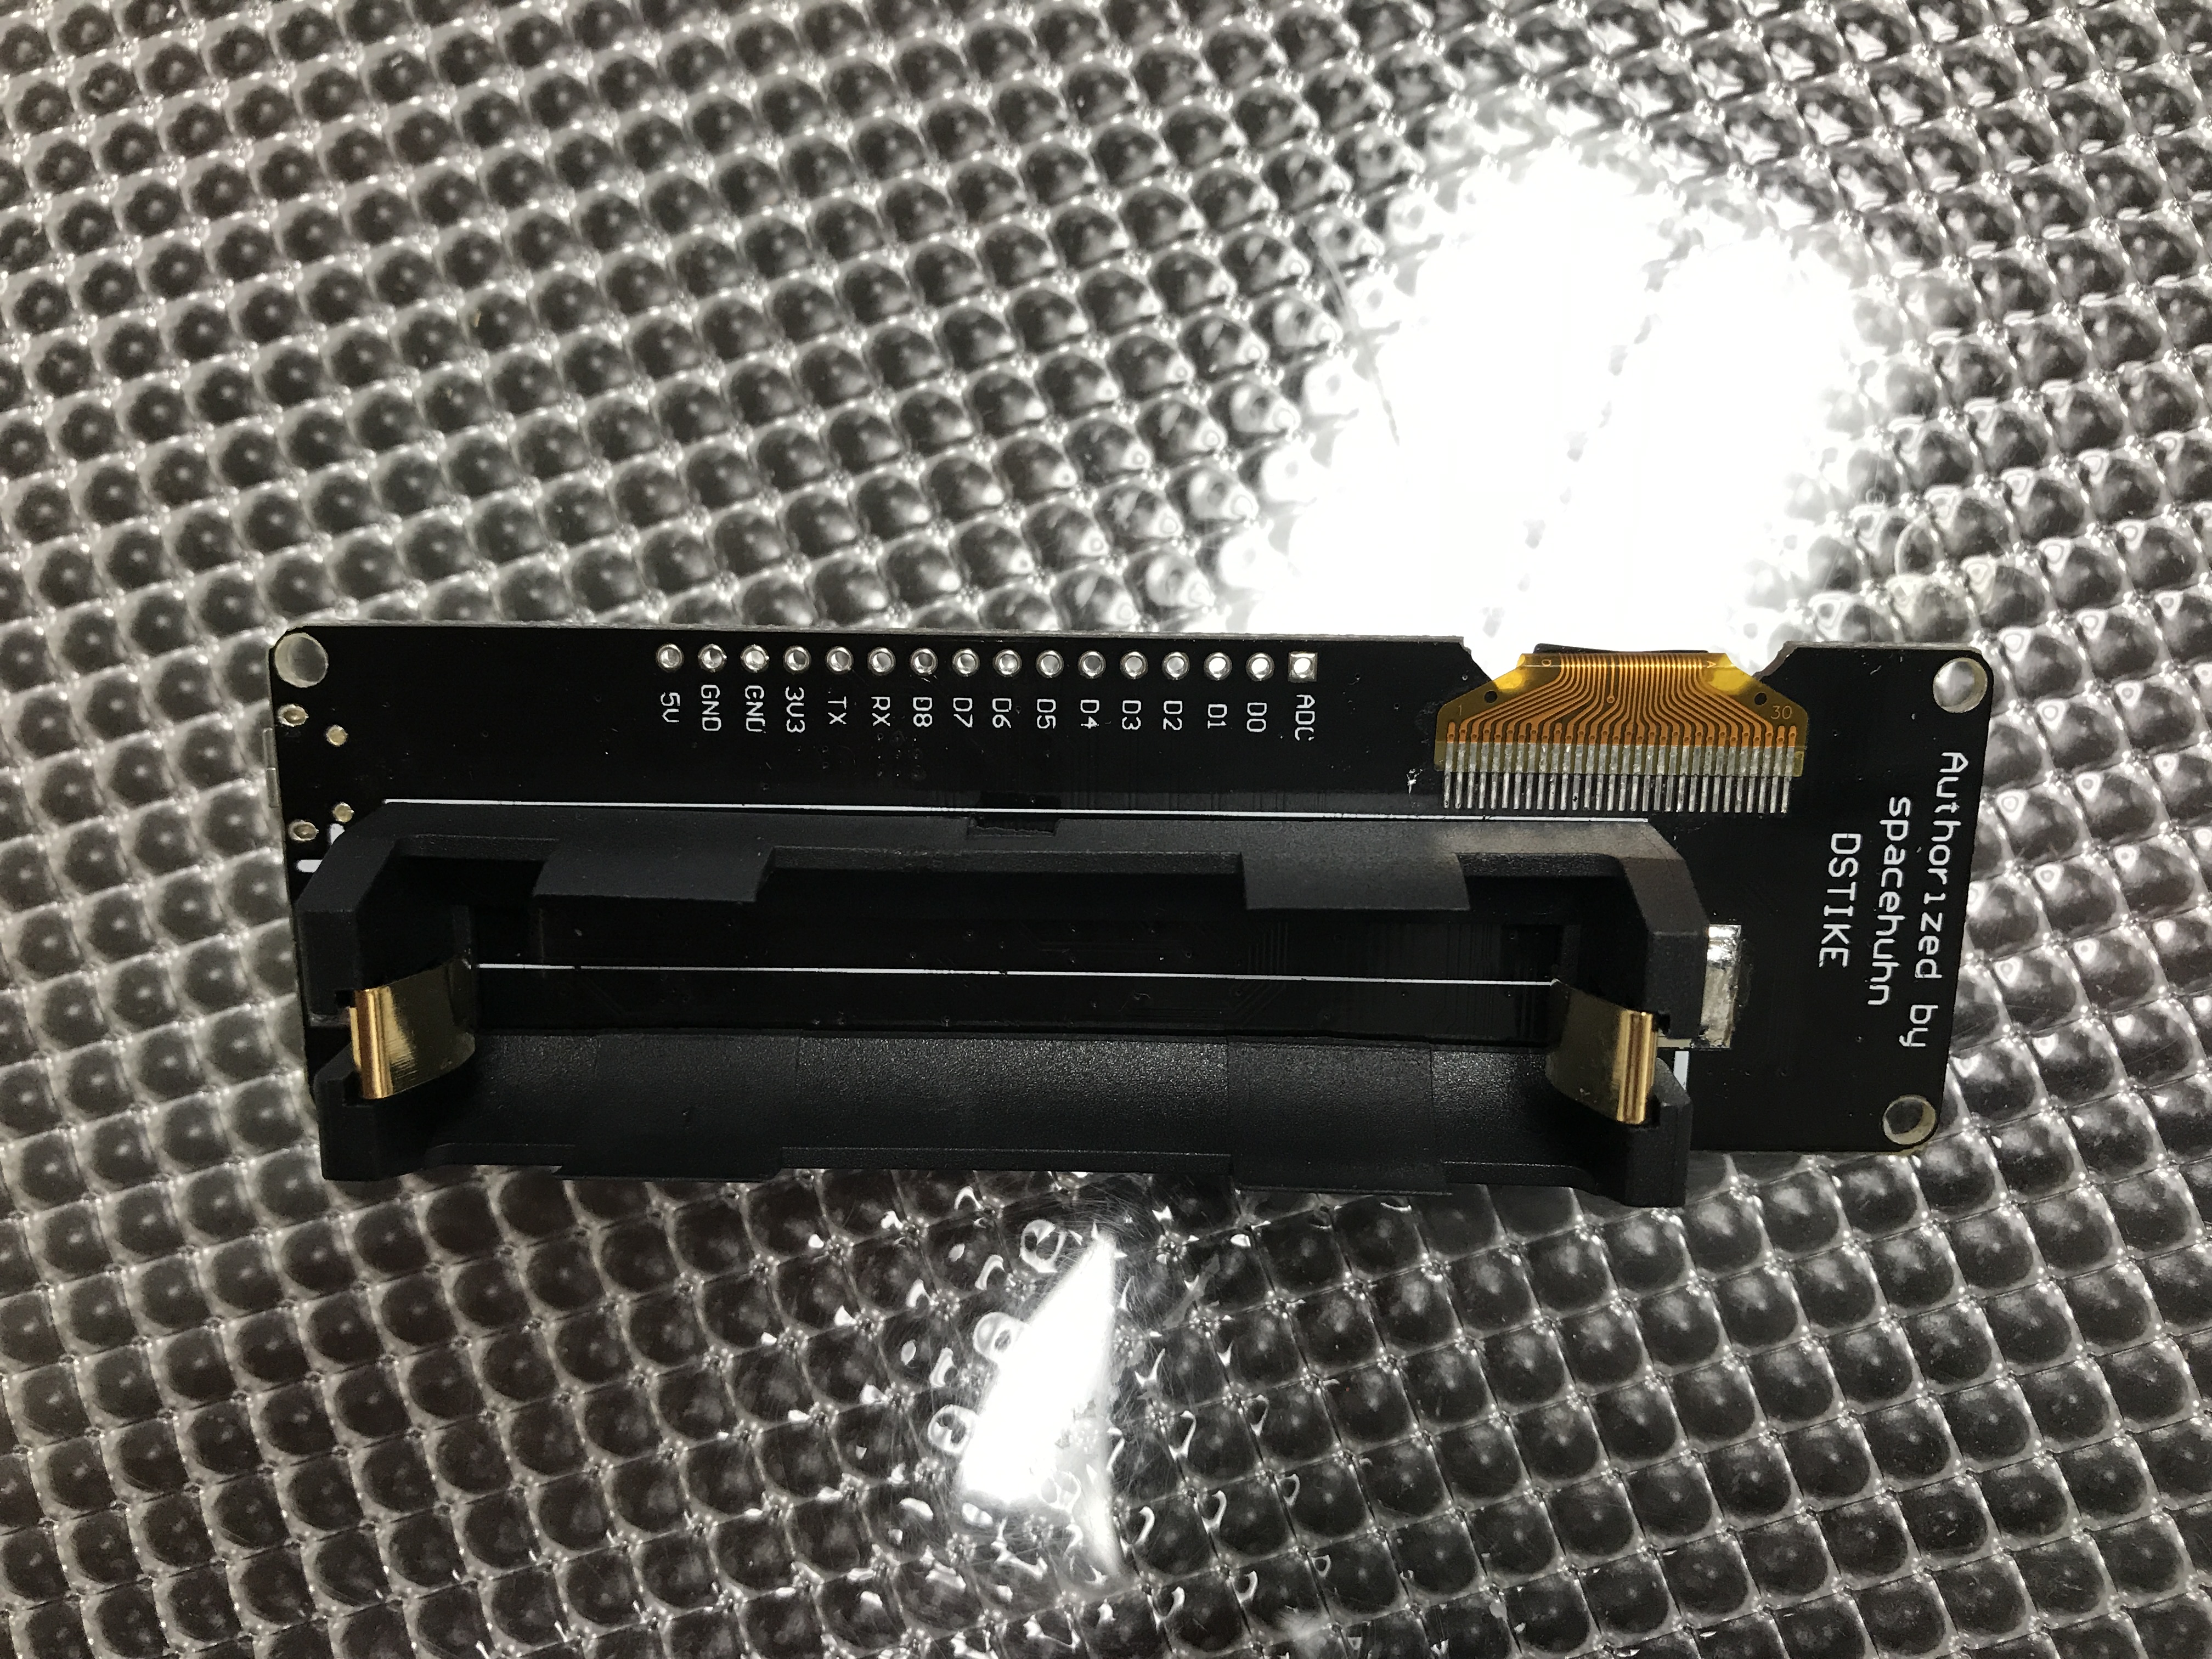
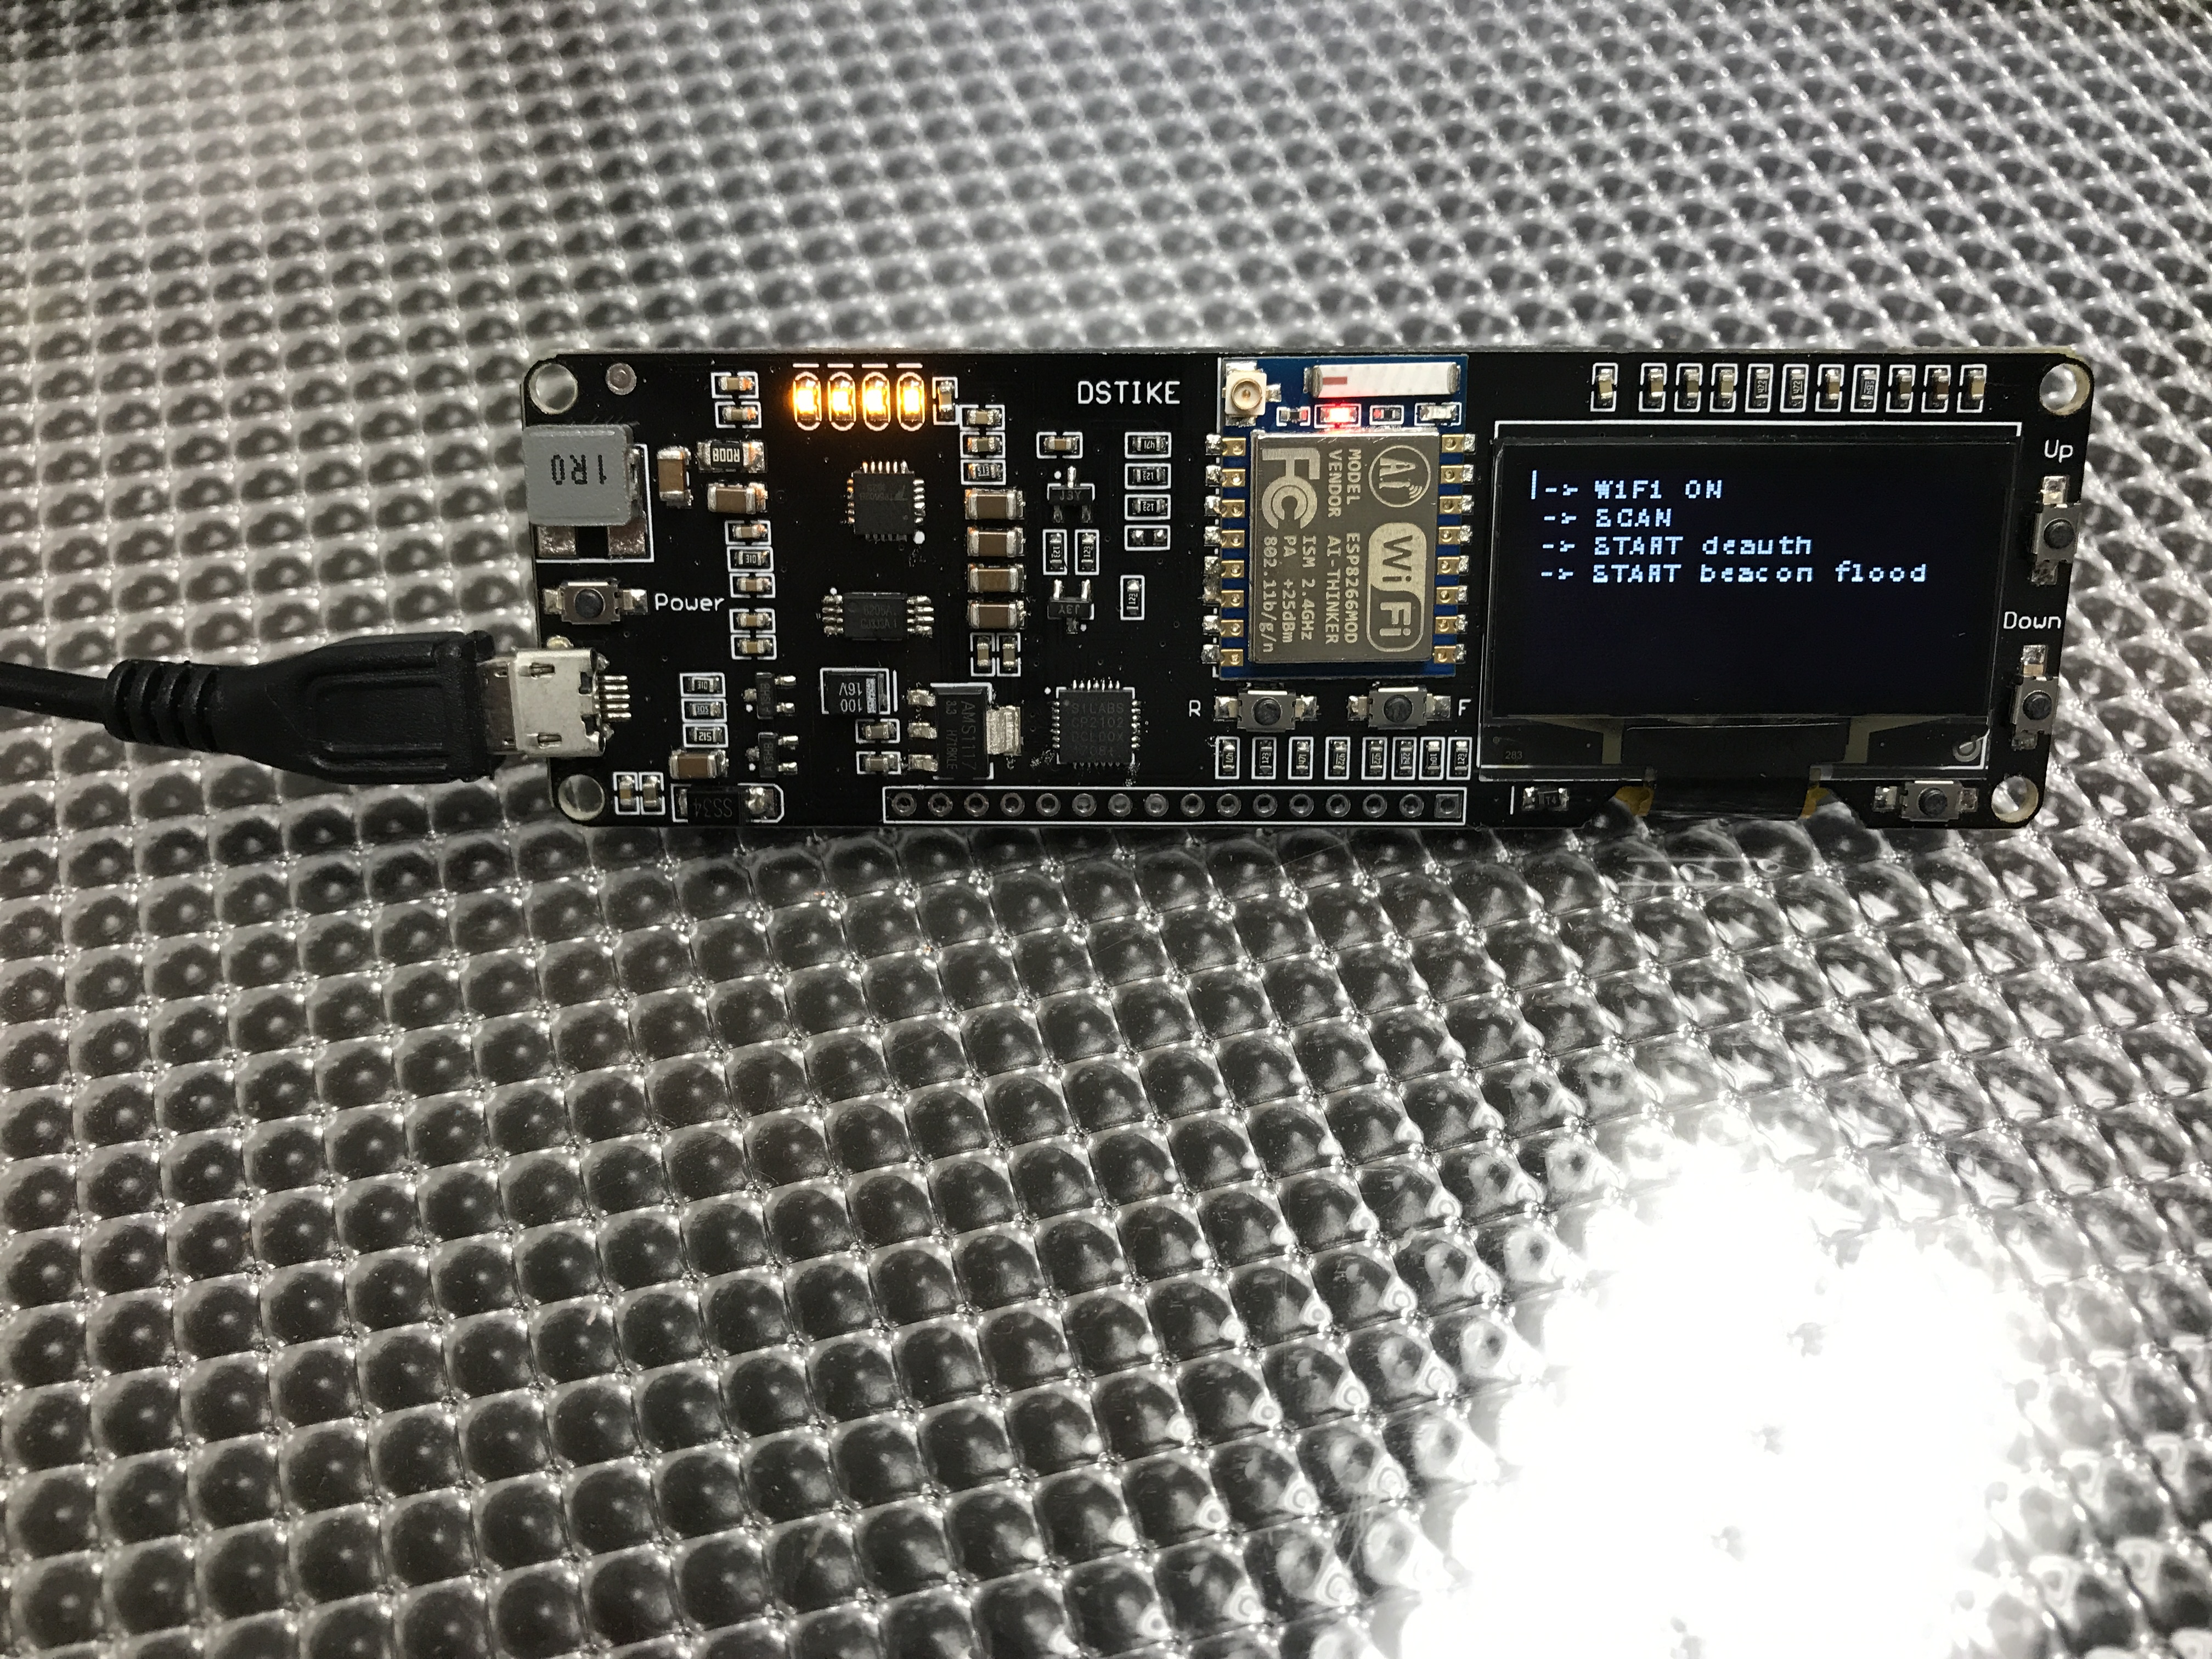
I should also note that, when lit, my battery status LEDs are YELLOW - not BLUE, as seen in the videos on YouTube. I therefore suspect component swapping or .... a forgery.
So, as a first step, maybe I should verify I have "real" boards that are actually designed by and built for spacehun...
Here come photos of the front and back sides of what I received. Can anyone compare these to what they purchased and note any differences and/or similarities...?
MMushovic
on 21 Sep 2017
MMushovic
on 21 Sep 2017
MMushovic
on 21 Sep 2017

MMushovic
on 21 Sep 2017
MMushovic
on 21 Sep 2017
These look like the boards in spacehun's YouTube videos and - I should also note - they work great!
Again, I'm just trying to upload new code that tweaks the user interface a little.
MMushovic
on 21 Sep 2017
Windows situations are well known on the ESP8266 issue tracker.
Your dstike boards should be detected just like any other NodeMCU/ESP8266 dev board.
If you have another computer, you can try to plug it there and isolate the source of the issue from the results.
Until this is observed, it's hard to tell for sure if it's a hardware problem or a driver/windows problem.
Out of curiosity I plugged my v1.6 (same as yours) in a windows 10 machine and it successfully got detected as a LPT/COM device (I saw it appear in the device manager).
The device name is: Silicon Labs CP210x USB to UART Bridge
Driver Manufacturer is: Integrisys S.A.
tobozo
on 21 Sep 2017
@MMushovic don't spam please.
I would contact Travis over tindie or aliexpress, depending on where you bought it. My guess is that you got a board with a faulty module, or something like that.
That can happen from time to time.
Explain your problem and what you already tried and I'm sure you guys will figure something out.
 spacehuhn
on 21 Sep 2017
spacehuhn
on 21 Sep 2017
I'm not sure how you see this as spamming....
Inspired by your notes and code posted on Github, I purchased TWO of these devices (via AliExpress) to tinker with. I am unable to proceed, however, as BOTH devices fail to detect when plugged into a USB port. I'd consider the "faulty module" theory if the observed behavior wasn't consistent, occurring on BOTH devices on multiple machines, using various cables. I think this is a design question or driver installation question and therefore perfect for a discussion in a forum such as this one.
BTW, who is Travis...?
MMushovic
on 21 Sep 2017
Hello. I am travis.
I do not think it is a hardware problem because I test well before I send it.
I think you have a driver problem
Please download CP2102 driver from here :
http://dong-sen.com/faq/
Most fake nodmcu use ch340 driver it is different.
And the yellow LEDs is OK. Because the ones I sent to spacehuhn is a prototype...
Now my boards has yellow LEDs and green LEDs two version.
It does not effect.
So please setup CP2102 driver and have a try.
 lspoplove
on 22 Sep 2017
lspoplove
on 22 Sep 2017
Another hint is : when you uploading the code, please take out the battery first....
lspoplove
on 22 Sep 2017
Travis, do you need to hold down the F (flash) button when loading the code...?
MMushovic
on 22 Sep 2017
No, You do not need to hold flash button when you use Arduino IDE
lspoplove
on 22 Sep 2017
Travis, I found the problem: It was a cable without USB Data +/- lines. Swapping in yet another cable, I'm now able to detect the device.
Now, however, when I load the .BIN file to the device, the device no longer works - the screen stays black and the buttons do nothing. Any ideas...? Is this a simple issue with programming?
MMushovic
on 25 Sep 2017
What kind of bin file are you using? And use which tool ? If possible please take pictures also.
lspoplove
on 26 Sep 2017
The .BIN file is named "esp8266_deauther_1mb_oled_sh1106.bin" and comes from this page:
https://github.com/spacehuhn/esp8266_deauther/releases
The releases page linked off the project section of this page:
https://github.com/spacehuhn/esp8266_deauther
I've tried both the Arduino IDE based "compile source code" method and the nodemcu-flasher based "load bin file" method from your project page on GitHub.
What would you like photos of...?
MMushovic
on 26 Sep 2017
It should work. After you upload the file, you have to unplug usb and reconnect it.
lspoplove
on 26 Sep 2017
After you upload the file, you have to unplug usb and reconnect it.
I did. No effect. No screen and no function in the module.
It should work.
I agree.. but it doesn't... :^)
When I use either the nodemcu-flasher utility or the Arduino IDE, I do see the blue LED blink. I take this to mean firmware is being uploaded to the module. But then.... nothing.
I suspect the settings in the nodemcu-flasher utility.
Are there specific things I can take photos or screen shots of...? Would a video of the LED flashing help...?
MMushovic
on 26 Sep 2017
Based on how this is going, I'm glad that I bought two devices. I still have one with all original code in it that still works fine. If I can look at anything in that module or it's firmware to help diagnose what's going on, please let me know...
MMushovic
on 26 Sep 2017
Would you like to make a video? I want to know how you upload the firmware.
lspoplove
on 26 Sep 2017
I decided to focus my efforts on the "load existing BIN file" approach as it seemed the least number of variables and would require the least effort.
After watching numerous YouTube videos, I learned more about how to use the _nodemcu-flasher_ program AND that it is notoriously flaky... that is, while it appears to work, it doesn't actually program successfully every time. Persistence and consecutive repeated attempts eventually resulted in success and I was finally able to load the BIN file into the board and get everything working again.
Thank you for your attention and help!
MMushovic
on 27 Sep 2017
Now, in preparation for making the UI changes, I am back to trying compile and load (unmodified) source code into the boards via the Arduino IDE interface.
I've followed the setup steps outlined on the Github project page located here. Boards updated and files copied.
Next, I've installed the OLED library for my SH1106 based display; this library is located here. I'm assuming I've got the correct library since it is mentioned here.
Finally, I've uncommented (and commented out) the display type that I have (i.e. SH1106).
Compiling via the Arduino IDE interface gives no errors.
Uploading the new image via the Arduino IDE interface to the unit also gives no errors.
After unplugging and replugging the unit to USB, however, I get... nothing. No display. No function.
I can use _nodemcu-flasher_ to successfully reinstall the default BIN image and everything works again.
I'm close! But still not there.
While I dig thru all the other notes here, does anyone have any advice on what to look at next...?
MMushovic
on 27 Sep 2017
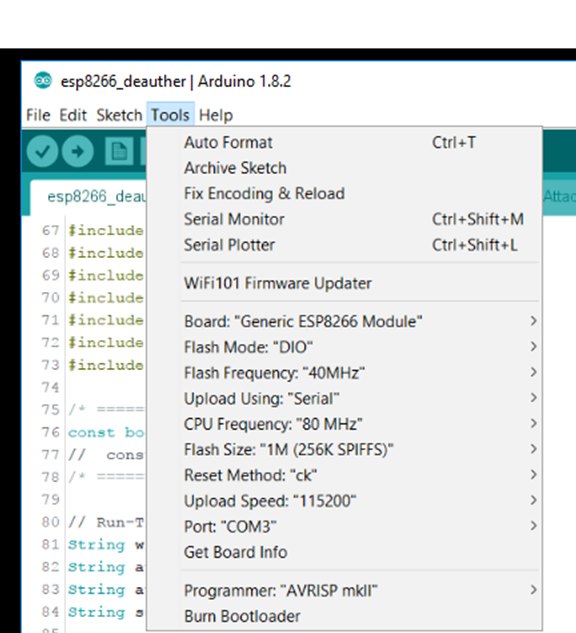
I had to choose the Generic ESP8266 Module with Flash Size at 1M (256K SPIFFS) to get things working.
Can you access your serial console while it's running? If so, does it ouput anything?
tobozo
on 27 Sep 2017
@tobozo , thank you for the note! I was using a different ESP8266 setting. But now, when I use your settings (above), I get the following errors during compilation:
Sketch uses 592210 bytes (77%) of program storage space. Maximum is 761840 bytes.
Global variables use 57924 bytes (70%) of dynamic memory, leaving 23996 bytes for local variables. Maximum is 81920 bytes.
warning: espcomm_sync failed
error: espcomm_open failed
error: espcomm_open failed
I feel like I'm getting closer... 👍
MMushovic
on 27 Sep 2017
did you close your serial window before uploading ?
tobozo
on 27 Sep 2017
Yes, I'm currently trying uploading with NO serial message window open and seeing the compilation errors above.
I also tried looking at debug messages via the serial port and do see messages as well as some gibberish characters.
I will close down serial, Arduino IDE, power cycle everything and try again...
MMushovic
on 27 Sep 2017
And these are "uploader" errors I'm seeing not "compiler" (but it looks like you already figured that out :)
MMushovic
on 27 Sep 2017
Just to double check: I do not need to hold FLASH or RESET buttons to upload... correct?
MMushovic
on 27 Sep 2017
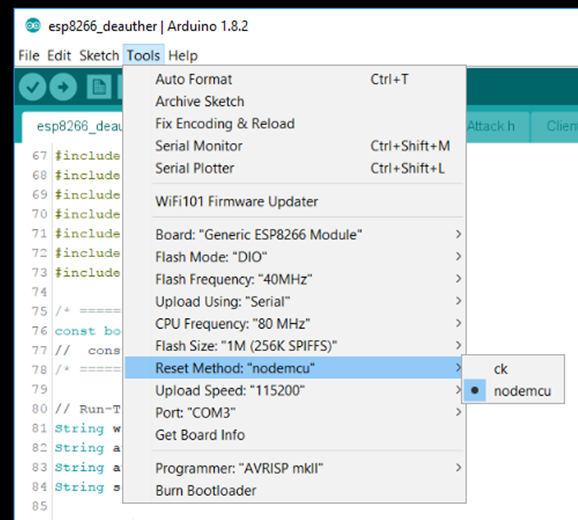
Do these Arduino IDE settings all look correct (or like yours)...?
MMushovic
on 27 Sep 2017
Got it! I just changed Reset Method:from "ck" to "nodemcu"
Code now uploads and the device works!
MMushovic
on 27 Sep 2017
Here are the Arduino IDE settings that allow me to update the device:
MMushovic
on 27 Sep 2017
@tobozo - _thank you_ _again_ for the advice... it got me poking in the right direction!
MMushovic
on 27 Sep 2017
Closing the issue... thanks to everyone who responded
MMushovic
on 28 Sep 2017
Related issues
 newlearnergrgsm
·
4Comments
newlearnergrgsm
·
4Comments
 cadencetheking
·
4Comments
cadencetheking
·
4Comments
 tobybear
·
4Comments
tobybear
·
4Comments
 sy9039
·
5Comments
sy9039
·
5Comments
 xdobry
·
3Comments
xdobry
·
3Comments