Xiaomi-pro-hackintosh: Using 4k@60Hz monitor
Hey,
I am having difficulties getting my Xiaomi Notebook Pro to run with the HP Envy 27s at 4k. It only shows 2560x1600 as max resolution when connecting with either HDMI (which should do 4k@30Hz) or DisplayPort via USB-C-(+Power-Delivery)-Adapter (which should do 4k@60Hz). I also tried to use SwitchResX which didn't help either. I believe this is due to the fact that the UHD 620 is faked to HD 620 which is known to have issues with 4k. There haven't been any issues when I booted from a GParted Live USB, 4k was working flawlessly with the Live USB.
Any ideas? Can we fake the UHD 620 to UHD 630 (which is used in the 2018 MacBooks)?
Thank you in advance!
 shilch
All 91 comments
Hi, you can try to open HiDPI in your external screen.
First, insert you screen and close the laptop lid.
Second, run the script in https://github.com/xzhih/one-key-hidpi
Third, restart and see whether it works.
Screen is not working if we fake with UHD 630 id, and it's not recommended by Clover and Whatevergreen. For example, in https://github.com/acidanthera/WhateverGreen/blob/master/WhateverGreen/kern_model.cpp, you can see { 0x5917, 0x5916, "Intel UHD Graphics 620" },.
 stevezhengshiqi
on 9 Dec 2018
stevezhengshiqi
on 9 Dec 2018
Hey, thanks for the response.
I connected the screen, closed the lid and ran the script:
sh -c "$(curl -fsSL https://raw.githubusercontent.com/xzhih/one-key-hidpi/master/hidpi.sh)"
Spoiler: one-key-hidpi script output
Note: I don't have an external monitor to
test the script.If you have multiple monitors,
please run the script on a single monitor,
or cover the notebook when it is connected to the monitor.
============================================
Backing up...
Password:
(1) Enable HIDPI
(2) Enable HIDPI (with patch)
(3) Disable HIDPI
Enter your choice [1~3]: 1
|** Choose Icon ***|
(1) iMac
(2) MacBook
(3) MacBook Pro
(4) LG Display
(5) Remain as it is
Enter your choice [1~5]: 5
|** resolution config ***|
(1) 1080P Display
(2) 2K Display
(3) Manual input resolution
Enter your choice: 3
Enter the HIDPI resolution, separated by a space,like this: 1680x945 1600x900 1440x810
:3840x2160
Enabled, please reboot.
Rebooting the logo for the first time will become huge, then it will not be.
Then I rebooted. Unfortunately, that didn't change anything in the monitor settings.
shilch
on 9 Dec 2018
Maybe the script is not perfect yet. You can try to manually add resolution according to Rehabman's instruction. Because I am not able to access an external monitor, I haven't tested yet.
stevezhengshiqi
on 9 Dec 2018
Thanks for the link. I played a bit with the files and was able to make the monitor settings show higher resolutions. But if I select them, they are still only transmitted at 2560x1600@60Hz max (so I get a stretched screen). That means, macOS is not able to output higher resolutions.
I also ordered the official Xiaomi USB-C-to-Mini-DP Adapter which I should receive in a few days/weeks, maybe it works better with macOS. That still keeps me wondering why GParted didn't have any issues with the current adapter.
Edit: When using the same config file for HDMI (to test 4k@30Hz), I just get a black screen.
shilch
on 9 Dec 2018
So, I just received the Xiaomi USBC-to-miniDP Adapter and a 4k-miniDP-to-DP cable and it still does not work. I tried it with the display overrides and switchResX. When I set 4k in switchResX, I get a black screen with sometimes a frame showing up for a fraction of a second (not a 4k frame though).
shilch
on 15 Dec 2018
@shilch I have the same problem, I have a little progress now. But it's not perfect, because it looks a bit fuzzy, I think this is caused by the graphics driver.
sh -c "$(curl -fsSL https://raw.githubusercontent.com/xzhih/one-key-hidpi/master/hidpi.sh)"
Spoiler: one-key-hidpi script output
Note: I don't have an external monitor to
test the script.If you have multiple monitors,
please run the script on a single monitor,
or cover the notebook when it is connected to the monitor.
============================================
(1) Enable HIDPI
(2) Enable HIDPI (with patch)
(3) Disable HIDPI
Enter your choice [1~3]: 1
|** Choose Icon ***|
(1) iMac
(2) MacBook
(3) MacBook Pro
(4) LG Display
(5) Remain as it is
Enter your choice [1~5]: 5
|** resolution config ***|
(1) 1080P Display
(2) 2K Display
(3) Manual input resolution
Enter your choice: 1 (do not use manual resolution)
 nanking
on 7 Jan 2019
nanking
on 7 Jan 2019
@nanking Thank you! I will check out your configuration once I am next to my monitor and will report back.
shilch
on 7 Jan 2019
I just had the chance to test the tool. I tried 1080p as well as 2k settings, both just overwrite the default display settings but the output resolution is still limited to 2560x1600.
shilch
on 14 Jan 2019
你好,我和上面那位仁兄一样尝试了很多种方法,通过typc转miniDP转DP连接4k显示器,windows下可以实现4k60hz,但是黑果下只能实现2560x1600
请问下未来是否有完善的可能。
 ghostJun
on 15 Jan 2019
ghostJun
on 15 Jan 2019
Today, I tested with 4K HDMI, and it works fine in 30Hz.

I think the size of DVMT may make a difference. I increased my DVMT to 64MB by using the script in #8, and deleting framebuffer-fbmem and framebuffer-stolenmem.
stevezhengshiqi
on 15 Jan 2019
@stevezhengshiqi Interesting, thanks the suggestion of increasing DVMT! I will try this later.
Is there a way to find out the current DVMT size?
shilch
on 15 Jan 2019
Default is 32 MB.
stevezhengshiqi
on 16 Jan 2019
I am not sure whether increasing DVMT to 64MB was successful.
I downloaded the exps5.5_en.zip, executed the Backup.cmd, executed the bios_unlock.cmd and then the DVMT_set.cmd. After restarting, I removed the framebuffer-fbmem and framebuffer-stolenmen from Clover. After another restart, macOS booted as before without any issues (would it have issues if DVMT was 32MB?). Now, using Displayport to connect to the 4k monitor does no longer work and HDMI still only allows 2560x1600 max.
I am not sure whether DVMT actually was set to 64MB (I had some PowerShell issues which I believe I fixed). Windows says that "Dedicated Video Memory" is set to 128MB which according to this table (source) means 128MB DVMT?!
shilch
on 16 Jan 2019
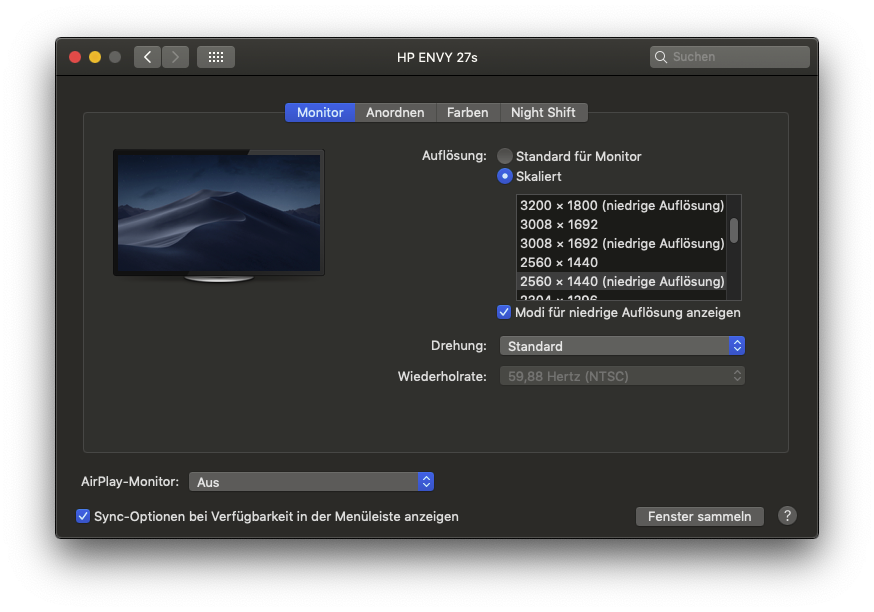
I got, what I would at least call a partial success: While my external monitor is still black via DP, I was able to move the display configuration window over to my laptop screen:

The configuration looks different than before as the external monitor is now detected as HiDPI. Changing the resolution doesn't do anything though, the screen is still black. With HDMI, I don't get offered these settings, it's still limited to 2560x1600 and SwitchResX doesn't help either.
shilch
on 16 Jan 2019
After adding back framebuffer-fbmem and framebuffer-stolenmem, connecting via DP works as before. But no HiDPI settings now.
shilch
on 16 Jan 2019
@shilch Try to remove boot argument -cdfon in config.plist, and delete the two sets of data you mentioned above.
stevezhengshiqi
on 17 Jan 2019
@stevezhengshiqi I don't have -cdfon in my boot argument list.
This is my config.plist:
config.plist.zip
shilch
on 17 Jan 2019
Maybe you can try to use the latest config in the repository, ACPI tables/SMBIOS model may affect the HDMI. Also don't forget to close the lid for a few seconds and reopen it after connecting to HDMI.
stevezhengshiqi
on 17 Jan 2019
I just removed my EFI stuff and used the new content from the repository. However, HDMI is still limited as before and DP results in a black screen (when removing framebuffer-fbmem and framebuffer-stolenmem). Do you mind sharing your EFI folder?
shilch
on 17 Jan 2019
By the way, I just noticed that in your screenshot it says "Metal: Supported, feature set macOS GPUFamily1 v3" while for me it says "Metal: Supported, feature set macOS GPUFamily2 v1". Does this indicate a difference in graphic configuration?
shilch
on 17 Jan 2019
bump
shilch
on 28 Jan 2019
Today, I tested with 4K HDMI, and it works fine in 30Hz.
I think the size of DVMT may make a difference. I increased my DVMT to 64MB by using the script in #8, and deletingframebuffer-fbmemandframebuffer-stolenmem.
For your information , you are right.
For HIDPI to work we need DVMT set to 64mb in bios. When I changed it it worked.
But , I don't recommend HIDPI for 2 reasons :
1) high battery consumprion. When HIDPI is enabled , dram is at 0,76. When off stays at 0,36.
2) fonts are blurry.
Can i ask something else ? Do you thing setting DVMT to 128 would have benefits ?
 Mateo1234454545
on 29 Jan 2019
Mateo1234454545
on 29 Jan 2019
@Mateo1234454545 It looks like it shows "Metal: macOS GPUFamily1 v3" for you as well. Do you mind sharing your EFI or CLOVER folder?
shilch
on 30 Jan 2019
@shilch That’s my sample screenshot which was quoted by him. I believe the Metal version is related to macOS version and has nothing to do with EFI. I am using 10.13.6.
stevezhengshiqi
on 30 Jan 2019
By the way, I'm having macOS GPUFamily 2 v1
P.S Mojave 10.14.3
On Wed, Jan 30, 2019, 1:53 PM Steve Zheng <[email protected] wrote:
@shilch https://github.com/shilch That’s my sample screenshot which was
quoted by him. I believe the Metal version is related to macOS version and
have nothing to do with EFI.—
You are receiving this because you are subscribed to this thread.
Reply to this email directly, view it on GitHub
https://github.com/daliansky/XiaoMi-Pro/issues/117#issuecomment-458901039,
or mute the thread
https://github.com/notifications/unsubscribe-auth/ApNk8xL1JXsbB2jfV6htq4LoErZS8Kh4ks5vIXm_gaJpZM4ZKHar
.
 FallenChromium
on 30 Jan 2019
FallenChromium
on 30 Jan 2019
@stevezhengshiqi Oh, my fault 🤦♂️
Do you mind sharing your EFI folder? I am having a hard time getting 4k via HDMI or DP.
shilch
on 30 Jan 2019
@shilch Sure, but I don't think my EFI folder would help you a lot. I leave only necessary kexts in CLOVER/kexts/Other, and change SMBIOS model to MacBook10,1 for stricter Graphics power control.
CLOVER.zip
stevezhengshiqi
on 30 Jan 2019
Thanks! I will run diff to see what's different.
shilch
on 30 Jan 2019
@stevezhengshiqi , would you mind testing smbios macbookair 8,1 ?
I'm using it right now and seems promising.
Mateo1234454545
on 30 Jan 2019
@Mateo1234454545 I am using HS 10.13.6, and it doesn't support macbookair8,1. Maybe other kind people are encouraged to test.
stevezhengshiqi
on 30 Jan 2019
I had a partial success getting 4k working.
I installed Windows on my laptop (was using a Windows Live-USB before) to go through the whole dvmt process again. Since I switched from DP to HDMI a few weeks ago because DP did no longer work with macOS since removing these two framebuffer- settings, Windows connected to the external monitor via HDMI as well. To my surprise, Windows only got 2560x1600 as resolution. With Display-Port I got 4k@60Hz again. On the back of the monitor I have two HDMI ports, I was always using the one that was advertised as supporting 4k. Interestingly, when connecting to the other port, Windows as well as macOS support 4k.
Unfortunately, the HDMI version used in the Xiaomi Notebook Pro doesn't support 4k@60Hz. Any ideas how we can get 4k@60Hz via Display-Port?
shilch
on 1 Feb 2019
Hi, I'm having the same issue driving a 3840x1600 monitor. I've patched the DVMT to 64mb and removed the framebuffer data. I'm able to set the monitor at full resolution but I get a blank screen. However on one occasion, I woke the laptop from sleep and was able to get the monitor to work at full resolution. Any ideas?
 alex-and-the
on 2 Feb 2019
alex-and-the
on 2 Feb 2019
@alex-and-the That's normal as README says, and you need reopen the lid if the internal screen is blank.
stevezhengshiqi
on 2 Feb 2019
Sorry, I wasn't clear in the previous post. I'm connecting to my external display via DP over USB C. I have no problems with the internal display, it's the external that is blank. Only on one occasion where I woke the laptop from sleep did I manage to get the external monitor to display a picture.
alex-and-the
on 2 Feb 2019
@shilch Sure, but I don't think my EFI folder would help you a lot. I leave only necessary kexts in CLOVER/kexts/Other, and change SMBIOS model to MacBook10,1 for stricter Graphics power control.
CLOVER.zip
@stevezhengshiqi , how is macbook 10,1 compared to 14,1 or 15,2 ?
Mateo1234454545
on 3 Feb 2019
@Mateo1234454545 I don’t think there is much difference. CPUFriend and injected ig-platform-id determine the CPU and GPU performance in a large extent. In my case, geekbench score is almost the same for the three models.
stevezhengshiqi
on 3 Feb 2019
同样的问题,我是通过type-c转miniDP接4K显示器,最大输出分辨率只能选2560x1600,目前还是没有解决办法吗?
 leogcry22
on 19 Mar 2019
leogcry22
on 19 Mar 2019
@leogcry22 I recently tried connecting via miniDP again and after a few seconds of black screen it worked at 4k@60Hz. After a restart I haven't been able to reproduce this again.
shilch
on 19 Mar 2019

现在miniDP外接可以正常输出4K了,但是不管是开缩放还是原生分辨率下,显示器上字体显示都很模糊
leogcry22
on 19 Mar 2019
Hi, I'm having the same behaviour as the author of this post. I am using the same graphical configuration as is in the config.plist in this repo. USB-C and HDMI both give a max res of 1440P at 60Hz.
 ghost
on 19 Mar 2019
ghost
on 19 Mar 2019
现在miniDP外接可以正常输出4K了,但是不管是开缩放还是原生分辨率下,显示器上字体显示都很模糊
感觉看起来好像还可以.我是连4K都无法输出,一直只有2K的分辨率
 kydxone
on 20 Apr 2019
kydxone
on 20 Apr 2019
https://github.com/daliansky/XiaoMi-Pro/issues/117#issuecomment-458505214
I guess you r right. I found a thread in tonymax about uhd620's similar problem. It said that dvmt pre-allocated requires 128MB for 4k-60hz.
I'm looking for ways to set dvmt as 128MB. I guess mabbe the bios doesn't support 128mb dvmt option.
 Jyunta
on 23 Apr 2019
Jyunta
on 23 Apr 2019
@Jyunta Thanks for the tip, just tested setting to 128MB but it looks like I'm still at 96MB. I believe you can find out the DVMT by dividing that number on "About this Mac" by 16: 1536 / 16 = 96 - but I'm not sure.

@stevezhengshiqi Since it's working for you: Which number is shown for you on this window?
Nevermind, you also have 1536: https://github.com/daliansky/XiaoMi-Pro/issues/117#issuecomment-454467155
shilch
on 11 May 2019
I am now capable to use my extern 4k monitor in 4k@30Hz through both HDMI and type-c-2-miniDP. I followed the instruction to modify DVMT to 64MB and remove the framebuffer data.
 THUVAVA
on 12 May 2019
THUVAVA
on 12 May 2019
However, when I switched to 4k@60Hz, the monitor went blank. The monitor turned to normal when I switched back to 4k@30Hz. I wonder if the 64MB-DMVT limit the performance. Does some of you have the way to set DMVT to 96MB?
THUVAVA
on 12 May 2019


THUVAVA
on 12 May 2019
I can achieve 30Hz via HDMI as well, but I prefer lower resolution with higher frequency over 30Hz 4k.
@THUVAVA In the dvmt PowerShell file there's some hex number you can increase to set to higher than 64mb dvmt.
shilch
on 12 May 2019
Change sasetup_patched.txt to below for 128M DVMT, and flash the dvmt mod as before, NOT TESTED as I don't own 4k monitor.. so use it with your own risk!!! CAN BRICK YOUR COMPUTER And please do a backup before using below script. So if this don't work and your computer is bricked you can restore with some hardware programmer...
#************************************************************************************
Insyde H2OUVE (UEFI Variable Editor) Version 100.00.16.08
Copyright (c) 2012 - 2015, Insyde Software Corp. All Rights Reserved.

#************************************************************************************
#  Please follow file format to modify variable information.
#
#  File Format:
#
#   [Index] Variable Name
#          GUID: XXXXXXXX-XXXX-XXXX-XXXX-XXXXXXXXXXXX
#          Attributes: 0xXX
#          DataSize: 0xXX
#          Data:
#                00000000: XX XX XX XX XX XX XX XX XX XX XX XX XX XX XX XX
#                00000010: XX XX XX XX XX XX XX XX XX XX XX XX XX XX XX XX
#                 .....                         .....
#
#  1. Index is a number in Hex.
#  2. The number of data must be equal to datasize.(Except datasize = 0)
#  3. "X") represents a hex number.
#
#  Delete Variable:
#    Please modify datasize or Attributes value to zero.
#
#************************************************************************************

 [001] "SaSetup"
      GUID: 72C5E28C-7783-43A1-8767-FAD73FCCAFA4
      Attributes: 0x7
      DataSize: 0x1D9
      Data:
            00000000: 05 00 00 00 00 00 00 00 00 01 02 02 00 01 00 00
            00000010: 00 00 00 00 00 00 00 00 00 00 00 00 00 00 00 00
            00000020: 00 00 00 00 00 00 00 00 00 00 00 00 00 00 00 00
            00000030: 00 17 59 00 00 00 00 01 02 00 00 00 00 00 01 03
            00000040: 00 03 01 01 01 00 01 FF 01 FF 00 00 00 00 00 04
            00000050: 04 04 03 03 03 02 02 02 00 00 00 00 00 00 01 01
            00000060: 01 00 00 00 00 00 00 00 02 02 02 01 01 01 FF FF
            00000070: FF 01 01 01 01 01 01 01 07 07 07 07 07 07 07 07
            00000080: 07 07 07 07 07 07 07 07 07 07 07 07 07 07 07 07
            00000090: 07 07 07 07 07 07 07 07 02 02 02 02 02 02 02 02
            000000A0: 02 02 02 02 02 02 02 02 00 00 00 00 00 00 00 00
            000000B0: 00 B8 0B 00 00 01 02 00 00 02 10 27 02 00 02 00
            000000C0: 00 00 00 00 00 4B 4B 4B 01 00 02 00 03 00 00 00
            000000D0: 00 0A 00 0A 00 0A 00 04 04 04 00 1A 00 0B 00 04
            000000E0: 02 00 00 01 00 01 01 02 00 00 00 01 00 00 01 02
            000000F0: 00 01 04 04 04 04 07 07 07 07 02 02 02 02 03 03
            00000100: 02 00 01 01 04 02 2C 01 64 00 02 1F 00 01 00 00
            00000110: 00 00 00 01 01 00 00 02 01 20 03 00 00 18 01 07
            00000120: 00 01 00 01 01 00 01 00 00 04 0C 00 03 00 00 00
            00000130: 01 01 01 01 01 01 01 01 01 01 01 01 00 01 01 01
            00000140: 01 01 01 01 01 01 01 01 01 00 00 01 01 01 00 01
            00000150: 01 01 00 00 00 01 01 00 01 01 00 04 00 00 00 01
            00000160: 0A 00 DE 00 00 00 00 00 00 FF FF FF FF FF FF FF
            00000170: FF FF FF FF FF FF FF FF FF 0A 0A 06 06 AC AC D4
            00000180: D4 DD DD 0A 0A 06 06 AC AC D4 D4 DD DD 01 00 02
            00000190: 00 30 01 40 00 00 00 00 00 01 00 00 00 01 00 01
            000001A0: 00 0B 00 01 00 00 01 00 00 00 00 00 00 00 00 00
            000001B0: 00 00 00 00 00 00 00 00 00 00 00 00 00 00 00 00
            000001C0: 00 00 00 00 00 00 00 00 00 00 00 00 00 00 00 00
            000001D0: 00 00 00 00 00 00 00 01 00
 Menchen
on 12 May 2019
Menchen
on 12 May 2019
Thank you @Menchen. Is this different from editing line number 19 in this file: https://github.com/daliansky/XiaoMi-Pro/blob/master/BIOS/DVMT_and_0xE2_fix/bin/patchscript_dvmt.ps1?
shilch
on 12 May 2019
@shilch It's the same. Have confirmed patching that file myself under windows VM. Noted 96M (0x03) is default after the patch, not 64M (There is also some DOS(bios) unit to macOS unit that's weir....). So changing to 0x04 make it 128M, recommended for 4K@60.
All my modification is changing the last hex in 000000D0 from 01(32M) to 04(4x32M->128M), so theoretically it's pretty safe to flash...
Menchen
on 12 May 2019
@Menchen Mmh, well recently I modified line 19 to $bytes[$offset] = 0x34 which I assume is 128MB and patched it but the monitor is still black via DP, but I also can't really tell whether setting it to 128MB was successful. Is there some way to find out?
shilch
on 12 May 2019
@shilch try
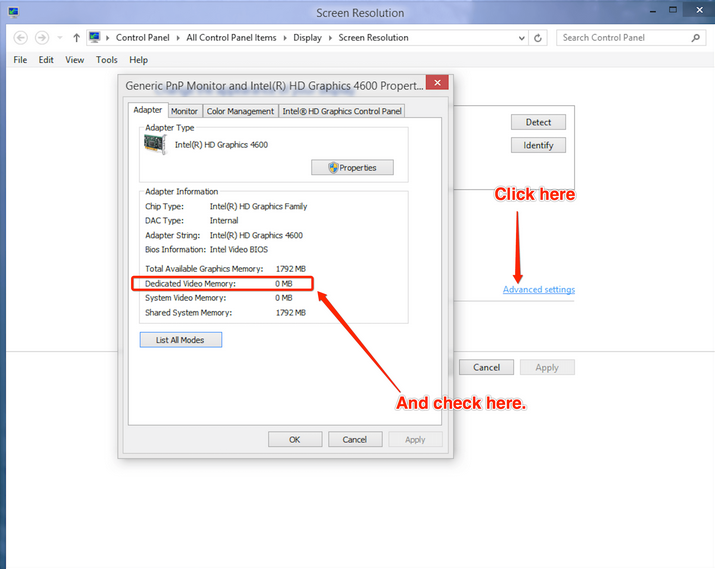
Should be 128m
and also try h2ouve -gv dvmtRead.txt -n SaSetup in bin folder.... Also try 192? with 0x06....
Menchen
on 12 May 2019
Looks like I do have DVMT=128MB. But screen turns black when I connect via DP :/

I'll try 192MB later, I doubt that it will do anything about it though.
shilch
on 13 May 2019
I can use the monitor via DP if I choose a lower resolution: "2560 x 1440 (low resolution)".
shilch
on 13 May 2019
“Windows is NOT a valid way to determine what DVMT-prealloc is set to. There is no correlation, especially with Windows 10” by RehabMan。No matter what dvmt you set, the dedicated vedio memory shows 128M....
THUVAVA
on 14 May 2019
我碰到了和 @shilch 一样的问题。
- 电脑型号是 MI PRO MIX150 i7/16g/256g,加装了一块 金士顿 A1000 M.2 NVMe 240G SSD:
| 规格 | 详细信息 |
| -------- | ---------------------------------------- |
| 电脑型号 | 小米笔记本电脑Pro 15.6''(MX150) |
| 处理器 | 英特尔 酷睿 i7-8550U 处理器 |
| 内存 | 16GB 三星 DDR4 2400MHz |
| 硬盘 | 三星 NVMe固态硬盘 PM981 256GB |
| 集成显卡 | 英特尔 UHD 图形620 |
| 显示器 | 京东方 NV156FHM-N61 FHD 1920x1080 (15.6 英寸) |
| 声卡 | 瑞昱 ALC298 (节点:30/99) |
| 网卡 | 英特尔 无线 8265 |
| 读卡器 | 瑞昱 RTS5129 |
- 使用 【黑果小兵】macOS Mojave 10.14.5 18F132 正式版 with Clover 4928原版镜像 这个镜像安装
- EFI 用 XiaoMi NoteBook Pro EFI v1.3.3
- 使用小米官方的type-c转接口通过mdp连接4K显示器
安装完成后(未刷帧缓存)连接显示器最大分辩率只有2560x1600,字体显示模糊。
然后我按照 XiaoMi-Pro/BIOS 的提示升级主板BOIS到0906版本,刷入ME固件,再按照 DVMT and 0xE2 fix 的提示刷帧缓存。
刷完帧缓存后连接4k显示器,已经有最大分辩率3840x2560了,但是跟 @shilch 一样 4K显示器黑屏,不管我怎么重新插拔、开关机,外置显示器一直黑屏。这时候系统应该是能够识别到显示器的,因为可以调节分辩率和缩放,还可以把应用窗口从内置屏拖过去外置屏(虽然外屏黑屏)。
后来偶然发现,如果我手动让电脑睡眠,等电脑进入睡眠后,按电源键唤醒,这时候奇迹出现了,内屏和外屏同时亮起来了,4K显示器正常工作了。 @shilch 你可以试一下,不知道这个对你有没有效。
现在有两个问题:
- 直接连上显示器,显示器黑屏,需要手工睡眠,再唤醒,外屏才能亮起来。每次都要这么操作。
- 如果在系统节能设置里开启无动作自动关闭显示器,当显示器自动关闭后,内外屏同时黑屏,两个屏幕都无法唤醒,只能强制关机重启。我看了别人说内屏黑屏,盒上盖子,过一会再开盖,就能唤醒,但是我试了不行。
 bakyoo
on 15 May 2019
bakyoo
on 15 May 2019
@bakyoo Interesting find! However, it doesn't look like the trick works for me or the translator isn't very precise. How do you do a manual sleep?
I did the following:
- Connect via miniDP
- Set resolution to 4k, now the external monitor turns black (internal monitor still working)
- Clicked on the Apple->Sleep
- Waited a few seconds
- Pressed the power button, the internal display wakes instantly
- External monitor still black
If (instead of clicking Apple->Sleep) I close the lid and reopen it, both displays will be black and I can't do anything except a reboot.
shilch
on 15 May 2019
I managed to get my external screen to work at 4k@60Hz a while back, but I have never been able to reproduce this: https://github.com/daliansky/XiaoMi-Pro/issues/117#issuecomment-474230702
shilch
on 15 May 2019
@shilch Yes, via the Apple -> Sleep menu, you'd to make sure the system has sleep down, and then press the power button to wake it up, or you will get both monitor black, and can't wake up any more. maybe this due to the model of the external monitor, my is DELL P2715Q.
and i don't use the hidpi.sh script.
btw, i get black even set to 2k resolution until do above steps.
bakyoo
on 15 May 2019
How do I know that the system is in sleep? How long does it take?
shilch
on 15 May 2019
The power button light starts breath. for me it's about 1 minute.
bakyoo
on 15 May 2019
Awesome, it did work! Thanks @bakyoo
Whoever stumbles on this thread: Make sure to reset your energy saving settings to default before attempting this, I had the issue that the screen doesn't turn back on.
shilch
on 15 May 2019
That is awesome, it works!!!! thanks !!
THUVAVA
on 15 May 2019
@shilch So,does the 4k@60hz works well? Thanks!
 Lechenx
on 16 May 2019
Lechenx
on 16 May 2019
@ChenLLE Yes, it does work fine. Connect the monitor, go into sleep mode, wait still the power button light pulsates and then press it.
shilch
on 16 May 2019
@shilch I followed your advice and I can use 4k @ 60hz with type-c / DisplayPort but sometimes during use the 4k monitor goes black for a few seconds and then turns back on normally.
What can it depend on?
I'm using this adapter: https://amzn.to/2HsiYMD
and I have enabled HiDPi
 ZambraDesigner
on 15 Jun 2019
ZambraDesigner
on 15 Jun 2019
@ZambraDesigner I experience that issue sometimes as well. The easy fix is either doing this sleep and wake thing again or just reboot.
Please note that this adapter only has 60W power delivery, the laptop can take 65W though. Personally, I'm using the official miniDP-adapter by Xiaomi and a miniDP-to-DP 4k cable.
shilch
on 15 Jun 2019
@shilch thanks, I'll try to repeat the operation to see if it resolves.
To the adapter I connected the original cable and charger and I do not know how difficult it is to recharge the notebook. Even under stress the battery always remains 100%.
What can the 60W interfere with against the 65w?
ZambraDesigner
on 17 Jun 2019
@ZambraDesigner I believe with 60W the battery level won't increase under load.
shilch
on 17 Jun 2019
@shilch , 60W is enough, there some limit that Xiaomi notebook have, event with 65W charger alone I get 60W only, considering we dont have dGPU, which would cost us 15W more at full load.
- Cpu and igpu and memory, 15W max at default due to TDP limit
- Screen , not sure but shuold be 5W
- Wifi and Bluetooth close 4W
- Usb and camera, 5W shuold be overkill.
That leave us 29W at full cpu load. And we dont even have met half of 60W.
That's said, with dGPU, even with stock charger battery won't charge under full load.
Menchen
on 17 Jun 2019
,但是不管是开缩放还是原生分辨率下,显示器上字体显示都很模糊
你的问题解决了么,我试着同时接上dp和HDMI,显示器可以显示4k,但是有时候可以60hz,有时候只能30hz
 NetworkedThought
on 20 Jun 2019
NetworkedThought
on 20 Jun 2019
Interesting find! However, it doesn't look like the trick works for me or the translator isn't very precise. How do you do a manual sleep?
I did the following:
- Connect via miniDP
- Set resolution to 4k, now the external monitor turns black (internal monitor still working)
- Clicked on the Apple->Sleep
- Waited a few seconds
- Pressed the power button, the internal display wakes instantly
- External monitor still black
If (instead of clicking Apple->Sleep) I close the lid and reopen it, both displays will be black and I can't do anything except a reboot.
it works, thank you
NetworkedThought
on 20 Jun 2019
Hey guys, https://github.com/acidanthera/WhateverGreen/commit/8689a5c872b19319b0039868d352967cd3c1b589 is something worth trying. I will try if I have an chance to plug an external screen.
stevezhengshiqi
on 25 Jun 2019
Hey guys, acidanthera/WhateverGreen@8689a5c is something worth trying. I will try if I have an chance to plug a external screen.
@stevezhengshiqi How can I try? What file should I replace in the EFI?
ZambraDesigner
on 28 Jun 2019
Hey guys, acidanthera/WhateverGreen@8689a5c is something worth trying. I will try if I have an chance to plug an external screen.
soory, I can't really understand how to try this solution, on the other hand, I also used dp port to connect the monitor, was this solutin only suitable for hdmi 2.0?
Lechenx
on 30 Jun 2019
@ZambraDesigner You would have to compile the new code yourself or just wait for a new pre-compiled version of the kext.
shilch
on 30 Jun 2019
@shilch Are your mac os running in 4k on your monitor now ?
Do you have any bug ?
If everything is working can you tell the step you did ?
I am still stuck on 2560x1440 ..
 Raphencoder
on 7 Jul 2019
Raphencoder
on 7 Jul 2019
@shilch Are your mac os running in 4k on your monitor now ?
Do you have any bug ?
If everything is working can you tell the step you did ?
I am still stuck on 2560x1440 ..
It is now working in 4k even though I am using a resolution of 2304x1296 @ 60Hz HiDPI.
To get to this I first ran the script to increase the 64MB video memory: https://github.com/daliansky/XiaoMi-Pro-Hackintosh/tree/master/BIOS/DVMT_and_0xE2_fix
then I enabled HiDPI: https://github.com/daliansky/XiaoMi-Pro-Hackintosh/tree/master/one-key-hidpi
and finally installed SwitchResX to improve the resolution
ZambraDesigner
on 8 Jul 2019
Thanks for the quick answer, I did everything and yet the HiDPI resolution dont appear in preference system even when ALT is pressed ..
I have this message from HiDPI:
Wonderful! This is the end of the installation, please reboot and choose 1424x802 in SysPref!
Any ideas ?
Raphencoder
on 8 Jul 2019
Thanks for the quick answer, I did everything and yet the HiDPI resolution dont appear in preference system even when ALT is pressed ..
I have this message from HiDPI:
Wonderful! This is the end of the installation, please reboot and choose 1424x802 in SysPref!Any ideas ?
Hi, I'm not sorry but I don't know what it depends on.
Surely @stevezhengshiqi can help you.
ZambraDesigner
on 9 Jul 2019
@Raphencoder The hidpi script in this repository is only for internal screen. For external screen, please close the lid and run the script in https://github.com/xzhih/one-key-hidpi
stevezhengshiqi
on 25 Jul 2019
Hello, I think for 4k to work, you have to set vram to 2048mb
 hugotai101
on 13 Oct 2019
hugotai101
on 13 Oct 2019
Hello,
I've got a USB C 4k Monitor but I don't really understand how I can make it work.
This is my first hackintosh so I am not really experienced (I have no clue what HiDPI for example). I am stuck with 1440p max.
Can please somebody explain step by step how to do it? Do I have to make changes to the bios? (Right now I have the version 502).
Thank you in advance!
 clmsftsw
on 25 Mar 2020
clmsftsw
on 25 Mar 2020
Hello,
I've got a USB C 4k Monitor but I don't really understand how I can make it work.
This is my first hackintosh so I am not really experienced (I have no clue what HiDPI for example). I am stuck with 1440p max.Can please somebody explain step by step how to do it? Do I have to make changes to the bios? (Right now I have the version 502).
Thank you in advance!
Hello!
I have a similar issue, I am on bios 906,
Display DELL 4919DW 5120x1440, I have patched the bios for 64MB dvmt.
I get 3800 ish by 1080p at maximum, using hidpi I can output 5120x1440 but it's scaled and looks horrible!
Charging, mouse and keyboard works fine, 2540 by 1440 also works fine when running PBP
 almenjonatan
on 3 Apr 2020
almenjonatan
on 3 Apr 2020
Anyone have audio over USB C out while on 4K 60hz?
 bhagirathbhard
on 27 Apr 2020
bhagirathbhard
on 27 Apr 2020
Thanks for this nice trick with Sleep, but one question remains. Since the hardware is obviously fine (default DVMT etc.), why does this happen only when hot-plugging the USB-C cable for the first time? What is the difference in HW state after the system sleeps & wakes up? Maybe we can all try to observe differences in IORegistryExplorer?
 dkoluris
on 13 Jun 2020
dkoluris
on 13 Jun 2020
Examined the difference in the states before & after sleeping the hack, and there's one small difference under IGPU in IOreg. So... we need to inject IOScreenRestoreState <02 00 00 00> in AppleIntelFramebuffer@2 to make DP work on both cold boot, and after sleep.
I don't know how to do that in OC or Clover, someone else?
dkoluris
on 1 Jul 2020
@shilch I followed your advice and I can use 4k @ 60hz with type-c / DisplayPort but sometimes during use the 4k monitor goes black for a few seconds and then turns back on normally.
What can it depend on?
I'm using this adapter: https://amzn.to/2HsiYMD
and I have enabled HiDPi
@shilch @daliansky @stevezhengshiqi
I have upgraded from EFI 1.3.8 to 1.4.3 and now I notice frequent black screens on the external monitor.
The external monitor is a 4k Philips connected via type c (PD) DisplayPort with 4k 60hz resolution.
With EFI 1.3.8 black screens happened but very few (2-3 in 8 working hours)
With EFI 1.4.3 they are more frequent, even 1-2 every 15 minutes up to complete signal losses which I resolve by disconnecting and reconnecting the type-c display port cable.
Black screens last about 1-2 seconds.
ZambraDesigner
on 6 Aug 2020
@ZambraDesigner You could try two methods:
- Change
framebuffer-flagstoCwfjAA==inconfig.plist - Devices (DeviceProperties) - Properties (Add) - PciRoot(0x0)/Pci(0x2,0x0) - Find the the following code in
config.plist:
<key>PciRoot(0x0)/Pci(0x2,0x0)</key>
            <dict>
                <key>AAPL,ig-platform-id</key>
                <data>AAAWWQ==</data>
                <key>AAPL,slot-name</key>
                <string>Internal</string>
                <key>complete-modeset-framebuffers</key>
                <data>AAAAAAAAAAE=</data>
                <key>device-id</key>
                <data>FlkAAA==</data>
                <key>force-online</key>
                <data>AQAAAA==</data>
                <key>force-online-framebuffers</key>
                <data>AAAAAAAAAAE=</data>
                <key>framebuffer-con0-enable</key>
                <data>AQAAAA==</data>
                <key>framebuffer-con0-flags</key>
                <data>mAQAAA==</data>
                <key>framebuffer-con1-enable</key>
                <data>AQAAAA==</data>
                <key>framebuffer-con1-flags</key>
                <data>xwMAAA==</data>
                <key>framebuffer-con1-pipe</key>
                <data>CgAAAA==</data>
                <key>framebuffer-con1-type</key>
                <data>AAgAAA==</data>
                <key>framebuffer-con2-enable</key>
                <data>AQAAAA==</data>
                <key>framebuffer-con2-flags</key>
                <data>xwMAAA==</data>
                <key>framebuffer-flags</key>
                <data>CwfDAA==</data>
                <key>framebuffer-patch-enable</key>
                <data>AQAAAA==</data>
                <key>hda-gfx</key>
                <string>onboard-1</string>
            </dict>
Change to:
<key>PciRoot(0x0)/Pci(0x2,0x0)</key>
            <dict>
                <key>AAPL,ig-platform-id</key>
                <data>BQAcWQ==</data>
                <key>AAPL,slot-name</key>
                <string>Internal</string>
                <key>complete-modeset-framebuffers</key>
                <data>AAAAAAAAAAE=</data>
                <key>device-id</key>
                <data>FlkAAA==</data>
                <key>force-online</key>
                <data>AQAAAA==</data>
                <key>force-online-framebuffers</key>
                <data>AAAAAAAAAAE=</data>
                <key>framebuffer-con1-enable</key>
                <data>AQAAAA==</data>
                <key>framebuffer-con1-pipe</key>
                <data>CgAAAA==</data>
                <key>framebuffer-con1-type</key>
                <data>AAgAAA==</data>
                <key>framebuffer-patch-enable</key>
                <data>AQAAAA==</data>
                <key>hda-gfx</key>
                <string>onboard-1</string>
            </dict>
@ZambraDesigner You could try two methods:
- Change
framebuffer-flagstoCwfjAA==inconfig.plist - Devices (DeviceProperties) - Properties (Add) - PciRoot(0x0)/Pci(0x2,0x0)- Find the the following code in
config.plist:<key>PciRoot(0x0)/Pci(0x2,0x0)</key> <dict> <key>AAPL,ig-platform-id</key> <data>AAAWWQ==</data> <key>AAPL,slot-name</key> <string>Internal</string> <key>complete-modeset-framebuffers</key> <data>AAAAAAAAAAE=</data> <key>device-id</key> <data>FlkAAA==</data> <key>force-online</key> <data>AQAAAA==</data> <key>force-online-framebuffers</key> <data>AAAAAAAAAAE=</data> <key>framebuffer-con0-enable</key> <data>AQAAAA==</data> <key>framebuffer-con0-flags</key> <data>mAQAAA==</data> <key>framebuffer-con1-enable</key> <data>AQAAAA==</data> <key>framebuffer-con1-flags</key> <data>xwMAAA==</data> <key>framebuffer-con1-pipe</key> <data>CgAAAA==</data> <key>framebuffer-con1-type</key> <data>AAgAAA==</data> <key>framebuffer-con2-enable</key> <data>AQAAAA==</data> <key>framebuffer-con2-flags</key> <data>xwMAAA==</data> <key>framebuffer-flags</key> <data>CwfDAA==</data> <key>framebuffer-patch-enable</key> <data>AQAAAA==</data> <key>hda-gfx</key> <string>onboard-1</string> </dict>Change to:
<key>PciRoot(0x0)/Pci(0x2,0x0)</key>
          <dict>
              <key>AAPL,ig-platform-id</key>
              <data>BQAcWQ==</data>
              <key>AAPL,slot-name</key>
              <string>Internal</string>
              <key>complete-modeset-framebuffers</key>
              <data>AAAAAAAAAAE=</data>
              <key>device-id</key>
              <data>FlkAAA==</data>
              <key>force-online</key>
              <data>AQAAAA==</data>
              <key>force-online-framebuffers</key>
              <data>AAAAAAAAAAE=</data>
              <key>framebuffer-con1-enable</key>
              <data>AQAAAA==</data>
              <key>framebuffer-con1-pipe</key>
              <data>CgAAAA==</data>
              <key>framebuffer-con1-type</key>
              <data>AAgAAA==</data>
              <key>framebuffer-patch-enable</key>
              <data>AQAAAA==</data>
              <key>hda-gfx</key>
              <string>onboard-1</string>
          </dict>
Thanks @stevezhengshiqi
I ran the second method and the black screens have shrunk a lot but occasionally still some.
They happen both when the PC is overloaded and the fan starts for a few seconds, and when it seems normal.
ZambraDesigner
on 11 Aug 2020
I went straight to modify DVMT-Preallocated values and it simply works!
4K@60Hz with type-c to miniDP adaptor.
It's worth trying.
我直接顺手把CFG和DVMT都修改了,转接DP输出4K@60Hz很完美
看评论里说不用HiDPI也会省电,笔记本内屏只能100%1080P,字有点小,先试几天看看是不是真的省电(原先续航跟流水一般)
 DavidZhu199
on 11 Nov 2020
DavidZhu199
on 11 Nov 2020
Related issues
 wuchuguang
·
5Comments
wuchuguang
·
5Comments
 paajake
·
8Comments
Mateo1234454545
·
5Comments
paajake
·
8Comments
Mateo1234454545
·
5Comments
 Detrous
·
3Comments
Detrous
·
3Comments
 cook1e0
·
7Comments
cook1e0
·
7Comments
Most helpful comment
Awesome, it did work! Thanks @bakyoo
Whoever stumbles on this thread: Make sure to reset your energy saving settings to default before attempting this, I had the issue that the screen doesn't turn back on.