Wixsharp: Update simply not working
Hi,
I just can't make upgrade work. I am using same project.GUID and not specifying ProductId and UpgradeCode. But newer version gets installed over old one and I see both versions in Add/Remove Programs. I tried many combinations and did exactly as described in documentation. Newer version doesn't seem to detect the old version since in BeforeInstall event, IsUpgrading and IsModifying are both false. Only IsInstalling is true. In this event I see that UpgradeCode is the same as in older version while ProductCode changed. I have a simple setup, left most of code from a default implementation. I simply don't understand how this should work.
Thanks and best regards
Tomaz
 tomazk8
All 11 comments
For the major upgrade scenario only UpgradeCode supposed to be the same:
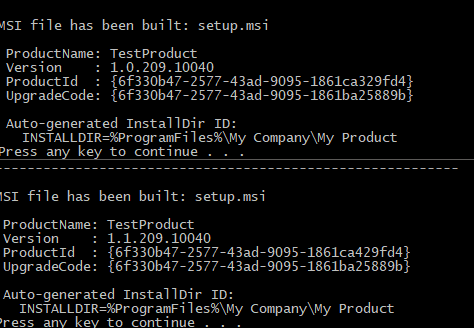
Use 'Samples\MajorUpgrade.setup.cs' sample as a starting point. The compile output above is for the "NativeUIApproach" routine from the sample. The only difference between these two builds is that the version has been changed from 1.0.209.10040 to 1.1.209.10040.
```C#
var project =
new ManagedProject("TestProduct",
new Dir(@"%ProgramFiles%\My Company\My Product",
new File(@"Files\1\MyApp.exe"),
new File(@"Files\1\MyApp.cs"),
new File(@"Files\1\readme.txt")));
project.GUID = new Guid("6f330b47-2577-43ad-9095-1861ba25889b");
project.Version = new Version("1.1.209.10040");
project.MajorUpgrade = new MajorUpgrade
{
Schedule = UpgradeSchedule.afterInstallInitialize,
DowngradeErrorMessage = "A later version of [ProductName] is already installed. Setup will now exit."
};
return project;
```
I just tested. After installing the 1.0.209.10040 msi the product has been upgraded correctly by installing the 1.1.209.10040 msi with uninstalling the prev version:
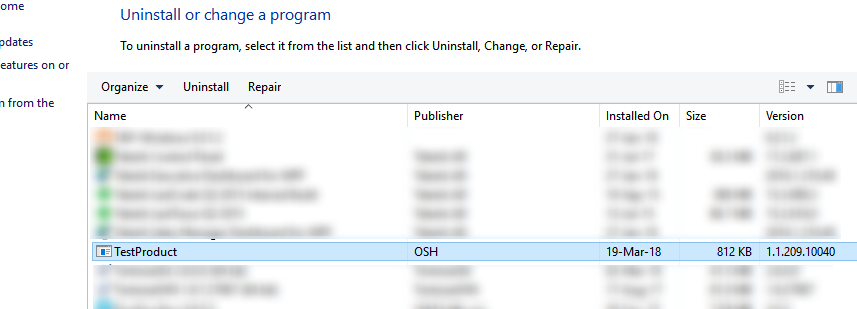
 oleg-shilo
on 19 Mar 2018
oleg-shilo
on 19 Mar 2018
One thing to note MSI doesn't take into account the 4th number of the version. It only looks at the first 3 sets of number making the version number.
 AlexBar
on 4 Dec 2019
AlexBar
on 4 Dec 2019
@AlexBar is right. In order to take into account the 4th number of the version, you must specify AllowSameVersionUpgrades.
C#
project.MajorUpgrade = new MajorUpgrade
{
    AllowSameVersionUpgrades = true,
    Schedule = UpgradeSchedule.afterInstallInitialize,
    DowngradeErrorMessage = "A later version of [ProductName] is already installed. Setup will now exit."
};
 Xaddan
on 4 Dec 2019
Xaddan
on 4 Dec 2019
I am facing the exact same issue as the OP. The project GUID has not changed but the product version number has, from 8.3.3.369 to 9.0.0.390.
I thought I'd be clever by checking myself for a custom registry entry that the installer writes and if present to follow the uninstall/repair/upgrade code flow. I tested with uninstalling and got an 1605 error in the log. This was just an experiment that obviously didn't work.
Obviously the log produced by the V9 installer when I follow through with the installation doesn't include anything since as far as it is concerned, this is a new install.
So how do I go about finding the problem? Any help would be appreciated.
 gw-ubunye
on 17 Jan 2020
gw-ubunye
on 17 Jan 2020
The project GUID has not changed but the product version number has, from 8.3.3.369 to 9.0.0.390.
I suggest you have a look at generated wxs file. First, see if the vital guids are changed (or not) as expected. I am talking about product id and upgrade code. If something is wrong there then it is WixSharp "guilt". If not then it is a pure MSI/WiX upgrade challenge.
oleg-shilo
on 17 Jan 2020
The file is deleted after the build completes. How do I get to it? Secondly, I don't have the file of the old version to compare against since it was compiled on a build server that persists the build artifacts only.
gw-ubunye
on 17 Jan 2020
If you have your project created from VS template then this file is not deleted.
If you are you are not using template then you need to set:
C#
project.PreserveTempFiles = true;
If you no longer have sources then you can use Orcas to open your older MSI and find out the identity values (guids) from it.
oleg-shilo
on 17 Jan 2020
Old version - using Orca
UpgradeCode {24F55E9F-EE8A-46FD-82D7-289351E94EAF}
ProductCode {24F55E9F-EE8A-46FD-82D7-289351E94EAF}
New version from wsx file
Product Id="24f55e9f-ee8a-46fd-82d7-289361e94eb0"
UpgradeCode="24f55e9f-ee8a-46fd-82d7-289351e94eaf"
gw-ubunye
on 17 Jan 2020
As far as I can tell the guids are just fine. UpgradeCode is the same and product code is different.
Then the answer will be somewhere in the WiX "depth". Try to search in WiX resources and see if the emitted MajorUpgrade element is consistent with WiX guideline.
oleg-shilo
on 17 Jan 2020
The MajorUpgrade element in both versions' wsx file is exactly the same:
<MajorUpgrade AllowSameVersionUpgrades="yes" DowngradeErrorMessage="A later version of [ProductName] is already installed. Setup will now exit." Schedule="afterInstallInitialize" />
Upgrading from say 8.3.2.327 to 8.3.3.369 works correctly, i.e. no duplicate in Add/Remove Programs. Also, upgrading from an earlier version of 9 to a later one works correctly. It is 8 to 9 that doesn't work.
Is there a way to manually uninstall 8 when the 9 bootstrapper detects that it is there?
gw-ubunye
on 20 Jan 2020
Technically speaking only a single MSI session is possible at the time. Thus it is bootstrapper which chains multipme sessions needs to do the detection and uninstalling. So you are right, you need a bootstrapper.
Which one, it's a different story. You can have a look at WixBootstrapper samples and do the detection and interaction with the user during communication in the DetectPackageComplete event handler.
Though for many practical reasons you may you may prefer a single MSI approach with an intelligent launch condition. Have a look at "Simplified Bootstrapper" sample.
Thus in LaunchCondition CA you can detect presence of the v8. Launch msiexec -u <your product GUID> and wait until msiexec exits. And after that just resume the execution of your primary MSI.
oleg-shilo
on 21 Jan 2020
Related issues
 CADbloke
·
4Comments
CADbloke
·
4Comments
 JamesWHurst
·
5Comments
JamesWHurst
·
5Comments
 JasShao
·
4Comments
JasShao
·
4Comments
 ju2pom
·
5Comments
ju2pom
·
5Comments
 ayman-eltemsahi
·
4Comments
ayman-eltemsahi
·
4Comments
Most helpful comment
@AlexBar is right. In order to take into account the 4th number of the version, you must specify AllowSameVersionUpgrades.
C#
project.MajorUpgrade = new MajorUpgrade
{
    AllowSameVersionUpgrades = true,
    Schedule = UpgradeSchedule.afterInstallInitialize,
    DowngradeErrorMessage = "A later version of [ProductName] is already installed. Setup will now exit."
};