Tasmota: FYI Only - USB and 4 port power strip with Tasmota
Not a feature request unless the devs feel it is necessary to throw in a template for this power strip. Hats off to the developers for the generic template!
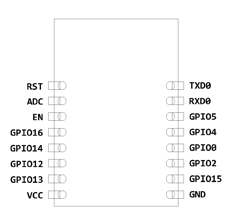
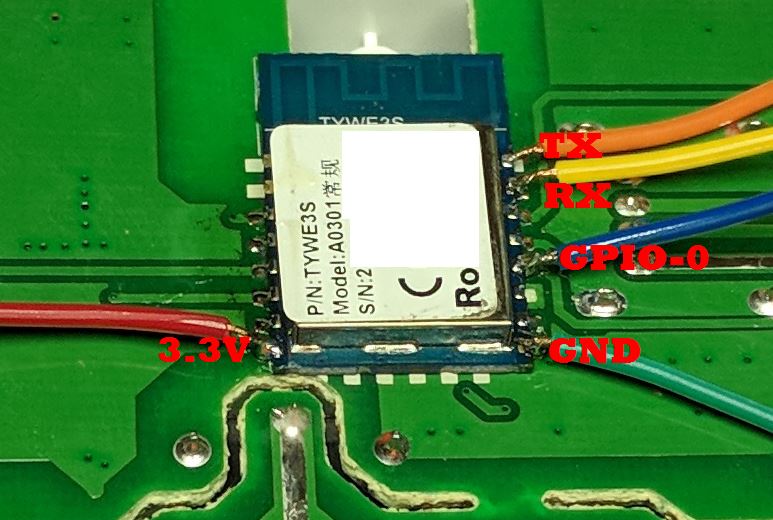
The power strip is a SM-SO301 with an FCC ID of 2AJ5F-SM-SO301. The ESP8266 module inside is a TYWE3S by Tuya. Take note if you use the docs to determine the pins, you will need to verify your VCC and GND pins! As you are looking at the back of the chip and the docs show it from the front, you'll need to flip flip the pins from side to side. Trace them out if ever in doubt!
Is the one I purchased, but I suspect there different model names and such for various voltages/plug types: https://www.amazon.com/gp/product/B073GQWHRP


 digiblur
All 26 comments
You should put this information on the Wiki, so it won't get lost.
 Frogmore42
on 27 Jul 2018
Frogmore42
on 27 Jul 2018
Definitely will... Under the Other Devices? https://github.com/arendst/Sonoff-Tasmota/wiki/Other-Devices
digiblur
on 27 Jul 2018
Yes, that looks like a good spot.
Frogmore42
on 27 Jul 2018
Mark the pictures with the GPIO locations to make it even more helpful to the next person.
Frogmore42
on 27 Jul 2018
Good job figuring it out, too 👍
Frogmore42
on 27 Jul 2018
Great idea on the GPIO pins on the chip. Seen some pictures like that before on here.
Making a note that I forgot to mention the button is a momentary switch(non-latching), need to correct my picture to be Button 1 (instead of Switch 1)as I was messing around with the HOLD function of the button.
digiblur
on 27 Jul 2018
Added to the Wiki. https://github.com/arendst/Sonoff-Tasmota/wiki/SM-SO301
digiblur
on 27 Jul 2018
Great! Thanks!
 ascillato2
on 18 Aug 2018
ascillato2
on 18 Aug 2018
Just used tuya-convert to flash this power strip. This made setting it up a breeze. Thanks!
 erwill2
on 3 Feb 2019
erwill2
on 3 Feb 2019
@digiblur can you help with turning all relays on and off with button. With the current settings the button only controls the usb.
erwill2
on 3 Feb 2019
@erwill2 using a button or switch? And do you want all relays to cycle?
digiblur
on 3 Feb 2019
@digiblur What I'm looking for is when I click the button on the power strip it cycles all the relays on or off regardless of current state. So if one relay is on they will all turn off if all are off the button will turn every relay on. I believe this was the original functionality in the Tuya app. Thanks again for your help and videos on youtube.
erwill2
on 4 Feb 2019
I did this using a rule:
ButtonTopic 0
SetOption1 1
SetOption32 20
Rule on button1#state=3 do backlog power1 0;power2 0;power3 0;power4 0;power5 0 endon on button1#state=2 do backlog power1 1;power2 1;power3 1;power4 1;power5 1 endon
Rule 1
Placed this into the Console line by line and what it does is short press = all come on, long press = all go off. Put here in case it helps.
 wlatic
on 27 Feb 2019
wlatic
on 27 Feb 2019
Sorry for posting in a closed issue...
I have tried your rule @wlatic , but I see that the on (or off) commands are delayed tenths of second between relays activations (power1 - delay - power2 - delay - power3 - delay - power4 - delay - power5)
Is there some way to speed it up and have all relays on (or off) simultaneosly or at least speed up the process?
 forast3r
on 21 May 2019
forast3r
on 21 May 2019
Forget my comment, just seen there is a 50ms delay between backlog commands
https://github.com/arendst/Sonoff-Tasmota/issues/4625#issuecomment-447394972
forast3r
on 21 May 2019
Maybe not the best place to post this but thought I would share:
I bought one like this on Amazon called Teckin SS30 and found the insides had changed. The ESP is not accessible with just taking the back panel off because it is on the other side of the pcb (but it just means 8 more screws). Fortunately I found tuya-convert which worked on it so I didn't have to solder anything. This thing was a great buy with all the control it gives.
 John2009R
on 20 Jul 2019
John2009R
on 20 Jul 2019
The template repository is the best location for this kind of information.
I created a PR to add this information to the template. It will take a day or two for the update to be merged.
 meingraham
on 20 Jul 2019
meingraham
on 20 Jul 2019
Ok. It wasn't clear how I could edit that page without forking it.
Also, here is an alternative template that puts the 4 AC outlets first and then the USB. That order seems more logical to me:
{"NAME":"SM-SO301","GPIO":[56,0,0,0,29,17,0,0,31,30,32,0,25],"FLAG":0,"BASE":18}
John2009R
on 20 Jul 2019
Yes, it creates a fork allowing you to edit the entry. If the PR is accepted and merged, you can then delete your fork.
I'll probably leave the template as is for "backward" compatibility. I don't have one of these devices, but like you said, the order is personal preference and can be changed by each user as desired.
meingraham
on 20 Jul 2019
What image do I use for the ss30? Also is 1.0.4 firmware tuyaconvert compatible for this device?
 CyiDev
on 25 Sep 2019
CyiDev
on 25 Sep 2019
I used whatever the version of tuya-convert was in July 2019 and the embedded tasmota version. After that I was able to do an update over the air with the latest basic.
John2009R
on 25 Sep 2019
I was able to flash it today. Stuck using your config as the only power option available is Power / Power1 and it turns on the second power outlet. 2 and above return errors.
CyiDev
on 26 Sep 2019
This looks exactly like the TONBUX smart strip. Mine stopped working with stock firmware but will try to flash it anyway. If it's not damaged it should work. Tonbux on Amazon.
 SAM26K
on 16 Oct 2019
SAM26K
on 16 Oct 2019
Here is another one. Same power strip sold under a different brand: YAGALA
SAM26K
on 17 Oct 2019
Folks, I picked one of these up from amazon.ca this week that looks identical, but none of the templates worked. They actually caused it to reset and lose all its settings including wifi. It was advertised as a Teckin SS30, but there was literally nothing to identify it, not even a model number or safety certification number in the manual, on the box, or on the device itself.
This is what ended up working for me (after going through the manual identification process):
{"NAME":"PowerBar","GPIO":[52,0,53,0,25,22,0,0,24,17,23,21,0],"FLAG":0,"BASE":18}
I also had to apply the rule posted previously, which worked awesome, thanks!
I now have it working using MQTT to Hassio/HA
Hopefully this can help someone who has the same problem.
BTW: I was able to flash this OTA using tuya-convert
A tutorial can be found here (not my video):
https://www.youtube.com/watch?v=dyUyewiKpRA
 zeit0dn1
on 4 Jan 2020
zeit0dn1
on 4 Jan 2020
Just came to comment that I received this device a few weeks ago and it did not use an ESP chip instead it used a realtek. Here is the model that mine used.
https://docs.tuya.com/en/iot/device-development/module/wifi-module/wifiwr2module?id=K9605tko0juc3
 cd85233
on 4 Jul 2020
cd85233
on 4 Jul 2020
Related issues
 wirelesssolution
·
3Comments
wirelesssolution
·
3Comments
 j4k3
·
3Comments
j4k3
·
3Comments
 TylerDurden23
·
3Comments
TylerDurden23
·
3Comments
 Ndrinta
·
3Comments
Ndrinta
·
3Comments
 luisfpinto
·
3Comments
luisfpinto
·
3Comments
Most helpful comment
Good job figuring it out, too 👍