Serenity: Help in Custom Form Template
Hi,
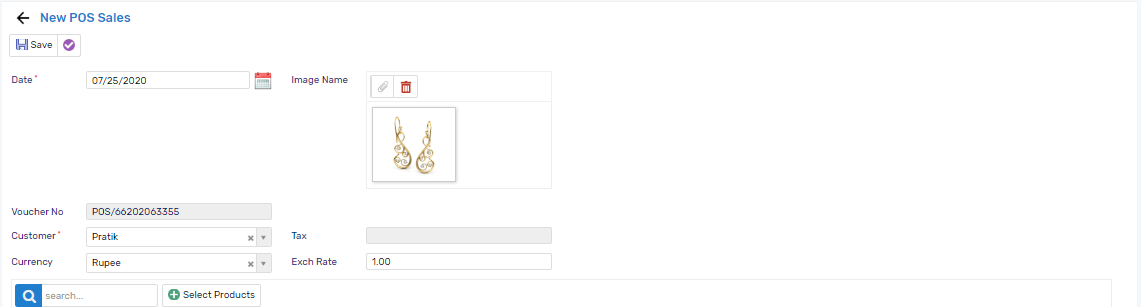
I have created a purchase invoice form and wanted to show product images as per the image attached. can anyone suggest how this can be achieved?
Basically I need to setup flex layout grid rows and column for div but don't know how to get it done in serenity
Thanks!!
 reach2rv
All 8 comments
Hello, Module / Administracion / User shows how an image is loaded.
To show it, look at the following image:
 ArsenioInojosa
on 21 Jul 2020
ArsenioInojosa
on 21 Jul 2020
@ArsenioInojosa I am aware of imageupload editor and use it in appropriate forms.. in above question of mine I am asking about how I can add
As you can see the image I have attached shows fields on left-side and I want to show image on right merging all rows of css column.
reach2rv
on 21 Jul 2020
You are simply attempting to edit the layout. The overall build of the layout is very similar to bootstrap 3 and you can use the typescript side to edit the layout and manipulate the behavior. For example, for my personal ease, I took all the demo widgets that are originally in the AdminLTE sample, and re-generated them using TypeScript so that I can use them to my leisure more fluidly. (https://github.com/sayuga/AdminLTE-Widgets-in-Typscript) All I then need to do is use TypeScript DOM commands to manipulate and add my widgets and others as I see fit.
Try adding the image per normal into the dialog. Look at what the source code shows for the id for the image encapsulation. Then manipulate on opening by moving it to it's proper location. This is one example
You could also adjust the CSS for that particular item in its' respective location. it all depends on your choice of approach
 sayuga
on 21 Jul 2020
sayuga
on 21 Jul 2020
@sayuga Thank you for your answer. I am still learning Typescript and CSS. Thus some little more elaborated help will enable me to overcome this problem.
I have attached the image, which clearly shows the image editor with an image. I am still not able to move it to the extreme right of the form and without creating a row gap between other control on the form.
it should be in its own column and should not affect the position of other controls.
Thanks again
reach2rv
on 25 Jul 2020
any idea how to set the width of Category ??? if this can be done then above can be achieved using category attribute
reach2rv
on 25 Jul 2020
Resolved
reach2rv
on 25 Jul 2020
Resolved
Please share the solution.
ArsenioInojosa
on 25 Jul 2020
- Add new .ts file in common/helper with the following functions
namespace yournamespace
{
    export function SetCategoryThreeColumn(editor: JQuery) {
        editor.closest('.category').addClass("col-md-3 col-sm-2");
    }
    export function SetCategoryNineColumn(editor: JQuery) {
        editor.closest('.category').addClass("col-md-9 col-sm-4");
    }

    export function HideCategoryLable(editor: JQuery) {
       //  This will hide category links
        editor.find('.category-links').hide();

        let $FirstCategory = editor.find('.first-category > .category-title');
        $FirstCategory.hide();

        let $Category = editor.find('.category-title');
        $Category.hide();
    }
}
columns can be set or additional functions for columns can be added as per requirement.
Once ready with the above functions build the project
Add Categories to the form.cs and put up fields required
Open dailog.ts and add following in constructor
yournamespace.SetCategoryTwoColumn(this.form.firstfieldincategory.element);
yournamespace.HideCategoryLable(this.element);
- Assign set category function to each category else form may look messy.
PS: if you are going to use your application on multiple devices like tablet check UI and amend CSS accordingly you may need to add specific CSS classes as per the device.
reach2rv
on 30 Jul 2020
Related issues
 stepankurdylo
·
3Comments
stepankurdylo
·
3Comments
 stixoffire
·
3Comments
stixoffire
·
3Comments
 gfo2007
·
3Comments
gfo2007
·
3Comments
 chintankukadiya18
·
3Comments
chintankukadiya18
·
3Comments
 newyearsoft
·
3Comments
newyearsoft
·
3Comments
Most helpful comment
You are simply attempting to edit the layout. The overall build of the layout is very similar to bootstrap 3 and you can use the typescript side to edit the layout and manipulate the behavior. For example, for my personal ease, I took all the demo widgets that are originally in the AdminLTE sample, and re-generated them using TypeScript so that I can use them to my leisure more fluidly. (https://github.com/sayuga/AdminLTE-Widgets-in-Typscript) All I then need to do is use TypeScript DOM commands to manipulate and add my widgets and others as I see fit.
Try adding the image per normal into the dialog. Look at what the source code shows for the id for the image encapsulation. Then manipulate on opening by moving it to it's proper location. This is one example
You could also adjust the CSS for that particular item in its' respective location. it all depends on your choice of approach