Rawtherapee: Microcontrast tool deserves some improvements
When processing sharp images captured with good lenses at a good aperture, the microcontrast tool is really nice to get some more fine details out of the capture.
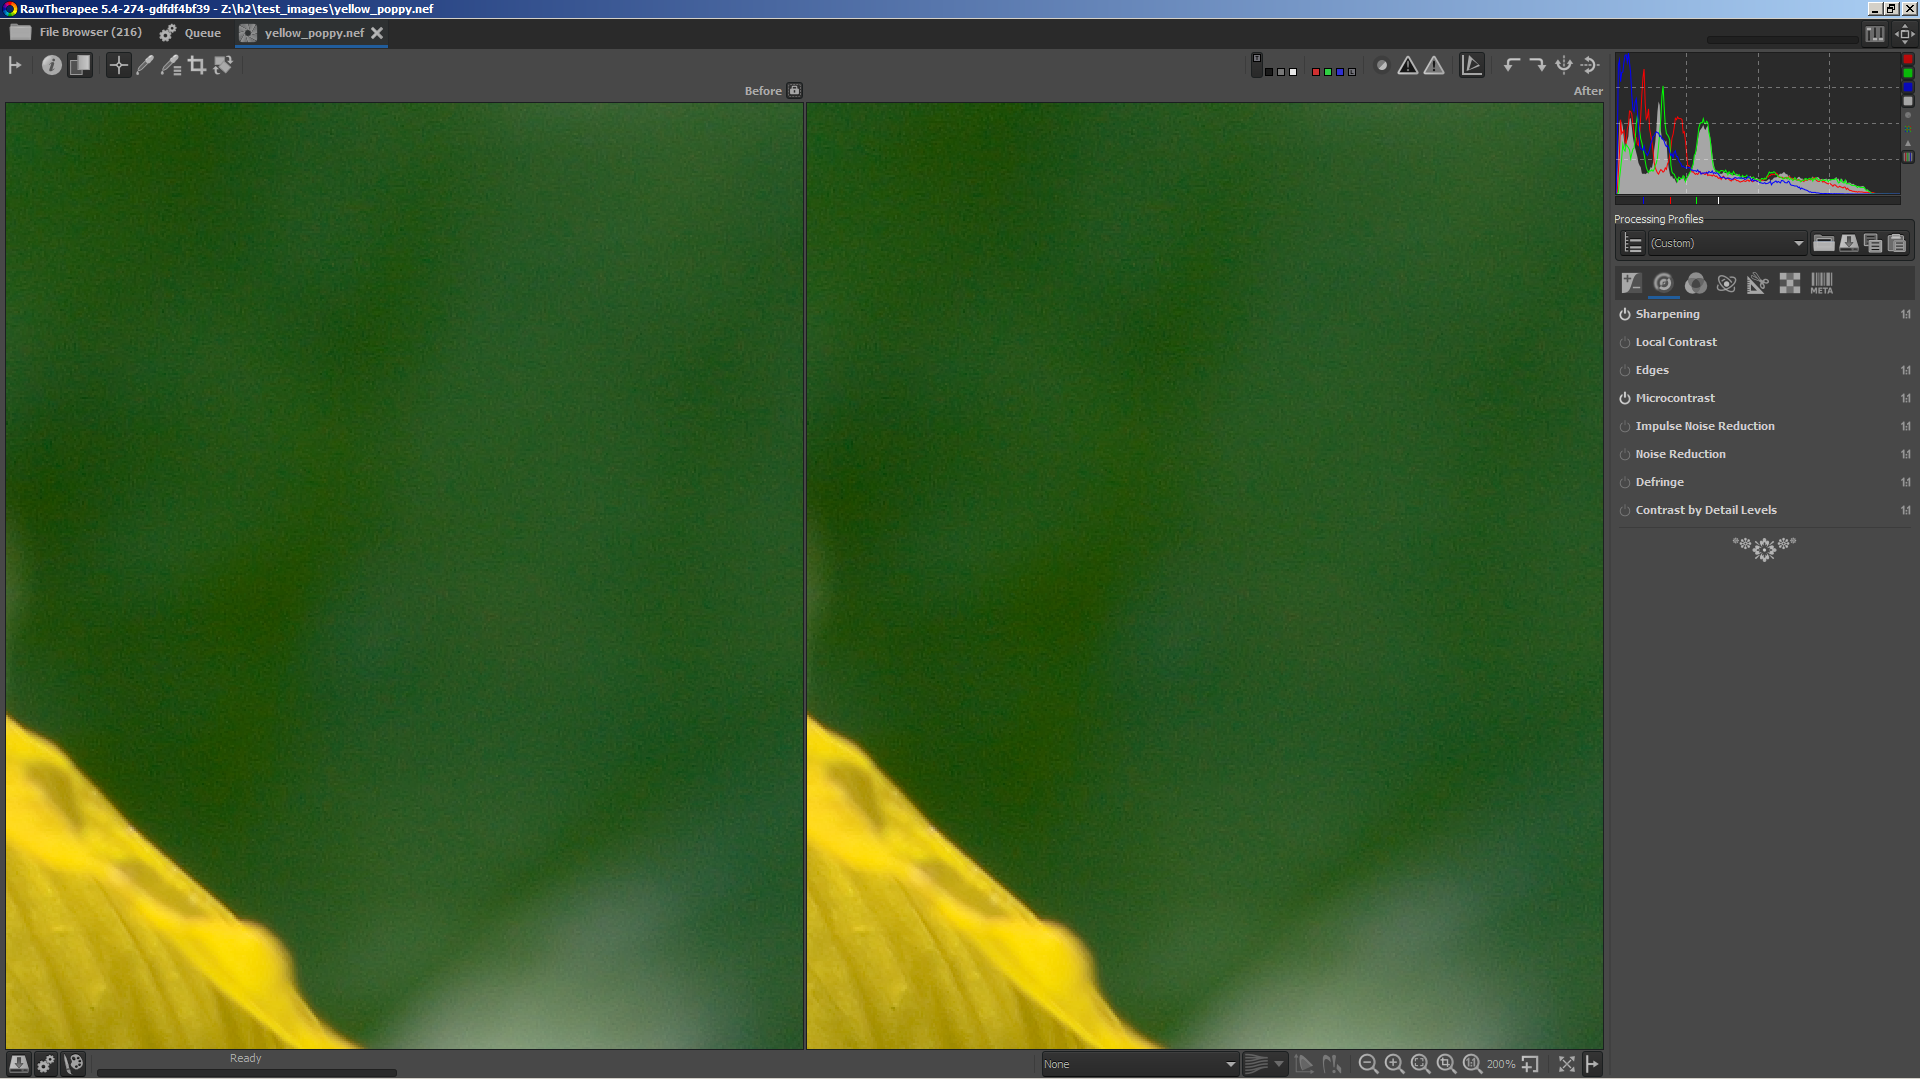
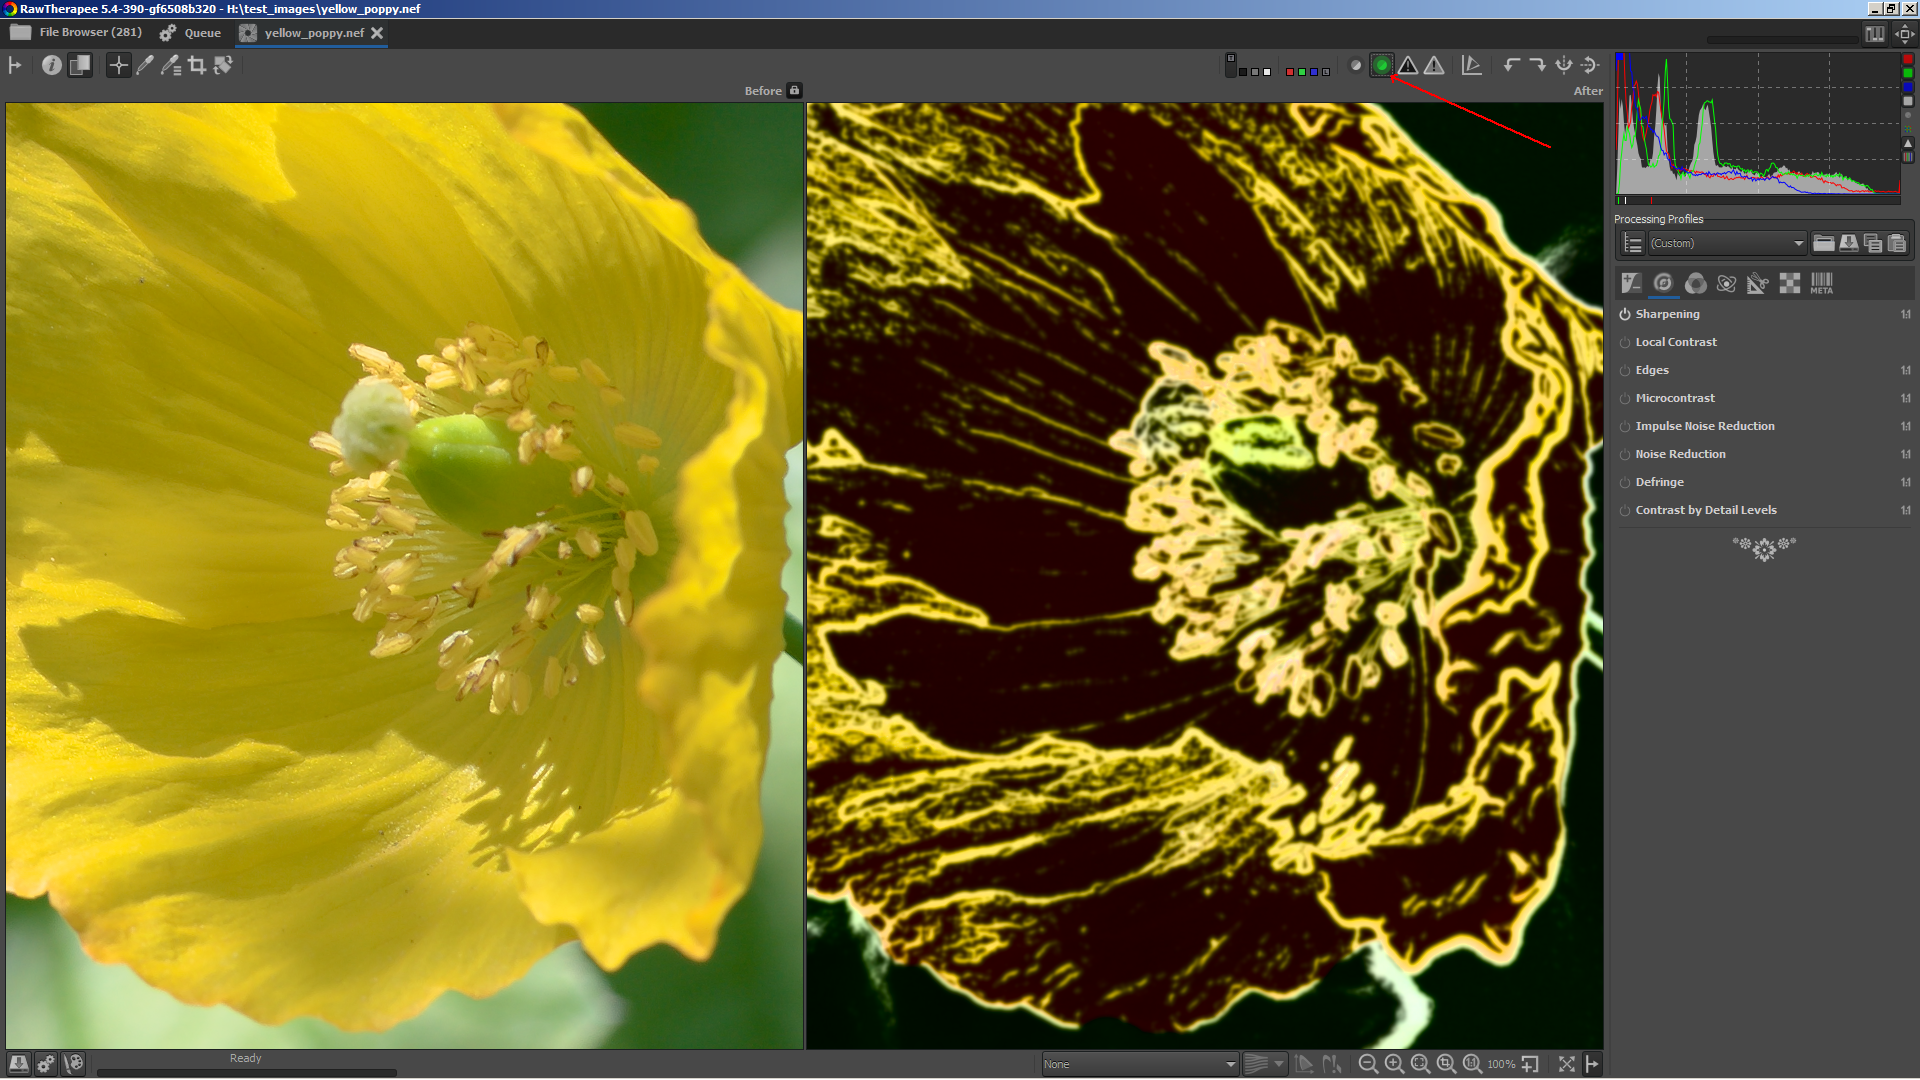
Here's an example using yellow_poppy.nef I took with the very sharp Apo-Rodagon 4.0/105mm some time ago:
Left is with Microcontrast disabled, right is with Microcontrast enabled:

Though there's some more fine details in the one with microcontrast enabled, there's also a downside:
The current microcontrast algorithm also increases the microcontrast in flat regions (regions with low contrast). Again left with microcontrast disabled and right with microcontrast enabled. There's clearly more noise on the right, which is bad:

This issue is about improving the current algorithm
 heckflosse
All 77 comments
Here's a first screenshot of the improved algorithm. Again left with microcontrast disabled and right with microcontrast enabled. Almost no difference between enabled and disabled in low contrast regions now.
And here's the very first patch:
diff --git a/rtengine/ipsharpen.cc b/rtengine/ipsharpen.cc
index 3c455b03e..3b3c88ff2 100644
--- a/rtengine/ipsharpen.cc
+++ b/rtengine/ipsharpen.cc
@@ -23,7 +23,8 @@
 #include "rt_math.h"
 #include "sleef.c"
 #include "opthelper.h"
-
+#define BENCHMARK
+#include "StopWatch.h"
 using namespace std;

 namespace rtengine
@@ -575,7 +576,7 @@ void ImProcFunctions::MLmicrocontrast(float** luminance, int W, int H)
     if (!params->sharpenMicro.enabled) {
         return;
     }
-
+BENCHFUN
     const int k = params->sharpenMicro.matrix ? 1 : 2;

     // k=2 matrix 5x5  k=1 matrix 3x3
@@ -619,8 +620,8 @@ void ImProcFunctions::MLmicrocontrast(float** luminance, int W, int H)
     const float Cont5[11] = {1.0f, 1.1f, 1.2f, 1.25f, 1.3f, 1.4f, 1.45f, 1.50f, 1.6f, 1.65f, 1.80f};

     const float s = amount;
-    const float sqrt2 = sqrt(2.0);
-    const float sqrt1d25 = sqrt(1.25);
+    constexpr float sqrt2 = sqrt(2.0);
+    constexpr float sqrt1d25 = sqrt(1.25);
     float *LM = new float[width * height]; //allocation for Luminance

 #ifdef _OPENMP
@@ -652,6 +653,9 @@ void ImProcFunctions::MLmicrocontrast(float** luminance, int W, int H)
                                                        + SQR(LM[offset + 2] - LM[offset - 2]) + SQR(LM[offset + 2 * width] - LM[offset - 2 * width])) * 0.0625f; //for 5x5

             contrast = std::min(contrast, 1.f);
+            float blend = 0.f;
+            if(contrast <= 0.25f)
+                blend = sqrt(sqrt(sqrt((0.25f - contrast) * 4.f)));

             //matrix 5x5
             float temp = v + 4.f *( v * (s + sqrt2 * s)); //begin 3x3
@@ -675,13 +679,12 @@ void ImProcFunctions::MLmicrocontrast(float** luminance, int W, int H)

             temp = std::max(temp, 0.f);

-            for(int row = j + k, n = SQR(2*k+1) - 1; row >= j - k; row--) {
-                for(int offset2 = row * width + i + k; offset2 >= row * width + i - k; offset2--) {
+            for(int row = j - k; row <= j + k; ++row) {
+                for(int offset2 = row * width + i - k; offset2 <= row * width + i + k; ++offset2) {
                     if((LM[offset2] - temp) * (v - LM[offset2]) > 0.f) {
                         temp = intp(0.75f, temp, LM[offset2]);
                         goto breakout;
                     }
-                    n--;
                 }
             }
             breakout:
@@ -751,7 +754,7 @@ void ImProcFunctions::MLmicrocontrast(float** luminance, int W, int H)
                 } else {
                     temp = 0.f;
                 }
-                luminance[j][i] *= (temp * temp2 + 1.f);
+                luminance[j][i] = intp(blend, luminance[j][i], luminance[j][i] * (temp * temp2 + 1.f));
             } else {

                 float temp4 = LM[offset] / tempL; //
@@ -802,7 +805,7 @@ void ImProcFunctions::MLmicrocontrast(float** luminance, int W, int H)
                     } else {
                         temp = 0.f;
                     }
-                    luminance[j][i] /= (temp * temp4 + 1.f);
+                    luminance[j][i] = intp(blend, luminance[j][i], luminance[j][i] / (temp * temp4 + 1.f));
                 }
             }
         }
I created microcontrast branch and added a contrast threshold adjuster.
The purpose of the adjuster is to restrict the effect of microcontrast to areas with higher contrast.
At setting 0 the effect is the same as in dev (microcontrast is applied to whole image). At setting 100 microcontrast is disabled. Any setting between 0 and 100 means that microcontrast will be not applied for regions with contrast lower than setting/2, then increasing to be fully applied for regions >= setting
heckflosse
on 14 May 2018
@Beep6581 asked on irc whether this method also could be applied to the Sharpening tool.
So I tried, and it works :)
left is with rl-deconv and microcontrast without contrast threshold, right is with contrast threshold
left is rl-deconv and microcontrast with contrast threshold, right without rl-deconv and without microcontrast

heckflosse
on 14 May 2018
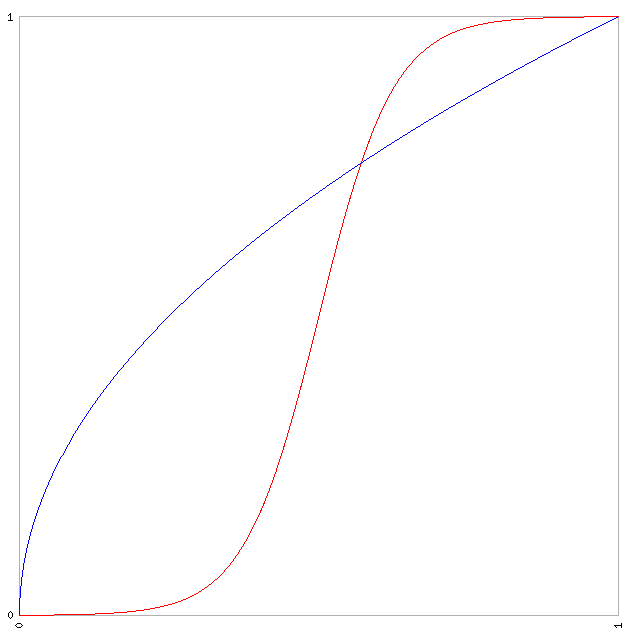
In next step I will try to improve the transitions between sharpened and unsharpend regions. Currently the transitition uses the blue curve. Using the red red curve should be better...
heckflosse
on 15 May 2018
I pushed some stuff to the microcontrast branch to get more tests.
Because I'm lazy I misused the RL damping adjuster as a contrast threshold adjuster for RL sharpening.
I also changed the transition curve.
Here's an example of a transition curve:
Let's assume the contrast threshold adjuster is set to 20. This value will be divided by 100 => 0.2
Here's the curve for threshold 20 (0.2)
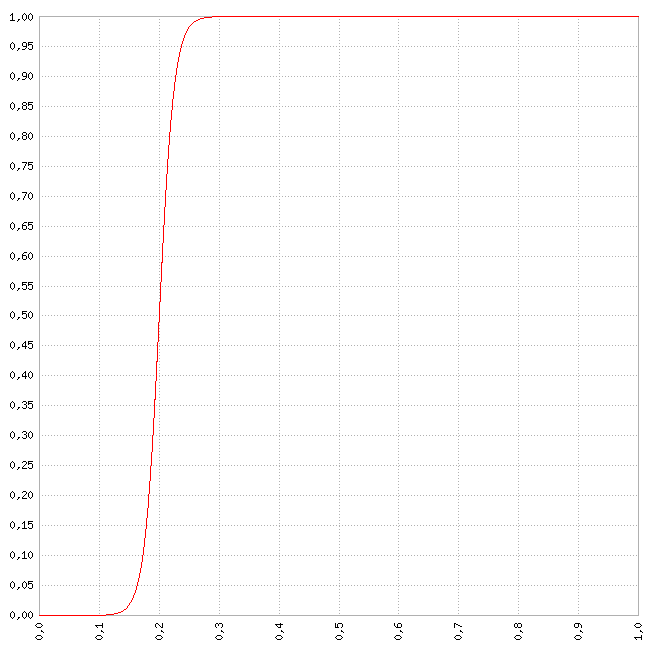
What does that mean?
Let's define c as the contrast of a pixel compared to its 5x5 surrounding.
c is in range [0;1]
The resulting pixel then will be
result = blendfactor * sharpened + (1 - blendfactor) * unsharpened
Here's a table with some values for the above example
 c      blendfactor

0,00 | 0,000000112535
0,01 | 0,000000250452
0,02 | 0,000000557390
0,03 | 0,000001240494
0,04 | 0,000002760765
0,05 | 0,000006144175
0,06 | 0,000013674009
0,07 | 0,000030431557
0,08 | 0,000067724150
0,09 | 0,000150710358
0,10 | 0,000335350130
0,11 | 0,000746028834
0,12 | 0,001658801080
0,13 | 0,003684239899
0,14 | 0,008162571153
0,15 | 0,017986209962
0,16 | 0,039165722797
0,17 | 0,083172696494
0,18 | 0,167981614866
0,19 | 0,310025518872
0,20 | 0,500000000000
0,21 | 0,689974481128
0,22 | 0,832018385134
0,23 | 0,916827303506
0,24 | 0,960834277203
0,25 | 0,982013790038
0,26 | 0,991837428847
0,27 | 0,996315760101
0,28 | 0,998341198920
0,29 | 0,999253971166
0,30 | 0,999664649870
0,31 | 0,999849289642
0,32 | 0,999932275850
0,33 | 0,999969568443
0,34 | 0,999986325991
0,35 | 0,999993855825
0,36 | 0,999997239235
0,37 | 0,999998759506
0,38 | 0,999999442610
0,39 | 0,999999749548
0,40 | 0,999999887465
0,41 | 0,999999949435
0,42 | 0,999999977280
0,43 | 0,999999989791
0,44 | 0,999999995413
0,45 | 0,999999997939
0,46 | 0,999999999074
0,47 | 0,999999999584
0,48 | 0,999999999813
0,49 | 0,999999999916
0,50 | 0,999999999962
0,51 | 0,999999999983
0,52 | 0,999999999992
0,53 | 0,999999999997
0,54 | 0,999999999998
0,55 | 0,999999999999
0,56 | 1,000000000000
This looks like a great improvement to the RL sharpening, looking forward to trying it out!
 agriggio
on 15 May 2018
agriggio
on 15 May 2018
With the new contrast threshold adjuster in sharpening tool it's a bit easier to test now.
It works with RL and USM, but with USM it only works when Halo control and edges are disabled
heckflosse
on 20 May 2018
I've been playing a little with this modification and I think it works great! But might I suggest an accompanying change for the default values of the Microcontrast tool? To me the original value for Quantity = 20 only had a barely noticeable effect, but cranking it up too much would induce unwanted sharpness in the smooth areas. So I usually keep it low.
But with the updated tool this is no longer necessary! Therefore after testing this on a few pictures, I would suggest defaults of Quantity = 50 and Contrast Threshold = 10 as a good starting point.
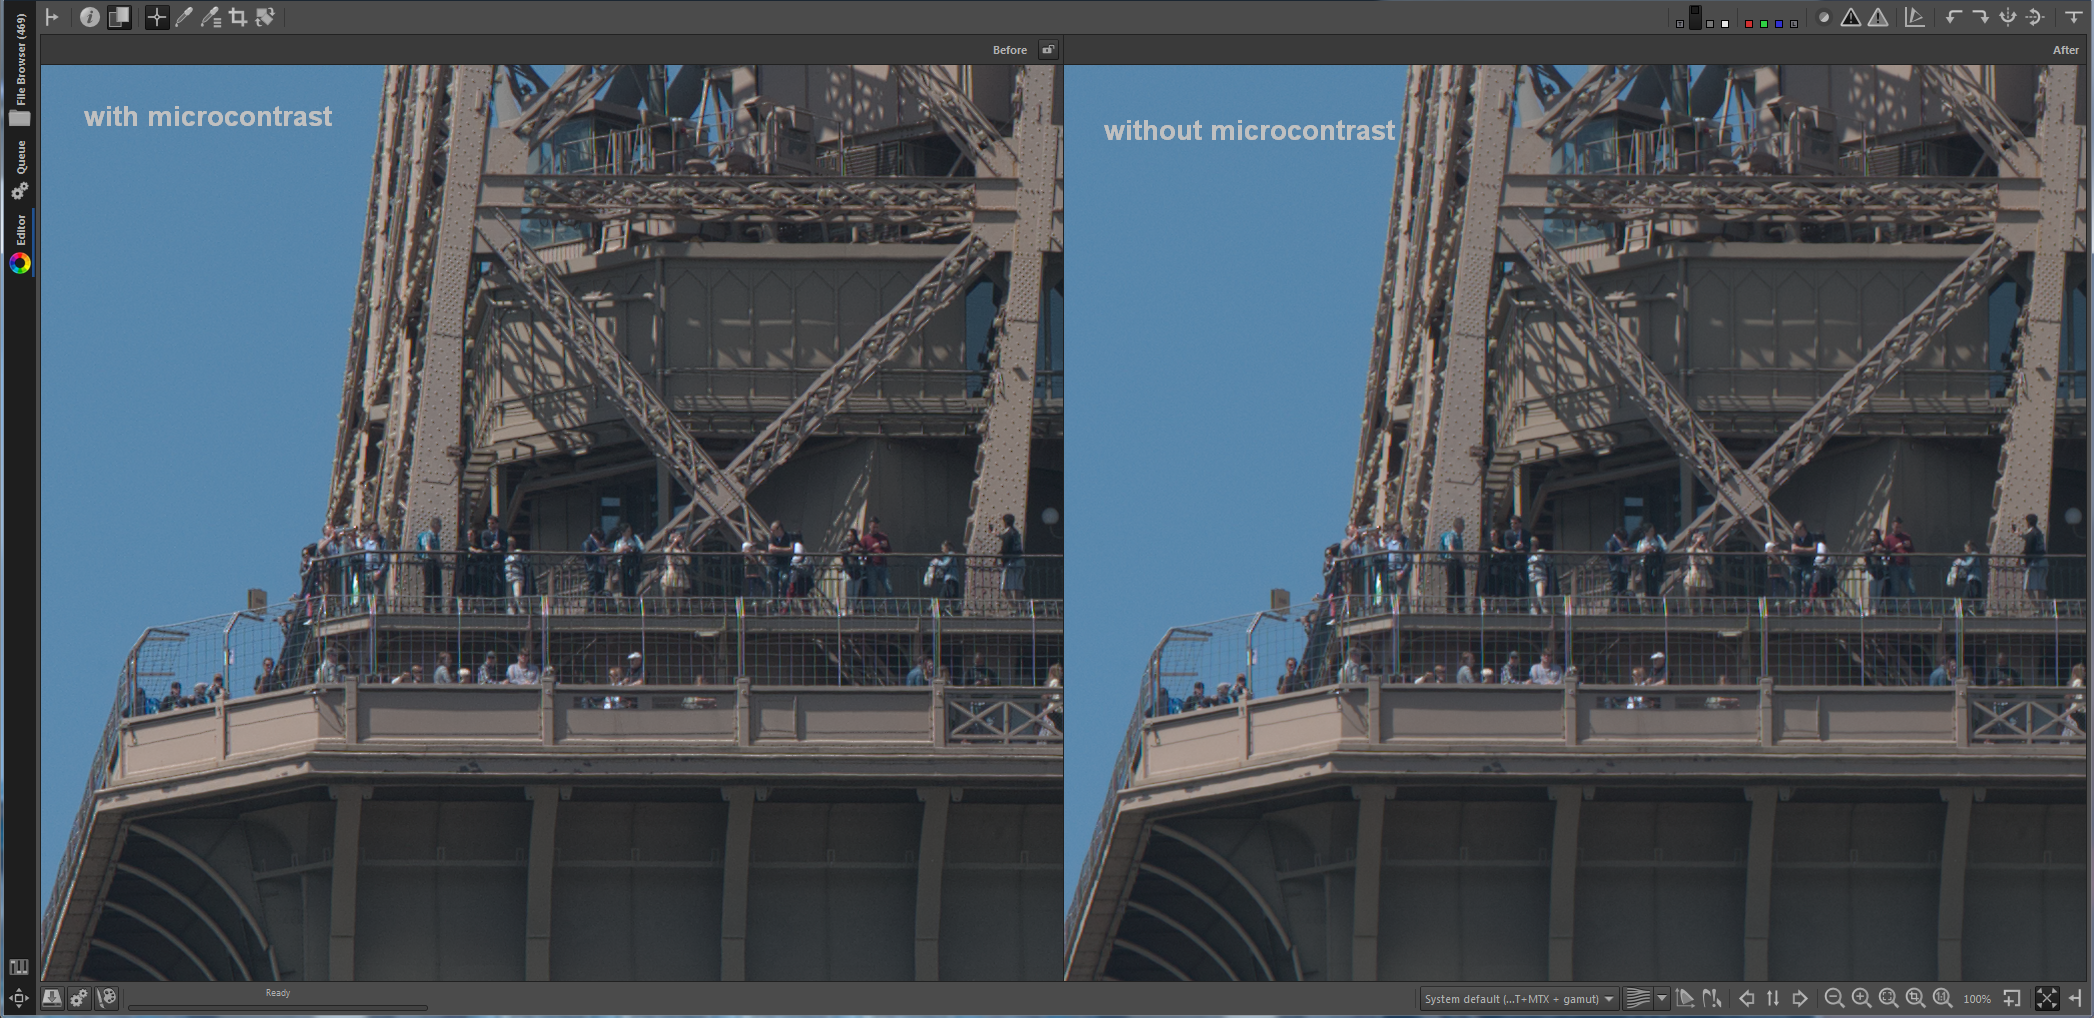
(small comparison with a piece of the Eiffel tower)
 Thanatomanic
on 20 May 2018
Thanatomanic
on 20 May 2018
@Thanatomanic Thanks for testing and feedback. Very much appreciated!
In my tests Quantity = 50 leads to too strong microcontrast in regions with fine detail. I tested with Pixel Shift files from Pentax K1. Maybe worth to note that I use Microcontrast in combination with RL sharpening to get the fine details. Without RL sharpening it maybe different.
How do this settings look at your images (with latest commit to microcontrast branch)?
heckflosse
on 20 May 2018
@heckflosse These settings look wonderful! You have convinced me that Sharpening brings out even more crispness in the images.
So, leaving Quantity = 20 does make sense when you use Sharpening too. If using Microcontrast only, a setting of Quantity = 50 would make a little more sense, but one has to choose :-)
With regard to the Contrast threshold: the difference between 10 and 15 is barely noticeable for Microcontrast, but for Sharpening it is. So I would go for Default = 15 here in both cases for symmetry's sake. But it should not be default = 0 at least.
Thanatomanic
on 20 May 2018
@Thanatomanic I agree that default = 0 is not a good choice. I used it for backwards compatibility because I was lazy today :)
I will change that as soon as we have an agreement about a good default. btw: I agree that Default = 15 is quite good in my tests. But let's wait for tests from others as well. Not all raw files are equal ;-)
heckflosse
on 20 May 2018
@Thanatomanic For symmetry's sake I also agree. I would like to have only one contrast threshold adjuster for Microcontrast and Sharpening. But that would somehow break the logic, as this are different tools :(
heckflosse
on 21 May 2018
I would like to change the default for RL-Sharpening damping adjuster to 0. Any objections?
heckflosse
on 21 May 2018
Damping=0 would result in "microcontrast" being added to flat areas (see the white wall):
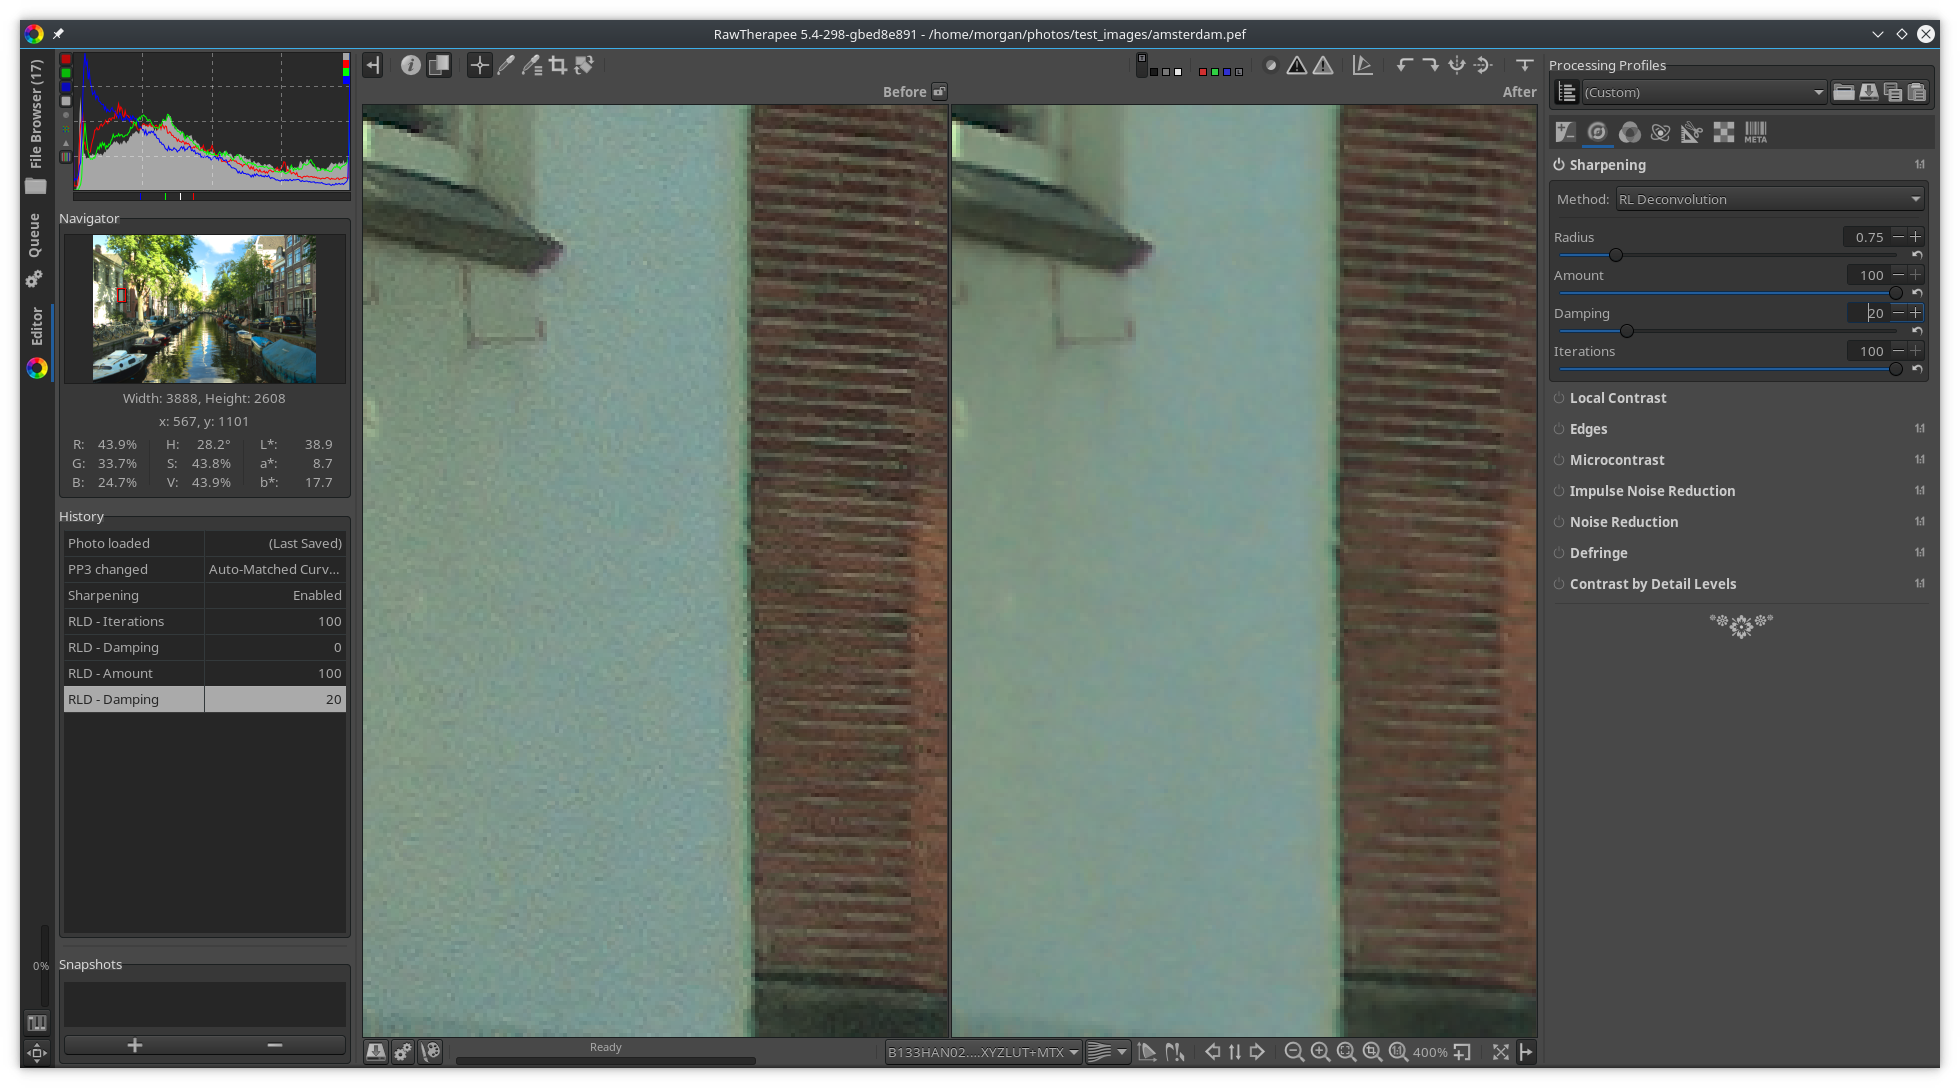
If the new threshold adjuster prevents that, and if it functions better than damping (from the screenshots you showed, that seems to be the case) then there's probably no need for damping>0 by default.
 Beep6581
on 22 May 2018
Beep6581
on 22 May 2018
The local contrast tool can add 'contrast artefacts' in flat areas too. Would it be possible to add a contrast threshold in this tool too? Or are there any objections to do that?
 hholtm
on 23 May 2018
hholtm
on 23 May 2018
@hholtm Can you provide a raw with the corresponding pp3 to reproduce?
heckflosse
on 23 May 2018
I just pushed the new code. Please do not try using RL damping > 0. That's waste of testing time.
The changes clearly are designed to be applied with RL damping set to 0
heckflosse
on 24 May 2018
@heckflosse I can't find a simple possibility to upload a zip with 28 MB. Can you tell me how to upload please?
hholtm
on 24 May 2018
@hholtm use https://filebin.net/
Beep6581
on 24 May 2018
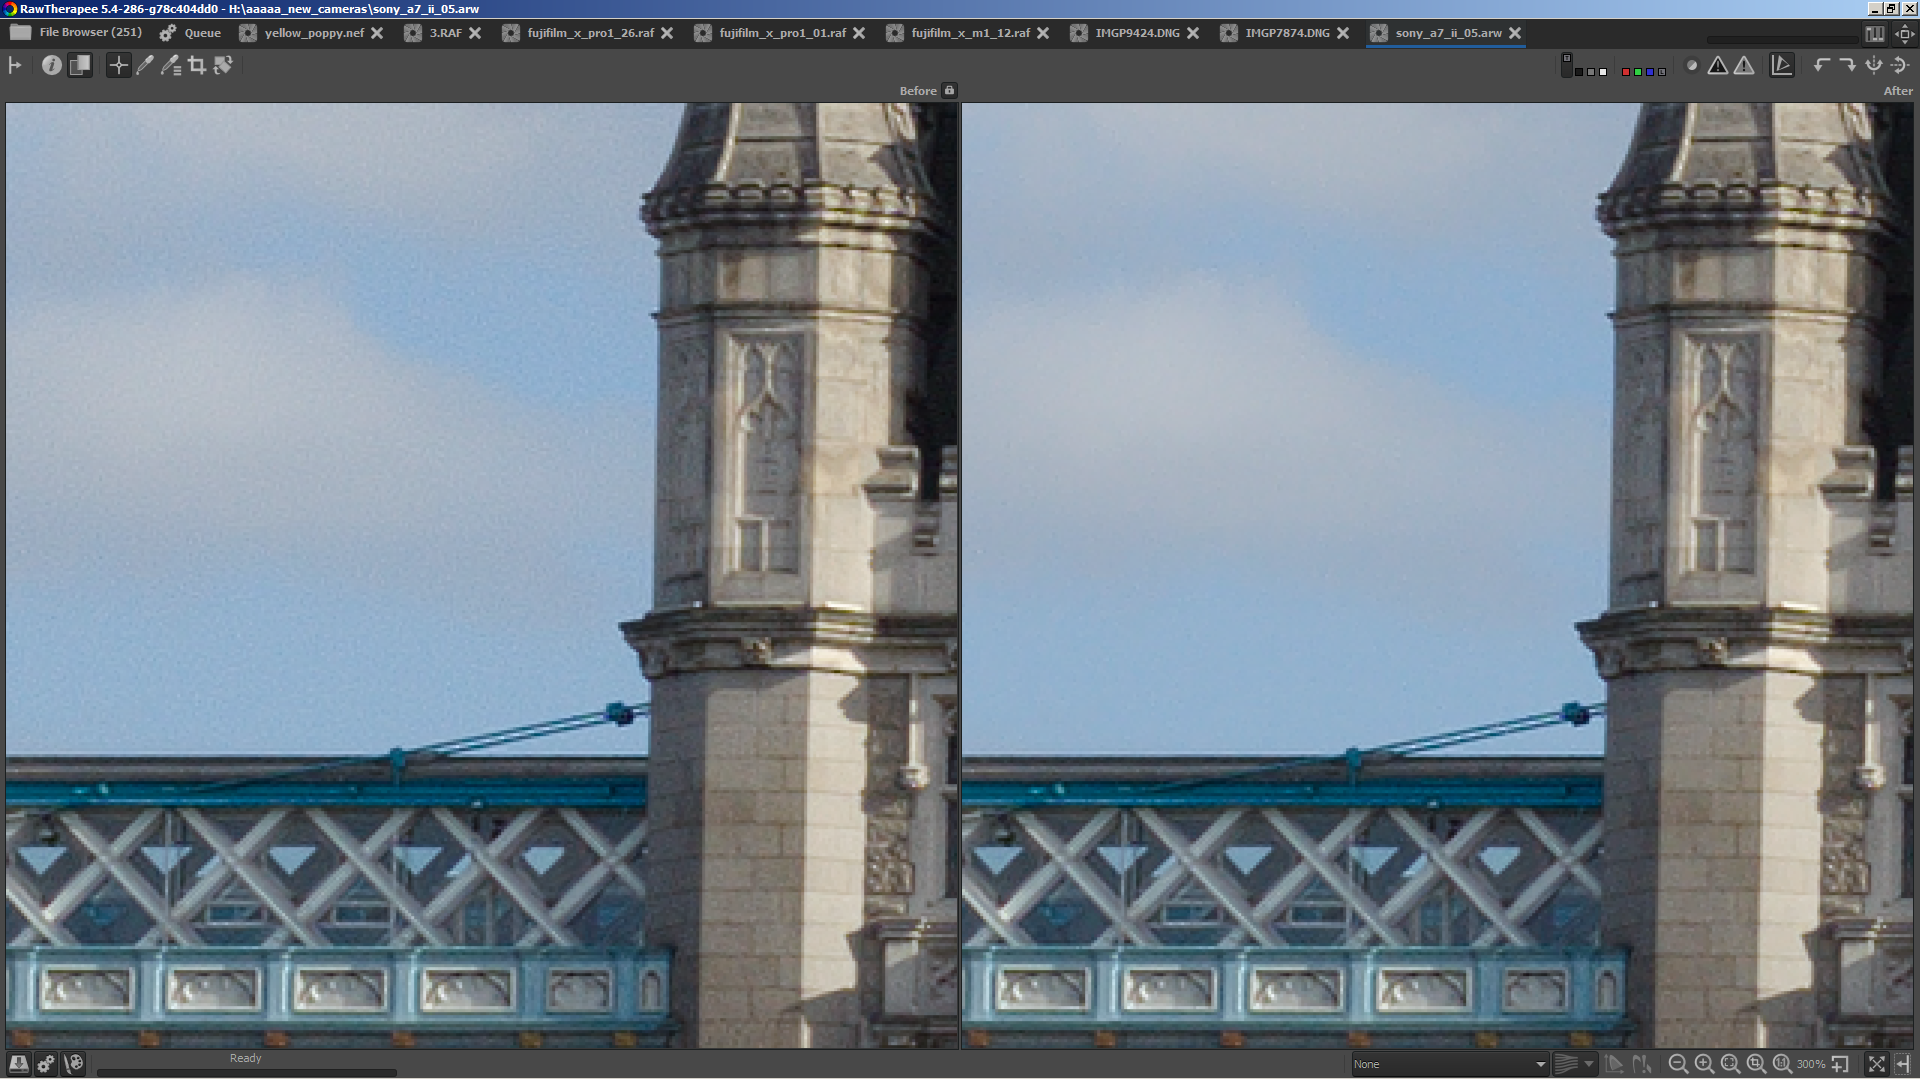
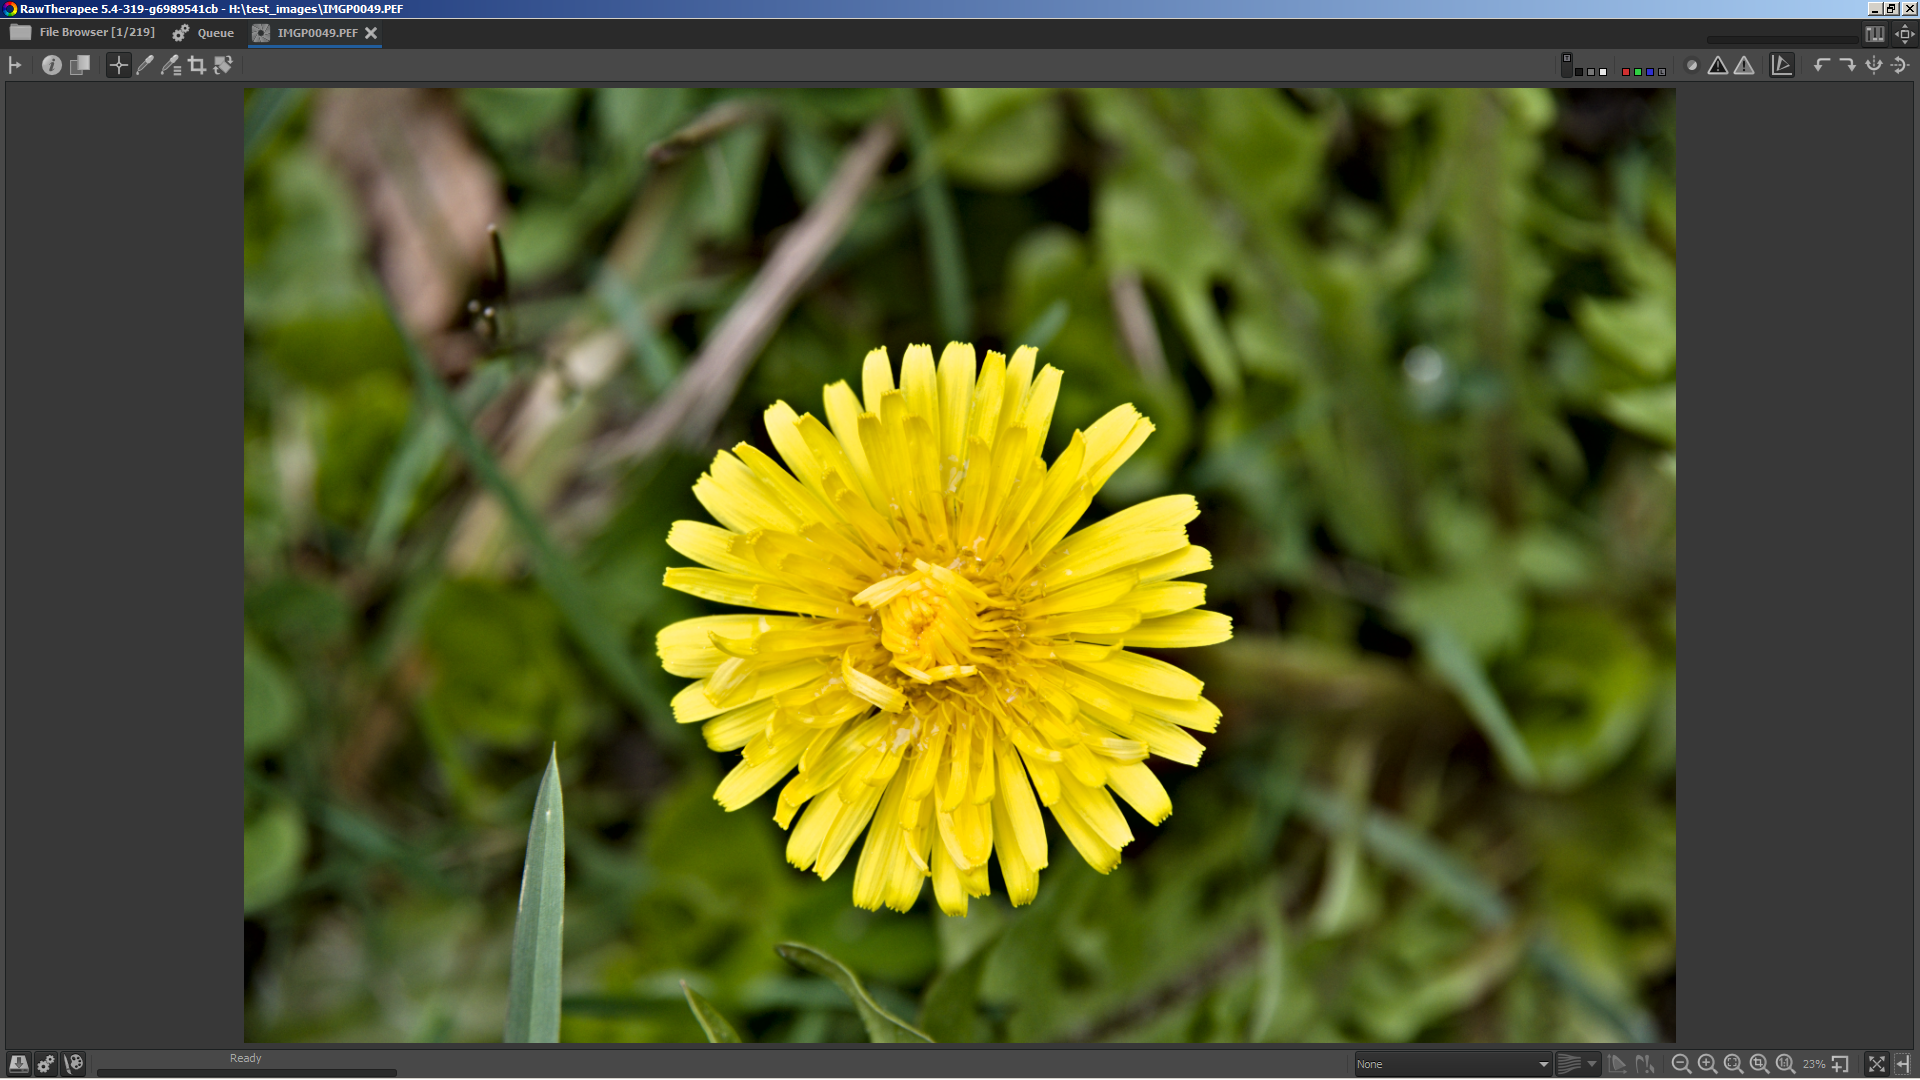
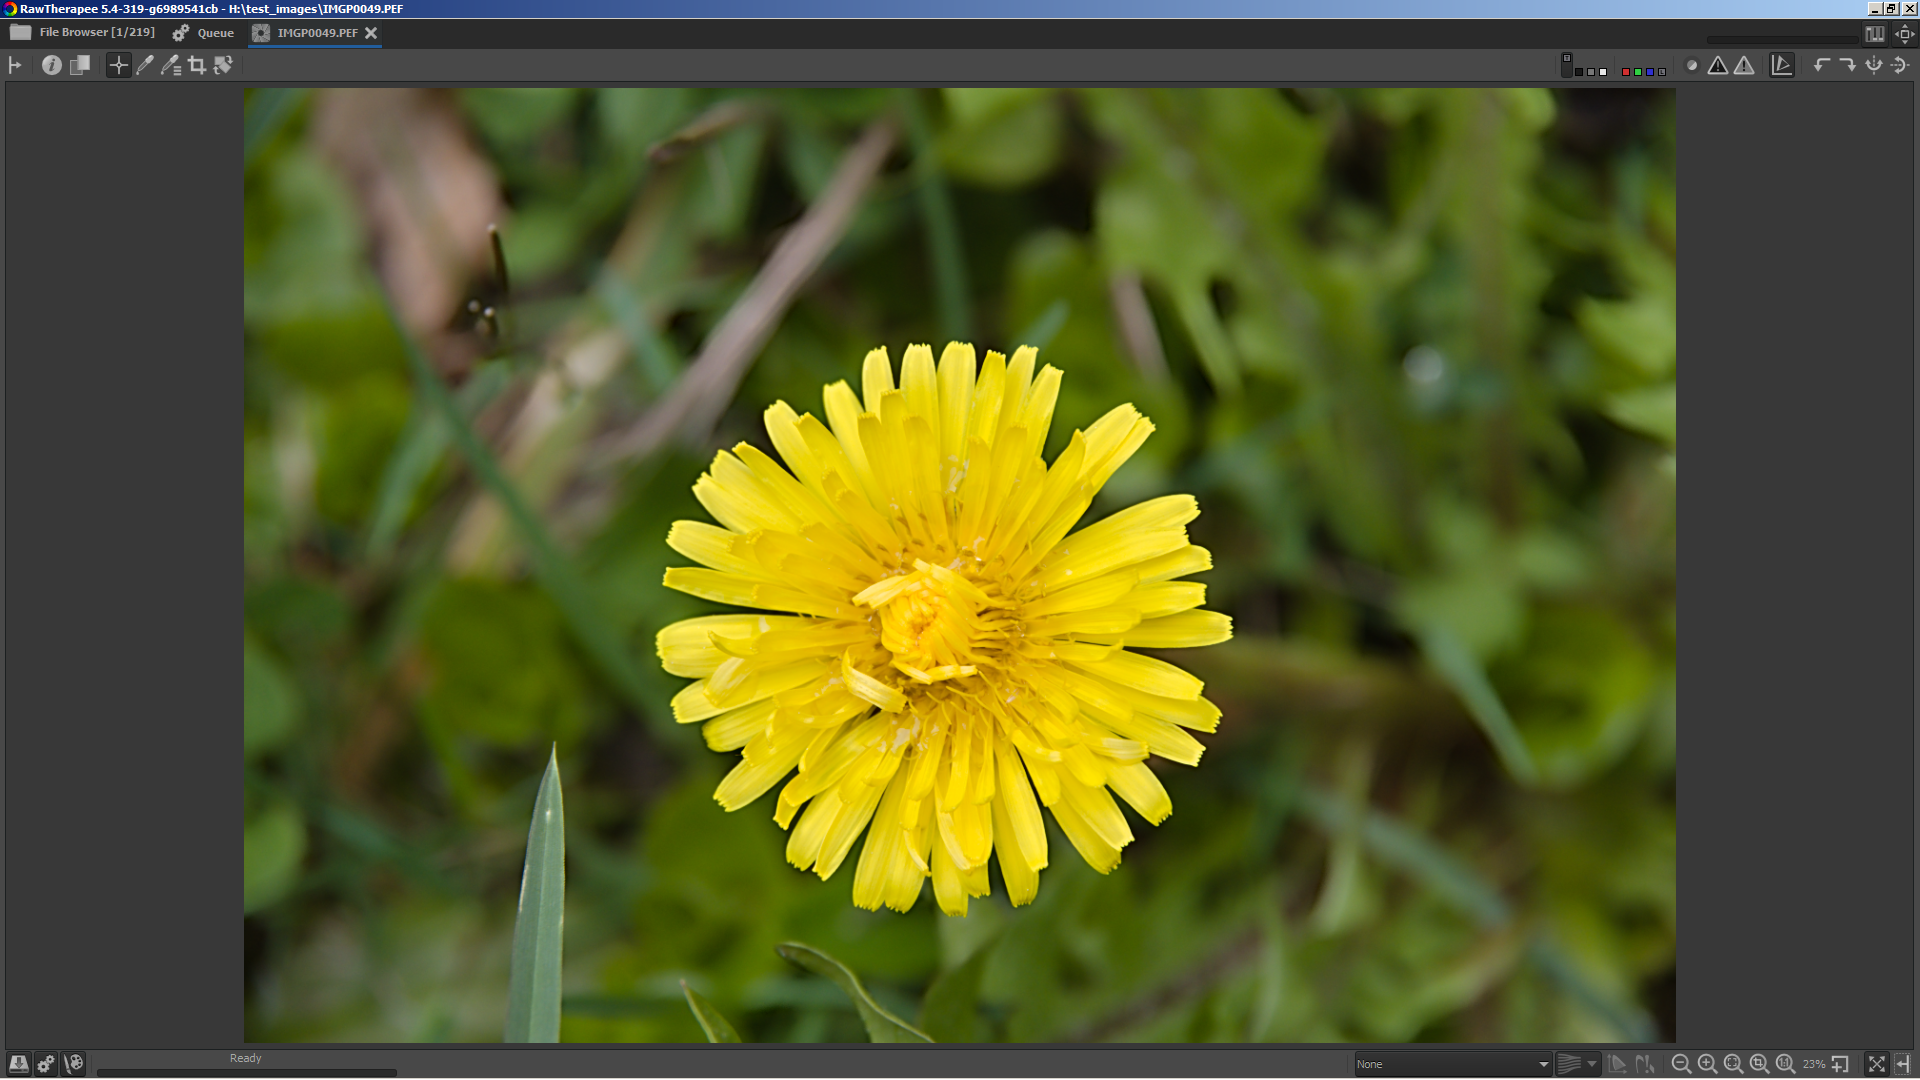
Here are some screenshots using the latest version
Left is Contrast Threshold = 0, Radius = 0.75, Amount = 100, Damping = 20, Iterations = 30
Right is Contrast Threshold = 20, Radius = 0.75, Amount = 100, Damping = 0, Iterations = 30
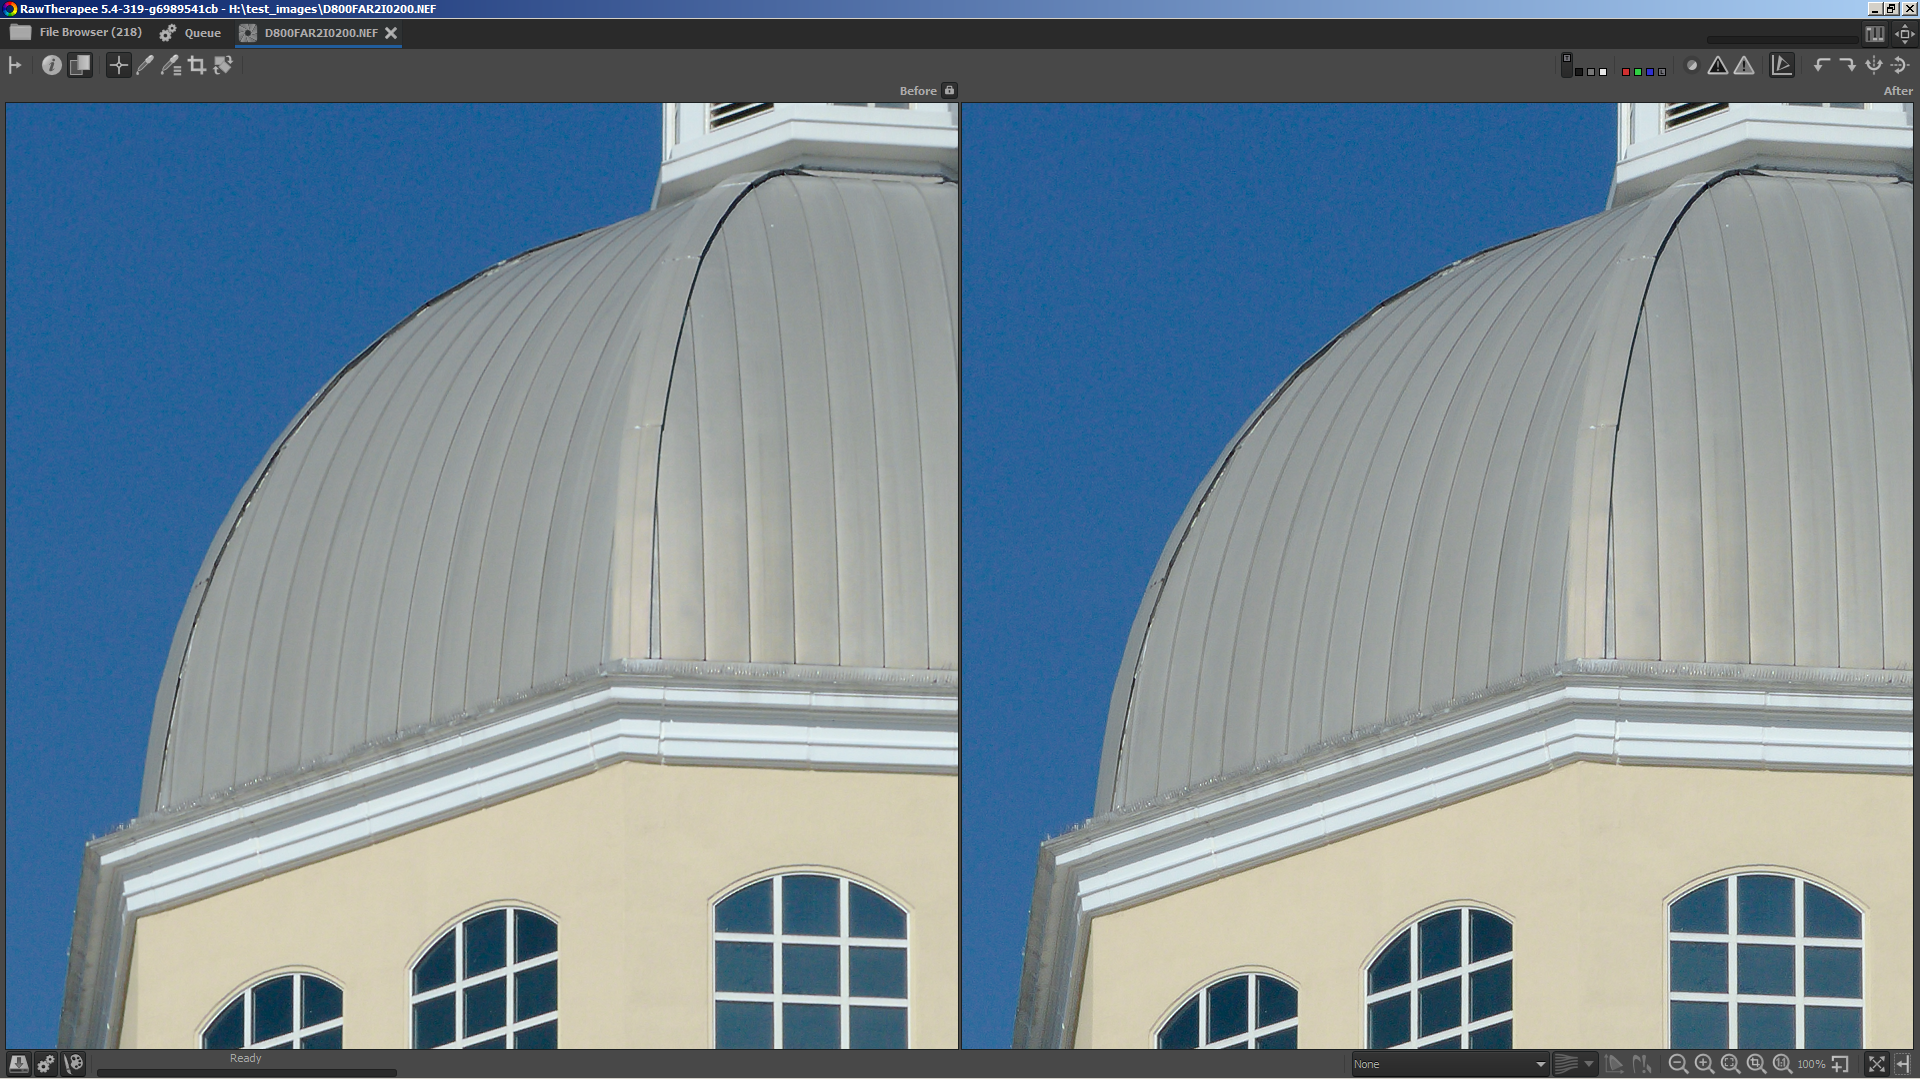
Both have a smooth sky. Right has more fine details in the spikes.

Right has much better details in the stairs and the bricks.
heckflosse
on 24 May 2018
Fantastic!
Beep6581
on 24 May 2018
files:
https://filebin.net/q9a1txf1dz0j70vi/IMGP0049.PEF?t=efgxk0ox
https://filebin.net/q9a1txf1dz0j70vi/IMGP0049.PEF.pp3?t=efgxk0ox
If you change the amount in local contrast from .2 to for examle .8 in 1:1 in the unsharp part differences are noticeable. Please check if it's an idea to add a contrast threshold.
The enhancement is remarkable and the difference in the pictures above too - many thanks for it.
hholtm
on 24 May 2018
@hholtm It's possible to implement a contrast threshold for Local contrast. But the effect would be different. I will give it a try now
heckflosse
on 24 May 2018
@hholtm Using the same method as in sharpening leads (as expected) to a completely different effect.
Here's a screenshot with local contrast amount .8
here's the same with contrast threshold = 20

here's the same with contrast threshold = 40
And for reference also without 'Local contrast'

heckflosse
on 24 May 2018
Thank you for trying. It seems to be not as good as I hoped it would be.
threshold=40 seems to be interesting, theshold=20 is not
hholtm
on 24 May 2018
Love the result for the Microcontrast & Sharpening. But the Local contrast not so much.
Also, on a tangent, wouldn't this give us yet another tool to work some magic on local contrast (we already have Contrast by detail and the Wavelets, so wouldn't that be some overkill unless it works _much_ better)?
Thanatomanic
on 24 May 2018
@Thanatomanic I absolutely agree that the result for Local Contrast is not good. Was just a try ;-)
heckflosse
on 24 May 2018
I tested the Sharpening contrast threshold adjuster on a bunch of files to find a good default value (PS means pixelshift).
I used the following settings: Radius = 0.75, Amount = 100, Damping = 0, Iterations = 30
Here are first results:
Camera                    ISO        contrast threshold
--------------------------------------------------------
Nikon D200                100                 20
Nikon D5                  200                 15
Nikon D50                 200                 20
Nikon D5300               200                 25
Nikon D610                100                 15
Nikon D700                200                 20
Nikon D750                100                 15
Nikon D800                200                 25
Nikon D800e               100                 20
Nikon D810                100                 15
Nikon D90                 200                 25
Fuji GFX 50S              100                 20
Fuji X-H1                 200                 20
Fuji X-T1                 200                 15
Canon EOS 1300D           100                 25
Canon EOS 5D Mark III     100                 10
Canon EOS 5DS R           100                 15
Canon EOS 6D Mark II      100                 20
Canon EOS 7D              100                 25
Pentax 645D               100                 15
Sony DSLR-A580            100                 10
Sony ILCA-77M2            100                 25
Sony ILCE-7               100                 20
Sony ILCE-7M2             100                 15
Sony ILCE-7R              100                 20
Sony ILCE-7RM3            100                 10
Sony ILCE-7RM3 PS         100                  5
Olympus E-M10 Mark II     100                 20
Olympus E-M10 Mark III    100                 20
Olympus E-P5              100                 20
Panasonic DMC-LX100       100                 20
Pentax K-1                100                 10
Pentax K-1 PS             100                  5
Pentax K-3                100                 15
Pentax K-3 II             100                 30
Pentax K-3 II PS          100                 15
Pentax K-5                 80                 25
Pentax K-5 II             100                 15
Pentax K-70               100                 20
Pentax K-70 PS            100                 10
Pentax K10D               100                 20
Pentax KP                 100                 15
Phase One IQ3              50                 10
Phase One P45+             50                 15
Good defaults for other cameras are welcome. Please report your findings.
heckflosse
on 24 May 2018
awesome! I'll test as soon as I have the chance
agriggio
on 24 May 2018
Contrast by detail uses a threshold. Does it work the same way (same curve) as Microcontrast & Sharpening? If not: is it an idea to adapt it?
hholtm
on 25 May 2018
@hholtm It works completely different (and also in dependency of detail level). I think it works quite nice and there's no need to change it.
heckflosse
on 25 May 2018
I extended the range of the Sharpening Contrast threshold adjuster from 0-100 to 0-200.
The larger range can be useful for selective sharpening
Examples:
left without sharpening, right with contrast threshold = 20

left without sharpening, right with contrast threshold = 120
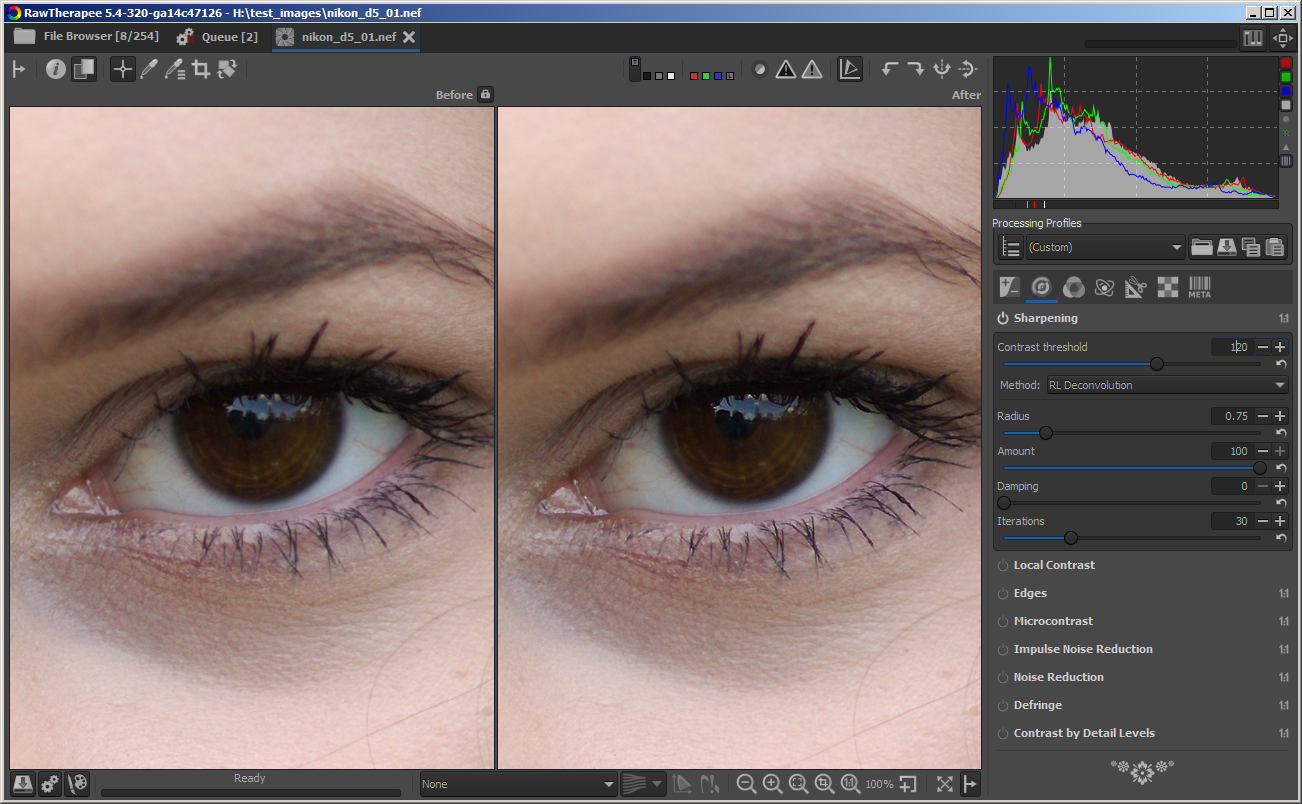
left with contrast threshold = 20, right with contrast threshold = 120

Eyelashes and reflection in the eye are still sharpened a bit, while skin below the eye is not sharpened
heckflosse
on 27 May 2018
@heckflosse this new feature is really awesome! I just love it. A quick example (these are all 1:1 crops).
Original, no sharpening at all:

Somewhat aggressive settings (RL sharpening, microcontrast and CBDL) with contrast threshold to 0. Notice the bad sharpening artifacts

As above, but with contrast threshold to 20. Just great

agriggio
on 27 May 2018
Is this (especially the contrast threshold) optimized for Amaze demosaicing?
Because I just tried with LMMSE and I get weird stepping in fine lines that somewhat look like aliasing. I settled on LMMSE some weeks ago for micro four thirds shots starting at ISO 800, sometimes even ISO 500, because the noise in uniform areas is way better manageable. But I have to say a first quick test looks promising: Same amount of detail + better uniform areas with amaze + RL sharpening + microcontrast + NR than what I got with LMMSE before. THX!
 ff2000
on 27 May 2018
ff2000
on 27 May 2018
@ff2000
Is this (especially the contrast threshold) optimized for Amaze demosaicing?
Absolutely not!
heckflosse
on 27 May 2018
OK, thx.
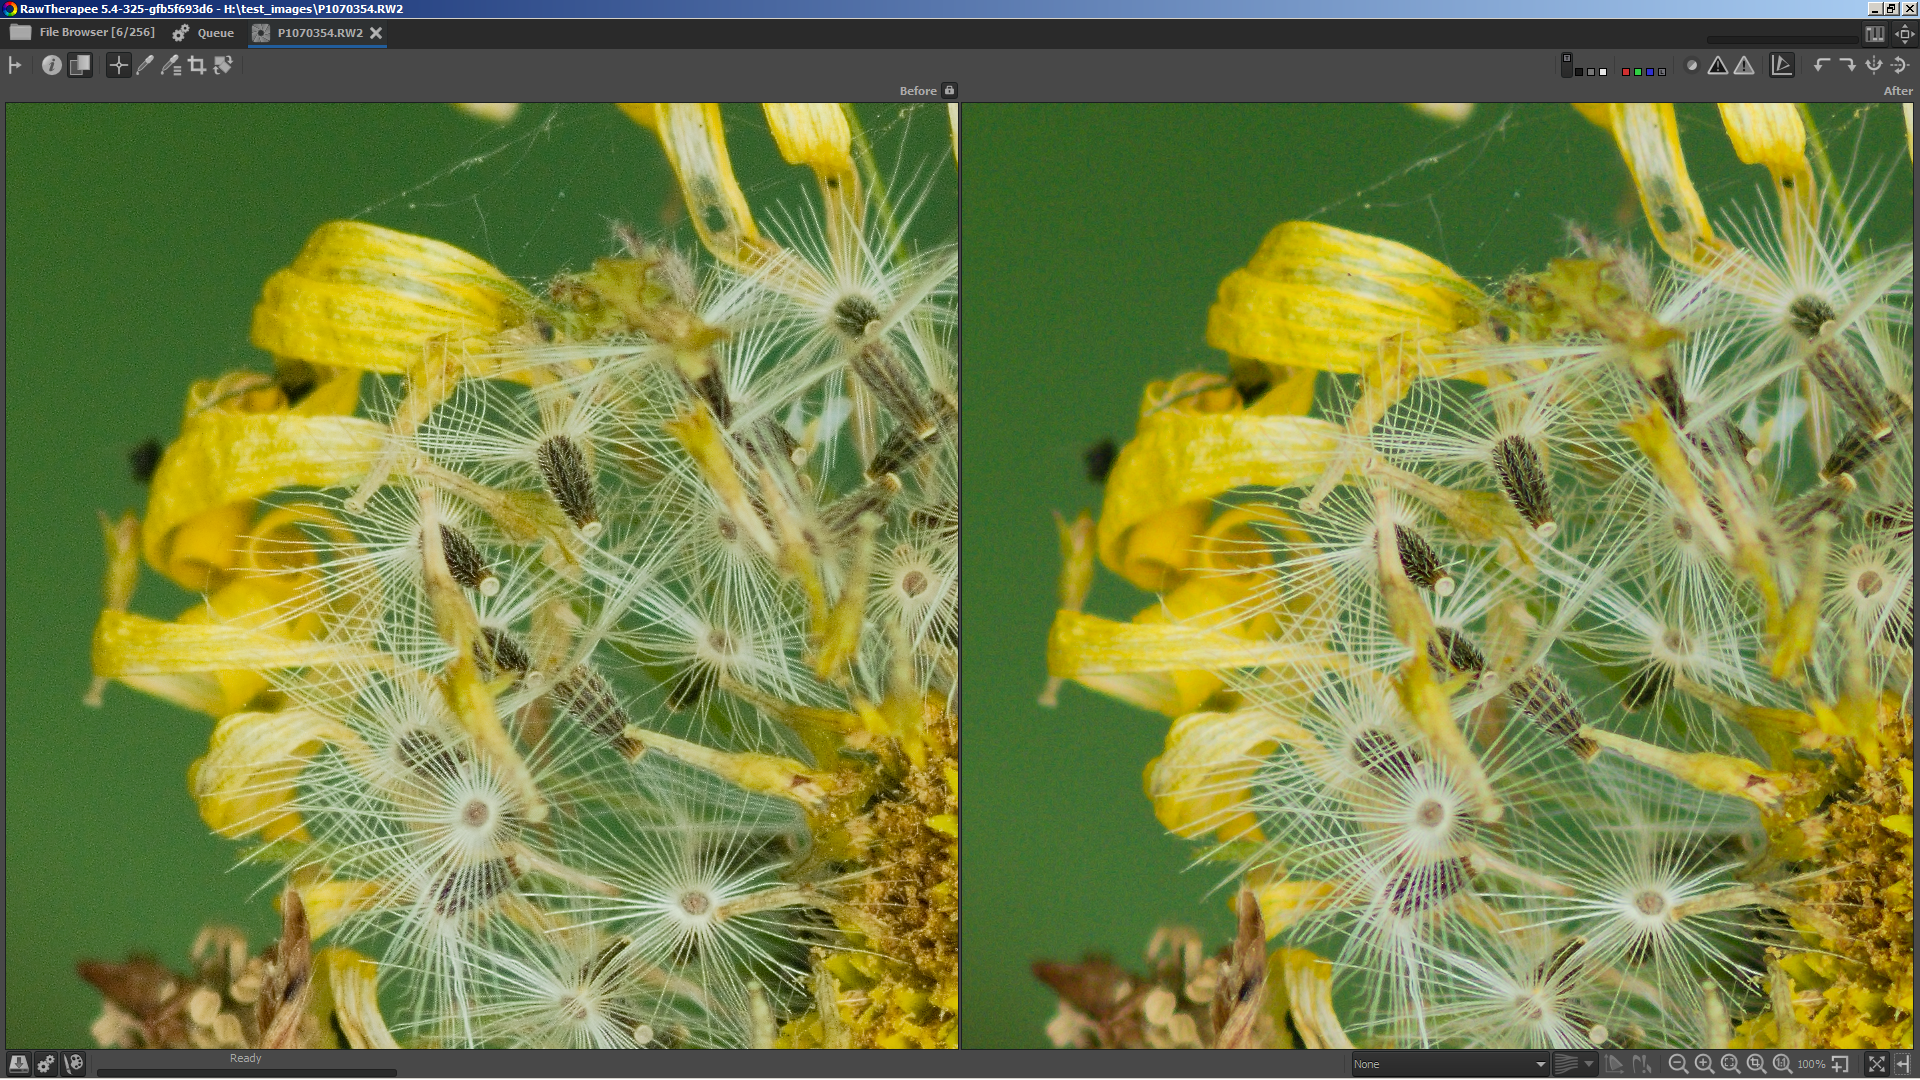
Just a screenshot to show what I mean. Left is LMMSE, right is AMAZE, all settings left the same.
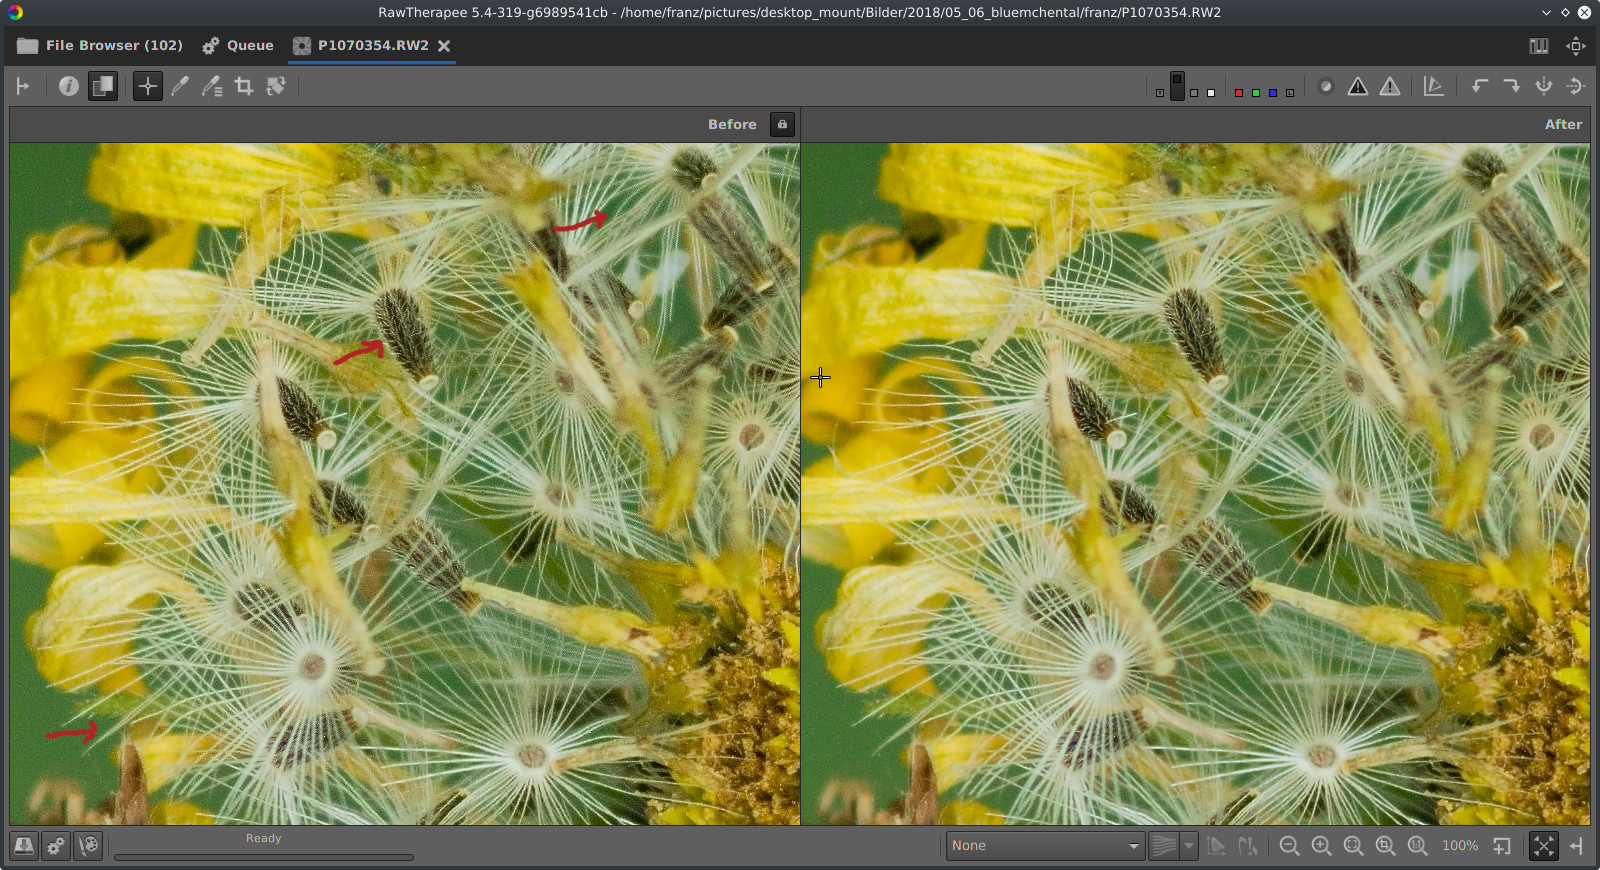
Most small hairs show it (I marked two), but I immediately realised it with the small seed where IMO all the detail is lost in noise.
Raw file is here:
https://www.dropbox.com/s/nipi8e0mfum4wbf/P1070354.RW2?dl=0
PP3:
https://www.dropbox.com/s/86cphw2hx3ckgd0/P1070354.RW2.pp3?dl=0
ff2000
on 28 May 2018
@ff2000
Iirc LMMSE and IGV are made for really noisy shots which can't be sharpened well at all.
I had a look at your raw.
Here's what I get using the attached pp3. Left is your lmmse version, right is my version
I used amaze with false colour correction steps set to zero, RL-Sharpening with threshold 120, radius 0.65, amount 100, damping 0 and iterations 30.
P1070354.RW2.zip
heckflosse
on 28 May 2018
Thx for playing with the file. Also NR seems to do a great job, better than without the contrast threshold slider. I see, there is a lot new things to play with now, and a lot to learn... Things are getting better and better, thank you guys, you are awesome!
ff2000
on 28 May 2018
@ff2000 Thx :+1:
btw: as the contrast threshold adjuster also works with USM, this settings for your raw are also not so bad:
contrast threshold = 100
USM
Radius 0.45
Amount 1000
The result is similar to RL-Sharpening, but USM is about 14 times faster compared to RL with 30 iterations
heckflosse
on 28 May 2018
I just merged into dev to get more tests.
heckflosse
on 28 May 2018
@heckflosse
https://github.com/Beep6581/RawTherapee/blame/dev/rtengine/ipsharpen.cc#L688
https://github.com/Beep6581/RawTherapee/blame/dev/rtengine/ipsharpen.cc#L689
I had to change constexpr to const to get this to compile under clang-mp 3.9/c++11 on mac.
 Benitoite
on 29 May 2018
Benitoite
on 29 May 2018
@Benitoite Thanks for reporting. Fix pushed.
heckflosse
on 29 May 2018
@heckflosse Ingo I did some more tests on images from my Fuji X-T2. It was also a good opportunity for me try finding a best sharpening settings for this camera. As RL Sharpening does no good to x-trans files, I used USM sharpening. I found the best balance in settings to be 0.4 for radius, 800 for amount, and ISO/2 for contrast threshold on well exposed images (this threshold can be increased for underexposed images which are pushed and reveal some shadow noise).
I haven't found the use for microcontrast so far, but it seems to work as expected.
 sguyader
on 29 May 2018
sguyader
on 29 May 2018
@sguyader Sébastien, great that you tried to find good sharpening setings for your X-T2. I just tried with your settings on a X-Pro1 file which has only 16.2 MP. There ISO/4 seems to work fine for the contrast threshold. About RL Sharpening and xtrans files I think that the default radius of 0.75 is too large (maybe because xtrans cameras don't have an AA filter). I got much better results using radius 0.6 for xtrans
heckflosse
on 29 May 2018
@heckflosse Thanks Ingo, I'll try RL Sharpening with smaller radius, and see how it compares to USM Sharpening.
sguyader
on 29 May 2018
@heckflosse that's a nice tool to have! Thanks :).. Just an idea though: would it be possible to implement a visual, mask helper, similar to the one in the attached video clip? It would be much easier to tell the optimum level of sharpening.
https://filebin.net/smibg6ccqepdzvrw
 kazah7
on 8 Jun 2018
kazah7
on 8 Jun 2018
@kazah7 I already thought about that, but it would require some major changes in the rt pipeline to do that correctly. Definitely not for next release ;-)
heckflosse
on 8 Jun 2018
@kazah7 For the contrast threshold adjuster in sharpening tool it's quite easy to implement because it's at the end of the pipeline. For contrast threshold adjuster in microcontrast tool it's more difficult.
heckflosse
on 9 Jun 2018
First example screenshot:
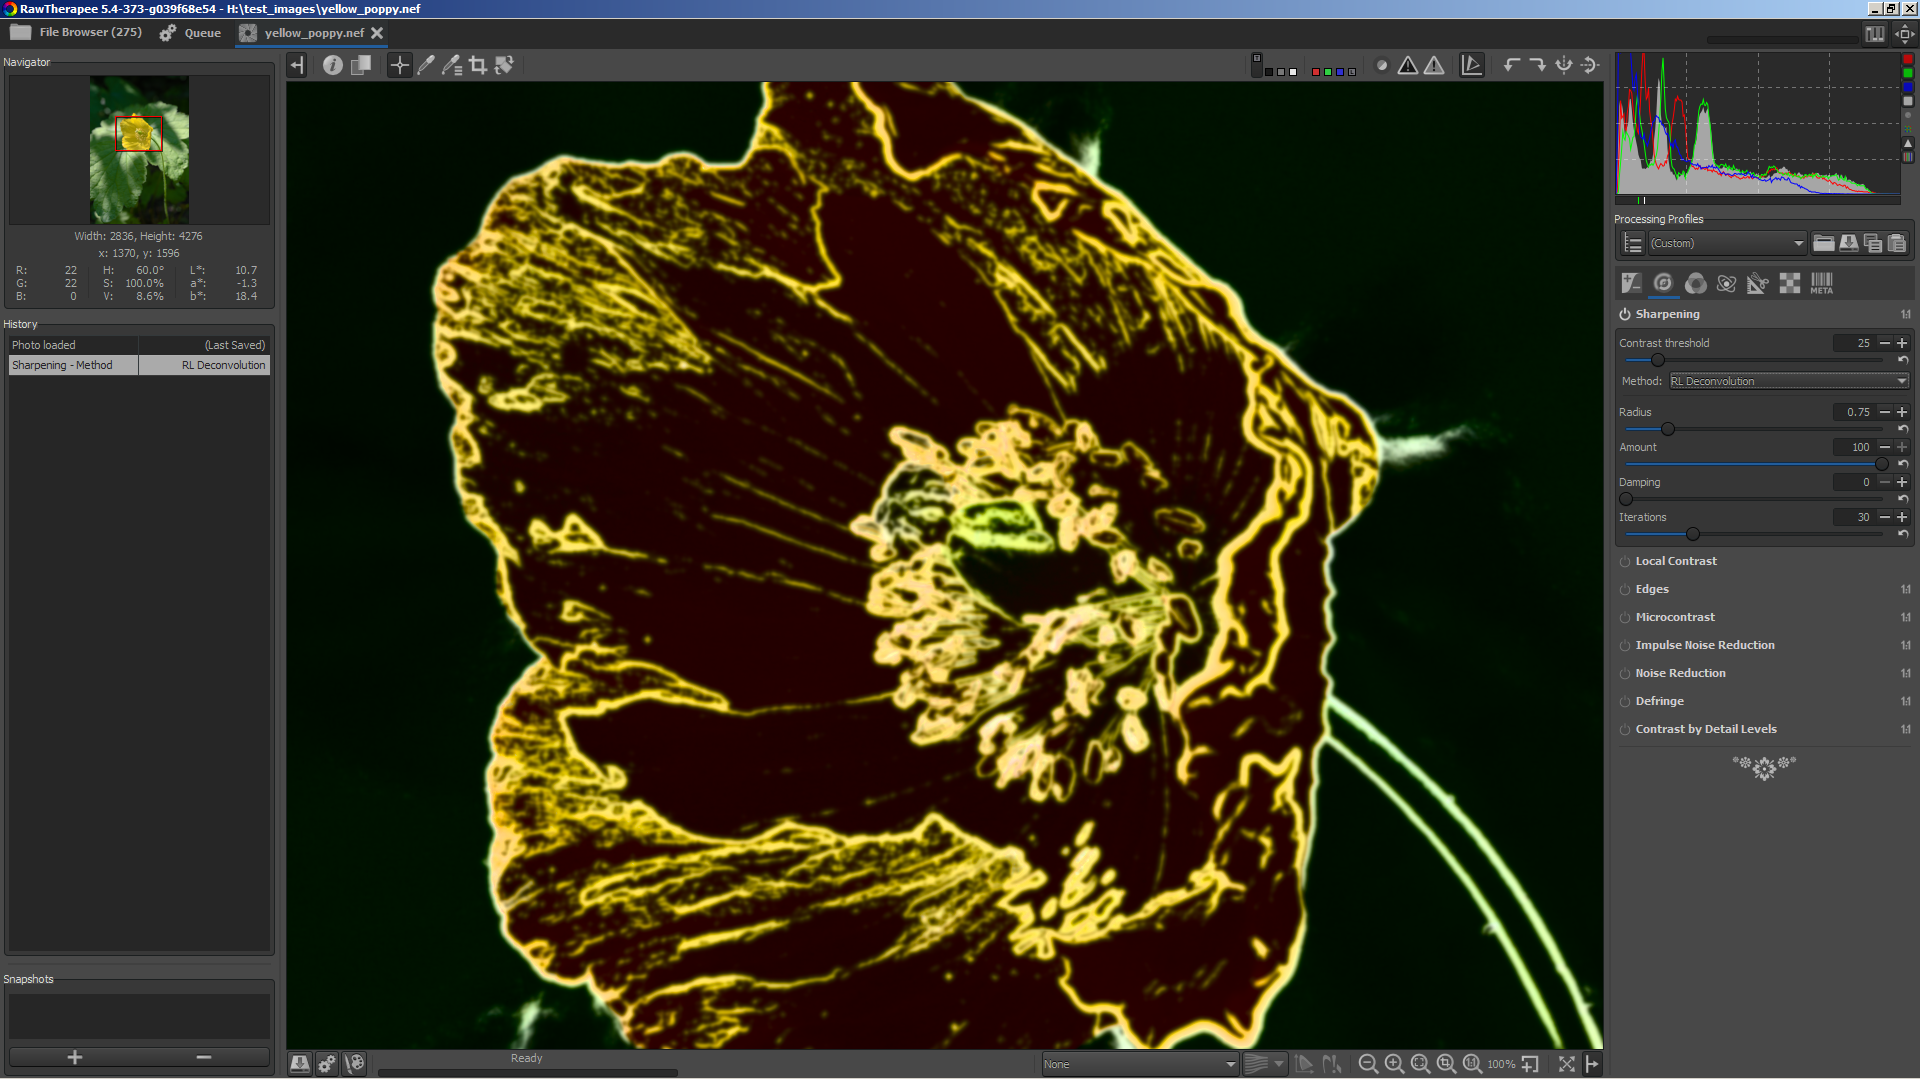
Edit: same without colours is also possible:
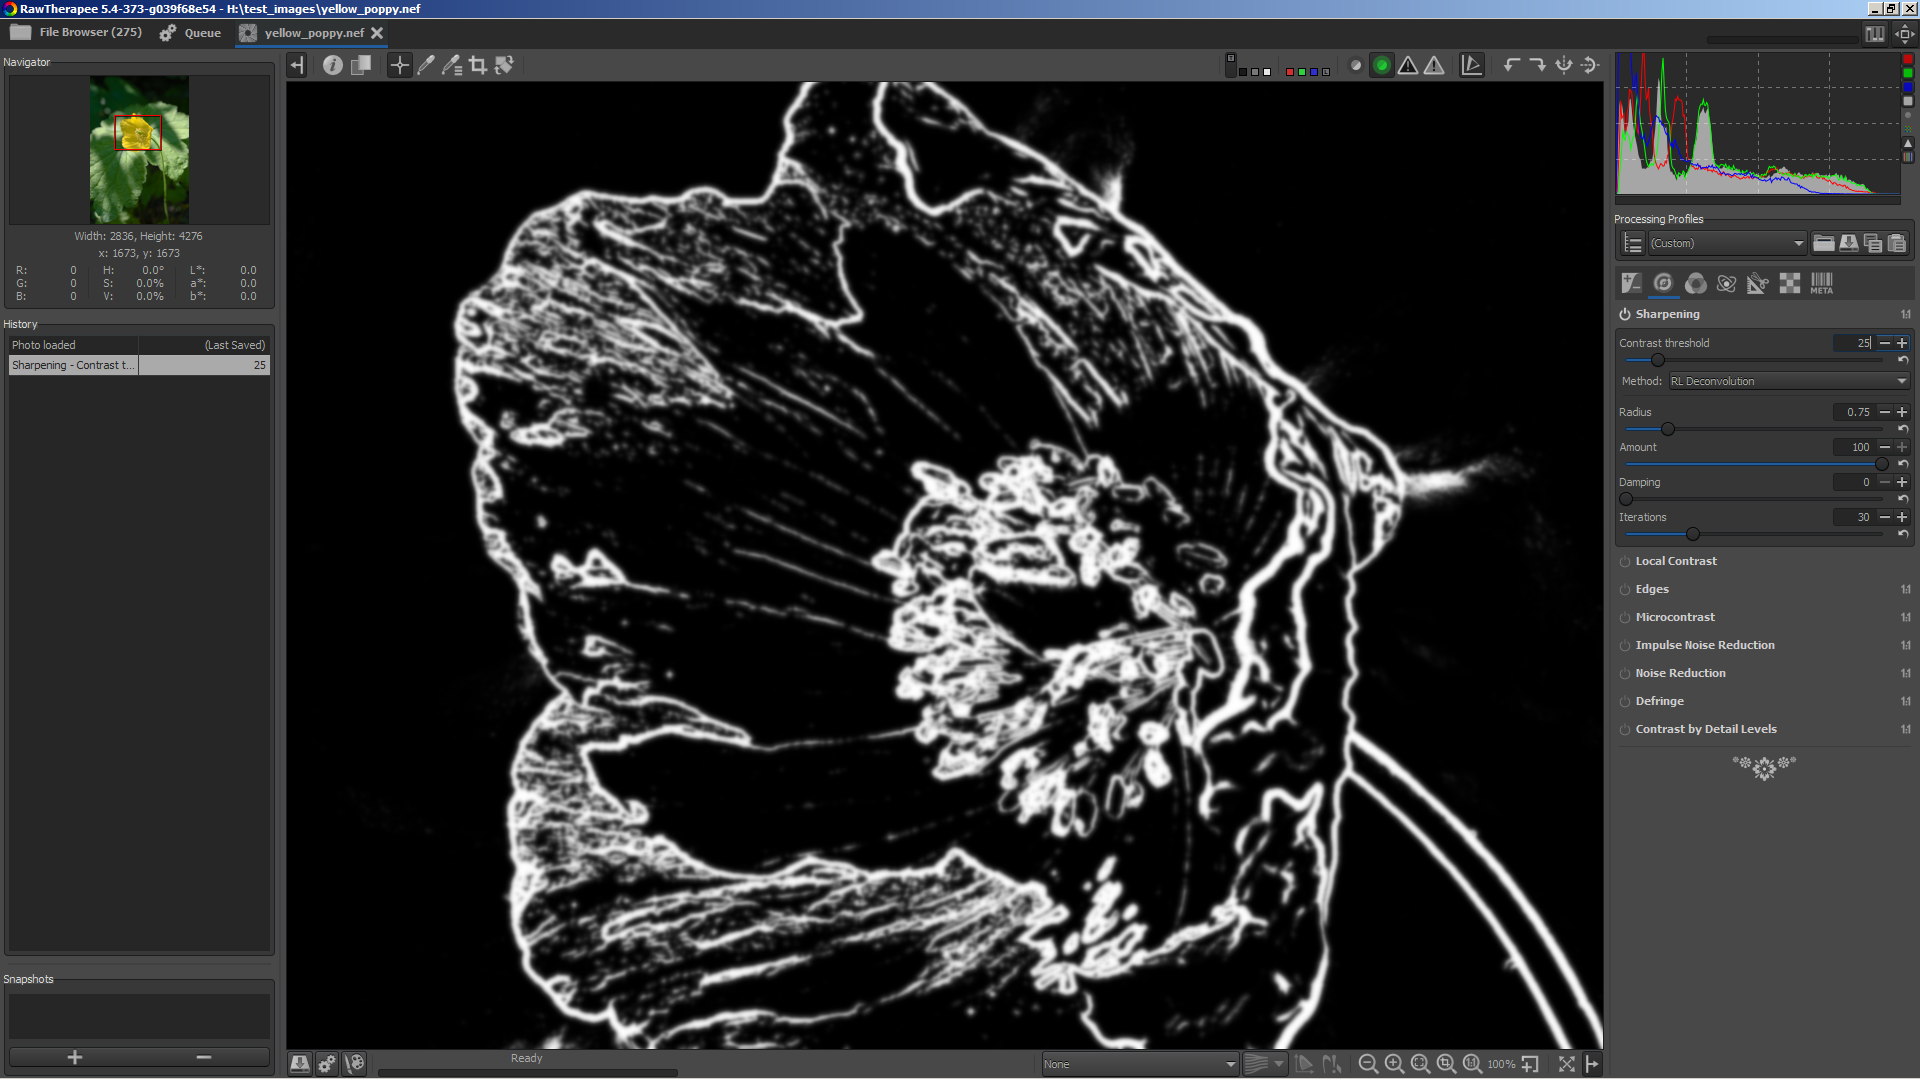
heckflosse
on 9 Jun 2018
@heckflosse wow, that was fast! : ) It will really make a difference. Btw, black and white is in IMHO less distracting. Are you using some shortcut for the preview?
kazah7
on 9 Jun 2018
@kazah7 Currently it's a prototype. I need some help of other contributors for the gui (I'm not a gui coder)
I like the b&w also, but the coloured one is better when threshold is zero.
Here's a screenshot of the coloured one when threshold is zero
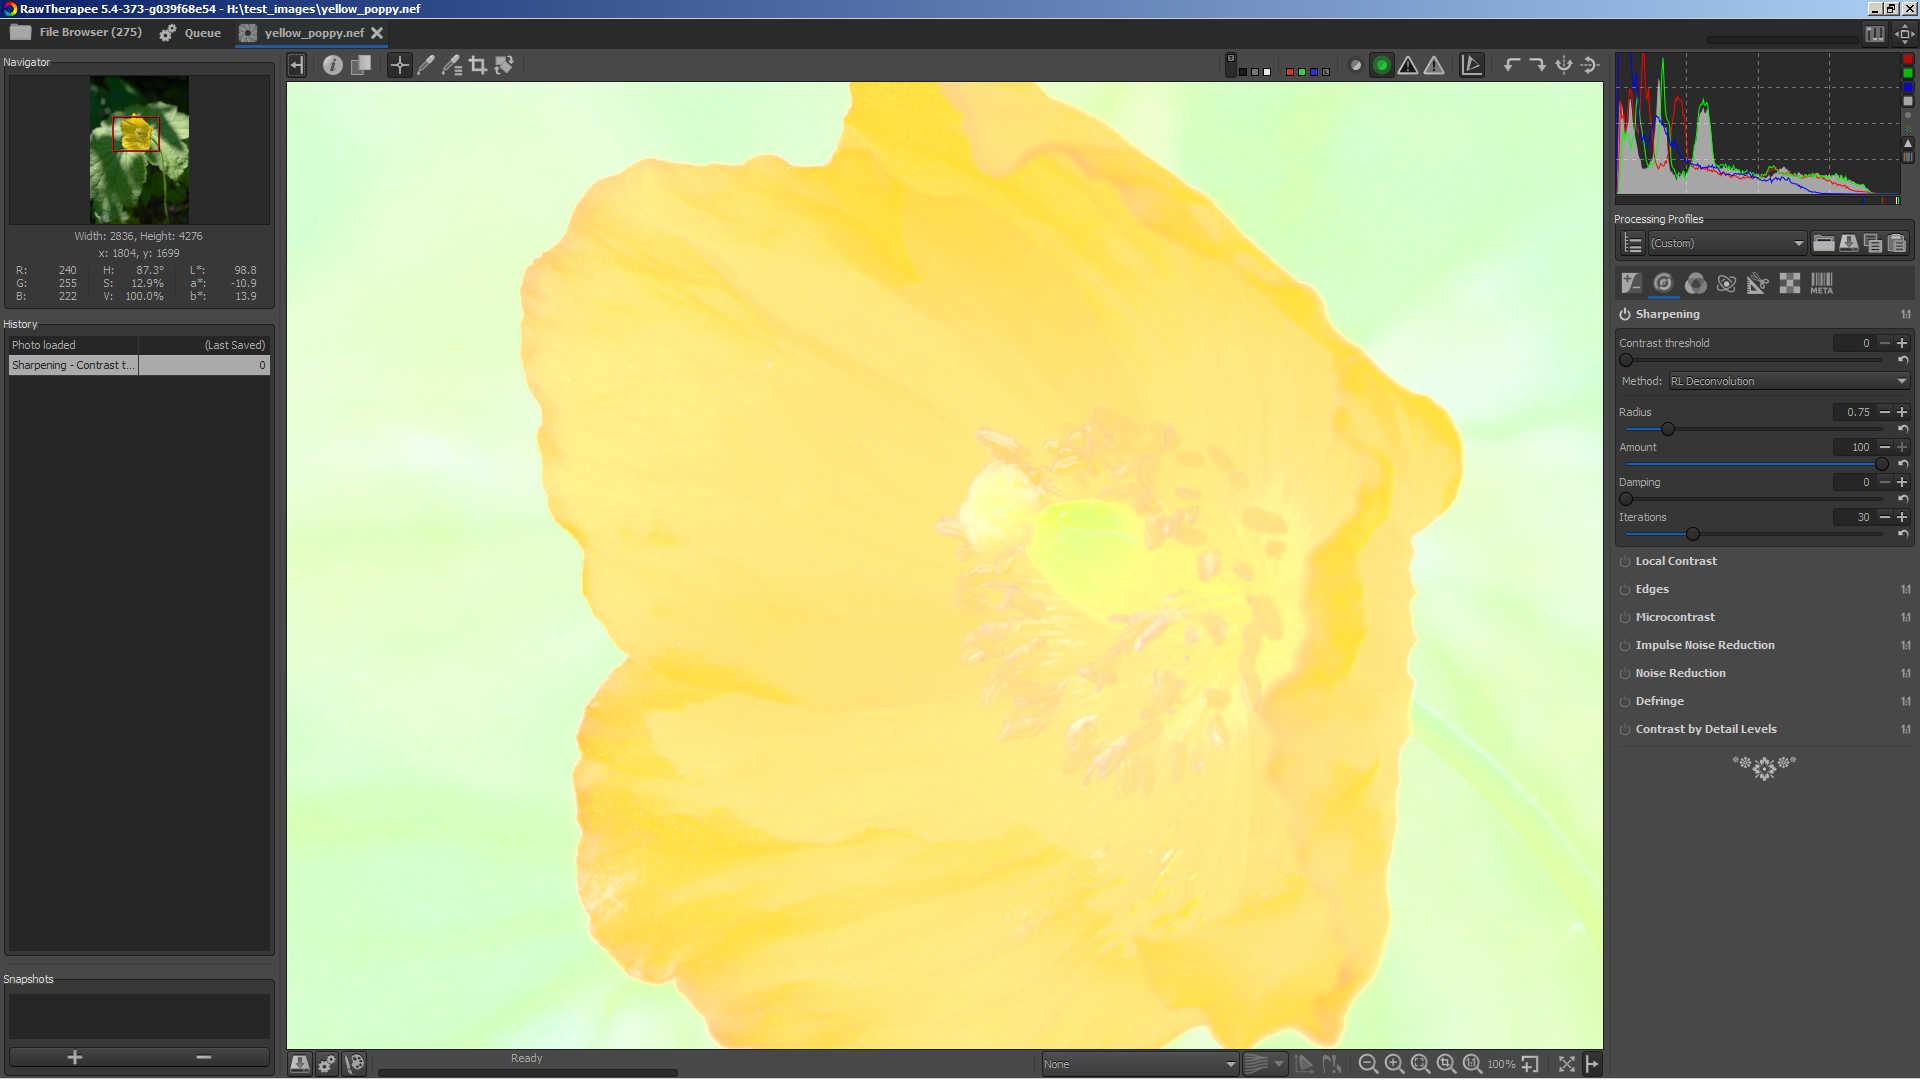
The b&w one shows a plain white preview for this case (no need to post a screenshot I guess ;-)
heckflosse
on 9 Jun 2018
That looks great! Thx!
Do you think it is possible to also show such a mask for amaze+vng4 threshold?
ff2000
on 10 Jun 2018
@ff2000 For amaze+vng4 it's much more difficult to implement in the current pipeline.
heckflosse
on 10 Jun 2018
In branch sharpmask I prepared the engine to allow showing the mask which is used internally to blend between sharpened and unsharpened regions.
I also added a new button (right from focus mask button, also has the same icon atm...)
Currently nothing happens when the button is pressed.
I need some help from other devs ( @Hombre57 @agriggio @Floessie ) because I don't know how to trigger the processing from that button.
heckflosse
on 10 Jun 2018
In sharpmask branch now the mask is shown when the button is pressed. Button still has wrong icon.
Branch is also up to date with dev.
heckflosse
on 13 Jun 2018
Very cool!
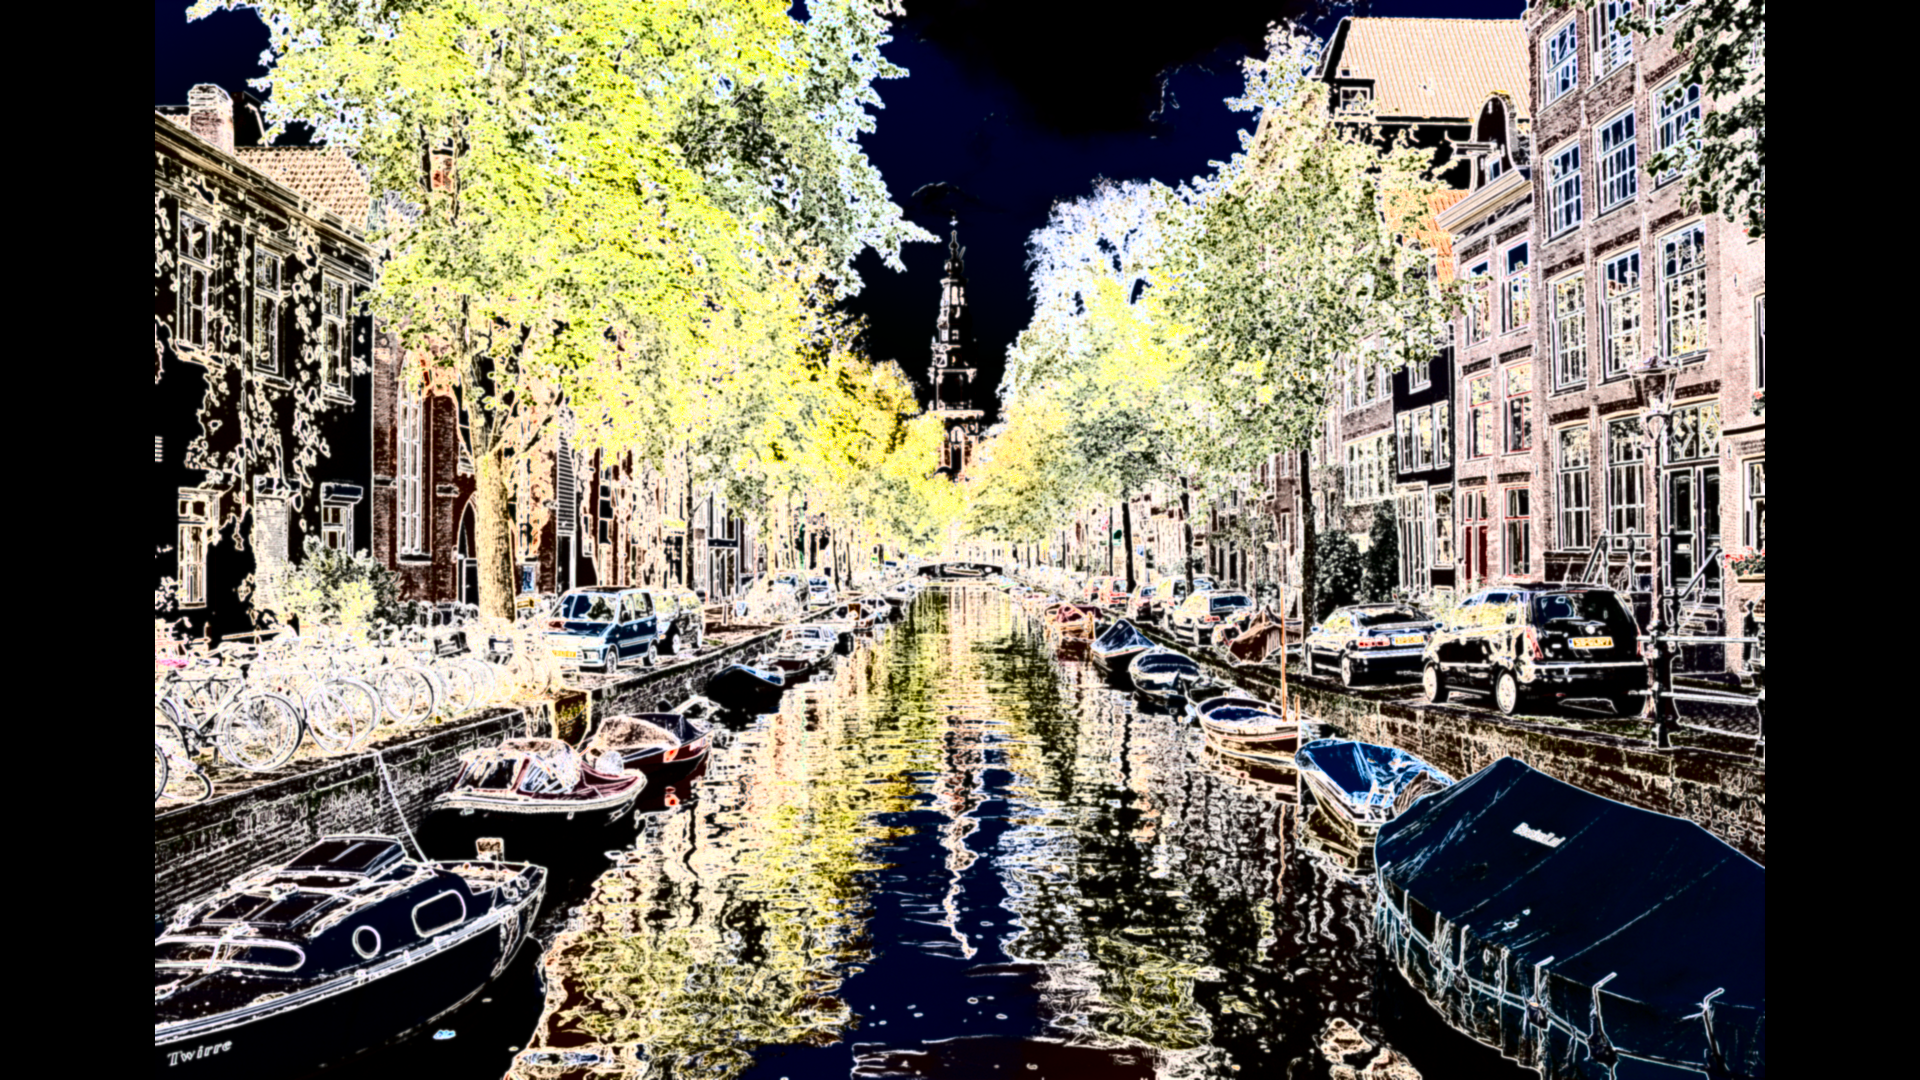
Would it be possible to see it at <100% zoom? :]
Beep6581
on 13 Jun 2018
@Beep6581 Only for amsterdam.pef :]
heckflosse
on 13 Jun 2018
Branch sharpmask seems to be very interesting and promising.
@gaaned92: Is it possible to publish a win64-release on keybase?
Best regards
Heinrich
hholtm
on 13 Jun 2018
To clarify: Showing the mask works for zoom levels >= 100%. The amsterdam.pef screenshot from above was just a hack ;-)
heckflosse
on 13 Jun 2018
@hholtm
"sharpmask" build uploaded
 gaaned92
on 13 Jun 2018
gaaned92
on 13 Jun 2018
@gaaned92 Thank you :+1:
heckflosse
on 13 Jun 2018
Maybe worth to mention that the mask view also (kind of) visualizes the effect on sharpening of other tools which are before sharpening (switching between amaze and amaze+vng4, microcontrast, noise reduction, local contrast.....)
heckflosse
on 13 Jun 2018
@heckflosse thanks for this new tool! Gonna be awesome : )
kazah7
on 13 Jun 2018
@kazah7 please report your experience with the mask view. Currently it's a first try based on my thoughts. That for sure does not mean it's perfect ;-)
heckflosse
on 13 Jun 2018
heckflosse
on 13 Jun 2018
RawTherapee_dev_5.4-397-g67b032cc6_WinVista_64.zip
uploaded at
https://keybase.pub/gaaned92/RTW64NightlyBuilds/
gaaned92
on 13 Jun 2018
RT-dev-5.4-397 works fine, many thanks to all!
The new sharpness mask is very useful for finetuning details. Thanks for it!
Sharpmask works only if sharpening is enabled and contrast threshold is >0. Perhaps it is an idea to check the second conditin too by activating sharpmask and show a hint if conditions are not ok.
Over all RT gets better and better, it's awesome! :-)
IMHO it would be a good idea to give sharpmask an own icon, especially for a new user it could be less confusing.
hholtm
on 14 Jun 2018
Hi,
I've just done some testing and I can say that's a huge help for the sharpening! I had been missing this mask option for months. At first, I found the color mask more confusing than a black and white one. Now – there is no difference.
So, I haven't yet encountered any serious problems. I am just missing a nice shortcut.. but I guess it will be implemented soon.
Two questions though:
- how to differentiate between “sharpen only edges” and “contrast threshold”. Aren't these similar?;
- when I turn the contrast mask on and subsequently I switch the focus mask on, the former in no longer pressed yet the mask in still visible. Is it the way it should be? I am attaching video to explain it better.
All in all - a great work!
https://filebin.net/zz27jgnn4qn5xozk/2018-06-14_09-56-00.mp4?t=7prrhok3
kazah7
on 14 Jun 2018
Thanks for the feedback
@hholtm Sharpmask also works at contrast threshold = 0. In this case it shows that the whole image will be sharpened. It will also get an own icon. It was just not possible atm to do that because @Beep6581 is reviewing rt icon stuff and creating a new one would have broken his work.
@kazah7 I guess we will add a shortcut once we found a good one. Sharpmask now is disabled when focus mask is enabled. I never used sharpen only edges because I mostly use RL Deconvolution.
heckflosse
on 14 Jun 2018
@heckflosse Ingo, is it expected that playing with the amount slider for RL Sharpening has an effect on the sharp mask? Reducing amount darkens the sharp mask preview, while for USM sharpening playing with amount does nothing.
sguyader
on 14 Jun 2018
@sguyader Yes, this is expected because the amount slider in RL is just a simple blend factor between sharpened and unsharpened while in USM it's a bit more complicated.
heckflosse
on 14 Jun 2018
@sguyader Sébastien, imho with the new contrast threshold adjuster, the amount adjuster in RL is mainly for backwards compatibility. At least I didn't need it anymore since we have the contrast threshold adjuster.
heckflosse
on 14 Jun 2018
Any objections to close this?
heckflosse
on 17 Aug 2018
@heckflosse : Is there still any idea to automate generation of threshold values in demosaicising, sharpening and microcontrast or escaped it my notice?
hholtm
on 18 Aug 2018
@hholtm For dual demosaicing the automatic calculation of contrast threshold is already available in code. Though currently it's deactivated because I think this auto calculated value should also be shwon in gui and I also need a gui control to select the relevant area in the image. For that I need some help from other devs. Maybe @Hombre57 can help ;-)
heckflosse
on 18 Aug 2018
@heckflosse Yeah, I offered my my help few weeks ago but didn't had time since then :confused: I'll start my new job on next Monday, I hope to be back to RT soon for this kind of big patch.
 Hombre57
on 18 Aug 2018
Hombre57
on 18 Aug 2018
I would like to close this issue and open a new one for the automatic calculation of dual demosaic contrast threshold. Any objections?
heckflosse
on 23 Aug 2018
Related issues
agriggio
·
4Comments
Thanatomanic
·
3Comments
Beep6581
·
5Comments
 elecprog
·
5Comments
heckflosse
·
5Comments
elecprog
·
5Comments
heckflosse
·
5Comments
Most helpful comment
@Beep6581 asked on irc whether this method also could be applied to the Sharpening tool.
So I tried, and it works :)
left is with rl-deconv and microcontrast without contrast threshold, right is with contrast threshold

left is rl-deconv and microcontrast with contrast threshold, right without rl-deconv and without microcontrast