Announcements - New Features, Design Patterns, and Methods
I'm unsure how GitHub sends out updates. I don't think people are informed about Wiki changes for example. I've been announcing new features and more importantly, new ways of doing things, on the Wiki. I'm going to put announcements here so they are more visible. If there are objections about the traffic, well, what can I say, it's a busy/active project.
 MikeTheWatchGuy
All 855 comments
New use pattern - Element lookup using Keys
keys can be used to lookup Elements. As a result, all Elements are capable of having a key, including non-output elements such as a Text Element.
To get an element object from a form, you call
form.FindElement(key)
This is the new, preferred method for doing Updates on elements.
Previously if you wanted to output something to a Text Element, you needed to create the text element outside of the form layout and keep that text element variable around so you can call text_element. Update('new text')
The new design pattern is thus:
In your form layout, include a key on your Element:
layout = [[sg.Text('My text', key='text')]]
Later in your code you can update this Text Element by making this call, assuming the variable form is your FlexForm object:
form.FindElement('text').Update('new text')
The Demo programs have all been updated to use this new technique. This capability and its impact on the length of programs led to pushing version 2.30 out the door quickly.
MikeTheWatchGuy
on 6 Sep 2018
Borderless Windows are Here
Try them on your next form.
Add this to your FlexForm call:
no_titlebar = True
You can expect to see some of these in the Demo programs.

You can click anywhere on the window and drag to move it. Don't forget to put an exit key on these windows.
Be sure and make an "exit" button or you'll be running task manager to close your windows. The reason is the when you turn on this option, you will not see an icon on your taskbar for the window. This happens on both Windows and Linux. Thus, if you do not supply an exit button, the user will have no means to close the window.
MikeTheWatchGuy
on 6 Sep 2018
Grab Anywhere
Tonight's change is perhaps going to be a really cool thing or one that is going to piss people off.
But, hey, I like it this way. If you don't, setgrab_anywhere = Falsein your call to FlexForm.
As the name implies, you can grab and drag your window using any point on the window, not just the title bar. I was only enabling this when the title bar was turned off. I think it's a much superior way to interact with a window.
FlexForm is becoming quite the call!
def __init__(self, title, default_element_size=DEFAULT_ELEMENT_SIZE, default_button_element_size = (None, None), auto_size_text=None, auto_size_buttons=None, scale=(None, None), location=(None, None), button_color=None, font=None, progress_bar_color=(None, None), background_color=None, is_tabbed_form=False, border_depth=None, auto_close=False, auto_close_duration=DEFAULT_AUTOCLOSE_TIME, icon=DEFAULT_WINDOW_ICON, return_keyboard_events=False, use_default_focus=True, text_justification=None, no_titlebar=False, grab_anywhere=True):
So, enjoy a lazy way of interacting with windows on me.
You will want to turn if off for forms with a SLIDER. you need the slider to move, not the window. I'll update the Demos that use sliders to turn off the grab_anywhere.
MikeTheWatchGuy
on 7 Sep 2018
Tables
This one has been requested a number of times. Rather than make a Table Element, decided to see if the current PySimpleGUI is capable of making nice tables using standard Elements. The answer seems to be yes, it's possible with existing Elements. The key was to enable text justification in the InputText element. By right justifying the text in those Elements, it's possible to create a nice looking table.
Here's an example using a ComboBox and Input Elements.

You'll find the code that generated the table in the file Demo_Table_Simulation.py. It requires the latest PySimpleGUI from GitHub in order to use the justification setting.
This is a "live keyboard" demo. It updates the table values as you are typing.
There are 3 fields at the top of the table. If you enter a value into the 3rd field, the cell that the other 2 cells represents will be changed to that value. Enter 1, 2, 1234 and cell (1,2) will be changed to 1234.
There is a new trick demonstrated in this demo that shows off the power of Python. Rather than pass in a string as the key to the Input Elements, I passed a tuple. Nothing about the key requires it to be a string. The only requirement is that you use the same type to look up the element when you call FindElement or use the key to read the return values.
This is the code that makes the Input Elements:
    for i in range(20):
        inputs = [sg.In('{}{}'.format(i,j), size=(8, 1), pad=(1, 1), justification='right', key=(i,j), do_not_clear=True) for j in range(10)]
See how the key is set to (i,j). This allow me to easily find the Element that is represented by (i,j) later. What to access the cell at (0,0)? This you would make this call:
form.FindElement((0,0))
Hopefully this is enough capability for the folks that need tables in their forms/window.
MikeTheWatchGuy
on 7 Sep 2018
Three Point Oh!
So maybe I kinda screwed up the numbering when the last one became 2.30. I didn't think about it looking like 2.3 also. Doh!
There have been a lot of changes lately so perhaps it's time for a major bump.
It's a clean slate
MikeTheWatchGuy
on 8 Sep 2018
keep_on_top = True
What might this setting do in a call to FlexForm? If you guessed create a window that's ways on top you're right.
This one little flag enables cool floating toolbars that stay on top of all of your other windows. I'll admit a large portion of this project is for selfish purposes, that I have a platform to develop tools on top of.
Now I've got this nifty toolbar on the top part of my screen, always ready to launch or do something.

MikeTheWatchGuy
on 8 Sep 2018
3.0.2 release today to turn off the grab_anywhere feature for non-blocking forms. tkinter is printing out a warning/error message when the form is closed using a button. Doesn't appear to have any effect on the overall functioning, but it's distressing to see. Better to disable this feature for now.
Plan is to add back an override mechanism should a user want it.
MikeTheWatchGuy
on 8 Sep 2018
RELEASED 3.0.2
MikeTheWatchGuy
on 8 Sep 2018
Floating Toolbar - New demo program
This is an always-on-top, compact floating toolbar. They are super-handy to leave running. Something satisfying about writing code that then gets used often, especially if they make you much more efficient.
MikeTheWatchGuy
on 9 Sep 2018
Async Forms
Updated the Readme / primary doc to discuss the use of non-block forms.
As explained in the documentation there are a number of techniques to move away from async forms including using the change_submits = True parameter for elements and return_keyboard_events = True
MikeTheWatchGuy
on 9 Sep 2018
Floating Desktop Widgets
I've discovered that in about 30 lines of code you can create a floating desktop widget.

If you click the pause button, it switches to Run.

This "Widget" is always on top of the other windows.
Looking for a way of launching these in a way that have no taskbar icons. If launched from PyCharm it behaves this way. If launched from a Toolbar, the toolbar's window is attached to the timer. Close it and the timer closes.
This demo is the first time I've ever combined a ReadNonBlocking with a Read in the same form. The reason for using it in this program is that while the timer is paused, there' s nothing happening so why have the program running the loop when it can wait for the user to do something like click a button. When the button is clicked we return from the Read call.
Thank you to jfong for sending an interesting version of this program. His ideas have rolled into a into the project code many times.
MikeTheWatchGuy
on 9 Sep 2018
Menus are done
The last of the big features, Menus, was just released to GitHub. With it comes the ability to get the look and feel of a windows program. I don't know if the architecture will lend itself to being used this way or not, but it did seem like a useful feature to add..
MikeTheWatchGuy
on 10 Sep 2018
3.7 Support
Thanks to @mrstephenneal we can now say that PySimpleGUI works on Python 3.7. There was a button issue causing trouble. Looks like it's fixed now so I think 3.7 is now safe to with PSG.
MikeTheWatchGuy
on 10 Sep 2018
Release 3.01.00
Menus! (and a Listbox.Update bug) are the big features.
Since the Menu code is somewhat isolated, and I want to get some users on it, decided to go ahead and push it all out there in 3.01.00
I didn't mention this in the readme section on menus, but by default (you can't currently turn it off) menus are detachable. If you double-click the dashed line then you get a floating version of that menu. Should make for some pretty interesting user interfaces?
MikeTheWatchGuy
on 10 Sep 2018
3.1.1
There have been enough bug fixes to trigger another PyPI release. People have been doing more and more with the Update method. These fixes were mostly in those methods.
MikeTheWatchGuy
on 11 Sep 2018
Update methods updated
Added the ability to enable / disable all input elements.
Set parameter disable=True to disable, disable=False to enable, disable=None to leave it alone
A number of Demo programs also refreshed.
Expect a PyPI release soon.
Note that some Update method changes also changed parameter names from new_value to value, new_values to values. Some were different than others. Removed new_ so they all match now. Sorry to those living on the bleeding edge!
Here's a before/after. Elements towards the bottom of the window were disabled.
Yes, even buttons can be disabled now. No more needing to gray out your own buttons!


MikeTheWatchGuy
on 11 Sep 2018
3.1.2
Big change this time around is the ability to disable widgets. All input widgets have an Update method that has the parameter disabledthat you set to Trueif you want to disable it.
A few critical bugs in there too which pushed up the release to today.
MikeTheWatchGuy
on 11 Sep 2018
Resizable Windows, Font settings for input text elements, beginnings of Treeview Element
You can stretch windows bigger now and some of the elements will resize with the window. **
The Input Text Elements did not have a functioning Font setting. Doh! Don't know how that got missed.
The very beginnings of the Treeview element are in there.
Hopefully nothing was broke. Any time I make changes to the core widget packing I get nervous!
** Had to turn off some of the Resizable windows features....Buttons and other elements were moving / expanding in forms that I didn't want the to expand. The change fucked up too many elements to leave on for now.
MikeTheWatchGuy
on 12 Sep 2018
Two new Demo programs - CPU Desktop Widget, Spinner Compound Element
Added another Desktop Widget to the demos. This one shows the CPU utilization.
The spinner allows you to change how often it's refreshed
The Spinner Compound Element was done in response from a user wanting to see a different kind of spinner. This one has larger buttons and is laid out horizontally.

The point of this demo is that it's possible to put together multiple Elements into a higher level element. There aren't many of these I can think of at the moment, but given how many user questions are asked, something else is bound to be asked for.
MikeTheWatchGuy
on 12 Sep 2018
Table Element, Complete rework of Popups, Death of MsgBox
You can blame the Popup changes on this issue:
https://github.com/MikeTheWatchGuy/PySimpleGUI/issues/204
All of the Popups were rewritten to use a long list of customization parameters. The base Popup function remained more or less the same.
Decided while I was going all the Popup work that it's time to completely remove MsgBox. Sorry all you early adopters. You'll need to do a bulk rename and then you'll be fine.
Table Elements
Finally have something to show in the form of tables. The element name is Table. While the tkinter Treeview widget was used, many of the parameters were not exposed. If they were, the caller could really mess things up. Better to present a nice "Table-friendly'" interface than something specific to tkinter. After all, the plan is to expand PySimpleGUI to use other GUI frameworks.
A Demo program is in the works.
It's possible to add scrollbars to the Table element by simply placing it into a Column element.
There's still work to do and a good number of bugs, but I encourage you to give it a try.

If you do not put the Table Element inside of a Column, then you can still view and scroll the table, it just will not have scrollbars.
There is a problem currently with keyboard input when placed into a Column. The keyboard keys work fine when NOT inside of the Column but stop working when placed inside a Column Element.
This program will read a CSV file and display it in a window.
import csv
import PySimpleGUI as sg

filename = sg.PopupGetFile('filename to open', no_window=True, file_types=(("CSV Files","*.csv"),))
# --- populate table with file contents --- #
data = []
if filename is not None:
    with open(filename, "r") as infile:
        reader = csv.reader(infile)
        try:
            data = list(reader)  # read everything else into a list of rows
        except:
            sg.PopupError('Error reading file')
            exit(69)

sg.SetOptions(element_padding=(0, 0))

col_layout = [[sg.Table(values=data, headings=[x for x in range(len(data[0]))], max_col_width=8,
                        auto_size_columns=False, justification='right', size=(8, len(data)))]]

layout = [[sg.Column(col_layout, size=(1200,600), scrollable=True)],]

form = sg.FlexForm('Table', grab_anywhere=False)
b, v = form.LayoutAndRead(layout)
It's another bit of PySimpleGUI "challenge code"..... The challenge is to do the same operation in another GUI framework in less lines of code. I would enjoy seeing the tkinter code required to create the window that this 20 line PySimpleGUI program creates. Most of the code deals with reading the CSV file 👍
MikeTheWatchGuy
on 13 Sep 2018
Linux Virtual Environment
I finally installed VirtualBox and am running Ubuntu Linux. I tried to install the Mint distro, but the display was scrambled when it booted.
I was surprised how close the Linux screen shots look to the Windows.


Even Pong worked the first time.
I don't believe that Python has been labelled the "go to language" for doing cross-platform GUI work. I guess I never stopped to think about it. I don't recall seeing this kind of thinking in posts or books I've read on Python. Perhaps it's time for that to change?
MikeTheWatchGuy
on 14 Sep 2018
3.2.0
Released a new release to PyPI. Sorry about all these releases, but features continue to pour into the code. I'm finding even the folks that are actively using PySimpleGUI only run the pip installed version rather than the GitHub version. That means if I want runtime on the code, I'm only going to get any is to do a full release.
There were a number of changes that could f-up, so be on the lookout. The biggest addition to 3.2.0 was the Table Element (beta quality at the moment).
If you are running older programs then you may crash due to missing functions, MsgBox and several others. This is because I've moved 100% to Popup calls. It's not like I haven't been warning people so I don't expect complaints.
Some people are calling ReadNonBlockingprior to your Event Loop so that the form gets fully made. This call is needed if you want to perform actions on elements prior to calling Read. For example, if you want your form to be shown with some Elements set in the disabled state (using calls to Update), you will need to make an additional call after your Layout call.
Instead of calling ReadNonBlocking in these situations, you can call Finalize/PreRead/PrepareForUpdate. I have not been able to standardize on a name, so I'm providing multiple. I'm sure a winner will emerge. I've been using Finalize.
The call sequence becomes this:
form.Layout(layout)
form.Finalize()
element.Update(.....)
while True:
     b, v = form.Read()
You'll also find the Finalize call used in the scripts that use the Canvas Element.
See the Readme for more info on what's in the release. Note that the readme has not yet been updated with the Table Element and several other changes. There's only so much I can do.
MikeTheWatchGuy
on 14 Sep 2018
One Line Progress Meters
PySimpleGUI has always had a one-line progress meter called EasyProgressMeter. However, that function has a limitation of only 1 meter being active at a time.
The new way to do Progress Meters is the function OneLineProgesssMeter.
All of the documentation and examples will reflect this new function.
Have to say it's nice to be able to run as many meters as desired without having to worry about more than 1 being on the screen at a time.
I intend to remove EasyProgressMeter within the next 5 or 6 releases to PyPI. I tried to insert a warning in the code, but too much code was shared to fit the message in.
I'm sorry about the change, but really would like to both add this function and rename the capability to something very descriptive. If there is enough revolt over removing EasyProgressMeter, I'll leave it in and simply drop it from all the documentation.
MikeTheWatchGuy
on 15 Sep 2018
3.3.0
Yea, yea, it seems like only yesterday that version 3.2.0 was released. That's because it WAS only yesterday. I've been busy.
There are 2 changes I wanted out quickly....
- The ability to turn off displaying row numbers
- The new
OneLineProgressMeterfunction
The Progress Meter feature alone is a great use of PySimpleGUI. A number of users are using it only for this purpose in their programs.
MikeTheWatchGuy
on 15 Sep 2018
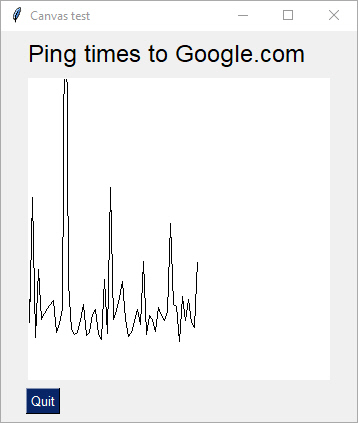
Graphing
New demo program - graph ping using canvas.
I'm thinking about creating a Graph Element, something that makes it super easy to users tog create graphs, both line and x,y plot. The demo should how to take a canvas element and graph ping times.
There is another ping-graph demo using Matplotlib. This graph only uses tkinter.
Finally, because the pings take a long time, I moved the ping calls outside of the GUI event loop. Calling ping inside event loop was causing the GUI to respond sluggishly. This is because the ping was taking 1 second which means the gui wasn't being refreshed / wasn't responsive during the second. Now the GUI sleeps for 200 ms while the ping is done by a thread.
This is yet another toe in the water with threading. The problems I saw in the past are no longer there, it would appear.
I also checked in the ping.py file that you need for this demo. It's a pure python implementation of ping and works pretty well, even if slow.
MikeTheWatchGuy
on 16 Sep 2018
Progress Meters
Thanks to @JorjMcKie I've learned more about the performance of the EasyProgressMeter and thus probably the OneLineProgressMeter. The more arguments to display the longer it takes.
Was going to document in the Cookbook / Readme that if you have performance concerns, you can call the progress meter less frequently. You don't have to update it 1 count at a time. It could be like this:
for i in range(10000):
    if i % 5 == 0: sg.OneLineProgressMeter('My 1-line progress meter', i+1, 10000, 'single')
This meter is only called every 5 times through the loop. It finished quite a bit quicker than the test updating the meter every single time.
MikeTheWatchGuy
on 16 Sep 2018
PySimpleGUI programs as an EXE file!
The biggest thing to hit PySimpleGUI since Colors.... the ability to run programs written for PySimpleGUI as an exe file. ALL credit goes to @JorjMcKie for this.
There is no need to distribute Python with your programs. It's all included in the exe and folder of supporting files.
From what I understand of nuitka, this code is compiled C++ code, not python code. The performance is thus _potentially_ better! It's the best of both worlds.
Working to get the process documented. It's tricky and required a special script. Stay tuned....
MikeTheWatchGuy
on 16 Sep 2018
Graph Element
This one is pretty exciting as it does something new on the screen. The Graph Element allows you to easily create a canvas and draw on it using your own coordinate system. You don't need to do conversions from your graph coordinates to the tkinter canvas graph coordinates.
The Demo program for it is a good example. It displays a pint graph. The graph we're creating is a line graph what we would like to to from 0,0 in the bottom left to 100, 500 in the upper right. This will give us 100 data points along the x axis and up to 500 ms on the y axis.
After creating the Graph Element, we can do 3 operations on it:
- Draw Line
- Draw Point
3 Erase
The draw line draws a line from 1 point to another. The points are specified using your graph coordinates, not the tkinter canvas coordinates.

I know I have a LOT of documentation to do.
In the meantime, try using Control+P if you're using PyCharm. Press Control+P while you are typing in the parameters and you'll see a popup showing you what the legal parameters are. This feature is almost necessary when using PySimpleGUI because functions have SO many optional parameters.

I hope to see some cool creations using the capability. I'm starting to see more and more projects pop up on GitHub that use PySimpleGUI! Keep those examples coming! And keep the requests for new features coming too. They have made this such a better package because of your help.
Sample code:
This is your layout:
    layout = [  [sg.T('Ping times to Google.com', font='Any 18')],
               [sg.Graph((300,300), (0,0), (100,500),background_color='white', key='graph')],
               [sg.Quit()]]

    form = sg.FlexForm('Canvas test', grab_anywhere=True)
    form.Layout(layout)
To draw a line, call DrawLine:
form.FindElement('graph').DrawLine(from_point, to_point)
MikeTheWatchGuy
on 16 Sep 2018
Movable Graph Element
Made the Graph Element "movable". This means the graph can be shifted when it reaches the "End".
Here's a 1,000 data-point ping graph or 16 minutes woth of pining

MikeTheWatchGuy
on 17 Sep 2018
Button return values as keys rather than button text
Just dropped in a sizable change in how buttons work. For buttons that have a key value, the key is returned rather than the button text. This is needed for forms that have multiple buttons with the same text.
The 'best' way to rework existing code is to get your key == button_text.
Expect a number of Demos and Recipes to change. Lots to do to explain this one.
It's _another_ excellent suggestion provides by @mrstephenneal.
Keep those ideas coming people! They're turning PSG into an event better package! Don't be shy if you need a change.
MikeTheWatchGuy
on 17 Sep 2018
Nuitka launches only from command window
Not sure what happened, but I can't seem to load the Nuitka .EXE file by double clicking. It doesn't do anything but flash a command window like it has crashed.
However, when I type the exe filename on a command prompt, it works GREAT. Perhaps if I added to a batch file then double-click would work. Will try soon.
MikeTheWatchGuy
on 17 Sep 2018
Clickable 'text'
I noticed on some GUIs it's possible to determine when someone clicks on text. I experimented and found a way to duplicate this behavior

The 'Clear' text is actually a button with the border_width = 0 and color = black like the background. Poof... instant clickable text
Cross that feature off the list
MikeTheWatchGuy
on 18 Sep 2018
Frame Element
Just when you think I'm out of new elements to spring on you, I cough up another.
For those people with an eye for design and want their forms to look as good ad possible, give you the Frame Element

The frame element allows you to group your Elements into a nice box with a text label.
It takes 2 required parameters - title& layout.
You can customize the text font, size, color, relief style. I do not _yet_ have a setting where you can specify the location of the label.
You can think of these as Column Elements with a label and an outline because that is exactly what they are, except you cannot scroll a Frame Element.
The implementation uses the tkinter labelframewidget. I decided to name this Element Frame since that's exactly what it is. I do not have a labelled and unlabeled Frame. If you want a frame without a label, specify None for the title
This is one of those features that have zero impact on your form's capabilities, but has a big impact on the appearance of a form.
MikeTheWatchGuy
on 18 Sep 2018
3.4.0
Released 3.4.0 today. I'm sure most of you head straight to the readme file, scroll to the bottom and read the release notes. I'll go ahead and post them here just to humor myself.
There is significant amounts of work to be done on the docs to get the new Frame and Graph elements documented in the readme, Cookbook and tutorial. Soon I hope. In the meantime, all you advanced users can quickly figure them out using PyCharms Control+P feature.
3.4.0
- New Element Frame (a labelled frame for grouping elements. Similar to Column),
- New Element Graph (like a Canvas element except uses the caller's coordinate system rather than tkinter's).
- Set an initial_folder for browsing type buttons (browse for file/folder).
- Buttons return key value rather than button text if a key is specified,
- OneLineProgressMeter! Replaced EasyProgressMeter (sorry folks that's the way progress works sometimes),
- Changed ALL of the Popup calls to provide many more customization settings - changed PopupGetFolder, PopupGetFile, PopupGetText, Popup, PopupNoButtons, PopupNonBlocking, PopupNoTitlebar, PopupAutoClose, PopupCancel, PopupOK, PopupOKCancel, PopupYesNo
MikeTheWatchGuy
on 18 Sep 2018
Stack Overflow, Reddit
I've been watching both StackOverflow and Reddit for opportunities to help people out using PySimpleGUI.
I answered on StackOverflow question about adding a GUI onto a command line program that I'm particularly proud of. A sample GUI was provided that was made in Visual Studio. It took 15 lines of code in PySimpleGUI to duplicate the design.
Check it out if you get the chance:
StackOverflow Post
MikeTheWatchGuy
on 18 Sep 2018
Fun with Graph Element
I'm 1/2 way through my 6,000 ping graph :-) The top is 500 ms.

MikeTheWatchGuy
on 18 Sep 2018
3.4.0 is no more
Deleted release 3.4.0. Everyone will have to wait on the new release. You can always get and test against the Master Branch to see if you're going to have trouble in the upcoming releases. It would be great if someone people could be running from Master rather than PyPI.
This backed out the button change as well as the laundry list of new features and bug fixes. It'll all have to wait until I can make sure all Demos work with new code and there is more documentation updated.
MikeTheWatchGuy
on 18 Sep 2018
6,000 Point Canvas (6,000 Point Ping Graph)
My ping graph has finally finished and is scrolling nicely. It's spanning 3 monitors

MikeTheWatchGuy
on 19 Sep 2018
Is there a class using PySimpleGUI??
I see three different repositories popped up, at the same time, with the same structure. They all implement a calculator using PyGame and PySimpleGUI.
It sure looks like some class is teaching PSG!
That's crazy!
I dunno if PySimpleGUI is ready to be used in a class just yet. Heck, I'm still breaking features.
https://github.com/ozone94/Calculator_PySimpleGUI/tree/2d2d8898ce51f2ca223434acd2af6c8682ddf5c3
https://github.com/poschananT/CalculatorPySimpleGUI_6001012620033
MikeTheWatchGuy
on 19 Sep 2018
3.4.1
OK, the release is back to being a release, now that there's the required Button.GetText call which allows you to figure out the current text value on a button.
This release _shouldn't_ break anyone's code.... unless you're one of those super-advanced users that are changing the text on their buttons (smarty pants's). Those folks have a the special Button.GetText method just for them so that the button text can be retrieved.
For those of your that are writing a lot of code that uses ReadFormButton, I have created a shortcut, ReadButton, so that you save a few characters in your layout.
Overall this is a pretty strong release with two new elements, Graph and Frame. The Frame element enables PSG windows to look even better, more professional.
I can't WAIT to see what people do with these things. I see something new that you guys create every day and it's quite motivating. Keep the ideas and inspiration coming!
MikeTheWatchGuy
on 19 Sep 2018
There IS a class using PySimpleGUI
Holy crap.... I saw this in a readme today:
My reference :: Introduction to Computer Science Using Python and Pygame by Paul Vincent Craven
Can't wait to see if more text is added to this:
https://manachanok94.blogspot.com/2018/09/calculator-using-pygame-vs-pysimplegui.html
Sure looks like there's a computer science class using it!
Part of the exercise also appears to be the students
- Create a GitHub repository
- Make a readme, structure the GitHub nicely
- Create a blog and in the blog write the difference between writing a calculator program in PyGame versus PySimpleGUI... really looking forward to getting this feedback from students!
This is one of the goals I originally had for the package, make something usable by students, people just starting so that they get exposed to doing good user interfaces from the beginning of their career. It seems like a good thing to learn how to lay out a screen in a pleasing and functional way.
"Be careful what you ask for" is definitely fitting for this situation.
https://github.com/Manachanok/Calculator
Some students already commenting on how much more compact PySimpleGUI is at their calculator assignment than their PyGame implementations.
One student wrote this:
It's a total of 34 lines compared to Pygame written in a hundred lines. Simple by name
I try to remain neutral when speaking of other packages. Everyone working on these packages has fantastic intentions, works hard, is altruistic, and we all have a slightly different outlook on how to create a simple GUI. It's not my place to knock any, any, of the GUI packages.
MikeTheWatchGuy
on 19 Sep 2018
Text Element Relief Setting
Oh what a relief it is.
Continuing on polishing the look and feel of PySimpleGUI. Today's feature is the ability to add a relief to Text Elements.
It's part of the Demo_All_Widgets.py code along with the new Frame Element.
The first line of the layout reads:
sg.Text('All graphic widgets in one form!', size=(30, 1), justification='center', font=("Helvetica", 25), relief=sg.RELIEF_RIDGE)

MikeTheWatchGuy
on 19 Sep 2018
Listbox bind_return_key
Previously Listboxes always submitted when the return key was pressed. Now it's controlled using a new bind_return_key. Listbox is like the other Elements now. I also added double-clicking! I find myself double clicking the listbox and nothing happens. I have to click a button or press return key. Now you'll get control back on double-click if you've set bind_return_key
MikeTheWatchGuy
on 19 Sep 2018
For fun... my desktop
I bet some nuclear power plants have less gauges and controls. 1/2 of one of my monitors. 3 of those widgets are PySimpleGUI powered.

MikeTheWatchGuy
on 19 Sep 2018
Combining Form and Layout calls
There are a handful of design patterns that we all have been using.
Two of the blocking style ones are:
The simple form:
form = sg.FlexForm('My form')
button, value = form.LayoutAndRead(layout)
The perpetual form:
form = sg.FlexForm('My form')
form.Layout(layout)
while True:
      button, value =form.Read()
I have disliked the second one of those since I wrote the code. It felt wordy.
In Python, I am constantly scanning trying to simplify, compact, make easier. Nothing is more fun than combining function calls. So I was elated when I stumbled in to a code change that allows this new pattern:
form = sg.FlexForm('My form').Layout(layout)

while True:
      button, value =form.Read()
It was a super simple change to the code, and damn, the result is awesome.
You can expect this one to get released quickly and have the demos, cookbook updated too.
MikeTheWatchGuy
on 19 Sep 2018
Table Demos - CSV & Pandas
It's great when community members write some of this stuff... I get a lot of behind the scenes help from you guys whether it's advice on naming, determining new parameters, how to implement a new element. Otherion wrote a couple of Table Element demos. One uses the CSV library the other pandas. There are more bugs to work out with the table element. I'm not happy with now I used the size parameter and I'm not sure the autosizing it sizing correctly. These Demos will make excellent patterns for folks wanting to work with tables. I have a 3rd one that I'll post soon that works with databases!
MikeTheWatchGuy
on 20 Sep 2018
Shorter Button Names
The upcoming release will include new shorter names for buttons. You'll still be able to use all the same names as before. However, they'll change in the Demos, particularly new demos, and the Cookbook.
This comes from 2 things. 1 - I'm fundamentally lazy. You may have noticed my frequent use of sg.T() and sg.In() instead of sg.Text and sg.InputText. 2 - I saw the incredibly wordy looking programs the students made. They were calculator programs so naturally the UI was crammed with buttons. There were 20+ sg.ReadFormButton() calls in every program. Ugh, too much clutter.
The change required me to shuffle around some parameters in the Button Element. I learned a big lesson as well in NOT relying on positional arguments when making internal function calls. I have more cleanup to do. I needed to make the Button Element have the text in the first position if I was to steal it and make it a user callable function rather than only internally used. It's such a great name, Button() that it seemed a shame to hide.
Here are the new names:
SimpleButton becomes Button
ReadFormButton becomes ReadButton or RButton
You can easily guess which of these you'll see me using the most.
Thus, all of the buttons, in their shortest form, are:
RButton
RealtimeButton
If someone right a program with a ton of RealtimeButton then maybe I'll shorten it too. I can't think of another name for that one.
Again, you do not need to change your code. The wordy-buttons will continue to work, but won't be used in examples anymore.
MikeTheWatchGuy
on 20 Sep 2018
Tooltips

Thanks to the help of @rtrrtr we now have tooltips on all of the Elements... or almost all of them... or the ones that matter.
If you find a tooltip parameter in the call to the Element, then you can add a tooltip to it.
This includes the shortcut buttons like Submit(), Yes(), etc.
It really helps when someone supplies code like this. It enables me to hook in the new feature quickly and easily.
Since this touched every Element and shortcut, there's a good chance I f-ed something up, so be on the lookout.
As usual, it's in the Master Branch. I'll let it sit for a day or two and then off to PyPI it'll go along with the other features and bug fixes made since 3.4.1
MikeTheWatchGuy
on 21 Sep 2018
3.5.0
Another day, another truckload of features. Seemed like plenty of stuff saved up over the past few days that it's worthy of a released. Seems like pretty much everyone wants to run the pip installed version rather than pulling the latest Master Branch. So, I'm going to push stuff out there and hope that if it breaks someone speaks up quickly. So far that's what happened, someone speaks up when something breaks. Keep speaking up!
The feature list
- Tool Tips for all elements
- Clickable text
- Text Element relief setting
- Keys as targets for buttons
- New names for buttons:
- Button = SimpleButton
- RButton = ReadButton = ReadFormButton
- Double clickable list entries
- Auto sizing table widths works now
- Feature DELETED - Scaling. Removed from all elements
The biggest reason I wanted it out is so I can use Button and RButton! That's going to save a lot of keystrokes and it'll compact the code. Maybe I should make Btn? Or how about just B? LOL
Then there's tooltips which multiple people asked for.
I also killed off Scaling in this release. That touched SO many parts of the code so I hope it survived OK. If you were using the scaling feature..... uhm, I'm sorry? I don't think anyone is however.
Enjoy!
MikeTheWatchGuy
on 21 Sep 2018
Graph Element
This is the latest Recipe addition to the Cookbook. I created a 10-line program that created this lovely screenshot.

import math
import PySimpleGUI as sg

layout = [[sg.Graph(canvas_size=(400, 400), graph_bottom_left=(-100,-100), graph_top_right=(100,100), background_color='white', key='graph')],]

form = sg.FlexForm('Graph of Sine Function').Layout(layout)
form.Finalize()
graph = form.FindElement('graph')

for x in range(-100,100):
    y = math.sin(x/20)*50
    graph.DrawPoint((x,y))

button, values = form.Read()
What I like about working with these Graph Elements is that I don't have to worry about translating into on-screen coordinates. It's always a pain in the ass dealing with the converting into screen coordinates. Having that removed so that I'm working in my desired coordinates is really satisfying.
In this case I wanted a graph that went from -100 to 100 in both X and Y axis. Defining those values as well as the size of the screen area to use is all done in the call to Graph.
sg.Graph(canvas_size=(400, 400), graph_bottom_left=(-100,-100), graph_top_right=(100,100), background_color='white', key='graph')
The actual graphing of the data points is this little loop, again, working in my own coordinates to draw the points:
for x in range(-100,100):
    y = math.sin(x/20)*50
    graph.DrawPoint((x,y))
And add just a couple more lines of code and you can get axis and another graph
for x in range(-100,100):
    y = x**2/20-100
    graph.DrawPoint((x,y))
    y = math.sin(x/20)*50
    graph.DrawPoint((x,y), color='red')

MikeTheWatchGuy
on 21 Sep 2018
3.5.1 (the "oh shit" release)
It only hit me today how "broken" 3.5.0 was! I didn't realize that older Python3 installs were flat out broken... that PySimpleGUI wouldn't run at all! Doh! It was due to this issue:
https://github.com/MikeTheWatchGuy/PySimpleGUI/issues/298
MikeTheWatchGuy
on 22 Sep 2018
PyInstaller LIVES.... PyInstaller + PySimpleGUI = WinForms
Gosh, a HUGE mega-thank you is owed to @mrsunday334 and @hpca01 get PyInstaller working.
This is a pretty epic kind of event.
pyinstaller -wF your_program.py
This simple line will make a single .EXE file than when executed opens straight into the GUI. No secondary dos prompt window. AND the .exe file is small at 9 MB in total.
This is _huge_ for IT people that have wanted to deploy their tools to users but installing Python is out of the question.
MikeTheWatchGuy
on 22 Sep 2018
Posted on Reddit - Not above begging for upvotes
I took a chance and posted about the PyInstaller news on Reddit. I done so well there, but I have picked up some great contributors so I'll take the rocks with the roses.
If you want to see how I fared or want to, ahem, upvote, here's where you'll find the post...
https://www.reddit.com/r/Python/comments/9i41la/i_duplicated_a_winforms_experience_in_python/
After 20 minutes I had 3 upvotes going for me.... which lasted for a few more minutes before out came the downvotes. Not sure why I bother except that I do pick up some great supporters. It's just discouraging when some people can't handle being supportive of someone else's effort or success.
MikeTheWatchGuy
on 23 Sep 2018
It seemed like only yesterday....
Noticed release history while doing the big update to Readme file. It actually seems like _eons_ ago when theses features were added:
Jul 16 (10 weeks ago) All parameters to Elements changed from CamelCase to lower_case
Jul 26 (9 weeks ago) Slider, Listbox elements. Color options
Aug 9 (7 weeks ago) Dictionaries... yes, dictionaries were added only 7 weeks ago.
Aug 16 (6 weeks ago) Columns
Aug 25 (5 weeks ago) Keyboard and mouse events
And the real shocker for me....
_Jul 10 (11 weeks ago) First release to PyPI.. Release 1.0_
Over 13,000 downloads since release 1.0 (not a huge number, but beats my expectations)
Thank you to _everyone_! GREAT feature suggestions, awesome support and encouragement. And it just keeps getting better....
MikeTheWatchGuy
on 23 Sep 2018
Added PyInstaller Recipe to Cookbook
This is such a cool feature! Had to include it in the Cookbook.
MikeTheWatchGuy
on 23 Sep 2018
3.5.2
A community member discovered a crippling bug. Elements inside of Frame Elements were not being returned in the return values. That means Frames are badly broken. Can't have that sitting around for long.
Also made the Finalize method chainable. I have updated all of the Demo programs that use it.
This means that form creation, layout and finalize can be a single line of Python code. It's simple to understand and compacts the code by another line. I'm really enjoying using the chaining capability!
form = sg.FlexForm('My form').Layout(layout).Finalize()
This will get you a form that is completely 'formed' so that you can can address elements using Update.
An example can be found in Demo_Canvas.
Prior to the Read, we want to get the Canvas Element so that it can be drawn on.
form = sg.FlexForm('Canvas test').Layout(layout).Finalize()
cir = form.FindElement('canvas').TKCanvas.create_oval(50, 50, 100, 100)
Without the Finalize the Canvas Element cannot be found.
Hoping that this is an accepted practice. It makes things nicer looking and easy to understand in my opinion.
MikeTheWatchGuy
on 23 Sep 2018
Removed LookAndFeelcapability for Macs
Sorry Mac people, I need to take away the ability to injure yourself. The button problems are forcing me to do this. If you want to customize the look, you can always do it using the SetOptions function.
MikeTheWatchGuy
on 23 Sep 2018
Hokey YouTube Video
https://www.youtube.com/watch?v=0jUvMfRmuog
I've been seeing people post SO many whacky and terrible programming tutorial videos that I just had to try it myself.
I also got a screen capture tool for another project and I've been itching to use it.
In my video I write a guess the number game in under 2:30.
I had to delete the first attempt because you can't see the window that it made.
MikeTheWatchGuy
on 23 Sep 2018
3.6.0
I jammed 3.6.0 so that I could openly post in documents the new PySimpleGUI method, Window, without it crashing when people used it because the PyPI doesn't have it.
When I made the YouTube video I had not thought through that if someone tried to run the code it wouldn't run. DOH! So, out the door it went...without release notes. DOH!
Whatever... it's done...
MikeTheWatchGuy
on 23 Sep 2018
Windows, Not Forms
We're all creating windows, damnit, not forms.
It dawned on me that FlexForm is a dumb, non-descriptive name for our windows.
So, I made the executive decision to change from FlexForm calls to Windowcalls.
I LOVE the result, especially if you change the variable names too. It "feels" like a real GUI now!
window = sg.Window('My window!').Layout(layout)
button, values = window.Read()
I've had a bitch of a time replacing the 1,300 spots that Form appears in the documentation alone. I had to examine and fix each one as they were unique situations. But, it's DONE, at least for the docs.
Now it's on to the Demo programs.
I feel like I'm living in "1984" and am going back and changing history, "Forms are no longer used, we will use Window from now on"... as I go through all these documents and erase all references to forms.
Next up are the Demo programs. They all needed to be "refreshed" anyway.
I'm learning that this package is evolving at a fast pace. These design patterns that used to feel so permanent, aren't.
The good news for existing users is that I'm leaving the old names alone. My goal is to catch the new wave of users and get them steered into using the naming conventions that I want people to use. They wont' know any better than to use the new names.
MikeTheWatchGuy
on 24 Sep 2018
Demo Refresh
Went through each Demo program, all 68 of them, and made 2 changes.
- Changed all exit calls to sys.exit calls so that PyInstaller doesn't crash when extiing
- Reworked all of the PySimpleGUI calls to follow the same design pattern.
The new way of doing things that are in the Demos now matches the Readme and Cookbooks.
There were these 3 basic design patterns (Learn it, Love it, Live it)
Simple Read Window Call
layout = [[ some layout ]]

window = sg.Window('My new window').Layout(layout)
button, value = window.Read()
Persistent Window with Event Loop
layout = [[ some layout ]]

window = sg.Window('My new window').Layout(layout)

while True:
    button, value = window.Read()
If Element needs updating prior to Event Loop (window needs to be finalized)
layout = [[ some layout ]]

window = sg.Window('My new window').Layout(layout).Finalize()

# need a finalize to do things like scribble on a canvas
cir = window.FindElement('canvas').TKCanvas.create_oval(50, 50, 100, 100)

while True:
    button, value = window.Read()
I found myself sometimes not adding the Finalize() onto the end of the and instead writing it on another line just so it's clear a Finalize was required for an upcoming function call.
Generally speaking, these design patterns cover 90%+ of the use cases
It would be nice if we all agreed on some version of these so that PSG code looks similar whenever possible.
I'm thoroughly enjoying the way the latest code reads or I wouldn't be motivated to make these billions of tiny changes.
The chained methods were a huge help in reducing the number lines of code and improved readability.
Some beginners may be puzzled over the chaining, but due to the number of Cookbook examples and amount of Demo code, they will generally not be starting from scratch and will experience these in a functioning program.
MikeTheWatchGuy
on 25 Sep 2018
The Suggested Design Patterns
You'll find a new Demo. I'm using this as my "Template" for my programs now. Would be nice to get something we can agree on
# DESIGN PATTERN 1 - Simple Window
import PySimpleGUI as sg

layout = [[ sg.Text('My layout') ]]

window = sg.Window('My window').Layout(layout)
button, value = window.Read()

# DESIGN PATTERN 2 - Persistent Window
import PySimpleGUI as sg

layout = [[ sg.Text('My layout') ]]

window = sg.Window('My new window').Layout(layout)

while True:     # Event Loop
    button, value = window.Read()
    if button is None:
        break

# DESIGN PATTERN 3 - Persistent Window with "early update" required
import PySimpleGUI as sg

layout = [[ sg.Text('My layout') ]]

window = sg.Window('My new window').Layout(layout).Finalize()

while True:     # Event Loop
    button, value = window.Read()
    if button is None:
        break
New Tab Update
I was gluing elements inside of frames to the bottom instead of to the top. The result was clearly incorrect. It's been fixed, but the fix involved changing how ALL elements are packed all windows. In other words, it's a risky change.
I'm anxious to get the Tabs feature released on PyPI because it's been broken for so long and perhaps this was a make or break feature for someone.. I'm really looking forward to seeing the creations people come up with!
_Once I get the documentation ready for Tabs tonight, I'll release to PyPI._
MikeTheWatchGuy
on 25 Sep 2018
Overseas Adoption of PySimpleGUI
It's fun to see how different people, and different cultures, are using PSG. There are some interesting, obscure ones. I ran across this site that has a GUI portion of their Python class that mentions PSG.

I'm in great company and seemed to be the choice given for doing Desktop GUI work. The other choices were console and Flash.
It's clear that the documentation and sample programs were not just copied and used. Someone wrote some code to explain some of the basic Elements
http://www.digisoln.com/?py3&lesson=GUI__moreFormElements
Then there was these encouraging words that came via a Reddit message:
I came across your package last week from the Chinese Linux and open-source communities, posted in the social media platform called wechat. These two posts about your package have been read 4253 and 679 times, respectively. Obviously, your package is getting a lot of attention.
Posts: https://mp.weixin.qq.com/s/2tR7uhG-bXuT0TecqgAPKA https://mp.weixin.qq.com/s/o8CfyXgm03gs07jbngpBAw
And finally, a mention on Twitter....
Somehow PSG and Soccer go together.... it's kinda weird, but I'll take weird :-)
https://www.tweet247.net/australia/vflw
Tony #-e^(iπ) (7 hours ago)
@Asher_Wolf Seeing the Hawks VFLW and VFLM teams win ... and continuing to get my head around python - pySimpleGUI at the moment for developing user interfaces for solutions..
MikeTheWatchGuy
on 25 Sep 2018
3.8.0
Tabs tabs and more tabs... that's what I hope to see in some of the new GUIs people are building.
Tabs are FINALLY done as close to "right" as I can currently get them. I was anxious to get rid of the old, hacked together version of Tabs which drove the getting the new Tab Element done and out the door. That and it's such a cool feature! I expect that some nice looking advanced stuff coming from the community.
Check out this bit of recursive Window building! What fun being able to put an Output Element into a small tab in the Window.

As pointed out in the readme not all of the color options are available I expect that will change as soon as I can figure out what needs to be done to get it to work.
As always... ENJOY!
MikeTheWatchGuy
on 25 Sep 2018
PySimpleGUI27 - 1.0.0
It's officially released, the Python 2.7 version of PySimpleGUI
I didn't wake up this morning thinking I would release a 2.7 version. In fact, I had ruled out 2.7 long ago... swearing not to support it.
But, I see the large numbers of people installing on their 2.7 machines AND someone gave me significant instructions that got me over the hump. The rest was grunt work.
I was able to pip2 install it on my windows machine, but my environment is not fully set up to do the import correctly.
If someone can check to see if it works that would be awesome.
The package name for the 2.7 version is
PySimpleGUI27
Not sure how to get the word out in this one. I'll have to retrace my steps perhaps for the Python 3 marketing effort.
MikeTheWatchGuy
on 25 Sep 2018
A morning without Issues
Was shocked this morning to see no issues logged.... whew! I thought for sure there would be tons of questions about the new PySimpleGUI27 release. I see plenty of PyPI installs already so I know it's being used 👍
MikeTheWatchGuy
on 26 Sep 2018
2.7 Pent-up Demand
On the first day of availability, with only a single Reddit announcement, the 2.7 version of PySimpleGUI for 406 downloads. That's a pretty strong showing for day 1 with little marketing.
The Python 3 version almost topped 1,000 with 993 downloads yesterday.
Together there were 1,399 installs yesterday, the most so far for a single day.
OK, so maybe I am watching the popularity. It helps me understand where hear about PySimpleGUI and thus were I should make announcements about cool new stuff.
MikeTheWatchGuy
on 26 Sep 2018
It's already easy....
I made an error by creating the function window.UpdateElements() this week and am removing it from the SDK.
I find I need to keep myself from over-doing the "make it easy" mantra. I'm learning that it's already easy is sometimes the answer.
Take for example Graph Axis. I wanted to add axis markers to my sine graph. I was toying with the idea of making methods to the Graph Element that would help draw the axis. However, when I thought about what an axis and the markers are, and I coded it up instead within the application, I quickly learned that it's easy for the user to make their own axis markers.
It was a lot easier when I added the DrawText method... (there was no way to draw text until I added it)
Here's my graph:

Pretty spiffy, huh?
While the code to draw the axis is longer than the code to make the plot, it's still quite straightforward and easy to follow:
# Draw axis
graph.DrawLine((-100,0), (100,0))
graph.DrawLine((0,-100), (0,100))

# Draw markers and text X-axis
for x in range(-100, 101, 20):
    graph.DrawLine((x,-3), (x,3))
    if x != 0:
        graph.DrawText( x, (x,-10), color='green')

#Draw markers and text Y-axis
for y in range(-100, 101, 20):
    graph.DrawLine((-3,y), (3,y))
    if y != 0:
        graph.DrawText( y, (-10,y), color='blue'
3.8.2 + 1.0.4
These dual release are going to be the death of me... so will the dual code bases.
There may be a "Freezing" of 2.7 in terms of features until I can get the dual code base problem solved.
I wanted to get a couple of features out today. In particular I want to turn off grab_anywhere. While I really like this feature and thus defaulted it to being on.... it would seem other people find it puzzling. They simply don't understand why their window moves then clicking on a field.
With the widening of the users by 2.7 and I'm seeing actual classes starting to use the package, I want to get it stable and as wrapped-up as I can get it. I dunno about other people, but it feels like PySimpleGUI is at a "good place". The renaming is done, the design patterns look tight and neat. All of the major elements are done and even some of the advanced complex ones.
There are a number of "soft" areas that need some work. So, while it's fun to crank out new capabilities, there is some cleanup to be done. The docs went through major round of cleaning up, so I don't see more happening there. The areas I'm think of are:
- A united code base
- Graph methods are f-ing up with 2.7 (points are drawn like lines, the pixels don't seem square, etc)
- Finish checking 2.7 demos
- Finish tabs (colors are not done)
- I know I'm forgetting stuff.. I have a 2-page list written down and a huge issues list
MikeTheWatchGuy
on 27 Sep 2018
Programming Class Lesson Examples Posted
I have been conversing on Twitter with a teacher that is putting together a lesson plan for next year that includes PySimpleGUI! It's exciting that someone has signed on to give it a try in a teaching environment. This was a primary goal of the entire project.
I have posted some of his examples here on the GitHub under the folder ProgrammingClassExamples. I'm sure he would accept any feedback people have.
I'm finding it fascinating to see how other people are using the SDK. It's already being used in ways I had not thought of... it's a little scary to be honest.
One thing I really liked about the examples is that he picked up the latest design patterns and naming conventions and is following them. (Window, stringing together the Window and Layout calls, etc). It's nice looking code in my opinion. Go give one or two of them a try. Help out our up future software stars.
MikeTheWatchGuy
on 27 Sep 2018
Old-Style Tabs Are Disappearing - Please port to new-style
The function call ShowTabbedForm and all other functions relating to the old style of tabs are soon going to be completely removed from the code. You should immediately move to the new-style of tabs if you haven't already.
I want to avoid someone finding old docs or reading the code and then using the old, unsupported and 1/2 broken functions.
Out with the old! In with the new Tabs!
MikeTheWatchGuy
on 27 Sep 2018
Nobody said it would be easy
Last night I tried my hand at my first pull request and I have to say I failed miserably.
I struggled with the GitHub tools. I eventually went through line by line using PyCharm and made the merge that way.
It was a 3-hour process and now that it's done, I still have to go through and write a test harness to test the changes.
This is a part of the project I had not counted on being difficult.
I do want to say a big 'thank you' to @Venim for making several changes to the code that I incorporated, and for being patient as I work through this process.
I hope to finish all the changes and testing them today so that I can get a PyPI release out.
The Popups in the current release still have grab_anywhere turned on by default. They need to default to off.
I forget which at the moment, but a few of the Demo programs will not run with the PyPI release due to new features.
MikeTheWatchGuy
on 28 Sep 2018
3.8.4
3.83. was a bad release... sorry about that if you picked it up. I did not run through all the tests and I missed testing a merge that I did... incorrectly. For a couple hours the PyPI code had broken menus. It's working now.
Release contents include:
3.8.3
- Listbox, Slider, Combobox, Checkbox, Spin, Tab Group - if change_submits is set, will return the Element's key rather than ''
- Added change_subm3.8.3its capability to Checkbox, Tab Group
- Combobox - Can set value to an Index into the Values table rather than the Value itself
- Warnings added to Drawing routines for Graph element (rather than crashing)
- Window - can "force top level" window to be used rather than a normal window. Means that instead of calling Tk to get a window, will call TopLevel to get the window
- Window Disable / Enable - Disables events (button clicks, etc) for a Window. Use this when you open a second window and want to disable the first window from doing anything. This will simulate a 'dialog box'
- Tab Group returns a value with Window is Read. Return value is the string of the selected tab
- Turned off grab_anywhere for Popups
- New parameter, default_extension, for PopupGetFile
- Keyboard shortcuts for menu items. Can hold ALT key to select items in men
- Removed old-style Tabs - Risky change because it hit fundamental window packing and creation. Will also break any old code using this style tab (sorry folks this is how progress happens)
MikeTheWatchGuy
on 29 Sep 2018
Hide / UnHide Windows
A couple of new Windows methods.
Hide and UnHide work as the name says. It will completely hide a window, include removing it from the taskbar.
Several people have requested a Window disable. I implemented a Disable / Enable pair, but it's not working as well as I had hoped. This is one way to make sure people don't interact with your window while you have another window open.
MikeTheWatchGuy
on 29 Sep 2018
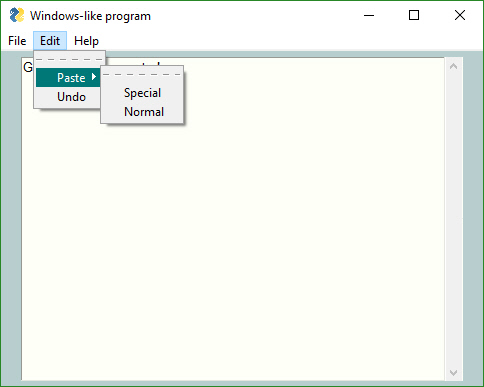
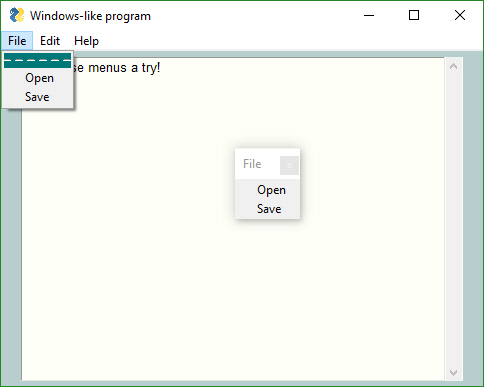
Menu Shortcuts
If you're making an application that has a menu, you can make it look really professional by using Alt-key shortcuts. You can thank @vemin for this code. This menu definition:
    # ------ Menu Definition ------ #
    menu_def = [['&File', ['&Open', '&Save', '---', 'Properties', 'E&xit' ]],
                ['&Edit', ['Paste', ['Special', 'Normal',], 'Undo'],],
                ['&Help', '&About...'],]
made this professional looking window.

And all it took was adding an & in front of the letter you want to underline.
So, go nuts... fool your friends into thinking you wrote a WinForms app. Ha ha ha! No WinForms needed here in order to get a nice looking Window.
MikeTheWatchGuy
on 30 Sep 2018
107 Pages
That's how long the ReadMe is when pasted into Microsoft word. That doesn't count the Cookbook which adds another 45 pages. I've created a PDF from the Cookbook and uploaded it to the Docs folder
The question is whether or not people read them. I really don't know if the docs are actively used.
Speaking of documentation and Cookbooks, I created a One Minute Cookbook. The Recipes are shown in a table format with a screenshot. Here's an overview of a few pages.


MikeTheWatchGuy
on 30 Sep 2018
Personally, I love the docs – when I am looking at using one of PSG's features it is nice to be able to quickly find a realistic usage case and some suggested best practices. Along with the demos, they make it easy to quickly dive into things.
 emallay
on 30 Sep 2018
emallay
on 30 Sep 2018
I use the docs a lot, too.
On Sun, Sep 30, 2018 at 12:37 AM emallay notifications@github.com wrote:
Personally, I love the docs – when I am looking at using one of PSG's
features it is nice to be able to quickly find a realistic usage case and
some suggested best practices. Along with the demos, they make it easy to
quickly dive into things.—
You are receiving this because you are subscribed to this thread.
Reply to this email directly, view it on GitHub
https://github.com/MikeTheWatchGuy/PySimpleGUI/issues/142#issuecomment-425696191,
or mute the thread
https://github.com/notifications/unsubscribe-auth/AGKiYue4lUYqigDOTJQmbBqELpFyr0_qks5ugFirgaJpZM4WdqH-
.
 john144
on 30 Sep 2018
john144
on 30 Sep 2018
PyCompactGUI
Every time I see a post on Reddit where someone has coded up a GUI in their favorite framework, I like to see if I can duplicate the results using PSG.
This is NOT an attempt to knock anyone else's efforts. I have bundles of respect for anyone with the courage to take what they've produced and put it up for public comment. It takes bravery, this I can state from experience.
There was a cool one posted yesterday that takes my CPU meter one step further. It's a graphics display of system stats. The poster wrote it in Qt. I found this particularly interesting.
I was able to use their module that does all of the stats gathering using psutil. I wasn't able to duplicate the stats however as that module kept crashing on certain stats, even when I ran it on Linux as the poster stated they did. For those stats, I re-used the CPU count.
This is the poster's Qt screen:

And this is the screen from PSG:

The layouts are almost identical.
Of course the question that I am seeking the answer to is "how much code" was required.
Not counting the stats collection, just looking at the GUI portion:
Qt - 213 lines of code
PSG - 43 lines of code
I made no attempt to compact code by removing blank lines, however if I did remove the blank lines from the total, the number would be 34 lines of actual code.
Rather than post the code as a file, I'm going to just paste the code here. I don't want to put it in the main GitHub, but I do want to share it to see if maybe I could have done something better.
One reason for the compactness is the data_dict dictionary. With it I'm able to loop through getting Element Keys and the function that should be called to get the value to be displayed using the Key. This compacted the event loop down to only 2 lines of code above the normal Read / Check for quit.
I'm actually really surprised at how short it ended up being, which is why I'm posting it here as an example.
You can knock this package for all the things it lacks, but 'results' is not one of its weak points. It's really hard to argue with the end-results.
#!/usr/bin/env python
import PySimpleGUI as sg
from modules import *

sg.SetOptions(element_padding=(3,1), auto_size_buttons=False, button_element_size=(12,1))

cpu_frame = [[sg.T('Number of CPUs'), sg.T('',key='_cpus')],
             [sg.T('Clock Speed'),sg.T('', key='_clock')],
             [sg.T('CPU Utilization'), sg.T('', key='_util')],
             [sg.T('')]]

power_frame = [[sg.T('CPU Temp'), sg.T('',key='_ctemp')],
             [sg.T('GPU Temp'),sg.T('', key='_gtemp')],
             [sg.T('CPU Fan'), sg.T('', key='_cfan')],
             [sg.T('GPU Fan'), sg.T('', key='_gfan')]]

ram_frame = [[sg.T('Total'), sg.T('',key='_rtotal')],
             [sg.T('Used'),sg.T('', key='_rused')],
             [sg.T('Available'), sg.T('', key='_ravail')],
             [sg.T('Percent Utilized'), sg.T('', key='_rutil')]]

storage_frame = [[sg.T('Total'), sg.T('',key='_stotal')],
             [sg.T('Used'),sg.T('', key='_sused')],
             [sg.T('Available'), sg.T('', key='_savail')],
             [sg.T('Percent Utilized'), sg.T('', key='_sutil')]]

layout = [[sg.Frame('CPU', cpu_frame), sg.Frame('Power', power_frame)],
          [sg.Frame('RAM', ram_frame), sg.Frame('Storage', storage_frame)],
          [ sg.RButton('Refesh', pad=((350,0),0)), sg.Button('Exit', pad=((10,0),0))]]

window = sg.Window('PC Status Details Under the Hood', auto_size_text=False, default_element_size=(15,1)).Layout(layout)

data_dict = {'_cpus': cpu_count, '_clock' :cpu_count, '_util':cpu_utilization,
             '_ctemp': cpu_count, '_gtemp': cpu_count, '_cfan': cpu_count, '_gfan':cpu_count,
             '_rtotal': ram_total, '_rused': ram_used, '_ravail': ram_available, '_rutil':ram_utilization,
             '_stotal': storage_total, '_sused': storage_used, '_savail': storage_available, '_sutil':storage_utilization}

while True:     # Event Loop
    button, value = window.Read()
    if button is None or value is None:
        break
    for key, value in data_dict.items():
        window.FindElement(key).Update(value())
New 3.8.5 release posting to PyPI today
I'm posting a new version today to PyPI. Anyone have a feature they want to make sure is included?
Currently it has these:
- Fix for Menus.
- Fixed table colors. Now they work
- Fixed returning keys for tabs
- Window Hide / UnHide methods
- Changed all Popups to remove context manager
The only "new" functionality Table Hide / UnHide.
MikeTheWatchGuy
on 30 Sep 2018
Update errors
Would like to know if anyone is using a try block around calls to Element.Update()
I made an error checking change could cause a problem with your code. Please post if use try's with Update.
MikeTheWatchGuy
on 1 Oct 2018
Use PyCharm's macro capabilities!
Maybe I'm the only one making lots of GUIs on my scratchboards, if so, you can ignore this. I find myself throwing together GUIs a lot while trying to help people, making new Demos, etc.
I got tired of typing the same template code or opening a template .py file, copying, pasting, etc.
PyCharm to the rescue. I used their "Live Template" feature.
I type Control+J and I see this

If I choose the simple one I get this typed into my window:

And if I choose persistent I see this one

"poof! Instant running GUI"
MikeTheWatchGuy
on 1 Oct 2018
Confirmation GUI
I was adding an item to my toolbar, a Release to PyPI one to be specific and I want to be SURE before something like that happens. So I added this if statement.
if (sg.PopupYesNo('Are you sure?', keep_on_top=True) == 'Yes'):
    print('Doing important stuff here')
else:
    print('** Cancelled **')
I got this little box popped up on top of everything else

Debug your GUI using the GUI
MikeTheWatchGuy
on 1 Oct 2018
3.8.6
- Fix for Menus.
- Fixed table colors. Now they work
- Fixed returning keys for tabs
- Window Hide / UnHide methods
- Changed all Popups to remove context manager
- Error checking for Element.Update calls ( no more crashes when calling Update on a bad element!)
MikeTheWatchGuy
on 1 Oct 2018
tab_location Setting For TabGroup Element
Something for all you advanced Tab-users. You can now specify the location your tabs will show up by setting the tab_location parameter in you TabGroup Element. Choices are top, bottom, left, right.


MikeTheWatchGuy
on 1 Oct 2018
PySimpleGUI Tutorial on YouTube
It seems like some people want to learn by watching other people code on YouTube.... so, I took a chance and stuck my neck out by making a video that shows how to build a CPU Meter using PySimpleGUI.
Here's my Reddit post if you're interested.
https://www.reddit.com/r/Python/comments/9kkine/tutorial_build_a_cpu_utilization_meter_using/
Personally, I don't think I could stand watching me code for 5 minutes, but who knows, maybe other people like this kind of stuff.
MikeTheWatchGuy
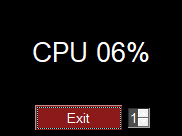
on 1 Oct 2018
Coding Convention
I've presented a number of Templates and Design Patterns in the documentation, cookbook and demo files.
I openly steal good ideas from the PSG community. I just found a new one that I really like that concerns keys that I'm swiping and modifying that came from @jfongattw.
We're all using keys a lot more since they are used to identify elements. I have modified the way I am naming my keys. I am adding '_' to the beginning and ending of my key values. This makes spotting keys in the code trivial (I like trivial).
The tutorial I did earlier today used keys like this:
[sg.Text('', size=(8,2), font='Helvetica 20', justification='center', key='_text_')],
Later when I needed to update that element:
window.FindElement('_text_').Update(f'CPU {cpu_percent:02.0f}%')
I like this enough that I'm going through the code and docs to rename all my keys this way. I would like to set this as the design pattern newcomers to adopt in their key values. If you're using keys, give it a try and let us know what you think.
MikeTheWatchGuy
on 2 Oct 2018
New "advanced" widgets
I've been on the lookout for new ways of displaying information. It would be nice to be able to build a Dashboard using PySimpleGUI. I can do this using both Matplotlib as well as other methods.
I just stumbled on an interesting one. This program uses Pillow to create a PNG of a speedometer. I just ran it with a value of 87. The result was this:

I should be able to adapt this to output to an Image Element.
https://github.com/Andrew-Shay/python-gauge
Another COOL METER!
I found this posted on StackOverflow... it's amazing what people post sometimes. Sometimes it's an entire implementation, like this one!
import tkinter as tk
from math import pi, cos, sin


class Meter(tk.Frame):
    def __init__(self, master=None, **kw):
        tk.Frame.__init__(self, master, **kw)

        self.meter = []
        self.angle = []
        self.var = tk.IntVar(self, 0)

        self.canvas = tk.Canvas(self, width=200, height=110,
                                borderwidth=2, relief='sunken',
                                bg='white')
        self.scale = tk.Scale(self, orient='horizontal', from_=0, to=100, variable=self.var)

        for j, i in enumerate(range(0, 100, 5)):
            self.meter.append(self.canvas.create_line(100, 100, 10, 100,
                                                      fill='grey%i' % i,
                                                      width=3,
                                                      arrow='last'))
            self.angle.append(0)
            self.canvas.lower(self.meter[j])
            self.updateMeterLine(0.2, j)

        self.canvas.create_arc(10, 10, 190, 190, extent=108, start=36,
                               style='arc', outline='red')

        self.canvas.pack(fill='both')
        self.scale.pack()

        self.var.trace_add('write', self.updateMeter)  # if this line raises an error, change it to the old way of adding a trace: self.var.trace('w', self.updateMeter)
        self.updateMeterTimer()

    def updateMeterLine(self, a, l=0):
        """Draw a meter line (and recurse for lighter ones...)"""
        oldangle = self.angle[l]
        self.angle[l] = a
        x = 100 - 90 * cos(a * pi)
        y = 100 - 90 * sin(a * pi)
        self.canvas.coords(self.meter[l], 100, 100, x, y)
        l += 1
        if l < len(self.meter):
            self.updateMeterLine(oldangle, l)

    def updateMeter(self, name1, name2, op):
        """Convert variable to angle on trace"""
        mini = self.scale.cget('from')
        maxi = self.scale.cget('to')
        pos = (self.var.get() - mini) / (maxi - mini)
        self.updateMeterLine(pos * 0.6 + 0.2)

    def updateMeterTimer(self):
        """Fade over time"""
        self.var.set(self.var.get())
        self.after(20, self.updateMeterTimer)


if __name__ == '__main__':
    root = tk.Tk()
    meter = Meter(root)
    meter.pack()
    root.mainloop()
New Demo Program - LED Status Indicators
Slowly trying to duplicate what I see on other GUIs out there. One popular use for GUIs is to display status or show a Dashboard. A "Stoplight indicator"or LED indicator is a popular widget on Dashboards.
I created a couple of little functions that make it easy to add these to your Windows.
This layout
layout = [[sg.Text('My layout')],
          [sg.Text('CPU Use'), LEDIndicator('_cpu_')],
          [sg.Text('RAM'), LEDIndicator('_ram_')],
          [sg.Text('Temperature'), LEDIndicator('_temp_')],
          [sg.Text('Server 1'), LEDIndicator('_server1_')],
          [sg.RButton('Read The Window'), sg.Exit()]]
Produced this window:

To change one of the indicators:
SetLED(window, '_cpu_', 'green')
MikeTheWatchGuy
on 2 Oct 2018
UNIFIED CODE BASE!
A HUGE thanks is owed to @rtrrtr for help with Pasteurize!! THIS solved SO many problems.
I now have a single code base. I generate the PySimpleGUI27.py file from my core PySimpleGUI.py file. No more completely separate files. Whew! It was really stressful running 2 code bases. The 2 version was lagging already and I wasn't going to be porting stuff over anytime soon.
Now I'm going to publish the thing on PyPI and see if it works!
I've just uploaded it to Master.. but will soon pop it up on PyPI. Experience tells me that having it in Master doesn't actually buy much usage or early testing. Few people download from Master, especially for Version 2.7.
So, I'm going to roll the dice. I'm going to do a unified PyPI release... both at the same time so they're in perfect sync. Yea, I'm cranking through the release numbers, but, heck, I'm cranking through the releases so it's not like I'm inflating the numbers. These are hard earned releases damnit.
MikeTheWatchGuy
on 2 Oct 2018
3.9.0 & 1.1.0 The first unified release
It's done.... a single PySimpleGUI codebase release.
Let's hope it doesn't go south on us. I think it should be fine, but I've thought that many times when disaster was moments away.
The only feature change for the P3 version is Tab Locations, a really cool feature in my opinion and one I hope people will explore. Surely there's some cool GUI layouts that must exist using tabs on the left or bottom of windows. Try them out. I may need to add more options for locations. You'll soon see there's a top and bottom on the left side :-)
Enjoy!
1.1.1 Ooopss....
I forgot to put in the readme that for the 2.7 version you need to pip install future
MikeTheWatchGuy
on 2 Oct 2018
Love your enthusiasm, this is a great project.
 jondkelley
on 5 Oct 2018
jondkelley
on 5 Oct 2018
Why thank you! I'm certainly "into this project". Glad to see you're a fan of it too. When looking at the results of the project alone, it's a rather remarkable capability. I've never seen anything like it, in any language. Cross-platform GUI development across Windows, Mac and Linux is downright easy / trivial using PSG. Someway, maybe someday, it can be extended to Android and iOS. That would be awesome!
MikeTheWatchGuy
on 5 Oct 2018
Demos demos demos
I've been adding more demos lately. I've not said much here about them. We're up to 76 Demo programs. Two I added tonight that I like are Pyplot programs that both create bar charts. I thought that maybe a few people would be inspired by the simplicity that they may jump in and try making some of their own. You've got more toes than there are lines of code.
Check out how downright trivial it is to produce these charts. Who said Excel was the best at all-things-numbers. I dunno about you, but I've struggled over the past 5 or 6 years to create simple graphs in Excel. They've made it hard. Cheat and use Python instead next time.
I've started to create Demos in pairs. One for the super-simple case and then another that's more complex. For these bar charts, they are both pretty simple.
The way these demos work is that you paste the Pyplot code into the marked section.
# ------------------------------- PASTE YOUR MATPLOTLIB CODE HERE -------------------------------

import numpy as np
import matplotlib.pyplot as plt

values_to_plot = (20, 35, 30, 35, 27)
ind = np.arange(len(values_to_plot))
width = 0.4

p1 = plt.bar(ind, values_to_plot, width)

plt.ylabel('Y-Axis Values')
plt.title('Plot Title')
plt.xticks(ind, ('Item 1', 'Item 2', 'Item 3', 'Item 4', 'Item 5'))
plt.yticks(np.arange(0, 81, 10))
plt.legend((p1[0],), ('Data Group 1',))


# ------------------------------- END OF YOUR MATPLOTLIB CODE -------------------------------

A slightly more complex version
#------------------------------- PASTE YOUR MATPLOTLIB CODE HERE -------------------------------
import matplotlib.pyplot as plt
import numpy as np
label = ['Adventure', 'Action', 'Drama', 'Comedy', 'Thriller/Suspense', 'Horror', 'Romantic Comedy', 'Musical',
         'Documentary', 'Black Comedy', 'Western', 'Concert/Performance', 'Multiple Genres', 'Reality']
no_movies = [941, 854, 4595, 2125, 942, 509, 548, 149, 1952, 161, 64, 61, 35, 5]

index = np.arange(len(label))
plt.bar(index, no_movies)
plt.xlabel('Genre', fontsize=5)
plt.ylabel('No of Movies', fontsize=5)
plt.xticks(index, label, fontsize=5, rotation=30)
plt.title('Market Share for Each Genre 1995-2017')

#------------------------------- END OF YOUR MATPLOTLIB CODE -------------------------------

MikeTheWatchGuy
on 5 Oct 2018
Themes for Tabs
You enable them by adding the theme parameter to the TabGroup element.
sg.TabGroup([[sg.Tab('Tab 1', tab1_layout), sg.Tab('Tab 2', tab2_layout)]],theme=sg.THEME_XPNATIVE)
New feature of the day.... themes for tabs.
Make your tabbed windows look even better by throwing a theme onto theme.
You have 8 to choose from on Windows and 5 to choose from on Linux. I dunno about Mac.... likely only 1 for you Mac people (and you should be happy with that ;-)
I was surprised to see the code crash and burn when using 3 of the themes on Linux. Those 3 are winnative, vista and xpnative. Yes, all windows terms, but damn, can't you at least use those designs on Linux. Linux "borrows" stuff from Windows all the time.
Choices for Windows
No theme parameter

THEME_VISTA

THEME_CLASSIC

THEME_CLAM

THEME_ALT

THEME_DEFAULT

THEME_WINNATIVE

Linux Themes
No theme specified

THEME_DEFAULT

THEME_CLASSIC

THEME_CLAM

THEME_ALT

As usual, the docs are lagging in telling you about this.... so consider it a treat for you "announcement" readers. It'll be released on PyPI soon. There are getting to be enough features for a release. The Tab features are drawing to a close, despite not yet figuring out how to set the tab background color (admitting de-feet)
MikeTheWatchGuy
on 5 Oct 2018
Ideas for new features
I read a lot of sites, looking for information about ttk or tkinter features I've not yet implemented or that I can implement better.
Today I found this rather remarkable site.
https://pyinmyeye.blogspot.com/
I thought it may inspire some of us to come up with more creative features.... not that I've run out of features!! There is still much work to do in implementing the Tree Element and fixing up the Table Element. Still, it's fun to be able to provide a rich menu of things for you to add to your GUIs.
We've got a good thing going and I need your help and encouragement in order to keep new stuff coming. I clearly am not coming up with these things on my own.
MikeTheWatchGuy
on 5 Oct 2018
www.PySimpleGUI.org Documentation Improved
Remember that you can quickly get to the read-the-docs for PSG by going to www.PySimpleGUI.org . This is where I send people as an introduction to the package. www.PySimpleGUI.com on the other hand brings you to the GitHub. http://tutorial.PySimpleGUI.org will get you the tutorial.
I went through the "readme" which is actually the User Manual, and updated the outline levels so that now you can quickly jump to individual Element definitions.
The TOC looks like this for the section that covers the Elements:

Clicking on the Checkbox Element brings you straight to the parameters definition for the Element:

While not a huge change to in terms of the number of characters changed, the usefulness of this document just jumped way up.
MikeTheWatchGuy
on 5 Oct 2018
New coding convention
I've proposed a couple of coding conventions that I've adopted. I'm just now starting this one so I dunno if I'll stick with it.
The Window definitions sometimes have a number of parameters set. While the Elements also have lots of parameters, you can't really do much to improve readability because they are in the middle of a window layout definition.
I've started to break apart the parameters and putting them one per line, just like I did the call definitions on the ReadMe file.
# Make a window
window = sg.Window('My window',
                   default_element_size=(20,1),
                   auto_size_text=False,
                   return_keyboard_events=True,
                   text_justification='right').Layout(layout)
I think the readability greatly outweighs the downside of taking up more lines of code.
Hoping I can remember to do this! If you see I'm not in something new I'm posting, please say something. I'll do this to the Demo programs, Cookbook, tutorial and readme file as I'm doing other updates.
MikeTheWatchGuy
on 6 Oct 2018
New Killer Demo!
Another day, another PSG demo....
Today something that we can all actually USE for a change.
It's a process killer using psutil. I've checked it out on both Windows and Linux and it's working great. Sorry Mac people, you're likely left out of the party since all the cool features are broken on mac 👎
The filename is
Demo_psutil_Kill_Processes.py
Follow the on-screen directions.
You can kill more than 1 process by selecting more than 1 in the listbox. To do this, hold the control key while making your selection.
If you have suggestions on making it better, speak up. I thought about making it a "stay on top window" as these utilities tend to be more useful if on top of the windows you want to kill.
I'm creating a hot-key to launch this program and am giving up using taskmanager for this task.
Enjoy!
MikeTheWatchGuy
on 6 Oct 2018
More Look and Feel
Now you can create your own Look and Feel entry. The table has been exposed for your abuse.
To add an entry, insert a line of code with your definition and another line to pull it up and use it.
sg.LOOK_AND_FEEL_TABLE['Topanga_Dark'] = {'BACKGROUND': '#282923', 'TEXT': '#E7DB74', 'INPUT': '#282923',
                      'SCROLL': '#E7C855', 'TEXT_INPUT': '#45473D', 'BUTTON': ('#E7C855', '#284B5A'),
                      'PROGRESS': "#282923", 'SCROLL': '#282923', 'BORDER': 1,'SLIDER_DEPTH':0, 'PROGRESS_DEPTH':0}

sg.ChangeLookAndFeel('Topanga_Dark')
This will enable users to easily share look and feels and it'll give me the opportunity to pull more of them into the standard library of color schemes. I've already stolen one color scheme, Topanga.
MikeTheWatchGuy
on 6 Oct 2018
SDK Quick Reference
Just released a demo program that will help you with finding the options available for each of the elements. You can use this instead of looking through the source code. It has every parameter currently available documented. Hopefully it won't drift too far out of date.
Get the file Demo_PSG_SDK_Quick_Ref.py

MikeTheWatchGuy
on 6 Oct 2018
First Serious Tutorial (Is in Chinese)
https://blog.csdn.net/qimi923511491/article/details/82936460
I've stumbled on the first serious looking tutorial on PySimpleGUI that someone else wrote. I've heard from Asian users that PSG is popular in Asia. I see some evidence of this popping up here and there.
It's fun to read someone else's description of the package. I wouldn't expect a tutorial to just straight to using Frames, but it looks like that's what they're doing. Clearly has an eye for making nice looking GUIs 👍
There's a twist to it all however.... it is actually a tutorial on integrating PySimpleGUI and PySerial. I didn't realize it, but PySerial is a HUGELY popular package. _Today_ that got over 46,000 downloads!!!!
I can only hope this program gets picked up by their users and they then develop it further! It's awesome to see people using the package to create something new and usable.
MikeTheWatchGuy
on 6 Oct 2018
More PSG In The News...
Stumbled upon this document showing PSG on a list of important packages for this programming course.

Further down in the document you'll see PSG...

Of course there are a LOT of GUI packages listed. The point is that we made it onto the list. The course that is using this list is UBLIS 503 at University of Buffalo.
MikeTheWatchGuy
on 6 Oct 2018
Filtering Design Pattern
While playing around with my "Process Killer" app I came up with a pretty cool new feature that I'm sure I'll reuse.
The feature is a "text filter". The idea is to type in an input box and the program will use that value to narrow down the list of items in a listbox. It happens super-quickly too... as fast as you type!
Here's the list of processes after doing a refresh...

Then I started typing characters into the text input box and the listbox began to get smaller and smaller. I eventually found the task I was searching for after a few letters.

Unfortunately I stumbled onto a bug while writing this. For some reason the list of values doesn't scroll on windows. It doesn't on Linux. Something tells me it has to do with the fact the list was initially empty.
MikeTheWatchGuy
on 7 Oct 2018
Process Killer Posted on Reddit
https://www.reddit.com/r/Python/comments/9m2dqe/i_made_a_process_killer_utility_with_a_gui/
I decided to post the process killer app on Reddit. I dunno if many people will like it. I do know that some of the best contributors to PSG were introduced to the package through Reddit. So, I make it a habit to post on Reddit on a regular basis.

MikeTheWatchGuy
on 7 Oct 2018
Turtle Integration
This is one I've been wanting to get knocked out for quite a while. I'm slowly working my way through features and capabilities that kids would be interested in.
Next up along these same lines is the ability to draw willy-nilly on a canvas with the ability to save the result somewhere.

MikeTheWatchGuy
on 7 Oct 2018
HowDoI
If you've not looked at the very end of the Readme, I highly suggest you do and read the section on a utility named HowDoI. One of the Demo programs is a front-end onto this _amazing utility_. My programming productivity has grown several-fold since discovering it.
The command-line utility HowDoI is itself a clever front-end to StackOverflow. It takes your query and searches for the number 1 answer to your question. It then presents the code that was included with that number 1 answer.
The result is an encyclopedia of "how can I do this thing".
I use this on average of at least 3, sometimes 10, times a day. It's good for any programming language. I've been doing c# development and it's saved me many times. I use it often enough that I have a hotkey defined that launches it.
For Python, it's a fantastic way to grab simple algorithms or syntax. Sure, you may know how to do one of these things or can figure it out, but why bother if you can instantly get one or more solutions.
Here's an example for today..... Random string of characters. I want to mock something up with a string of characters. Rather than take the 5 minutes to figure it out, I typed
python generate random string
into my how do I utility and I got this:

I simply copy, paste into my code and move on.
''.join(random.choice(string.ascii_uppercase + string.digits) for _ in range(N))
Bonus points to the poster for a _proper_ use of the _ variable name. It actually is helpful to see it used in this particular instance as you can instantly see this variable is not used at all in the main expression. BTW, you won't find any use of _ in PySimpleGUI as I really don't recall having a spot where it fit.
I can hear the groans about copying and pasting code. For a seasoned programmer, this is a fine thing to do. If I don't know what's good code from bad now in my career, I deserve to be forever banned from computers. I DO know good code, damnit, so I should be able to use something like this free from guilt.
So, give yourself a "programming power-up". You may be as shocked as I was to find just what a huge help this is.
MikeTheWatchGuy
on 7 Oct 2018
PopupQuick
There's a new Popup in town.... PopupQuick It's just what it sounds like... a quick-Popup.
By quick I mean - it doesn't stick around for very long and it doesn't block your code.
It is a self-closing, non-blocking call. Use it to show a quick status message without stopping the flow of your program.
I'm finding it really handy for debugging. If I don't want to parse through the print output and the message is brief, then this is my new goto communication mechanism.
MikeTheWatchGuy
on 7 Oct 2018
New Releases Posting to PyPI today
There are enough features piled up in PSG that it's getting to be time to push out another release. Will be posting later today so if there's a feature that you want to make sure is in there, now is a good time to say something.
MikeTheWatchGuy
on 7 Oct 2018
SDK Quick Reference Demo Application
Version 2 of this demo looks a lot better than the first. It could be better still, but this is about as far as I'm taking this one for the time being.

I wanted to try out the tabs located on the left. For this application they worked pretty well. It's similar to a listbox interface
The tab "Styles" / "Themes" need work. I am still unable to change the tab background color nor can I set the font on the tab. I'm sure I'll be coming back around to tabs in the near future. For now it'll have to do as things are at the moment.
MikeTheWatchGuy
on 8 Oct 2018
3.9.1 & 1.1.2 Released
Just posted to PyPI
- Tab features
- Themes
- Enable / Disable
- Tab text colors
- Selected tab color
- New GetListValues method for Listbox
- Can now have multiple progress bars in 1 window
- Fix for closing debug-output window with other windows open
- Topanga Look and Feel setting
- User can create new look and feel settings / can access the look and feel table
- New PopupQuick call. Shows a non-blocking popup window with auto-close
- Tree Element partially done (don't use despite it showing up)
The docs are lagging a tad for some of these features like Tab themes & colors, the new PopupQuick call.
Not the largest release so far, but it does put a bow, for now, on Tabs.
Note that the Tree Element coding has started, and it does show up as a class, but it's not done so it won't do anything useful if you tried it.
MikeTheWatchGuy
on 8 Oct 2018
GUI Programming Class Materials
I have just uploaded the latest set of materials created by Tony Crewe, a teacher in Australia. These are some of the best examples I've seen yet of using the SDK.
He did clever things like placed windows in locations on the screen in a way that it looks like they were created from a single window. His program "8d Tables - add logo" is one such file. Here's the result from executing it.
It first shows this window:

After you choose a CSV file, the screen changes to this:

There are no doubt many things I'm going to learn from looking at Tony's code! This is one of the most clever things I've seen. For those of you wanting to see "Expanding" windows, here's one way of doing it.
You'll find all of Tony's examples posted in a subdirectory named "Programming Class Examples" in this GitHub
MikeTheWatchGuy
on 8 Oct 2018
Disabled Elements
I finally got around to adding the disabled parameter to the remainder of the element. Previously you had to use the Update method to get elements to Disabled. Now you can do it when you create the element. It's checked into the Master Branch.
MikeTheWatchGuy
on 9 Oct 2018
OpenCV Webcam Integration
I _finally_ got the OpenCV and PySimpleGUI integration to work. I was able to play from a file, but it was a bit of a hack, saving every frame to disk. I've seen a lot of requests posted from people looking to show an webcam using OpenCV with a GUI. Now it can be done easily using PySimpleGUI.
I posted a new Demo file... Demo_OpenCV_Webcam.py or something close to that.
I hope someone makes a really good AI program using it!

MikeTheWatchGuy
on 9 Oct 2018
Doc-Strings and Disabled Buttons
- Finished up the Disabled Elements capability by adding parm to all shortcut buttons such as Submit, Quit, RButton, etc.
- Doc strings added to all Elements
- Various cleanup of old tab code
MikeTheWatchGuy
on 9 Oct 2018
New PDFs posted
A few days back I used a website to generate PDF files from the current Readme and Cookbook. I know some of you prefer the PDFs. They are posted on the GitHub site under docs.
MikeTheWatchGuy
on 9 Oct 2018
Window - Disappear Reappear
This should appeal to those of you creating "Dialog Boxes", Popup windows that appear over the top of your main window. Previously the only option to keep the user from entering data in the main window was to call window.Disable. Now you can make the entire window disappear by calling Window.Disappear.
#!/usr/bin/env python
import sys
if sys.version_info[0] >= 3:
    import PySimpleGUI as sg
else:
    import PySimpleGUI27 as sg

layout = [[ sg.Text('My Window') ],
          [ sg.RButton('Disappear')]]

window = sg.Window('My window').Layout(layout)

while True:
    button, value = window.Read()
    if button is None:
        break
    if button == 'Disappear':
        window.Disapper()
        sg.Popup('Click OK to make window reappear')
        window.Reappear()
Tree Element !
OK, the initial release of the tree element is in Master Branch. You'll find a demo program that shows you how to do it. Also, the Readme / ReadTheDocs has been updated with information on how to use it.
I wanted to do a Demo program that crawled a folder tree and populated the tree with the file sizes, but I got too tired and went with a simple one. Maybe someone else can do the folder version.
Enjoy!
MikeTheWatchGuy
on 10 Oct 2018
Table Row Colors
In order to make tables more readable I've implemented a new parameter for the Table Element:
alternating_row_color
Every other row will be shaded with this color if it's set.
The effect is something along these lines.

MikeTheWatchGuy
on 10 Oct 2018
Reddit post on GUIs
https://www.reddit.com/r/learnpython/comments/9mzhqj/best_tutorialsresources_for_python_guis/
I can only do so much shameless promotion on my own. After a while people get a little tired of yet another Demo program using PySimpleGUI
However, I don't feel bad responding to people asking for help / assistance on finding a GUI framework.
This post is a particularly good one to respond to as the poster is asking for GUIs with tutorials.... the only thing PSG has oodles of is Tutorials and Demo programs.
_
If there are any of you fine readers of this announcement that care to second the nomination of PSG as a good framework, I sure would appreciate the help.
_
The only way to get found in the sea of posts and searches, is unfortunately to post. "If you build it they will come" does not at all apply to Python Packages. PyPI is loaded with great Python packages that never get found.
MikeTheWatchGuy
on 10 Oct 2018
Move over PyGame

Maybe not PyGame, but PyBoardGame ; -)
Demo_Chess_Board.py
Recieved info about an AI project related to Chess and was curious what it would take to render a chessboard like this one. After some new feature additions I found that it takes 100 lines of code.
I think it looks pretty cool and will be even better once it's brought to life by an AI back end.
There are a couple of tabs waiting to be filled out with AI tuning parameters and statistics. This one should be fun.
MikeTheWatchGuy
on 11 Oct 2018
Chess Anyone?
More progress on the Chess game. I've checked into the GitHub a folder named Chess that has the app and all of the images required. It should work right out of the box.
What it currently does it play back games stored in the PGN file format. First open a PGN file, then click on any square and it'll advance the game by 1 move, moving the piece on the board.

I'm trying to duplicate the user interface found on this site.

It turned out to be a much easier task than I thought it would be. I did have to make some changes to the Button Element to allow for image changes in the Update method. I'll be checking them into PyPI shortly so that you can run this program using the pip installed PSG. I managed to code it all up from scratch, including the core PSG changes, in 1 evening.
I'm also learning that moving large element groups around is quite easy. For example at first all of the controls were on the tab with the board. Pulling them out so that they always stayed visible required adding a Column to the main window that is outside of the tab group.
Sizing the buttons turned out to be easy too. They simply sized themselves to fit the images. The images were easily found on the WikiCommons site. It looks like the site I'm copying also get the pieces from the same location as our boards are identical (except I just noticed I swapped black and white).
Where this is headed is that it will be hooked up to an AI engine. I'm working with a Reddit poster that said they needed some help choosing a GUI framework. I use opportunities like this to drive the features. Without this little project the new button features wouldn't have been available.
MikeTheWatchGuy
on 11 Oct 2018
Slack Channel
I rarely use Slack, but sometimes it's a real help with debugging, etc. I've created a PySimpleGUI channel. If you use slack and want to drop in, here's a link that's good for a week:
https://join.slack.com/t/pysimplegui/shared_invite/enQtNDUzNzE4Mzg2MDQ4LTc5OGZlMzYxZjBiMDc3OTI5YTUxOWZlOTI1M2NlZDA5Y2JlMDY5N2MwMWQzNWIzNTM4ZmFlOTdhZjU4ZTEyYmM
MikeTheWatchGuy
on 11 Oct 2018
3.9.3 & 1.1.3
Hefty release this time. Every element was touched in some manner. Plus the new TREE ELEMENT makes its first appearance.
- Disabled setting when creating element for:
- Input
- Combo
- Option Menu
- Listbox
- Radio
- Checkbox
- Spinner
- Multiline
- Buttons
- Slider
- Doc strings on all Elements updated
- Buttons can take image data as well as image files
- Button Update can change images
- Images can have background color
- Table element new num_rows parameter
- Table Element new alternating_row_color parameter
- Tree Element
- Window Disappear / Reappear methods
- Popup buttons resized to same size
- Exposed look and feel table
MikeTheWatchGuy
on 11 Oct 2018
Getting the word out...
A
BIG thank you
to those of you out there helping to get the word out about PySimpleGUI. I see the posts and they're appreciated.
I've tried to make it easy to recommend by creating some URLs. The best place to send people is the documentation rather than the GitHub site. Simply tell people to visit:
http//www.PySimpleGUI.org
That will take you to the readthedocs entry which has the full doc as well as the Cookbook and the Tutorial.
Note... be careful, particuarly on Reddit, of just typing in www.PySimpleGUI.org by itself. Reddit sticks a "https" onto the front which will FAIL for my site because it has to be http not https because of how it forwards.
MikeTheWatchGuy
on 12 Oct 2018
Large update to Readme (18 pages added)
The docs now total 206 pages.
As much as I despise updating the damned docs, I know it's the right and only thing to do. There IS no other choice. Actually I suppose the choice is seeing a billion questions posted as well as no one using this package.
This update included listing ALL of the Methods available for the Window object and all of the Elements (the Update methods in particular). I'm surprised they were not already in there. I also noticed the Image Element was not yet documented.
This should bring the docs up to match the current PySimpleGUI.py source code. I added the new parameters to each Element. Also explained the "common" parameters like font, colors, the keys, etc.
It still has a ways to go in explaining how to do "complex" GUIs that use persistent windows and update elements. I make an attempt at it, but it's so deep into the document that I'm not sure if it gets read. Not even sure what the right heading is for that section.
If you notice something not right in the docs, please don't say something... no, wait, DO say something.
I'm confident that without these User Manual (readme) and the Cookbook there would be maybe 1/10th the number of people using PySimpleGUI. I've heard from numerous people that it was the docs that lured them in.
MikeTheWatchGuy
on 12 Oct 2018
Floating Toolbars
Two new Demo Program just posted. I posted it in folder because one of them uses PNG images. The both implement a button toolbar.
This one reads the PNG files from disk

And this one has the PNG files embedded into the source code.

You can move them by grabbing the edges. You "gran anywhere" however, so dragging it using a button works fine.
The code to implement these is TINY like the buttons. The one with buttons stored in files is 30 lines.
#!/usr/bin/env python
import sys
if sys.version_info[0] >= 3:
    import PySimpleGUI as sg
else:
    import PySimpleGUI27 as sg
import os

BUTTON_PATH =  '.'
button_names = ('close', 'cookbook', 'cpu', 'github', 'pysimplegui', 'run', 'storage', 'timer', 'checkmark', 'camera', 'house', 'download')

def ShowMeTheButtons():
    button_files = [os.path.join(BUTTON_PATH, b+'.png') for b in button_names]

    sg.SetOptions(auto_size_buttons=True, margins=(0,0), button_color=sg.COLOR_SYSTEM_DEFAULT)

    toolbar_buttons = [[sg.RButton('{}'.format(button_names[i]), image_size=(32,32), image_filename=f, pad=(0,0), tooltip=button_names[i]) for i, f in enumerate(button_files)],]

    layout =  [[sg.Frame('', toolbar_buttons,)]]

    form = sg.FlexForm('Toolbar',
                       no_titlebar=True,
                       grab_anywhere=True,
                       background_color='grey76',
                       keep_on_top=True,
                       ).Layout(layout)

    # ---===--- Loop taking in user input --- #
    while True:
        button, value = form.Read()
        print(button)
        if button == 'close' or button is None:
            break           # exit button clicked

if __name__ == '__main__':
    ShowMeTheButtons()
Warning - parm order changing on Button.Update
When I created Button.Update, I did not lay out the parameters in a decent order. The result is that updating the text on the button required using a named parameter because it was the second parameter. I'm moving it to the most logical place, the first parm. It will remain there. This way you can call Update('Button Text').
However, if you're already relying on the order of the parameters being a certain way, this will mess you up. Please let me know if you are calling button update without any parm names.
MikeTheWatchGuy
on 13 Oct 2018
New YouTube Videos and Reddit Post
I just posted 2 new tutorial videos and am about to make a 3rd. First assumes ZERO knowledge of GUIs and demonstrates an input field and a button
The second one adds Checkbox, Radio Button, and Slider
The third will cover persistent windows where elements get updated.
The Reddit post is actually doing great!
https://www.reddit.com/r/Python/comments/9nvdmw/tutorial_beginning_as_in_your_first_time_gui/
I finally found something Reddit seems to like 👍
MikeTheWatchGuy
on 13 Oct 2018
Reddit Redemption!
Damn, my Reddit video post has gone crazy. Who would have known that making a couple of videos would have a big impact.
I just posted a third that teaches you how to keep a window open. They are getting longer and longer... but if you think about how much time would be spent teaching these same concepts in tkinter they're short.
MikeTheWatchGuy
on 13 Oct 2018
How Do I - PSG Front End Now Available As Package
This is a life-changing tool... I know it changed my programming life and it may yours too. I run this program so often that I have a hot-key setup that launches it. I reference it at least 2 or 3 times a day at minimum.
If someone could try it out, I sure would appreciate it!
You need to be on WINDOWS however. I can't seem to get HowDoI to build on Linux.
I promise the payoff is worth it.
Just type
pip install pysimplegui-howdoi
And that will install it.
You will then want to change to the install folder which will be in the site packages. Once there you'll run the PySimpleGUI-HowDoI.py file that you'll find there.
To get the folder where it installed type this and you'll find it under "location":
pip show pysimplegui-howdoi
MikeTheWatchGuy
on 14 Oct 2018
EXE Maker !
If you enjoy having EXE versions of your favorite Python programs, but find typing the pyinstaller command into the command prompt too tedious, then I've got a Demo program for you!
Demo_EXE_ Maker.py will make EXE files AND it will do it with an embedded windows icon so that when you see your program in Windows explorer, it will show this icon.

I have not yet figured out how to build an EXE file for this program however. There's something about it that is crashing the program.
If you get an error popup and think it was shown in error, you can easily copy and paste the command line that was being attempted from the output window. Paste it into a command prompt to get the full output so you can troubleshoot it.

I have not yet figured out how to get the scrolling output as the command is being executed working. I will look through the old GitHub Issues as I know someone was nice enough to post it there. I was just never able to get it working before. Now that I have a real use for it where I need scrolling output, that'll give me a bit more incentive to get it working.
This is one of those really handy little programs that demonstrates how nice it is sometimes to have a GUI front-end for a utility.
MikeTheWatchGuy
on 15 Oct 2018
Distribution breakthrough!
I am slowly figuring out how to use these tools, perhaps in a correct ways at times.
I now know ONE way to distribute these "demo programs" in a way that is pip-installable. Don't worry, I'm not going to dump 80 crummy demo out onto PyPI... but I am going to release the programs that I think are really good and useful.
Two that come to mind are HowDoI and Demo_EXE_Maker.
The howdoi one has been re-released as:
pysimplegui-howdoi
Here's how I'm suggesting it be done. First, you pip install the package that has the program in it. Then, invoke the program directly, without having to locate it in the site-packages folders. This is done using a python -m command.
For example, to run the howdoi program, pip install it:
pip install pysimplegui-howdoi
Then run it
python -m pysimplegui-howodi.pysimplegui-howdoi
I'm not sure if python "applications" are being distributed this way or if I'm using pip in a rather bastardized way that will be shunned. It won't be the first time for me to do something like that.
Oh well, in the meantime, enjoy the programs.
MikeTheWatchGuy
on 15 Oct 2018
pysimplegui-exemaker Released
I just released another PSG based application. I used the same mechanism as the howdoi and PySimpleGUI-chess.
To install the EXE Maker:
pip install pysimplegui-exemaker
After install to run:
python -m pysimplegui-exemaker.pysimplegui-exemaker
I'm really getting into this method of releasing programs. I hope I don't run into an ugly snag.
I have not, however, tested this on Linux... I suppose that's next!
These will not work with Python 2.7 however as I require PySimpleGUI not PySimpleGUI27.
Someday I guess I'll have to merge those into a single file. Drat.
Anyway, enjoy!
Oh, this utility will create EXE files from your python script. No need to memorize the PyInstaller command line.
It should be used for simple programs that do not require data to be packaged with them. I'm still working on the data part. It will include an optional windows icon that is shown in windows explorer. It doesn't yet support the icon that's shown when you run the program. You will continue to need to have that .ico file in the folder you run the exe from.
MikeTheWatchGuy
on 15 Oct 2018
Events, not Buttons
event, values = window.Read()
Time for a naming convention change. I should have done this long ago, but hey, sometimes it takes a while as these things evolve. Putting together these YouTube videos are causing me to really think about every aspect of the PSG Framework. I have to be able to explain, in plain English, how these things work.
When we call Read(), what is being returned as Button are actually Events. Of course a button click is an event, but so are keyboard presses, double-clicks on listboxes, keys etc. As the capability of PSG has expanded, so has the role of that parameter. Long ago it changed from being just a button to these other things
You can expect a global update... when these things change, they have to change system-wide.... that means the docs, the cookbook, all of the demos, etc. Going forward they will all read:
event, values = window.Read()
If I was at a company, I would assign something like this to an intern. But, I'm afraid I'm the intern.
I can't really get away with a global search and replace because that variable "button" is used many times in every Demo. I'll take any volunteers that feel compelled to jump in and start making changes 👍
MikeTheWatchGuy
on 15 Oct 2018
Double-plus Good Events
It's done. The readme, cookbook and all 81 Demo programs have been updated to use the new Read format:
event, values = window.Read()
These changes, like the change from FlexForm to Window, feel like something out of 1984. All of the old ways of doing things are stamped out, erased, replaced by the new way... as if they never existed.
Help stamp out the old method by informing me if you see it somewhere.
I also added another couple of pages to the readme that discussed events, including this bit about the different values that the event variable can communicate:
For all Windows:
- Button click
- Window closed using X
For Windows that have specifically enabled these. Please see the appropriate section in this document to learn about how to enable these and what the event return values are.
- Keyboard key press
- Mouse wheel up/down
- Menu item selected
- An Element Changed (slider, spinner, etc)
- A list item was clicked
- Return key was pressed in input element
Look for the upcoming "Master Class" on PySimpleGUI that I'm recording for YouTube. I hope to be able to quickly cover all of the elements, events, and coding conventions in under 10 minutes.
I'm getting a lot of feedback that people like these videos. What I'm not getting feedback on is what they would like to see in new videos.
The concept of 'keys' didn't click for a number of people until they saw the video. While I don't watch programming videos, I guess a lot of other people do.
MikeTheWatchGuy
on 15 Oct 2018
"Cool Buttons" Demo
Requires the latest PSG from GitHub.
Windows

Linux

Mac
??? Who knows... probably not.
The new demo is called Demo_Nice_Buttons.py and shows how you can create really nice looking buttons without having external files. They are part of the source code itself so you don't have to worry about the images being lost.
I may start using some cool buttons from time to time now that this capability exists. The missing piece was the ability to put text on top of these buttons.
It's getting past time to check in a new PySimpleGUI into PyPI so these demos will function correctly.
Themes and Styles - My Downfall...
If I could only crack the Themes/Styles nut then we could have nice looking Tabs, etc. I'm STILL struggling with tkinter styles and themes. I found 2 new books to help me and maybe this time around I'll figure it out. At the moment, you can't mix tabs and combo boxes on t the same page or it messes up the tab.
MikeTheWatchGuy
on 16 Oct 2018
More YouTube Videos
I made 3 more [badly produced] YouTube videos. The plan is to go much more in-depth with these.
So far I've only made it thought the pop-ups. Things will likely get more interesting with the next one with will be on the Window and the individual Elements.
I don't know how you guys can stand watching them. Let me know what works and I'll try to do more of that :-)
MikeTheWatchGuy
on 16 Oct 2018
Slider Tick Intervals
I don't feel like I'm making progress unless a get 1 new feature added every day or two.
Today's addition is labels on sliders. Specified using tick_interval when you create the slider. They look much more scientific with these labels.


They are going out in the release later today. I missed getting PyPI posted yesterday. Too busy making those damned videos.
MikeTheWatchGuy
on 16 Oct 2018
Resizable Windows
I'm caving to public pressure and turning OFF window resizing. If you want to make your windows resizable, you can set the resizable parameter in your call to Window.
This change means all of the popups are now automatically not resizable. If this is a problem for anyone, please let me know. Given that I've heard multiple requests to turn it off I don't think I'll hear from anyone wanting it enabled.
This feature is a good opportunity to show how I use howodi. I knew there was likely an easy way to disable a window. My first stop for these kinds of questions is my howdoi app. It is a single key press away. I typed in the query and got back the exact answer I needed. I dropped it into the code and was done.

MikeTheWatchGuy
on 16 Oct 2018
3.9.4 & 1.1.4
Released these changes today:
- Parameter order change for Button.Update so that new button ext is at front
- New Graph.DrawArc method
- Slider tick interval parameter for labeling sliders
- Menu tearoff now disabled by default
- Tree Data printing simplified and made prettier
- Window resizable parameter. Defaults to not resizable
- Button images can have text over them now
- BUG fix in listbox double-click. First bug fix in months
- New Look And Feel capability. List predefined settings using ListOfLookAndFeelValues
I'm going to take a moment and give myself credit.... This listbox bug fix is the first user-submitted bug fix in _months_... I've fixed bugs that I find, and even those are few. Over these months features have continued to be added at a brisk pace.
Of course writing this post is going to cause countless bugs and problems, but hey, I'll take the moment of victory in exchange.
MikeTheWatchGuy
on 16 Oct 2018
Move & Alpha Channel - New Windows methods / features
Once again applications drive forward features.
I've been working on a new Desktop Widget that checks emails and shows you a summary in the upper right corner of the screen. In order to get the window to the upper right corner of the screen, AFTER it's been created required a new Window method. I added the Move(x,y) method that allows you to move windows.
I also created a method to adjust the Alpha Channel. With this you can do really cool fade-in or fade-out or just plain fade of your window. Window.SetAlpha(alpha) where alpha is between 0 (transparent) and 1
I also continued working on buttons.

I really like the close button on the floating widget. I'm experimenting with embedding the button inside the code. For these little buttons it works great!
If you turn off the title bar and move your buttons in the right places, you can make some layouts that perhaps simulate other environments. If I were to create a minimize window method then it would be possible to create windows that look and behave like a Mac window.... hmmmm.... could be interesting to see.....
MikeTheWatchGuy
on 17 Oct 2018


I was completely unable to resist the temptation to re-create what I think a Mac window looks like.
I even added a new Windows "Minimize" method, However, tkinter was clever and figured out that I was attempting to minimize a window without a taskbar. Thus there was no way to restore it because without a titlebar there is no icon on the taskbar.
Was still a good exercise as it demonstrates that several different looks can be created using the PSG framework.
MikeTheWatchGuy
on 17 Oct 2018
Alpha Channel
Changed up the Alpha Channel code so that it's a property. If you're into using method calls only , then you can still use the SetAlpha. But the "better" way is to set the property Window.AlphaChannel to the value you want.
Checked in a Demo showing a "notification" window that fades in, partially. It uses an embedded close button. Seems like something that could be used to make a desk-top notifier for things like email or an RSS feed.

Wasn't difficult for the code to do that fade-in thing:
for i in range(1, 75, 2):
    window.AlphaChannel = float(i)/100
    time.sleep(.01)
Be sure an set the alpha to 0 when creating the window or else it'll flash on at full visibility before fading in. Also be sure and Finalize the window prior to making the call.
window = sg.Window('',
                   no_titlebar=True,
                   grab_anywhere=True,
                   keep_on_top=True,
                   alpha_channel=0
                   ).Layout(layout).Finalize()
Nested [[[[[]]]]]
Gnarly nesting can happen if you attempt to write a layout without using intermediate variables.
Check out this tab definition:
tab_window = [[ sg.TabGroup([[sg.Tab('Parms',[[sg.Text(desc_window, font=('Consolas 12'))]]),
                              sg.Tab('Methods', [[sg.Column([[sg.Text(desc_window_methods)]], size=(500,500), scrollable=True, )]])]])]]
That actually gets put into a Tab inside of a Tab Group, so it's not the completed layout. I count 9 levels of )'s and ]'s. It's what is needed to make this window from the Demo_PSG_SDK_Quick_Ref:


It was that second tab with the scrollable column that was tricky.
MikeTheWatchGuy
on 17 Oct 2018
Lesson 4 of The Complete Course uploaded.... Windows & System Settings
Another YouTube disaster uploaded. In this one I go through all of the parameters used in the SetOptions and the Window object.
9 minutes seems like a really long time..... but it's not when you're explaining a ton of parameters. I went as fast as I could.
Next one up I'll explain all of the "normal" elements. That one I may have to split up. The last Element video will be on "Container" elements (frame, column, tab).
Current plan looks like this:
5 - Basic elements (there are 17 of them)
7 - Container elements (there are 4 of them)
6 - Window methods
7 - Persistent Window design & Events
If you have a topic that's not covered, speak up.
MikeTheWatchGuy
on 17 Oct 2018
Timeouts - a new event
Things just got a little more interesting....
You can now put a timeout on your reads. This is helpful for programs that need to do something periodically. Instead of sleeping between checks you can instead do a Window.Read() with a timeout. The effect is that your GUI remains active and responsive during the time you would otherwise be sleeping.
It also means you don't use non-blocking reads. It's cleaner from a design / architecture standpoint and is more responsive from a user stand-point.
The syntax is:
event, values = window.Read(timeout=(key_to_return, time_in_milliseconds))
The timeout value is a tuple. The first entry in the tuple is what event you want returned when there's a timeout. The second entry is the amount of time, in milliseconds,, to wait.
The documentation has not been written on this yet, nor has there been a check-in of the Demo programs and Recipes that use reads with timeouts. Expect them in the next few days. Release to PyPI later in the week.
MikeTheWatchGuy
on 18 Oct 2018
YouTube -- Lesson 5 Part 1 - PSG The Complete Course - The Text Element and Common Parms
Uploaded another video in the "complete course" series. We're getting into the Elements now, starting with the Text Element. Much of the time is spent talking about the parameters that are common with other elements.
MikeTheWatchGuy
on 18 Oct 2018
Timeout values split (How can I explain Read timeouts?)
Not that I expect that anyone has used the new timeout capability on Window.Read(), but I split the timeout=(key, timeout), into Window.Read(timeout=xxxx, key=kkkk). Having them as a tuple meant people would have to read the documents in order to get the meaning and the chances of that are very slim.
Documenting this is going to be really tricky. This is an advanced feature that likely requires a background in embedded systems to grasp quickly. If you are polling, this is THE right way to do it. It gives the GUI all of the CPU it wants to do things like move the window, respond to clicks on checkboxes, etc. While also "sleeping" for the user so that the event loop ticks at the right intervals.
I timed how long a Read with a timeout takes and on my desktop machine it's taking 1ms or less. That's pretty low overhead to add to an event loop. I made the resolution of the timeout in milliseconds so that it can be tuned to provide timing of the event loop if needed.
If anyone has ideas on how to document this, I'm listening.
People are already "abusing" the ReadNonBlocking call by using it in situations where it's not needed. When it comes to polling devices, the instinct is to use a ReadNonBlocking with a sleep. That's the most straight-forward looking way to do it.
I suppose the right answer is to address this in an exacting way with headings like "How to run an event loop that polls devices"
I'm posting a couple of examples that show how to do this. The two I've already converted are the CPU/task monitor that polls the running tasks every few seconds. The other is the floating-timer-widget that displays a running timer. Both do a good job of explaining it. Posting them right now....
MikeTheWatchGuy
on 18 Oct 2018
Lesson 5-Part 2 - PySimpleGUI The Complete Course
I've uploaded another video for those of you that are into learning all the ins and outs... Today's video is about the "in's", as in InputText, keys, return values.
MikeTheWatchGuy
on 18 Oct 2018
Email Notifier App (Could use help)
I've created a cool Outlook Email Notifier. I don't want to post it with the demos. It's here for now:
https://gist.github.com/MikeTheWatchGuy/96f5108dbf02a5cc3fdea912fd3cde4a
It utilizes calls into Outlook itself... so that means you have to be running Outlook for it work. I'm using Outlook to access Hotmail and it's working great!
However, I am unable to interrupt the program to kill it. I can't close it by right clicking on the taskbar. Nothing works except my task killer or the task manager. If you plan on running the program all the time, then perhaps it's OK.
As far as it working, it works great! Newest emails are shown at the top.
It's semi-transparent to blend in with my desktop better.
If you've worked with the win32com package and can help out, please take a look at the code. Like all of my programs that use PSG, thee're simple to follow. Doesn't hurt that it's less than 50 lines of code.
MikeTheWatchGuy
on 19 Oct 2018
First PSA I've seen regarding PySimpleGUI
I'm a bit stunned frankly.
https://www.reddit.com/r/Python/comments/9ph1ru/psa_python_beginners_in_gui_programming_dont/
I don't understand why someone would post something like this when the results have been so encouraging so far.
MikeTheWatchGuy
on 19 Oct 2018
There are always people who don't like it if everyone else doesn't accept their personal approach to programming. The poster shows his narrow-mindedness in his comment "You can't take shortcuts when programming". Of course you can, and you should! Personally I have no desire to create my GUI in assembly and I'm guessing the poster doesn't either...
I don't see myself using PSG (yet) for a complex, commercial GUI but it is an amazing tool for what it does.
Don't fret the haters.
emallay
on 19 Oct 2018
Thank you... much appreciated.
I certainly do not suggest PSG be used for complex, commercial GUI. I've openly stated that. I can be honest about what it does and doesn't do.
I'm trying not to take it personally... wear the attack as a badge of honor, but dang, I'm a human being like everyone else and this was taken to an extreme. It's weird. Just plain weird.
MikeTheWatchGuy
on 19 Oct 2018
On-Screen Keyboard (So cool!)
@jackyOO7 has submitted a really cool Demo program that implements an on-screen keyboard. This is perfect for Raspberry Pi users with a touchscreen.

Wow... I never thought about doing some so complex looking... and yet the code is really elegant with great use of list comprehensions. I'll be lifting sections of this code.
He/She? also submitted changes to make Comboboxes read-only, meaning you can't change the entries by typing them in. This will be a new option when you create the element. I'm going to enable it by default as I think the expected behavior for drop-downs is that you cannot change them.
MikeTheWatchGuy
on 19 Oct 2018
Submitting Pulls / Changes
I've never stated a policy or process or anything else when it comes to pull requests. Pull requests for new Demo applications or changes to demo applications are fine to make. If they seem like a good fit, I'll accept the merge.
Suggested changes to the core PySimpleGUI file I won't be merging using the Pull tools. If you have changes to make, you're free to make them and submit them to be used. I just won't be using the Pull/Merge process or tools to make the changes. I will hand edit your changes into the code.
I'm not thankful for the changes you may make, the time you commit to making them. I am grateful to anyone spending time to make this a better package. I'll certainly add your name to the list of contributors to the project as well in the readme. You deserve credit and to be acknowledged in a public way.
If you do have a change to the core code, please submit a small test harness that will test this feature. It will improve the chances that the change will be incorporated.
I apologize if how I'm structuring things is not in the spirit of Open Source. I'm just old fashioned I suppose and am the current owner and maintainer of the code. Hand merging the changes, where I type in the code, is the only way I know for me, personally, to absorb and accept the change. I don't mean to discourage participation.
There have been a couple of people suggest core changes that were accepted using this weird process of mine and I hope there are more. If you have suggestions on how to improve this process, you're free and encouraged to make them. I'm into having fun with this stuff and into participation so please do join the party.
MikeTheWatchGuy
on 19 Oct 2018
How Do I Answer of the Day
It's really fun to be able to ask a question and immediately get back the answer I need. I dunno, something oddly satisfying about being about to ask an oracle of sorts.
I'm posting these in hopes that I can help others craft the right kind of requests to send. It's taken me a while to be able to come up with the right search string, but I think I've gotten it down.
Today... I need to convert a string that's in hex to an integer. I've done it before, but heck, I can't memorize everything. So, out comes How Do I to the immediate rescue....

MikeTheWatchGuy
on 19 Oct 2018
Table Selections
Yippee! Table Element inches towards being fully complete.
When you get back the values from Read, the Table Element will now return a list of selected elements, starting with 0. If the first and fifth elements are elected, then the list returned from Read will be[0, 4]. It's up to you to determine what that exactly means.
Keep the suggestions coming. I want to get this Table Element complete at some point.
I know sizing is a problem. The window doesn't automatically size and with the new sizing parameter in the Widow call being set to no-resize, you'll have even more issues with sizing. If you want to resize a column smaller, that does work, but you'll have to turn off the no-resize option in your Window call.
MikeTheWatchGuy
on 19 Oct 2018
Going to 4.0
The version numbers are at 3.9.4 and 1.1.4
I'm going to bump the Python 3 version by a full number to 4.0.0.
Here's why. While I can use 2 digits in any one of the versioning spaces, the reality is that you can't actually use them. If I were to bump to 3.10, there WILL be people confused thinking the version is 3.1. It's happened in the past, several times.
The other reason is the timeouts on the Read calls. This is a bigger feature than a 0.0.1 bump.
Maybe this project suffers from Versioning inflation.. if it does and it bothers you then heck, say something. I would much rather hear someone complain openly, or privately, than stew over it. Email me at [email protected] if you ever have any comments to share.
And with that, the 4.0 bus is leaving soon...
- Read Timeouts
- Table rows selected returned in read (YES!)
- combox read only
- Alpha channel for windows
- icon can be base64 image
- FindElementWithFocus
- Move and minimize windows
Those are enough for a .1 so it's up to 4.0 we go... I don't tend to make a big deal about what version number we're on. I don't ever recall posting "New Version 3.0!" in any of the marketing type posts I've made (the videos on how to use the package, etc).
MikeTheWatchGuy
on 20 Oct 2018
3.10.1 & 1.2.1
I've thought about this overnight, and a user was kind enough to point me to some versioning guidelines. I didn't like the idea of rolling over to a major number just because I've run out of minor numbers.
I think a remedy to the confusion between 3.10 and 3.1 is going to be to always include the 3rd digit. I would prefer that third digit be non-zero to be overly sure the message gets across that there are 3 digits in use.
So, we're moving on to 3.10.1 for this next release today.
MikeTheWatchGuy
on 20 Oct 2018
New Demo - Menus with Toolbar and Status Bar

I think this is the closest I've gotten to writing a program that looks similar to a traditional Windows program.
It uses a new capability for buttons to accept Base64 images which allows me to store the toolbar in the python source file itself.
It possible to tie the toolbar actions directly to the menu actions by setting the toolbar button key equal to the menu item. This will cause the Read to return the exact same event.
MikeTheWatchGuy
on 20 Oct 2018
New Demo - Email notification widget

This is one I've been wanting to do for a long time and all of the pieces finally came together to make it happen. This newest release contained several of them including:
- Move window
- Set Alpha Channel
- Read with timeout
- Button in Base64 format (this one may have already worked, not sure)
This is a great example of when to use a Read with Timeout. Basically any time you've got a program that periodically reads or write something, then it's a prime candidate for Read With Timeout. If your design includes a sleep inside of the event loop, then you should change it to Read with Timeout.
The advantage to using Read with timeout is that the GUI remains 100% responsive during this waiting period. If you used a sleep, the window would appear to be locked up.
Now that I've written a few programs using it, it's difficult to believe I've made it this far without seriously needing it. I think it's another case of developing a feature "just in time". Today I saw the first robotics project using PySimpleGUI.
I'll go post to PyPI the releases now since there are Demos that depend on those changes in order to work. I'm not a fan of Demos that don't work or requiring that PSG be downloaded from GitHub.
Just tested this one on Linux... it's often a coin-toss as to whether it would work... and this one did! It's working from the pip install in fact so that PyPI uploaded seems to have worked too.
MikeTheWatchGuy
on 20 Oct 2018
3.10.1 & 1.2.1
The docs are done, the files uploaded, it's official... we've got a release.. Here are the contents:
- Combobox new readonly parameter in init and Update
- Better default sizes for Slider
- Read of Tables now returns which rows are selected (big damned deal feature)
- PARTIAL support of Table.Update with new values (use at your own peril)
- Alpha channel setting for Windows
- Timeout setting for Window.Read (big damned deal feature)
- Icon can be base64 image now in SetIcon call
- Window.FindElementWithFocus call
- Window.Move allows moving window anywhere on screen
- Window.Minimize will minimize to taskbar
- Button background color can be set to system default (i.e. not changed)
MikeTheWatchGuy
on 20 Oct 2018
Emergency patch later
I seemed to have not quite coded up the Read with Timeout correctly... I caught it today, of course hours after I did my PyPI release. I'll post tonight.
MikeTheWatchGuy
on 20 Oct 2018
New Demo - LCD Clock and Weather for Raspberry Pi
I've seen some projects being discussed among Raspberry Pi owners of making a weather station, clock, etc out of their Pi.
I thought coding up a Cookbook Recipe would be helpful.
I took 2 shots, one with a real camera because I thought it was important to see it on the real screen.


The ':' even blinks, as it should, right?
I clearly don't have the entire user interface fleshed out. It's meant to be a skeleton, not a complete solution. It's a starting point.
Like the toolbar programs I've been writing lately, this program does not rely on any external files. All of the graphic images are inside the program file.
I wasn't very efficient with my code writing I'm afraid, so the GUI is a bit long at 60 lines of code. The other 40 lines are all the graphic assets.
For 100 lines of Python code, it's pretty good.
MikeTheWatchGuy
on 20 Oct 2018
Video Lesson 5 Part 3 Posted on YouTube
Another lesson posted. Covers checkboxes, radio button, and sliders, the last of the "simple" input elements.
Next up are the "list" oriented elements (listbox, combo, etc)
MikeTheWatchGuy
on 21 Oct 2018
Made it onto the Vinta Awesome-Python page!
Whew! Finally made it onto the page:
https://github.com/vinta/awesome-python
The voting was at 30, well over the 20 mark as required. Thank you to everyone that voted!
MikeTheWatchGuy
on 21 Oct 2018
Another school picks up PySimpleGUI
This time it's a school in France (I think in France as the page is in French)
PySimpleGUI is on the homepage, not buried somewhere...
MikeTheWatchGuy
on 21 Oct 2018
Note to the forkers.... reformatted PySimpleGUI.py
If you forked the project, then you're likely to see a ton of recent changes between your version of PySimpleGUI.py and the latest version. That is because I ran PyCharm's reformatter on the file. It was looking a bit ragged. It appears the changes had no side effect. I assume it's a feature that's been thoroughly tested long before this project.
MikeTheWatchGuy
on 22 Oct 2018
VerticalSeparator - New Element
Time for another Element, although this one has quite limited usefulness. What it does, however, is finish up all of the tkinter widgets. I think I can state that all of the tkinter supplied widgets are represented, in some fashion.
I wish I could have supported horizontal too, but the way the PSG Auto-Packer works prevents it from working correctly. To make matters slightly worse, you'll only get a vertical separator that spans a single row. It works great when you've got a column, however. With a column it appears as if it is spanning multiple rows.

MikeTheWatchGuy
on 22 Oct 2018
Deprecation of Window.ReadNonBlocking
Heads-up... down the road...not now, don't panic.... ReadNonBlocking is going away.
I'll be modifying the Cookbook, Demos, and all other documents to remove this method call.
It is being replaced by the new, preferred call:
window.Read(timeout=0)
Setting the timeout to 0 in fact calls the ReadNonBlocking as it is today. You'll get back the exact same event information. I'm trying to determine if that should change.... that the timeout key should be returned rather than None. That change would hit quite a bit of code however and so I'm hesitating on doing that. For now, just know the two are the same.
This will consolidate things nicely so that Windows have a single Read call... a simplification 👍
It will also shift the thinking of the user into not using a non-blocking read willy-nilly. I want people to think about this decision long and hard as it has implications on the entire system, not just their program.
A read with a fast timeout of 10ms takes a fraction of 1% of the CPU where a timeout of 0ms takes 100%.
The change has been checked into Master Branch and will get released on PyPI soon.. if you want to released sooner than later just speak up. I'll be changing the docs, etc. It needs to be in PyPI prior to those check-ins.
MikeTheWatchGuy
on 22 Oct 2018
Weather and Clock Program for Raspberry Pi (or Windows)
I've seen a number of people post on Reddit and elsewhere, saying they are going to build an app for their Raspberry Pi that includes a weather forecast. That's a perfect kind of app for PySimpleGUI! Right?
So, I built one to see what was possible, how difficult it was, and to provide a template that other people can use to get a jump-start on their project. I'm on a kick to include graphics inside of the applications and this one was right in line with that trend.
The most difficult part for me was getting the weather data. I looked at a number of packages before finding one that still worked. The package you'll need to install is python-forecastio. You'll need to sign up for a free key from the nice folks at DarkSky.
It uses the new Read with Timeout call... how did we ever get along without it?? It's used to 'sleep' the GUI in between the blinks of the LED : . If it wasn't for that blink, the timeout could be set to several hours, the frequency you want to check the weather. It takes very little CPU time and it shows the application is still working.
Maybe this will give someone enough of a jump-start to actually do their project. It can't hurt to add one more Demo Application to the GitHub.... we're up to 99 as of today.

MikeTheWatchGuy
on 22 Oct 2018
More OpenCV Fun
@jackyOO7 strikes again with another excellent Demo App... this time it's an OpenCV demonstration. It's pretty amazing actually.

It shows you a video image, in realtime, and lets you use different image processing functions.
I'm so blown away by the processing power of computers now. Reading individual frames from a web camera and doing image processing on them doesn't make a dent in my processor.
MikeTheWatchGuy
on 23 Oct 2018
Inching towards no more NonBlockingRead
I realized now that I'm likely to break the API soon... maybe that 4.0 release is coming sooner than I thought.
There are some things about the calls ReadNonBlocking and CloseNonBlocking that bug me. I don't like that there are 2 different reads and it's always bugged me that the event return value is "None" normally for non-blocking windows and means the window was closed for normal windows. The 2 values have been swapped for some time and it's bugged me the whole time.
If you were to switch your code from Read to ReadNonBlocking currently, you would have to change your test for the window being closed or your program would exit immediately.
I also realized that if you want to close a persistent window right now, you call CloseNonBlocking. It feels like a hack... maybe because it is?
I just checked in changes that I think will fix all our mixed up issues.... and I'm tempted to thrust those changes onto the world at some point after fair warning.
The NEW way of doing things is that if you want your reads to be non-blocking, set the timeout value to 0 in your Read call. This will cause "timeout" events to be constantly returned if there is nothing else happening, like a button click. If the window is closed, the event will be None, instead of timeout. This puts both types of reads in sync... it means ALL reads will return None as the event if the window is closed.
Additionally, there is a NEW Window method... Close. It will close the window regardless of what "type" of window it is... blocking or non-blocking.
The result of all these changes is a super-simplification. There is no more 2 types of windows... there is just 1 and that one window behaves the same way when it comes to closing events.
I would like to remove the non-blocking calls at some point, but could use feedback on all this first. I don't want to just spring this on everyone while their code breaks.
All you really have to remember is:
- Use Read with timeout=0 if you want non-blocking
- Event == None if the user closes the window with the X key
- Call Window.Close() to close a window that is open
MikeTheWatchGuy
on 23 Oct 2018
3.10.3 & 1.2.3
Had a bit of a scare with a bad setting sneaking into the last PyPI release. I was working on resizable windows and forgot to change one of the settings (expand) to false. The result was that some windows look stretched. The elements will not be tightly packed together, if there is room for them to expand into.
It's actually a good time to pop a release out as I got my non-blocking windows calls in there that I've been wanting. Now I can make the changes to the Demo programs and they'll work.
The changes in this release include:
- New element - Vertical Separator
- New parameter for InputText - change_submits. If True will cause Read to return when a button fills in the InputText element
- Read with timeout = 0 is same as read non blocking and is the new preferred method
- Will return event == None if window closed
- New Close method will close all window types
- Scrollbars for Tables automatically added (no need for a Column Element)
- Table Update method complete
- Turned off expand when packing row frame... was accidentally turned on (primary reason for this release)
- Try added to Image Update so won't crash if bad image passed in
MikeTheWatchGuy
on 23 Oct 2018
Play Chess Against An AI Opponent
Watch me quickly lose a rook...

I finally hooked up a chess playing AI to the chess GUI that was previously released.
You will need to download the EXE file that contains the AI code from here:
https://stockfishchess.org/download/
Then run the program Demo_Chess_AGAINST_AI.py that is part of the Chess folder on GitHub
It will ask you for the location of the EXE file and then you'll be up and running. To play, click on a piece you want to move, it will turn red, and then choose where you want to place it. To cancel the move, click on the original location or on any illegal location.
You can change the difficulty by setting the "Level" located on the right side of the GUI.
I have not yet released this as a package. Wanting to see if others can play it off the GitHub first.
MikeTheWatchGuy
on 23 Oct 2018
Mentioned in PyCoder's Weekly Newsletter
Hey, we made it into another newsletter... PyCoder's Weekly is one I like and read. PySimpleGUI is at the top of the Projects & Code section this week.
If you don't yet get this one, check them out - https://www.pycoders.com/
MikeTheWatchGuy
on 23 Oct 2018
Assault on ReadNonBlocking Continues....
I think I have finally put the final nail in the coffin for ReadNonBlocking.
I just checked into Master Branch the change that removes the requirement that ReadNonBlocking be used for RealtimeButtons. Now it works the way it always should have. If the button is pressed, Read will immediately return the button for as long as the button is held down. When the button is let go, the Read will once again block.
Normal buttons will of course return only a single Read call the entire time it's being held.
You can also use RealtimeButtons with Read with Timeout.
MikeTheWatchGuy
on 24 Oct 2018
Another Educational Use
PySimpleGUI has popped up in another course. This time it's in a Geography lecture at Binghamton University, State University of New York.
I'm a bit surprised that PySimpleGUI is being offered as the only GUI package being taught, but I guess for this kind of course, you don't need more than 1 GUI package. Whichever package gets the job done would be considered a winner and it seems that PSG is a winner this time.
MikeTheWatchGuy
on 24 Oct 2018
FTDI Chips Using PySimpleGUI To Test Devices
This appears to be a company using PySimpleGUI as a front-end to interfacing to their USB to UART chips. Nice to see some commercial uses mixed in with academia and personal projects.
https://github.com/fs000x/ft260UI


MikeTheWatchGuy
on 24 Oct 2018
Google Text To Speech Front End
I stole this idea from another repository... I'll admit that.... but I'm giving back by providing an answer to a problem everyone seems to have that wants to create more than 1 phrase of speech.
The new demo is called Demo_Google_TTS.py and is located here.
Converting a block of text to speech could be done using a command line, I suppose, but you have to worry about "s being in the text It's a trivial little interface, but it fits the problem perfectly..

The one thing I'm giving back to the internet is my stack overflow answer to the multi-query problem.
https://stackoverflow.com/questions/51741201/gtts-unable-to-save-file-twice/52977492#52977492
Of course feel free to up-vote if you happen to like the answer.
The natural thing to want to do with this program is to add a loop to the query. Asking for multiple lines of text to read back is only natural. However, it presents a problem. The code works the first time through the loop, but crashes with a permission problem the 2nd time through. You cannot overwrite the file you were just playing from.
The solution... double-buffering. Write to one buffer, playback from it, then switch to another buffer for the next time, then back to the first. It requires two files, but having 2 files is a whole lot better than not having a working program, right?
I like these kinds of GUIs because they are so simple yet provide a whole fantastic user experience. Compare typing your words, or pasting your words to be spoken into GUI versus doing the same on a command line. It's difficult to argue in favor of a command line interface
MikeTheWatchGuy
on 24 Oct 2018
YouTube Lesson # 6 - Menus
Uploaded a brief video on Menus.
Still have more "parts" to do for lesson 5 which is a detailed look at every Element.
The next one I'm working up is on Persistent windows, sure to be a popular video considering the questions I've been getting lately about how to work with persistent windows.
MikeTheWatchGuy
on 26 Oct 2018
Tree Element - new features secret
This morning I jammed out a couple of new features for the Tree Element.
- Returned values indicate which keys are selected
- When creating Tree, can indicate the tree should be shown expanded
One of the secret weapons in my ability to quickly add features is..... howdoi.
Here is how difficult it was for me to add the "show expanded feature"

I asked howdoi how to do it... I got back the line of code I needed. I couldn't use it directly, but it gave me the hint I needed and I used that hint to create the feature in less than 5 minutes. This happens a LOT. More than I want to admit. It's why I'm pushy about howdoi. The results can be amazing.
MikeTheWatchGuy
on 26 Oct 2018
Mac loses another feature - Filetype list on File Browse buttons
A user reported a crash while trying to use a File Browse button. tkinter crashes, complaining of an empty file descriptor list. However, the list I sent wasn't empty. It seems other people are having the exact same issue. It's WEIRD to have this big of a problem. All of the file dialogs broken?
For the time being, I'm turning off the ability to filter files on Mac. If a Mac user wants this feature back, they can research this problem and find the solution. I don't have the ability to test on Macs or I certainly would try to find it.
Here is the issue for background:
https://github.com/MikeTheWatchGuy/PySimpleGUI/issues/562
MikeTheWatchGuy
on 27 Oct 2018
Multi-window support and more added to Master Branch (risky change so please help me test by running GitHub Master Branch code.
Normally I integrate changes into Master often, almost daily, without making an announcement.
This time the changes will hit everyone's code so I want to send a head-up just in case there's a problem. Let me know if something breaks, please!
The biggest change was to the Window.Read method. You can run multiple windows now. Also, if you are using non-blocking reads, you should change them to Read(timeout=0). This will normalize the return values so that a closed window will always come back as event == None. Previously the values was None if a window was closed on a NonBlockingRead call.
I'll write up a bunch of stuff for the Readme on these new changes, including the new design patterns that are recommended.
We're getting into territory that PySimpleGUI was never designed to go into... but hey, if it works, why not? It was users that helped me figure out it'll work, so thanks to everyone that's been stretching the boundaries.
MikeTheWatchGuy
on 27 Oct 2018
I just tried it. I saw Window 1 and Window 2, but Window 3 showed up
somewhere off screen. I ran a WinSpy tool, and it's X and Y were something
like -32000.
On Fri, Oct 26, 2018 at 5:54 PM MikeTheWatchGuy notifications@github.com
wrote:
Multi-window support and more added to Master Branch (risky change so
please help me test by running GitHub Master Branch code.Normally I integrate changes into Master often, almost daily, without
making an announcement.This time the changes will hit everyone's code so I want to send a head-up
just in case there's a problem. Let me know if something breaks, please!The biggest change was to the Window.Read method. You can run multiple
windows now. Also, if you are using non-blocking reads, you should change
them to Read(timeout=0). This will normalize the return values so that a
closed window will always come back as event == None. Previously the
values was None if a window was closed on a NonBlockingRead call.I'll write up a bunch of stuff for the Readme on these new changes,
including the new design patterns that are recommended.We're getting into territory that PySimpleGUI was never designed to go
into... but hey, if it works, why not? It was users that helped me figure
out it'll work, so thanks to everyone that's been stretching the boundaries.—
You are receiving this because you commented.
Reply to this email directly, view it on GitHub
https://github.com/MikeTheWatchGuy/PySimpleGUI/issues/142#issuecomment-433564061,
or mute the thread
https://github.com/notifications/unsubscribe-auth/AGKiYjZWSbthVkYP2cKfAWPHw2LqL04Cks5uo5KZgaJpZM4WdqH-
.
john144
on 27 Oct 2018
I just tried it.
What's it?
MikeTheWatchGuy
on 27 Oct 2018
I hope you can see the attachments. One shot shows the windows as
originally displayed. Then I adjusted the Y-coordinate of Window 3, and
then I could see it.
On Fri, Oct 26, 2018 at 6:01 PM MikeTheWatchGuy notifications@github.com
wrote:
I just tried it.
What's it?
—
You are receiving this because you commented.
Reply to this email directly, view it on GitHub
https://github.com/MikeTheWatchGuy/PySimpleGUI/issues/142#issuecomment-433565090,
or mute the thread
https://github.com/notifications/unsubscribe-auth/AGKiYh2SbiqJbfyFpafn9D5nYjLLnk3uks5uo5Q-gaJpZM4WdqH-
.
john144
on 27 Oct 2018
Demo program... now I got it. The coordinates were potentially high if your display resolution is low.
BTW, thanks @john144 for giving it a try!
MikeTheWatchGuy
on 27 Oct 2018
New Desktop Widget.... psutil Dashboard
Demo_Desktop_Widget_psutil_Dashboard.py
I've set out to slowly replace the Rainmeter widgets. I didn't think this was a project I was going to do, I just seem to have ended up doing it. I write them to get an idea of what it's like to use the different Elements and Window methods as well as for the fun of it. Something really enjoyable about writing these GUIs where you can immediately get feedback on the screen.

What I like about these graphs is that they're super simple to make using Graph Elements. This is because when you create the Graph Element, you set your own coordinate system. So, if I'm working with graphing percentages, then it makes sense that the graphs go from 0 to 100. To make an area chart I simply draw a line at each datapoint up to the value being graphed. If my data point is 28%, then I draw a line from 0 to 28. It's just that simple.
While the real estate is compact, there is a bit of code required as there are 6 different data sets being collected and graphed.
Like the Email checker widget, I made this one have an alpha channel so that it's dimmed and I also used the same graphic Red-X as a close button.
I just completed it, so I'm not quite sure how accurate it is. I think the graphs are hooked up to the right stats.
MikeTheWatchGuy
on 27 Oct 2018
PySimpleGUI On Android!
Yes, believe it or not PySimpleGUI will run on Android now!
Use this program, Pydroid 3
https://play.google.com/store/apps/details?id=ru.iiec.pydroid3&rdid=ru.iiec.pydroid3
You will have to insert an import at the top of your code:
import tkinter
And for some reason using a Slider Element caused it to exit the program entirely with no errors or other info (weird).
I was able to run the dashboard that I just created that uses the pip installed psutil! I supports pip installs too. That's how I loaded both PySimpleGUI and psutil.
I find this absolutely shocking. I'm amazed that PySimpleGUI runs and I'm even more amazed that psutil runs. I guess it was only a matter of time before someone ported over tkinter. It even support Qt. Sorry I don't yet have PySimpleGUI-Qt running yet.
It's only an IDE so you can't make an "application" that runs standalone.... yet. That too seems like it's only a matter of time, right?


MikeTheWatchGuy
on 28 Oct 2018
Shortcut Buttons No Longer Closes Window!
I saw another post tonight of someone not understanding why their OK button closed the window. That's it... it's time to fix this thing.
Thinking it through, it no longer makes sense for these buttons to close the window. The behavior goes back to when PSG was a Forms GUI only. There it made sense that the buttons closed the window. Back then ALL buttons closed the window.
This change needs to get out into the hands of new people trying the package out. That means I'm wanting to release it right away... however, the "risky" Read code is in there. Then again, the only way to get something really tested seems to be to let it lose on PyPI.
I think I'm just going to have to have faith in my code and go ahead and release both to PyPI tomorrow. What the heck, I'm only changing code that deals with every Read call and most likely buttons on everyone's windows.
When I tested this change on several programs, it didn't matter that the window remained open. The program exited and closed the window. The side effect seems to be small.
It's REALLY tempting to change the definition of Button to be a ReadButton, and create a new QButton to replace it (QuitButton). I'll open an issue to see what the thoughts are.
MikeTheWatchGuy
on 28 Oct 2018
More fun with Desktop Widgets
Demo_Desktop_Widget_CPU_Dashboard.py
I've been really getting into these desktop widgets. It's like I can now make my own Rainmeter widgets, easily! I've always wanted to do that but didn't have the chops to do it using Rainmeter. I needed something much easier, more simple... like PSG.
This time it's a view of all of the CPU's cores. I have a core i9 processor, so windows is reporting a whopping 20 cores are available. Damn, that's a spicy meatball.

By the way, this is what happens when you use ReadNonBlocking, or Read(timeout=0). Check out Core 14. It would be solid at 100% all the way across if windows would let it.

And this is how it looks if you set a timeout of 400 ms. The CPU time does spike while the code is running and updating the graphs, but the time between goes to 0 near 0 in between. Be nice, don't use ReadNonBlocking. OK, I'll stop my assault soon on ReadNonBlocking. I'm tempted to completely do away with the thing. Hmmmm.... I DO provide a call that does the same thing... maybe it's getting close to time to remove it.

MikeTheWatchGuy
on 28 Oct 2018
3.11.0 & 1.11.0
Pushing one of the riskier releases out the door, on time. I really WANTED to change Button completely over to being the same as RButton. I've already added the code for a CButton, CloseButton.
Anyway, next time. There are enough things in this release already that can go bad. Don't need to add one more risk.
There's what you'll enjoy this time around...
- Syncing up the second digit of the releases so that they stay in sync better. the 2.7 release is built literally from the 3.x code so they really are the same
- Reworked Read call... significantly.
- Realtime buttons work with timeouts or blocking read
- Removed default value parm on Buttons and Button Updates
- New Tree Element parm show_expanded. Causes Tree to be shown as fully expanded
- Tree Element now returns which rows are selected when Read
- New Window method BringToFront
- Shortcut buttons no longer close windows!
- Added CloseButton, CButton that closes the windows
MikeTheWatchGuy
on 28 Oct 2018
Button no longer closes the Window
Having slept on the decision, I'm moving forward with making the standard button no longer closes the window. I'll let this change run on my machine for few days and then push it out.
The reason for this is that the majority of the programs I'm writing and that I see questions posted on are persistent windows. More and more PySimpleGUI is being used to create 'traditional' windows. This is actually an exciting development.
LOTS OF documentation and code has to be changed so that the design pattern is followed. I've just made a sh*t-ton of work for myself.
Why this is a safe change.... I believe that 99% or 100% of the applications running at the moment will drop off the end of the program after a close button is clicked. If not, people are going to notice it right away and will come to the site to protest, but I doubt this is going to happen.
There is a NEW BUTTON in town... the CButton or CloseButton will close the window. It acts like the 'old' Button.
You will no longer need to specify ReadButton or RButton in your code once you switch to the new release. You can still use these calls of course. Just know they are the same as Button.
You may want to add window.Close() calls to the end of your programs if you don't want to change your Button calls to CButton. Or not... it's up to you as there are no problems that I see from simply exiting the program and letting Python do the cleanup for you.
MikeTheWatchGuy
on 28 Oct 2018
Reddit... she's a fickle one
https://www.reddit.com/r/Python/comments/9s0h3w/rainmeter_style_desktop_widget_in_python_graph_of/
Can't keep me down for long... so it's been back to Reddit as a way to introduce PySimpleGUI to potential users. Almost every day someone is asking a Python GUI question where they are looking for a package.
The last few Rainmeter style desktop widgets had fallen flat on Reddit. Not a lot of interest. Last night I tossed another up where, the CPU core dashboard. I'm convinced the right title and search terms a key to being found. I posted it last night.
I was shocked this morning when is was upvoted 164 times, viewed 10.8K times and 95% upvoted. Great response!
I keep thinking people have to be tired of seeing this SDK, that all Python readers have seen it, but doesn't seem to be the case from the comments that get posted. The comments read like it's the first time they've heard about PySimpleGUI.
MikeTheWatchGuy
on 28 Oct 2018
3.12.0 & 1.12.0
OK, it's DONE! Button no longer closes windows. And, all of the shortcut buttons no longer close windows.
If you want your button to close the window you'll need to make it a CButton or CloseButton
You can also call window.Close() to close the window instead of having the button do it.
I decided to go ahead and release this today. There was a HUGE surge in the number of installs over the weeks... they tripled overnight. Given that large number of installs, if the previous release broke something, people would have surely complained.
So, I assumed the previous release from today was fine and went ahead and let this one go.
I have also updated ALL of the Demo programs and ALL of the docs. It's been a busy, not very fun day as a result.
The Cookbook needs reworking. I did some work on getting solid Persistent Window Design Patterns defined up front. Before they were much much later in the document because they were a new feature.
It seems like the way PySimpleGUI is being used has completely flipped. At first, it was a one-shot, forms like window with a few people pushing the envelope by creating windows that stayed open. Over the past couple of months the number of people using one-shot windows has dwindled and the number of people using persistent windows surged.
So, it only seemed natural to make the default Button be a button that reads the windows contents without closing the window.
This change was likely not very risky in the grand scheme of things because the one-shot programs tended to exit right after the window was read so that it's not a problem that the window remained open after the Read.
PLEASE open an Issue if you have any trouble with the new release!
MikeTheWatchGuy
on 29 Oct 2018
All Demos Updated to Use NEW Button Definition
PLEASE be sure and update to 3.12 or later when using the Demo code!
I went through all 100 of the demos and changed RButton / ReadButton to Button
This means if you run these Demos using older code, these buttons will CLOSE the Window.
It was a decision I had to make of whether I support the old releases in the Demos, or present the best possible design patterns using the new code. I went with best possible design patterns. I want to see people not using ReadButton anymore so the way to do that is to eradicate them from the Cookbook, Readme/User Manual, and Demo programs.
Sorry for the confusion this is going to cause, but it's better than the previous confusion.
MikeTheWatchGuy
on 29 Oct 2018
3.13.0 & 2.13.0
Jammed out another release tonight.
Despite it being an emergency release of sorts and there was a release just last night, it's still got a lot of good features....
- Improved multiple window handling of Popups when the X is used to close
- Change submits added for:
- Multiline
- Input Text
- Table
- Tree
- Option to close calendar chooser when date selected
- Update for Tree Element
- Scroll bars for Trees
The biggest one is that multiple windows is finally working the way I wanted it to work.
There are a couple of other things that I still want to do with it that, but for now it should get us quite a ways. The big fix tonight was Popups not closing correctly. Now you can have windows that launch Popups and they work fine.
Sorry for the large number of releases over the past few days. Trying to get through some big changes that it's been a little bumpy is all.
MikeTheWatchGuy
on 30 Oct 2018
Copy Button Added to SDK Quick Reference App
Some people don't use PyCharm (weird, right?) and don't use an editor that gives you the function parameters. These folks rely on the docs or on the SDK Quick Reference application.
I added a Copy button to the application. It will copy what you see onto the clip board, ready to paste into your code. That generally means all of the parameters to a call. You would rarely need all those parms, so you may spend more time deleting than you do adding.

MikeTheWatchGuy
on 30 Oct 2018
New "Design Pattern" Demo Program
I've been getting a good number of new-comer type requests from people looking for a persistent window GUI that takes input and updates the window with an output.
I didn't have a simple version of a program that did this. The prior examples had more complex things it was doing, like browsing fonts.
This may be a new "short-cut" pattern for me. The program is called
Demo_Design_Pattern_Persistent_Window.py
Here's the code:
# -------------------------------------#
# DESIGN PATTERN 2 - Persistent Window #
# Update a text field based on input   #
# -------------------------------------#
import sys
if sys.version_info[0] >= 3:
    import PySimpleGUI as sg
else:
    import PySimpleGUI27 as sg

layout = [[sg.Text('Your typed chars appear here:'), sg.Text('', key='_OUTPUT_') ],
          [sg.Input(key='_IN_')],
          [sg.Button('Show'), sg.Button('Exit')]]

window = sg.Window('Window Title').Layout(layout)

while True:                 # Event Loop
    event, values = window.Read()
    if event is None or event == 'Exit':
        break
    if event == 'Show':
        # change the "output" element to be the value of "input" element
        window.FindElement('_OUTPUT_').Update(values['_IN_'])
2,000 installs yesterday
New record number of pip installs yesterday. I can't explain it. Huge spike over the past 3 days. I cannot tell if traffic comes from Reddit, Facebook a newsletter, etc. If you see something in a newsletter, drop a post. PySimpleGUI was in PythonBytes last week.
MikeTheWatchGuy
on 30 Oct 2018
Mention in PyCoder's Weekly
Another mention in a newsletter, but it was in a roundabout way.... In the "Discussions" section I spotted this:
Discussions
Plot Your CPU Usage With Python Desktop Widget
Renders an animated graph of your entire system by watching the utilization of each of your CPU cores. Built with PySimpleGUI.
REDDIT.COM
I clicked the link prior to making it down to PySimpleGUI... I wanted to learn how the heck someone did something like I just posted about. I was led to a popular post I made on Reddit. It does read sorta like an article so I can see where it made for interesting reading. I've no doubt there will be a spike in traffic from this one even though the post is a few days old.
I'm starting to believe this post I made that shows a Rainmeter-style widget is that increased the traffic over the past few days. It DOES look pretty cool and now anyone can make little widgets that look like Rainmeter, without learning all that pesky Rainmeter code.
MikeTheWatchGuy
on 30 Oct 2018
Latest design patterns updated in Cookbook and Readme
FYI... for newcomers, these are the "Design Patterns" I suggest they follow as a starting point. Here is how they are presented in the Cookbook.
Pattern 1 - "One-shot Window" - Read int list (The Most Common Pattern)
This will be the most common pattern you'll follow if you are not using an "event loop" (not reading the window multiple times). The window is read and closes.
Because no "keys" were specified in the window layout, the return values will be a list of values. If a key is present, then the values are a dictionary. See the main readme document or further down in this document for more on these 2 ways of reading window values.
import PySimpleGUI as sg

layout = [[sg.Text('My one-shot window.')],
                 [sg.InputText(), sg.FileBrowse()],
                 [sg.Submit(), sg.Cancel()]]

window = sg.Window('Window Title').Layout(layout)

event, values = window.Read()
window.Close()

source_filename = values[0]
Pattern 2 A - Persistent window (multiple reads using an event loop)
Some of the more advanced programs operate with the window remaining visible on the screen. Input values are collected, but rather than closing the window, it is kept visible acting as a way to both output information to the user and gather input data.
This code will present a window and will print values until the user clicks the exit button or closes window using an X.
import PySimpleGUI as sg

layout = [[sg.Text('Persistent window')],
          [sg.Input()],
          [sg.Button('Read'), sg.Exit()]]

window = sg.Window('Window that stays open').Layout(layout)

while True:
    event, values = window.Read()
    if event is None or event == 'Exit':
        break
    print(event, values)

window.Close()
Pattern 2 B - Persistent window (multiple reads using an event loop + updates data in window)
This is a slightly more complex, but maybe more realistic version that reads input from the user and displays that input as text in the window. Your program is likely to be doing both of those activities so this will give you a big jump-start.
Do not worry yet what all of these statements mean. Just copy it so you can begin to play with it, make some changes. Experiment to see how thing work.
import sys
if sys.version_info[0] >= 3:
    import PySimpleGUI as sg
else:
    import PySimpleGUI27 as sg

layout = [[sg.Text('Your typed chars appear here:'), sg.Text('', key='_OUTPUT_') ],
          [sg.Input(key='_IN_')],
          [sg.Button('Show'), sg.Button('Exit')]]

window = sg.Window('Window Title').Layout(layout)

while True:                 # Event Loop
  event, values = window.Read()
  print(event, values)
  if event is None or event == 'Exit':
      break
  if event == 'Show':
      # change the "output" element to be the value of "input" element
      window.FindElement('_OUTPUT_').Update(values['_IN_'])

window.Close()
PopupQuickMessage
Time for a new Popup.... it's been a while.... I saw an app tonight that did something very clever. I didn't recognize it as a PySimpleGUI application because of this clever trick.
The trick was to show a Popup with no titlebar, no buttons, with a timeout. The result is a message that flashes up on the screen for a short period of time. It took setting a number of parameters in order to create this Popup. I like it enough to create a call with these settings set for you. It's similar to the PopupQuick. Since it basically shows you a message, I added "message" to the name.

Here is the code that produced the video...
while True:                 # Event Loop
    event, values = window.Read()
    if event is None or event == 'Exit':
        break
    if event == 'Show':
        sg.PopupQuickMessage("My message", 'This message will disappear in 2 seconds', text_color='red')
The message disappears while the program is in the call to Read. It is a completely asynchronous event to the loop.
NOTE, you still have to call Read or Refresh on the window if you want it to disappear. You can't, for example, sleep for 6 seconds right after the call and expect it to disappear.
MikeTheWatchGuy
on 31 Oct 2018
Day 112
I have been reviewing the issues, to-do lists, notes, etc. It seems like PySimpleGUI has reached a good spot in terms of functionality and stability. It has all of the windowing behaviors I wanted, timeout work, all of the tkinter widgets are represented, input values are returned for everything and there is plenty of customizations available. If development were to stop right now, it wouldn't be a bad package to live with. A great number of "Simple" applications could be built with what is currently available.
I find it hard to believe that it has been "only 112 days" since the initial check-in on July 11. It gives me a lot of hope for the next PySimpleGUI project....
I'm still pondering if Qt or Driod is next. I'm leaning towards Droid / Kivy because it's something completely different and it could really open up some pretty cool things if making Android applications becomes as easy as it is to make the current PSG style applications. It also takes the user's creations off of their computer and into their pocket, on their phone. How cool it will be to be able to show your friends your latest program by handing them your phone? Right? Well, I think it would be cool.
There is no doubt plenty more development left to do on PySimpleGUI-tkinter, so it's not like the development is going to halt on. But there may be some slowing of the pace from what it's been at for the past 112 days.
Thank you to everyone that has posted, emailed, contributed to this effort. My initial narrow focus could not have led me to where we are now. I couldn't have done it without your assistance.
MikeTheWatchGuy
on 31 Oct 2018
Risky Change - "Master Root Window"
Let's start the day off with a risky, hits every program change.
I just checked in a change that I made overnight that's a bit risky, but gets rid of a nasty problem.
Previously, the first window created became the "Parent window" to all other windows. If that first window happened to be the "Debug print" window, then when you close the debug print, it closed all other windows created after it. Not good.
I tried this change once before with a not-good outcome. This time it seems to work perfectly.
When the first window is created, another hidden window is first created that is the parent to all other windows. This should work, in theory.
I could use a couple of people to use the GitHub code for their projects, particularly if multiple windows are used.
I thought I had all of the windowing stuff DONE, but clearly not quite.
This will make the Debug print window much more usable as you'll be able to simply close it if you don't want it anymore and it won't close your other windows.
MikeTheWatchGuy
on 31 Oct 2018
New Cookbook and Readme Design Patterns
I give in.... the do_not_clear parameter has been added to the design patterns in the documentation and demo program.
I've gotten numerous issues logged over the past few weeks of people getting tripped up by this... no more shall this happen, I hope...
Also notice that I've started to not only surround the Keys with _, I also make them upper case now. I've found it really helps show where in the code the elements are being referenced. The _ alone wasn't drawing enough attention.
Here is one of the new patterns....
Pattern 2 B - Persistent window (multiple reads using an event loop + updates data in window)
This is a slightly more complex, but maybe more realistic version that reads input from the user and displays that input as text in the window. Your program is likely to be doing both of those activities so this will give you a big jump-start.
Do not worry yet what all of these statements mean. Just copy it so you can begin to play with it, make some changes. Experiment to see how thing work.
A final note... the parameter do_not_clear in the input call determines the action of the input field after a button event. If this value is True, the input value remains visible following button clicks. If False, then the input field is CLEARED of whatever was input. If you are building a "Form" type of window with data entry, you likely want False, the default setting (you can remove the parameter completely).
import sys
if sys.version_info[0] >= 3:
    import PySimpleGUI as sg
else:
    import PySimpleGUI27 as sg

layout = [[sg.Text('Your typed chars appear here:'), sg.Text('', key='_OUTPUT_') ],
          [sg.Input(do_not_clear=True, key='_IN_')],
          [sg.Button('Show'), sg.Button('Exit')]]

window = sg.Window('Window Title').Layout(layout)

while True:                 # Event Loop
  event, values = window.Read()
  print(event, values)
  if event is None or event == 'Exit':
      break
  if event == 'Show':
      # change the "output" element to be the value of "input" element
      window.FindElement('_OUTPUT_').Update(values['_IN_'])

window.Close()
Write Only Elements
Another day, another new PySimpleGUI feature.
You can indicate you do not want an element to have a return value by add to that element's key the value WRITE_ONLY_KEY.
Here is an example layout
layout =    [
            [sg.Text('Your typed chars appear here:'), sg.Text('', key='_OUTPUT_')],
            [sg.In(key=sg.WRITE_ONLY_KEY+' my key')],
            [sg.Input(do_not_clear=True, key='_IN_')],
            [sg.Button('Show'), sg.Button('Exit')]
            ]
Elements like the Multiline can be both input and output. If you've used a multiline to output 3 MB worth of data, you do not want to read that data back.
BTW, I'm much more likely to implement a feature this way than I am by adding more parameter's to the Elements themselves. I would like to keep the Elements simple if possible by minimizing the number of parameters.
Please don't hardcode the value of the variable WRITE_ONLY_KEY in your code as I've been known to change constant values. I changed the timeout one today in fact so be careful if you've hardcoded that old string value in your code (I may be guilty of that myself which is why I'm saying something)
MikeTheWatchGuy
on 1 Nov 2018
Input Validation Example
I'm finally at a spot where I can demonstrate what I've had in mind for "input validation". Rather than setup callbacks or pass in validation strings, I've always had my eyes set on the user doing the validation... in a SIMPLE way.
This demo program will do that, AND, it will automatically advance from one field to the next. I don't know about you, but some days I impress the sh*t out of myself.
You'll need to get the latest code from Master Branch for the SetFocus to work. Just delete that line if you want.
The input fields for the time only accept numeric digits. When 2 digits have been entered, the cursor will automagically move on to the next field.
Notice that the line of code that does the validation, is A LINE of code:
window.FindElement(event).Update(re.sub("[^0-9]", "", values[event]))
No callbacks, no pattern match strings being passed in. Just straightforward Python code using reg exp.
import PySimpleGUI as sg
import re

sg.ChangeLookAndFeel('LightGreen')

layout = [[sg.Text('Time Input Validation Demonstration', font='Any 18')],
          [
           sg.In(key='_TIME1_', size=(4,1), change_submits=True, do_not_clear=True ), sg.T(':', pad=(0,0)),
           sg.In(key='_TIME2_', size=(4,1), change_submits=True, do_not_clear=True), sg.T(':', pad=(0,0)),
           sg.In(key='_TIME3_', size=(4,1), change_submits=True, do_not_clear=True)],
          [sg.Multiline(key='_M_', do_not_clear=True)],
          [sg.OK()]]

window = sg.Window('Demo - Input Validation', font=('Helvetica 14')).Layout(layout)

while True:
    event, values = window.Read()
    if event in (None, 'Quit'):
        break
    if event in ('_TIME1_', '_TIME2_', '_TIME3_'):
        window.FindElement(event).Update(re.sub("[^0-9]", "", values[event]))
    if event == '_TIME1_' and len(window.FindElement(event).Get()) == 2:
        window.FindElement('_TIME2_').SetFocus()
    if event == '_TIME2_' and len(window.FindElement(event).Get()) == 2:
        window.FindElement('_TIME3_').SetFocus()
    if event == '_TIME3_' and len(window.FindElement(event).Get()) == 2:
        window.FindElement('_M_').SetFocus()
window.Close()
Starting Date Parameter added to date chooser
If you are using the CalendarButton and your dates are a long ways away from today, you're going to be happy to see the new parameter added to that button!
Set the tuple to the date you want and the calendar chooser will open to that date:
default_date_m_d_y=(12,2,1999)
It actually doesn't choose the day for you, but rather opens you to that month and year. Choosing the date will automatically close the chooser window too.
This test code demonstrates how to use it:
import sys

if sys.version_info[0] >= 3:
    import PySimpleGUI as sg
else:
    import PySimpleGUI27 as sg

layout =    [
            [sg.Input(do_not_clear=True, key='_IN1_'), sg.CalendarButton('cal', '_IN1_')],
            [sg.Input(do_not_clear=True, key='_IN2_'), sg.CalendarButton('cal','_IN2_', default_date_m_d_y=(12,2,1999))],
            [sg.Button('Show'), sg.Button('Exit')]
            ]

window = sg.Window('Window Title').Layout(layout)

while True:  # Event Loop
    event, values = window.Read()
    print(event, values)
    if event is None or event == 'Exit':
        break

window.Close()
3.14.0 & 1.14.0
It's only been 3 days since the last PyPI release and already features were beginning to pile up. There are some cool ones I'm eager to get out, including the change submits that now enables input validation much more easily. As usual, the docs are lagging a tad. These new API calls and functions are not yet in there, and there are plenty of them including new methods on the Window object. Lots of parameters for debug window.
You can enjoy these new features by upgrading
More windowing changes...
using a hidden root windowing (Tk())
all children are Toplevel() windows
Read only setting for:
Input Text
Multiline
Font setting for InputCombo, Multiline
change_submits settinf for Radio Element
SetFocus for multiline, input elements
Default mon, day, year for calendar chooser button
Tree element update, added ability to change a single key
Message parm removed from ReadNonBlocking
Fix for closing windows using X
CurrentLocation method for Windows
Debug Window options
location
font
no_button
no_titlebar
grab_anywhere
keep_on_top
New Print / EasyPrint options
location
font
no_button
no_titlebar
grab_anywhere
keep_on_top
New popup, PopupQuickMessage
PopupGetFolder, PopupGetFile new initial_folder parm
MikeTheWatchGuy
on 2 Nov 2018
change_submits for File & Folder Browse Buttons
Buttons that "hold" and return information in the values list now have the ability to return back their values immediately upon selection. This will enable you to fill another field with file / folder information. You could, for example, populate a Listbox Element with a list of files rather than populate a single line input element.
I'm still looking at adding it to the Color chooser and calendar elements. I'm having difficulty because these 2 buttons do not return values in the list of values so they can't have themselves be the target. Once I add the ability for these buttons to hold and return a value, then change_submits will be appropriate.
I got this idea by reading someone else's code that was posted on GitHub. This clever engineer bypassed the SDK and manipulated internal class variables in a way that implemented the feature without having any sdk changes. Has to be the most clever use I've seen yet, especially because the variable being manipulated didn't even exist as part of the class.
This little bit of code demonstrates how to fill in a multiline and a listbox using the list of files returned from browsing.
import PySimpleGUI as sg
layout = [
    [sg.Text('Select some files')],
    [sg.FilesBrowse('Select Files', change_submits=True, target='_FILES_', key='_FILES_')],
    [sg.Multiline(size=(60,8), key='_MULTI_')],
    [sg.Listbox([], size=(60,6), key='_LIST_')],
    [sg.Button('Read')]
         ]

window = sg.Window('Main').Layout(layout)
while True:
    event, values = window.Read()
    print(event, values)
    if event is None:
        break
    if event == '_FILES_':
        window.FindElement('_MULTI_').Update('\n'.join((values['_FILES_'].split(';'))))
        window.FindElement('_LIST_').Update((values['_FILES_'].split(';')))
disable_close for Windows
You can now stop the X from closing a window by setting the disable_close parameter to the Window() call to True.
MikeTheWatchGuy
on 3 Nov 2018
Hey Bud, if you want to add my app to the repo of tools made using your lib:
https://github.com/hpca01/BatchPDFFile
On Sat, Nov 3, 2018 at 9:32 AM MikeTheWatchGuy notifications@github.com
wrote:
disable_close for Windows
You can now stop the X from closing a window by setting the disable_close
parameter to the Window() call to True.—
You are receiving this because you were mentioned.
Reply to this email directly, view it on GitHub
https://github.com/MikeTheWatchGuy/PySimpleGUI/issues/142#issuecomment-435601547,
or mute the thread
https://github.com/notifications/unsubscribe-auth/AccLM7I2hpI4bk5wkxMA3rz3CFnrkr8rks5urcUfgaJpZM4WdqH-
.
 hpca01
on 3 Nov 2018
hpca01
on 3 Nov 2018
I was looking at your code earlier. I opened an Issue commenting on one section of it. I'll add you to the list of people using PySimpleGUI in their projects.
MikeTheWatchGuy
on 3 Nov 2018
Graph Element Mouse Events
New changes checked into Master Branch.
I've been working on the interactive capabilities of Elements recently. The Table Element just got a new double-click event for example.
This time I turned to the Graph Element. There are 2 capabilities that I've been wanting to add that just got added:
- Ability to receive mouse-clicks
- Ability to receive mouse-drags
sg.Graph((800,800), (0,450), (450,0), key='_GRAPH_', change_submits=True, drag_submits=False)
To get these mouse events, set change_submits in the graph element. To get a continuous stream of mouse events as the the mouse is click and dragged, also set the drag_submits parameter. With this set you'll get events as long as the mouse button if held down. This capability is needed for "drawing" type programs.
With change_submits, you'll also get a value of None, None when the mouse is released. However, you will not receive this (None, None) value when the button is released if you have drag_submits set. Sorry but it wasn't architecturally possible.
These 2 features can enable things like a drawing application to be built. I built a Crossword Puzzle demo program to demonstrate the mouse click capability

MikeTheWatchGuy
on 4 Nov 2018
PySimpleGUI_Qt
Development has officially started on PySimpleGUI for Qt.
Today was the Hello day! I'm actually really surprised at the outcome of this test and the port I'm doing.
The first PySimpleGUI program running on top of Qt was this one....
import PySimpleGUI_Qt as sg

layout = [[sg.Text('Hello PySimpleGUI!')]]

window = sg.Window('My first QT Window').Layout(layout)

event, values = window.Read()

For a while, the code is going to be the same, boring, simple PySimpleGUI code that you've been used to. It's all going to look the same, but eventually there will be some really cool widgets and capabilities. Before you know it you'll be writing Qt applications! You just have to be careful not to tell anyone you're using PySimpleGUI as a way to get them written.
This is going to be fun! And may even be easier than originally thought.
Making lots of quick progress today!
Here's the current list of Elements that are up and running... This screenshot was taken from Linux

MikeTheWatchGuy
on 4 Nov 2018
QT Reads Working....
For the first day of working with Qt, I sure got a long ways. I'm thrilled to say the least. I thought it would be a week or more before I would be able to read values coming back from a Qt window.

This Window reads and returned these values:
Test ['Input text goes here', 'Combo 2', ['Listbox Item 2'], 57, 4, True, False, True, False, True, False, 7]
Here is the code used to generate the window:
import PySimpleGUI_Qt as sg
layout = [
        [sg.Text('Hello PySimpleGUI!'),sg.Text(' '*5), sg.Text('Multiple Elements on 1 row works...'), ],
        [sg.Text('Input something here'), sg.Input('default text')],
        [sg.Combo(['Combo 1', 'Combo 2', 'Combo 3'])],
        [sg.Listbox(['Listbox Item 1', 'Listbox Item 2', 'Listbox Item 3'], size=(30,5)),
        sg.Slider((1,100))],
        [sg.Slider((1,10), orientation='h')],
        [sg.Checkbox('Checkbox 1'), sg.Checkbox('Checkbox 2')],
        [sg.Checkbox('Checkbox 3'), sg.Checkbox('Checkbox 4')],
        [sg.Radio('Radio1', group_id=1),sg.Radio('Radio2', group_id=1)],
        [sg.Spin((5,8))],
        [sg.Button('My Button')],
          ]
window = sg.Window('My first QT Window').Layout(layout)
while True:
    event, values = window.Read()
    print(event, values)
I have a feeling this entire project is going to come together rather quickly.
I'm not yet able to determine what the button clicked was specifically, only that a button was clicked. I'm not able to open multiple windows, etc etc etc. It's super early.
Because I need the stuff backed up, I checked it all into GitHub so you're welcome to try it if you really want to experience the early results (I don't recommend it but knock yourself out).
I was really surprised at how easy it was to install PySide2, particularly on Linux. It's obvious that the windows will look really very nice running Qt and I'm betting there are some awesome widgets awaiting us so stay tuned, good times ahead!
MikeTheWatchGuy
on 5 Nov 2018
Dial - The First New Qt Element
Progress is moving along swiftly. 11 Elements are completed and returning values when read. The Buttons are all hooked up correctly too. Popups are working.
And, now the first new element in a while... meet... the Dial Element...
layout = [
            [sg.Text('This is the new Dial Element!')],
            [sg.Dial(range=(1,100), key='_DIAL_')],
            [sg.Button('Show'), sg.Button('Exit')]
         ]

This Qt stuff is working out quite well within the PySimpleGUI framework. I expect a good number of these new Elements to be popping up along the way. There are too many of these goodies to pass up!
Soon it will be to the point that I can turn lose some users on it. What's missing at the moment are the Size. font, and color parameters. They should be straightforward to complete. I may be far enough along by the weekend to post an official Alpha version.
MikeTheWatchGuy
on 5 Nov 2018
Qt Progress

And there they are! The PySimpleGUI blue buttons. Can't miss 'em when someone posts a screenshot.
Guess what today's focus was on? Perhaps fonts and colors? Managed to crack the font and color nut today. I'm hacking my way though this and so far so good!
I'm on target for sure now to have a "tech demo" available by the weekend. I would like to make progress on some Update Methods by then so that some of the more interesting programs can be tried. If you've got a program that you want to see running on Qt then get ready! It's almost here!
MikeTheWatchGuy
on 6 Nov 2018
Qt - Done with base widgets
Everything bagel anyone?
The only Element that didn't make it was the "Option Menu", a widget that's unique to tkinter.
Everything else that you see is working!

The big breakthroughs today was getting those recursive "Container Elements". I've got Frame and Column working so you can pretty much layout your Window exactly how you would like it.
Font sizes work, colors work, returning values works. It may already be in a pre-Alpha condition ready for some brave soul.
Here is the code for that mess....
# ------ Column Definition ------ #
column1 = [[sg.Text('Column 1', background_color='lightblue',text_color='black', justification='center', size=(100,30))],
           [sg.Spin((1,10), size=(100,30))],
           [sg.Spin((1,10), size=(100,30))],
           [sg.Spin((1,10), size=(100,30))],]

layout = [
    [sg.Menu(menu_def, tearoff=True)],
    [sg.Text('(Almost) All widgets in one Window!', size=(600, 50), justification='l', font=("Helvetica", 25), relief=sg.RELIEF_RIDGE)],
    [sg.Text('Here is some text.... and a place to enter text')],
    [sg.InputText('This is my text', size=(300,30))],
    [sg.Frame(layout=[
    [sg.Checkbox('Checkbox', size=(185,30)),  sg.Checkbox('My second checkbox!', default=True)],
    [sg.Radio('My first Radio!', "RADIO1", default=True, size=(180,30), ),sg.Radio('My second Radio!', "RADIO1")]], title='Options',title_color='red', relief=sg.RELIEF_SUNKEN, tooltip='Use these to set flags', ), sg.Stretch()],
    [sg.Multiline(default_text='This is the default Text should you decide not to type anything', size=(300, 80)),
     sg.Multiline(default_text='A second multi-line', size=(300, 80))],
    [sg.InputCombo(('Combobox 1', 'Combobox 2'), size=(150, 30)),
     sg.Slider(range=(1, 100), orientation='h', size=(150, 30), default_value=85)],
    [sg.InputOptionMenu(('Menu Option 1', 'Menu Option 2', 'Menu Option 3'))],
    [sg.Listbox(values=('Listbox 1', 'Listbox 2', 'Listbox 3'), size=(200,100)),
     sg.Frame('Labelled Group',[[
     sg.Slider(range=(1, 100), orientation='v', default_value=25, tick_interval=25),
     sg.Slider(range=(1, 100), orientation='v', default_value=75),
     sg.Slider(range=(1, 100), orientation='v', default_value=10),
     sg.Column(column1, background_color='lightblue')]]), sg.Stretch()],
    [sg.Text('_' * 80)],
    [sg.Text('Choose A Folder')],
    [sg.Text('Your Folder', auto_size_text=True, justification='right'),
     sg.InputText('Default Folder', size=(300,30)), sg.FolderBrowse()],
    [sg.Submit(tooltip='Click to submit this form', size=(120,30)), sg.Cancel(size=(120,30))]]

window = sg.Window('Everything bagel', default_element_size=(40, 1), grab_anywhere=False, font=('Helvetica', 12)).Layout(layout)
event, values = window.Read()
Great Widget Access
PSG-Qt is providing greater access to the underlying Qt objects. The original PSG was not designed to be used this way, but the architecture certainly doesn't prevent it. It was more of a philosophy then a design constraint. I wanted to "shield" from tkinter as much as possible.
With Qt I want you to have full control of the widgets. You'll still have to go through the layout process prior to accessing them (i.e. you'll call Finalize should you want to configure them prior to a Read() call.) Finalize is a Read Non-blocking call, by the way.
This means your Window will be visible prior to you configuring your widgets. This is an architectural limitation and the objects are created when the window is "built". There are no easy ways around this. Maybe down the road. I've not heard any complaints about this so far so I'm not considering it to be a big issue.
I've named the Qt objects using this naming convention:
All Qt objects begin with QT_. The remainder of the variable name is the object
For example QT_ComboBox = QComboBox()
By opening up access, you guys can go nuts customizing your PySimpleGUI Elements. If I don't provide access to come particular setting that you want to get to, you'll have easy access now.
I think I'm more excited about Qt than I was tkinter. You ability to interact with your data is going to go up significantly. I hope I can do a great job on the Table Element because there are some cool things that Qt enables you to do.
A downside is that it's LARGE. PyInstaller creates a 200 MB .exe file. Not very viable for distributing your applications to other people. But is at least usable and I was able to compile a PySimpleGUI_Qt program and it worked!
Hoping to keep up the pace and get a lot more of it written quickly. I'm stumbling around at the moment working on multiline line output and also the Output Element itself which is the re-routed stdout
MikeTheWatchGuy
on 7 Nov 2018
Qt - Files and folders buttons operational
The FileBrowse, FilesBrowse, SaveAs, and FolderBrowse buttons are all operational. They open the dialog box to get the info from the user and then fill in the information in the target element. They also support the change_submits parameter. Starting to add some of that interactive stuff now too that uses the change_submits flag.
MikeTheWatchGuy
on 7 Nov 2018
Output Element and MultilineOutput Element!
Two more output Elements are done. The Output Element reroutes stdout and stderr to a multiline window. The Multiline Element is basically the same kind of widget visually. You manually update the contents of a MultilineOutput Element using the Update method.
These both moved the project forward a ways as there are a number of Demo programs that can now run using PySimpleGUI_Qt.
My target program to get up and running is HowDoI, which is what drove the Output Element. The next thing to do for that program is get the "enter_submits" parameter working for the MultilineInput Element so that you can type in a query and press enter.
This is how I generally go about feature development... find a need, implement the feature. While I'm in there I usually look for other things to implement. Slowly it all fills out into a full-featured port!
Here's the current condition of that program. Everything works except for the enter_submits thing.
It's hard to tell the difference between the tkinter one and the Qt one. It's encouraging that I'm able to duplicate the same layouts using the PySimpleGUI framework. The source code isn't exactly the same because of the size parameter now being in pixels, but other than that the layouts and Read calls, etc, are identical between the 2 programs.

MikeTheWatchGuy
on 7 Nov 2018
How to Submit a Pull Request
It's really rare for me to accept pull requests directly. If contributing and getting GitHub recognition via the pull requests is an important thing for you, then don't submit a request. I hand merge changes 99% of the time. It's pretty rare to get Pull Requests anyway.
If you do have a new thing to add or a bug to fix, please submit a "Test Harness" to go with it. It should exercise the change and also demonstrate that nothing else was broken in that area of code.
I made a change today to the Update method of Multiline Elements. You can now change the background color and text color using Update. If this was submitted as a Pull Request, I would like to see a file that resembles something like this:
````python
import sys
if sys.version_info[0] >= 3:
import PySimpleGUI as sg
else:
import PySimpleGUI27 as sg
layout = [
[sg.Text('Your typed chars appear here:'), sg.Text('', key='_OUTPUT_')],
[sg.Input(do_not_clear=True, key='_IN_')],
[sg.Multiline(key='+MULTI+', do_not_clear=True, size=(20,10))],
[sg.Button('Normal'), sg.Button('Text'), sg.Button('Background'),sg.Button('Reset'),sg.Button('Exit')]
]
window = sg.Window('Window Title').Layout(layout)
while True: # Event Loop
event, values = window.Read()
print(event, values)
if event is None or event == 'Exit':
break
if event == 'Normal':
window.FindElement('+MULTI+').Update(values['_IN_']+'n', append=True)
elif event == 'Text':
window.FindElement('+MULTI+').Update(values['_IN_']+'n', text_color='red', append=True)
elif event == 'Background':
window.FindElement('+MULTI+').Update(values['_IN_']+'n', background_color='gray20', append=True)
elif event == 'Reset':
window.FindElement('+MULTI+').Update(values['_IN_']+'n', text_color='black', background_color='white', append=True)
window.Close()
```
MikeTheWatchGuy
on 7 Nov 2018
Qt Padding....
What a huge difference now that I got control over padding!
My desktop toolbar just got replaced! One by one the Demo programs are being picked off. I've been trying hard to replace HowDoI, but I just can't get the enter key binding code to work.
The toolbar I use is a good example of the tight layouts that are again possible.
MikeTheWatchGuy
on 8 Nov 2018
Qt Speed Test
If you've attempted to create a lot of buttons using tkinter or a large number of individual text fields, you're in a for a bit of a wait.
I'm happy to report better load times for these windows with lots of Elements.
This Demo program has always been a bit of a CPU killer in the past.

Here's the verdict on load times. It's not close enough to be a contest.
MikeTheWatchGuy
on 8 Nov 2018
pip install PySimpleGUIQt
Fun command line command of the day!
It's officially a pre-alpha release.
Here is what works and doesn't work
Functioning features
Features are being added daily to this Qt port of PySimpleGUI.
These Elements are "complete":
- Text
- Input single line
- Input multiline
- Output multiline (new)
- Dial (new)
- Output - reroute stdout
- Spinner
- Sliders
- Buttons - RButtons, CButtons, Short-cut Buttons
- Checkbox
- Radio Buttons
- Listbox
- ComboBox
- Labeled Frames
- Columns - enables you to make pretty much any layout!
- Alpha channel for windows
- No Title Bar setting
- Enter submits for multiline
- Fonts
- Colors for text and background
Complete is a relative term
Missing Features
Notable MISSING features at the moment include:
- Timeouts - nothing dealing with timeouts has been ported
- Tables, Graphs, Trees - the more complex Elements have not yet been ported. Stay tuned, new ones being added daily!
- Change submits - enter submits works for multiline
MikeTheWatchGuy
on 8 Nov 2018
Qt - Non-blocking Read Calls!
Wow, this really opened up the number of possible applications that can run. You can now set a timeout value of 0 in the Read call and PySimpleGUIQt will do a non-blocking read. I've go the Desktop Timer demo running. Qt is FAST too. I thought it would be slower than tkinter and it may be faster. Exciting stuff to see work.
I REALLY want to get the Table and Graph widgets done. Those will produce some pretty spectacular results. I'm trying to get to the point that the Rainmeter style programs will all run. So far the CPU meter does, including semi-transparent.
MikeTheWatchGuy
on 9 Nov 2018
Qt inches towards desktop widgets
Just completed and checked in the "Grab Anywhere" feature. This feature is needed for windows with no titlebar, like the desktop widget or this HowDoI window.
I'll confess that I have been using HowDoI extensively for this port. It's my secret to cranking out features at a record pace. Here's the response I got from HowDoI regarding dragging windows. I copied, pasted, and slightly modified the code and poof, instant feature completed. It took less than 5 minutes.

MikeTheWatchGuy
on 9 Nov 2018
Qt Table Element
Told you I was working hard to get that Table Element working... and now I've got a crude version working!

It supports setting colors, obviously. Displaying the table is all that's currently working. Can't set the column headings, indicate if row numbers should be present, shading every other row, etc, are all not completed. You also will not get back a Read Result that's meaningful (always returns a value of '0').
This is going to be one very difficult element to complete. There will be more options available than on the tkinter version. Stuff like selecting columns, perhaps sorting, etc, are down the road.
MikeTheWatchGuy
on 9 Nov 2018
Qt Summary
These are the "Completed" Elements. 16 down, 6 to go! Not bad for 5 days.
Note that each of the "Completed Elements" are not fully complete. For example, the only element that support any kind of change_submits is the multiline input's enter_submits.
Completed Elements
- Text
- Single Line Input
- Multiline input
- Multiline output (2 different ones now)
- Output (stdout)
- Button
- Listbox
- Combobox
- Spinner
- Radio
- Checkbox
- Slider
- Table
- Column
- Labelled Frame
- Dial (brand new element!)
Elements to be completed:
- Graph
- Image
- Tree
- Option menu (may not be possible)
- Progress Meter
- Tab & Tab Group
I'm likely going to focus on completing in this order for unfinished elements: Graph, Progress Meter, Tabs, Image, and the dreaded Tree. Of course along the way I'm adding the change submits, timeouts, etc. Slowly filling in features more or less as they are required in the applications I'm using to test and drive the features.
Today I'm focusing on reading the Table Element.
MikeTheWatchGuy
on 9 Nov 2018
Qt Table Reads Work...
Well, that was quick. Thank you HowDoI!!
Just like the original PySimpleGUI, the Qt version returns which rows are selected.

Check out the query and response.
Now check out the code used to generate the response to a window.Read()
                    value = []
                    indexes = element.QT_TableWidget.selectionModel().selectedRows()
                    for index in sorted(indexes):
                        value.append(index.row())
IF you are an experienced engineer, then this tool is downright deadly for this kind of coding. I need these widgets to basically work. I only have to get them to work once
MikeTheWatchGuy
on 9 Nov 2018
Qt Element Summary for Release 0.3.0
New PyPI version posted this morning. This is a quick-reference of the available Widgets in your toolbox.
Here is a visual summary of the currently operational Elements as of version 0.3.0

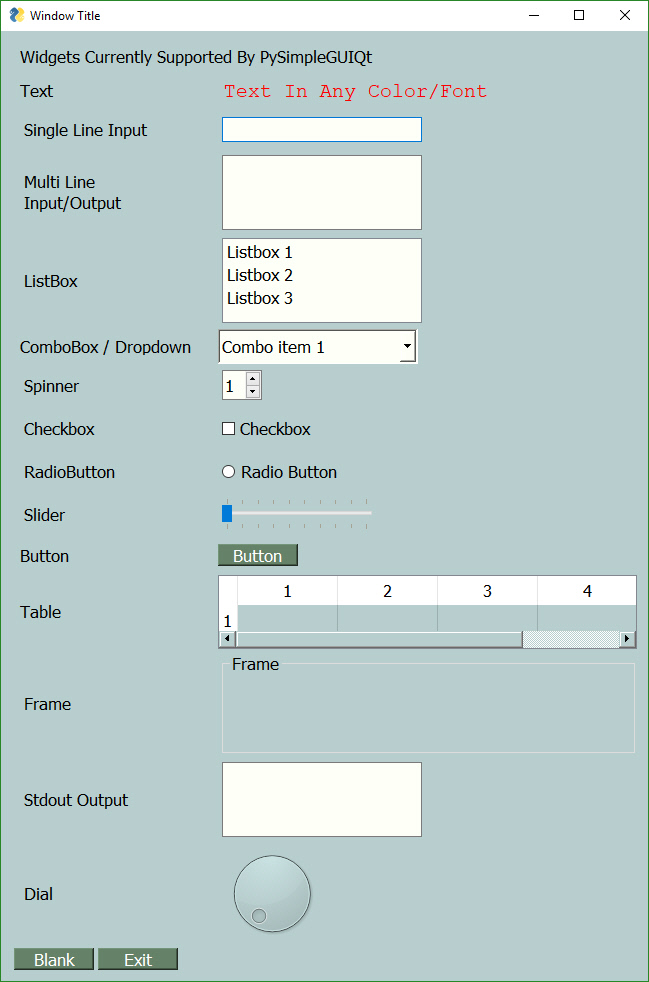
MikeTheWatchGuy
on 9 Nov 2018
change_submits For Dial Element
I just finished getting the change_submits feature working for dials. The reason I chose dials was to demonstrate how you can create your own set of extended widgets. It's very easy and straightforward.
I didn't like the fact that the Dial Widget supplied by Qt had no indicator as to the value it is currently set at. The way I solved it was to use a Text Element that displays the dial value. It is one line of code in the event loop to do this.
window.FindElement('+DIAL_VALUE+').Update(values['_DIAL_'])
Update the text element with

import PySimpleGUIQt as sg

layout = [
            [sg.Text('This is the new Dial Element!')],
            [sg.T(' ', size=(70,10)), sg.T('0', key='+DIAL_VALUE+', font=('Helvetica', 15))],
            [sg.Dial(range=(1,100), key='_DIAL_', change_submits=True)],
            [sg.Button('Show'), sg.Button('Exit')]
         ]

window = sg.Window('Window Title').Layout(layout)

while True:             # Event Loop
    event, values = window.Read()
    print(event, values)
    if event is None or event == 'Exit':
        break
    window.FindElement('+DIAL_VALUE+').Update(values['_DIAL_'])

window.Close()
634 People Tried PySimpleGUIQt Yesterday!
Awesome to see the number of people trying out Qt surge so much! Damn, I'm going to have to get going on finishing all of the features.
Thank you to everyone that's giving it a try.
MikeTheWatchGuy
on 10 Nov 2018
Qt Timeouts!
Great news! Timeouts work on Window.Read calls. This enables all sorts of fun applications like the Timer and other desktop widgets that poll. It also enables multiple window support.
I just ported someone's code that did a 2-window application. The second window is a pop-up of sorts that is running a timer. When the timer is completed, it updates the first window and closes. To move it over to Qt required only TWO changes. The import, and the size statements. That was ALL that was required. It was amazing to see come up and work.
Here is the tkinter version:

And this is the Qt version


They are strikingly similar in appearance. In fact, the tkinter version could flatten out the buttons and tighten up the spacing and it would look even closer. Doing this, I get this window... running tkinter:

MikeTheWatchGuy
on 10 Nov 2018
Qt Background Images... more reasons to try PySimpleGUIQt today!
Come join the Pre-Alpha fun! PySimpleGUIQt is doing better than expected.
There have been numerous requests background images on your windows. I've not been able to deliver that feature on tkinter.
For Qt, however, it's possible to do... so, you can now have background images as the background to a window. All you have to do is add this parameter to your Window call:
background_image = 'yourpngfile.png'
I haven't done it for columns yet... I'm waiting to see what the demand is for that feature.
Coming very soon.... the Graph Element! That's now my focus. I'm dying to get the CPU Core Usage Rainmeter display working. There are a lot of methods to handle for that Element so it could take a minute to do. Now that I can display images, I expect the Image element to get nailed down soon too. I am taking requests for feature priority for brave people wanting to use PySimpleGUIQt for their project.
MikeTheWatchGuy
on 10 Nov 2018
0.4.0
More features rolled out including
- Images as background
- Timeouts
- Change submits
There are a bunch of others that I'll document in the readme. I'll be doing a real ReadMe this weekend.
These are not small features, btw. You can already read one element and update the value of another and also run non-blocking windows... using a timeout value instead of running non-blocking at all.
MikeTheWatchGuy
on 10 Nov 2018
"It just worked"
I've been racing towards getting the CPU Cores Utilization Graphics to work. I finished coding the Graph Element and the DrawLine route. Then I changed 1 line in the CPU Dashboard program and bam! Up pops this graph!
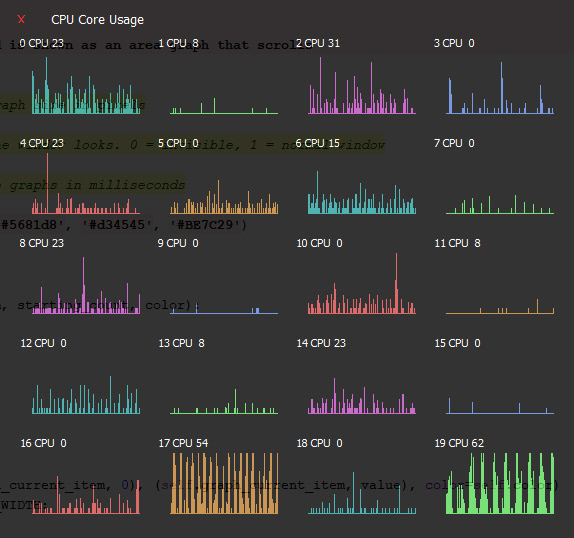
The source code was 100% backwards compatible. Even the transparency was correct.
MikeTheWatchGuy
on 11 Nov 2018
Qt Graph Widget working!
"I would rather be lucky than good" applied to this one too.
Check out this one.... tkinter on top, Qt on the bottom. Both are running as fast as possible and they look roughly the SAME in terms of graph speed.
Last night was unable to figure out how to correctly move the graphs. I toyed around this morning and it suddenly worked.
I continue to struggle a bit with getting the layouts "tight".
Well on the way to getting this Graph Element in the bag and soon!

MikeTheWatchGuy
on 11 Nov 2018
PySimpleGUIQT 0.6.0
Just posted 0.6.0 to PyPI. The Graph Element was the new addition. Getting closer and closer to "Feature complete" in terms of the individual elements. The major ones left to go - Tree, Image, Tabs, Menus.
Next up... Image
Then Tree, Tabs, Menu
MikeTheWatchGuy
on 11 Nov 2018
4 times the number of people downloaded Qt versus tkinter yesterday!
Even though Qt is at "Pre-Alpha" status, it was pip installed over 500 times yesterday. tkinter version 130. It's a LOT more popular than I expected, especially since it's not feature complete and it requires a lot more setup (PySide2).
MikeTheWatchGuy
on 11 Nov 2018
Qt 0.7.0
Fix for Popups not closing. Surprised no one noticed.
Partially done with Image Element. One test of it passed. Not sure how well it works yet. Trying to get the Base64 version working.
MikeTheWatchGuy
on 11 Nov 2018
TABS!
Yes, Tabs are among the slain features. It took a lot of wrestling with Qt

I don't have the styling stuff completed, but I can see that it's going to be AWESOME because we'll be able to change fonts, sizes, colors, etc.
MikeTheWatchGuy
on 11 Nov 2018
Trees!

I've even got the little icons hooked up this time!
The only thing left until "Feature complete" is Menus!
I'm determined to be done by Tues, when PySimpleGUI is going to be highlights on a popular podcast.
MikeTheWatchGuy
on 11 Nov 2018
Base 64 Images

You might recognize this little clock / weather app. I finally got the help I needed in order to get Base64 images displayed. Next thing I want to do with those is add them to buttons so that I get my little red X button back again. Custom button graphics will always deliver a nice boost to a layout.
MikeTheWatchGuy
on 12 Nov 2018
Stretch Element
There is another new Element that is part of PySimpleGUIQt called the Stretch Element. What it does is pushes Elements around left and right within the window. If you want 2 elements to be on oppposite sides of a window, put a stretch between them. If you want them to remain together, put a stretch on one side of them.
You can also use it to push an element to the right or left side.
For example, to push a button to the far right, add Stretch to the left of it:
        layout = [[sg.Column(clock, background_color='black')],
                  [sg.Column(weather_cols[x], background_color='black') for x in range(NUM_COLS)],

                  [sg.Stretch(), sg.RButton('Exit', button_color=('black', 'black'),
                              image_data=orangeround[22:], tooltip='close window')]]

Having the stretch on the left side of the Button caused the button to go to the far right.
MikeTheWatchGuy
on 12 Nov 2018
Menus!
And another feature falls... ONE more to go... progress meters.
I hate working on the menu code. It's recursive which is a bitch for my brain. I fumble around until it magically works. It took a couple of days.
I'm on schedule to be FEATURE COMPLETE today, 1 week from when I started this port.
All I have to do is get Progress Bars done today!

I've got more work to do on menus, such as adding keys to them, a feature I don't have in the current PySimpleGUI but is one I want to do so that menus can have duplicate names if desired. Right now you cannot use the same text for 2 menu entries or else your event will be identical and you won't know which was chosen.
MikeTheWatchGuy
on 12 Nov 2018
0.9.0 ALPHA
PySimpleGUIQt is "Feature Complete". That means all of the elements are represented in some fashion. Some are more complete than others. Over the coming week the elements will be fleshed out more and the other features refined.
I think it's ready for most people to use. It's going to take a while before a proper User's Manual is done. You should use the code as a guide for what the valid parameters are for calls.

And even better news.... the Progress Meter code is 10 times faster.
Here is what the final list of Elements looks like:

MikeTheWatchGuy
on 12 Nov 2018
PySimpleGUIQt + PyInstaller
Good news.... PySimpleGUIQt applications can be turned into .EXE files! That's awesome!
The bad news... they 210MB in size, a 20X increase. They're normally under 10MB. Clearly a LOT of modules are being pulled in. I was careful to import EACH widget / object I used individually on the import statement. It should have resulted in a smaller EXE file (I would think), but clearly did not.
MikeTheWatchGuy
on 12 Nov 2018
Qt - Autoclose Windows, multi-window support, auto-conversion of sizes
New release on master branch. Will push to PyPI later today. It's got some great new features.
One of the best, still experimental, is the conversion from tkinter character sizes to Qt pixel sizes. It's a very rough, simple multiplication method, but it works.
This enables you to run your PySimpleGUI-tkinter code without making ANY changes other than the import.
No other changes required at all to your code! That's pretty amazing, right? ;-)
It's always working well with multiple windows. In fact it was working better than the tkinter version until I fixed the tkinter problem this morning.
Give it a try! You never know, you may really like it. I changed the requirements on PyPI so that it now will automatically install PySide2 when you pip install PySimpleGUIQt.
MikeTheWatchGuy
on 13 Nov 2018
PySide2 and PyQt5 both work
I found that PyQt5 will work as well as PySide2!
I'm checking in a change that will load PyQt5 if it finds it, if not PySide2.
MikeTheWatchGuy
on 13 Nov 2018
0.10.0 Qt
Just released PySimpleGUIQt version 0.10.0
It supports both PySide2 and PyQt5.
MikeTheWatchGuy
on 13 Nov 2018

MikeTheWatchGuy
on 13 Nov 2018
# Coolest PySimpleGUI application of the day
I cruise GitHub on occasion to see how people are using PySimpleGUI. I ran across this code today:
https://github.com/jeejz/pythonProjects/blob/branch1/Sudoku%20Solver/jij/sudoku/main.py
import PySimpleGUI as psg

def DrawBox():
    column = [[]]
    input1 = []
    for i in range(1,10):
        for j in range(1,10):
            key = str(i)+str(j)
            input1.append(psg.InputText(default_text=key,do_not_clear=True, size=(3, 3), key=(key)))
            if j%3 == 0 :
                input1.append(psg.VerticalSeparator())
        column.append(input1)
        input1 = []
        if i%3 == 0:
            column.append([psg.Text('_' * 50,justification='CENTER')])

    layout = [  [psg.Column(column, size=(800,800))],
              [psg.OK(), psg.Cancel() ]]

    window =  psg.Window('Submit Question',auto_size_text=True ).Layout(layout)

    while True:
        event, value = window.Read()
        print(event, value)
        if event is None or event == 'Exit' or event == 'Cancel':
            break

DrawBox()
I couldn't figure out exactly what he was drawing. Check out this screen!

What a beautiful creation.
I took the code and "ported" it to PySimpleGUIQt. I had to change 3 lines of code. The result was this:

MikeTheWatchGuy
on 15 Nov 2018
WxPython...
Text, Input, and Button elements are done in PySimpleGUIWx
These screens are from:
PySimpleGUI
PySimpleGUIQt
PySimpleGUIWx

I've got a long ways to go yet on Qt, so I have to stop working on the Wx port. I wanted to see how difficult it would be to get those basic 3 elements done in Wx. It's looking pretty easy.
Here's the code that drew these. The only thing changed between them is the sizes.
def main():
    layout = [[Text('You are running the PySimpleGUI.py file itself')],
              [Text('You should be importing it rather than running it', size=(50, 2))],
              [Text('Here is your sample input window....')],
              [Text('Source Folder', size=(15, 1), justification='right'), InputText('Source', focus=True),
               FolderBrowse()],
              [Text('Destination Folder', size=(15, 1), justification='right'), InputText('Dest'), FolderBrowse()],
              [Ok(), Cancel()]]

    window = Window('Demo window..', default_element_size=(300,25)).Layout(layout)
    event, values = window.Read()
    window.Close()
PySimpleGUIQt
All the Qt without the ugly.
MikeTheWatchGuy
on 17 Nov 2018
Python Bytes Podcast
Another Podcast mention in Python Bytes....
https://pythonbytes.fm/episodes/show/104/api-evolution-the-right-way
This means more traffic... a great and terrible thing, especially for Qt.
There is a long ways to go on Qt and I'm relying somewhat on the users to guide the priorities. By that I mean, when someone write an issue complaining a feature doesn't work, I get busy and get it fully functional.
I ran into a number of issues with Tables while making a sample application that summarizes all the Elements. Ugh, I hate tables.
MikeTheWatchGuy
on 17 Nov 2018
New Demo "Everything Bagel" App
Tired of the unorganized look of the window that has all of the elements shown. This one includes graphics and tabs too....

MikeTheWatchGuy
on 17 Nov 2018
Popups title parameter
All Popup calls now have a parameter, title that will be used. For normal Popups, if no title is given, then the first parameter to be displayed is used (the old behavior). If you don't want any title, then set title=''
MikeTheWatchGuy
on 18 Nov 2018
New YouTube Tutorial - Lesson 7 - Multiple Windows
MikeTheWatchGuy
on 18 Nov 2018
Finally a REAL machine learning application
I found a great little machine learning project that I got through email. I'll have to figure out how to point you guys to it.
It's a Yolo *you only look once" demo. You've seen these things before. Boxes are put around objects. One of the big "problems" in machine learning that I see / experience is that they're all command line driven ... and that SUCKS. It's difficult to change parameters and re-run tests.
Here's a sample frame from a video:

Notice it's running in a PySimpleGUI window.
You'll find a video of the entire sequence here:
The experience WITH a GUI is nice. I can browse, or copy and paste, my input file. Common paths like the path to the pre-trained data files can be filled in as defaults. The result is that you can slide around sliders to change parameters, hit the OK button and watch the video in real-time.
The alternate approach and the one that I started with, required a command line for all of those parameters and file paths with the output being dumped into a video file. I wasn't able to get the video files it produced to play. But thanks to the GUI that I wrote, I didn't need them as I can watch the algorithm produce the images in real time.
I would like to hear from folks that are working on machine learning or want to get involved with machine learning projects. I've been cranking out the Demo programs in hopes that someone would pick them up and do something. Perhaps this Yolo stuff will draw in more of the scientific crowd.
MikeTheWatchGuy
on 19 Nov 2018
YOLO Demo Program Posted to GitHub
You'll find the Yolo demo here:
https://github.com/MikeTheWatchGuy/PySimpleGUI/tree/master/YoloObjectDetection
You will need to download this 242MB training data file in order for it to work.
https://www.dropbox.com/s/0pq7le6fwtbarkc/yolov3.weights?dl=1
You will also need openCV.
pip install opencv-python
After the install you'll be able to run the demos.
Demo 1 - process a single image, output with objects detected.
Demo 2 - process a video, display the output to the screen (option in code to save to file commented out...uncomment to enable writes)
I've wanted this kind of demo for the GUI for some time.
Since there's an opencv demo program already posted that integrates with a webcam, it only seems logical to try and combine these 2 programs, so that's what I did. The original version is posted and a version with an option to use your webcam is also posted. Both can write the output to disk as well.
Had this remained a command line program, it would have really gotten messy to try and duplicate this GUI:

The advantage of using the GUI front-end is pretty obvious. The parameters are already filled in for you with default values. When you run the file yolo_video.py, all you'll have to do is press enter or click OK and the demo will run. It doesn't get any easier.
This demo comes courtesy of Dr. Adrian Rosebrock. You'll find a PDF full of information about how you can learn more about computer vision and deep learning via his pyimagesearch organization.
There is an excellent article that accompanies the posted source code where you can learn more about this awesome technology:
https://www.pyimagesearch.com/2018/11/12/yolo-object-detection-with-opencv/
MikeTheWatchGuy
on 20 Nov 2018
3.15.0 & 1.15.0
Release contents:
Error checking for InputText.Get method
Text color, background color added to multiline element.Update
Update method for Output Element - gives ability to clear the output
Graph Element - Read returns values if new flages set
- Change submits, drag submits
- Returns x,y coordinates
Column element new parm vertical_scroll_only
Table element new parm - bind return key - returns if return or double click
New Window parms - size, disable_close
"Better" multiwindow capabilities
Window.Size property
Popups - new title parm, custom_text
- title sets the window title
- custom_text - single string or tuple string sets text on button(s)
This is the longest I've gone between releases in a very long time. Part of the issue is the Qt port ate up a fully week.
There are a number of features in this release that users requested and are already using. If you're one of those users, you should delete your PySimpleGUI.py file and use the pip installed one.
If you are a multi-window user... please give this release a try. This should be the last time I mess with multiple window problems as it looks like they may be finally fixed.
The documentation is lagging. As usual, look at the code using your IDE for the most up to date function parameters. Control Q and Control P in PyCharm are your friends.
MikeTheWatchGuy
on 20 Nov 2018
0.12.0 - 20-Nov-2018
Getting to be quite the chore to stay on top of 3 releases at a time while doing development on 2 frameworks.
Multiple windows should be working correctly in this release (finally). It would appear that I have both tkinter and Qt working correctly with more than 1 window. Sick of working on race conditions from having multiple windows open.
Correctly restore stdout when OutputElement is deleted
Added Finalize ability
Better multiwindow handling... maybe it's finally fixed!
Radio button default value
Dial element default value
Show expanded option for trees
Titles for popups
MikeTheWatchGuy
on 20 Nov 2018
YOLO From Webcam, Arg Parsing
In the "I would rather be lucky than good" category, I learned that the dictionary return values that PySimpleGUI produces is exactly the same kind of dictionary that the argparser utilizes. This means that if you have a program that uses the argparse module, you can replace this statement:
args = vars(ap.parse_args())
with
event, args = win.Read()
Then in your window layout you will set your keys to the values that you expected argparse to return.
For example, if your code added arguments using this:
ap.add_argument("-o", "--output", required=True, help="path to output video")
then you want your key to be 'output'
[sg.Text('Path to output video'), sg.In(o_vid,size=(40,1), key='output'), sg.FileSaveAs()]
Here is what it looks like all put together...

MikeTheWatchGuy
on 20 Nov 2018
More Yolo
Added ability to adjust the parameters in realtime while watching the video.

This is the real power of having a GUI versus a command line. With a command line you wouldn't be able to do any adjustments of the parameters. Now you can adjust them and immediately see the impact.
MikeTheWatchGuy
on 21 Nov 2018
GitHub Scraping
Finally a PySimpleGUI Demo Application that will scrape a site and do something with it.

This program will scrape the PySimpleGUI GitHub site and display a popup when a new issue is logged or if any open issue is updated.
You can easily modify it to scrape your favorite sites.
Even though this demo program is located in the Qt section, it will run on tkinter by simply changing the import statement. This ability to seamlessly move from one GUI Framework to another continues to surprise me.
I find it shocking that so the differences under the PySimpleGUI SDK are great and yet the same source code produces nearly identical windows. I'm always surprised when it works. Maybe I should have more faith in my code?
MikeTheWatchGuy
on 21 Nov 2018
Qt - Touch keyboard demo
I need applications in order to move forward the packages. It helps generate a priority list. I'm going through the cleaning up phase for Qt.... I'm writing the rest of the features. For example, to complete the InputText element, I needed to write the set and get focus capability. This feature I recalled was written for this demo program that is a pop-up keyboard.
So, I ported the popup keyboard over to Qt.

This program was one of the very first multi-window programs... back before multiwindow was a thing. It was written by a community member.
It's actually 100% source-code-compatible between PySimpleGUI and PySimpleGUIQt. You only need to change the import and it runs. Here is how it looks in both tkinter and Qt.

MikeTheWatchGuy
on 22 Nov 2018
Qt 0.13.0
The assault on the Qt feature set continues.
Focused on finishing the Text, Input Text and Multiline Input Elements.
NEW Vertical and Horizontal Separator elements
Focus for Input Text and Multiline Input
- Get focus
- Set focus
Multiline input - Change submits
- Update - disabled, append
Multiline output - Update value, append, disabled, get value
Text clicked submits
File types for open files
Initial folder, file types, for browse buttons
File types standardized on tkinter data format
Find Element With Focus now works for input and multiline input
Yet more multiwindow handling
Relief for Text element
Input text disable
Correct sizing of Comboboxes using visible items parm
Correct default values for input and multiline input
Change submits for multiline
Horizontal and Vertical separators
PopupGetFile and PopupGetFolder - no_window option works
MikeTheWatchGuy
on 22 Nov 2018
Source Code Compatible


I never dreamed that PySimpleGUI code would be portable between GUI frameworks, but that's exactly what it's turned out to be.
I just completed the Vertical and Horizontal Separators in PySimpleGUIQt. I wanted to see if a program like a Sudoku solver could be laid out using PySimpleGUI and these Elements.
To my surprise it worked. I only changed the import statement.
There is a gotcha behind this however.... it is another level of complexity on top of everything else. I have to maintain that backwards and forwards compatibility of PySimpleGUI source code. It doesn't always work out to be 100% compatible, but it gets you at least 99% of the way there most of the time.
MikeTheWatchGuy
on 22 Nov 2018
Qt Separators (cont)

import PySimpleGUIQt as psg

psg.SetOptions(border_width=0)
lines = []
lines.append([psg.HorizontalSeparator()])
for line in range(4):
    cols = []
    col = []
    for cell in range(4):
        col = []
        cols.append(psg.VerticalSeparator())
        for x in range(3):
            row = []
            for y in range(3):
                row.append(psg.InputText(default_text='', do_not_clear=True, size=(3, 1), change_submits=True, justification='center'))
            col.append(row)
        cols.append(psg.Column(col))
    cols.append(psg.VerticalSeparator())
    lines.append(cols)
    lines.append([psg.HorizontalSeparator()])
layout = [*lines,
          [psg.OK(), psg.Cancel() ]]

window =  psg.Window('Submit Question',auto_size_text=True ).Layout(layout)

prev_val = {}
while True:
    event, value = window.Read()
This the nicest I've been able to make the Sudoku puzzle layout using the new Separator Elements in PySimpleGUIQt.
MikeTheWatchGuy
on 22 Nov 2018
New Shortcut - Element instead of FindElement... be thankful that you've got an easier way
Not liking the way the SDK looks with all these FindElement calls all over the place. I have added a short-cut function, Element.
If you use the shortcut, Element, then your update calls will go from this:
window.FindElement('_KEY_').Update(result)
to this:
window.Element('_KEY_').Update(result)
I think it reads really well. We're all used to seeing these calls in the design patterns. It shouldn't be too big of a shock. I'll make sure PyPI is updated prior to releasing any Demo Programs that use it.
MikeTheWatchGuy
on 22 Nov 2018
50,000
Today PySimpleGUI hit 50,000 pip installs across the 3 different releases (PySimpleGUI for Python 3, PySimpleGUI for Python 2.7, PySimpleGUIQt)
Doesn't this somehow show that there is a "there there"? There is a real need for a simple, easy to use GUI for Python.
Gotta get Qt done so Wx can get done so that Kivy can get started!
MikeTheWatchGuy
on 22 Nov 2018
ButtonMenu -- New Element!
I have a surprise element to announce. I wasn't planing on creating this element, but the opportunity arose and I took advantage of it. I'm supposed to be finishing the Qt port, not adding new features. While I was working on finishing it, I ran into how to build a button with a drop-down menu.
The ButtonMenu element is a combination button and a menu.
You define the menu using the exact same notation as a normal menu, except that it's only 1 entry instead of a list of entries.
You can get this capability by upgrading to the PySimpleGUIQt.py file located in the master branch. I'll release to PyPI soon.
There are a number of element sizing changes that are in this release that I want more testing time on before releasing so I'm not doing it today.
I would like to get them working with the system tray, but that's a whole other effort.
I didn't believe that tkinter could do this, but evidently it is possible. So,I'll be back-porting the code over to PySimpleGUI at some point. For now, if you want the feature, go with Qt.

import PySimpleGUIQt as sg

sg.SetOptions(element_padding=(1,0), text_color='white')
menu_def = ['&File', ['&Open', ['1','2','3'], '&Save', '&Properties', 'E&xit']]

layout = [
    [sg.ButtonMenu('Menu', menu_def, key='_MENU_'), sg.T('This is a button bar '), sg.Button('Normal'),sg.Button('Another one'),  sg.Stretch()],
         ]

window = sg.Window('Window Title',
                   size=(80,20),
                   no_titlebar=True,
                   background_color='black',
                   grab_anywhere=True,
                   ).Layout(layout)

while True:             # Event Loop
    event, values = window.Read()
    print(event, values)
    if event is None or event == 'Exit' or values['_MENU_'] == 'Exit':
        break

window.Close()
Qt 0.14.0
Biggest features - "correct" element padding, fonts.
Completed feature list is now at:
Text, Input, Multiliine, Multiline Out, Output, Slider, Checkbox, Radio Button
The development continues to be focused on completing each of the elements and thus completing the Qt support.
If you've got a program using Qt that has trouble or you your code uses a particular feature not yet complete, post an Issue so that it gets priority support.
Slider tick positions set using relief parm
ButtonMenu Element
Multiline.Update font parm
Text.Update color and font now work
Button.Update font support
Window.Element = Window.FindElement
Better font support for all elements - underline, bold
Element padding - complete rework
Text element padding
Button padding
Input Text padding
Input Text password char
Listbox padding
Combobox padding
Multiline padding
Checkbox padding
Radio padding
Progress Bar padding
Output padding
Image padding
Graph padding
Slider - set tick marks using relief parm
Dial - set tick information using resolution and tick interval
Table padding
Tree padding
Seperator padding
Force window sizing should mean windows are better sized
Popup - better layout
MikeTheWatchGuy
on 24 Nov 2018
System Tray Icons! (On Qt only)
It's been a while since a major new feature, right. The ButtonMenu Element seems so long ago. At least "earlier in the week" long ago.
This is real unusual treat... the ability to run tasks in the system tray. You can show cascading menus as a way of interacting with your program.
I don't have any fancy read with timeouts on this one.... yet...
I'll at least add a polling capability, a timeout value of 0. For now, there's just a Read call.
menu_def = ['&File', ['&Open', '&Save',['1', '2', ['a','b']], '&Properties', 'E&xit']]

tray = sg.SystemTray('My Tray', menu=menu_def, data_base64=logo)

while True:
    menu_item = tray.Read()
    print(menu_item)
    if menu_item in (None, 'Exit'):
        break
You can supply your icon in 3 different ways, same as the Image Element.
- A filename
- An in-ram image
- A Base-64 image (my favorite because it doesn't require any other files)
For these types of applications in particular it seemed super important to support base-64 icons. These are PNG files by the file, not icons that we're dealing with. Although, I'm guessing if you fed it icons it would also work.
This is a feature that I will port over to Wx for sure. Tkinter doesn't have this capability built-in that I'm aware of.

You can get this release from the Master Branch. It's not been released to PyPI yet. This one is fresh off the line.
MikeTheWatchGuy
on 25 Nov 2018
0.15.0 Qt
If you're keeping count, yes, there have been TWO PyPI releases of PySimpleGUIQt today.
I had a bug that I wanted to get fixed right away and I really wanted to get this new SystemTray feature out there!
New SystemTray feature! Read about it in the Readme now
margin paramter for Text Element. Takes 4 ints
Corrected button colors when disabled. For now am restoring them to original colors
Border Depth for all elements that support it (inputs, slider, table, tree, etc)
Fix for Element padding done incorrectly!! Sorry about this one
MikeTheWatchGuy
on 25 Nov 2018
Windows users... you may need to perform a regedit in order to see system tray balloons
I had to add this registry key before I was able to see any notifications when running windows. Works great on Linux right out to the box.

MikeTheWatchGuy
on 25 Nov 2018
Menu keys (Qt) - You asked for it, you got it
Menus, on PySimpleGUIQt, now support KEYS.
To specify a key, insert a :: after the menu item, followed by your key value. This menu has keys on all items except for exit.
menu_def = [['&File', ['&Open::KeyOpen', '&Save::KeySave', '&Properties::KeyProp', 'E&xit']], ]
Menus also show up in the 'values' return values. If you get a menu item selected, the _entire menu entry including the key is returned_
In our above example, if "Open" were chosen in the GUI, then the event / value of the menu entry will be Open::KeyOpen
This way you will get back the maximum amount of information.
Should you not like the :: separator characters, you can change them by modifying the variable MENU_KEY_SEPARATOR
Note that the return values so not include the & character.
Enjoy!
Lesson in this feature, ask for features!
MikeTheWatchGuy
on 25 Nov 2018
0.16.0 Qt 3rd PyPI release today
Sorry for all the updates, but I've been kinda busy implementing stuff that I want to push out there because I've got a lot of Qt installs happening and want these features used and tested.
Easier forcing to use PyQt5 for testing
Predefined events for Tray Icons
- Double Clicked
- Icon Activated
- Message Clicked
- Timeout key for polling
Tray icon tooltip
Menu keys with programmable separator
Better element padding hierarchy
Menubar now returns values as does the ButtonMenu
MikeTheWatchGuy
on 25 Nov 2018
0.18.0 Qt
This has the completed SystemTray feature in it's entirety. I think it's officially "done" with nothing left to do. Other changes included in the release:
Tooltips for all elements
Completion of all SystemTray features
Read from SystemTray with or without timeout
Specify icons from 3 types of sources
Show message with custom or preset icons
Update
- Menu
- Tooltip
- Icon
PopupScrolled - new location parameter, fixed bug that wasn't closing window when completed
MikeTheWatchGuy
on 27 Nov 2018
0.19.0 Qt
Big new thing - being able to mark menu items as disabled
Update methods fully completed for several more elements
Ability to disable menu items by adding ! to the front
Disable menu works for menus, button menus, sysytem tray menus
Combo - Update Method - Value, values, disabled, font
Listbox - Update Method - Values, disabled
Listbox - SetValue Method - sets the selected items
Radio Button - Update Method - value, disabled
Checkbox - Update Method - value, disabled
Spinner - Update Method - value, values, disabled
Spinner - change_submits works
Image - New feature! click_submits option (acts like a button in a way)
Window - Get screen dimensions
Slider - disable
Dial - disable
MikeTheWatchGuy
on 28 Nov 2018
PySimpleGUI Under The Hood
PySimpleGUI Architecture
PySimpleGUI is a "wrapper" for tkinter and Qt, with more on the way. Their are a number of "tricks" / architecture decisions that make this package appealing to both beginners and experienced GUI developers. Both will appreciate the simplicity. Simple doesn't mean shallow. There is considerable depth to the PySimpleGUI architecture.
What is it?
PySimpleGUI is a code-generator in many ways. When you get and configure a "Text Element (Widget)", PySimpleGUI makes exactly the same tkinter or Qt calls that a developer would.
Here is part of the code that is executed when you create a Text Widget.
element.QT_Label = qlabel = QLabel(element.DisplayText, toplevel_win.QTWindow)
if element.Justification is not None:
    justification = element.Justification
elif toplevel_win.TextJustification is not None:
    justification = toplevel_win.TextJustification
else:
    justification = DEFAULT_TEXT_JUSTIFICATION
if justification[0] == 'c':
    element.QT_Label.setAlignment(Qt.AlignCenter)
elif justification[0] == 'r':
    element.QT_Label.setAlignment(Qt.AlignRight)
if not auto_size_text:
    if element_size[0] is not None:
        element.QT_Label.setFixedWidth(element_size[0])
    if element_size[1] is not None:
        element.QT_Label.setFixedHeight(element_size[1])
The "beauty" or PySimpleGUI is the code you see above was specified with this line of code
Text('Text', justification='left', size=(20,1))
You can see just how little effort it took to generate, and configure on your behalf, code that resembles hand-generated Qt code.
Architectural Decisions / Direction / Goals
- Present a GUI interface that is not object oriented
- Run an event loop within the user's application
- Events (button clicks, keystrokes, menu choices, etc) are funneled through a single interface, Window.Read()
- Users can use simple 'if' statements to act upon the GUIs events.... if this button press, do this.
- There are no callbacks
- Can change a widget's settings is a single call
- Widget interaction is modeled simply, through simple widget updates
- Change Widget A's value to value of Widget B is a single call
- A widget's current value is returned in a dictionary when there is an event
- Can duplicate nearly any window layout created by coding directly in tkinter/Qt.
- Create complete documentation with a LOT of illustrations
- Don't try to solve all GUI problems.
- Be the 80% of 80/20. Leave the difficult 20% to the major frameworks. Solve the other 80% of GUI problems.
This is the magic combination that is PySimpleGUI. It's a unique design that is approachable and enjoyable to use.
Window Definition
Widgets (Elements in PySimpleGUI-speak)
Creating widgets and placing them into a window definition is done with a single object, named appropriately in a simple manner. There are no "Label" widgets, but there is a "Text" one.
PySimpleGUI takes advantage of the Python named parameter feature. Object calls and methods are loaded up with lots of potential parameters. An IDE is a must. Let's look at a Text widget.
Text(text, size=(None, None), auto_size_text=None, click_submits=None, relief=None, font=None, text_color=None, background_color=None, justification=None, pad=None, margins=None, key=None, tooltip=None)
There are 13 different values and settings that can be specified when creating a Text widget. They are set when you create the widget, not several lines away.
The amount of code required to set those 13 values is certainly greater than 1 line of code per value. Closer to 2 or 3.
Not only are you setting the visible settings for a Text widget, but you're setting some behaviors. For example, enable_events will cause this Text widget to inform the application when someone clicks on the text. In 1 parameter we've done the work of several lines of code dealing with callbacks. Callbacks are not something PySimpleGUI have to deal with. There are no callbacks.
Defining a Window
Break a window can be broken down into rows like this:

Then stack row "rows"up and you've got yourself a window.
If you were to break down the sketched out window into Widgets, you would get something like this:
"Filename"
Input Text, Browse for files
Ok button, Cancel button
To create PySimpleGUI from this, you simply make a list for each row and put those lists together.
Example Code - Simple Form-style Window
    import PySimpleGUI as sg

    layout = [[sg.Text('Filename')],
              [sg.Input(), sg.FileBrowse()],
              [sg.OK(), sg.Cancel()] ]

    event, values = sg.Window('Get filename example').Layout(layout).Read()
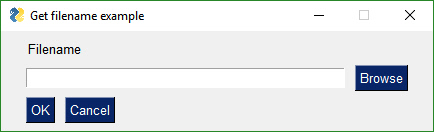
Here is a complete program that will show the example window, get the values from the user.
That's all you need. It's "simple" after all.
Your layout is a visual representation of your window. You can clearly see 3 rows of widgets being defined. If you would like your text to be red, then your layout would look like this:
layout = [[sg.Text('Filename', text_color='red')],
          [sg.Input(), sg.FileBrowse()],
          [sg.OK(), sg.Cancel()]]
Event Loops
Example Code - Window with Event Loop
The event loop in PySimpleGUI is where all the action takes place. There are no callbacks in PySimpleGUI. All of the code is located in 1 place, inside the loop.
Getting user input is achieved by calling Window.Read()
A typical call to Read:
event, values = sg.window.Read()
event will be the event that happened. values are all of the window's widgets current values, in dictionary format.
Adding an event loop to the previous example results in this code:
import PySimpleGUI as sg

layout = [[sg.Text('Filename', text_color='red')],
          [sg.Input(), sg.FileBrowse()],
          [sg.OK(), sg.Cancel()]]

window = sg.Window('Get filename example').Layout(layout)

# The Event Loop
while True:
    event, values = window.Read()
    if event is None:
        break
Within your event loop you take actions based on the event.
Let's say you want to print whatever is in the input field when the user clicks the OK button. The changed event loop is:
# The Event Loop
while True:
    event, values = window.Read()
    if event is None:
        break
    if event == 'OK':
        print(values[0])
For buttons, when they are clicked, they return their text as the event, or you can set a "key" that will be what it returned to you when the button is clicked. Adding a key to our OK button is done by adding the key parameter to the OK() call.
sg.OK(key='_OK BUTTON_')
Now when the OK button is clicked, the event value will be _OK BUTTON_.
Widget Interaction
Reading a widget
Any time that an event happens, you are provided a dictionary containing all of your widget's values.
event, values = window.Read()
Thevalues return code is a dictionary of the widget's values. Adding a key to the Input widget will cause that key to be what is used to "loop up" the value of that widget in the values variable.
If our Input widget was changed to have a key:
sg.Input(key='_INPUT_')
Then the value for that input field can be obtained from the values variable. The value of the Input widget in this case will be:
values['_INPUT_']
Changing a widget's value
Every widget has an Update method that will the widget's value or settings.
To update an widget, you must first get the object. You can either save it in a variable when you create it or you can look up a widget by it's key. Remember widgets are called Elements in PySimpleGUI. To get the Input Element in the previous example, you could call Element or FindElement.
window.Element(key)
Once you have the element, then you can call the Update function:
window.Element(key).Update(value and settings)
Widget interaction
Building further on the key idea and Updating widgets, let's look at an example where the text 'Filename' is replaced by whatever you type in the input box.
The basic logic:
If button == 'OK':
change text to input field's value
import PySimpleGUI as sg

layout = [[sg.Text('Filename', text_color='red', key='_TEXT_')],
          [sg.Input(key='_INPUT_'), sg.FileBrowse()],
          [sg.OK(key='_OK BUTTON_'), sg.Cancel()]]

window = sg.Window('Get filename example').Layout(layout)

# The Event Loop
while True:
  event, values = window.Read()
  if event is None:
        break
  if event == '_OK BUTTON_':
        window.Element('_TEXT_').Update(values['_INPUT_'])
As you can see, the pseudo-code on the real code look very similar.
Note the statement if event is None is what catches the user clicking the X to close the window. When the user does that, we want to exit the program by breaking from the event loop.
Async Designs
Asynchronous designs are possible using PySimpleGUI. To use async, add a timeout parameter to the window.Read() call.,
Example
Let's say you wanted to make a GUI that displays your latest emails, checking every 30 seconds. Rather than spin off a thread for the mail checker, run it within your GUI's event loop. Ideally we want the GUI to run as much as possible so that it's responsive. This is how it's accomplished
# The Event Loop
while True:
    event, values = window.Read(timeout=30000)
If you don't want to GUI to delay at all then set timeout=0. Setting timeout=0 will run in a completely non-blocked, async fashion.
Wrap-up
The overall architecture was meant to enable someone to duplicate both the GUI at a near-pixel-level and the behavior of a program written directly in the tkinter or Qt framework. PySimpleGUI provides a way of interacting with the native widgets in a more Python-friendly, novice-user-friendly manner. It is not meant for large, commercial applications. Those types of applications are in the 20% not covered by PySimpleGUI.
Portability
Both PySimpleGUI code and the PySimpleGUI package itself are highly portable. Taking a PySimpleGUI application from tkinter to Qt requires changing the import from import PySimpleGUI to import PySimpleGUIQt. That really is all that is typically required.
The PySimpleGUI module itself is highly portable too. Porting from tkinter to Qt took 1 week to get all of the widgets up and running with their basic operations.
MikeTheWatchGuy
on 30 Nov 2018
enable_events
There is a new parameter that has been added to all, or nearly all, Elements. It is a rename of the change_submits parameter. The reason for this change is that I want all of the elements to have a common name and I wanted it to be descriptive. Now there's a direct correlation between reading events and enabling those events. This makes it clear you're enabling events from that Element.
You can still use change_submits. The internal value is an 'or' of the two settings. I will be changing all of the sample code and all of the documentations to use this new variable. So that the old code will continue to function, the change_submits parameter will be kept.
MikeTheWatchGuy
on 30 Nov 2018
Disabling Menus
This week's big feature is the ability to enable/disable menus as well as updating menus after the window has been created and is running.
You can use the Update method to change the menu definition for all versions of PySimpleGUI and for all Elements that use Menus. On Qt this means not only the Menubar, but also ButtonMenu and the SystemTray.
This should really help those applications that rely on menus as a primary form of user interaction.
Sorry it's taken so long to get to this one. Better late than never.
MikeTheWatchGuy
on 30 Nov 2018
Auto-Complete Input Text Box
I just helped a user implement an auto-complete input textbox.
It's a really fancy auto-complete with a pop-up window.


What's AMAZING and AWESOME about this demo is that the tkinter code and the Qt code is identical. Given the sophisticated behavior of the widgets, that's doing pretty good!
It's features like this one that drive new features (or drive the completion of features being ported). So, speak up when you have trouble or want to do something with PySimpleGUI that you can't figure out how to do. I'm likely to implement something to help you if it extends the package in a way that's in line with the overall charter.
In total, the implementation took 90 lines of code, although only about 70 of those are code.
Keep those ideas coming!
MikeTheWatchGuy
on 1 Dec 2018
3.17.0 2-Dec-2017
Tooltip offset now programmable. Set variable DEFAULT_TOOLTIP_OFFSET. Defaults to (20,-20)
Tooltips are always on top now
Disable menu items
Menu items can have keys
StatusBar Element (preparing for a real status bar in Qt)
enable_events parameter added to ALL Elements capable of generating events
InputText.Update select parameter will select the input text
Listbox.Update - set_to_index parameter will select a single items
Menus can be updated!
Menus have an entry in the return values
LayoutAndRead depricated
Multi-window support continues (X detection)
PopupScrolled now has a location parameter
row_height parameter to Table Element
Stretch Element (DUMMY) so that can be source code compatible with Qt
ButtonMenu Element (DUMMY) so can be source code compat with Qt. Will implement eventually
MikeTheWatchGuy
on 2 Dec 2018
Discord Channel
There's now a #PySimpleGUI-help discord channel you can post your questions to.
Discord has made it easy to copy and paste images and code. Be sure and surround your code with markdown formatting strings.
Put this on your first line: \```python
then paste your code
Then put this on the last line: ```
MikeTheWatchGuy
on 2 Dec 2018
Centering In Window Using Qt
Here's a PySimpleGUIQt trick for you.
This window done in PySimpleGUI-tkinter would involve a lot of 'padding'.

Using Stretch Elements in Qt it is an easy task.
The Stretch Element will "push" an element to one side or the other. To push a Button to the far right side of the window, put a Stretch to the left of it. To center elements, place a Stretch on both sides of the Element you wish to center.
The above code was made using this layout:
layout = [[sg.Stretch(), sg.Text('Add New Classes', font=("Helvetica", 25)), sg.Stretch()],
          [sg.Stretch(), sg.Text('Course Code',  font=("Helvetica", 15)), sg.Stretch()],
          [ sg.Stretch(), sg.Input( size=(20, 2), ),  sg.Stretch()],
          [sg.Stretch(), sg.Text('Period Number', font=("Helvetica", 15)),sg.Stretch()],
          [sg.Stretch(), sg.Input( size=(20, 2)), sg.Stretch()],
          [sg.Stretch(), sg.Text('Year',font=("Helvetica", 15)), sg.Stretch(),],
          [sg.Stretch(), sg.DropDown(('2016', '2017', '2018', '2019'), size=(12,2),font=("Helvetica", 15) ), sg.Stretch(),],
          [sg.Stretch(), sg.ReadButton('Add Course', key='add_new_courses_button', size=(20, 2),
                         bind_return_key=True),sg.Stretch(),]
          ]
Kivy
I couldn't stay away. Was too tempting.
Here's the first PySimpleGUIKivy program to run:
import PySimpleGUIKivy as sg

layout = [[sg.Text('My first Kivy Window!')]]

window = sg.Window('Title of first Kivy Window').Layout(layout)

window.Read()
It's a nothing window, but it's a huge first step. Real elements are being populated into a window and shown.

And to show that indeed the layout is being parsed, I did 2 lines:

import PySimpleGUIKivy as sg

layout = [[sg.Text('My first Kivy Window!')],
          [sg.Text('A second line just to prove'), sg.Text('that it actually works')],]

window = sg.Window('Title of first Kivy Window').Layout(layout)

window.Read()
Visible / Invisible Elements
I have just made changes to Qt, not yet checked in, that enable elements to be created invisible. They can also be made invisible/visible using their Update call.
I am unsure if I should have spent time on this technique or spent time on being able to "add" elements to a window.
Adding elements to a layout
The only way I've been able to come up with that this could work is for the user to define Column Elements that are populated later. I will need to add the ability to create a new column layout and to "finalize" it which is how the actual widgets get created and placed.
This will require a bit of work and I don't yet know if it's going to work nor be worth the effort.
What I'm lacking at the moment is a concrete example of a need. If someone has a program that will use this feature then I'm more likely to develop it. I need targets for features like this and at the moment one doesn't exist.
I don't know many examples from normal day to day programs that I can point to for inspiration.
Visibility extends to Columns and Frames
With the visibility code I'm going to check in soon, you can control an entire Frame or Column's visibility by Updating the Frame or Column. It will automatically hide all of the Elements inside of the container element.

MikeTheWatchGuy
on 4 Dec 2018
HowDoI Query of the Day
I use this tool all day every day and I learn some really clever things from it. Needed a way to change from Qt's color format to the PySimpleGUI color format. First try I got this clever way of turning a color tuple into a hex string.

I find it stunning how much is FREE these days. We are awash in tools and technologies that are at our fingertips, cheaply. The IDEs and toolchains are free. The GUI frameworks are free for most of us. There are little to no barriers to creativity now. It's a great time to be programming.
MikeTheWatchGuy
on 5 Dec 2018
Qt Tab Colors
I can finally check tabs off the list on Qt.

It took forever to get this one right. There remains an issue if you nest tabs where the border gets lost but hopefully you won't hit it. If you do, say something and I'll go back in there to see if I can fix it.
Qt is still in Alpha status. Some features are not fully complete. I'm working my way through them all, one at a time.
Tables and Graphs have gotten little attention and they need work, so be prepared if you use them.
I took a big hit when I created these invisible elements. It required hitting all of the elements and all of their Update methods. Plus I did it for part of the tkinter implementation.
MikeTheWatchGuy
on 6 Dec 2018
Self-Deprecating PySimpleGUI 3.17.1
Had an "emergency" patch go out today. It seems the PopupGetFolder crashes because it was calling LayoutAndRead, a function that was recently deprecated. Doh!
MikeTheWatchGuy
on 6 Dec 2018
Qt - size_px Size in Pixels
For Qt, all elements now also have a parameter size_px. This enables you to size your elements using either pixels or characters! Be aware, however, that using this parameter will cause your code to no longer run using tkinter as this is a Qt only feature.
I'm surprised no one has asked for the ability to size down to the pixel level. My conversion routing must not have been a bad guess. I needed to get down to the pixel level when I created a spinner consisting of items rather than integers. See #859.
MikeTheWatchGuy
on 6 Dec 2018
0.20.0 Qt
It's felt like I've been getting nothing done lately. Then I put together this Qt release and realized I got quite a bit done. I did all this AND got the Kivy port up and running, creating Text, Input and Button Elements on the screen.
Here are the release notes
- Ability to change calculations between characters and pixels
- size_px added to ALL elements that have a size parameter
- General Element.Update(widget, background_color, text_color, font, visible)
- visible parameter added to ALL elements
- enable_events flag
- Input text - enable events, visibility, size_px
- Input text update added capabilities
- ability to highlight the input string
- background, text colors and font
- Combo - enable events, visibility, size_px
- Combo - auto complete feature
- Combo - added to Update - background color, text color, font, visible
- Listbox - enable events, visibility, size_px
- Listbox - better scaling from characters to pixels
- Listbox - ability to Update with set to index, text color, font, visibility
- Radio - enable events, visibility, size_px
- Radio - Update additions - background_color, text_color, font, visibility
- Checkbox - enable events, visibility, size_px
- Checkbox - Update additions - background_color, text_color, font, visibility
- Spin - enable events, visibility, size_px
- Spin - Update additions - background_color, text_color, font, visibility
- Multiline input - enable events, visibility, size_px
- Multiline input - Update additions - background_color, text_color, font, visibility
- Multiline input better character to pixel scaling
- Multiline output - enable events, visibility, size_px
- Multiline output - Update additions - background_color, text_color, visibility
- Text - enable events, size in pixels
- Text - Update addition of visibility
- Output - visible, size_px
- Output - added update capablity with new value, background_color, text_color, font, visibility
- Button - enable events, visible, size_px
- Button - Color Chooser feature completed
- Button - Color Chooser can target (None, None) which will store the value to be returned with the values from Read()
- Button - fixed bug in SaveAs button code. Bad filter variable
- Button - Updated added font, visibility
- Button - new SetFocus() method will set the focus onto the button
- ButtonMenu - Update method implemented that includes menu definition changes, text, button color, font, visibility
- ProgressBar - added visibility, size_px
- ProgressBar - added Update method for changing the visibility
- Images - events, size_pix, visibility
- Images - can now get click events for images!
- Images - Update added visibility
- Graph - visibility, size_px
- Graph - Update method for changing visibility
- Frame - visibility, size_px
- Frame - Update method added that controls visibility
- ALL elements inside of a Frame that's invisible will also be invisible
- Tab - visible parameter added, however not yet functional!
- TabGroup - enable events, visibility
- TabGroup - Update for controlling visibility
- Slider - enable events, size_px
- Slider - Update method now includes visibility
- Dial - enable events, size_px, visibility
- Dial - Update method added visibilty control
- Column - visibility added
- Column - Added Update method to control visibility
- ALL elements inside of an invisible Column Element will also be invisible
- MenuBar - added visibility
- MenuBar - Update can now change menu definitions at runtime, and control visibility
- Table - enable events, size_px, visibility
- Table - Update method can control visibility
- Tree - enable events, size_px, visibility
- Tree - Update method can control visibility
- VisibilityChanged() function that must be called when using Qt so that the window will shrink or grow
- window.GetScreenDimensions can now be called prior to window creation
- window.Size property
- enable_events added to all of the shortcut buttons and browse buttons
- Ability to set a button image from a file
- Combo - ability to set a default value
- Combo - Readonly setting. Allows for user editing of value
- Menus - Ability to disable / enable any part of a menu by adding a ! before the entry name
- Tabs - ability to set tab text color, background color, background color of seletected tab
- Tabs - ability to set widget area's background color
- Sliders - paging works properly (using page-up page-down or slider slider area to advance slider)
- Tree - Setting number of visible rows implemented
- Added 5 pixels to every window. Have been having issues with text being cutoff on the right side
- SetOptions - ability to change default error button color for popups
MikeTheWatchGuy
on 6 Dec 2018
If you downloaded a PySimpleGUI.py file from GitHub....
Don't forget to upgrade to the latest PyPI release by doing a pip install. If I fixed a problem or completed a feature while working on your problem and you downloaded a PySimpleGUI.py file from GitHub as a fix, you should delete the previously downloaded PySimpleGUI.py file and upgrade via pip to pick up your changes in the released version.
pip install --upgrade --no-cache-dir PySimpleGUI
MikeTheWatchGuy
on 7 Dec 2018
Filtered Listbox (Search)
import PySimpleGUI as sg

names = ['Roberta', 'Kylie', 'Jenny', 'Helen',
        'Andrea', 'Meredith','Deborah','Pauline',
        'Belinda', 'Wendy']

layout = [  [sg.Text('Listbox with search')],
            [sg.Input(do_not_clear=True, size=(20,1),enable_events=True, key='_INPUT_')],
            [sg.Listbox(names, size=(20,4), enable_events=True, key='_LIST_')],
            [sg.Button('Chrome'), sg.Button('Exit')]]

window = sg.Window('Window Title').Layout(layout)

while True:             # Event Loop
    event, values = window.Read()
    if event is None or event == 'Exit':
        break
    print(event, values)
    if values['_INPUT_'] != '':
        search = values['_INPUT_']
        new_values = [x for x in names if search in x]
        window.Element('_LIST_').Update(new_values)
    else:
        window.Element('_LIST_').Update(names)
    if event == '_LIST_' and len(values['_LIST_']):
        sg.Popup('Selected ', values['_LIST_'])

window.Close()


Just coded up this little gem for someone on Discord.
It will get a search term from an input field and use it to search and display a listbox. It's simple, easy, and elegant to do in PySimpleGUI.
Since it's only 28 lines of code it seemed worthy of being posted. I have no clue what it would take to do this same program in Qt, but I can tell you it's a lot more than 28 lines of code.
MikeTheWatchGuy
on 7 Dec 2018
DrawImage for Graph Element
You can now add images to your Graph Element.
While creating a card game I encountered a problem. I wanted to show overlapping cards, but I was unable to do that using PySimpleGUI.
Here is a screenshot of the effect I was trying to achieve.

I could find no way to do this other than to add a new primitive to the Graph Element.
This capability means you can now show an image and collect clicks on that image, a potentially fantastic feature for the right application.
MikeTheWatchGuy
on 8 Dec 2018
Base64 Image Encoder
This is one for you perfectionists out there that want the cool buttons that can be embedded in your Python script.
This utility / demo program will take a folder full of PNGs and turn them into a single Python source file, output.py. In that file you will find variables that are the same as the filename. All you have to do is call the PySimpleGUI image related functions using the parameter data . The data parameter can be found in the Image Element, Button Element and now in the Graph.DrawImage primitive. In Qt you'll find it identified with a 64 in the variable name.
Here is how I drew the 2 card you see in the prior post:
    Elem('_GRAPH_').DrawImage(data=b2, location=(0,0))
    Elem('_GRAPH_').DrawImage(data=r2, location=(100,40))
The variable r2 is the red 2 card and b2 is the blue 2 card, both in base 64.
The call to Elem is a new technique I'm using that utilizes a lambda to shorten things. It is simply defined as:
Elem = lambda key: window.Element(key)
Think of it as a simple copy and paste. Instead of Elem, paste in window.Element. That is all it's doing, replacing a bunch of text.
MikeTheWatchGuy
on 8 Dec 2018
Shortcuts using Lambda
I've really been getting into making the code more compact by using lambda expressions. I know, scary stuff.... but not the way I'm using them.
Think of Lambda as "function" or "def" because it's just like a def in many ways.
For programs that Update a lot of elements, there's a lot of copying or typing involved. Every time you must call:
window.FindElement('key) before you adding .Update(values)
Even if you use the new shorter version it's still a lot of text:
window.Element('key')
Check out the magic of this:
Elem = lambda key: window.Element(key)
After that assignment, I can use Elem like this:
Elem('key').Update(values)
Nice, right?
Look at that lambda for a moment. Everything before the : are parameters. After the : are the statements in the "Function". It's just like writing:
def Elem(key):
    return window.Element(key)
The same trick can be used for creating Elements that have long, complex parameter values. Maybe all of your buttons need to be the same size (12,1) and use Helvetica size 14 font and the color is white on blue.
You can write that as this:
sg.Button('text', size=(12,1), font='Helvetica 14', button_color=('white', 'blue'))
If you have 10 of those to do, then for sure use this technique. You can create a MyButton type:
MyButton = lambda text: sg.Button(text, size=(12,1), font='Helvetica 14', button_color=('white', 'blue'))
Then in the layout all you have to specify is:
MyButton('Custom text')
You can get fancier and allow more fields to be specified, with default values, etc.
I learned this technique by reading one of the users' code. You can learn a lot by reading code. I highly recommend doing it.
MikeTheWatchGuy
on 8 Dec 2018
Window element_padding on PySimpleGUI and CurrentLocation() on PySimpleGUIQt
Just completed forward and back-porting features between PySimpleGUI and PySimpleGUIQt. Maintaining the features across 2 platforms is proving to be challenging.
One way I'm forcing the issue is to try my best to get Demo programs to run on both PySimpleGUI and PySimpleGUIQt by only changing the import statement.
Today I ported the pop-up touch keyboard back and forth. I had 2 versions, one for tk, the other Qt. Now there's a single version that works equally well. To do this, each platform needed some functionality available only on the other platform.
I can't imagine the headaches that are coming when I add Kivy and Wx. Oy!
Here is the touch keyboard running on tkinter and Qt. Only 1 line change to move between the 2 frameworks.
The element_padding parameter is a particularly good one to have. Now instead of calling SetOptions to change the padding, you can do it when you create the window. It also keeps the scope at the window level. Using SetOptions changes the padding for all windows, including things like Popups.


MikeTheWatchGuy
on 8 Dec 2018
Qt Window.Move, Window.Minimize, Window.Disable, ProgressMeters
Just finished up the Window implementation, except for the disable_close parameter. I added the Move, Minimize, Disable.
There was also work done on Progress Meters. You can set custom colors now! The vertical orientation works now too.
As you can see, there are still feature implementations that are not yet completed on PySimpleGUIQt. I'm adding them as quickly as I can and am trying to update the docs with the changes too. Plus I'm adding new features if needed by a user and the feature fits with PySimpleGUI.
How to research problems
When you get to something that you're not able to guess parameter names, look in the documentation. Here's the order I recommend people research parameters or function names:
- The main user documentation (he Readme) - http://www.PySimpleGUI.org
- If running Qt, also check the Qt docs - https://github.com/MikeTheWatchGuy/PySimpleGUI/tree/master/PySimpleGUIQt
- The code itself - PyCharm users control click on the function name and check the function definition.
- SDK Quick Ref - There is a demo program that shows the function definitions. Warning that it can get a little out of date.
If you check those 3 locations and don't find the answer, by all means post an Issue and it'll get addressed quickly. I may or may not be able to do something to fix the problem, but I'll look into whatever is happening.
This package is on a fast-track. I apologize if the docs are lagging or if a feature is not yet complete. Doing my best to keep the features coming.
MikeTheWatchGuy
on 9 Dec 2018
Qt 0.21.0
0.21.0 - 9-Dec-2018
- Removed use of global variabels - using static class variabels instead
- Listbox.Get() will return current listbox value
- Progressbar now has color support
- Progressbar can be vertical now
- Can change bar or back and background color
- (barcolor, background color - None if use default)
- Table num_rows parameter implemented
- Table.Update - can change number of visible rows
- Window resizable parm - implemented, default changed from False to True
- Window.Move - implemented
- Window.Minimize - implemented
- Window.Disable - implemented
- Window.Enable - implemented
- Window.CurrentLocation - implemented
- Fixed too small scrollbar in Combobox
- Fixed too small scrollbar in Listbox
- Changed "text" window to a complex one for quick regression testing (try running PySimpleGUIQt.py by itself)
MikeTheWatchGuy
on 10 Dec 2018
Qt 0.22.0
- Spin.Get method - get the current value of the spinner
Forgot to add that one in.
MikeTheWatchGuy
on 10 Dec 2018
3.18.0 & 1.18.0
If you are running a custom PySimpleGUI.py file, delete it and upgrade to the latest release
pip install --upgrade --no-cache-dir PySimpleGUI
It feels like a risky-ish release. There is a lot in this release. Please report issues. Hopefully your feature made it into the release
Noteworthy items
- Visibility touched every element and every element's Update method.
- I changed some internal architecture, moved globals into class variables.
- Completely replaced the OneLineProgressMeter code. Started from scratch. The code condensed nicely and is much more elegant. Also provides a reason code if you want to know why the meter gave an "end" return code (cancelled, closed with X, reached max count).
- Menus are broken in version 2.7. You really shouldn't be on legacy Python anyway.
- Visibility - can be used to create "dynamic" windows. Elements can come and go. On this tkinter release they only seem to grow. Once you show a widget that space is reserved for it.
- Graphs can have images! Great for games.
- Clickable images
- Debug window pops back up after you close it if you call sg.Print again. Previously it defaulted back to the console.
- Can set the padding at the Window level using new Window parameter
NOTE - Menus are broken on version 2.7. Don't know how long they've been this way.
Default progress bar length changed to shorter
- Master window and tracking of num open windows moved from global to Window class variable
- Element visibility setting (when created and when Updating element)
- Input text visiblity
- Combo visiblity
- Combo replaces InputCombo as the primary class name
- Option menu visibility
- Listbox visiblity
- Listbox new SetFocus method
- Radio visibility
- Checkbox visibility
- Spin visiblity
- Spin new Get method returns current value
- Multiline visiblity
- Text visibility
- StatusBar visiblity
- Output visibility
- Button visibility
- Button SetFocus
- ProgressBar - New Update method (used only for visibility)
- Image - clickable images! enable_events parameter
- Image visibility
- Canvas visibility
- Graph visibility
- Graph - new DrawImage capability (finally)
- Frame visibility
- Tab visibility (may not be fully functional)
- TabGroup visibility
- Slider visibility
- Slider - new disable_number_display parameter
- Column visibilty
- Menu visibility - Not functional
- Table visibility
- Table - new num_rows parm for Update - changes number of visible rows
- Tree visiblity
- Window - New element_padding parameter will set padding for entire window
- OneLineProgressMeter - Completely REPLACED the implementation
- OneLineProgressMeter - can get reason for the cancellation (cancel button versus X)
- EasyProgressMeter - completely removed. Use OneLineProgressMeter instead
- Debug window, EasyPrint, Print - debug window will re-open if printed to after being closed
- SetOptions - can change the error button color
- Much bigger window created when running PySimpleGUI.py by itself. Meant to help with regression testing
MikeTheWatchGuy
on 11 Dec 2018
Uno On PySimpleGUI
Instead of working dutifully on the outstanding Qt issues, I spent that past couple of days coding up this Uno game. I borrowed the game engine from a text based version of the game.
What I wanted to demonstrate were these 2 things.
- PySimpleGUI can be used to make games
- You can store graphic files, a good number of them, inside your code.
I mentioned earlier that I wrote a base64 image converter that will encode a folder full of PNGs into a single .py source file. The reason I wrote that utility was for this game. I needed to convert 100 PNG files to base64 so doing it by hand was not an option.
I still need to finish up some polishing and I want to properly cite where I got the code as well as where the image files originated. Once I get those together, I'll release it officially.
My hope is to release this on ActiveState, the place I found the text based version.
Feedback is most welcomed!

MikeTheWatchGuy
on 13 Dec 2018
Lambda Update
GUIs of all types can be wordy. While creating the Uno card game I ended up making a number of lambda expressions to cut down, significantly, the amount of code I had to write.
For programs that do a lot of updating of elements on the screen, I'm going to likely be showing more and more of these lambda expressions in the demo programs.
This one in particular is handy:
Update = lambda elem, value: window.Element(elem).Update(value)
This allows you to write:
Update(key, value)
and it will do the same thing as if you called:
window.Element(key).Update(value)
When you have a dozen or more of these to do in your window then it makes sense do use a lambda instead of copying and pasting. For one thing it allows you to change a single line of code instead of dozens of lines of code.
I also created one for Text elements:
T = lambda text, key=None, font='Helvetica 16', **kwargs: sg.T(text, key=key, font=font, **kwargs )
Then I can write:
T('My text')
and my text will be Helvetica 16 sized automatically. I was using it with keys a lot too which is why you see the key argument. To make a text element with a key value:
T('Player', '_P3_')
The **kwargs makes it possible to add on as many of the Text parameters as I want such as visibility:
T('Cards', '_C3_', visible=False)
Here's a chunk of the layout definition so you can see it in action:
        col_players = [
            [OvalButton('Quit', greenbutton, key='_QUIT_', visible=False)],
            [T('Player', '_P1_', text_color=yellow_color)],
            [T('Cards', '_C1_', text_color=yellow_color)],
            [T(' ' * 15)],
            [T('Player', '_P2_', text_color=red_color)],
            [T('Cards', '_C2_',  text_color=red_color)],
            [T(' ' * 15,'_S3_',  visible=False,)],
            [T('Player', '_P3_', visible=False)],
            [T('Cards', '_C3_', visible=False)],
            [T(' ' * 15, '_S4_', visible=False,)],
            [T('Player', '_P4_', visible=False)],
            [T('Cards', '_C4_', visible=False)],]
Note that you don't need to add sg. to the front of these too.
I realize that the code looks a bit foreign compared to other PySimpleGUI code, but I think it's worth the time savings and ease of modifying things in a centralized way.
MikeTheWatchGuy
on 13 Dec 2018
Uno game "complete"
I am close enough to being "done" to call it "done". Is a program ever truly done?
I posted about it here on Reddit (should you want to upvote for example ;-)
https://www.reddit.com/r/Python/comments/a5tzhq/uno_card_game_using_a_gui_pysimplegui/
Here is what the final version looks like:

MikeTheWatchGuy
on 13 Dec 2018
3.19.2 13-Dec-2018
- Warning for Mac's when trying to change button color
- New parms for Button.Update - image_size and image_subsample
- Buttons - remove highlight when border depth == 0
- OneLineProgressMeter - better layout implementation
I completely forgot when I released Uno today that I needed new features from PySimpleGUI. So, I dashed out this release... actually 3 released today. Solved a problem with outlines around buttons in Linux. Gives me an idea of what may be wrong with checkboxes.
MikeTheWatchGuy
on 13 Dec 2018
Pane Element
It's been a while since a new element was implemented. Just when I think I've got them all.
I didn't know what the tkinter "Paned Window" was until recently. I don't know quite how to integrate them into a GUI. I haven't seen one in any other applications that I can think of. It feels like a mobile app widget.
If you want to try yourself, you'll find the changes in the Master Branch on GitHub.
Here is one in action.

One of the input elements is updating the other. Each are in a different “pane”. One is nested inside of the other.
The rule is:
A Pane Element takes a list of panes. A pain is defined as a Column element. So, the Pane Element takes a list of Column Elements as the input.
import PySimpleGUI as sg

col1 = sg.Column([[sg.Text('in pane1')],
                  [sg.T('Pane1')],
                  [sg.T('Pane1')],
                  ])
col2 = sg.Column([[sg.Text('in pane2')],
                  [sg.T('Pane2')],
                  [sg.Input(key='_IN2_', do_not_clear=True)],
                  [sg.T('Pane2')],
                  [sg.T('Pane2')],
                  ])


col3 = sg.Column([[sg.Text('test')],
                  [sg.In(key='_IN3_', enable_events=True, do_not_clear=True)],
                  ])

layout = [ [sg.Text('Click'), sg.Text('', key='_OUTPUT_')],
           [sg.Button('Go')],
           [sg.Pane([sg.Column([[sg.Pane([col1, col2], orientation='v',  background_color=None, show_handle=True, visible=True, key='_PANE_', relief=sg.RELIEF_SUNKEN),]]),col3 ], orientation='h', background_color=None, size=(160,120), relief=sg.RELIEF_RIDGE)]
        ]

window = sg.Window('Window Title', default_element_size=(15,1)).Layout(layout)

while True:             # Event Loop
    event, values = window.Read()
    print(event, values)
    if event is None or event == 'Exit':
        break
    if event == 'Go':
        window.Element('_PANE_').Update(visible=True)
    window.Element('_IN2_').Update(values['_IN3_'])

window.Close()
John Conway's Game of Life

If you're a fan of 1970's computing, then you know Conway's "Game of Life". This implementation wraps the engine in a PySimpleGUI GUI. You setup the initial board, click "Go" and watch the fun.
You can change the speed and number of generations parameters on the fly. There are some pretty wild patterns that have been "Discovered" and documented.
You place blocks by clicking. To delete a block, click it.
You will need a new PySimpleGUI.py file to run this as the new DeleteFigure is needed (to delete the blocks). This is exactly why I write these demo programs, to move forward the SDK. DeleteFigure is needed for a variety of programs so it's good to get it done and available for people to use.
This runs on tkinter at the moment.
Will push the PySimpleGUI.py file up to PyPI quickly so that only a pip install is required.
MikeTheWatchGuy
on 18 Dec 2018
3.20.0 & 1.20.0 18-Dec-2018
- New Pane Element
- Graph.DeleteFigure method
- disable_minimize - New parameter for Window
- Fix for 2.7 menus
- Debug Window no longer re-routes stdout by default
- Can re-route by specifying in Print / EasyPrint call
- New non-blocking for PopupScrolled
- Can set title for PopupScrolled window
The big features for this release are the new Pane Element, menu fix for 2.7, and delete figure needed for game of life.
MikeTheWatchGuy
on 18 Dec 2018
 MikeTheWatchGuy
on 18 Dec 2018
MikeTheWatchGuy
on 18 Dec 2018
Mixing tkinter and Qt

It just dawned on me that it's possible to mix tkinter and Qt windows in the same application. Of course you cannot put Qt widgets into a tkinter window and vice versa, but you can have windows from both frameworks up on the screen at the same time, interacting.
Maybe there's a feature only available in Qt that you need for one of your screen, but are fine with tkinter for rest of your application.
import PySimpleGUI as sg
import PySimpleGUIQt as sgqt

layout = [ [sg.Text('Type here for display in Qt window:')],
            [sg.Input(do_not_clear=True, enable_events=True, key='_IN_')],
            [sg.Button('Show'), sg.Button('Exit')]]

window = sg.Window('tkinter Window').Layout(layout)

layout2 = [ [sgqt.Text('This is a Qt Window')],
            [sgqt.Text('         ', key='_OUTPUT_')],
            [sgqt.Button('Show'), sgqt.Button('Exit'), sgqt.Stretch()]]

window2 = sgqt.Window('Qt Window').Layout(layout2).Finalize()

while True:             # Event Loop
    event, values = window.Read()
    if event is None or event == 'Exit':
        break
    window2.FindElement('_OUTPUT_').Update(values['_IN_'])
    window2.Refresh()

window.Close()
ButtonMenus for PySimpleGUI (tkinter version)
I finally got off my ass and completed the ButtonMenu Element for tkinter. It's been around for Qt for some time now.

I did this reacting to the Issue posted here #961 .
It enables you to have menus that match the background. You should be able to put an image on these buttons.
What is NOT yet completed is the ability to update the colors of the button. You can update the menu definition however, just like in Qt. In Qt I don't believe it's possible to change the button text and colors either. Of course, if that's a problem in your application, post an issue.
If you haven't noticed, it's the users of PySimpleGUI that often dictate the priorities of features. If something is impossible and should be possible, I'm likely to do something about it.
I am quite aware of the number of outstanding issues at the moment. The Qt port is still in Alpha condition, awaiting the completion of all of the Elements' features and configurations. Every day it's a little bit closer however, so have faith that it'll get done.
MikeTheWatchGuy
on 21 Dec 2018
Bar Charts
Ever wanted to graph some data but don't have the time to learn Matplotlib?
How about a simple bar chart using PySimpleGUI instead.
I wrote this little program in response to a Reddit question:
import PySimpleGUI as sg
import random

BAR_WIDTH = 50
BAR_SPACING = 75
EDGE_OFFSET = 3
GRAPH_SIZE = (500,500)
DATA_SIZE = (500,500)

graph = sg.Graph(GRAPH_SIZE, (0, 0), DATA_SIZE)

layout = [[sg.Text('Bar graphs using PySimpleGUI')],
          [graph],
          [sg.Button('OK')]]

window = sg.Window('Window Title').Layout(layout)

while True:
    event, values = window.Read()
    graph.Erase()
    if event is None:
        break

    for i in range(7):
        graph_value = random.randint(0, 400)
        graph.DrawRectangle(top_left=(i * BAR_SPACING + EDGE_OFFSET, graph_value),
                            bottom_right=(i * BAR_SPACING + EDGE_OFFSET + BAR_WIDTH, 0), fill_color='blue')
        graph.DrawText(text=graph_value, location=(i*BAR_SPACING+EDGE_OFFSET+25, graph_value+10))

Every time you click OK, you get a new random chart.
The entire program can be boiled down to a single statement:
        graph.DrawRectangle(top_left=(i * BAR_SPACING + EDGE_OFFSET, graph_value),
                            bottom_right=(i * BAR_SPACING + EDGE_OFFSET + BAR_WIDTH, 0), fill_color='blue')
A "bar" in a bar chart is nothing more than a rectangle. This statement draws a bar chart. The size of the bar is same as the value being graphed (graph_value)
The beauty of the Graph Element is that when you define it, you define the coordinate system you'll be using. This make graphing stuff super _simple_. Tell the DrawRectangle primitive the value of your data and it'll take care of translating it into the pixel sizes to be plotted on the screen. You get to live in your data's coordinate system, not the tkinter canvas pixel dimensions.
MikeTheWatchGuy
on 21 Dec 2018
Right Click Menus! NEW for PySimpleGUI-tk
While working on the new ButtonMenu feature I discovered that tkinter has "popup" menus that I can assign to widgets.
You won't be able to modify the menu after you've assigned it to an element, but at least you'll one menu. I'll look at doing Updates to these menus later when someone has a real use for them and needs to be able to modify the menu.
You can set it on these elements:
text, image, canvas, graph, column, frame, table, tree
If you set it for the window when calling Window, it will automatically assign that menu to all occurrences of elements that support menu. It's as close to a global menu setting as I can get.
Note this is for the tkinter version of PySimpleGUI. I'll look into what it'll take to port to Qt.
Here's a trick for you.... if you want your entire window's background to have a right click menu, then place your layout into a Column element that has the right click menu enabled.
I'm open to expanding this feature if someone has a solid use case for it. So far no one has asked for this feature, but it was somewhat easy to implement so I went ahead and added it.
MikeTheWatchGuy
on 22 Dec 2018
PySimpleGUIWx version 0.0.1
It's official.... I started on the WxPython port.

This test window demonstrates what's operational. The buttons aren't hooked up yet, but the rest of the window functions as it should. Even managed to set the icon correctly.
While it's checked into GitHub, it won't do you a lot of good since the only thing it does at the moment is display windows like this one. No return values are sent back because buttons are not yet operational.
I have to say that programming using Wx is pretty awesome. They have a debug tool that's AMAZING. It runs in parallel with your application window. I am able to "browse" the widgets I've created, highlight them on my window and examine all of its settings. It's invaluable as 1/2 the battle is understanding what setting can be changed.

I can see why people enjoy working with it. Wx has a lot of well-written documentation and there are tons of sample programs. It would be awesome if Python could adopt Wx on a permanent basis and make it available automatically.
MikeTheWatchGuy
on 22 Dec 2018
Sample Application Using Custom Graphics
I wanted to share this application I wrote this afternoon. It's a betting application that I'm using in another project. PySimpleGUI made making this application downright trivial. It would have taken me quite a while to do it in C# and I'm guessing the amount of code would have been significantly more.

There is a lesson to be learned here for people that want to make their tkinter PySimpleGUI programs look better.
This application uses custom graphics for the check mark where you choose the bet and the up/down arrows. I could have used a "spinner" to input the amount to bet, but it would have looked like one of those GUIs from the 90's.
It was super easy to make these custom spinner. I simply put the PNG files into a folder, ran the Base64 converter program, copied and pasted the resulting code into my code and then referenced the buttons as base64 variables when I created the up/down buttons.
MikeTheWatchGuy
on 22 Dec 2018
System Tray Icon (from Wx)
The System Tray Icon feature from Qt is awesome. If you've not played with it, I highly suggest you give it a try. There are demo programs that make it super easy to use.
Here is how I use it:

I scrape the GitHub site for Issues and show the current count, most recently updated issue in the menu. I also provide a "quick launch" capability to do things like make a pull request, or launch Discord.
It's a fantastic way to quickly get to your most frequent tasks without launching a browser first and then choosing a destination.
However, if you're a tkinter user you do not have this option available. BUT, soon you'll be able to run the WxPython version.
So why does this matter? Why would you want to use WxPython version of something over Qt.
The reason is around the size of the EXE file created by PyInstaller and the overall memory usage. Qt is rather HUGE by comparison. When I compile a PySimpleGUI program using tkinter it's about 9 MB in size, with WxPython it's 11 MB and with Qt it's 240 MB. Clearly Qt is an issue.
What I'm suggesting is that if you want to use a system tray icon and you're not a Qt user, then use the soon to be released Wx version. I'm hoping to get it written today.
I really like the idea of being able to mix and match these different GUI frameworks! It's my hope that an application can launch windows using any of the 3 GUI frameworks. I'm particularly excited about mixing Wx and tkinter in the same application as I've outlined here.
Watch for the announcement today for System Tray icons. PySimpleGUIWx may be usable starting today! Wow, that would be exciting.
MikeTheWatchGuy
on 24 Dec 2018
0.2.0 PySimpleGUIWx
This release is a pretty much feature complete SystemTray implementation! It's source code compatible with the Qt System Tray implementation, the only choice up until now.
I've switched my GitHub Issues Watcher system tray application over from Qt To Wx and it's working beautifully.
This 0.2.0 release has all the features expected, the ability to hide the icon, detect message clicks, etc.
You'll find 3 demo programs that show how to use the SystemTray object.
MikeTheWatchGuy
on 26 Dec 2018
0.3.0 PySimpleGUIWx
I didn't think I was going to do much more, but ended up hooking up buttons, read with timeout, etc, so that pop-ups are functioning!
Windows are already useful and can be combined with the SystemTray.
0.3.0 - 27-Dec-2018
- Hooked up buttons!
- Browse file button is only file/folder button that works
- Text, Input and Button elements are the only working elements
- SystemTray can take any kind of image as icon
- Read with Timeout (non-zero) works
- Popups
MikeTheWatchGuy
on 28 Dec 2018
3.21.0 28-Dec-2018
- ButtonMenu Element
- Embedded base64 default icon
- Input Text Right click menu
- Disabled Input Text are now 'readonly' instead of disabled
- Listbox right click menu
- Multiline right click menu
- Text right click menu
- Output right click menu
- Image right click menu
- Canvas right click menu
- Graph right click menu
- Frame right click menu
- Tab, tabgroup right click menu (unsure if works correctly)
- Column right click menu
- Table right click menu
- Tree right click menu
- Window level right click menu
- Window icon can be filename or bytes (Base64 string)
- Window.Maximize method
- Attempted to use Styles better with Combobox
- Fixed bug blocking setting bar colors in OneLineProgressMeter
MikeTheWatchGuy
on 29 Dec 2018
PySimpleGUI(Tk) New features on GitHub
There has been some nice stuff tossed into the tkinter PySimpleGUI that you may be interested in. Not yet on PyPI.
- Ability to set the size of a Column - should really help with making lined up layouts easy
- Tables now have optional horizontal scrollbar. It's turned off by default.
MikeTheWatchGuy
on 30 Dec 2018
0.4.0 PySimpleGUIWx
- Text Element - colors, font work
- Text Update method works
- Button - Close button implemented
- Button - Implemented basic button, correctly presented Values on Read
- Button - Can now set font
- Changed overall "App" variable usage for better mainloop control
- Windows - Timeouts and non-blocking Reads work
- Windows - Autoclose works
- Windows - Non-blocking calls supported (timeout=0)
- Windows - Grab anywhere works
- Windows - No title-bar works
- Windows - Location and Size working correctly
- Correctly adding element padding to Text, Input, Buttons
- Popups - most Popups work (except for the input type that involve folders)
This is a sizable update to PySimpleGUIWx. You can do most all of the Popup calls, including the ones without title bars or are non-blocking or auto-closing.
MikeTheWatchGuy
on 30 Dec 2018
PySimpleGUIWx Development Strategy
While it may look like chaotic development, there is method to the madness.
First, if you haven't noticed, I'm attentive to the Issue list and what users are doing that may need assistance. The package has been extended, often, with the help of programmers building their applications. When PySimpleGUI is lacking in an area simply because it hasn't been fully developed, I'm more likely to work on that if someone is using it. So, be vocal with your requests.
Second, there's a Wx port in the mix. Yea, I know, Qt isn't "done" so why Wx? The reason is that I am not seeing a lot of problems reported by Qt users. It's "good enough" at this point. I'm an 80% person. But will finish the other 20% if there's an active need. The reason for adding Wx is that it is the "happy middle" between tkinter and Qt.
Wx brings with it features that tkinter doesn't have but could use. The System Tray is the obvious one. Further down the road the more complex Elements are likely going to be coming from Wx. There are some nice ones I'm eyeing such as speedometers.
I'm bringing up Wx in chunks that are usable immediately. The system tray is "done" but I'm sure people will want icons on the menus, etc. It's a solid working, basic system tray icon.
The cool thing about Wx and tkinter is that they can run side-by-side. There is no restriction on running a WxPython system tray with tkinter windows.
But, I am trying to get the WxPython windows operational too, starting with the Popups. The idea here is to provide the high-level APIs so that users an begin to use them right away. Some people don't need fully-custom windows so why not build something that's useful right away?
While creating the Popup windows, I'm also developing the core Window features like changing location, sizing, etc These features are represented by the parameters to popup. Get Popup fully operational and I'll have a good number of Window features completed because you can set things like no titlebar in a popup call.
I think it's a useful strategy to be working from. There have been over 1,100 installs of PySimpleGUIWx already. That's pretty amazing considering the tiny amount of features that have been completed.
I also try to push features out the door quickly and often. There have been 4 released of PySimpleGUIWx in the past 5 days, each pretty beefy.
Frequent releases get the cool new things into the hands of users quickly and also gets run-time on the package. I'm finding it difficult to get enough traffic pulling releases from GitHub that I really have to release to PyPI if I want any testing done at all on the releases.
It's crazy but the results speak for themselves. I see a good number of happy users.
MikeTheWatchGuy
on 30 Dec 2018
GitHub Migration
I'm planning on migrating the PySimpleGUI project over to another GitHub account. I want it to live in a standalone location. The new account is called... wait for it....
PySimpleGUI
That will make the location of the software:
I'm targeting Jan 1 to make the change.
Evidently GitHub will provide forwarding links, for people period of time.
I recommend people use http://www.PySimpleGUI.com when wanting to get to the PySimpleGUI GitHub page as that URL will always point to the current GitHub repository. http://www.PySimpleGUI.org will get you the latest documentation.
MikeTheWatchGuy
on 30 Dec 2018
PySimpleGUI Feature Matrix
This is what I'm working from while developing PySimpleGUIWx and finishing PySimpleGUIQt.

MikeTheWatchGuy
on 31 Dec 2018
New Year's news
Migration to new GitHub
We're now live at:
https://github.com/PySimpleGUI/PySimpleGUI
GitHub will automatically forward people that try to use the old addresses.
I recommend using http://www.PySimpleGUI.com as it'll point to the right place.
By the numbers....100,000
There have been 100,000 (ok, 99,000 but it'll be 100K by tomorrow) pip installs of PySimpleGUI, when you add together the 4 packages representing 3 ports, PySimpleGUI, PySimpleGUI27, PySimpleGUIQt, PySimpleGUIWx
I have no clue how that number translates into anything real. How many installs happen daily that are automated and how many are brand new users? Who knows.
Also recently passed the 1,000 stars mark. This one has some meaning behind it as no robots are at work, only people, when it comes to stars. 1,000 people indicating this is a good package does have some statistical value.
6 months.... the amount of time PySimpleGUI has been released.
MikeTheWatchGuy
on 2 Jan 2019
Wow... a paper feature matrix... Long time no see :)
Happy new year and happy 100k downloads of PysimpleGUI.
 deajan
on 2 Jan 2019
deajan
on 2 Jan 2019
100,000 Installs
Yesterday the total number of Pip installs for PySimpleGUI, all versions, reached 100,052.
It's a milestone of sorts, reaching the "first" 100K. It's not very useful on its own, but is good if you're comparing other packages that also have this stat as well as comparing the PySimpleGUI versions.
The rate of installs, per week:
PySimpleGUI 2,000
PySimpleGUIQt 3,000
PySimpleGUI27 1,400
PySimpleGUIWx 1,300
MikeTheWatchGuy
on 3 Jan 2019
Wx - Visibility
Working through the feature matrix. Working to get Input, Button, and Text done, solidly. This way the features that are available to users should work. A good number won't work until I get around to fixing whatever is causing the issue.

It takes Voodoo to get these Frameworks to autosize windows. Each are different and some are weird, but eventually the job does get done.
This demo shows a window that starts with several Elements invisible.
If you want you element to be invisible from the start, you will not be able to do that using the Visible parameter. You will instead Finalize your window and then make Update calls to set the ones you want to be invisible.
If you do not use this 2-step method, then you will get a messed up background when the window expands. Here's an example of setting the visible flag to False.

MikeTheWatchGuy
on 5 Jan 2019
0.5.0 PySimpleGUIWx 6-Jan-2019
- New element - Multiline input
- New element - Multiline output
- Borderless Windows
- Grab anywhere windows
- Alpha channel for windows
- Finishing up the Text and Input Text Elements
- Visibilty for all Elements
- Input Get / Set focus
- Output element - unable to get stdout to re-route
- Debug window works
Uploaded this latest release to PyPI today.
It's getting there!
MikeTheWatchGuy
on 6 Jan 2019
Feature matrix cont...
The problem is that there are actually 3 answers per square, not just 1.

MikeTheWatchGuy
on 6 Jan 2019
Measuring speed of packages & ease of porting.
It's getting even more fun with Wx coming onto the scene.
Check out the Color_Names demo program!
Qt and Wx both loaded in 2 or 3 seconds. Tkinter took 4 or 5 seconds. It's a noticeable difference.
Three different frameworks available by simply changing the import statement. Ease of changing between the packages == how long it takes to change two letters. This super-quick time to move between frameworks is a benefit/feature that had never dawned on me before.
All 3 performed great at this program, popping up multiple windows, tooltips, spacing of buttons.
MikeTheWatchGuy
on 7 Jan 2019
One Line Progress Meter - Wx

Almost all of the high level interfaces into PySimpleGUIWx are done (Popups, Debug Print, Progress Meter). So if Wx is your favorite and all you need are simple popups, then you should perhaps consider trying it out.
In order to implement the progress meter, I needed to complete the Text, Column and Progress Bar elements.
I recommend grabbing a version from the Master Branch as the changes take a little while to get to PyPI.
MikeTheWatchGuy
on 9 Jan 2019
PySimpleGUIWx 0.6.0 - The "it's coming together" release
Wx is coming together fairly quickly.
I'm following a strategy of bringing up features and functions an element at a time, but, in an order that enables certain applications. For Example, the HowDoI application is one of the first to bring up. It requires a Multiline Input, Output, Buttons, No titlebar Grab Anywhere.
The System Tray application that scrapes GitHub Issues and launches some applications Also works.
Next up will be the Launcher button-bar that I run that runs programs and scripts at the push of a button.
I also focused on the high-level features set.... the Popups, Debug Window and the Progress Meter. Those too required certain features - autoclose, Output element, multi-windows, progress meter, async windows, in addition to features already listed.
If you have an application that you would like to run on PySimpleGUIWx but the port has not supplied you with all of the required features, open an Issue. It helps me guide the effort
0.6.0 9-Jan-2019
- Column Element
- Checkbox Element with events
- Output Element
- Background Image (I think works)
- Debug Print
- One Line Progress Meter
- All Popups works
------------ complete and ready to use ------------
Elements:
- Text
- Input Text
- Buttons including file/folder browse
- Input multiline
- Outputmultiline
- Output
- Columns
- Progress Meters
Features
- Windows & System Tray
- Debug Print
- All Popups
- Check box
- Keyboard key events
- Mouse wheel events
- Multiple windows
- Async windows
- Read with timeout
- Background images
- One Line Progress Meter (tm)
- Autoclosing windows
- No titlebar windows
- Grab anywhere windows
- Default Icon
- Base64 Icons
MikeTheWatchGuy
on 9 Jan 2019
The PySimpleGUI Logo
Now that the PySimpleGUI logo is included with the source file you're more likely to have seen it. The code isn't on PyPI yet for the main PySimpleGUI.py file, but it's been on GitHub for a while now.
Here's a reminder of how it looks:

I'm curious how many people have _not_ noticed that it's the Python logo turned on it's head. Prior to using it I looked on the net and I wasn't able to find any images like it. None. No posts where someone has used the Python logo in this way. Doing an "image search" on Google and Bing brought up no matches. I'm surprised no one at least did it once and posted it.
I like it because it resembles the letters "SG" (as in Simple GUI).... at least that was the idea.
Hey, can't be a 'thing'without a name and a logo, right?
MikeTheWatchGuy
on 9 Jan 2019
Docs stored only on GitHub
I'm now storing the docs only on the GitHub site. Previously I had local copies that I would work from and check in. This will enable everyone to access the most up to date documents.
MikeTheWatchGuy
on 11 Jan 2019
Trees with Icons
Finally there's a match between how trees on PySimpleGUI and PySimpleGUIQt behave.... sorta....
Checked in a new Tree Element Demo program that displays a directory structure with a little folder icon for each folder.
Using PySimpleGUI the code produces this window:

PySimpleGUIQt produces this window:

It would appear that the Qt implementation does not yet have "values" that you can set on each entry. On the tkinter version I've added the file size for each entry.
If you are developing a program using PySimpleGUIQt that uses trees and you need to store values, just post an Issue and it'll get implemented.
What continues to amaze me is that the _exact_ same source code produced those 2 windows. PySimpleGUI code continues to be source code compatible between the GUI frameworks. I fully expect and so far have seen PySimpleGUIWx code be compatible. It's an exciting time to be working with PySimpleGUI.
MikeTheWatchGuy
on 11 Jan 2019
PySimpleGUIWx Get Comboboxes and Radio Buttons
Nailed two more elements last night.... complete with colors, sizes, events and updates.
Here's a summary window of the Elements that are up and running.
Not visible is the Column Element which enables just about any layout.

MikeTheWatchGuy
on 12 Jan 2019
WxPython thoughts....
I'm liking WxPython!
It's very consistent in how the widgets are configured and how you interact with them. The result is that I'm able to properly get the colors and styles right without weird side effects. With tkinter the combobox element still isn't able to be correctly styled and sometimes looks pretty dated. Not so with the PySimpleGUIWx combobox. It looks great.
The only downside I've experienced with WxPython so far has been the Linux installation. It was hell and feel like it's going to be a barrier to entry.
It may be that the PySimpleGUIWx users are pretty much limited to windows but that's still a large number of users.
My hope is that I'm going to be able to do a better job with tables and trees using WxPython and that I also am going to be able to use the exciting advanced widgets like Speedometers!! It would be cool to be able to use custom widgets that are available on the net.
While WxPython is the most comfortable of the GUI frameworks I've used so far, it's far far away from being beginner "friendly". It's barely "intermediate friendly". While I wish it could become the standard for Python, there's still an enormous gap for beginners.
If only these GUI frameworks offered a _parallel SDK_ to their primary SDK that is more like PySimpleGUI.
It's clearly possible to offer an _alternate_ interface to the same underlying objects in a way that's more user friendly. I'm surprised it's not been done or isn't being done now.
Given how approachable Python bills itself as, why isn't the GUI programming also approachable?
MikeTheWatchGuy
on 12 Jan 2019
Black
Trying the latest coding fad by running PySimpleGUIWx through the black code reformatting tool. The only option I turned off was "normalizing quotes". I like single quotes and it would have converted everything to double quotes.
It's "interesting". It will make documenting the element objects easier as it formats init calls by putting each parameter on a separate line.
For example, it reformatted the Window class definition to this:
    def __init__(
        self,
        title,
        default_element_size=DEFAULT_ELEMENT_SIZE,
        default_button_element_size=(None, None),
        auto_size_text=None,
        auto_size_buttons=None,
        location=(None, None),
        size=(None, None),
        element_padding=None,
        button_color=None,
        font=None,
        progress_bar_color=(None, None),
        background_color=None,
        border_depth=None,
        auto_close=False,
        auto_close_duration=None,
        icon=DEFAULT_BASE64_ICON,
        force_toplevel=False,
        alpha_channel=1,
        return_keyboard_events=False,
        use_default_focus=True,
        text_justification=None,
        no_titlebar=False,
        grab_anywhere=False,
        keep_on_top=False,
        resizable=True,
        disable_close=False,
        disable_minimize=False,
        background_image=None,
    ):
It's a lot easier to read, but it means scrolling through a LOT more pages of code. It pushed the number of lines of code from 6,985 to 9,368! YIKES!
It also modified the window layout code in an unexpected way:
BEFORE
def main():
    # ChangeLookAndFeel('Black')
    layout = [[Text('TEXT1',tooltip='Tooltip'), Text('TEXT2', )],
              [Text('You should be importing it rather than running it', justification='l', size=(50, 1))],
              [Text('Here is your sample input window....')],
              [Text('Source Folder', size=(15, 1), justification='right'), InputText('Source', focus=True),
               FileBrowse()],
              [Text('Destination Folder', size=(15, 1), justification='right'), InputText('Dest'), FolderBrowse()],
              [Button('Ok')]]

    window = Window('Demo window..',
                    default_element_size=(35,1),
                    auto_size_text=True,
                    auto_size_buttons=True,
                    no_titlebar=False,
                    disable_close=False,
                    disable_minimize=True,
                    grab_anywhere=True,
                    ).Layout(layout)
    event, values = window.Read()
    print(event, values)
    window.Close()
AFTER
def main():
    # ChangeLookAndFeel('Black')
    layout = [
        [Text('TEXT1', tooltip='Tooltip'), Text('TEXT2')],
        [
            Text(
                'You should be importing it rather than running it',
                justification='l',
                size=(50, 1),
            )
        ],
        [Text('Here is your sample input window....')],
        [
            Text('Source Folder', size=(15, 1), justification='right'),
            InputText('Source', focus=True),
            FileBrowse(),
        ],
        [
            Text('Destination Folder', size=(15, 1), justification='right'),
            InputText('Dest'),
            FolderBrowse(),
        ],
        [Button('Ok')],
    ]

    window = Window(
        'Demo window..',
        default_element_size=(35, 1),
        auto_size_text=True,
        auto_size_buttons=True,
        no_titlebar=False,
        disable_close=False,
        disable_minimize=True,
        grab_anywhere=True,
    ).Layout(layout)
    event, values = window.Read()
    print(event, values)
    window.Close()
The verdict is that it's great for Class definitions, but completely and totally f's up thePySimpleGUI window layouts. What was readable and matched the screen became nothing more than code and lines of parameter (yuck).
Not sure where that leaves the PySimpleGUIWx.py code itself.
MikeTheWatchGuy
on 12 Jan 2019
3.22.0 PySimpleGUI 1.22.0 PySimpleGUI27
- Added type hints to some portions of the code
- Output element can be made invisible
- Image sizing and subsample for Button images
- Invisibility for ButtonMenus
- Attempt at specifying size of Column elements (limited success)
- Table Element
- New row_colors parameter
- New vertical_scroll_only parameter - NOTE - will have to disable to get horizontal scrollbars
- Tree Element
- New row_height parameter
- New feature - Icons for tree entries using filename or Base64 images
- Fix for bug sending back continuous mouse events
- New parameter silence_on_error for FindElement / Element calls
- Slider returns float now
- Fix for Menus when using Python 2.7
- Combobox Styling (again)
MikeTheWatchGuy
on 13 Jan 2019
GitHub Private Repositories Are Now _Free_
I heard this news on the Python Bytes podcast (has fantastic, practical, stuff you can use). Previously if you wanted a private project, you had to pay a monthly fee. Now private projects are free up to a certain number of developers (I think 3).
Not surprisingly, GitHub didn't send me anything about the change.
MikeTheWatchGuy
on 15 Jan 2019
3.23.0 1.23.0 16-Jan-2019
A surprise release of animated GIFs!
No one has asked for this one in a while. I want to be able to offer an indeterminate progress bar, essentially a "loading" indicator. Spinners, donuts, progress bars,... There are some real fun ones that I'm finding that I'll also be posting.

- Animated GIFs!
- Calendar Chooser stays on top of other windows
- Fixed bug of no column headings for Tables
- Tables now use the font parameter
MikeTheWatchGuy
on 16 Jan 2019
A GIFt to you....
import PySimpleGUI as sg

gif103 = b'R0lGODlhoAAYAKEAALy+vOTm5P7+/gAAACH/C05FVFNDQVBFMi4wAwEAAAAh+QQJCQACACwAAAAAoAAYAAAC55SPqcvtD6OctNqLs968+w+G4kiW5omm6sq27gvHMgzU9u3cOpDvdu/jNYI1oM+4Q+pygaazKWQAns/oYkqFMrMBqwKb9SbAVDGCXN2G1WV2esjtup3mA5o+18K5dcNdLxXXJ/Ant7d22Jb4FsiXZ9iIGKk4yXgl+DhYqIm5iOcJeOkICikqaUqJavnVWfnpGso6Clsqe2qbirs61qr66hvLOwtcK3xrnIu8e9ar++sczDwMXSx9bJ2MvWzXrPzsHW1HpIQzNG4eRP6DfsSe5L40Iz9PX29/j5+vv8/f7/8PMKDAgf4KAAAh+QQJCQAHACwAAAAAoAAYAIKsqqzU1tTk4uS8urzc3tzk5uS8vrz+/v4D/ni63P4wykmrvTjrzbv/YCiOZGliQKqurHq+cEwBRG3fOAHIfB/TAkJwSBQGd76kEgSsDZ1QIXJJrVpowoF2y7VNF4aweCwZmw3lszitRkfaYbZafnY0B4G8Pj8Q6hwGBYKDgm4QgYSDhg+IiQWLgI6FZZKPlJKQDY2JmVgEeHt6AENfCpuEmQynipeOqWCVr6axrZy1qHZ+oKEBfUeRmLesb7TEwcauwpPItg1YArsGe301pQery4fF2sfcycy44MPezQx3vHmjv5rbjO3A3+Th8uPu3fbxC567odQC1tgsicuGr1zBeQfrwTO4EKGCc+j8AXzH7l5DhRXzXSS4c1EgPY4HIOqR1stLR1nXKKpSCctiRoYvHcbE+GwAAC03u1QDFCaAtJ4D0vj0+RPlT6JEjQ7tuebN0qJKiyYt83SqsyBR/GD1Y82K168htfoZ++QP2LNfn9nAytZJV7RwebSYyyKu3bt48+rdy7ev378NEgAAIfkECQkABQAsAAAAAKAAGACCVFZUtLK05ObkvL68xMLE/v7+AAAAAAAAA/5Yutz+MMpJq7046827/2AojmRpYkCqrqx6vnBMAcRA1LeN74Ds/zGabYgjDnvApBIkLDqNyKV0amkGrtjswBZdDL+1gSRM3hIk5vQQXf6O1WQ0OM2Gbx3CQUC/3ev3NV0KBAKFhoVnEQOHh4kQi4yIaJGSipQCjg+QkZkOm4ydBVZbpKSAA4IFn42TlKEMhK5jl69etLOyEbGceGF+pX1HDruguLyWuY+3usvKyZrNC6PAwYHD0dfP2ccQxKzM2g3ehrWD2KK+v6YBOKmr5MbF4NwP45Xd57D5C/aYvTbqSp1K1a9cgYLxvuELp48hv33mwuUJaEqHO4gHMSKcJ2BvIb1tHeudG8UO2ECQCkU6jPhRnMaXKzNKTJdFC5dhN3LqZKNzp6KePh8BzclzaFGgR3v+C0ONlDUqUKMu1cG0yE2pWKM2AfPkadavS1qIZQG2rNmzaNOqXcu2rdsGCQAAIfkECQkACgAsAAAAAKAAGACDVFZUpKKk1NbUvLq85OLkxMLErKqs3N7cvL685Obk/v7+AAAAAAAAAAAAAAAAAAAABP5QyUmrvTjrzbv/YCiOZGmeaKqubOuCQCzPtCwZeK7v+ev/KkABURgWicYk4HZoOp/QgwFIrYaEgax2ux0sFYYDQUweE8zkqXXNvgAQgYF8TpcHEN/wuEzmE9RtgWxYdYUDd3lNBIZzToATRAiRkxpDk5YFGpKYmwianJQZoJial50Wb3GMc4hMYwMCsbKxA2kWCAm5urmZGbi7ur0Yv8AJwhfEwMe3xbyazcaoBaqrh3iuB7CzsrVijxLJu8sV4cGV0OMUBejPzekT6+6ocNV212BOsAWy+wLdUhbiFXsnQaCydgMRHhTFzldDCoTqtcL3ahs3AWO+KSjnjKE8j9sJQS7EYFDcuY8Q6clBMIClS3uJxGiz2O1PwIcXSpoTaZLnTpI4b6KcgMWAJEMsJ+rJZpGWI2ZDhYYEGrWCzo5Up+YMqiDV0ZZgWcJk0mRmv301NV6N5hPr1qrquMaFC49rREZJ7y2due2fWrl16RYEPFiwgrUED9tV+fLlWHxlBxgwZMtqkcuYP2HO7Gsz52GeL2sOPdqzNGpIrSXa0ydKE42CYr9IxaV2Fr2KWvvxJrv3DyGSggsfjhsNnz4ZfStvUaM5jRs5AvDYIX259evYs2vfzr279+8iIgAAIfkECQkACgAsAAAAAKAAGACDVFZUrKqszMrMvL683N7c5ObklJaUtLK0xMLE5OLk/v7+AAAAAAAAAAAAAAAAAAAABP5QyUmrvTjrzbv/YCiOZGmeaKqubOuCQSzPtCwBeK7v+ev/qgBhSCwaCYEbYoBYNpnOKABIrYaEhqx2u00kFQCm2DkWD6bWtPqCFbjfcLcBqSyT7wj0eq8OJAxxgQIGXjdiBwGIiokBTnoTZktmGpKVA0wal5ZimZuSlJqhmBmilhZtgnBzXwBOAZewsAdijxIIBbi5uAiZurq8pL65wBgDwru9x8QXxsqnBICpb6t1CLOxsrQWzcLL28cF3hW3zhnk3cno5uDiqNKDdGBir9iXs0u1Cue+4hT7v+n4BQS4rlwxds+iCUDghuFCOfFaMblW794ZC/+GUUJYUB2GjMrIOgoUSZCCH4XSqMlbQhFbIyb5uI38yJGmwQsgw228ibHmBHcpI7qqZ89RT57jfB71iFNpUqT+nAJNpTIMS6IDXub5BnVCzn5enUbtaktsWKSoHAqq6kqSyyf5vu5kunRmU7L6zJZFC+0dRFaHGDFSZHRck8MLm3Q6zPDwYsSOSTFurFgy48RgJUCBXNlkX79V7Ry2c5GP6SpYuKjOEpH0nTH5TsteISTBkdtCXZOOPbu3iRrAadzgQVyH7+PIkytfzry58+fQRUQAACH5BAkJAAwALAAAAACgABgAg1RWVKSipMzOzNze3Ly6vNTW1OTm5MTCxKyqrOTi5Ly+vNza3P7+/gAAAAAAAAAAAAT+kMlJq7046827/2AojmRpnmiqrmzrvhUgz3Q9S0iu77wO/8AT4KA4EI3FoxKAGzif0OgAEaz+eljqZBjoer9fApOBGCTM6LM6rbW6V2VptM0AKAKEvH6fDyjGZWdpg2t0b4clZQKLjI0JdFx8kgR+gE4Jk3pPhgxFCp6gGkSgowcan6WoCqepoRmtpRiKC7S1tAJTFHZ4mXqVTWcEAgUFw8YEaJwKBszNzKYZy87N0BjS0wbVF9fT2hbczt4TCAkCtrYCj7p3vb5/TU4ExPPzyGbK2M+n+dmi/OIUDvzblw8gmQHmFhQYoJAhLkjs2lF6dzAYsWH0kCVYwElgQX/+H6MNFBkSg0dsBmfVWngr15YDvNr9qjhA2DyMAuypqwCOGkiUP7sFDTfU54VZLGkVWPBwHS8FBKBKjTrRkhl59OoJ6jjSZNcLJ4W++mohLNGjCFcyvLVTwi6JVeHVLJa1AIEFZ/CVBEu2glmjXveW7YujnFKGC4u5dBtxquO4NLFepHs372DBfglP+KtvLOaAmlUebgkJJtyZcTBhJMZ0QeXFE3p2DgzUc23aYnGftaCoke+2dRpTfYwaTTu8sCUYWc7coIQkzY2wii49GvXq1q6nREMomdPTFOM82Xhu4z1E6BNl4aELJpj3XcITwrsxQX0nnNLrb2Hnk///AMoplwZe9CGnRn77JYiCDQzWgMMOAegQIQ8RKmjhhRhmqOGGHHbo4YcZRAAAIfkECQkADQAsAAAAAKAAGACDVFZUrKqs1NbUvL685ObkxMbE3N7clJaUtLK0xMLE7O7szMrM5OLk/v7+AAAAAAAABP6wyUmrvTjrzbv/YCiOZGmeaKqubOu+VSDPdD1LQK7vvA7/wFPAQCwaj4YALjFIMJ3NpxQQrP4E2KxWSxkevuBwmKFsAJroZxo9oFrfLIFiTq/PBV3DYcHv+/kHSUtraoUJbnCJJ3J8CY2PCngTAQx7f5cHZDhoCAGdn54BT4gTbExsGqeqA00arKtorrCnqa+2rRdyCQy8vbwFkXmWBQvExsULgWUATwGsz88IaKQSCQTX2NcJrtnZ2xkD3djfGOHiBOQX5uLpFIy9BrzxC8GTepeYgmZP0tDR0xbMKbg2EB23ggUNZrCGcFwqghAVliPQUBuGd/HkEWAATJIESv57iOEDpO8ME2f+WEljQq2BtXPtKrzMNjAmhXXYanKD+bCbzlwKdmns1VHYSD/KBiXol3JlGwsvBypgMNVmKYhTLS7EykArhqgUqTKwKkFgWK8VMG5kkLGovWFHk+5r4uwUNFFNWq6bmpWsS4Jd++4MKxgc4LN+owbuavXdULb0PDYAeekYMbkmBzD1h2AUVMCL/ZoTy1d0WNJje4oVa3ojX6qNFSzISMDARgJuP94TORJzs5Ss8B4KeA21xAuKXadeuFi56deFvx5mfVE2W1/z6umGi0zk5ZKcgA8QxfLza+qGCXc9Tlw9Wqjrxb6vIFA++wlyChjTv1/75EpHFXQgQAG+0YVAJ6F84plM0EDBRCqrSCGLLQ7KAkUUDy4UYRTV2eGhZF4g04d3JC1DiBOFAKTIiiRs4WIWwogh4xclpagGIS2xqGMLQ1xnRG1AFmGijVGskeOOSKJgw5I14NDDkzskKeWUVFZp5ZVYZqnllhlEAAAh+QQJCQAMACwAAAAAoAAYAINUVlSkoqTMzszc3ty8urzU1tTk5uTEwsSsqqzk4uS8vrzc2tz+/v4AAAAAAAAAAAAE/pDJSau9OOvNu/9gKI5kaZ5oqq5s674pIM90PUtIru+8Dv/AE+CgOBCNxaMSgBs4n9DoABGs/npY6mQY6Hq/XwKTgRgkzOdEem3WWt+rsjTqZgAUAYJ+z9cHFGNlZ2ZOg4ZOdXCKE0UKjY8YZQKTlJUJdVx9mgR/gYWbe4WJDI9EkBmmqY4HGquuja2qpxgKBra3tqwXkgu9vr0CUxR3eaB7nU1nBAIFzc4FBISjtbi3urTV1q3Zudvc1xcH3AbgFLy/vgKXw3jGx4BNTgTNzPXQT6Pi397Z5RX6/TQArOaPArWAuxII6FVgQIEFD4NhaueOEzwyhOY9cxbtzLRx/gUnDMQVUsJBgvxQogIZacDCXwOACdtyoJg7ZBiV2StQr+NMCiO1rdw3FCGGoN0ynCTZcmHDhhBdrttCkYACq1ivWvRkRuNGaAkWTDXIsqjKo2XRElVrtAICheigSmRnc9NVnHIGzGO2kcACRBaQkhOYNlzhwIcrLBVq4RzUdD/t1NxztTIfvBmf2fPr0cLipGzPGl47ui1i0uZc9nIYledYO1X7WMbclW+zBQs5R5YguCSD3oRR/0sM1Ijx400rKY9MjDLWPpiVGRO7m9Tx67GuG8+u3XeS7izeEkqDps2wybKzbo1XCJ2vNKMWyf+QJUcAH1TB6PdyUdB4NWKpNBFWZ/MVCMQdjiSo4IL9FfJEgGJRB5iBFLpgw4U14IDFfTpwmEOFIIYo4ogklmjiiShSGAEAIfkECQkADQAsAAAAAKAAGACDVFZUrKqs1NbUvL685ObkxMbE3N7clJaUtLK0xMLE7O7szMrM5OLk/v7+AAAAAAAABP6wyUmrvTjrzbv/YCiOZGmeaKqubOu+aSDPdD1LQK7vvA7/wFPAQCwaj4YALjFIMJ3NpxQQrP4E2KxWSxkevuBwmKFsAJroZxo9oFrfLIFiTq/PBV3DYcHv+/kHSUtraoUJbnCJFWxMbBhyfAmRkwp4EwEMe3+bB2Q4aAgBoaOiAU+IE4wDjhmNrqsJGrCzaLKvrBgDBLu8u7EXcgkMw8TDBZV5mgULy83MC4FlAE8Bq9bWCGioEgm9vb+53rzgF7riBOQW5uLpFd0Ku/C+jwoLxAbD+AvIl3qbnILMPMl2DZs2dfESopNFQJ68ha0aKoSIoZvEi+0orOMFL2MDSP4M8OUjwOCYJQmY9iz7ByjgGSbVCq7KxmRbA4vsNODkSLGcuI4Mz3nkllABg3nAFAgbScxkMpZ+og1KQFAmzTYWLMIzanRoA3Nbj/bMWlSsV60NGXQNmtbo2AkgDZAMaYwfSn/PWEoV2KRao2ummthcx/Xo2XhH3XolrNZwULeKdSJurBTDPntMQ+472SDlH2cr974cULUgglNk0yZmsHgXZbWtjb4+TFL22gxgG5P0CElkSJIEnPZTyXKZaGoyVwU+hLC2btpuG59d7Tz267cULF7nXY/uXH12O+Nd+Yy8aFDJB5iqSbaw9Me6sadC7FY+N7HxFzv5C4WepAIAAnjIjHAoZQLVMwcQIM1ApZCCwFU2/RVFLa28IoUts0ChHxRRMBGHHSCG50Ve5QlQgInnubKfKk7YpMiLH2whYxbJiGHjFy5JYY2OargI448sDEGXEQQg4RIjOhLiI5BMCmHDkzTg0MOUOzRp5ZVYZqnlllx26SWTEQAAIfkECQkADAAsAAAAAKAAGACDVFZUpKKkzM7M3N7cvLq81NbU5ObkxMLErKqs5OLkvL683Nrc/v7+AAAAAAAAAAAABP6QyUmrvTjrzbv/YCiOZGmeaKqubOu+cAfMdG3TEqLvfL/HwCAJcFAcikcjcgnIDZ7QqHSAEFpfvmx1Qgx4v2AwoclADBLnNHqt3l7fKfNU6mYAFAGCfs/XBxRkZmhqhGx1cCZGCoqMGkWMjwcYZgKVlpcJdV19nAR/gU8JnXtQhwyQi4+OqaxGGq2RCq8GtLW0khkKtra4FpQLwMHAAlQUd3mje59OaAQCBQXP0gRpprq7t7PYBr0X19jdFgfb3NrgkwMCwsICmcZ4ycqATk8E0Pf31GfW5OEV37v8URi3TeAEgLwc9ZuUQN2CAgMeRiSmCV48T/PKpLEnDdozav4JFpgieC4DyYDmUJpcuLIgOocRIT5sp+kAsnjLNDbDh4/AAjT8XLYsieFkwlwsiyat8KsAsIjDinGxqIBA1atWMYI644xnNAIhpQ5cKo5sBaO1DEpAm22oSl8NgUF0CpHiu5vJcsoZYO/eM2g+gVpAmFahUKWHvZkdm5jCr3XD3E1FhrWyVmZ8o+H7+FPsBLbl3B5FTPQCaLUMTr+UOHdANM+bLuoN1dXjAnWBPUsg3Jb0W9OLPx8ZTvwV8eMvLymXLOGYHstYZ4eM13nk8eK5rg83rh31FQRswoetiHfU7Cgh1yUYZAqR+w9adAT4MTmMfS8ZBan5uX79gmrvBS4YBBGLFGjggfmFckZnITUIoIAQunDDhDbkwMN88mkR4YYcdujhhyCGKOKIKkQAACH5BAkJAA0ALAAAAACgABgAg1RWVKyqrNTW1Ly+vOTm5MTGxNze3JSWlLSytMTCxOzu7MzKzOTi5P7+/gAAAAAAAAT+sMlJq7046827/2AojmRpnmiqrmzrvnAXzHRt0xKg73y/x8AgKWAoGo9IQyCXGCSaTyd0ChBaX4KsdrulEA/gsFjMWDYAzjRUnR5Ur3CVQEGv2+kCr+Gw6Pv/fQdKTGxrhglvcShtTW0ajZADThhzfQmWmAp5EwEMfICgB2U5aQgBpqinAVCJE4ySjY+ws5MZtJEaAwS7vLsJub29vxdzCQzHyMcFmnqfCwV90NELgmYAUAGS2toIaa0SCcG8wxi64gTkF+bi6RbhCrvwvsDy8uiUCgvHBvvHC8yc9kwDFWjUmVLbtnVr8q2BuXrzbBGAGBHDu3jjgAWD165CuI3+94gpMIbMAAEGBv5tktDJGcFAg85ga6PQm7tzIS2K46ixF88MH+EpYFBRXTwGQ4tSqIQymTKALAVKI1igGqEE3RJKWujm5sSJSBl0pPAQrFKPGJPmNHo06dgJxsy6xUfSpF0Gy1Y2+DLwmV+Y1tJk0zpglZOG64bOBXrU7FsJicOu9To07MieipG+/aePqNO8Xjy9/GtVppOsWhGwonwM7GOHuyxrpncs8+uHksU+OhpWt0h9/OyeBB2Qz9S/fkpfczJY6yqG7jxnnozWbNjXcZNe331y+u3YSYe+Zdp6HwGVzfpOg6YcIWHDiCzoyrxdIli13+8TpU72SSMpAzx9EgUj4ylQwIEIQnMgVHuJ9sdxgF11SiqpRNHQGgA2IeAsU+QSSRSvXTHHHSTqxReECgpQVUxoHKKGf4cpImMJXNSoRTNj5AgGi4a8wmFDMwbZQifBHUGAXUUcGViPIBoCpJBQonDDlDbk4MOVPESp5ZZcdunll2CGKaYKEQAAIfkECQkADAAsAAAAAKAAGACDVFZUpKKkzM7M3N7cvLq81NbU5ObkxMLErKqs5OLkvL683Nrc/v7+AAAAAAAAAAAABP6QyUmrvTjrzbv/YCiOZGmeaKqubOu+cAzMdG3TEqLvfL/HwCAJcFAcikcjcgnIDZ7QqHSAEFpfvmx1Qgx4v2AwoclADBLnNHqt3l7fKfNU6mYAFAGCfs/XBxRkZmxsaml1cBJGCoqMGkWMjwcai5GUChhmApqbmwVUFF19ogR/gU8Jo3tQhwyQlpcZlZCTBrW2tZIZCre3uRi7vLiYAwILxsfGAgl1d3mpe6VOaAQCBQXV1wUEhhbAwb4X3rzgFgfBwrrnBuQV5ufsTsXIxwKfXHjP0IBOTwTW//+2nWElrhetdwe/OVIHb0JBWw0RJJC3wFPFBfWYHXCWL1qZNP7+sInclmABK3cKYzFciFBlSwwoxw0rZrHiAIzLQOHLR2rfx2kArRUTaI/CQ3QwV6Z7eSGmQZcpLWQ6VhNjUTs7CSjQynVrT1NnqGX7J4DAmpNKkzItl7ZpW7ZrJ0ikedOmVY0cR231KGeAv6DWCCxAQ/BtO8NGEU9wCpFl1ApTjdW8lvMex62Y+fAFOXaswMqJ41JgjNSt6MWKJZBeN3OexYw68/LJvDkstqCCCcN9vFtmrCPAg08KTnw4ceAzOSkHbWfjnsx9NpfMN/hqouPIdWE/gmiFxDMLCpW82kxU5r0++4IvOa8k8+7wP2jxETuMfS/pxQ92n8C99fgAsipAxCIEFmhgfmmAd4Z71f0X4IMn3CChDTloEYAWEGao4YYcdujhhyB2GAEAIfkECQkADQAsAAAAAKAAGACDVFZUrKqs1NbUvL685ObkxMbE3N7clJaUtLK0xMLE7O7szMrM5OLk/v7+AAAAAAAABP6wyUmrvTjrzbv/YCiOZGmeaKqubOu+cBzMdG3TEqDvfL/HwCApYCgaj0hDIJcYJJpPJ3QKEFpfgqx2u6UQD+CwWMxYNgDONFSdHlSvcJVAQa/b6QKv4bDo+/99B0pMbGuGCW9xFG1NbRqNkANOGpKRaRhzfQmanAp5EwEMfICkB2U5aQgBqqyrAVCJE4yVko+0jJQEuru6Cbm8u74ZA8DBmAoJDMrLygWeeqMFC9LT1QuCZgBQAZLd3QhpsRIJxb2/xcIY5Aq67ObDBO7uBOkX6+3GF5nLBsr9C89A7SEFqICpbKm8eQPXRFwDYvHw0cslLx8GiLzY1bNADpjGc/67PupTsIBBP38EGDj7JCEUH2oErw06s63NwnAcy03M0DHjTnX4FDB4d7EdA6FE7QUd+rPCnGQol62EFvMPNkIJwCmUxNBNzohChW6sAJEd0qYWMIYdOpZCsnhDkbaVFfIo22MlDaQ02Sxgy4HW+sCUibAJt60DXjlxqNYu2godkcp9ZNQusnNrL8MTapnB3Kf89hoAyLKBy4J+qF2l6UTrVgSwvnKGO1cCxM6ai8JF6pkyXLu9ecYdavczyah6Vfo1PXCwNWmrtTk5vPVVQ47E1z52azSlWN+dt9P1Prz2Q6NnjUNdtneqwGipBcA8QKDwANcKFSNKu1vZd3j9JYOV1hONSDHAI1EwYl6CU0xyAUDTFCDhhNIsdxpq08gX3TYItNJKFA6tYWATCNIyhSIrzHHHiqV9EZhg8kE3ExqHqEHgYijmOAIXPGoBzRhAgjGjIbOY6JCOSK5ABF9IEFCEk0XYV2MUsSVpJQs3ZGlDDj50ycOVYIYp5phklmnmmWRGAAAh+QQJCQAMACwAAAAAoAAYAINUVlSkoqTMzszc3ty8urzU1tTk5uTEwsSsqqzk4uS8vrzc2tz+/v4AAAAAAAAAAAAE/pDJSau9OOvNu/9gKI5kaZ5oqq5s675wTAJ0bd+1hOx87/OyoDAEOCgORuQxyQToBtCodDpADK+tn9Y6KQa+4HCY4GQgBgl0OrFuo7nY+OlMncIZAEWAwO/7+QEKZWdpaFCFiFB3JkcKjY8aRo+SBxqOlJcKlpiQF2cCoKGiCXdef6cEgYOHqH2HiwyTmZoZCga3uLeVtbm5uxi2vbqWwsOeAwILysvKAlUUeXutfao6hQQF2drZBIawwcK/FwfFBuIW4L3nFeTF6xTt4RifzMwCpNB609SCT2nYAgoEHNhNkYV46oi5i1Tu3YR0vhTK85QgmbICAxZgdFbqgLR9/tXMRMG2TVu3NN8aMlyYAWHEliphsrRAD+PFjPdK6duXqp/IfwKDZhNAIMECfBUg4nIoQakxDC6XrpwINSZNZMtsNnvWZacCAl/Dgu25Cg3JkgUIHOUKz+o4twfhspPbdmYFBBVvasTJFo9HnmT9DSAQUFthtSjR0X24WELUp2/txpU8gd6CjFlz5pMmtnNgkVDOBlwQEHFfx40ZPDY3NaFMqpFhU6i51ybHzYBDEhosVCDpokdTUoaHpLjxTcaP10quHBjz4vOQiZqOVIKpsZ6/6mY1bS2s59DliJ+9xhAbNJd1fpy2Pc1lo/XYpB9PP4SWAD82i9n/xScdQ2qwMiGfN/UV+EIRjiSo4IL+AVjIURCWB4uBFJaAw4U36LDFDvj5UOGHIIYo4ogklmgiChEAACH5BAkJAA0ALAAAAACgABgAg1RWVKyqrNTW1Ly+vOTm5MTGxNze3JSWlLSytMTCxOzu7MzKzOTi5P7+/gAAAAAAAAT+sMlJq7046827/2AojmRpnmiqrmzrvnBMBnRt37UE7Hzv87KgMBQwGI/IpCGgSwwSTugzSgUMry2BdsvlUoqHsHg8ZjAbgKc6ulYPrNg4SqCo2+91wddwWPj/gH4HS01tbIcJcChuTm4ajZADTxqSkWqUlo0YdH4JnZ8KehMBDH2BpwdmOmoIAa2vrgFRihOMlZKUBLq7ugm5vLu+GQPAwb/FwhZ0CQzNzs0FoXumBQvV13+DZwBRAZLf3whqtBIJxb2PBAq66+jD6uzGGebt7QTJF+bw+/gUnM4GmgVcIG0Un1OBCqTaxgocOHFOyDUgtq9dvwoUea27SEGfxnv+x3ZtDMmLY4N/AQUSYBBNlARSfaohFEQITTc3D8dZ8AjMZLl4Chi4w0AxaNCh+YAKBTlPaVCTywCuhFbw5cGZ2WpyeyLOoSSIb3Y6ZeBzokgGR8syUyc07TGjQssWbRt3k4IFDAxMTdlymh+ZgGRqW+XEm9cBsp5IzAiXKQZ9QdGilXvWKOXIcNXqkiwZqgJmKgUSdNkA5inANLdF6eoVwSyxbOlSZnuUbLrYkdXSXfk0F1y3F/7lXamXZdXSB1FbW75gsM0nhr3KirhTqGTgjzc3ni2Z7ezGjvMt7R7e3+dn1o2TBvO3/Z9qztM4Ye0wcSILxOB2xiSlkpNH/UF7olYkUsgFhYD/BXdXAQw2yOBoX5SCUAECUKiQVt0gAAssUkjExhSXyCGieXiUuF5ygS0Hn1aGIFKgRCPGuEEXNG4xDRk4hoGhIbfccp+MQLpQRF55HUGAXkgawdAhIBaoWJBQroDDlDfo8MOVPUSp5ZZcdunll2CGiUIEACH5BAkJAAwALAAAAACgABgAg1RWVKSipMzOzNze3Ly6vNTW1OTm5MTCxKyqrOTi5Ly+vNza3P7+/gAAAAAAAAAAAAT+kMlJq7046827/2AojmRpnmiqrmzrvnAsW0Bt37gtIXzv/72ZcOgBHBSHYxKpbAJ2g6h0Sh0giNgVcHudGAPgsFhMeDIQg0R6nVC30+pudl5CV6lyBkARIPj/gH4BCmZoamxRh4p5EkgKjpAaR5CTBxqPlZgKl5mRGZ2VGGgCpKWmCXlfgasEg4WJrH9SjAwKBre4t5YZtrm4uxi9vgbAF8K+xRbHuckTowvQ0dACVhR7fbF/rlBqBAUCBd/hAgRrtAfDupfpxJLszRTo6fATy7+iAwLS0gKo1nzZtBGCEsVbuIPhysVR9s7dvHUPeTX8NNHCM2gFBiwosIBaKoD+AVsNPLPGGzhx4MqlOVfxgrxh9CS8ROYQZk2aFxAk0JcRo0aP1g5gC7iNZLeDPBOmWUDLnjqKETHMZHaTKlSbOfNF6znNnxeQBBSEHStW5Ks0BE6K+6bSa7yWFqbeu4pTKtwKcp9a1LpRY0+gX4eyElvUzgCTCBMmWFCtgtN2dK3ajery7lvKFHTq27cRsARVfsSKBlS4ZOKDBBYsxGt5Ql7Ik7HGrlsZszOtPbn2+ygY0OjSaNWCS6m6cbwkyJNzSq6cF/PmwZ4jXy4dn6nrnvWAHR2o9OKAxWnRGd/BUHE3iYzrEbpqNOGRhqPsW3xePPn7orj8+Demfxj4bLQwIeBibYSH34Et7PHIggw2COAaUxBYXBT2IWhhCDlkiMMO+nFx4YcghijiiCSWGGIEACH5BAkJAA0ALAAAAACgABgAg1RWVKyqrNTW1Ly+vOTm5MTGxNze3JSWlLSytMTCxOzu7MzKzOTi5P7+/gAAAAAAAAT+sMlJq7046827/2AojmRpnmiqrmzrvnAsW0Ft37gtAXzv/72ZcOgJGI7IpNIQ2CUGiWcUKq0CiNiVYMvtdinGg3hMJjOaDQB0LWWvB9es3CRQ2O94uwBsOCz+gIF/B0xObm2ICXEUb09vGo6RA1Aak5JrlZeOkJadlBd1fwmipAp7EwEMfoKsB2c7awgBsrSzAVKLEwMEvL28CZW+vsAZu8K/wccExBjGx8wVdQkM1NXUBaZ8qwsFf93cg4VpUgGT5uYIa7kSCQQKvO/Ixe7wvdAW7fHxy5D19Pzz9NnDEIqaAYPUFmRD1ccbK0CE0ACQku4cOnUWnPV6d69CO2H+HJP5CjlPWUcKH0cCtCDNmgECDAwoPCUh1baH4SSuKWdxUron6xp8fKeAgbxm8BgUPXphqDujK5vWK1r0pK6pUK0qXBDT2rWFNRt+wxnRUIKKPX/CybhRqVGr7IwuXQq3gTOqb5PNzZthqFy+LBVwjUng5UFsNBuEcQio27ey46CUc3TuFpSgft0qqHtXM+enmhnU/ejW7WeYeDcTFPzSKwPEYFThDARZzRO0FhHgYvt0qeh+oIv+7vsX9XCkqQFLfWrcakHChgnM1AbOoeOcZnn2tKwIH6/QUXm7fXoaL1N8UMeHr2DM/HoJLV3LBKu44exutWP1nHQLaMYolE1+AckUjYwmyRScAWiJgH0dSAUGWxUg4YSO0WdTdeCMtUBt5CAgiy207DbHiCLUkceJiS2GUwECFHAAATolgqAbQZFoYwZe5MiFNmX0KIY4Ex3SCBs13mikCUbEpERhhiERo5Az+nfklCjkYCUOOwChpQ9Udunll2CGKeaYX0YAACH5BAkJAAsALAAAAACgABgAg1RWVKSipMzOzLy6vNze3MTCxOTm5KyqrNza3Ly+vOTi5P7+/gAAAAAAAAAAAAAAAAT+cMlJq7046827/2AojmRpnmiqrmzrvnAsq0Bt37g977wMFIkCUBgcGgG9pPJyaDqfT8ovQK1arQPkcqs8EL7g8PcgTQQG6LQaHUhoKcFEfK4Bzu0FjRy/T+j5dBmAeHp3fRheAoqLjApkE1NrkgNtbxMJBpmamXkZmJuanRifoAaiF6Sgpxapm6sVraGIBAIItre2AgSPEgBmk2uVFgWlnHrFpnXIrxTExcyXy8rPs7W4twKOZWfAacKw0oLho+Oo5cPn4NRMCtbXCLq8C5HdbG7o6xjOpdAS+6rT+AUEKC5fhUTvcu3aVs+eJQmxjBUUOJGgvnTNME7456paQninCyH9GpCApMmSJb9lNIiP4kWWFTjKqtiR5kwLB9p9jCelALd6KqPBXOnygkyJL4u2tGhUI8KEPEVyQ3nSZFB/GrEO3Zh1wdFkNpE23fr0XdReI4Heiymkrds/bt96iit3FN22cO/mpVuNkd+QaKdWpXqVi2EYXhSIESOPntqHhyOzgELZybYrmKmslcz5sC85oEOL3ty5tJIcqHGYXs26tevXsGMfjgAAIfkECQkACgAsAAAAAKAAGACDlJaUxMbE3N7c7O7svL681NbU5ObkrKqszMrM5OLk/v7+AAAAAAAAAAAAAAAAAAAABP5QyUmrvTjrzbv/YCiOZGmeaKqubOu+cCyrR23fuD3vvHwIwKBwKDj0jshLYclsNik/gHRKpSaMySyyMOh6v90CVABAmM9oM6BoIbjfcA18TpDT3/Z7PaN35+8YXGYBg4UDYhMHCWVpjQBXFgEGBgOTlQZ7GJKUlpOZF5uXl5+RnZyYGqGmpBWqp6wSXAEJtLW0AYdjjAiEvbxqbBUEk8SWsBPDxcZyyst8zZTHEsnKA9IK1MXWgQMItQK04Ai5iWS/jWdrWBTDlQMJ76h87vCUCdcE9PT4+vb89vvk9Ht3TJatBOAS4EIkQdEudMDWTZhlKYE/gRbfxeOXEZ5Fjv4AP2IMKQ9Dvo4buXlDeHChrkIQ1bWx55Egs3ceo92kFW/bM5w98dEMujOnTwsGw7FUSK6hOYi/ZAqrSHSeUZEZZl0tCYpnR66RvNoD20psSiXdDhoQYGAcQwUOz/0ilC4Yu7E58dX0ylGjx757AfsV/JebVnBsbzWF+5TuGV9SKVD0azOrxb1HL5wcem8k0M5WOYP8XDCtrYQuyz2EWVfiNDcB4MSWEzs2bD98CNjejU/3bd92eAPPLXw22gC9kPMitDiu48cFCEXWQl0GFzDY30aBSRey3ergXTgZz0RXlfNSvodfr+UHSyFr47NVz75+jxz4cdjfz7+///8ABgNYXQQAIfkECQkABQAsAAAAAKAAGACCfH58vL685ObkzM7M1NLU/v7+AAAAAAAAA/5Yutz+MMpJq7046827/2AojmRpnmiqrmzrvnAsw0Bt3/es7xZA/MDgDwAJGI9ICXIZUDKPzmczIjVGn1cmxDfoer8E4iMgKJvL0+L5nB6vzW0H+S2IN+ZvOwO/1i/4bFsEA4M/hIUDYnJ0dRIDjH4Kj3SRBZN5jpCZlJuYD1yDX4RdineaVKdqnKirqp6ufUqpDT6hiF2DpXuMA7J0vaxvwLBnw26/vsLJa8YMXLjQuLp/s4utx6/YscHbxHDLgZ+3tl7TCoBmzabI3MXg6e9l6rvs3vJboqOjYfaN7d//0MTz168SOoEBCdJCFMpLrn7zqNXT5i5hxHO8Bl4scE5QQEQADvfZMsdxQACTXU4aVInS5EqUJ106gZnyJUuZVFjGtJKTJk4HoKLpI8mj6I5nDPcRNcqUBo6nNZpKnUq1qtWrWLNq3cq1q1cKCQAAO2ZvZlpFYkliUkxFdG9ZdlpHWWpMU3d6N0VKTDNnVk01aWxQaXBDSXJ2SDMxK3lHMGxMVHJVY0lUU0xvTGdvemw='


layout = [  [sg.Text('Loading....', font='ANY 15')],
            [sg.Image(data=gif103, key='_IMAGE_')],
           [sg.Button('Cancel')]
         ]

window = sg.Window('My new window').Layout(layout)

while True:             # Event Loop
    event, values = window.Read(timeout=0)
    if event in (None, 'Exit', 'Cancel'):
        break
    window.Element('_IMAGE_').UpdateAnimation(gif103,  time_between_frames=50)
3.24.0 PySimpleGUI, 1.24.0 PySimpleGUI27 17-Jan-2018
- PopupAnimated - A popup call for showing "loading" type of windows
PopupAnimated
I couldn't resist jamming out one "final" feature for animated GIFs, the PopupAnimated function. This call enables you to show a "loading" window / animation without the need to create and show the window yourself.
To use it, simply call PopupAnimated over and over. It will automatically keep track of which frame to show and when. Add the call to your work loop just like you would a OneLineProgressMeter. It's like having a OneLineAnimatedGIF call.
Also, there is a built-in, default, animated GIF that you can use if you don't have one. The variable is named:
DEFAULT_BASE64_LOADING_GIF
Here's an example use:
for i in range(100000):
    sg.PopupAnimated(sg.DEFAULT_BASE64_LOADING_GIF, background_color='white', time_between_frames=100)
sg.PopupAnimated(None)      # close all Animated Popups
The result is a spinning animation lasting a few seconds.
The result looks like this:

Not bad for a couple of lines of code, right?
Demo_Animated_GIFs.py
A new demo program was released at the same time. It shows you how to use the PopupAnimated call as well as how to run your own animation in your custom window. The file also contains 10 Base64 encoded GIF files, ready to copy and paste into your code!
Runs on legacy Python
For those of you stuck in the 2.7 world, shockingly this code also runs on legacy Python. I wouldn't have though all these graphic formats and operations wouldn't be supported, but I'll be damned if it doesn't work. Hats off to the tkinter team for this feature.
MikeTheWatchGuy
on 17 Jan 2019
Animated GIF Checkin
I have posted 20 animated GIFs that I have been using to test the animated GIF features. You'll find them here:
https://github.com/PySimpleGUI/PySimpleGUI/tree/master/GIFs
In that folder you'll also find a file output.py which contains the Base64 versions of all of the GIF files. You can copy these variables into your code and use them directly with the new calls.
Simple and easy to use!
Animated GIF Design Philosophy
If not apparent, my goal is to typically boil down PySimpleGUI interfaces into a single line of code if possible, assuming that a single line of code is the most simple, straightforward way of doing things.
For Animated GIFs there are 2 single-lines of code. One is the PopupAnimatedand the other is the UpdateAnimation. Both of these single calls cause a GIF file or Base64 variable to be animated.
If these actions were performed by the user code then it would be significantly more complex and more code than a single line. The caller would need to worry about how many frames are in the GIF, how often to show a new frame, etc.
MikeTheWatchGuy
on 17 Jan 2019
PySimpleGUIWx - Spinner
The Wx port just got a new element! The Spinner is done! It took longer than expected because I had to combine 2 WxPython widgets to get the implementation right. It's a combination of a text entry box and a "spin button". The reason is that a normal Spinbox Widget in WxPython controls an integer counter. It does not display strings.
In tkinter strings are displayed. In Qt there was also some tricks that had to be played in order to get strings to show up in a Spin Element. Because tkinter went first I've made the other frameworks, Qt and WxPython, look and behave like tkinter. It's a superior interface in my opinion as you can still show an up/down integer counter.
Up next.... _Listbox_.... and soon.... TABLES! (oh joy... how I hate tables but maybe this time it'll be easy)
MikeTheWatchGuy
on 20 Jan 2019
0.7.0 PySimpleGUIWx 21-Jan-2019
- Element.Update support for disabled and tooltip
- Combo Element
- Newest Combo paramters
- Radio Element
- Newest Radio paramters (size_px, visible, enable_events)
- Type hints on Wx widgets
- Spinner Element
- Newest Spinner paramters
- Text Element visibility
- Column Element size_px parameter (unclear if works... likely does not)
- Column visibility
- Column Update method added
- System Tray - support for any kind of image format for icons
- Window.Move
- Window.Minimize
- Window.Maximize
- Window.Disable
- Window.Enable
- Window.Hide
- Window.UnHide
- Window.BringToFront
- Popup non_blocking - returns window and button not just button
- More comprehensive test harness when running PySimpleGUIWx.py
These are currently the working Elements
- Text
- Input Text
- Buttons including file/folder browse
- Input multiline
- Output multiline
- Output
- Columns
- Progress Meters
- Checkbox
- Radio Button
- Combobox
- Spinner
MikeTheWatchGuy
on 21 Jan 2019
Wx Release
Didn't realize how long it's been since the last PySimpleGUIWx release.... was something like 10 days. There were 3 new elements in this release, so it's not like development stood still. New are the Radio, Combobox and Spinner elements.
The Radio Buttons were weird to code. I had to group the creation of the Wx Radio Button widgets in a specific order. This made it impossible to use the tk or Qt methods. The problem comes when you have a group of radio buttons in your window with other radio buttons in between the group, then the buttons in the middle would be included in the group. It required multiple "passes" over the window layout to create the Radio Buttons in groups. It was somewhat painful.
The "logical" choice for the next Element to implement is the Listbox.
I would like to skip it or get it done quickly so I can get to...... TABLES!!
I'm hoping that WxPython can represent "the" port to use for tables. I guess I'm hoping even more that the port will go smoothly.
Then Trees... and finally the FUN part, custom Widgets like gauges and speedometers!! I'll take suggestions for these cool new styles of widgets. Would like to show everyone what WxPython is capable of by exposing as many of the interfaces as possible.
"New package, same great taste".
MikeTheWatchGuy
on 21 Jan 2019
r/PySimpleGUI - The PSG Subreddit
https://www.reddit.com/r/PySimpleGUI/
I got this idea from the Remi project... the newest target for a porting effort.
I have no idea if it'll help people discover PySimpleGUI or get support or if it'll be a complete waste of everyone's time.
MikeTheWatchGuy
on 21 Jan 2019
PySimpleGUIWeb !
Wow!
I'm blown away by a new port that's started.... yes, yet another platform.... this one is DIFFERENT however. This time your program runs in a Web page! You got that right, in a web page.
import PySimpleGUIWeb as sg

def main():
    layout = [
                [sg.Text('This is a text element')],
                [sg.Text('Here is another' ), sg.Text(' and another on the same line')],
                [sg.Text('If you close the browser tab, the app will exit gracefully')],
                [sg.InputText('Source'), sg.FolderBrowse()],
                [sg.InputText('Dest'), sg.FolderBrowse()],
                [sg.Ok(), sg.Cancel()]
            ]

    window = sg.Window('Demo window..').Layout(layout)
    while True:
        event, values = window.Read()
        print(event, values)
        if event is None:
            break
    window.Close()

main()
print('Program terminating normally')
The port has barely begun (as in today was the first day of coding) and already the Text, Input Text, and Button Elements are running (at a basic level).
The version that was just checked in, 0.1.1, is a "proof of concept" release meant to show it's "possible".
MikeTheWatchGuy
on 22 Jan 2019
Not sure why YouTube has decided to crunch my video down so badly!
MikeTheWatchGuy
on 22 Jan 2019
Web Progress & Development Strategy
Last night I got the Timer demo app up and running. I use the demo apps as a way to step through features and implement them. It's like laying train tracks out in front of a train of demo programs.

The advantage to this kind of development is that I can release groups of features that fit together to form "typical" applications. As long as your app only needs Text, Input Text and Buttons, then you could in theory be using PySimpleGUIWeb. It would be quite limited as there is no 'styling' currently available. The point is features are released in "sets" and the ports tend to follow similar paths in the order Elements are brought online.
I also make multiple passes at the elements. The Text Element at the moment has no font, size or color controls. You can only create the text and Update the text. Buttons you can change the text but not the colors.
The current feature set matches these Timer Demo required features:
- Create a window with Text and Buttons
- Update the Text fields
- Update the Button text
- Close the window when finished
The next chunk to be done is the fonts, colors, sizes and padding along with some Window features like setting the title. That will enable the window to look more like the ones created using tkinter, Qt, WxPython:

I'm thinking of doing something interesting with Popup. Instead of creating a window using normal user Elements, the window will be a "Notification Window" that slides out in the bottom right of the Window desktop. I don't know how they work on Linux. I'm going to try it and see if it works well or is a bust.
Here's the code that produced the timer window
#!/usr/bin/env python
import sys
import PySimpleGUIWeb as sg
import time

# ----------------  Create Form  ----------------
layout = [
    [sg.Text('')],
    [sg.Text('test', size=(8, 2), font=('Helvetica', 20), justification='center', key='text')],
    [sg.Button('Pause', key='button', button_color=('white', '#001480')),
     sg.Button('Reset', button_color=('white', '#007339'), key='Reset'),
     sg.Exit(button_color=('white', '#8B1A1A'), key='Exit')]
        ]

window = sg.Window('Running Timer').Layout(layout)

# ----------------  main loop  ----------------
current_time = 0
paused = False
start_time = int(round(time.time() * 100))
while (True):
    # --------- Read and update window --------
    if not paused:
        event, values = window.Read(timeout=10)
        current_time = int(round(time.time() * 100)) - start_time
    else:
        event, values = window.Read()
    if event == 'button':
        event = window.FindElement(event).GetText()
    # --------- Do Button Operations --------
    if event is None or event == 'Exit':        # ALWAYS give a way out of program
        break
    if event is 'Reset':
        start_time = int(round(time.time() * 100))
        current_time = 0
        paused_time = start_time
    elif event == 'Pause':
        paused = True
        paused_time = int(round(time.time() * 100))
        element = window.FindElement('button')
        element.Update(text='Run')
    elif event == 'Run':
        paused = False
        start_time = start_time + int(round(time.time() * 100)) - paused_time
        element = window.FindElement('button')
        element.Update(text='Pause')

    # --------- Display timer in window --------
    window.FindElement('text').Update('{:02d}:{:02d}.{:02d}'.format((current_time // 100) // 60,
                                                                  (current_time // 100) % 60,
                                                                  current_time % 100))
# --------- After loop --------
window.Close()
0.2.0 PySimpleGUIWeb
Dropped another release tonight. This release adds fonts, colors, sizes. In other words, the things that make a GUI interesting.
Enough functionality was added to complete the Timer program so that it appears the same as the Timer when run using tkinter.
I can't stress how weird, freaky, strange it feels to be running this PySimpleGUI code in a browser window.

The exact same code is running on PySimpleGUI (tkinter) and PySimpleGUIWeb.
The differences are in things like the size of the text fields. Minor things you normally tweak a little when moving from one platform to another.
#!/usr/bin/env python
import PySimpleGUI as sg
import time

# ----------------  Create Form  ----------------
layout = [
    [sg.Text('', background_color='black')],
    [sg.Text('test', size=(20, 1), font=('Helvetica', 30), justification='center', text_color='white', key='text', background_color='black')],
    [sg.Text('', background_color='black')],
    [sg.Button('Pause', key='button', button_color=('white', '#001480')),
     sg.Button('Reset', button_color=('white', '#007339'), key='Reset'),
     sg.Exit(button_color=('white', '#8B1A1A'), key='Exit')]
        ]

window = sg.Window('Running Timer', background_color='black', font='Helvetica 18').Layout(layout)

# ----------------  main loop  ----------------
current_time = 0
paused = False
start_time = int(round(time.time() * 100))
while (True):
    # --------- Read and update window --------
    if not paused:
        event, values = window.Read(timeout=0)
        current_time = int(round(time.time() * 100)) - start_time
    else:
        event, values = window.Read()
    if event == 'button':
        event = window.FindElement(event).GetText()
    # --------- Do Button Operations --------
    if event is None or event == 'Exit':        # ALWAYS give a way out of program
        break
    if event is 'Reset':
        start_time = int(round(time.time() * 100))
        current_time = 0
        paused_time = start_time
    elif event == 'Pause':
        paused = True
        paused_time = int(round(time.time() * 100))
        element = window.FindElement('button')
        element.Update(text='Run')
    elif event == 'Run':
        paused = False
        start_time = start_time + int(round(time.time() * 100)) - paused_time
        element = window.FindElement('button')
        element.Update(text='Pause')

    # --------- Display timer in window --------
    window.FindElement('text').Update('{:02d}:{:02d}.{:02d}'.format((current_time // 100) // 60,
                                                                  (current_time // 100) % 60,
                                                                  current_time % 100))
# --------- After loop --------
window.Close()
0.2.1 PySimpleGUIWeb
If you upgraded to 0.2.0 then please get 0.2.1. If you don't set a background color it will crash without telling you why.
I'm struggling a little on getting exceptions turned on in my code again while executing in the Remi environment.
MikeTheWatchGuy
on 24 Jan 2019
0.3.0 PySimpleGUIWeb 24-Jan-2019
- Checkbox Element
- Combobox Element
- Listbox Element
- Element padding for all elements
I couldn't resist releasing the Checkbox, Combobox, Listbox elements that were just completed. Making loads of progress very quickly. Will be implementing Tables and Tree before long and then it'll be on to the fun, unique and interesting unique to PySimpleGUIWeb features. Looking forward to the new notification-style popups.
Correct padding of Elements enabled the Color demo to run. Surely you recall seeing this demo program previously. I've posted a screenshot of this program using every port as the ports are brought up using these demo programs. Despite seeing this program so many times in the past, it's always exciting when the demo programs start to run, one by one. Each new demo represents some new subset of functional features.

MikeTheWatchGuy
on 24 Jan 2019
Android support....
PySimpleGUI on Windows, Mac and Linux desktop GUI provided through:
- tkinter, WxPython, Qt
PySimpleGUIWeb Browser support provided through:
- Remi
Here's something I had not at all expected from the PySimpleGUIWeb effort:
- Ability to run PySimpleGUI programs on Android
I just read that it's possible to run Remi on Android
This has been possible for a couple of years evidently. QPython is used as the Android Python port of choice for this operation.
I'm trying to run PySimpleGUIWeb on Android ASAP!
Remi may be the technology that enables PySimpleGUI to offer a complete solution that includes both desktop and mobile.
I had previously been eyeing Kivy for the Android port, but I ran into difficulty with the Kivy port. Maybe someday I'll pick it up and make another pass at it. But for now it's on hold with PySimpleGUIWeb being the primary vehicle for Android applications.
It would be ideal to be able to show Remi applications on Android in a way that removes all of the web browser graphics where you're left with only the PySimpleGUI elements on the screen.
It keeps getting better and better for this PySimpleGUIWeb port!
MikeTheWatchGuy
on 25 Jan 2019
0.4.0 PySimpleGUIWeb
pip will now also install Remi when installing PySimpleGUIWeb
Functioning Elements
- Text
- Single line text input
- Multiline Input
- Multiline Output
- Listbox
- Combobox
- Checkbox
- Slider
- Spinner (numbers only...hardcoded to 0 to 100)
New features
- Tooltips for all elements (so cool this works)
- Input Text events
- Text clicked event
- Listbox selected event
- Combobox selected event
- Checkbox Update
- Disable parameter for all elements
- Window.Close shuts down the server
- Enabled exceptions during packing operation
- New test harness exercises all element types
MikeTheWatchGuy
on 26 Jan 2019
PySimpleGUIWeb RUNNING online
If you're ever on the road and in the mood for some PySimpleGUI programming but don't have access to your Python machine then this will be of interest to you!
https://repl.it/@PySimpleGUI/PySimpleGUIWeb-Demos
Thanks to the hard work of the Remi project and the repl.it folks it's possible to _run your PySimpleGUI code directly in your browser, no Python installation required._
It's trippy to see actual PySimpleGUI code in the online editor with the resulting window shown in a window in the browser based debugger.
MikeTheWatchGuy
on 27 Jan 2019
0.5.0 PySimpleGUIWeb 1-Feb-2019
Time for another release! Columns! Now you can get just about any layout. Really wanted to get this out so can begin to work with repl.it more. repl.it is the future for the PySimpleGUI Cookbook. Tutorials as well should be using the embedded iframe feature of repl.it.
- New default font size. Was Helvetica 10, now Helvetica 15
- InputText Element single character events working! (Finally)
- Listbox simple Update (values only)
- Column Element! New!
- Column element experimental justification setting doesn't work yet
- Element background colors now picked up from container, not top level window
- Autosize Text
- Autosize Button Text
MikeTheWatchGuy
on 2 Feb 2019
Python Developers' Survey...
https://www.jetbrains.com/research/python-developers-survey-2018/
I'm stunned by this data:

That tells me that PySimpleGUIWeb is absolutely the right priority at this time. Or that more Web Developers answered the survey than other developers.
This data is based on 20,000 people that filled out the survey.
MikeTheWatchGuy
on 7 Feb 2019
PySimpleGUIWeb Installations
The number of pip installs of PySimpleGUIWeb continue to take the top spot of the PySimpleGUI ports. It's also interesting to see how the Remi installs track the PySimpleGUI installs, especially after I indicated that Remi is a required package that is automatically installed with PySimpleGUIWeb installs.
PySimpleGUIWeb has triggered a shuffling of the priorities.... especially after enabling it to run on repl.it. There is SO much that can be done using PySimpleGUIWeb now that PySimpleGUI can't do. The port has a long long ways to go, but it's moving along briskly. PySimpleGUIWeb on repl.it has the potential to be an excellent educational resource for learning both Python and GUI programming.
Never did I think that PySimpleGUI would be running in a browser. It wasn't on the roadmap of planned ports.
Check out these install stats. Remi is on the left, PySimpleGUIWeb on the right.

MikeTheWatchGuy
on 7 Feb 2019
PySimpleGUIWeb is in a sweet spot combining ease of use, versatility, and wide deployability.
 pamoroso
on 7 Feb 2019
pamoroso
on 7 Feb 2019
0.8.1 Multiple windows!!
This is an officially cool release!!
Really excited this is working, however brittle it may be.
You can now have Popups! Multiple windows are working, even running on Repl.it.
Here's one that shows a popup.
https://repl.it/@PySimpleGUI/Popup-Demonstration
8.1 is the newest version. It removed the bad code in the Hide and UnHide methods. Sorry about that code being in there.
You can run the design pattern 1 using 0.8.1! (It will crash on 0.8.0)
This is exciting stuff. I'm not sure yet how it'll all come together, but I do know this is a significant capability to add. The range of potential applications just increased by a big factor.
MikeTheWatchGuy
on 9 Feb 2019
PySimpleGUIWeb -Window.Hide, Window.UnHide
Snuck in Window.Hide and Window.UnHide. These calls weren't all that useful in Windows, Qt, Wx, but, for Remi they are a powerful tool. They allow you to manage the display of your multiple windows.
At the moment, only one PSG Window can be displayed on a Web page at a time. A Popup will replace the window that called the popup. When the popup exits, the calling window is restored.
If you want run multiple windows then you need a way to indicate which of your windows should be shown. This is where Hide and UnHide come in. To "switch" to another window, Hide the current window and UnHide the one you want to show. To switch back, UnHide the original window, and Hide the current one.
In the PySimpleGUI code, you simply run the normal Multiple Windows Design Pattern, but need to add code to manage specifically which window is visible.
This could really open up an application that has setup screens, enter detailed information screens, etc.
MikeTheWatchGuy
on 13 Feb 2019
0.9.0 PySimpleGUIWeb is out
I slipped out a new version the other evening. It was to get the Hide and UnHide features available since multiple windows is now "a thing".
This port paired with repl.it has turned out to be one of the best things to happen to PySimpleGUI.
Here is why.... By simply going to a webpage, a user will not just see the PySimpleGUI code, but they will watch it execute. There is no pip install. Nothing at all to do except WATCH. It's like forcing them to look at the running code, correctly solving a problem.
Here is an example where this really came in handy:
https://www.reddit.com/r/learnpython/comments/aqwqy0/gui_random_number_of_buttons_depending_on/
A Reddit poster wanted to know if it's possible to have 1 window create another window with a large amount of buttons,. based on input from the first window.
Pfffffftttt... such a simple thing to do in PySimpleGUI. In fact, it was easy enough that it can run using PySimpleGUIWeb! And that means a user gets to SEE the prototype solution to their problem and can copy and paste it right into their project.
Then change from import PySimpleGUIWeb to import PySimpleGUI and poof you're up and running on tkinter.
It really is like magic!
MikeTheWatchGuy
on 15 Feb 2019
Reddit PySimpleGUIWeb Announcement
https://www.reddit.com/r/Python/comments/ar3x3b/embedding_entire_python_guis_in_webpages_with/
I took another chance and posted about PySimpleGUIWeb. I'm excited about repl.it and the potential it holds. It's not one of my better posts, but it at least lets everyone know there's a PySimpleGUI web GUI solution available, ready to use.
Seeing how there was a recent request in r/Python for a ban of all GUI posts on r/Python for some period of time, I don't expect this announcement to get the warmest of receptions. But that's OK, as long as the people that ARE interested in PySimpleGUI get the message.
I'm not above directly asking for your support. If you happen to be on Reddit, reading this post, feel free to up-vote the topic 😏
MikeTheWatchGuy
on 16 Feb 2019
0.10.0 PySimpleGUIWeb 16-Feb-2019
Pushing out another release, enabling a little bit more. It's available immediately on repl.it.
- Completed Text.Update method. Can now change:
- Text
- Font family & size
- Background color
- Text Color
- Visibility
- Completed Button.Update with exception of images
- Completed Spin.Update with except of range. This element still pretty crippled
- Completed Slider.Update - Can update value, visibility, disabled, but not the range
- Image Element!
- Events for Image Element
- Image.Update to change image
MikeTheWatchGuy
on 17 Feb 2019
Releases for PySimpleGUI, PySimpleGUI27 and PySimpleGUIWx
There have been some changes that hit EVERY release of PySimpleGUI. One is the addition to change your display information on the call to OneLineProgressMeter. Previously changing the display arguments had no effect.
Other changes were bug fixes or adding new capabilities (the Update method for Text on Wx).
PySimpleGUI & PySimpleGUI27 .25 & 1.25 20-Feb-2019
- Comments :-)
- Convert Text to string right away
- Caught exceptions when main program shut down with X
- Caught exceptions in all of the graphics primitives
- Added parameter exportselection=False to Listbox so can use multiple listboxes
- OneLineProgressMeter - Can now change the text on every call if desired
PySimpleGUIWx 0.8.0 20-Feb-2019
- Big Try/Except block around Update method for multiline in case window closed
- Text - convert incoming text to string right away
- Text.Update - convert incoming value to string
- Completed Button.Update method. Can now change text, color, etc.
- Added Try around reading multiline input value - not sure why needed
- OneLineProgressMeter - can update text on every call now
MikeTheWatchGuy
on 20 Feb 2019
0.11.0 PySimpleGUIWeb
A great release for those of you wanting to control the Remi settings such as the IP address and Port! All can be set in the call to Window now.
- Slider - Can update range using .Update method
- NEW Window parameters that allow control over all Remi startup settings
- New Window parameters and default values:
- web_debug=False
- web_ip='0.0.0.0'
- web_port=0
- web_start_broswer=True
- web_update_interval=.00001
- Can set the Window backaground image (sorta works sometimes)
- Struggling to get the "resources" settings understood so can work with files
- I have a ways to go
MikeTheWatchGuy
on 25 Feb 2019
Nice that PySimpleGUIWeb is going on forwards with big steps :)
Also some new releases of PySimpleGUI and PySimpleGUIWx, good to know those projets are still being given love :p
deajan
on 26 Feb 2019
I'm REALLY need a new Qt release to go out immediately because it's breaking with the new pyside 2
MikeTheWatchGuy
on 27 Feb 2019
How Do I - Web-style
https://repl.it/@PySimpleGUI/howdoipy
My favorite PySimpleGUI utility, HowDoI, has finally ported to the Web. However, it gets better than that. It runs on repl.it too!
I had to shrink down the window to make it fit better with repl.it. I want to fix that up so it's better. I can change fonts, etc.
Anyway, the point is that it WORKS !!! I'm stunned!
MikeTheWatchGuy
on 27 Feb 2019
0.10.0 PySimpleGUIWeb Release
- A single-purpose release.... get the Combo.Update call fully operational.
I did this for 2 reasons.... one is that it needed to be done. All of the elements need their Update methods complete if not already completed.
Reason two is that I wanted to be able to demonstrate the solution to this Issue:
https://github.com/PySimpleGUI/PySimpleGUI/issues/1184
Because of the PySimpleGUIWeb update I just did, I was able to run the code on repl.it.
https://repl.it/@PySimpleGUI/Combox-How-To-Updatepy
This enables me to share code with people in a way they can IMMEDIATELY interact with. You don't need to download the code, open it in PyCharm, and try it out. Just follow the link and click "Run".
MikeTheWatchGuy
on 28 Feb 2019
Issues template
Now when you fill out an Issue on GitHub, there is a little template to follow. I need some basic information that is often missing and thus I make an assumption (Iike WHICH PySimpleGUI is being discussed).
The format is simple:
Issue Title Prefixes - [Bug], [Question], [Enhancement]
What is the import statement in your program that imports the PySimpleGUI package?
Your PySimpleGUI version if known:
Operating System and version:
What's up?
MikeTheWatchGuy
on 1 Mar 2019
New Demo Program - multithreaded design pattern
There was a Reddit post asking for help with async PySimpleGUI programming.
https://www.reddit.com/r/learnpython/comments/awbsft/async_design_patterns/
Made me realize I didn't have a demo program written that shows how to do multi-threading with PySimpleGUI, or at least one way of doing it.
You'll find the new demo program here:
https://github.com/PySimpleGUI/PySimpleGUI/blob/master/DemoPrograms/Demo_Multithreaded_Queued.py
But, what's really impressive is that you'll find a running version of it here:
https://repl.it/@PySimpleGUI/Async-With-Queue-Communicationspy
PySimpleGUIWeb is _so powerful_ when it comes to being a teaching aid for PySimpleGUI. It is why PySimpleGUIWeb continues to soak up the dev cycles. This specific Demo is a great example showing that not only are PySimpleGUIWeb calls being taught, but deeper Python concepts are ALSO being demonstrated, live, in a web page.
In this repl.it you're able to experiment with not just the GUI elements, timing values, loops, etc, but you're also being exposed to the Queue and Thread objects. You can immediately begin modifying the program and observing the behavioral changes, all without doing a damned thing with your local machine
MikeTheWatchGuy
on 2 Mar 2019
Slow going...
I'm really sorry that bugs are starting to pile up. This is a bit of a first for the project as I've been able stay on top of critical bugs that are affecting people.
I'm behind on getting a critical release of Qt out the door since the new pyside2 doesn't work with current release. The Web port continues to take up time, but I'm spending not much on it these days.
The reasons for the slowdown are that I'm helping someone on their GUI for a fairly large project. System tray, multiple windows, etc. It's taking much longer than expected. Another project with higher priority than PySimpleGUI has also been eating lots of cycles.
So, I feel bad that some of you are stuck with bugs blocking you. I'll at least answer the new bugs and determine how difficult to work on. I hate bugs!!!
MikeTheWatchGuy
on 5 Mar 2019
0.13.0 PySimpleGUIWeb 5-Mar-2019
- Added new parameter to Window - web_multiple_instance
- Like other Window web parameters, this value is passsed Remi upon start
- The default value is TRUE (Previously I think default was False by Remi)
- Was made as a result of comment on repl.it.
Hopefully the repl.it's will run better now!
MikeTheWatchGuy
on 5 Mar 2019
0.15.0 PySimpleGUIWeb 5-Mar-2019
- Made the multiple_instance parameter FALSE by default (was messing up badly with True)
Well, things didn't go well at ALL when I released 13 and ran it in repl.it. It kept starting over, etc.
2 releases later and perhaps it's back to "normal" with this multiple instance thing turned off. Feel free to turn it on if you want.
MikeTheWatchGuy
on 5 Mar 2019
0.23.0 PySimpleGUIQt 8-Mar-2019
Here, enjoy this truck-load of Qt changes :-)
I'm sorry it's been a while since a release of Qt. The latest pyside2 causes PySimpleGUI to crash so I HAD to do something. I don't normally sit on releases this long because in my opinion it's a lot better to release them as quickly as possible.
There were changes that may affect window layouts. I changed the pixel scaling in particular. There are ways for you to get your old scaling back if you really want it.
If you're waiting on an Issue to get fixed, try and be patient. I DO get around to them as you can see.
- Fixed crash that was happening with latest pyside2 release!!!!
- Huge update to OneLineProgressMeter
- Debug window got title and do-not-reroute-std-out option
- Popups get a title option
- PopupScrolled gets non-blocking option
- Default logo included in Base64 Format
- Changed Chars to pixels scaling. Went from (10,25) to (10,35)
- Changed pixel to chars cutoff from 10 to 12
- Change progress bar default size to 200 from 250
- Reworked the _my_windows global variable / class to use Window class variables
- Change in how Elements / Widgets are updated. Need to use {} correctly
- InputText supports drag and drop
- Support for Checkbox.Get()
- Support for strings in spinbox
- Added Update method to Output element
- Changed Button default file_types from . to *
- Support for Tab enable_events so they now generate events
- Table.Update can change the number of rows of table
- Window class now manages the list of active popups, user defined icon, QTApplication, num open windows
- Window resizable parameter default changed from False to True
- Window new parameter - disable_minimize
- Window.GetScreenDimensions added
- Window.Move added
- Window.Minimize added
- Window.Maximize added
- Window.Disable added
- Window.Enable added
- Window.BringToFront added
- Window.CurrentLocation added
- TabGroup now returns which tab is selected in the return values
- Completely new Style generation class and functions (I hope it works!!!!)
- Style reworked for Column, Text, Button, Input, Combobox, Listbox, Input Multiline, Output Multiline, Progress Bar, Spinbox, Output,
- Progress Bar colors are now correct
- Events generated when tabs are changed
- "Better" Table support. Uses num_rows now and styles the scrollbar
- Tree element can support multiple types of icons including base64
- Fixed tree element scroll bar
- Icon ccan be set using SetOptions
- main for PySimpleGUIQt.py gets a nice test harness that shows lots of Elements
MikeTheWatchGuy
on 8 Mar 2019
Updated Demo_Multi_Threaded_Queued.py
Lately there's been more talk about multi-threading (as well as a few projects that I'm working on that are actively using these kinds of techniques.
Today the code was:
- Extensively commented
- Added using itertools
- Made the imports less specific so that the code is more specific
- Uses 3 threads now instead of 2
A few things to point out in that list. I modified the threading import to go from
from threading import Thread
to
import threading
The reason I've done this is that I want to the calls to Thread in the main code to reflect exactly where that call to Thread is going to:
threading.Thread(target=worker_thread, args=('Thread 1', 500, gui_queue,), daemon=True).start()
Another of the changes was using itertools.
I'm normally not a fan of "exotics" in the code, but itertools is part of the standard library going back to legacy Python, so it's not a new technology... it's just new to me.
I specifically wanted to solve a long-standing construct issue with me.
Here's a bit of code that I KNEW could be written better in Python:
    i = 0
    while True:
        sleep(run_freq/1000)
        gui_queue.put('{} - {}'.format(thread_name, i))
        i += 1
That code was replaced by this code:
    for i in itertools.count():                             # loop forever, keeping count in i as it loops
        time.sleep(run_freq/1000)                           # sleep for a while
        gui_queue.put('{} - {}'.format(thread_name, i))     # put a message into queue for GUI
There are times that I want to run an infinite loop, but with a COUNTER. Unfortunately there is no:
for i in range(Infinity):
However I was able to essentially get the exact same result using this line of code:
for i in itertools.count(): # loop forever, keeping count in i as it loops
It saved me 2 lines of code that looked clunky to me.
You can expect this kind of thing in the future for my code. However, I think that it's super-critical to comment a loop like this one HEAVILY, explaining exactly what's happening. In this case, what's happening is an infinite loop with a counter variable i being available for use in the loop as if it were a normal for loop.
MikeTheWatchGuy
on 9 Mar 2019
Repl.it with TKINTER
https://repl.it/@PySimpleGUI/PySimpleGUI-using-tkinter
I found that I can run the real PySimpleGUI rather than the Web one on repl.it. It seems to have some bugs. I sometimes have to rename the project and that will cause some kind of "re-install" of stuff that's required. You'll see these messages down in the lower right of the screen.
I make a little "launcher" app so that I can show several programs in this one project.
I had to include the entire PySimpleGUI.py file as part of the project. Thankfully that one file is all that's ever needed to get PySimpleGUI to work!

There are some quirks like the title bar being missing sometimes so you are unable to move the windows.
Other time, it doesn't reliably work. It's getting there! It's amazing that I can now provide sample and demo programs using plain PySimpleGUI and they can be run in a web page.. unchanged.
MikeTheWatchGuy
on 13 Mar 2019
PySimpleGUIWeb Tables
I read on Reddit that someone was considering PySimpleGUI but needed to use Tables and it says in the PySimpleGUI docs that the Table stuff sucks (paraphrase).
Doh!
I either need to be less honest or write better software. I'm leaning towards less honest now 😒
I appreciate the person who replied to the post, defending the PySimpleGUI Tables. Thank you whoever that was. I'll take any Reddit support I can get. It's not easy starting a movement ya know. (Nearing the 200,000th Pip install).
ANYWAY, it's motivated me to get my ass going on implementing Tables for.... PySimpleGUIWeb. Of course, sorry Wx, again.
Here's the progress so far:

I can't select rows yet nor do anything fancy like get events back from them. But you'll at least be able to feed PySimpleGUIWeb a table and it'll be shown.
I will post to GitHub tonight, probably PyPI too so I can repl.it. It's better to have something 1/2 way working than no way working
Next up... selecting rows. Oh joy.
MikeTheWatchGuy
on 14 Mar 2019
0.17.0 14-Mar-2019 PySimpleGUIWeb
- More Table features supported
- Option to display row numbers
- New parameter
row_header_text - Can turn on / off displaying row numbers
enable_eventstext_color- Font
- Can get the value of the item clicked using Table.SelectedItem. Can be coded as window.Element('_table_').SelectedItem
While not many of the options are available (such as alternating row colors or number of rows), there are still enough awesome features to let this one ship. Better to have something that's "pretty good" than nothing at all.
You can see the Web version of the Table Element in use here:
https://repl.it/@PySimpleGUI/Table-Element
MikeTheWatchGuy
on 15 Mar 2019
0.18.0 15-Mar-2019
- Hotfix for bug that causes Popups / secondary windows to crash
- Table gets
starting_row_numparameter
Yet another PySimpleGUIWeb release. This one added more capabilities for the Table Element and fixed a bug that broke the Popups / secondary windows.... not good!
MikeTheWatchGuy
on 15 Mar 2019
201,000 Installs
It's 200K day!
The pip odometer clicked over another 100,000 today.
It's a stat that likely means next to nothing by itself, but I find it interesting to compare it to other packages. Some packages are just plain monsters, getting millions of installs. These are the more general purpose packages.
Pyside2, for example, only has 158,000 installs. I find this one weirdly low.
Kivy 664,000
WxPython 846,000
PyQt5 2,324,228
Then there are the other "simplified" GUIs
easygui 430,000
gooey 188,000
appjar 84,000
toga 98,000
guizero 108,000
I think the 'takeaway', at least for me, is that in the few months (less than 1 year) that PySimpleGUI has been around it has managed to attract as many users and more than projects that have been around for several years.
I like this trend!!
PySimpleGUI has the kind of legs and impact that I knew it would have.
None of this would have been possible, however, without the user community that has stepped forward to help get the word out to other people, to make suggestions that are awesome and make the package much better. So, it's a congratulations that goes out to the user community for hitting this milestone. I'm the not the person that's racking up the install stats, it's all of you out there building awesome applications.
Thank you for your support and encouragement. I hear from a good number of users that thank me for building this. Often in the Issues I see positive comments despite a bug being reported. Those little comments matter. They do have an impact, a very positive one. Sometimes one short phrase is what gets me through the day, that keeps me motivated to keep pushing forward.
MikeTheWatchGuy
on 18 Mar 2019
Congrats!!! :clap: :clap: :clap:
Keep up the impressive work, thanks for your effort in making PySimpleGUI....I believe this will hit the 1 MILLION mark soon (and billion soon after):1st_place_medal:
One day PySimpleGUI will be the "go to" GUI tool for all Python projects :)
 sidbmw
on 20 Mar 2019
sidbmw
on 20 Mar 2019
do_not_clear defaults to True now!!!
Mark your calendar, it's finally happened...
No more having to add the annoying do_not_clear=True to your input and multiline input/output elements!
You can simply write:
sg.Input()
and your input field will not be cleared when you "Read" the window.
I still must change all the docs, but for now, I'm happy just having jammed it out the door on these ports:
- tkinter
- Qt
- WxPython
- Web/Remi
Enjoy! I do apologize for not changing it much sooner.
Now I'm going to have to start explaining "how to clear the input fields after clicking a button". I know the questions will start pouring in. LOL
MikeTheWatchGuy
on 23 Mar 2019
3.27.0 PySimpleGUI 31-Mar-2019
Mixup.... 3.26 changes don't appear to have been correctly released so releasing in 3.27 now
- do_not_clear now defaults to TRUE!!!
- Input Element
- Multiline Element
- Enable Radio Buttons to be in different containers
- Ability to modify Autoscroll setting in Multiline.Update call
- PopupGetFolder, PopupGetFile, PopupGetText - title defaults to message if none provided
- PopupAnimated - image_source can be a filename or bytes (base64)
- Option Menu can now have values updated
MikeTheWatchGuy
on 31 Mar 2019
I really screwed up the 3.26 release last week before surgery.
The changes were simply not there when I pip installed.
I rarely run the installed version of course, so I completely missed that the new animation feature wasn't working.
I'm really sorry if anyone lost time on this f-up.
The new stuff is there now and should be working fine.
MikeTheWatchGuy
on 31 Mar 2019
PySimpleGUI (tkinter) repl.it Template
Here is a template. The PySimpleGUI release that's used is 3.27.
https://repl.it/@PySimpleGUI/PySimpleGUI-on-tkinter-TEMPLATE
The cool thing about this template is that you can "fork it" on replit, paste your code into the main program window and run your plain PySimpleGUI code, in a browser.
I'm starting to use this more and more when answering Issues. It allows me to have control over which version of PySimpleGUI is being used. And it demonstrates, live, to the Issue reader, the fix that I'm proposing. No download and running in PyCharm on their system needed. Just follow the link.
I used it today to answer this question about replacing a window's contents:
https://github.com/PySimpleGUI/PySimpleGUI/issues/1270
And #1271 too.
I think it's super helpful to be able to answer this way.
If not, just tell me to knock it off :-)
MikeTheWatchGuy
on 31 Mar 2019
Some Things I Learned This Week
I've said it a number of times... this package grows as a direct result of how users use PySimpleGUI. Feature implementation often follows the requests by users rather than a firm, detailed roadmap. "Just enough, just in time" programming is how I think of it.
I learn from looking at how people use PySimpleGUI and am able sometimes to incorporate what I learn directly back into the code code or I learn a new technique from a user and am able to distribute it back to the community through this GitHub or through documentation / demo programs.
And, I learn from writing PySimpleGUI code to help people. I find myself duplicating GUIs that others have written so that I can compare the code required to duplicate the same GUI window. It's usually 1/2 the amount of code or less and pretty much always more clear to read (all subjective I realize). I learn where it's difficult or even impossible to duplicate other GUIs. It's all good stuff.
Using "special characters" as images on buttons
Check out this site for symbols to copy.
There is a restriction that I ran into for some characters if they are above some threshold. I don't recall all the particulars. You'll know when you hit a problem.
Here's an example of them in use:
import PySimpleGUI as sg

layout = [[sg.Text('Up and down buttons for free!')],
            [sg.Button('▲'), sg.Button('▼')]]

e,v = sg.Window('Window Title').Layout(layout).Read()
print(e,v)
tkinter window:

Qt window:

Wx Window:

Web (Remi)

"Building" Layouts
I've struggled to come up with good demo programs, cookbook entries that show how to programmatically build a window. In the past I did things like use the '*' operator to unpack a list directly into a layout. This required Python 3.4 (I think) in order for it to work.
This new technique relies on concatenation of lists using the '+' operator. Should have tried this one long ago.
Like the above example, most layouts are these static lists of lists:
layout = [[sg.Text('Up and down buttons for free!')],
            [sg.Button('▲'), sg.Button('▼')]]
How do you easily add onto the end, or more importantly, how can you add something in the middle?
The way to do it is to always keep your layout pieces as these double lists [ [ ] ] and add them together.
To "add" the buttons then it would look something like this:
layout = [[sg.Text('Up and down buttons for free!')]] + \
            [[sg.Button('▲'), sg.Button('▼')]]
or, more than likely, you already have a variable layout going and want to add to the end:
layout = [[sg.Text('Up and down buttons for free!')]]

layout +=  [[sg.Button('▲'), sg.Button('▼')]]
You can expect to see something more written about this in the future in the docs and in demo programs. It's been a thorn for beginners that I think this technique will solve.
MikeTheWatchGuy
on 2 Apr 2019
More Shortcuts
New shortcuts were added to all 4 ports of PySimpleGUI. These enable you to use very short names for Elements. The new ones include:
InputText:
I
Button:
B
Btn
Butt
I've noticed more people don't use shortcuts, and that's all well and good. I'm impatient, especially when it comes to cranking out simple GUIs that have Text, InputText, and Button elements. It makes a lot of sense to me to have _available_ shorthand versions of these for people that want them.
The problem with having these is that I'm tempted to use them all the time, even in "teaching" situations, but that's not a good idea. It's easy to guess that Text('This is text') is something that's going to display text in some way. It's not quite so clear when it's written: T('This is text'). It gets worse with B for Button and I for InputText. Who knows, maybe it won't be an issue.
MikeTheWatchGuy
on 2 Apr 2019
Base64 Window Icon support added to Qt (so now in ALL ports)
I'm elated to have just checked in a change that allows you to specify the icon parameter in a call to Window to be a Base64 Byte String in addition to a filename.
All of the other PySimpleGUI ports (tkinter, WxPython, Remi) supported Base64 window icons, so it's nice that Qt supports them now too!!
This has not yet been released to PyPI. It's only on GitHub at this point.
I will try and get this up on PyPI this evening as I also want to get the super-short shortcuts uploaded too (B = Button, I = Input).
MikeTheWatchGuy
on 4 Apr 2019
Training the masses on Buttons.....
There is a new round of users arriving to the PySimpleGUI party!! How exciting.
This wave seems to be struggling with getting the news that PySimpleGUI does not at all follow the other GUI frameworks' OO model.
One of the more recent batches of questions has been around "How to hook a button up to a function". I've seen people guess by adding a command= parameter to the Button call, but that clearly didn't get them far.
And to make matters a little more difficult, the posts for help are spreading away from the GitHub issues list and onto sites like StackOverflow where I recently answered this one:
https://stackoverflow.com/questions/55515627/pysimplegui-call-a-function-when-pressing-button/55517255#55517255
This triggered me to take a couple of actions in addition to answering the specific StackOverflow post.
- I created a new Demo program that specifically addresses connecting buttons to functions.
- To go with that, I've created a repl.it sample program so it can be immediately examined and EXECUTED. https://repl.it/@PySimpleGUI/Call-Func-When-Button-Pressed
I am wondering what else to do on top of this. I'm tempted to add a BIG NOTICE right at the top of the Readme, urging people to read a very short introduction (perhaps also new) that quickly educates the reader that this GUI SDK is unlike the others and introduces them quickly to the concepts like Event Loops.
This notice and section is meant not for the complete beginner as much as the intermediate or advanced programmer that has had GUI exposure before and needs to be told "this time it's different".
I'm open to suggestions.... or perhaps this isn't a huge program that I need to worry about.
MikeTheWatchGuy
on 5 Apr 2019
Repl.it PySimpleGUI tkinter-style....
More on this incredible repli.it capability.
I continue, daily, to be blown away by repl.it and what it is enabling PySimpleGUI to do.
My latest obsession is the ability to run actual PySimpleGUI code in a web browser...not the PySimpleGUIWeb version,. but the real PySimpleGUI (tkinter) version.
I'm tempted to turn as many of the existing Demo Programs into repl.it versions and then adding the link to the repl.it to the top of the Demo Program.py file's source code.
For example, someone asked about a Chat program on Reddit, so I thought it was a great opportunity to move it over to replit for display.
I've now added this repl.it link to the comments of the demo code here on GitHub:
https://github.com/PySimpleGUI/PySimpleGUI/blob/master/DemoPrograms/Demo_Chat.py
One down, potentially lots to go....
MikeTheWatchGuy
on 5 Apr 2019
0.25.0 PySimpleGUIQt 5-Apr-2019
_Really_ wanted to get this Base64 icon released to PyPI as well as the new shortcuts. This means all the ports finally have the real PySimpleGUI icon built into the code so that it will always display, by default. It's a cool logo, and it's great to be able to look at a window and know if it's a PySimpleGUI window (most likely people won't change the logo).
Don't feel like I can really begin to use the shortcuts until all of the ports have them released to PyPI. So, not sg.Butts in my layouts yet.
- Uses built-in Default Base64 Logo! (no more .ico file needed)
- New shortcuts for Elements
- I = InputText
- B = Butt = Btn = Button
- Convert user supplied button text to string just in case not a string
- Parameter
iconinWindowcall can be Base64 byte string in addition to filename
MikeTheWatchGuy
on 5 Apr 2019
## import PySimpleGUI as g
Tossed this out for comments and wasn't well received, so leaving everything as sg. I'm likely to use g from time to time in stuff I post in Issues, and other places where I want to be brief or have the layout a little less cluttered.
This is likely to be the new import statement I'm going to use going forward.
PySimpleGUI
As you might have noticed in the prior announcement post, of more shortcuts for Elements, it is the layouts that I'm most interested in simplifying at the moment.
I don't _think_ there's going to be a huge objection to this other than mixing and matching code is going to be a problem.
(Start lament)..... THIS is the kind of change I would like to be able to assign to my dev team and have them change all of the Demo Programs, docs, cookbooks and repl.it's for the project. But, alas, there is no PSG Dev Team just yet. Need a few more months for that one.
(End lament)
I'm unsure just how global I should MAKE a change for this import versus simply using it going forward.
MikeTheWatchGuy
on 5 Apr 2019
ANDROID!!!!

It's finally happened.... PySimpleGUI is running on Android!
This "screen shot" is of my FirePad running the widget summary (minus the image)
There is an ongoing issue providing instructions on how to do this.
1288
The method is based on using termux. Use it to install Python, natively on Android. You're not running PySimpleGUI code on one of those Python Apps from the app store. No, you're running Python 3.7.3 on Android's Linux. Then you do a pip install of PySimpleGUIWeb... Run pip to install it?? Damn, it doesn't get any better than this!
_You do not need to "root" your device in any way._
How many "This changes everything" moments can PySimpleGUI have??
Wow.... huge thank you to the Remi team and to @MisterY for pulling it all together and showing us the path!
MikeTheWatchGuy
on 6 Apr 2019
0.20.0 07-Apr-2019 PySimpleGUIWeb
Main purpose is to get the Output Element released so that Prints will go to window!
- Output Element WORKS!! Can re-route stdout to window
- Added Idle function to Remi MyApp for stdout re-route (thanks Davide!!)
- New Shortcuts:
- I = InputText
- B = Btn = Butt = Button
- Removed temp size in Multiline setup
- Button - convert button text passed in into a string
- Added support for base64 Images in Image.Update but it's not working! Don't use!
- Changed web_update_interval=.0000001 from 0 (YIKES I HOPE SOMETHING DIDN'T BREAK!)
MikeTheWatchGuy
on 8 Apr 2019
Tic tac toe....and Reddit Observations
This sure got a lot of attention in the past few hours on Reddit.
https://www.reddit.com/r/learnpython/comments/bb598q/way_to_get_graphics_in_my_tic_tac_toe_game/
As usual, I was drawn in to comment. No one was recommending PySimpleGUI after all :-) And damn, THIS is what the package was written and meant to be. "My First GUI"(tm)
I'm starting to see a pattern in "uptake" of people supporting PySimpleGUI. The more established programmers are the most "resistant" or skeptical or whatever label may fit as it's difficult to not be super-biased when pigeonholing people.
It's the newbies that gravitate towards PySimpleGUI. It's those actively looking for a solution to a problem they've not solved before.
Not saying these are the only people using PySimpleGUI, but does seem to be who are most apt to give it a try.
I'm sure people are tired of me recommending this package, but damn, I honestly and really do believe what I post. If PySimpleGUI is a great fit, I say so. If it's not, I'm not going to push it.
Anyway, the lesson I think I'm learning is that there is no converting those that are skeptics. Evidence is not part of the equation.
Sorry to be making noise about Reddit again.... oy... but it is where I learn the most. It's where I get exposed to new users, often one user at a time.
And it's the users that help make this package what it is. It's the USERS that bring in the new ideas. I wouldn't be working on getting PySimpleGUI running on Android had it not been for a user. SO many features and architectural directions were proposed by people using the package. The more of you there are out there, the more good ideas that are brought to this project.
MikeTheWatchGuy
on 9 Apr 2019
0.21.0 10-Apr-2019 PySimpleGUIWeb
This was a needed addition. By setting the disable_close parameter in your call to Window, it will allow you to close your browser and to reconnect with your application as if your browser never closed. You will not be notified in fact that it's closed.
If you want the user to be able to exit, you'll need to supply and Exit button of some kind that will in turn call Window.Close.
This seemed like a must Android programs
- If
disable_closeparameter set in Window call, then Remi will not disconnect when browser closed. Great for reconnecting.
MikeTheWatchGuy
on 11 Apr 2019
ALL Ports Updated - PySimpleGUI, Qt, WxPython, Web
And the laziness continues.
Windows just got easier to create!
The SECOND parameter to a Window call is now...... layout.
You can now specify the layout as part of the call to Window itself. You no longer need to add .Layout to the end of your window calls, unless you want to.
This
window = sg.Window('Window Title').Layout(layout)
Becomes this
window = sg.Window('Window Title', layout)
If you want to play it safe for a while so that it catches an attempt at running with an older version, you can specify the parameter name in the call....
window = sg.Window('Window Title', layout=layout)
Of course, make SURE you've installed the latest update from PyPI or GitHub prior to doing this change or self you won't be setting the layout parameter, you'll instead be passing your layout in as the default_element_size, what was the second parameter.
This should make things look much easier for beginners! No "chaining" required to create a window.
Since this is a somewhat important API change, I made it across the board and did a PyPI push of all 4 ports. Whew! Everyone better be damned grateful 😃
MikeTheWatchGuy
on 12 Apr 2019
0.23.0 21-Apr-2019 PySimpleGUIWeb
Getting this Graph Element up and running is going to really propel a looking GUIs along. You can make bar charts, line charts, do math stuff, draw images, make games, animate stuff, etc.
I'm building up stuff to be able to make a simple game for Android.
- GRAPH ELEMENT almost done!
* DrawLine
- DrawRectangle
- DrawPoint
- DrawCicle
- DrawText
- Erase
- Move
- MoveFigure (by a delta amount)
- RelocateFigure (draw to a new spot)
- Update - for background color change
- Enable events works for single clicks (no drags yet)
- Changed Image element to use SuperImage class
- Image element works better?
- Base64 not yet working
MikeTheWatchGuy
on 21 Apr 2019
3.29 22-Apr-2019 PySimpleGUI
Added the new RelocateFigure to PySimpleGUI so that the Web and Tkinter version can both run the same code.
- New method for
Graph-RelocateFigure - Output Element no longer accepts focus
MikeTheWatchGuy
on 23 Apr 2019
New pymunk based demo
Check out the new demo that integrates pymunk into both PySimpleGUI and PySimpleGUIWeb.
https://github.com/PySimpleGUI/PySimpleGUI/blob/master/DemoPrograms/Demo_Graph_pymunk_2D_Graphics.py
I want to try and use it to create a simple 2 player game to be played between 2 phones.
I'm terrible at thinking of game stuff.
Maybe it can be used to make Pong?
Here is what the ball test looks like on tkinter and in a browser with Remi.

This is the browser version. Only changed the import statement.

Or start the balls in a random location and speed up the time....

MikeTheWatchGuy
on 23 Apr 2019
0.24.0 PySimpleGUIWeb 23-Apr-2019
- Enabled SuperImage class to accept base64 imagees
- Now use an SvgGroup to hold all of the drawing items
- Circle can now set outline color
- DrawImage still isn't working
- Move isn't working
- Added Relocate for group
- Lazy buttons - Up, Down, Left, Right(()
- Creates buttons with arrows on them as text
- Base64 support for Image Element
MikeTheWatchGuy
on 24 Apr 2019
0.25.0 PySimpleGUIWeb 25-Apr-19
- DrawImage method for Graph now takes BOTH filenames and base64 variables
- Fix for DrawRectangle
MikeTheWatchGuy
on 26 Apr 2019
New Demo Program Added - Demo_Script_Launcher_Realtime_Output.py
I've been using this technique to output shell / subprocess output in realtime for things like the EXE maker. But, I had not officially released this streamed output model anywhere in the demo code programs so it seemed like the right time.
Here is the "Run Command" function that makes it all possible:
def runCommand(cmd, timeout=None, window=None):
    """ run shell command
    @param cmd: command to execute
    @param timeout: timeout for command execution
    @param window: the PySimpleGUI window that the output is going to (needed to do refresh on)
    @return: (return code from command, command output)
    """
    p = subprocess.Popen(cmd, shell=True, stdout=subprocess.PIPE, stderr=subprocess.STDOUT)
    output = ''
    for line in p.stdout:
        line = line.decode(errors='replace' if (sys.version_info) < (3, 5) else 'backslashreplace').rstrip()
        output += line
        print(line)
        window.Refresh() if window else None        # yes, a 1-line if, so shoot me

    retval = p.wait(timeout)
    return (retval, output)
PyGame Integration
Lately I've been playing around with game related stuff because I want to build a demo application that runs on Android and allows 2 people to interact at the same time, looking at the same screen. It's a perfect setup for a game.
The problem, however, is that some of these packages do not support ARM. The pymunk 2D engine is a good example. Runs great on Windows, Linux, but wouldn't pip install correctly on Android using Termux.
I doubt there will be a way to integrate PyGame to PySimpleGUIWeb, but perhaps there is a way. I've asked the fine folks at Remi (@dddomodossola) to see if there's a way of hooking in (Issue here)
In the meantime, I've posted 2 Demo programs for use with the tkinter version of PySimpleGUI. The 2 Demos are:
- Super minimal. Sets things up for you to begin. It will take a button click and draw a circle.
- Snake Game - it's a game I lifted from the net. It runs inside of a PySimpleGUI window (tkinter)!!
MikeTheWatchGuy
on 28 Apr 2019
Super Mario PyGame integration example
Just located this Mario Brothers source code and wanted to see if I could run it inside of a PySimpleGUI window. It took a while to figure out the Mario code. I found the 3 places I needed to make a change. 1. Initial setup of the screen
- Passing the window variable to main program
- Added window.Read() call and event loop contents to the "Main Loop" in the game

MikeTheWatchGuy
on 28 Apr 2019
Android Games On the Way! PySimpleGUI and pymunk running on Android....

This is a "game" that is running on my Android tablet. It's a proof of concept kind of thing. I managed to work with the pymunk team to get pymunk up and running on Android. I'll add the commands you need to enter into Termux with the code.
I connected to it from my PC. Both screens show the same thing and both react to input. It should make for a good gaming experience between you and your friends. You write and run your code on your device (phone, etc), and tell your friends your IP address so they can connect.
That makes a couple of different game engines that I managed to integrate with today.
MikeTheWatchGuy
on 29 Apr 2019
PyGame running inside PySimpleGUIWeb
Check this out!! I've been getting a LOT of help from the Remi project. Without Davide's help I wouldn't be able to do any of this.
I need to solve a sound problem as I'm not hearing any sound when using PySimpleGUIWeb. I do have sound when using the tkinter PySimpleGUI so I'm pretty sure it's going to be possible, at least when played on a local machine.
I wonder if sound could be routed to go out the browser such that anyone connected to the device will hear the sound.....

MikeTheWatchGuy
on 30 Apr 2019
0.26.0 PySimpleGUIWeb 1-May-2019
- Combo - converts values into a list of strings
- Image.Update is working with both filename and base64 (but no size controls yet)
- Window - new parameter - return_key_down_events. Normally it's key up events that are returned from Read calls
- Returning keyboard input works!
- Turned off Remi Logging completely (may be a bad idea. can change it back)
- Rearranged code so that same code is used for first window and following windows
- Window disable_close parameter controls wether or not server keeps running after user disconnects
MikeTheWatchGuy
on 2 May 2019
Window(title, layout, ...) changed in docs
The Readme and Cookbook have been updated to use the "new-style" window call. The layout is specified as the second parameter to Window.
All of the statements that looked like this:
window = sg.Window('Running Timer').Layout(layout)
were changed to look like this:
window = sg.Window('Running Timer', layout)
It will help out the folks with very little Python experience. Now making a Window is a single function call instead of a chained object.
Truth is that I'm lazy and was tired of typing layout twice for no good reason.
MikeTheWatchGuy
on 2 May 2019
Window.FindElement('_KEY_') changed in docs to Window.Element('_KEY_')
Continuing with the updates to Readme and Cookbook (which have not been updating on the read the docs site since MARCH!)
I went through those 2 docs and changed all of the calls to FindElement to Element.
I have been using the short-form (Element) in all of the code I've written in the past 3+ months. If you've followed this project, you know just how lazy I am. And I don't think that dropping the "Find" from the call is going to confuse people.
Now I just need to make all these changes to the demo files too!
MikeTheWatchGuy
on 2 May 2019
Overseas Users
In order to learn more about how people use PySimpleGUI, I go on the hunt for stuff people make or write about the package.
There's a vibrant overseas community of users, Russia, China, ...
I ran into this interesting list today.
http://bubuko.com/infodetail-3038936.html
It claims to be a list of the Python standard library packages that you may find useful:

I scrolled down and saw the GUI section which read:
GUI
Tkinter: can be replaced by pysimplegui, super easy to use
Python Software Foundation, are you listening? 😉
MikeTheWatchGuy
on 3 May 2019
Drawing with PySimpleGUIWeb
I've been adding the drag code for the Graph Element. This code returns the mouse position when inside of a graph element. It's what is required for doing things like this:

It doesn't have mouse down/up detection yet which means I get events if the mouse is down or not. Have to get the code working so that events are only returned when the mouse button is down. SOON!
MikeTheWatchGuy
on 3 May 2019
More Drawing
I've got the mouse up/down working now so that drag events are only returned when a mouse button is down.
The result....a better "drawing app", complete with ability to pick colors:

And it came to less than 30 lines of code.
import PySimpleGUIWeb as sg

layout = [  [sg.Text('Drawing App')],
            [sg.Graph((400,400), (0,0), (400,400), enable_events=True, key='_GRAPH_',background_color='lightblue', drag_submits=True)],
            [sg.B('OR', button_color=('orange', 'orange')),         # Pen color orange
             sg.B('BL', button_color=('black', 'black')),           # Pen color black
             sg.B('RD', button_color=('red', 'red')),],             # Pen color red
            [sg.Button('Exit'), sg.B('Erase')]]

window = sg.Window('Window Title', layout)

prev_point = None
line_color = 'black'
while True:             # Event Loop
    event, values = window.Read()
    if event in (None, 'Exit'):
        break
    if event == 'Erase':
        window.Element('_GRAPH_').Erase()
    elif event == '_GRAPH_':
        if values['_GRAPH_'] == (None, None):
            prev_point = None
        if prev_point is not None:
            window.Element('_GRAPH_').DrawLine(prev_point, values['_GRAPH_'],line_color, 2)
        prev_point = values['_GRAPH_']
    else:
        line_color = {'OR':'orange', 'BL':'black', 'RD':'red'}[event]

window.Close()
PySimpleGUIWeb - A Progress Meter
It's not the ProgressMeter Element....yet.. but it may turn out to be at some point soon.
I've been working hard on the Graph element and the drawing primitives. After reading an Issue on the Remi site where Davide pointed out that a Progress Meter could be drawn manually quite easily I decided to give it a shot using PySimpleGUIWeb.
Here's a meter that went from 0 to 1000

And this is the entire program that does it. If I in-lined everything and didn't have the constants at the top, it would have been
import PySimpleGUIWeb as sg

BAR_SIZE = (200,20)
MAX = 1000
BACKGROUND_COLOR = 'gray'
BAR_COLOR = 'red'

def draw_bar(graph:sg.Graph, current, max, color):
    graph.Erase()
    graph.DrawRectangle((0,BAR_SIZE[1]), (int(BAR_SIZE[0]* current/max),0), fill_color=color)


def main():
    layout = [  [sg.Text('Progress Bar Simulation')],
                [sg.Graph(BAR_SIZE, (0,0), BAR_SIZE, background_color=BACKGROUND_COLOR, key='_GRAPH_' )],
                [sg.Button('Exit')]]

    window = sg.Window('Simulating a Progress Meter', layout)
    graph = window.Element('_GRAPH_')
    for count in range(MAX):             # Event Loop
        event, values = window.Read(timeout=1)
        if event in (None, 'Exit'):
            break
        draw_bar(graph, count, MAX, BAR_COLOR)
    sg.Popup('Maximum amount reached... exiting application')
    window.Close()

main()
or if you want to in-line everything, then it's only 15 lines of code in total, for everything. Wow, PSG rocks...
import PySimpleGUIWeb as sg

layout = [  [sg.Text('Progress Bar Simulation')],
            [sg.Graph((200,20), (0,0), (200,20), background_color='gray', key='_GRAPH_' )],
            [sg.Button('Exit')]]

window = sg.Window('Simulating a Progress Meter', layout)
graph = window.Element('_GRAPH_')
for count in range(1000):             # Event Loop
    event, values = window.Read(timeout=1)
    if event in (None, 'Exit'):
        break
    graph.Erase()
    graph.DrawRectangle((0, 20), (int(200 * count / 1000), 0), fill_color='red')
window.Close()
Oh, and it works with tkinter too!! Just change the import statement and you get this nice window:

MikeTheWatchGuy
on 3 May 2019
Repl.it Jam Starting NOW..... Ends tomorrow at 6:00 PM EST
I hesitate to post this because I don't want any competition, but at the same time, if they see a flood of people using PySimpleGUI for this Jam, then it'll get written about.
So... why not share it?!
Here is the full text of the annoucement:
Hello jammers! This jam is going to be a bit different. In the past you've always had a theme your project you needed to follow. This time, you have a task. In this scenario, you've been hired by Lottery Royal, the world's first lottery based battle royal game. The LR team wants to analyze previous lottery winnings, so they can replicate those events in game. Your job is to create a program, that will display all the information in a readable way. The team doesn't care what you use, as long as they can use it without much trouble. The program must read the data from a file, you cannot hard code the data. You can find your data here below.
Being a member of the LR team myself, feel free to ask me any questions in the appropriate channel. judging will also be done a bit differently. Due to the huge amounts of submissions, it has become very cumbersome to give in depth feedback. For this jam, participating admins, mods, and guardians will rate their favorite submissions. The submission that is most consistently picked highly will win!
The prize is the same as always. If you win, you'll get the super special and awesome Jam Champion role. In addition, you'll be allowed an emoji of your choice to the guild.
Now get started. Here's your data, and go make those GUIs!
https://catalog.data.gov/dataset/lottery-mega-millions-winning-numbers-beginning-2002
Your judges are @Mosrod, @kpasta, @timchen, @katya, @Edwin (Lightning Fast / EanKeen), and Mwah.
When the jam ends, this form will close shortly after. When you're finished, post your project here: https://forms.gle/EPn3rJqffMSTWXJL9
Google Docs
Code Jam Submissions!
Put your working repl here! This will close after the jam is over.
MikeTheWatchGuy
on 5 May 2019
PySimpleGUI Wins Repl.it Code Jam
Used PySimpleGUI to enter this code jam:


This was the entry:
https://repl.it/@PySimpleGUI/Lottery
Have to say it was a satisfying victory on a number of levels. One was that while I've been using repl.it for these awesome PySimpleGUI examples, it's actually a much bigger tool than that. Python is but one of many languages that it can run. There must be 20 or 30 languages / environments on the available environments list.
Python's tkinter was the indirect winner. It IS possible to create an attractive GUI using the plain tkinter version of PySimpleGUI. Thankfully it's the furthest along development wise. I was able to throw quite a bit of code from Demo Programs that were already written like integrating with Matplotlib to make bar graphs.
In total I spent maybe 3 hours on the entry.
My favorite feature is the "Search" tab and the sliders that are used to search and show the results in realtime. That feature was likely the thing that got it across the line.

It was coded quite inefficiently. I should go back and combine the create figure calls that are all identical except for the labels. But, was in a hurry as it was a 24 hour thing and neatness didn't count quite so much.
So, was a good day for Python and PySimpleGUI.
MikeTheWatchGuy
on 8 May 2019
0.27.0 PySimpleGUIWeb 8-May-2019
These changes enabled some of the demos to run, like the Game of life which you can find running here:
https://repl.it/@PySimpleGUI/Conways-Game-of-Life-Web
- Changed default icon from string to bytes
- New Text Update to match newer call parameters
- Added image_subsample, image_size parms to be backward compat. Note - not enabled
- SuperImage changes - load both base64 images and files
- Fix for DrawRectangle
- Added data parm to DrawImage
- Added DeleteFigure
- Tab Support
- Just barely beginning
- May or may not work
- Window new class variable - AllKeysDict
- Contains dictionary of all elements and keys
- Now used by FindElement / Element calls for quick lookup
- Fix for Column elements and rows that didn't line up. Changed tk_row_frame style
- Graph Element
- enable_events works
- drag events works
- click events works
MikeTheWatchGuy
on 8 May 2019
PySimpleGUI Designer!
You asked for it... now you've got it.
Check out the work by this amazing PySimpleGUI teacher....
https://youtu.be/dN7gXwnNoBA
What an amazing accomplishment! Wow....
MikeTheWatchGuy
on 8 May 2019
Drawing Primitives Used for Line Graphs
PySimpleGUI is awesome for making dashboards. The reason is that drawing your own custom bar and line graphs is much easier to do using PySimpleGUI than it is to do it in Matplotlib.
In this example code, a "Graph" is created with 0,0 being at the bottom left and (500,500) at the upper right. Think of it like the + portion of a normal math graph. This means to make a line graph over time you vary X from 0 to 500 and your Y value is 0 to 500 depending on what your value to be graphed is.
Check out this amazing screen shot of a tkinter, Qt, and Web based port of PySimpleGUI produced with the exact same source code:

Here is the code that was run:
import PySimpleGUIWeb as sg
from random import randint

layout = [[sg.Text('Line Graph Simplicity')],
            [sg.Graph((500,500), (0,0), (500,500), key='_GRAPH_')],
            [sg.OK()]]

window = sg.Window('Example of Line Graphing In PySimpleGUI', layout)

while True:             # Event Loop
    event, values = window.Read()
    if event is None:
        break
    # This portion draws the graph
    window.Element('_GRAPH_').Erase()
    prev_point = (0, 0)                 # start drawing in bottom left corner (0,0)
    for x in range(500):                # loop through X values
        y = randint(0, 500)             # make up a Y value
        window.Element('_GRAPH_').DrawLine(prev_point, (x, y))      # do the actual drawing of the line
        prev_point = x, y               # remember where to begin drawing next time
Menus for the web!

The PySimpleGUIWeb port is nearing an Alpha / feature semi-complete level. I think the only major thing left is Trees. All of the other Elements are pretty much done.
They may not have all of their options exposed (changing the fonts, etc), but the basics are all there which means the remainder I can fill in as features are requested.
I hope to get the Wx Port up to this level too soon.
MikeTheWatchGuy
on 11 May 2019
The magic of Type Hints and PyCharm
The code-completion feature of PyCharm goes PERFECTLY with PySimpleGUI. So does its clear display of a functions named parameters. This is super important when you have calls with many named parameters, like PySimpleGUI has. PySimpleGUI relies on named parameters EVERYWHERE.
MANY TIMES you will learn more about a feature's possibilities by looking at the parameters than looking at the docs. Sorry, but the docs lag the code.
Advice you can't go wrong with....
USE PyCharm WITH PySimpleGUI
Back to type hints.
You will see this kind of code in the PySimpleGUIWeb code:
self.Widget = None # type: remi.gui.Button
Then anytime I write
self.Widget.
in one of the other class functions, it will show me all the cool things that a Remi Button has!
I use this trick sometimes by settings a variable to itself just so I can set the comment. A variable by itself didn't seem to be enough. You'll see this in ALL of the ports:
element = element # type: Graph
It's a way of "check pointing" the variable. Saying, at this point, the variable element should be a class variable Graph. Then when I type element. it will show me all the things that a Graph. has to offer.
I can't tell you what a lifesaver it has been to use this. It's safe because it's all done in the comments and yet _with PyCharm it magically works._
MikeTheWatchGuy
on 14 May 2019
PySimpleGUI on Git gets new Transparent Window feature
There is a new parameter to the Window call....
transparent_color
Any place in your window this color is encountered will be made see-through. Often other GUI SDKs will use a green color for this as it lessens the likelihood that you have this color occurring naturally in your window.
You can also modify this value at runtime by calling:
window.SetTransparentColor('black')
The best use of this is for the loading animations where you want just the animation to show on top of the other windows
The function PopupAnimated now takes advantage of this new capability and the results look fantastic.
When applied to a window in general, the results are a little confusing.
The standard test window looks like this:

Calling window.SetTransparentColor passing in green as the color has this effect:

MikeTheWatchGuy
on 14 May 2019
New Demo - Long Running Operations
OK, I've finally had enough of these questions:
What do I do when my function takes so long to complete that it freezes my GUI?
My standard reply of "you spin it out into a task" isn't good enough. To be a PySimpleGUI solution, you need to be able to deploy it right away. The 5 minute rule. One of the best ways for that is to supply a Demo Program.
This demo program shows one method of performing long-running operations with PySimpleGUI. You'll find the demo here:
https://github.com/PySimpleGUI/PySimpleGUI/blob/master/DemoPrograms/Demo_Threaded_Work.py
See what you think. Maybe there's a better way to architect it for use. I tried to keep it simple enough to understand and good enough to deploy in a project.
MikeTheWatchGuy
on 14 May 2019
0.28.0 PySimpleGUIWeb 15-May-2019
- Menus
- Yes, the full Menu Bar across the top of the window!
- PLUS, you get more controls to set the colors and fonts
- Works with menu keys too
- Disabled items are not working however
- Correctly returns menu events
- Listbox
- Correctly handling Update calls that change the list
- Correctly returns a LIST of items (even if only 1)
- Button Graphics!
- Can specify either a filename or image data as the source
- Update parameters image_data and image_filename work!
- Fix in DrawLine. Wasn't returning the id
- DrawRectangle fixes - transparent fill color is default. Correctly draws coordinates now
- DrawImage seems to work with both data and files
- enable_events parameter for TabGroups
- Frame Element
- Behaves like a Column element for now since no official Remi Frame
- Fix for popups that get data - New dictionary return values messed up popups. Needed to use keys internally
MikeTheWatchGuy
on 15 May 2019
New Issue Reporting Process Change
Some time ago I created a template to be used with Issue reporting. I spent time creating this template because it's needed. If I didn't need the information being requested, I wouldn't take the time to ask for it.
I've been letting it slide when people don't fill it out and instead continue to be free-form.
Issues that are filled out without the template will no longer be accepted. They will be REJECTED.
I'm spending way too much time ASKING for the information that I asked for up front. If you can't take a moment to fill in the fields, then I can't take the many moments more to ask you each of the questions one by one.
Sorry if this feels draconian, but it's simply how it has to be. There is ONE person fielding all of the Issues, creating releases for FOUR different ports, and documenting everything. I don't know how to support the growing user base without this kind of cooperation.
MikeTheWatchGuy
on 16 May 2019
The BEST User Community Ever!
I looked to the pip install stats today for the new Debugger. I expected a couple hundred people, at MOST, would give it a try. After all, the only place I mentioned it was on the GitHub site. It was only today that I made a Reddit post.
I was stunned to see that yesterday over 1,000 pip installed took place!
Here are the stats from pepy. What's funny about pip installs is that the package names are not case sensitive. I just now realized what PySimpleGUIdebugger looks like in all lower case!
pysimpleguidebugger
Yes, I've created a "Py Simple Guide Bugger". I bet there's some British translation of that phrase that isn't so nice. It sounds like I've created a "Guide to Screwing Things Up Really Easily".
These are ONE DAY numbers remember because it's only been out officially for 1 day:

MikeTheWatchGuy
on 25 May 2019
PySimpleGUI Version 3.30
It's been a LONG time evidently. I don't like dumping this much in at one time.
3.30.0 PySimpleGUI 24-May-2019
- Rework of ALLL Tooltips. Was always displaying at uttuper left part of element. Not displays closer to where mouse entered or edited
- New Element.Widget base class variable. Brings tkinter into the newer architecture of user accessibility to underlying GUI Frameworks' widgets
- New SetTooltip Element method. Means all Elements gain this method. Can set the tooltip on the fly now for all elements
- Include scroll bar when making visible / invisible Listbox Elements
- New Radio Element method -
Radio.ResetGroup()sets all elements in the Radio Group to False - Added borderwidth to Multiline Element
Button.Click()- new method - Generates a button click even as if a user clicked a button (at the tkinter level)- Made a Graph.Images dictionary to keep track of images being used in a graph. When graph is deleted, all of the accociated images should be deleted too.'
- Added
Graph.SetFocus()to give a Graph Element the focus just as you can input elements - Table new parameter -
hide_vertical_scrollif True will hide the table's vertical bars - Window - new parameter -
transparent_color. Causes a single color to become completely transparent such that you see through the window, you can click through the window. Its like tineows never was there. - The new
Window.AllKeysDict = {}has been adopted by all PySimpleGUI ports. It's a new method of automatically creating missing keys, storing and retrieving keys in general for a window. - Changed how
window.Maximizeis implemented previously used the '-fullscreen' attribute. Now uses the 'zoomed' state - Window gets a new
Normal()method to return from Maximize state. Sets root.state('normal') - Window.Close() now closes the special
Window.hidden_master_rootwindow when the "last" window is closed Window.SetTransparentColormethod added. Same effect as if window was created with parameter set- An Element's Widget stored in
.Widgetattribute - Making ComboBox's ID unique by using it's Key
- Changed Multiline to be sunken and have a border depth setting now
- Removed a second canvas that was being used for Graph element.
- Changed how no titlebar is implemented running on Linux versus Windows. -type splash now used for Linux
- PopupScrolled - Added back using CloseButton to close the window
- Fixed PopupGetFolder to use correct PySimpleGUI program constructs (keys)
- PopupGetText populated values carrectly using the value variable, used keys
- PopupAnimated finally gets a completely transparent background
MikeTheWatchGuy
on 25 May 2019
Happy 100,000 PySimpleGUI Users!
We've finally officially reached the 100,000 pip installs of the tkinter 3.0 port of PySimpleGUI. In other works, PySimpleGUI.py.
Here are the stats. Something pushed it up to 1,000 installs yesterday. It must have been the Debugger!

MikeTheWatchGuy
on 26 May 2019
PySimpleGUIdebugger has been renamed to imwatchingyou
I did this name quickly to try and nip it before it becomes wildly popular and runs away with itself.
I did it for a couple of reasons. Having PySimpleGUI in the name itself made no sense. It uses PySimpleGUI but that's all. It can debug anything including tkinter programs or Qt programs.
PySimpleGUI has a number of trolls following it around at the moment. Go figure. I got some insight the other day when someone complained about my package versus another package that had been around for a very long time, but failed to get traction.
Jealousy is not a fun emotion to experience nor be the target of. I feel kinda bad for these guys., It's a really shitty emotion, jealousy, to feel.
So, I'm renaming and escaping, to some extent, the PySimpleGUI brand.
MikeTheWatchGuy
on 26 May 2019
imwatchingyou has consumed me, just as the web port has... sorry if you're waiting on an Issue
I just want to complete THREE more "features" on the project and I'll be done. :
- Simply get better GUI layout overall.
- Create a small, floating on top, thin/no border watcher window. Think tiny but powerful
- Internal integration into PySimpleGUI itself
Full-Internal Integration
The last one I'm particularly excited about. It would be so cool if PySimpleGUI programs simply had a built-in debugger that's at your fingertips while you're experiencing a problem, not after!
My hope is to make one that can be launched anytime you want, particularly when things aren't going so well.
At the rate I'm moving it could be a day or two to get through these things so give me just a liitlte more time and it'll be wrapped up and done.
MikeTheWatchGuy
on 28 May 2019
imwatchingyou Version 2.2.2 Released!
Finally got that monkey off my back.
Before diving back into the built-in version of the debugger, I'm going to be doing some work on the documentation. Working on having part of the docs auto-generated from the source code. So, lots of re-factoring to do so that only the user callable functions / methods are shown.
MikeTheWatchGuy
on 10 Jun 2019
3.38 PySimpleGUI, 1.38 PySimpleGUI27 10-June-2019 Released
Some changes that helped with the imwatchingyou project as well as user requests.
- Multiline - now has a "read only" state if created as "Disabled"
- Multiline - If window is created as resizable, then Multiline Elements will now expand when the window is enlarged, a feature long asked for.
- Output Element expands in the Y Direction
- "Expandable Rows" option added to PackFormIntoFrame allowing future elements to also expand
- Error Element - silence_on_error option
- Text Element wrapping - FINALLY got it right? No more "Fudge factor" added
- PopupScrolled - Windows are now resizable
- Option to "launch built-in debugger" from the test harness
- Remember that the Debugger is still in this code! It may or may not be operational as it's one version back from the latest release of the
imwatchingyoudebugger code. This code needs to be integrated back in from that project.
MikeTheWatchGuy
on 10 Jun 2019
3.39 PySimpleGUI & 1.39 PySimpleGUI27 13-June-2019
- Ported the imwatchingyou debugger code into PySimpleGUI code
- Replaced old debugger built-in code with the newer imwatchingyou version
- Required removing all of the 'sg.' before PySimpleGUI calls since not importing
- Dynamically create the debugger object when first call to
refreshorshowis made
- Started the procecss of renaming Class Methods that are private to start with _
- Needed for the automatic documentation generation that's being worked on
- Fixed crash when clicking the Debug button
- Fixed bug in DeleteFigure. Needed to delete image separately
- Added more type hints
- New
TabGroupmethodSelectTab(index)selects aTabwithin aTabGroup - New
Table.Updateparameter -select_rows. List of rows to select (0 is first) - Error checking in
Window.Layoutprovides error "hints" to the user
- Looks for badly placed ']'
- Looks for functions missing '()'
- Pops up a window warning user instead of crashing
- May have to revisit if the popups start getting in the way
- New implementations of
Window.Disable()andWindow.Enable()
- Previously did not work correctly at all
- Now using the "-disabled" attribute
- Allow Comboboxes to have empty starting values
- Was crashing
- Enables application to fill these in later
MikeTheWatchGuy
on 14 Jun 2019
Documentation Overhaul
Several announcements to make. This is the first.
In the process of having portions of the documentation be generated from the code itself. It makes sense and will keep the docs up to date with the latest features. There are a high number of features that are in the code now that are not documented. Not good.
I'm serious enough about this that I hired a contractor to help make the magic happen. MUCH better docs ahead. (There are already a bunch of fixes to the Readme that he did already released)
MikeTheWatchGuy
on 14 Jun 2019
Back to Android - PyDroid3 !
I tried PyDroid3 for Android again. PySimpleGUI pip installed perfectly and ran flawlessly.
If you want to run your code using PyDroid3, _you must add_
import tkinter
to your files that import PySimpleGUI. It must be what triggers to use tkinter or something. I just know that without it, the program crashes.
What's fantastic about how it works is that your application and only your application is visible when it's running. It's like having a small windows desktop with as many windows as you care to make. I was even able to invoke the built-in debugger and windows were popping up for it.
I will take some photos of apps running on my Galaxy tablet soon.
It's far from a standalone solution. It LOOKS the most standalone of everything I've done on Android. Recall that Termux ran in the browser so it certainly didn't take over the screen. I am hoping for a way to directly launch my application from Android but haven't figured it out.... yet....
I highly recommend trying this one out because the success rate is really high. I was able to download the GitHub and thus access all of the Demo Programs. I added the import tkinter to the top of the files and poof they're running on Android.
MikeTheWatchGuy
on 14 Jun 2019
Layout Verification Checks
Made some changes in the "Layout" code in an attempt to help people with the syntax of their layout variable. We've all done it.., put a ] in the wrong place... didn't add () to an element name (e.g. sg.Cancel).
Now there's a popup that will give you a hint about what the problem is and where it is in your layout. Hopefully this is better than crashing.
Here's an example. The ] should be placed on the end of the next to the last line. Instead it's at the end. The number of [] balances out fine so PyCharm doesn't complain.
layout = [[ sg.Text('Window 1'),],
          [sg.Input(do_not_clear=True)],
          [sg.Text('', key='_OUTPUT_', size=(20,1)),
          [sg.Button('Launch 2'), sg.Button('Exit'), sg.Debug()]]]
When you attempt to do the layout while creating the Window, you'll see this popup:

Instead of crashing, PySimpleGUI tosses out the offensive parts and continues the layout.
In this example, the resulting window was:

Here we see the last thing in the window is an Input Element, indicating that stuff after that Input Element is bad. Indeed, the first line in the layout that's bad is the Text that follows the Input
Fixing the layout you'll see the full window:

Note the new "Debug" button in this layout.
MikeTheWatchGuy
on 14 Jun 2019
Projects using PySimpleGUI - Add boids to the list....
I saw this article that a friend passed to me and thought it was a great candidate for integrating with PySimpleGUI. After all, they're just balls being moved around.
https://medium.com/better-programming/boids-simulating-birds-flock-behavior-in-python-9fff99375118
So, I kicked out the calls to P5, the old graphing library, and added in PySimpleGUI.... with a twist. Since we've got a GUI, why not use it? I don't know the algorithm enough to tweak with any of the algorithm's variables, but I do have control over the number of birds at any time.
The slider was a PySimpleGUI addition. With it you can slide it down to the point the speed is to your liking.
I forked the original code, made the modifications and posted a Git here along with a new Readme:
https://github.com/MikeTheWatchGuy/boids-PySimpleGUI
It took roughly 1 hour to do this "port".

Hold on for the AMAZING part!
I decided to give the Web port a try. I changed the import from PySimpleGUI to PySimpleGUIWeb and POOF... it just worked!

Unfortunately the Qt port didn't work so well :-( In theory it should run exactly the same way, but there seems to be some bug in the movement translation.
Here you can watch it on the web (very slowly)
https://repl.it/@PySimpleGUI/Boids-on-PySimpleGUI
MikeTheWatchGuy
on 16 Jun 2019
PySimpleGUI Ver 4.0
Welcome to the new world of PySimpleGUI programming. 4.0 is available on GitHub, but not yet released to PyPI.
So where are the major hubbub features that's causing this bump from 3.39 (39 releases?!) to 4.0??
In a word....
DOCUMENTATION
It just got MUCH better thanks to the efforts of @nngogol. It's not all done yet, but at least the doc strings are in the code and are IMMEDIATELY usable.
In PyCharm, it's a real JOY to program PySimpleGUI now. And for those of you that rely on the written word, the new README is being generated from the code!! Yes, finally, the API definitions will be kept UP TO DATE with the code.
The new readme should be coming in the next few days. Until then, enjoy the fully documented API calls (pretty much.... especially the Elements)
I'm really excited about the work that's already been done.
Let's take an example. I have the "quick documentation" automated popup turned on:

This is the same as pressing Control-Q while having the cursor on the name of an Element / Function call.
Here's what happens in PyCharm when I pause with my cursor on the Text Element:

There are 2 different "Signatures" you'll see for the function. One is a simple, showing the defaults view. Just below that is a detailed explanation of all of the parameters.
And it's going to get even better for the folks that like to read the docs online. More coming soon. For now, enjoy those parameter descriptions!
MikeTheWatchGuy
on 17 Jun 2019
__version__
PySimpleGUI is finally getting a version string. That should make a few of you happy that requested fthe change some time back. It will be the first line of code in the PySimpleGUI.py file. At the moment, we're sitting at version 4.0.0, but it is has not been posted to PyPI, so the version string is:
4.0.0 Unreleased

To indicate that the file has not yet been posted to PyPI, I am adding the word unreleased to the end of what will be (most likely be) the new version number. NOTE that it's possible and will in fact happen a LOT, that the code with version 4.0.0 Unreleased downloaded on one day may be different than the same version 4.0.0 Unreleased that was uploaded today. In other words, "Unreleased" means the contents are fuzzy and can vary.
If the version were simply 4.0.0 with nothing trailing the numbers, then that is an official release and will not vary from one copy to another.
I have not yet settled on an official format for the version string. I need to do some research on the norms and how I might be able to break them.
At this time, I don't believe there is a need to include the port in the version string. It's tempting, but strictly speaking not required as you can figure out the port by looking at the import statement.
What I have been using lately, that's been a real lifesaver, is to display the value of sg (from the statement import PySimpleGUI as sg
By going into the PySimpleGUI debugger and looking at the value or adding a print statement - print(sg) you are able to see exactly WHERE you're PySimpleGUI.py file is located. This is THE definitive way of knowing what version is running in your code.
Since the PSG debugger is turned on by default, if you are ever in doubt as to which PySimpleGUI.py file you are running, you can find this very easily by following these steps:
- Start your application
- Press the
BREAKkey on your keyboard - causes the debugger pop-up window to show - Look at the value of
sgin the popup window

You can take things a step further and get the version of tkinter. To do this, you'll need to bring up the debugger window (not the popup). You can press Ctrl+Break or right click on the popup window's text and choose 'Debugger'

From there you can use the REPL tab to both import tkinter and to view the version number

You can also view it by adding it as a "custom watch" on the "Variables" tab

To do this click on the button:

Then type this into the Custom Watch field:
tkinter.TkVersion

I find it a little odd that every system I have running Python is running version 8.6 of tkinter. This includes Windows. Mint Linux and a Raspberry Pi running Python (Python 3.4!).
Anyway, there's the long answer of what's coming in versioning of PySimpleGUI (and how to get PSG and tkinter versions while running using the built-in debugger).
MikeTheWatchGuy
on 18 Jun 2019
4.0.0 PySimpleGUI & 2.0.0 PySimpleGUI27 19-June-2019
Finally pushing this out the door!! Time for everyone to enjoy the new docstrings. No more mixed up understanding of parameters, at least for the primary tkinter port. The other port still need updating.
AND, this is the first release with the readme being generated. The project is still being developed so I expect there are likely some errors. Hopefully not enough to seriously hinder any newcomers.
Here are the changes that went to PyPI today
- DOC STRINGS DOCS STRINGS DOC STRINGS!
- Your IDE is about to become very happy
- All Elements have actual documentation in the call signature
- The Readme and ReadTheDocs will be generated going forward using the CODE
- HUGE Thanks for @nngogol for both copying & adding all those strings, but also for making an entire document creation system.
- New __version__ string for PySimpleGUI.py
- New parameter to ALL
SetFocuscalls.
- def SetFocus(self, force=False)
- If force is True, then a call to
focus_forceis made instead offocus_set
- Get - New Radio Button Method. Returns True is the Radio Button is set
- Rename of Debugger class to _Debugger so IDEs don't get confused
- User read access to last Button Color set now available via property
Button.ButtonColor - Rename of a number of callback handlers to start with _
- Fix for memory leak in Read call. Every call to read lost a little memory due to root.protocol calls
- Listbox.Update - New parameter - scroll_to_index - scroll view so that index is shown at the top
- First PyPI release to use new documentation!
MikeTheWatchGuy
on 19 Jun 2019
ReadTheDocs is fully operational! http://www.PySimpleGUI.org
This site, http://www.PySimpleGUI.org, is super important as it is where ALL of the docs live. The Cookbook, Readme, Arch doc, everything.
We made a huge breakthrough yesterday. Now all of the 4.0 changes are in ReadTheDocs. Previously is was stopped at about the 2/3 point. Now it makes it to the end it is looks gorgeous.
Next thing I'll be doing to it is updating the text, adding the missing descriptions, etc.
MikeTheWatchGuy
on 24 Jun 2019
Documentation using Python's help keyword
Because so many doc strings got dumped into
>>> help(sg.Listbox)
Help on class Listbox in module PySimpleGUI:

class Listbox(Element)
 |  A List Box.  Provide a list of values for the user to choose one or more of.   Returns a list of selected rows
 |  when a window.Read() is executed.
 |
 |  Method resolution order:
 |      Listbox
 |      Element
 |      builtins.object
 |
 |  Methods defined here:
 |
 |  GetListValues(self)
 |
 |  SetFocus(self, force=False)
 |
 |  SetValue(self, values)
 |      :param values:
 |
 |  Update(self, values=None, disabled=None, set_to_index=None, scroll_to_index=None, visible=None)
 |      :param values:  (Default value = None)
 |      :param disabled: disable or enable state of the element (Default value = None)
 |      :param set_to_index:  highlights the item at this index as if user clicked (Default value = None)
 |      :param scroll_to_index: scroll the listbox so that this index is the first shown (Default value = None)
 |      :param visible:  change visibility of element (Default value = None)
 |
 |  __del__(self)
 |
 |  __init__(self, values, default_values=None, select_mode=None, change_submits=False, enable_events=False, bind_return_key=False, size=(None, None), disabled=False, auto_size_text=None, font=None, background_color=None, text_color=None, key=None, pad=None, tooltip=None, right_click_menu=None, visible=True)
 |      Listbox Element
 |
 |      :param values:
 |      :param default_values:  (Default value = None)
 |      :param select_mode:  (Default value = None)
 |      :param change_submits: If True, pressing Enter key submits window (Default value = False)
 |      :param enable_events: Turns on the element specific events.(Default value = False)
 |      :param bind_return_key:  (Default value = False)
 |      :param size: (common_key) (w,h) w=characters-wide, h=rows-high (Default value = (None, None))
 |      :param disabled: set disable state for element (Default value = False)
 |      :param auto_size_text: True if size should fit the text length (Default value = None)
 |      :param font: (common_key) specifies the font family, size, etc (Default value = None)
 |      :param background_color: color of background (Default value = None)
 |      :param text_color: color of the text (Default value = None)
 |      :param key: (common_key) Used with window.FindElement and with return values (Default value = None)
 |      :param pad: (common_key) Amount of padding to put around element (Default value = None)
 |      :param tooltip: text, that will appear the you hover on (Default value = None)
 |      :param right_click_menu: see "Right Click Menus" (Default value = None)
 |      :param visible: set visibility state of the element (Default value = True)
 |
 |  ----------------------------------------------------------------------
 |  Methods inherited from Element:
 |
 |  SetTooltip(self, tooltip_text)
 |      :param tooltip_text:
 |
WORD OF CAUTION:
Note that not all methods have been properly renamed so that private methods start with _.
So, just be careful with using help to make sure that the Method is one that's meant to be called by users. Working on this rename as quickly as I can.
MikeTheWatchGuy
on 24 Jun 2019
Pong Returns
Really early on in PySimpleGUI's history I ported a pong game that was written for tkinter. It wasn't much of a port because it made tkinter calls still.
This week I grabbed another version of pong and ported it, but this time it only uses PySimpleGUI drawing primitives. This means that it's portable! The Demo Program is called Demo_Pong_Multiple_Platforms. In theory it should work on tkinter, Qt and Web ports, but the Qt port has some problems. However, the Web version did work!
Same source code for these 2 images, more or less. As you can see, I've got some problems still in the Graphics Primitives using PySimpleGUIWeb. It's nice to have a version that only uses PySimpleGUI calls. It means it should run on Android for example. That would be fun, especially if 2 phones were used!


(only just now noticed the difference in fonts between player 1 & 2. DOH! It's fixed now. Both are 60 point sized)
MikeTheWatchGuy
on 29 Jun 2019
Side By Side Comparisons - tkinter, PySimpleGUI
For the past several months I've been on the lookout for GUI programs or examples that can be used to directly compare and contrast an underlying GUI Framework versus PySimpleGUI (guess who's going to "win")
One way I'm going about this is to work with people that have an existing program that they may want to move to PySimpleGUI from _______ GUI Framework. They have an existing program or prototype which gives us something to model / copy.
The other way is to keep an eye out on the web. Today I found myself looking through some download managers since one of our users has just written one and I wanted to see the "competitors". In my search, I ran across this tutorials page. It has a little program to show you some of the "Selection Widgets" found in tkinter.
Rather than letting PySimpleGUI to layout a compact window and let it size itself, I forced a particular size since that's what the tkinter code did and I was shooting for DUPLICATE the tkinter window. Here are the 2 windows:


OK, so they're not pixel for pixel identical. I could f*ck around with my code further or call this "close enough for normal people" and move on. So, I'm taking the "close enough" this time.
The verdict on code size.
To keep things "fair", I removed all blank lines from the code. I didn't do anything crazy like putting an if statement all on 1 line.
27 lines of code written directly in tkinter
10 lines of code written in PySimpleGUI
This directly supports that claim that PySimpleGUI programmers write 3 to 10 times less code than tkinter, WxPython, Remi and certainly Qt
Now, let's look at readability of the code. For this, I'll put some of the blank lines back.
Code written in tkinter only:
from tkinter import *
from tkinter.ttk import Combobox
window=Tk()
var = StringVar()
var.set("one")
data=("one", "two", "three", "four")
cb=Combobox(window, values=data)
cb.place(x=60, y=150)

lb=Listbox(window, height=5, selectmode='multiple')
for num in data:
    lb.insert(END,num)
lb.place(x=250, y=150)

v0=IntVar()
v0.set(1)
r1=Radiobutton(window, text="male", variable=v0,value=1)
r2=Radiobutton(window, text="female", variable=v0,value=2)
r1.place(x=100,y=50)
r2.place(x=180, y=50)

v1 = IntVar()
v2 = IntVar()
C1 = Checkbutton(window, text = "Cricket", variable = v1)
C2 = Checkbutton(window, text = "Tennis", variable = v2)
C1.place(x=100, y=100)
C2.place(x=180, y=100)

window.title('Hello Python')
window.geometry("400x300+10+10")
window.mainloop()
Code written in PySimpleGUI
import PySimpleGUI as sg

data = ("one", "two", "three", "four")
layout = [[sg.Radio('Male', 1, default=True, key='_MALE_'), sg.Radio('Female', 1, key='_FEMALE_')],
            [sg.Checkbox('Cricket', key='_CRICKET_'), sg.Checkbox('Tennis', key='_TENNIS_')],
            [sg.Column([[sg.Combo(data, default_value=' ', size=(15,1), key='_COMBO_', pad=(0,0))]]), sg.Listbox(data, size=(25,5), key='_LISTBOX_')],]

window = sg.Window('Hello Python', layout, auto_size_text=False,default_element_size=(10,1), size=(400,300), element_padding=(10,20), margins=(20,20))

while True:             # Event Loop
    event, values = window.Read()
    if event in (None, 'Exit'):
        break
Can't wait for the Qt example!
MikeTheWatchGuy
on 6 Jul 2019
Thank you to all the awesome users!!
I'm super fortunate to hear from people frequently about their use of the package. It honestly has sustained me over the past year (on Jul 11).
Thanks for the notes, thanks for the suggestions. Some of the best features over the past 12 months have come from users. (I'll forever be grateful for the returning values as a dictionary suggestion early on)
I'm adding a FEW of the bits of notes, messages, emails that you guys/gals have sent. If you see your quote and want it removed, by all means speak up. It will be located in the readme and the ReadTheDocs version, and here in this post. No where else I can think of.
GUI Development does not have to be difficult nor painful. It can be FUN
What users are saying
(None of these comments were solicited & are not paid endorsements - other than a huge thank you they received!)
"I've been working to learn PyQT for the past week in my off time as an intro to GUI design and how to apply it to my existing scripts... Took me ~30 minutes to figure out PySimpleGUI and get my scripts working with a GUI."
"Python has been an absolute nightmare for me and I've avoided it like the plague. Until I saw PysimpleGUI."
"I've been pretty amazed at how much more intuitive it is than raw tk/qt. The dude developing it is super active on the project too so if you come across situations that you just can't get the code to do what you want you can make bug/enhancement issues that are almost assured to get a meaningful response."
"This library is the easiest way of gui programming in python! I'm totally in love with it ❤️"
"Wow that readme is extensive and great." (hear the love for docs often)
"Coming from R, Python is absolutely slick for GUIs. PySimpleGUI is a dream."
"I have been writing Python programs for about 4 or 5 months now. Up until this week I never had luck with any UI libraries like Tkinter, Qt, Kivy. I went from not even being able to load a window in Tkinter reliably to making a loading screen, and full program in one night with PySimpleGUI."
"I love PySimpleGUI! I've been teaching it in my Python classes instead of Tkinter."
MikeTheWatchGuy
on 8 Jul 2019
New Demo Program - Using threads for long tasks Demo_Multithreaded_Long_Tasks.py
This Demo has been a long time coming. Hadn't thought about it much until I received a new Raspberry Pi development system yesterday. Users have run into this problem, no doubt, and often don't know where to turn.
The complete newcomer to GUIs sometimes don't pick up on the "your GUI will freeze if you don't refresh it often". Attempts are made to perform tasks in their event loop that takes seconds or longer. It won't be long before Windows complains that your program has "Stopped Responding".
As a simple solution I wrote this Demo that uses a single thread to do the work. The concept here is that you can isolate your long-running work into a function that can be started up as a thread. When it's done, it sends a message to the GUI using a Queue.
You can see it running on Repl.it here:
https://repl.it/@PySimpleGUI/Threaded-for-doing-long-tasks
Here is what it looks like running there:

Of course with repl.it, the GUI itself is located in the upper right hand corner. Here's what it looks like running on my Windows machines:

It's located in the always growing Demo Programs area. You'll find it here:
https://github.com/PySimpleGUI/PySimpleGUI/blob/master/DemoPrograms/Demo_Multithreaded_Long_Tasks.py
MikeTheWatchGuy
on 9 Jul 2019
Happy Birthday! New Docs!
July 10th marked the 1 year mark for PySimpleGUI. I was looking at the release and only a few of the Elements had been created in the 1.0 release. Dictionary return values wouldn't come to be for quite some time. My how it's evolved.
1 year later and there are 4 ports underway
Running on Windows, Linux, Mac, Android, Raspberry Pi
Over 350,000 installs
Averaging about 300 visitors to the GitHub daily
Was shooting to release the new readme on the 1 year day, but missed it by a little. Oh well, that's how this project rolls.
Please understand that the documentation is not yet completed. I have a fair amount of doc strings to fix up.
The cool thing about this whole effort is that by doing these docs using doc strings, your IDE will automatically pick up the information and present it to you, showing you the different parameters in a call as well as explaining each of the parameters.
For example, with my cursor on the Radio element, PyCharm brings up the documentation automatically:

You can access similar information by typing help(element or function) at a REPL prompt >>>
Python will dump out all kinds of good info for you including not just the parameter meanings, but it also lists the member functions. Use these documentation tools to your advantage! They're better than anything available in the past.
There are still large sections missing, like info about the built-in debugger for example. So, the effort continues on. After getting the tkinter doc strings done, then it's time to turn to the other ports and do the same thing.
A big THANK YOU to all PySimpleGUI users that have helped make this package what it is today.
MikeTheWatchGuy
on 12 Jul 2019
More on docs....
Of course the best place to READ the docs is on ReadTheDocs (http://www.PySimpleGUI.org). There you'll get a nice table of contents down the left side. It's easier to navigate than the plain readme.
Last post showed an image of what happens when you put your cursor on a PySimpleGUI Element in your code. Let's see what happens when you do this with the other GUI packages.
Qt.... how about QRadioButton as an example:

hmmmm.... not much there... surely a button will have info...
Got some parameters this time, but zero explanation

If you're using tkinter instead of Qt it's even worse. Every single tkinter call shows the same general purpose document:

MikeTheWatchGuy
on 12 Jul 2019

MikeTheWatchGuy
on 17 Jul 2019
Python 3.7.4 tkinter Is BROKEN - Not supported by PySimpleGUI
After much time spent by myself and multiple other parties, I've shown that the tkinter that's installed with Python 3.7.4 is broken. It does not display Table colors.
Python 3.7.2 does work and will be the highest level of Python 3.7 that PySimpleGUI will support for the time being. I'm not going to spend another minute debugging tkinter for the 3.7 team.
I'll add this to the readme / read the docs.
Sorry to all those that wasted time on this.
MikeTheWatchGuy
on 20 Jul 2019
New features for tables
I completed the Table colors Update support for Tables in PySimpleGUI. You can set the text and background colors of tables using the Update method.
This particular feature and the massive addition of docstrings is inching us towards a 4.1 PySimpleGUI release.
MikeTheWatchGuy
on 20 Jul 2019
Ability to set background color of Tooltips using PySimpleGUI
I have exposed the background color for tooltips. You can set the variable:
TOOLTIP_BACKGROUND_COLOR
to any color string you want. You need to change the variable prior to creating your layout. Do it before making any PySimpleGUI calls.
import PySimpleGUI as sg

sg.TOOLTIP_BACKGROUND_COLOR = "#ffffe0"
The cruel GitHub Issue Searching Results
As you can see I use GitHJub Issues for a lots of things besides just issues. The reason is really simple, when searching GitHub Issues for a problem, I _definitely_ want these "notes", announcements, suggestions, templates, screenshots,etc, to be searched as well.
The cruel part is that GitHub shows results for these really long Issues, but when you open it up, you find THIS in the middle of the Issue:

WHAT!? Over 400 entries written are hidden. OK, so I manage to find this little box and I click it. What happens? Well, I see more, but then it's replaced with another little box
Oh, great, I'm "down to only'" 356 hidden entries". Search for "hidden entries", click again, searching, click, lather rinse repeat.
This happens for these Announcements as well as the screenshots.
I've tried to find ways of turning this off, but nothing has worked. So, it's time to break them apart so that all entries can be seen. It may take splitting into 3 or 4 or more Issues, but it's going to be worth it for sure as a lot of screenshots are hidden and a lot of good knowledge hidden as well.
MikeTheWatchGuy
on 20 Jul 2019
Pull Requests
Just updated the Issue that has the "Pull Request Policy" in it. I thought that since it's so short I'll just copy it here too.
TLDR - Not taking pull requests for core code. I'll still listen to your suggestions.
Pull Request Policy
I've talked about Pull Requests several times over the past year in the Announcements Issue. But, the way GitHub works, it _hides_ a LOT of posts when you look at an Issue. The result is that even if you search for Pull in the Announcements Issue, you will not find the full set of posts.
Pull Requests - Not taking pull requests for core code
If you have a bug fix or suggestion for enhancement in the core code, I'm still interested in taking a peek, but I'm not doing direct merges.
Pull requests are already rare so I don't think it's going to affect much of anything.
There are a lot of reasons that I won't bother listing. Let's just sum it up as more efficient, much happier without them.
This first year has gone really well. I fully expect year 2 to be just as productive.
Still Have Something To Share?
Some users are submitting their "suggested code changes" as part of the Issue they are using to report a bug. I love these kinds of fixes and suggestions. I find them easier to digest and they don't feel like a bag of code has just been dropped into my lap that I must deal with.
This will rub a few the wrong way and for that I'm really sorry. Perhaps it's not in the spirit of Open Software to work in this manner but I hear from a lot more happy users right now than unhappy ones and so this really shouldn't have an impact.
MikeTheWatchGuy
on 23 Jul 2019
Updated Readme/ReadTheDocs and Cookbook
I'm REALLY sorry to all the newcomers that hit example #1 in the readme, the example using the "Designer tool" (pencil and paper). The problem is that the values coming back from a Window.Read call are going to be a dictionary rather than a list. These early example bits of code attempted to unpack the dictionary like a list which leads to crashes.
Instead of the pleasant 5 minute install and run, you likely had a 2 minute install process followed by a really large amount of time spent on trying to get the example to run. Sh*t! I'm really sorry about that.
Both the Cookbook and the main documentation have undergone a number of changes to both explain things better and removal of this kind of non-working crap! It all just got a little out of control there for a bit.
MikeTheWatchGuy
on 23 Jul 2019
Slow Going - FINALLY cramming out a release for PySimpleGUI 4.1
Sorry that it's so slow the past few weeks. These docs have been a real chore and continue to. There has never been such a long time between releases.
I'm pulling together release notes now, but it's going to take a while as there are 616 changes since to the last PySimpleGUI release and each are checked before the release will go out.
MikeTheWatchGuy
on 4 Aug 2019
PySimpleGUI 4.1 Anniversary Release! 4-Aug-2019
Long time coming. Docstrings continue to be a focus.
NOTE the Python 2 version is still in the works.
- Version can be found using PySimpleGUI.version
- New bit of licensing info at the top of the file
- Types used in the doc strings. Also type hints in some comments. Because also running on 2.7 can't use full typing
- Added using of Warnings. Just getting started using this mechanism. May be great, maybe not. We'll see with this change
- Added TOOLTIP_BACKGROUND_COLOR which can be changed (it's tkinter only setting however so undertand this!)
- Graph.DrawText. Ability to set
text_locationwhen drawing text onto a Graph Element. Determines what part of the text will be located at the point you provide when you draw the text. Choices are:
- TEXT_LOCATION_TOP
- TEXT_LOCATION_BOTTOM
- TEXT_LOCATION_LEFT
- TEXT_LOCATION_RIGHT
- TEXT_LOCATION_TOP_LEFT
- TEXT_LOCATION_TOP_RIGHT
- TEXT_LOCATION_BOTTOM_LEFT
- TEXT_LOCATION_BOTTOM_RIGT
- TEXT_LOCATION_CENTER
- Flag ENABLE_TK_WINDOWS = False. If True, all windows will be made using only tk.Tk()
- SetFocus available for all elements now due to it being added to base class. May NOT work on all elements however
- Added Combo.GetSElectedItemsIndexes() - returns a list of all currently selected items
- Fixed Listbox.Update - set_to_index changed to be an int, list or tuple
- Added parent parameter to call to tkinter's askopenfilename, directory, filenames. Not sure why the root wasn't passed in before
- Button.Update - also sets the activebackground to the button's background color
- Graph - New parameter when creating.
float_values. If True, then you're indicating that your coordinate system is float not int based - Graph.Update - made background color optional parm so that visible only can be set
- Frame.Layout returns self now for chaining
- TabGroup.Layout returns self now for chaining
- Column.Layout returns self now for chaining
- Menu.Update menu_definition is now optional to allow for changing visibility only
- Added inivisiblity support for menu bars
- Table.Update supports setting alternating row color and row_colors (list of rows and the color to set)
- Set window.TimeoutKey to TIMEOUT_KEY initially
- Window - check for types for title (should be string) and layout (should be list) and warns user if not correct
- Window - renamed some methods by adding _ in front (like Show) as they are NOT user callable
- Another shortcut! Elem = Element = FindElement
- SaveToDisk - will not write buttons to file. Fixed problems due to buttons having keys
- Remapped Windowl.CloseNonBlockingForm, Window.CloseNonBlocking to be Window.CloseNonBlocking
- Fix for returning values from a combo list. Wasn't handling current value not in list of provided values
- Spin - Returns an actual value from list provided when Spin was created or updated
- Chaneged FillFormWithValues to use the new internal AllKeysDict dictionary
- Added try when creating combo. Problem happens when window is created twice. Prior window had already created the style
- Added list of table (tree) ids to the Table element
- Enabled autoclose to use fractions of a second
- Added a try around one of the destroys because it could fail if user aborted
- Popup - Icon is no longer set to default by default
- Fix for debugger trying to execute a REPL comand. The exec is only avilable in Python 3
- main() will display the version number in big letters when program is running
MikeTheWatchGuy
on 4 Aug 2019
It's been a minute
The documentation beat goes on. It's what most all of the time is spent on, in addition to support.
There are features and fixes going into all ports. Today I think all ports except Wx got some code change to them.
There has been so much going on and yet so little at the same time. I think spreading outward in all directions is about the best way to describe it.
Column sizes work now in PySimpleGUI (on GitHub)
This was a troubling problem that I finally managed to get my arms around. Setting a specific size now works for BOTH scrollable and non-scrollable columns. I predict this will have a very positive impact to layouts.
New documentation sections OTW include:
- Layout control (moving elements around)
- Generating versus declaring layouts (writing 3 or 4 lines of code that produces a window with 30 lines of elements)
- User Defined Elements
- User Expansion of PySimpleGUI through direct framework access
- Patching PySimpleGUI
- The built-in debugger
- Doc strings for the other 3 ports
Thanks for all the inspiration folks!
MikeTheWatchGuy
on 8 Aug 2019
Micro-Demos - Small programs that do something useful and can be pasted
Sorry for a lengthy post, but it does have 4 complete programs and 2 screen shots.
What makes these Micro-Demos fun is that they are short enough to "post" on a forum or GitHub Issue or on Reddit. No link to follow, just a short complete program. No code fragment to integrate either.
There have been a number of awesome features added / completed in PySimpleGUI (the main version). The reason PySimpleGUI tends to be more complete, mature is that it's the flagship of the family of ports. It's the proving ground as well for new SDK changes.
Demo 1A - Viewing a webcam in a GUI window using OpenCV - compacted
Modified existing demo to create a super-simplified, get the point through, demo. It's a whopping 13 lines of code if compacted:
import PySimpleGUI as sg
import cv2
layout = [[sg.Image(filename='', key='image')],]
window = sg.Window('Demo Application - OpenCV Integration', layout, location=(800,400))
cap = cv2.VideoCapture(0)
while True:
    event, values = window.Read(timeout=20, timeout_key='timeout')
    if event in ('Exit', None):
        break
    ret, frame = cap.read()
    imgbytes=cv2.imencode('.png', frame)[1].tobytes()
    window.FindElement('image').Update(data=imgbytes)
window.Close()
Demo 1AA - Ultra Compact
This is just plain showing off. It's 7 lines in total. 8 if you add the CR to my if statement ;-)
import cv2, PySimpleGUI as sg
window = sg.Window('Demo Application - OpenCV Integration', [[sg.Image(filename='', key='image')],], location=(800,400))
cap = cv2.VideoCapture(0)
while True:
    event, values = window.Read(timeout=20, timeout_key='timeout')
    if event is None:  break
    window.FindElement('image').Update(data=cv2.imencode('.png', cap.read()[1])[1].tobytes())
But that's not very readable, so let's go back to the original for this one. It's "fancy". It doesn't have a titlebar for example. And, if you uncomment the line for the right click menu, you'll be able to exit the application if you're not running in an IDE.
Demo 1B - Viewing a webcam in a GUI window using OpenCV - commented
import PySimpleGUI as sg
import cv2

def main():
    sg.ChangeLookAndFeel('Black')

    # define the window layout
    layout = [[sg.Image(filename='', key='image')],]

    # create the window and show it without the plot
    window = sg.Window('Demo Application - OpenCV Integration', layout,
                       location=(800,400), no_titlebar=True, grab_anywhere=True,)
                       # right_click_menu=['&Right', ['E&xit']],)

    # ---===--- Event LOOP Read and display frames, operate the GUI --- #
    cap = cv2.VideoCapture(0)
    while True:
        event, values = window.Read(timeout=20, timeout_key='timeout')
        if event in ('Exit', None):
            break
        ret, frame = cap.read()
        imgbytes=cv2.imencode('.png', frame)[1].tobytes()
        window.FindElement('image').Update(data=imgbytes)

    window.Close()

main()
What is downright extraordinary is that no special code was put in PySimpleGUI to support OpenCV. This just naturally happens if you write the right code. The code only uses PySimpleGUI and OpenCV.
Finally, it works on PySimpleGUIQt and PySimpleGUIWeb, you guessed it... by changing the import statement. STUNNED is how I feel every time this works. BTW, the Web version flickers and is being worked by the Remi team now.
Here's the window it produces

Demo 2 - Drawing On Top of An OpenCV Stream - Released as Demo_OpenCV_Draw_On_Webcam.py
This was a feature asked about and spurred 2 new Graph methods - BringFigureToFront, SendFigureToBack . The only way to "Draw" on something in PySimpleGUI is to use a Graph Element. The poster asked about using a mouse to draw.
The Graph Element mouse Dragging was finally completed this past week. The "Mouse Up" events were missing.
In order to "Draw" on a Graph, you need control of the Z-Order of the figures that are being drawn. In this case, the webcam image needs to be _behind_ whatever is being drawn, thus the 2 new methods.
Without further delay, a webcam stream that you can draw red circles all over while it streams.
import PySimpleGUI as sg
import cv2

def main():
    layout = [[sg.Graph((600,450),(0,450), (600,0), key='_GRAPH_', enable_events=True, drag_submits=True)],]

    window = sg.Window('Demo Application - OpenCV Integration', layout)

    graph_elem = window.Element('_GRAPH_')      # type: sg.Graph

    id = None
    # ---===--- Event LOOP Read and display frames, operate the GUI --- #
    cap = cv2.VideoCapture(0)
    while True:
        event, values = window.Read(timeout=0)
        if event in ('Exit', None):
            break

        ret, frame = cap.read()
        imgbytes=cv2.imencode('.png', frame)[1].tobytes()
        if id:
            graph_elem.DeleteFigure(id)             # delete previous image
        id = graph_elem.DrawImage(data=imgbytes, location=(0,0))    # draw new image
        graph_elem.SendFigureToBack(id)
        if event == '_GRAPH_':
            graph_elem.DrawCircle(values['_GRAPH_'], 5, fill_color='red', line_color='red')
    window.Close()

main()
Demo 3 - "Dragging" a Selection Rectangle
We've all used a paint program where you click, drag your mouse and it creates a rectangle that matches the size specified by releasing the mouse button. Click, hold, drag, release. AS you are dragging, a rectangle is drawn, erased if you move the mouse, then redrawn. The result looks like an animation
Evidently this is called a "Rubber Band Selection Rectangle". I learn something new every day from PySimpleGUI. This code was adapted from some user code. In particular I lifted the rectangle logic. However, the original was using PIL to draw a rectangle on the image itself prior to the image being displayed. While this worked, it consumed a lot of compute power and thus wasn't as responsive as it _could be_.
The more efficient way to create one of these rectangles is to use the Graph element's DrawRectangle method. IT's super fast and will work on other ports of PySimpleGUI once the mouse code is completed in those ports (PySimpleGUIQt comes to mind)
import PySimpleGUI as sg

# image_file = r'C:\Python\PycharmProjects\GooeyGUI\logo_black.png'
image_file = None       # image is optional

layout = [  [sg.Graph(canvas_size=(400, 400), graph_bottom_left=(0, 400), graph_top_right=(400, 0), key="graph", change_submits=True, drag_submits=True),],
            [sg.Text("", key="info", size=(60, 1))]]

window = sg.Window("Drag a Rectangle", layout).Finalize()     # need Finalize due to DrawImage call prior to Read

graph = window.Element("graph")     # type: sg.Graph

graph.DrawImage(image_file, location=(0,0)) if image_file else None
dragging = False
start_point = end_point = prior_rect = None
while True:
    event, values = window.Read()
    if event is None:
        break  # exit
    if event == "graph":
        graph.DeleteFigure(prior_rect)      # don't worry, PSG won't complain if bad ID
        if not dragging:
            start_point = values["graph"]
            dragging = True
        else:
            end_point = values["graph"]
            prior_rect = graph.DrawRectangle(start_point, end_point, line_color='red')
    elif event.endswith('+UP'):
        window.Element("info").Update(value=f"grabbed rectangle from {start_point} to {end_point}")
        # enable grabbing a new rect
        start_point = end_point = None
        dragging = False
    else:
        print("unhandled event", event, values)

MikeTheWatchGuy
on 12 Aug 2019
'Combo', 'Tab', 'TabGroup' Changes - Import API calls deprecated
I'm really sorry if you implemented code using some recently released API changes.
It's rare to flat out break the PySimpleGUI API, but this is a "band-aid" moment. The changes were recent, the number of users that likely used the deleted methods are few. So, rather than slowly remove them over time, they just disappeared and were replaced by others that will give you the data you need.
Rules are meant to be broken, but not architectures. In this case, the "don't break the install base's code" rule is broken, but as explained, the size of the impact is relatively small, but I DO feel the pain of those that are impacted. I'm really sorry about this.
The problem was that I hastily made some changes to the code that don't fit the big-picture architecture of PySimpleGUI. Without boring you too much - basically I added some stuff that uses "indexes" and I named some methods in inconsistent ways or I didn't implement the _right_ method.
ComboBox and TabGroup changes
There was a recent addition that returned the "Currently selected item" in terms of "index". This isn't how it's been done across all the ports for the other elements. The remedy is to supply methods that fit the architecture.
Combo.Get() & TabGroup.Get()
Some elements provide a Get method. This returns the "Current" (as in right now) value for an element. It's identical in value to what would have been returned from a call to "window.Read()`. A number of elements have this.
This method does sometimes confuse people. Newcomers, when seeing this method, sometimes think it has to be called in order to get the element's value. They don't realize that ALL element values are returned in the values portion of the window.Read call.
This Get method was added to the TabGroup Element so that the currently active tab is obtained. It was added to the ComboBox so that the current item can be read. Again, these are identical to what you will see in your call to window.Read so use that data if you can instead of calling Get.
Tab.Select()
A requested feature recently was the ability to make a particular tab the "active" or "selected" tab in its group. This is similar to the recently added Button.Click. In the last release, it was implemented as a call to the TabGroup where an index was passed to the group to select a tab. This didn't follow the norm of acting directly on an element that you want to take the action. In this case, it's the tab itself that's taking an action. You could say that it's the TabGroup. From an Object kind of look, operating on the Tab made more sense.
Again, I'm sorry about this change. I have been too buried in the documentation overhaul, cookbook and demo programs. It's been a while since this kind of new capability was added and I simply didn't take the time to look at the PySimpleGUI APIs as a whole prior to implementing.
MikeTheWatchGuy
on 12 Aug 2019
Another dumb but fun demo - realtime ASCII movie from your webcam
from PIL import Image
import numpy as np
import PySimpleGUI as sg; font_size=6
# import PySimpleGUIQt as sg; font_size=8            # if using, be sure and use the second layout that is commented out
# import PySimpleGUIWeb as sg; font_size=12           # yes, it runs in a webpage too!
import cv2

"""
    Interesting program that shows your webcam's image as ASCII text.  Runs in realtime, producing a stream of
    images so that it is actually animated ASCII text. Wild stuff that came about from a post on Reddit of all
    places.  The software bits that turn the image into ASCII text were shamelessly taken from this gist:
    https://gist.github.com/cdiener/10491632
    Brilliant work to have pulled off so much with so little Numpy
    What's remarkable about this program is that the animation is created by updating individual Text Elements going
    down the window, one line at a time, every time through the loop.  That's 48 lines of text every time. Rough
    timing shows an animation of more than 10 fps when running any of the PySimpleGUI ports.
"""

# The magic bits that make the ASCII stuff work shamelessly taken from https://gist.github.com/cdiener/10491632
chars = np.asarray(list(' .,:;irsXA253hMHGS#9B&@'))
SC, GCF, WCF = .1, 1, 7/4

sg.ChangeLookAndFeel('Black')   # make it look cool

# define the window layout
NUM_LINES = 48  # number of lines of text elements. Depends on cameras image size and the variable SC (scaller)
layout =  [*[[sg.T(i,size=(120,1), font=('Courier', font_size), key='_OUT_'+str(i))] for i in range(NUM_LINES)],
          [ sg.Button('Exit')]]

# if using PySimpleGUIQt, use this layout instead.  The text rows are too far apart otherwise.
# layout =  [*[[sg.T(i, size_px=(800,12), font=('Courier', font_size), key='_OUT_'+str(i))] for i in range(NUM_LINES)],
#           [ sg.Button('Exit')]]


# create the window and show it without the plot
window = sg.Window('Demo Application - OpenCV Integration', layout, location=(800,400),
                   no_titlebar=True, grab_anywhere=True, element_padding=(0,0))

# ---===--- Event LOOP Read and display frames, operate the GUI --- #
cap = cv2.VideoCapture(0)                               # Setup the OpenCV capture device (webcam)
while True:
    event, values = window.Read(timeout=0)
    if event in ('Exit', None):
        break
    ret, frame = cap.read()                             # Read image from capture device (camera)

    img = Image.fromarray(frame)  # create PIL image from frame
    # More magic that coverts the image to ascii
    S = (round(img.size[0] * SC * WCF), round(img.size[1] * SC))
    img = np.sum(np.asarray(img.resize(S)), axis=2)
    img -= img.min()
    img = (1.0 - img / img.max()) ** GCF * (chars.size - 1)

    # "Draw" the image in the window, one line of text at a time!
    for i, r in enumerate(chars[img.astype(int)]):
        window.Element('_OUT_'+str(i)).Update("".join(r))
window.Close()
It's posted in the demo section as Demo_OpenCV_Webcam_ASCII.py, but am posting here for easy copy and paste.
MikeTheWatchGuy
on 15 Aug 2019
THANK YOU FOR FILLING OUT THE ISSUE FORMS
Damn, we've got the best users ever here!
It's a pain in the ass to fill out an Issue form, answer the billion questions including perhaps an uncomfortable experience level one.
The experience level really helps make sure stuff is explained at a level you're likely able to easily digest. You've not going to be satisfied if a response goes way over your head and you'll be even more unsatisfied if the responses are well under your years of experience.
The experience question is not meant to embarrass or demean or any other nefarious purpose. It's an honest attempt to provide better support. Besides, you have _nothing_ to be embarrassed about!! None of us was born with programming skills. It's a 100% learned skill and every person here had a very first day of using Python.
MikeTheWatchGuy
on 15 Aug 2019
More ASCII movies
Did one more pass at this thing. Comments removed to save space.
Controls were added to the bottom. The latest GitHub made them larger for easier use, but's not shown in the movie.
Here's a movie showing what it's like to mess around with controls:
https://youtu.be/rzvJuz5bHTg
The ability to modify one or many parameters and see the result, in realtime, is where PySimpleGUI excels greatly over a command line only option. Just by clicking a spinbox or sliding a slider I can instantly see the effect it has.
Anywhere that "Tuning" is part of the process, a GUI can potentially greatly help. The model - [Running code, stopping, changing variable in code, running code again] cannot compete with click a button and instantly see the change. CLI vs GUI people, continue to debate this as long as you want.
This same kind of "parameter modification" was used in the YOLO demo. You can easily see how changing the "Threshold" has an impact on the classifier.
So, if you want to interact more with your program directly, consider exposing the knobs to turn in a GUI. With PySimpleGUIQt you could literally make them knobs 😏
Here's the modified program that also removes the need to modify anything except the 3 lines at the top in order to move from one platform to another.
Finally, notice this program "Generates the Layout". This topic is being added to the docs.... how to "Build" a GUI layout using Python code. In this case, 48 lines of Text Elements were created in a single statement.
from PIL import Image
import numpy as np
import PySimpleGUI as sg; font_size=6; USING_QT=False
# import PySimpleGUIQt as sg; font_size=8; USING_QT=True            # if using, be sure and use the second layout that is commented out
# import PySimpleGUIWeb as sg; font_size=12; USING_QT=False           # yes, it runs in a webpage too! Not as good as tkinter but works
import cv2

# The magic bits that make the ASCII stuff work shamelessly taken from https://gist.github.com/cdiener/10491632
chars = np.asarray(list(' .,:;irsXA253hMHGS#9B&@'))
SC, GCF, WCF = .1, 1, 7/4

sg.ChangeLookAndFeel('Black')   # make it look cool

# define the window layout
NUM_LINES = 48  # number of lines of text elements. Depends on cameras image size and the variable SC (scaller)
if USING_QT:
    layout = [[sg.T(i, size_px=(800, 12), font=('Courier', font_size), key='_OUT_' + str(i))] for i in range(NUM_LINES)]
else:
    layout =  [[sg.T(i,size=(120,1), font=('Courier', font_size), pad=(0,0), key='_OUT_'+str(i))] for i in range(NUM_LINES)]

layout += [[ sg.Button('Exit', size=(5,1)),
            sg.T('GCF', size=(4,1)), sg.Spin([round(i,2) for i in np.arange(0.1,20.0,0.1)], initial_value=1,  key='_SPIN_GCF_', size=(5,1)),
            sg.T('WCF', size=(4,1)), sg.Slider((1,4), resolution=.05, default_value=1.75, orientation='h', key='_SLIDER_WCF_', size=(15,15))]]

# create the window and show it without the plot
window = sg.Window('Demo Application - OpenCV Integration', layout, location=(800,400), font='Any 18')

# ---===--- Event LOOP Read and display frames, operate the GUI --- #
cap = cv2.VideoCapture(0)                               # Setup the OpenCV capture device (webcam)
while True:
    event, values = window.Read(timeout=0)
    if event in ('Exit', None):
        break
    ret, frame = cap.read()                             # Read image from capture device (camera)

    img = Image.fromarray(frame)  # create PIL image from frame
    GCF = float(values['_SPIN_GCF_'])
    WCF = values['_SLIDER_WCF_']
    # More magic that coverts the image to ascii
    S = (round(img.size[0] * SC * WCF), round(img.size[1] * SC))
    img = np.sum(np.asarray(img.resize(S)), axis=2)
    img -= img.min()
    img = (1.0 - img / img.max()) ** GCF * (chars.size - 1)

    # "Draw" the image in the window, one line of text at a time!
    for i, r in enumerate(chars[img.astype(int)]):
        window.Element('_OUT_'+str(i)).Update("".join(r))
window.Close()
window['key'] can replace window.FindElement('key')
In case you missed the excited announcement today of this new capability, be sure and check it out:
https://github.com/PySimpleGUI/PySimpleGUI/issues/1827
Briefly..... you can completely remove your calls to window.Element or window.FindElement and replace them with calls to:
window['key']
The code continues to compact!! This one in particular has been bugging me for a long time. I don't like "chaining" for new comers sake. And especially would like to make changing an element's settings and values easier.
Now the line of code to change an element allows your eyes to focus on the SINGLE call presented in the line of code, the call to Update
THE OLD WAY of updating an element:
window.FindElement(key).Update(value)
THE NEW WAY of updating an element:
window[key].Update(value)
This has been one of the most exciting changes since making return values a dictionary.
MikeTheWatchGuy
on 17 Aug 2019
Layout Generation
There are 3 ways I "grow" PySimpleGUI and my own knowledge.
Read other people's PySimpleGUI code. The author can have known Python for 2 weeks and still will be able to teach me something. Even simply layout can have some touch to them that I've not thought of. I like to see them ALL!! So please don't be shy.
The Reddit Challenges - There is no official contest or code challenge other than people describing their problem and then ask for a GUI recommendation. I bunch of stuff have come out of these. Most recently was an idea of showing your webcam's video stream as an ASCII image movie, a video of you through your webcam and show it in realtime in a window. So I wrote this program.
What is downright AMAZING about this program is that the way it is being shown to you is that each Text Element is Updated every time I read a webcam image and want to show it as ASCII. 48 Text Elements. I was SURE all the ports would fail, but they all worked GREAT.
If you missed the movie, here it is https://youtu.be/rzvJuz5bHTg
The screen capture didn't do it justice as it's quite smooth (runs in Remi BTW too)
- I want a tool or something else to make my life even lazier / efficient
(4) I cheat and have some brilliant friends that help me out, or give me solutions. They deserve just as much credit as anything else listed here.
Generating Layouts
Believe it or not all that leads up to the topic of "Generating Layouts" which means Python code that creates a layout rather than it being created only by hand.
In the process of solving the problems above, especially the Reddit ones, I write more layouts, and have more opportunities to ponder more compact or more "Pythonic" (not found of tossing that word around) ways of doing things.
How to generate or create layouts differently than the brute force ways but rather by machine and by hand have not yet been added to the documentation. It's the hot topic for me today to finish.
Generating Layouts Demo ([Demo_Layout_Generation.py]
(https://github.com/PySimpleGUI/PySimpleGUI/blob/master/DemoPrograms/Demo_Layout_Generation.py))
There are 8 different Design Patterns presented, although it'll be difficult for you to just copy and use them other than to study. Still, it's nice to have when you need to create a sh*t-load of buttons or input fields.
While used and not at all pointed out, I'll stress it in the docs, but keys can be ANYTHING. They're not limited to strings. This means they can hold something like (x,y) data. Each element in a matrix can have a key that is (row, col). The Questionnaire examples illustrate exactly what I'm talking about.
More Python Stuff, More Simple Coming....
Hoping to finish (miracles do happen) the readme and push out release(s) by the end of tomorrow.
There's a concept called "User Elements" that I don't see many people using that will be part of the docs too.
Plus even more Python stuff being looked at now. It's amazing what this language can do for this problem.
MikeTheWatchGuy
on 17 Aug 2019
Generating Layouts Code
What the heck, the code for all these layouts isn't very large, so here it is. No download needed. Maybe it'll spark an idea in your head that I can take too.
import PySimpleGUI as sg
"""
    Construct #0 - List comprehension to generate a row of Buttons

    Comprehensions are super-powers of Python.  In this example we're using a comprehension to create 4 buttons that
    are all on the same row.
"""


def layout0():
    layout = [[sg.Button(i) for i in range(4)]]     # A list of buttons is created

    window = sg.Window('Generated Layouts', layout)

    event, values = window.Read()

    print(event, values)
    window.Close()

"""
    Construct #1 - List comprehension to generate rows of Buttons

    More list super-power, this time used to build a series of buttons doing DOWN the window instead of across

"""

def layout1():
    layout = [[sg.Button(i)] for i in range(4)]    # a List of lists of buttons.  Notice the ] after Button

    window = sg.Window('Generated Layouts', layout)

    event, values = window.Read()

    print(event, values)
    window.Close()


"""
    Construct #2 - List comprehension to generate a row of Buttons and concatenation of more lines of elements

    Comprehensions are super-powers of Python.  In this example we're using a comprehension to create 4 buttons that
    are all on the same row, just like the previous example.
    However, here, we want to not just have a row of buttons, we want have an OK button at the bottom.
    To do this, you "add" the rest of the GUI layout onto the end of the generated part.

    Note - you can't end the layout line after the +. If you wanted to put the OK button on the next line, you need
    to add a \ at the end of the first line.
    See next Construct on how to not use a \ that also results in a VISUALLY similar to a norma layout
"""

def layout2():
    layout = [[sg.Button(i) for i in range(4)]] + [[sg.OK()]]  # if want to split, can't add newline after + to do it

    window = sg.Window('Generated Layouts', layout)

    event, values = window.Read()

    print(event, values)
    window.Close()


"""
    Construct # 3 - Adding together what appears to be 2 layouts

    Same as layout2, except that the OK button is put on another line without using a \ so that the layout appears to
    look like a normal, multiline layout without a \ at the end

    Also shown is the OLD tried and true way, using layout.append.  You will see the append technique in many of the
    Demo programs and probably elsewhere.  Hoping to remove these and instead use this more explicit method of +=.

    Using the + operator, as you've already seen, can be used in the middle of the layout.  A call to append you cannot
    use this way because it modifies the layout list directly.
"""

def layout3():
    # in terms of formatting, the layout to the RIGHT of the = sign looks like a 2-line GUI (ignore the layout +=
    layout =  [[sg.Button(i) for i in range(4)]]
    layout += [[sg.OK()]]               # this row is better than, but is the same as
    layout.append([sg.Cancel()])        # .. this row in that they both add a new ROW with a button on it

    window = sg.Window('Generated Layouts', layout)

    event, values = window.Read()

    print(event, values)
    window.Close()


"""
    Construct 4 - Using + to place Elements on the same row

    If you want to put elements on the same row, you can simply add them together.  All that is happening is that the
    items in one list are added to the items in another.  That's true for all these contructs using +
"""

def layout4():
    layout =  [[sg.Text('Enter some info')] + [sg.Input()] + [sg.Exit()]]

    window = sg.Window('Generated Layouts', layout)

    event, values = window.Read()

    print(event, values)
    window.Close()


"""
    Construct #5 - Simple "concatenation" of layouts
    Layouts are lists of lists.  Some of the examples and demo programs use a .append method to add rows to layouts.
    These will soono be replaced with this new technique.  It's so simple that I don't know why it took so long to
    find it.
    This layout uses list comprehensions heavily, and even uses 2 of them. So, if you find them confusing, skip down
    to the next Construct and you'll see the same layout built except for loops are used rather than comprehensions

    The next 3 examples all use this same window that is layed out like this:
        Each row is:
    Text1, Text2, Radio1, Radio2, Radio3, Radio4, Radio5
    Text1, Text2, Radio1, Radio2, Radio3, Radio4, Radio5
    ...

    It shows, in particular, this handy bit of layout building, a += to add on additional rows.
    layout =  [[stuff on row 1], [stuff on row 2]]
    layout += [[stuff on row 3]]

    Works as long as the things you are adding together look like this [[ ]]  (the famous double bracket layouts of PSG)
"""

def layout5():
    questions = ('Managing your day-to-day life', 'Coping with problems in your life?', 'Concentrating?',
                 'Get along with people in your family?', 'Get along with people outside your family?',
                 'Get along well in social situations?', 'Feel close to another person',
                 'Feel like you had someone to turn to if you needed help?', 'Felt confident in yourself?')

    layout = [[sg.T(qnum + 1, size=(2, 2)), sg.T(q, size=(30, 2))] + [sg.Radio('', group_id=qnum, size=(7, 2), key=(qnum, col)) for col in range(5)] for qnum, q in enumerate(questions)]
    layout += [[sg.OK()]]

    window = sg.Window('Computed Layout Questionnaire', layout)
    event, values = window.Read()

    print(event, values)
    window.Close()


"""
    Construct #6 - Computed layout without using list comprehensions
    This layout is identical to Contruct #5.  The difference is that rather than use list comprehensions, this code
    uses for loops.  Perhaps if you're a beginner this version makes more sense?

    In this example we start with a "blank layout" [[ ]] and add onto it.

    Works as long as the things you are adding together look like this [[ ]]  (the famous double bracket layouts of PSG)
"""


def layout6():
    questions = ('Managing your day-to-day life', 'Coping with problems in your life?', 'Concentrating?',
                 'Get along with people in your family?', 'Get along with people outside your family?',
                 'Get along well in social situations?', 'Feel close to another person',
                 'Feel like you had someone to turn to if you needed help?', 'Felt confident in yourself?')

    layout = [[]]
    for qnum, question in enumerate(questions):     # loop through questions
        row_layout = [sg.T(qnum + 1, size=(2, 2)), sg.T(question, size=(30, 2))]    # rows start with # and question
        for radio_num in range(5):                  # loop through 5 radio buttons and add to row
            row_layout += [sg.Radio('', group_id=qnum, size=(7, 2), key=(qnum, radio_num))]
        layout += [row_layout]                      # after row is completed layout, tack it onto the end of final layout

    layout += [[sg.OK()]]                           # and finally, add a row to the bottom that has an OK button

    window = sg.Window('Computed Layout Questionnaire', layout)
    event, values = window.Read()

    print(event, values)
    window.Close()


"""
    Construct #7 - * operator and list comprehensions
        Using the * operator from inside the layout
        List comprehension inside the layout
        Addition of rows to layouts
        All in a single variable assignment

    NOTE - this particular code, using the * operator, will not work on Python 2 and think it was added in Python 3.5

    This code shows a bunch of questions with Radio Button choices

    There is a double-loop comprehension used.  One that loops through the questions (rows) and the other loops through
    the Radio Button choices.
    Thus each row is:
    Text1, Text2, Radio1, Radio2, Radio3, Radio4, Radio5
    Text1, Text2, Radio1, Radio2, Radio3, Radio4, Radio5
    Text1, Text2, Radio1, Radio2, Radio3, Radio4, Radio5

    What the * operator is doing in these cases is expanding the list they are in front of into a SERIES of items
    from the list... one after another, as if they are separated with comma.  It's a way of "unpacking" from within
    a statement.

    The result is a beautifully compact way to make a layout, still using a layout variable, that consists of a
    variable number of rows and a variable number of columns in each row.
"""

def layout7():
    questions = ('Managing your day-to-day life', 'Coping with problems in your life?', 'Concentrating?',
                 'Get along with people in your family?', 'Get along with people outside your family?',
                 'Get along well in social situations?', 'Feel close to another person',
                 'Feel like you had someone to turn to if you needed help?', 'Felt confident in yourself?')

    layout = [[*[sg.T(qnum + 1, size=(2, 2)), sg.T(q, size=(30, 2))], # These are the question # and the question text
               *[sg.Radio('', group_id=qnum, size=(7, 2), key=(qnum, col)) for col in range(5)]] for qnum, q in enumerate(questions)] + [[sg.OK()]]     # finally add an OK button at the very bottom by using the '+' operator

    window = sg.Window('Questionnaire', layout)

    event, values = window.Read()

    print(event, values)
    window.Close()


# ------------------------- Call each of the Constructs -------------------------

layout0()
layout1()
layout2()
layout3()
layout4()
layout5()
layout6()
layout7()
More Fun Collapsing Code - Replacing Update call with.... nothing?
An bit of alien syntax has been added to PySimpleGUI. By no means do you have to use it, but you should understand that it exists and that you may run across it. The problem is that beginners won't understand it..... and I'm sure to use it a fair amount because it removes TWO function names from a statement.
Recall that window.FindElement(key) was replaced by window[key]
Typically the reason you're finding the element is that you want to call the element's Update method. When examined to see if it can be collapsed / simplified a rather strange and wonderful design pattern emerged.
Here's a little demo that will replace the text on the first line with whatever you type into the input box.
import PySimpleGUI as sg

layout = [[sg.Text('My layout', key='T')],
            [sg.In(key='I')],
            [sg.Button('Go')]]

window = sg.Window('My new window', layout)

while True:             # Event Loop
    event, values = window.Read()
    print(event, values)
    if event is None: break

    window.FindElement('T').Update(values['I'])
window.Close()
The statement to focus on is this one:
window.FindElement('T').Update(values['I'])
You already know the FindElement trick, now it's time for the Update trick. This is so alien..... Here goes...
Instead of getting the element and then calling Update, you "call the element". Yea, sounds weird.
Replace this line
window.FindElement('T').Update(values['I'])
with this one
window['T'](values['I'])
You are deleting .Update from your statement. What's left is just the (parms) portion. It looks foreign to me, but I can sure get used to it!
Of course, if you a variable that contains an element, you can "call" that variable.
text_elem = sg.Text('My text')

text_elem('new text')      # calls the Update method for that element
MMMmmmm mmmmm that's some mighty tasty Python there!
I'm stunned daily at what this language can do and what ideas users have.
So if you see this kind of thing, you'll know what it is. I'll be sure and comment them anyway.
This change is already on GitHub and will be release to PyPI tonight
MikeTheWatchGuy
on 18 Aug 2019
YouTube Tutorial That Includes PySimpleGUI GUI
I spotted a new video on YouTube that uses PySimpleGUI.
https://www.youtube.com/watch?v=IWDC9vcBIFQ
He did a nice thing by adding an index in the description to the location it can be found in the video. He's using it in an OO design, so it was really interesting to see how he split things up.
I learn something every time I see someone else's code.
It was nice to hear some kind words about PySimpleGUI. No complaints at all. Just reinforcement that it's simple.
MikeTheWatchGuy
on 19 Aug 2019
Release PySimpleGUI 4.2 and PySimpleGUI27 2.2
The cool lookup release! No more need for FindElement. You can continue to use FindElement.
However, your code will look weird and ancient. ;-) (i.e. readable)
MORE Docstring and main doc updates!
- New window[key] == window.FindElement(key)
- New Update calling method. Can directly call an Element and it will call its Update method
- windowkey == window.FindElement(key).Update(value=new_value)
- Made Tearoff part of element so anything can be a menu in theory
- Removed a bunch of __del__ calls. Hoping it doesn't bite me in memory leaks
- Combo.Get method added
- Combo.GetSelectedItemsIndexes removed
- New Graph methods SendFigureToBack, BringFigureToFront
- Butten release changed for better Graph Dragging
- Now returns key+"Up" for the event
- Also returns the x,y coords in the values
- Tab.Select method added
- TabGroup.Get method added - returns key of currently selected Tab
- Window finalize parameter added - Will call finalize if a layout is also included. No more need for Finalize!!
- Quiet, steady change to PEP8 user interface started
- Now available are Window methods - read, layout, finalize, find_element, element, close
- Should provide 100% PEP with these alone for most PySimpleGUI programs
- Added finding focus across ALL elements by using the .Widget member variable
- Fixed sizing Columns! NOW they will finally be the size specified
- Fixed not using the initialdir paramter in PopupGetFile if the no_window option is set
MikeTheWatchGuy
on 20 Aug 2019
Coming soon.... PEP8 compliant interfaces
The latest 4.2 release has with it these new Window methods:
read = Read
layout = Layout
finalize = Finalize
find_element = FindElement
element =FindElement
close = Close
Starting with Windows as these methods are what tend to be called the most. The Update methods for the elements are the 2nd most called and they can be dropped completely now by directly calling the element. I'll still add all the update methods, don't worry.
I hope to have a bunch more done this week. So, if TheCamelCaseMethod and CamelCaseFuncton names are driving you crazy, then don't worry, a fix is otw.
You can call:
window.read()
in this latest 4.2 release as well as
window.close()
That should take care of 70% of the PySimpleGUI programs out there.
MikeTheWatchGuy
on 20 Aug 2019
PEP8 Compliant Interfaces for PySimpleGUI is Done!
The tkinter port of PySimpleGUI now has PEP8 named method and function names. All of the user accessable methods and functions have a new PEP8 compliant name _in addition to_ the original names.
In other words, all of your old code continues to operate as it did before. You could even mix them if you wanted. Maybe you like the way Popup looks instead of popup. Take your pick.
Assuming all goes well, you can expect this to be cross-ported quickly and released to PyPI.
MikeTheWatchGuy
on 21 Aug 2019
Nice Tweet....
I go surfing for comments from time to time, just to see how the world is liking or hating PySimpleGUI. Thankfully, 99% of the comments I see posted are positive. Only recently have I taken a moment to notice that this is happening on a daily basis more and more.
Twitter I don't check as often as StackOverflow for example, but I do check it on occassion. Tonight I was treated to this surprising tweet:

And, no, I didn't pay him to say "after reading the docs", but I did thank him of course.
You guys/gals are the best user community on GitHub!
MikeTheWatchGuy
on 21 Aug 2019
Window gets finalize parameter
The layout for a window used to require a chained call or a plain call to Window.Layout. A few weeks ago, the layout became a parameter to the Window initialization, thus removing the need to call Layout directly.
The next on the hit-list to remove is the Finalize call.
It took now have a parameter finalize that you can set to True if you want the window to be finalized when it's created.
The old way:
window = window('Title').Layout(layout).Finalize()
The new way:
window = window('Title', layout, finalize=True)
It will do the same thing without the chaining, which is really foreign to beginners.
Like all changes to the SDK, the old interfaces will remain for quite a while, but may eventually be phased out after all documentation and demo programs have been modified to remove those calls.
MikeTheWatchGuy
on 22 Aug 2019
Legacy Python (2.7) Users Need to Begin Planning
As is discussed in the documentation, the Python 2.7 version of PySimpleGUI will cease to exist on Jan 1 2020. There will be no copes on this GitHub. The final 2.7 release will be left up on PyPI, but no new additions nor patches will be made.
"Cease to exist" = rm PySimpleGUI27*
In the coming weeks the final PySimpleGUI27.py file will be frozen, hopefully at a nice place in terms of the features you want.After the freeze, there will be no updates passed over from the PySimpleGUI.py work.
MikeTheWatchGuy
on 22 Aug 2019
New element_justification parameter for Window and Container Elements
You'll find the latest (on GitHub) PySimpleGUI.py file has the ability to do 2 new things.
Sizer Element
Add this element to a container and it will pad the container out to the specified size. It can be in 1 direction as well (i.e. only pad horizontally)
element_justification Parameter added to Window, Column, Tab and Frame
Valid values are 'left', 'right', 'center'
You only need to specify the first letter
element_justification = 'c'
The default, of course, is left justification.
 PySimpleGUI
on 22 Aug 2019
PySimpleGUI
on 22 Aug 2019
4.3 PySimpleGUI Release 22-Aug-2019
PEP8 PEP8 PEP8
Layout controls! Can finally center stuff
Some rather impactful changes this time
Let's hope it doesn't all blow up in our faces!
- PEP8 interfaces added for Class methods & functions
- Finally a PEP8 compliant interface for PySimpleGUI!!
- The "old CamelCase" are still in place and will be for quite some time
- Can mix and match at will if you want, but suggest picking one and sticking with it
- All docs and demo programs will need to be changed
- Internally saving parent row frame for layout checks
- Warnings on all Update calls - checks if Window.Read or Window.Finalize has been called
- Warning if a layout is attempted to be used twice
- Shows an "Error Popup" to get the user's attention for sure
- Removed all element-specific SetFocus methods and made it available to ALL elements
- Listbox - no_scrollbar parameter added. If True then no scrollbar will be shown
- NEW finalize bool parameter added to Window. Removes need to "chain" .Finalize() call.
- NEW element_justification parameter for Column, Frame, Tab Elements and Window
- Valid values are 'left', 'right', 'center'. Only first letter checked so can use 'l', 'c','r'
- Default = 'left'
- Result is that all Elements INSIDE of this container will be justified as specified
- Works well with new Sizer Elements
- NEW justification parameter for Column elements.
- Justifies Column AND the row it's on to this setting (left, right, center)
- Enables individual rows to be justified in addition to the entire window
- NEW Sizer Element
- Has width and height parameters. Can set one or both
- Causes the element it is contained within to expand according to width and height of Sizer Element
- Helps greatly with centering. Frames will shrink to fit the contents for example. Use Sizer to pad out to right size
- Added Window.visibility_changed to match the PySimpleGUIQt call
- Fixed Debugger so that popout window shows any newly added locals
PySimpleGUI
on 22 Aug 2019
More Twitter?
Never thought about Twitter being a place where PySimpleGUI would be discussed.
But more and more posts are showing up. Here's a nice one from today:
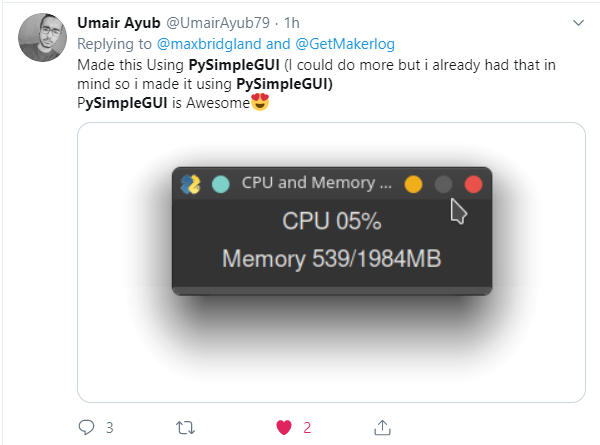
#PySimpleGUI is something positive it would appear. What a contrast from other sites.
PySimpleGUI
on 23 Aug 2019
New Layouts Section in Readme / Docs
https://pysimplegui.readthedocs.io/en/latest/#layouts
Finally was able to write the section on Layouts that I've been wanting to write for some time. I highly recommend reading through it by everyone, newcomer and veteran. It could save you a LOT of time and typing.
In it 5 different ways that layouts can be manipulated are discussed. I found organizing the information to be extremely valuable. I learned a lot about howto manipulate these layout lists and to generate them as well.
Don't Copy and Paste Layout Rows, Generate Instead!
One reason for writing it was to help the folks out that are creating layouts that are pages of code long. I get why there are so many elements, it's the brute force nature of the layouts that I'm seeing "in the wild" that had me concerned.
I don't blame the less experienced programmers for being inefficient and copying code... it's what junior programmers or newcomers to Python do.
Part of the block copied layouts is the fault of the documentation lacking in this area. _There have not been examples of the "right" ways to go about making efficient layouts_ . But, now there is!
So, please read through the "Layouts" section. Feedback is always welcomed!
PySimpleGUI
on 24 Aug 2019
PEP8-ified PySimpleGUIQt.... 2 down 2 to go!
One step closer to going PEP8 across the board!
PySimpleGUIWx and PySimpleGUIWeb are left. Web is next.
This is getting exciting! Soon we'll all be writing better looking PySimpleGUI code.
PySimpleGUI
on 27 Aug 2019
Lots of Doc Updates
Released a new version of the docs. Having been working for some time on these. It's both the readme and the version with table of contents remains http://www.PySimpleGUI.org.
_Added several sections_ including:
Extending PySimpleGUI
Multithreading,
Sshortcut for FindElement & Element.Update,
Column justification,
Sizer Element
PEP8
HorizontalSeparator,
Table.Get for Qt
ChangeLookAndFeel values
PySimpleGUI
on 31 Aug 2019
Repl.it Voting Help Needed!
https://repl.it/bugs/p/python-automatic-package-installs-intermittently-failing
Repl.it has a voting system for determining if your bug is going to be looked at.
If you use Repl.it with PySimpleGUI then please vote on fixing this bug:
https://repl.it/bugs/p/python-automatic-package-installs-intermittently-failing
On Repl.it, simply importing a package should be enough to trigger it to pip install it. You shouldn't have to manually install PySimpleGUI or PySimpleGUIWeb. The import should be enough. It should be a copy, paste, click run experience, but not so for some projects.
Thank you and I hope you're enjoying using PySimpleGUI!
PySimpleGUI
on 2 Sep 2019
PEP8 DONE!! Mass update of all 4 ports
It's [finally] DONE!! All 4 of the ports have PEP8 bindings in the code. It's checked into GitHub but not yet released to PyPI. SOON!! REALLY REALLY SOON! (Tomorrow).
Then begins the mass conversion of the documentation and the demo programs. For many of us, this will be a jarring transition. For newcomers, this will feel quite natural I'm guessing.
This release marks the first and only general GUI package in Python that uses PEP8 methods for all of the classes. Neither Qt nor WxPython have PEP8 names for their class methods. This is because they're conversions from C++. I've never understood why they haven't provided two things:
- snake_case_bindings for all of their class methods
- Interfaces that aren't args *kwargs based. It's next to impossible to figure out the parameters to some of these calls without searching through the docs
More Shortcuts for PySimpleGUI-tk
Trying out a number of different shortcuts for Elements. Some of them will likely be removed as they're perhaps a couple too many provided just to see which "feels" the best to write. Examples include LBox, DD, R, Rad, Status, Out, PBar, Prog, Col, ML, MLine.
The ones likely to disappear are Out, Prog since you're unlikely to be writing these very often. Their purpose after all is to save space when creating your layouts and if you only have 1 Output element, then having Out isn't saving you much and could be confusing.
Callable Windows
Remember the cool trick of "Calling an Element" where doing so actually calls the element's Update method?
window[key](new_values)
Well, now you can do something similar to Window objects. If you call a Window object, you'll be calling that window's Read method. So, you could write
event, values = window.Read(timeout=100)
as
event, values = window(timeout=100)
The code was added to all 4 ports, so feel free to give it a try and see what you think. Yea, it's a little bit crazy, but it's a little bit rock and roll too!
Back to the Web soon!
There are a number of fixes that the fine folks at Remi completed for us that really need to get into the code. Hoping to be able to do this pretty soon. It will open up a lot of cool stuff.
Video Playback using VLC Coming!
One user demonstrated that streaming real video, with audio is not just possible with PySimpleGUI, but it's working already in his code. This means OpenCV and "flip book" videos won't be the only mechanism to show video in your PySimpleGUI windows.
Docstrings for the ports soon too
It's important to get the hard work done on DocStrings pushed out to the other 3 ports. At the moment, only the tkinter version is benefiting from this work, but soon the others will too thanks to some tools written to help
Qt Designer
More work has been happening behind the scenes on this project. Hoping to get back to working on this soon-ish.
2019 has been exciting!
2018 was pretty damned exciting, but this year is shaping up to be just as impactful as last year. The new docs look fantastic and having docstrings on everything in the tk port has been FUN to have.
Being able to have a PEP8 compliant interface to the package seemed far away and not achievable anytime soon, but thanks to the Python language, it was possible to do on all 4 ports in a relatively short period of time.
And there's still another 4 months left this year!
PySimpleGUI
on 4 Sep 2019
Getting Closer to A Final Set of Shortcuts
I took away some of the terrible shortcuts I created yesterday. I figured no one has had time to use them. For example removed OM == OptionMenu and Out==Output because OptionMenu is rarely used already and Output elements by definition will appear only once in a layout.
I have also been working on a template you can copy that imports the Elements and their shortcuts. This will be a long import statement that you can simply copy and paste into your projects. The result is that you don't have to put sg. onto the front of every Element in your layouts! I have to say, it feels really nice to write this way. I wish there was a way to say "Import all classes".
NEVER ever type this line of code from PySimpleGUI import *
PLEASE oh please never do that. It's SO tempting I understand, but it must not happen. Instead copy and paste this single line of code:
from PySimpleGUI import InputCombo, Combo, Multiline, ML, MLine, Checkbox, CB, Check, Button, B, Btn, ButtonMenu,BMenu, Canvas, Column, Col, Combo, DropDown, Drop, DD, Frame, Graph, Image, InputText, Input, In, I, Listbox, LBox, LB, Menu, Multiline, ML, MLine, OptionMenu, Output, Pane, ProgressBar, Prog, PBar, Radio, R, Rad, Sizer, Slider, Spin, StatusBar, Tab, TabGroup, Table, Text, Txt, T, Tree, TreeData, VerticalSeparator, Window, Print
This is for plain PySimpleGUI only right now because I have not yet ported all of the shortcuts to the other ports. SOON for sure!
This import is discussed in a new Demo program:
Demo_Compact_Layouts_Element_Renaming.py
I'm pasting the entire program here so that you get some context and examples of how to use it. The demo points out that you too can create your own shortcuts quite easily.
Note the use of the PEP8 bindings. Get used to them as they're going to be added to all docs and code soon and hopefully quickly.
import PySimpleGUI as sg
# Import the elements individually to save space
from PySimpleGUI import InputCombo, Combo, Multiline, ML, MLine, Checkbox, CB, Check, Button, B, Btn, ButtonMenu,BMenu, Canvas, Column, Col, Combo, DropDown, Drop, DD, Frame, Graph, Image, InputText, Input, In, I, Listbox, LBox, LB,  Menu, Multiline, ML, MLine, OptionMenu, Output, Pane, ProgressBar, Prog, PBar, Radio, R, Rad, Sizer, Slider, Spin, StatusBar, Tab, TabGroup, Table, Text, Txt, T, Tree, TreeData,  VerticalSeparator, Window, Print


"""
    Demo - Compact Layouts and Element Renaming

    Some layouts contain many many elements such that space becomes a premium.  For experienced PySimpleGUI
    programmers, there is little additional knowledge to be gained by writing
        sg.Text('My text')
    rather than using one of the shortcuts such as
        sg.T('My text')
    However, even with shortcut usage, you continue to have the package prefix of
        sg.
    That's 3 characters per element that are added to your layout!
    The very long import statement st the top can be copied into your code to give you the ability to write
        T('My text')

    If you don't want to use that very-long import or perhaps want to use your own shortcut names, you can easily
    create your shortcut by simple assignment:
        T = sg.Text
    This enables you to use T just as if you imported the Class T from PySimpleGUI.  You could develop your own
    template that you copy and paste at the top of all of your PySimpleGUI programs.  Or perhaps perform an import
    of those assignments from a .py file you create.

    Note that you may lose docstrings in PyCharm using these shortcuts.  You can still see the parameters when pressing
    Control+P, but the Control+Q doesn't bring up the full list of parms and their descriptions.  Looking for a fix
    for this.

    PLEASE OH PLEASE OH PLEASE NEVER EVER EVER do this:
        from PySimpleGUI import *
    There is a bot scanning GitHub for this statement.  If found in your code, a squad of assassins will be dispatched
    from the PySimpleGUI headquarters and you will be hunted down and forced to change your code.
"""

# A user created shortcut....
# Suppose this user's layout contains many Multiline Elements.  It could be advantageous to have a single letter
# shortcut version for Multiline
M = sg.Multiline

# This layout uses the user defined "M" element as well as the PySimpleGUI Button shortcut, B.
layout = [[M(size=(30,3))],
          [B('OK')]]

event, values = Window('Shortcuts', layout).read()
sg.popup_scrolled(event, values)
4.4 PySimpleGUI, 2.4 PySimpleGUI27 Release 5-Sep-2019
- window() - "Calling" your Window object will perform a Read call
- InputText - move cursor to end following Update
- Shortcuts - trying to get a manageable and stable set of Normal, Short, Super-short
- DD - DropDown (Combo)
- LB, LBox - Listbox
- R, Rad - Radio
- ML, MLine - Multiline
- BMenu - ButtonMenu
- PBar, Prog - ProgressBar
- Col - Column
- Listbox - new method GetIndexes returns currently selected items as a list of indexes
- Output - new method Get returns the contents of the output element
- Button - For Macs don't don't allow setting button color. Previously only warned
- ButtonMenu - new Click method will click the button just like a normal Button's Click method
- Column scrolling finally works correctly with mousewheel. Shift+Mouse Scroll will scroll horizontally
- Table - Get method is a dummy version a Get because Qt port got a real Get method
- Table - Will add numerical column headers if Column Headsing is set to None when creating Table Element
- Table - FIXED the columns crazily resizing themselves bug!!
- Table - Can resize individual columns now
- Tree - was not returning Keys but instead the string representation of the key
- SetIcon will set to default base64 icon if there's an error loading icon
- Fix for duplicate key error. Was attempting to add a "unique key counter" onto end of keys if duplicate, but needed to turn into string first
- Columns
- No longer expand nor fill
- Sizing works for both scrolled and normal
- Setting focus - fixed bug when have tabs, columns, frames that have elements that can get the focus. Setting focus on top-level window
- InputText elements will now cause rows to expand due to X direction expansion
- Frame - Trying to set the size but doesn't seem to be setting it correctly
- Tabs will now expand & fill now (I hope this is OK!!!)
PySimpleGUI
on 6 Sep 2019
PySimpleGUI Emergency 4.4.1, 2.4.1 Release
Discovered this morning that the "Resizable Elements" meant to resize when window resizes broke general sizing, so had to scramble and turn it off. Hoping that something didn't break in the scramble to get it out.
PySimpleGUI
on 6 Sep 2019
0.28.0 PySimpleGUIQt 5-Sep-2019
FINALLY the Qt release went out to PyPI!! It's been a long time. This gets PySimpleGUIQt up to the same PEP8 level as PySimpleGUI. Next up is PySimpleGUIWx, then Web.
It's been a LONG LONG LONG time coming
- PEP8-ified! All methods and functions have PEP8 equivalents!! It's a BFD
- Version numbers in the code
- New key dictionary - Window.AllKeysDict has all of the windows keys in 1 place for FASTER lookups
- Element.Widget provides access to low level Qt Widget
- Multiline scaling in addition to single line
- Raised default pixel cutoff for single line scaling to 15 from 12
- Pixel conversion done in Elements and passed through to Element class as size_px
- Renamed lots of private functions and methods to begin with _
- "Callable" Elements - element(new_value) will cause element.update(new_value) to be called
- Removed all __del__ except for the Output Element one
- Button - Click method added. Your program can click a button as if a user did
- ButtonbMenu - Click mehtod also added like in Button element
- Graph Element
- Added DrawRectangle method
- Added RelocateFigure method
- Added return of ID to DrawLine, DrawCircle, DrawText
- Added Erase method to erase entire graph
- Tab - added Select method so can select a Tab as if user clicked it
- TabGroup - added Get method. Returns key of currently selected Tab, or text of Tab if no key set
- Table - Get method returns the table - GREAT way to enable users to edit a table and get the results
- SystemTray - uses default base64 icon if no icon supplied when creating
- Window - new finalize parameter removes need to add chained call to finalize
- Window.FindElement - added silent_on_error parameter
- Window[key] is the same as Window.FindElement(key)
- Calling a Window object calls Read for that window
- Fix for filetypes. Bug caused (*) to be added onto filetypes when browsing for files
- Combo returns exact value that was provided using an index into Values list instead of string from Qt
- Listbox returns actual supplied items
- Spinner returns avtual supplied item
- Tabgroup returns Tab key
- Finding element with focus now returns element regardless of type (any type of element can be returned)
- Radio Buttons now return events if enabled
- Graph element background colors added, uses new style class
- Table headings supported (where not supported before??)
- Popups switched to using new layout parm in Window call and uses keys too
PySimpleGUI
on 6 Sep 2019
Best Users _Ever_!
If I haven't thanked the entire group of users yet, then "THANK YOU!!"
I hear from you guys more often than I ever thought would happen and it's ALWAYS very welcomed. Some of these days and nights are a little difficult to get through, but that can turn around in an instant to hear from someone that PySimpleGUI has made an impact on their life.
And that's the way many of you have described it.... that [finally] being successful at writing a GUI had an extremely positive effect on you. It's a compliment in the highest of ways as it's what I wanted to achieve. I wanted to bring GUIs to _everyone_. And, I wanted GUIs to be easy for us all.
The programs everyone is writing, me included, are getting more and more complex and yet the framework's architecture is holding up quite well. I honestly haven't heard anyone say "I can't find any success using PySimpleGUI". Everyone that I can recall has had a positive experience.
I also learn from each and every one of you. Even complete beginners have something to add. Sometimes it's those folks that have the most to add because they're FRESH. They've not yet been "trained" to do things a certain way. Or maybe I see where I could document things better because a similar problem keeps happening.
Just know that messages you send or support you show on Reddit have a really big impact. And I SO very much appreciate it.
PySimpleGUI
on 6 Sep 2019
Instantly "Compress" Your Code
The "new way" of finding elements will soon be sweeping through all of the docs, cookbook and demo programs. I would love to remove FindElement from everywhere I can.
If you really want to compress, you can also remove the .Update call that often follows it.
If you're using an editor, you can do this in 2 steps.
First is to find and replace the FindElement or Element calls.
Let's say I have this line of code:
window.Element('_S1_OUT_').Update(values['_SLIDER_'])
What I do is search for:
.Element(
and replace it with
[
This will cause syntax errors all over the place, but don't worry, step 2 fixes all that.
The example line now looks like this:
window['_S1_OUT_').Update(values['_SLIDER_'])
Step 2, if you want the mega-short way, is to replace
).Update
with
]
If you don't want to remove the .Update part, then replace with
].Update
The new short line looks like this:
window['_S1_OUT_'](values['_SLIDER_'])
Or if you want the longer version:
window['_S1_OUT_'].Update(values['_SLIDER_'])
To me, the more important thing to lose is the FindElement call.
If you REALLY want to be brave, you can replace
event, values = window.Read()
with
event, values = window()
New YouTube Video That Uses PySimpleGUI
This one is the latest: https://www.youtube.com/watch?v=x5LSTDdffFk&feature=youtu.be
It's short at only 6 minutes, but the animations and explanations are thorough and very pleasant to watch. Wow, so nice to see it being taught like this.
The code for it is here: https://github.com/israel-dryer/PyDataMath-II
There are actually 2 videos he's made so far using PySimpleGUI. They are both excellent in my opinion.
This was the first one: https://www.youtube.com/watch?v=IWDC9vcBIFQ
I yet again learn something cool and awesome by reading someone else's PySimpleGUI code. I'm sure many of you recall that I create a function when I have Elements that have a lot of settings that are used over and over.
His approach was entirely different. What he did was he made a dictionary of the repeated parameters and then passed those in.
bw = {'size':(7,2), 'font':('Franklin Gothic Book', 24), 'button_color':("black","#F8F8F8")}
bt = {'size':(7,2), 'font':('Franklin Gothic Book', 24), 'button_color':("black","#F1EABC")}
bo = {'size':(15,2), 'font':('Franklin Gothic Book', 24), 'button_color':("black","#ECA527"), 'focus':True}

Then in his layout:
  [sg.Button('7',**bw), sg.Button('8',**bw), sg.Button('9',**bw), sg.Button("*",**bt)],
VERY clever and one that I'll be stealing for sure :-)
PySimpleGUI
on 16 Sep 2019
Element.set_size Experiment?
Just added to the tkinter port is the general ability, for all elements (in theory), the ability to "resize".
To set the size for an element, you call that element's set_size function, just like you would update or set_focus.
As mentioned in the Enhancement Issued opened to track the progress, with this call you can set one of the sizes to None so that only 1 is changed. The parameter passed in is a single variable which is a tuple of 2 ints.
Here's a bit of demo code:
import PySimpleGUI as sg

layout = [  [sg.Text('My Window', key='-TEXT-', background_color='lightblue')],
            [sg.Input(key='-IN-'), sg.Text('', key='-OUT-')],
            [sg.Button('Do Something'), sg.Button('Exit')]  ]

window = sg.Window('Window Title', layout, resizable=False)

while True:             # Event Loop
    event, values = window.read()
    print(event, values)
    if event in (None, 'Exit'):
        break
    if event == 'Do Something':
        window['-TEXT-'].set_size((20,3))
        window['-TEXT-'].Update('1\n2\n3')
        window['Exit'].set_size((None,2))       # Change only the height... one of the ONLY times None can be used in a size
window.close()
Please comment to the Issue if you end up using it or had problems with it.
2004
Enjoy!
PySimpleGUI
on 20 Sep 2019
Matplotlib Lives Again! (Ver 3.1.1) - Happy Data Science Day!
We've been help up for a little bit, unable to use 3.1 with PySimpleGUI. I'm happy to be able to announce that Matplotlib version 3.1.x works with PySimpleGUI again! You can safely pip install the newest Matplotlib now and it'll work with PySimpleGUI. If you have older code working with Matplotlib, you'll need to switch to this new method in order to upgrade your code.
While PySimpleGUI integrates with Matplotlib, it's technically not a "feature". It's an "Integration" with demo programs supplied to demonstrate _one way_ to accomplish integration.
BIG thank you goes out to @Em-Bo and @dirck for their help!
All of the Matplotlib demos, save two, have been updated to reflect the changes:
Demo_Matplotlib.py
Demo_Matplotlib_Animated.py
Demo_Matplotlib_Animated_Scatter.py (which animates faster now)
Demo_Matplotlib_Browser.py
Demo_Matplotlib_Browser_Paned.py
Not done are these 2 ping demos:
Demo_Matplotlib_Ping_Graph.py
Demo_Matplotlib_Ping_Graph_Large.py
PySimpleGUI
on 20 Sep 2019
Ability to get screen size regardless of window present
Previously with PySimpleGUI-tkinter, you could get the screen dimensions after you created you window by calling window.GetScreenDimensions(), but it only worked if you had a window already opened (thus the little 'w' on window).
Now you can call the class method Window.get_screen_size() with a window already opened or not:
import PySimpleGUI as sg

print(sg.Window.get_screen_size())
This should some in handy for people that are trying to set initial window sizes to match some portion or all of the available screen real estate.
PySimpleGUI
on 20 Sep 2019
PySimpleGUI Discovers Twitter
It stumbled onto the Twitter folks by accident last year. Tony, a teacher from Australia, was the first I can recall that tweeted something about it.
The PySimpleGUI Twitter id is @PySimpleGUI
(I just changed the ID)
Had my mind blown yesterday when there was a post of a screenshot of a code editor made with PySimpleGUI that was running a Calculator program that was written in PySimpleGUI.
https://twitter.com/PySimpleGUI/status/1175191301890936832
Can't wait to get my hands on this code... want to run the PySimpleGUI code editor inside of the PySimpleGUI code editor that is running a PySimpleGUI Demo program. It could go as deep as you want I would assume.
Anyway, if you're a Twitter person, please feel free to share your PySimpleGUI stuff. There IS a community there that is enjoying seeing what each other is creating. I'm still new, but it seems like a nicer community than some others.
I am such a newbie at Twitter I didn't know you can change the name. When I tried to sign up with PySimpleGUI, it gave me @SimplePy. I didn't know I could change it! I could SWEAR I tried in the past.
I don't know what will happen if someone uses the old ID but I'm going to stick with the new
@PySimpleGUI
PySimpleGUI
on 21 Sep 2019
PySimpleGUI Runs on Trinket.io
Happy to announce that another platform is available to run PySimpleGUI online besides repl.it. I did have to get a paid account, but it's cheap.
Here's the demo program for Conway's game of life:
https://trinket.io/library/trinkets/447e96f4d4
Here's a demo of a recent mock-up I did for a Reddit post
https://trinket.io/library/trinkets/3fed5650f4
The downside to trinket.io is that I have to include ALL of the source required for the project, including PySimpleGUI.py.
Still, trinket looks cleaner than repl.it to the user. It's a simple "run" button without a bunch of output scrolling past that makes no sense to most people.
PySimpleGUI
on 25 Sep 2019
More Trinket.io
I've been really putting some time into the Trinket.io examples as I work on Reddit and other problems. It's difficult to get the entire list of my programs out to you. It seems like the only way is by creating a "Lesson" and adding the programs to that.
https://trinket.io/pysimplegui/courses/demo-programs#/demo-programs
It also now has me thinking that perhaps putting the GitHub demo programs on either Trinket or Repl.it could be a great thing, That's a LOT of porting as there are 180+ programs at the moment.
There is also the problem on trinket that I have to include the entire PySimpleGUI.py file as part of the project. With repl.it PySimpleGUI is automatically loaded via pip so that you get the latest and greatest released version.
So, I'm torn. Trinkit's overall experience and interface feels cleaner and easier for the end user to operate. But it's got this architecture flaw of having to include the PySimpleGUI.py file. This seems fine for the Reddit posts I'm using it for.
PySimpleGUI
on 30 Sep 2019
0.13.0 1-OCT-2019 PySimpleGUIWx
FINALLY PySimpleGUIWx released to PyPI!
Really sorry about the delay. The release notes among other things slowed me down.
- Version numbering using sg.version string
- PEP8 bindings!
- Improved scaling of character to pixel sizes of elements that are multilined
- Added Metadata variable to all elements
- Renamed element callback functions to start with _
- Removed __del__ methods everywhere except Output Element
- Can "Call" an element which will call its Update method
- InputText element - convert default text and password char to string
- Removed old code such as tkinter's tooltip and drag and drop from Qt
- Shortcut I for InputText
- Listbox added size_px parm
- Changed type checking to use the comment style types
- Added Element.Widget to all Elements so can access the Wx widgets directly
- Text Element now defaults to '' so no need to specify anything if a blank Text Element (often used for output)
- Button text converted to string when creating button
- New Button shortcuts - B, Btn
- VerticalSeparator - Newly supported Element
- HorizontalSeparator - Newly supported Element
- Slider - added size_px parm
- Fixed leak caused by System Tray not cleaning up the timer
- Window - added finalize paramter so can skip using chained .Finalize()
- Window - AllKeysDict now used like other PySimpleGUI ports. Has all the keys and elements in a window
- Window.FindElement - added silent_on_error parm like other ports have
- Window[key] construct added that calls FindElement
- window() - can "Call" a window you've created. Will call Window.Read()
- Popup buttons no longer use CloseButtons for normal popups. Calls window.Close manually
- PopupGetFolder changed to use keys, normal button, new window design patterns
- PopupGetFile changed to use keys, normal buttons, new window design patterns
- PopupGetText changed to use keys, normal buttons, new window design patterns
- Default application (PySimpleGUI.main) now shows the version number like other PySimpleGUI ports
PySimpleGUI
on 1 Oct 2019
2,200 ⭐ 503,000 Installs
Hit 2 milestones today! (or close to today)
Thankfully stars are not downvotable 🙄
Have also been waiting for a while to hit the 500,000 total installs mark, both seemed to have happened this week or thereabouts.
Here is how each port contributes to the total:


THANK YOU PySimpleGUI users!! You're the BEST GitHub community ever!
PySimpleGUI
on 3 Oct 2019
The Cleanest PySimpleGUI Code
These examples may very well be some of THE best, cleanest, most modern pieces of PySimpleGUI code I've seen, and I read all the PySimpleGUI code I can. He uses type hints, or some kind of typing as it's beyond me at the moment. I'm still living in 3.5/3.6 world as the Pi is still stuck at 3.5.
Meet Israel Dryer's Notepad code - a less than 100 line PySimpleGUI program that implements a basic text editor with menus and other features you would expect.
It's portable and runs online on Trinket for example.
He also made perhaps THE best PySimpleGUI video, where he teaches you PySimpleGUI along with how to build a calculator based off an actual vintage TI calculator.
He also wrote a CODE EDITOR that also runs on Trinket. This code does some wild stuff with styling the windows, setting "themes". Has excellent menus. His stuff is very "complete" and polished. I'm pretty jealous as he out PySimpleGUI's me, easily.
Israel is one to watch for innovative uses of PySimpleGUI as well as how to utilize the Python language better while writing PySimpleGUI code.
PySimpleGUI
on 7 Oct 2019
A GitHub Star Graph
I ran into an interesting tool that graphs the number of stars a project has over time.
Here's the graph of PySimpleGUI's GitHub stars over time:
Hmmm..... not very interesting... just a slow gradual growth.
Then I started adding other projects.
It would seem that PySimpleGUI is doing pretty good!
I didn't include Kivy because it has over 10,000 stars across a 10 year span. The graph gets distorted.
PySimpleGUI
on 16 Oct 2019
Streaming Media Player!
We've got another homerun program from Israel Dryer! This time it's a media player.
This is incredible, truly incredible. Super-easy to understand code. It's at 125 now, but hasn't been "compressed" at all.
With a few minor changes that took maybe 4 minutes, it was up and running on PySimpleGUIQt. Now quite able to get it to run on PySimpleGUIWeb just yet.
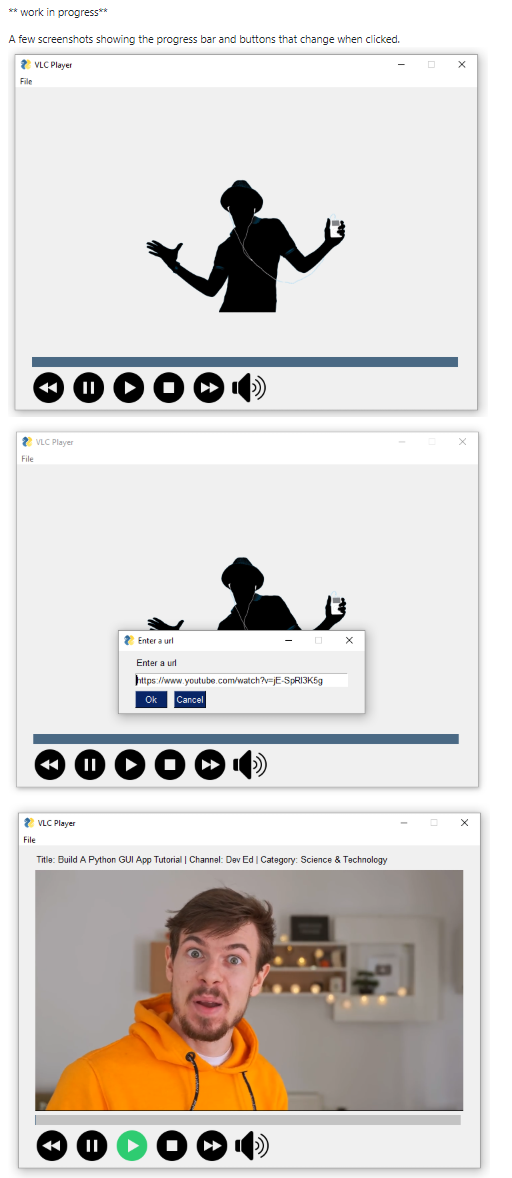
I played with an earlier version and made it a borderless window. Really spiffy.

PySimpleGUI
on 20 Oct 2019
Speed of Fixes, Project expectations
When there is a problem that a user reports, it's a frustrating experience, for everyone, not just the user reporting a problem. If you personally feel like the level of support, the effort to help or the stability of the software is not now or will not be in the future, up to your level of expectations, then please don't use PySimpleGUI. You've got other choices. Go with Qt and a paid license if you need corporate level support as it's simply not possible here.
PySimpleGUI is free software. The time spent creating it was donated, the time spent supporting users is donated, and the money paid to consultants to help from time to time to helps speed things up is donated. It has taken days, nights and weekends to get to this point and continues to take that kind of effort. Quite simply there isn't enough time nor ability to be perfect, to respond in a way that meets everyone's expectations, to run a flaw-free project. Life outside this project is preciously short and has been for almost 2 years.
I understand the form that accompanies Issue submissions can be a pain in the ass. I don't know exactly how long it takes to fill out, but I can't imagine it being an hour or more. There are other open source projects that utilize similar forms, many of which are much more strict in rejecting even partially filled out submissions. Every bug system I've seen and worked with has similar data that is collected with every submission. GitHub's Issue lists are not a bug database so these forms projects use are an attempt to re-create the capabilities of a normal bug tracking system. It's far from perfect.
One problem is that some users have never seen a bug database. Many are not professional software developers. The result could be that some people feel really put-out by the Issue resolution process. It's for efficiency purposes that Issues have these forms. It's an attempt to get you, the user, back up and running ASAP. If there is any doubt there, then again, this may not be the package for you. Damn, that's a terrible thing to say, but it's honest and an attempt to short-cut your frustration. Turning away users goes against everything this software was written for.
This is not a fun announcement to make. It's one of the least fun in fact. If there's a summary here, I would say it's that there are only so many hours available for this project and there are SO many more activities that need doing that those hours provide. Some projects take weeks to reply to an issue and every attempt will be made to ensure this isn't one of them. However, there can't be any promises made on how quickly your problem will be fixed. A fast workaround is often attempted to get you on the road again, but that's not always a possibility.
I ask for your help and understanding when asking for assistance. Your problem is the most important and highest priority thing for you, but if you can step back a little and see there are other people in the same boat and the project also needs to continue to move forward, then maybe it'll help with your frustration at the inability to address problems on your timeline that meet your expectations. Patience is requested and very much appreciated.
I'm really grateful for the support and encouragement users have shown over the past couple of years. It is very appreciated. Thank you for your time, and I'm sorry if any of you have been disappointed.
PySimpleGUI
on 24 Oct 2019
Mouse Vs Python Article by Mike Driscoll
My all-time favorite Python book author, Mike Driscoll, has written a short article on PySimpleGUI!
http://www.blog.pythonlibrary.org/2019/10/23/a-brief-intro-to-pysimplegui/
It's posted on his "Mouse Vs. Python" blog and being picked up by a number of newsletters. This is super exciting as Mike's helped my Python education along through his books. Python 101 has to be a favorite as I learned a lot of stuff about the standard library I didn't know (for example the daemon setting on Threads).
I think that Mike may write something larger in the future as he's a writer for RealPython. THAT would be something to see!
Here are some of the books Mike's written that you may recognize
- Python 101 - (eBook or Paperback or read it online)
- Python 201: Intermediate Python - (eBook or Paperback)
- wxPython Recipes - (eBook or Paperback)
- Python Interviews - (eBook or Paperback)
- ReportLab: PDF Processing with Python - (eBook or Paperback)
- Jupyter Notebook 101 - (eBook or Paperback)
- Creating GUI Applications with wxPython - (eBook or Paperback)
His most recent book, very recently published, is the WxPython book, so he's very very up on GUIs.
It's going to be fantastic to hear feedback from Mike! It's a great opportunity that will no doubt help improve the package.
PySimpleGUI
on 24 Oct 2019
Thank you for following naming / coding conventions!
Lagging behind on updating some of the docs, particularly the cookbook and readme. It's important to keep those up to date with the latest coding conventions (design patterns). They are the vehicle in which names and design patterns are shown, repeatedly, until you're brainwashed into naming your variables the same thing.
I want to applaud the consistency that the community has shown using the package. It's another unexpected outcome. The project has been riddled with these kinds of unexpected results. I read lots of PySimpleGUI code. As much as I can because I learn from it. What I'm seeing is consistency pretty much across the board. It's pretty cool
By consistency and coding conventions I mean the variable names, program structure, etc. 99% of the time I see
import PySimpleGUI as sg
and
layout = [[   ]]

window = sg.Window('title', layout)

event, values = window.read()
It may sound like I'm being picky when encouraging people to follow these but it has this huge advantage of any of us being able to pick up another's PySimpleGUI code and read it. It's easy to scan a page of code and find the event loop, where the input value are being used, etc.
The big one I'm trying to get switched over to at the moment is the replacement of FindElement with [ ]. But even if that change isn't made by everyone, the FindElement or find_element are easy to spot as well.
Seemed like something worthy of thanking the community for doing. It does have a positive impact in the end I think. Other people that are perhaps behind you in their skills have a chance to learn from you, .... take your code. .... and your artwork. 😉
PySimpleGUI
on 29 Oct 2019
Mini Media Player Anyone?
https://github.com/PySimpleGUI/PySimpleGUI/blob/master/DemoPrograms/Demo_Media_Player_VLC_Based.py

It plays back:
- Files from your hard drive
- YouTube links
- DropBox links (set dl=1 in the shared link)
Another winner demo program added courtesy of Israel Dryer. Stole his bare-bones media player that's part of his larger feature rich media player and turned it into a Demo Program. Changes were coding convention stuff, etc, nothing major that's for sure.
It's maybe 55 lines of code? PyCharm says 70, but 15 lines of that are comments. Need to write a little utility to display actual lines of code. It's ridiculously small. And even then, check out how difficult these lines are in the event loop:
    if event == 'play':
        list_player.play()
    if event == 'pause':
        list_player.pause()
    if event == 'stop':
        list_player.stop()
    if event == 'next':
        list_player.next()
        list_player.play()
    if event == 'previous':
        list_player.previous()      # first call causes current video to start over
        list_player.previous()      # second call moves back 1 video from current
        list_player.play()
Could it be done in less code using a dictionary or something, sure, but WHY? It would add significant complexity. It's not worth saving some code if you lose something so beautifully simple as this. The player buttons and how the player reacts is all right there in one place.
Code is present to allow running on Linux but I still need to test.
PySimpleGUI
on 30 Oct 2019
Notification Window - Fades in and out, click to dismiss
There's a new demo program that I think many of you will find useful and adds a very nice touch to your program.
This code displays a notification "window" that fades in and out and can be dismissed early by clicking on it.

The foundation for this code was sent by user @ncotrb who was nice enough to donate it to the pool of demo programs.
The unique features of this program include:
- Option to fade in / out the window
- Changing the mouse pointer from an arrow to a hand when over the window
- Entire window is drawn using a single Graph Element
I was trying to turn this demo into an something callable that would run this code as a subprocess, the idea being the ability to display a notification window at any point in a user's program regardless of the state of the caller's program or even which GUI framework is being used. Wasn't able to take the idea that far so perhaps someone else can make a try at it.
PySimpleGUI
on 31 Oct 2019
Reddit New PySimpleGUI Post
https://www.reddit.com/r/learnpython/comments/dpo0a8/first_pysimplegui_project/

( gist link is this - https://gist.github.com/quirksubdol/8390e53e70db2c03cb05ecf22408ca1e )
It's nice to see success stories.
What's remarkable about this program is that it was done by a student in their second week of a Python course. Talk about ambitious!
[EDIT] A day later and it continues to be upvoted :-) Nice! I'm glad the poster is feeling good about what he's done.

PySimpleGUI
on 31 Oct 2019
Another article!?
What's better than having your favorite Python author write a story about PySimpleGUI? I'll tell you what.... it's having TWO stories written! In under a week too!
http://www.blog.pythonlibrary.org/2019/10/31/the-demos-for-pysimplegui/
PySimpleGUI
on 1 Nov 2019
My Favorite Tweet
Total newcomer to Twitter, but finding it a fascinating place for Python stuff. Never used it for anything until a few months back.
Here's my favorite Tweet I've seen so far

PySimpleGUI
on 2 Nov 2019
Code sharing for Issues
I've been using Trinket to share code instead of Pastebin or pasting into a post somewhere. The reason is that people can immediately run the code.
If you are able to post your code on either Trinket or Repl.it to demonstrate a problem, I can guarantee you that you're issue IS going to get looked at quicker and ahead of others. The difference between "follow this link and see the behavior" and "add whatever code you need to in order to get my 5 lines of code to run" is like "biking to the grocery store" versus "taking a roundtrip to Mars"
One advantage these 2 platforms give you to try your code out on is that they are Linux based (perhaps you're running Windows / Mac or running a different Linux). It's another data point.
I'm not asking that everyone put their Issue code on Trinket. It just dawned on me how handy it is for troubleshooting in addition to demonstrating or teaching.
Maybe it's a terrible idea :-) I've got lots of ideas, they're not all good however.
EDIT.... oops, I forgot to share this bit of Trinket code as an example:
https://trinket.io/library/trinkets/49c5d264d8
import PySimpleGUI as sg

layout = [  [sg.Text('My Window')],
            [sg.Input(key='-IN-'), sg.Text('', key='-OUT-')],
            [sg.Button('Do Something'), sg.Button('Exit'),
             sg.Button('-FOCUS-IN-', visible=False), sg.Button('-FOCUS-OUT-', visible=False)]  ]

window = sg.Window('Window Title', layout, finalize=True)

window.TKroot.bind("<FocusIn>", window['-FOCUS-IN-'].ButtonReboundCallback)
window.TKroot.bind("<FocusOut>", window['-FOCUS-OUT-'].ButtonReboundCallback)

has_focus = True
while True:             # Event Loop
    event, values = window.read()
    if event in (None, 'Exit'):
        break
    if event == '-FOCUS-IN-' and not has_focus:
        print('Got focus!')
        has_focus = True
    elif event == '-FOCUS-OUT-' and has_focus:
        print('Leaving focus!')
        has_focus = False

window.close(); del window
This code was part of explaining how to get new "events" to be returned through calls to window.read().
It's one thing to see it, it's different to run it.
BTW, this particular extension to PySimpleGUI was only recently added and is not yet been released to PyPI from what I recall. It's on GitHub.
The idea here is to bind a tkinter event to a method in a Button. Yes, it's clunky for the time being. The point is to get you something that works with a small amount of code until a better way is written. It opens up a LOT of extending of PySimpleGUI for what little is added.
PySimpleGUI
on 3 Nov 2019
Screenshots - All of them but need fewer
I've had problems posting screenshots for people to see because GitHub will hide 100's of posts in an Issue from you. I found this site BounySource that archives GitHub best I can tell and doesn't hide any posts so that you can scroll through them all.
What's needed is maybe to put a few of the better ones in the Wiki???
I'm not sure of what the "better ones" would be. It's on the list to do... along with get the code written.....
https://www.bountysource.com/issues/60766522-screen-shots
https://www.bountysource.com/issues/79595971-screenshots-scratchpad-for-posting-and-documents
PySimpleGUI
on 4 Nov 2019
Release 4.5 PySimpleGUI 04-Nov-2019
FINALLY a release goes out and this is a big one!
Sorry it's taken SO long. The readme has finally been updated with the PEP8 bindings and evidently exceeds GitHub's size for the project's homepage. The ReadTheDocs still works though http://www.PySimpleGUI.org
- Metadata!
- All elements have a NEW metadata parameter that you can set to anything and access with Element.metadata
- Windows can have metadata too
- Window.finalize() - changed internally to do a fully window.read with timeout=1 so that it will complete all initializations correctly
- Removed typing import
- ButtonReboundCallback - Used with tkinter's Widget.bind method. Use this as a "target" for your bind and you'll get the event back via window.read()
- NEW Element methods that will work on a variety of elements:
- set_size - sets width, height. Can set one or both
- get_size - returns width, heigh of Element (underlying Widget), usually in PIXELS
- hide_row - hides the entire row that an element occupies
- unhide_row - makes visible the entire row that an element occupies
- expand - causes element to expand to fill available space in X or Y or both directions
- InputText Element - Update got new parameters: text_color=None, background_color=None, move_cursor_to='end'
- RadioButton - fix in Update. Was causing problems with loading a window from disk
- Text Element - new border width parameter that is used when there's a relief set for the text element
- Output Element - special expand method like the one for all other elements
- Frame element - Can change the text for the frame using Update method
- Slider element - can change range. Previously had to change value to change the range
- Scrollable frame / column - change to how mousewheel scrolls. Was causing all things to scroll when scrolling a single column
- NOTE - may have a bad side effect for scrolling tables with a mouse wheel
- Fix for icon setting when creating window. Wasn't defaulting to correct icon
- Window.get_screen_size() returns the screen width and height. Does not have to be a window that's created already as this is a class method
- Window.GetScreenDimensions - will return size even if the window has been destroyed by using get_screen_size
- Now deleting window read timers every time done with them
- Combo no longer defaults to first entry
- New Material1 and Material2 look and feel color schemes
- change_look_and_feel has new "force" parameter. Set to True to force colors when using a Mac
- Fix in popup_get_files when 0 length of filename
- Fix in Window.SetIcon - properly sets icon using file with Linux now. Was always defaulting
PySimpleGUI
on 6 Nov 2019
0.31.0 PySimpleGUIWeb 04-Nov-2019
It's been a LONG LONG time since a PySimpleGUIWeb release. So it's overdue, especially since the PEP8 binding have been held up. I've been wanting to make sure the animations would be flicker free before releasing again and thankfully the Remi team (of one) came through again! The OpenCV demos run in a browser as a result.
- PEP8 bindings!
- Window - NEW way of finding elements
- Use window[key] instead of window.FindElement(key)!!
- Winow - "calling" an existing window object will call its read method
- Version number added both dunder version and version work
- Renamed some variables to be private by adding _ to the front
- METADATA added to all elements and Window
- Ability to "call" an element. The effect is to call that element's update method
- Removed all delete functions in the classes. Were poorly done and not consistent
- Output element - fix for color defaults, CurrentValue contains all of the text currently shown
- Image Element
- Rewrite done by Remi team!!!
- Fixes flicker when using with OpenCV
- Removed quite a bit of unused code
- Added prints where items are not yet implemented
- Window - finalize parameter added
- Get screen dimensions always returns (0,0) for now until can figure it out
- Made return values computation easier
- Two new look and feel color settings - Material1, Material2
PySimpleGUI
on 7 Nov 2019
Meme Anyone?
I've never made a Meme, but I did make this illustrative diagram, perhaps for use when people go nuts online about how sh*tty PySimpleGUI is. I think it illustrates the point well. LOL.
I'm not knocking _any_ other GUI package. They all have their purpose and "best use" scenario. I think you guys here on this GitHub already get this or you wouldn't be the awesome users you are. I dunno, a little humor goes a long ways, even if a tad sarcastic.
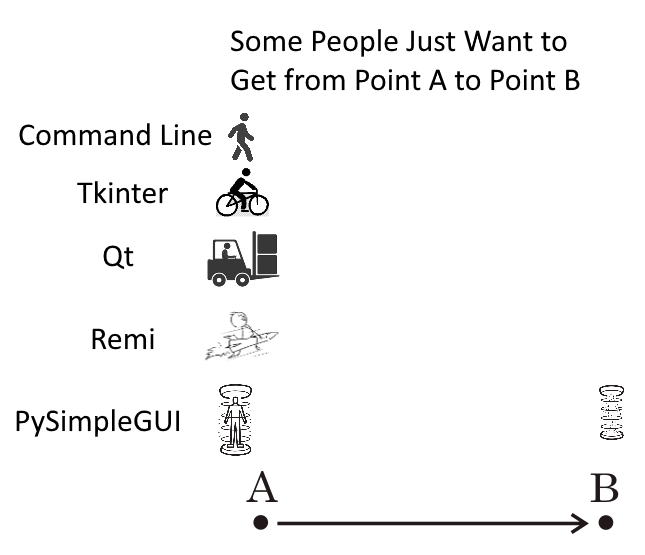
PySimpleGUI
on 7 Nov 2019
Posting Issues - Do NOT post your new issue as an addition to a closed issue
A problem has recently started happening where users with a problem simply tack their problem onto the end of a Closed Issue. This is a terrible problem. It circumvents the entire bug reporting, tracking, and ultimately bug fixing process. It also provides much less information than if a new issue was opened.
It's fine, of course, to reference a closed issue in your new open issue... by all means do that.
PySimpleGUI
on 8 Nov 2019
PySimpleGUIWeb 0.31.1 posted to PyPI
There was a corrupt init file that was uploaded as part of the PySimpleGUIWeb release that I didn't catch. Thankfully someone else did and reported it quickly.
I'm really sorry this happened! I'll strive to do a better job of testing the uploaded code in addition to installing it. I HATE BUGS, so it's appreciated when they're reported early like this rather than giving up and moving onto something else, assuming someone else will post something.
PySimpleGUI
on 8 Nov 2019
New Matplotlib Demo
Managed to get an interactive Matplotlib window to run in parallel with a PySimpleGUI window. The reason for doing this is if the user wishes to use the interactive tools that a Matplotlib window normally shows. It's actually really simple. Simple enough to post here:
import PySimpleGUI as sg
import matplotlib.pyplot as plt

"""
    Simultaneous PySimpleGUI Window AND a Matplotlib Interactive Window
    A number of people have requested the ability to run a normal PySimpleGUI window that
    launches a MatplotLib window that is interactive with the usual Matplotlib controls.
    It turns out to be a rather simple thing to do.  The secret is to add parameter block=False to plt.show()
"""

layout = [[sg.Button('Plot'), sg.Cancel(), sg.Button('Popup')]]
window = sg.Window('Have some Matplotlib....', layout)

while True:
    event, values = window.read()
    if event in (None, 'Cancel'):
        break
    elif event == 'Plot':
        history = [0.1, 0.2, 0.5, 0.7]
        plt.plot(history)
        plt.show(block=False)
    elif event == 'Popup':
        sg.popup('Yes, your application is still running')
window.close()
0.31.0 PySimpleGUIWeb 08-Nov-2019
It's getting to be like the old days of weekly releases. Whew!
I got more help from the Remi team!!!!!!!!! (Thank you Davide!!!)
Now the Output element scrolls correctly as does the MultilineOutput. Very nice to get this kind of help from such an expert.
So, I thought it important to push it out the door to everyone quickly.
PySimpleGUI
on 8 Nov 2019
Cookbook Updates
Released the first set of a series of updates to the Cookbook. This first set were for the initial sections, the first set of design patterns, and some PEP8 renaming. Hopefully 90% or more of the PEP8 conversions are done in that document. It's been released to readthedocs.
You might not know it, but it's available via: http://Cookbook.PySimpleGUI.org
I've had some excellent suggestions of things to add. One in particular is layout explanations.
I want to rework the multi-window patterns into something much more useful than the straight linear representation that's posted now.
Much more work still ahead for it as it's the active portion of the project at this moment.
Main docs Table Of Contents "fixed" for Elements
Was reported on Reddit as a problem... there were no entries at all for the call reference section. I guess the code changed or something that caused the header levels to get messed up. I've changed it so that the elements now show up in the table of contents (http://www.PySimpleGUI.org).
PySimpleGUI
on 10 Nov 2019
A More Colorful Cookbook
The Cookbook is getting a face-lift. All of the programs will include a call to change_look_and_feel. There's no reason that all of the Cookbook window's need to be gray. They won't run slower and the sure won't look any uglier. OK, maybe some of the color choices made in creating some of the themes weren't stellar picks, they're still better than gray and black, right?
These Cookbook edits are being rolled out as they're completed. You can see the latest in the main documentation http://www.PySimpleGUI.org and clicking on the Cookbook tab or going directly to http://Cookbook.PySimpleGUI.org
More Colorful Demo Programs
The Demo Programs are also going to get the color treatment. It's only 1 line of code after all and it's a feature that may be being overlooked because there has been next to zero examples of these colorful windows shown anywhere but in the single "GreenTan" themed window showing all of the available elements.
More Colors
With this added bit of focus on the colors / themes comes the desire to get a lot more themes available. Working on some tools to help find more color palettes as well as displaying what already exists better in the documentation.
Will be adding something to show how every entry Look and Feel entry appears so that selection is easy. It will also help inform as to what colors are not represented well.
More Graphics
Also added to the Cookbook are detailed instructions on how to create buttons that have an image instead of a rectangle. Creating Base64 buttons are a capability I want to encourage new users to not be afraid of making a custom button. It's not difficult to do and it adds literally 1 line extra of code to add an image to a button if you store the button inside the source code itself, and 0 lines extra if the image is in a file.
More Pages!
The full set of PEP8 bindings were finally included in the main documentation. This added a few more pages to the documentation... OK, a lot more.
For fun I created a PDF from the ReadTheDocs site. It is 511 pages long. 291 of those pages are the detailed call signatures for the classes, methods and functions. Because both the original methods and PEP8 versions are included, the documentation is larger than would normally be the case.
If you want to take a look at the PDF version, you'll find it checked into the GitHub at this location:
https://github.com/PySimpleGUI/PySimpleGUI/blob/master/docs/DocSnapshotFromReadTheDocs12Nov2019.pdf
PySimpleGUI
on 13 Nov 2019
International Users
It's been fun to see users from many countries having success with PySimpleGUI. A few weeks back a bunch of folks from Japan started posting info on Twitter. This evening this tutorial was Tweeted:
http://www.facialix.com/aprende-python/tutorial-creacion-de-interfaces-graficas-en-python-usando-pysimplegui/
It's written in Spanish but Google Translated it perfectly for me. Even the jokes translated 👍
I honestly don't know how international users do it. It's difficult enough learning to code GUIs in Python. Throw on top of that documentation that's not professionally written, a new GUI API and a foreign language. Wow.... much respect for the international PySimpleGUI users.
PySimpleGUI
on 13 Nov 2019
Trinket Is On Fire! 🔥
I'm stunned by how much Trinket is being used by people that I guess are checking out PySimpleGUI. The Trinket links have been posted a number of places including the main documentation, the Cookbook, and many Reddit posts.
It's been a great teaching aid in my opinion as not only can the code be shared and executed right on the site, but the "Lessons" built using the programs can include screenshots, explanatory text, etc. It's like an Interactive Cookbook. In fact, the entire Cookbook could probably be done there using the Lessons.
Looking at the list this morning, I see a LOT that have been looked at just in the past hour. I noticed this a few days ago and is doesn't seem to be letting up. The next page of the list below shows more of the Trinkets being viewed in the past 8 hours, day, etc.
There's a "lesson" to be learned here. I'm not sure what it is exactly, but something's hidden down in these stats.

PySimpleGUI
on 14 Nov 2019
2,500 Stars! THANK YOU!

Finally hit another nice milestone!
Of all the metrics that I have access to, I think stars on the GitHub are one of the best ways for me to judge "popularity" or "actual use". The reason I think this is the most accurate is that a human being needs to mouse up to that "STAR" button and click it. I don't believe anything automated is doing this.
_Thanks again for being an awesome community_.
It's nice to see the support and how thankful many of you are. It's really appreciated when you say "Thank You for PySimpleGUI".
For me, it's a nice compliment, but what registers more is that a difference was made. Someone, a person, a programmer, a non-programmer, a human being benefited from this thing that was made. kSomeone may have been able to make their first GUI using PySimpleGUI. Or maybe they _finally_ made their first GUI, after having tried before. Or...? Who know, but I'm going to take it as a difference of some kind was made and that's a really nice thing to read.
Thank you for your patience
I know things have been a bit slow, but know the best that can be done is being attempted. Some of these bugs and stuff may take a week or more to get to fixing and releasing. My hope is that in the meantime you are able to continue to make progress on your project in some other way or using a workaround or patched code.
I've been "patiently waiting" for the PyCharm bug fix that will enable docstrings to work for all of the renamed classes. It's been a very long time. So, if you've been waiting a very long time for a bug, I'm really sorry. If you think it's been "lost" say something so that it's brought back into the queue of stuff that's being actively worked.
Thank you for the support
That's the overall message here.
PySimpleGUI
on 15 Nov 2019
Look and Feel Theme Additions - Almost Completed
Have been working on adding a LOT of new color themes as well as a renaming the existing ones using a new naming convention. The old names still work, don't worry!
The new theme names all start with either Light or Dark followed by the background color and sometimes a number. This will allow you to "Guess" at some themes to try.
Maybe you're looking for a dark theme with a purple background... DarkPurple, DarkPurple1, DarkPurple2, etc, are good candidates for you to try.
If you want a preview of these Themes, you can simply call:
import PySimpleGUI as sg
sg.preview_all_look_and_feel_themes()
And you will be shown a window like this:

It's a super-quick and easy way for you to choose a theme. Drop that one line at the top of your code to get the window and then write down the theme name.
Fuzzy Theme Names
One new addition (thank you @Israel-Dryer) is a fuzzy theme name matcher. This allows you to specify theme names that are not exactly the same as the one shown on the preview. You can add spaces for example. Or swap words around. It's very clever and the results are nice. You can guess at themes and be confident you'll see SOME colors on your window. I can't guarantee that'll look great, but you can always choose another.
Back to Bugs / Issues after this
Trying to get bugs fixed in-between this Theme stuff, but finding it hard to multi-task when in heads-down mode. Give me another day and I'll get back to the queue of Issues.
The Code to Make Preview Window
I wanted to also share this code that was released as a demo. It's pretty extraordinary that the previewer window with all those themes was made without needing to do anything special in PySimpleGUI. It's shockingly short, AND, it runs on all of the platforms except for PySimpleGUIWx which is still lagging a bit. But as you can see, it runs on tktiner, Qt, and Remi. For Remi because the frame isn't labelled, I needed to add a line for the text telling the name of the Theme.
One of the things I like about this code is the use of "User Defined Element" or "Compound Element" which is the sample_layout function. I also like how the window is built using simple += operators. It makes putting together a layout look very easy for a beginner.
[EDIT] OH! I forgot the best thing that I discovered while making it... you can change look and feel settings midway through a layout definition and the new values will be used for the elements that follow the change. That is how I managed to get 1 single window to display all of the Themes. Note at the top of the loop where the Frames are being added, there is a call to change_look_and_feel.
import PySimpleGUI as sg; web=False
# import PySimpleGUIWeb as sg; web=True
# import PySimpleGUIQT as sg; web=False

WINDOW_BACKGROUND = 'lightblue'

def sample_layout():
    return [[sg.Text('Text element'), sg.InputText('Input data here', size=(15,1))],
                [sg.Button('Ok'), sg.Button('Cancel'), sg.Slider((1,10), orientation='h', size=(10,15)) ]]

layout =   [[sg.Text('Here is a complete list of themes', font='Default 18', background_color=WINDOW_BACKGROUND)]]

row = []
for count, theme in enumerate(sg.ListOfLookAndFeelValues()):
    sg.change_look_and_feel(theme)
    if not count % 9:
        layout += [row]
        row = []
    row += [sg.Frame(theme, sample_layout()  if not web else [[sg.T(theme)]]+sample_layout())]
if row:
    layout += [row]

sg.Window('Preview of all Look and Feel choices', layout, background_color=WINDOW_BACKGROUND).read()
Presenting... the PySimpleGUI Color Palette... 108 Choices of Color Combinations
Just about DONE with the work on turning 1,700 of color palettes into PySimpleGUI Themes. I don't know how good of a job I did, but at least a new "Standard" fell out of the process.
When starting on this last week, there were 27 different look and feel "themes". Now there are 108. The original 27 are still there, with their original names. AND, they've been duplicated using the new naming convention.
New Naming Convention
The way the new names work is as follows. First there's a Dark / Light designation. Then the background color, then a number from 1 to N, where N can and will vary per entry. For example, there are 4 "DarkGrey" settings and 6 "DarkPurple".
There are also 2 special names, Default, Default1. The first being the system defaults with the PySimpleGUI default buttons and Default1 specifies that all elements use the system defaults including the buttons. BLAND... please don't add to the number of boring gray windows. You don't have to go nuts with color, but damn, anything is better than gray on gray on gray.
New Fuzzy Matching
Finally, the name you pass into the change_look_and_feel call itself can now vary. No longer do you have to spell the dictionary key letter for letter. Now you can add spaces, mix around the words, and the code will attempt to find a matching theme for you.
Rewarded For Your Mistakes
Rather than punishing you with a gray window if you choose a Look and Feel Theme color that's not valid, you'll instead be treated to a random window Theme. You'll still be warned on the console about the error, provided with a list of valid entries, but the main window will be themed using a random palette. It's good to branch out every now and then and try something new, right? Well, now you don't have a choice.
Reminder - This is currently only located on GitHub and is currently only been made to the tkinter port. Once finalized, all ports will get updated quickly.
The Official List
I think this is the final list and that no changes will be made that will break your code if you were to use it.

But What If I Don't Remember
If you're ever in need for the quick reference image above but don't know where to find one, then generate one yourself by calling:
import PySimpleGUI as sg
sg.preview_all_look_and_feel_themes()
and you too will be treated with a large window filled with these little frames.
PySimpleGUI
on 16 Nov 2019
4.6.0 PySimpleGUI 16-Nov-2019
- Themes!!!
- Added a LOT of Look and Feel themes. Total > 100 now
- Doctring comments
- PEP8 bindings for button_rebound_collback, set_tooltip, set_focus
- Spin Element Update - shortened code
- Allow tk.PhotoImage objeft to be passed into Image.update as the data
- DrawRectangle - added line_width parameter. Defaults to 1
- Fix for Slider - was only setting the trough color if the background color was being set_focus
- Added a deiconify call to Window.Normal so it can be used to restore a window that has been minimized. Not working on Linux
- Combo - Fix for not allowing a "0" to be specified as the default
- Table - Saving the Frame that contains a table in the member variable table_frame. This will enable the frame to be changed to expandable in the future so that the table can be resized as a window expands.
- LOTS AND LOTS of Look and Feel themes!!!!
- Added SystemDefaultForReal to look and feel that will prodce 100% not styled windows
- Changed the "gray" strings in look and feel table into RGB strtings (e.g. gray25 = #404040). No all graphics subsystems
- Removed Mac restriction from Look and Feel setting changes. All color settings are changed EXCEPT for the button color now on a Mac
- "Fuzzy Logic" Look and Feel Theme Selection - No longer have to memorize every character and get the case right. Now can get "close enough" and it'll work!! (Thank you again @Israel-dryer for this bit of technology)
- New function - preview_all_look_and_feel_themes. Causes a window to be shown that shows all of the currently available look and feel themes
- Removed use of CloseButton in popup get file, folder, text. Was causing problems where input fields stopped working. See bug on GitHub
PySimpleGUI
on 16 Nov 2019
To Finish The Themes.....
I've made the changes to all 4 ports to support the new Color Themes as well as the new functions to display them, etc. Note that the PySimpleGUIWx port doesn't have the Frame Element completed so the function that displays all of the settings in a window doesn't work yet on PySimpleGUIWx (hmmmm.... a damned good reason to complete that work!)
PySimpleGUI
on 16 Nov 2019
0.30.0 PySimpleGUIQt 16-Nov-2019
TWO ports down with the new themes! (plus more stuff in there too...)
- THEMES!! Over 100 new Look and Feel themes to choose from!
- New func preview_all_look_and_feel_themes() that will display a large window with all possible themes shown
- Metadata! Now available on all elements when creating and accessable directly by program
- Metadata added to SystemTray objects and Window objects
- Metadata parameter added to all shortcut buttons and funcs
- Completed removal of PyQt5 code
- ML, MLine shortcuts added for Multiline (input)
- MLineOut shortcut for MultilineOutput
- Text element text is optional now
- Fixed bug in BrowseFiles button. Was only getting first item in list instead of full list of filenames
- BMenu shortcut for ButtonMenu
- PBar, Prog shortcuts for ProgressBar
- Range is now properly set in Slider.Update
- Background color supported for MenuBars now
- Added 5 extra pixels to window size. Now adding a total of 10 so things don't get cut off
PySimpleGUI
on 16 Nov 2019
0.14.0 PySimpleGUIWx 17-Nov-2019
- 105 Look and Feel Themes to choose from!
- New "Fuzzy" look and feel selection
- Preview all look and feels not yet supported due to lack of Frame support
PySimpleGUI
on 18 Nov 2019
0.33.0 PySimpleGUIWeb 17-Nov-2019
- Added autoscroll parameter to the MultilineOutput.update method
- TONS of new Look and Feel Themes
- Fuzzy name matcher for change_loo_and_feel call - string doesn't have to perfectly match now
- New preview_all_look_and_feel_themes function displays all of the colors for the Themes
PySimpleGUI
on 18 Nov 2019
ALL FOUR of the PySimpleGUI ports have been updated on PyPI!
It's been over only a 2-day span that the new color themes were completed and integrated into each of the ports. Now all of them have been posted to PyPI so it's safe for you to use the theme colors across all of the ports.
The pressure was on to get all those themes out at the same time. It is important that PySimpleGUI code stay as in-sync as possible. This was an opportunity to get things synced up a little. At least all the colors are present in the ports.
PySimpleGUI
on 18 Nov 2019
Mini-Excel Demo Program
Not sure where this idea came from... likely Reddit. Someone asked for an excel-like GUI that allows you to navigate using the arrow keys. This one also allows you to sort data by clicking on a column heading. There's also a button that dumps the data out in a list format so you can paste into code.
You can run the code online on Trinket.
https://pysimplegui.trinket.io/demo-programs#/tables/navigate-using-arrow-keys-sort-by-column
Of course it's also in the Demo Programs area:
https://github.com/PySimpleGUI/PySimpleGUI/blob/master/DemoPrograms/Demo_Table_Simulation_Arrow_Keys.py

Clicking "Show Table" button shows this window that you can copy from

One thing to notice about this demo is the layout definition....
layout = [[sg.Text('Click on a column header to sort by that column', font='Default 16')]] + \
         [[sg.Text(' ' * 15)] + [sg.Text(s, key=s, enable_events=True, font='Courier 14', size=(8, 1)) for i, s in enumerate(COL_HEADINGS)]] + \
         [[sg.T(r, size=(4, 1))] + [sg.Input(randint(0, 100), justification='r', key=(r, c)) for c in range(MAX_COLS)] for r in range(MAX_ROWS)] + \
         [[sg.Button('Show Table As Lists'), sg.Button('Exit')]]
It is created by "adding together" multiple layouts. There is a section in the documentation about creating layouts in this manner.
The reason for doing it this way is the two list comprehensions that are present in the middle 2 sections of the layout.
PySimpleGUI
on 18 Nov 2019
Cookbook Updates Continue
A reminder that the Cookbook is undergoing a series of updates. A good number of recipes and information that's been put in recently has been in the area of..... THEMES!
Yea, the topic that won't seem to go away, but it will soon I promise. To date there has been no place where modifying themes or explaining how to make new one has been posted in any of the docs. So, taking the opportunity to document the Look and Feel Themes while continuing the Cookbook changes.
There is at least another 50% more of the Cookbook that needs updating so I don't expect the update work to complete in the short term.
PySimpleGUI
on 19 Nov 2019
New PySimpleGUIQt Demo - imwatchingyou Combined with PySimpleGUIQt
In case you're new to PySimpleGUI or wasn't aware of the built-in debugger or the standalone imwatchingyou package, here's a quick reminder.
The base PySimpleGUI package has the imwatchingyou debugger built into it. The other ports of PySimpleGUI do not have the debugger built into them.
PySimpleGUI
on 19 Nov 2019
Thread Demos Rework / Rename
There was some overlap in the multi-threaded demos. There are currently 4 Demo Programs that are multi-threaded design patterns:
- Demo_Multithreaded_Different_Threads.py - Uses multiple functions (threads), each potentially doing different work
- Demo_Multithreaded_Long_tasks.py - Design pattern meant for a single piece of work that takes a long time
- Demo_Multithreaded_Multiple_Threads.py - Uses a single function but runs it as multiple threads
- Demo_Multithreaded_Logging.py - A user supplied demo that integrated a multi-threaded logging project with PySimpleGUI
The Multiple Threads Demo is currently running on Trinket. May also add the Long Tasks one since it's the simplest of the 4.
PySimpleGUI
on 19 Nov 2019
MAC USERS - change_look_and_feel is enabled for you in PySimpleGUI (tkinter port)
One part of releasing the 100+ color themes was to open it up for Mac users. You guys can now use the colors. I'm not sure why I didn't think of this before.... all of the colors are changed except for buttons. I believe only the button colors are causing trouble on Macs (a very very old problem).
Please give it a try and see if things look good to you or not. If a Demo Program changes the look and feel and it's not a good one for you, then you can simply delete the call to change_look_and_feel.
Welcome to the world of color! I hope the experience doesn't suck.
PySimpleGUI
on 19 Nov 2019
MAC USERS - New Button Solution For tkinter Port!!
Mac users have had a really rough go of things with PySimpleGUI, the plain tkinter port. The big problem has always been button color. This has left Mac users with 2 options.
- Live with only white buttons with black text
- Switch to PySimpleGUIQt
The downsides are pretty evident. The two biggest in my opinion - You miss a lot of the new features as they are added to PySimpleGUI first and then cross-ported over to PySimpleGUIQt. And the second is that Qt is huge in size.
Yesterday I stumbled onto a solution! (I also asked for help with ttk styling to that maybe ttk Buttons can be used in the future).
That solution is to use a Text element. Your buttons will be a little square-ish, but they already are pretty close to that with tkinter (NO knock to you tkinter!). I created a McButton as a test. It would be great to get some Mac users' feedback on how this looks.
Here is the McButton in use on a Window's machine along with a normal button:

And here is the code:
import PySimpleGUI as sg

sg.change_look_and_feel('Dark Blue 3')

def McButton(text, button_color=sg.DEFAULT_BUTTON_COLOR, key=None, size=(None, None)):
    return sg.Text(text, size=size if size != (None,None) else (len(str(text))+1,1), relief=sg.RELIEF_RAISED, enable_events=True, key=key if key is not None else text, text_color=button_color[0], background_color=button_color[1], justification='center', border_width=1)

layout = [  [sg.Text('Test of Buttons')],
        [sg.Input(key='-IN-')],
        [sg.Button('Button?', size=(8,1), key='-NORMAL BUTTON-'), sg.Button('Exit', key='-EXIT-')],
        [McButton('Button?', key='-MAC BUTTON-'), McButton('Exit')]]

window = sg.Window('Button Test', layout)

while True:             # Event Loop
    event, values = window.read()
    print(event, values)
    if event in (None, 'Exit', '-EXIT-'):
        break
window.close()
If this works well for Mac users (PLEASE try, and try changing the look and feel too), then I will begin designing how to make the McButton the standard for Macs and function in a way that is as close to the normal button as possible. It'll be tricky but I think it's possible.
At the moment, this solution is limited in that a BrowseButton doesn't use them. It's an entirely user-code based solution at the moment.
However, if a user wanted to create their own browse button it's possible, but I need to make a change to the Browse buttons so that they can be created invisible. As it is now, you'll need to make these buttons invisible yourself.
One Browse workaround would be to
- create the Browse Button
- make the Browse Button invisible (after finalizing the window)
- add a McButton with 'Browse' as text to your layout
- inside the Event Loop, if you get a click on the Browse McButton, then call the real Browse Button's
clickmethod
Here is a program that demonstrates doing this
import PySimpleGUI as sg

sg.change_look_and_feel('Dark Blue 3')

def McButton(text, button_color=sg.DEFAULT_BUTTON_COLOR, key=None, size=(None, None)):
    return sg.Text(text, size=size if size != (None,None) else (len(str(text))+1,1), relief=sg.RELIEF_RAISED, enable_events=True, key=key if key is not None else text, text_color=button_color[0], background_color=button_color[1], justification='center', border_width=1)

layout = [  [sg.Text('Test of Buttons')],
        [sg.Input(key='-IN-'), sg.FileBrowse(key='-REAL BROWSE-'), McButton('Browse', key='-McBrowse-')],
        [sg.Button('Button?', size=(8,1), key='-NORMAL BUTTON-'), sg.Button('Exit', key='-EXIT-')],
        [McButton('Button?', key='-MAC BUTTON-'), McButton('Exit')]]

window = sg.Window('Button Test', layout, finalize=True)

window['-REAL BROWSE-'].update(visible=False)

while True:             # Event Loop
    event, values = window.read()
    print(event, values)
    if event in (None, 'Exit', '-EXIT-'):
        break
    if event == '-McBrowse-':
        window['-REAL BROWSE-'].click()

window.close()
Of course it's not an ideal way to do things, but it works. If you've been watching, one thing I'm focused on generally speaking is getting users enabled to do something. If there's a problem that I can't immediately fix then I try to find a workaround at least. Some are better than others.
This workaround isn't all THAT bad in the end. To get a Browse Button you'll need to add 1 extra element to your layout and add 3 lines of code. That's it. As workarounds go, this one is pretty good.
I'll post this as another Issue as I would like a conversation to happen about this with Mac users before any serious attempt be made to create a new type of Mac specific button as it could be a fair amount of work.
PySimpleGUI
on 21 Nov 2019
It doesn't build for me. Error triggered by line 13 in the code, with error of:
File "/usr/local/Cellar/python/3.7.3/Frameworks/Python.framework/Versions/3.7/lib/python3.7/tkinter/__init__.py", line 1476, in _configure
self.tk.call(_flatten((self._w, cmd)) + self._options(cnf))
_tkinter.TclError: unknown color name "2"
Running on a Mac 10.14.5 with Python 3.7.3 and PySimpleGUI v4.6 via PyCharm. As a quick test, I pasted in your Color Pallet script from your earlier post and that ran fine on my system.
emallay
on 21 Nov 2019
I've opened a new Issue for these tests....
https://github.com/PySimpleGUI/PySimpleGUI/issues/2226
I just posted an update there. I needed to hard code the buttons. Please try the code from the Issue. There are 2 tests.
Sorry about that!
PySimpleGUI
on 21 Nov 2019
New Send Email Demo Program
Created another "integration" type of demo. In this case it integrates PySimpleGUI with smtplib which is actually not a huge deal to do of course. The GUI portion is a basic form that you fill out and then click "send". No magic there at all.
The magic in this particular demo is the imports....
import PySimpleGUI as sg
# import PySimpleGUIWeb as sg
# import PySimpleGUIWx as sg
# import PySimpleGUIQt as sg
Take your pick of ports. They all work. It's the kind of thing that's supposed to happen with PySimpleGUI where 1 program can be run on any of the PySimpleGUI ports. For this one it worked out really well with the exception of the popup_quick_message call. Autoclosing popups aren't functional yet in the web port, but they are in the other ports.
The way I got around this limitation was to not make the popup call if the port being used is the web port:
if sg.__name__ != 'PySimpleGUIWeb':     # auto close popups not yet supported in PySimpleGUIWeb
    sg.popup_quick_message('Sending your message... this will take a moment...', background_color='red')
There's a new variable added to each off the ports that can be used in the future to tell which port is being used. This will remove the need to rely on the filename to match the port's name. The variable is call.... port. So instead of using sg.__name__ in the future you'll be able to use sg.port (after I get the change released to PyPI.
Here is how the 4 ports looked when running this code:


It's awesome that the Themes worked! The "Dark Blue 3" worked right out of the box.
When a Demo is created, it's usually tested against at least PySimpleGUIQt.
PySimpleGUI
on 21 Nov 2019
Weekend goal == ttk.Button == Mac Buttons for real
I've decided to take yet another shot at ttk styling.
So far today I've had a couple of breakthroughs on the existing ttk widgets (Tab group, combo, progress bar and also tables (table background colors are working again!)).
It's got me hopeful that I can get the real ttk buttons working which means.... Buttons for Macs!!!!!
I mean real buttons for Macs too... and it also means better looking buttons for Linux and PCs perhaps too.
It's going to take a ton of work but worth it in my opinion.
One key to all this mess seems to be NOT mixing "Themes". It I try to style one widget using the "default" theme and another using the "clam" theme, then one of them loses all styling. This was an ongoing problem and in fact a number of things have been broken due to this.
It means, however, potentially have to choose a single theme for the entire window and sticking to it even though some elements expose the theme to you.
It may be safer to make a theme setting for the Window object and use that instead of the individual element themes. This will save you from having to set the theme for each element. Hmmm... a good idea regardless perhaps.
Anyway, goal for the weekend is ttk buttons! Stretch goal is to not lose button images in the process.
PySimpleGUI
on 23 Nov 2019
TTK BUTTONS! (And the other ttk widgets work properly now too)
I finally had the breakthrough I've been waiting almost 2 years for... oy... There has been SO much time wasted, err spent, on this ttk stuff, but it's worth it since there was really no other way to implement some of these Widgets (combo boxes, tabs, tab groups, tables, trees, ....)
Now things like the background color of tables work properly as do the "selected tab color".
There were 2 new parameters added to the Window call.
One is to override the use of normal buttons and to instead force that ttk buttons be used. At the moment, ttk buttons are only used on the Mac by default.
The other is a "theme" setting. Instead of setting themes on individual elements, you set them on a window-wide basis. The choices are till the same:
THEME_DEFAULT = 'default'
THEME_WINNATIVE = 'winnative'
THEME_CLAM = 'clam'
THEME_ALT = 'alt'
THEME_CLASSIC = 'classic'
THEME_VISTA = 'vista'
THEME_XPNATIVE = 'xpnative'
There still needs to be a bunch more work to be done in order to get the size parameter to make sense and to attempt button images. I might also add a parameter to the Button element itself so that individual buttons can be made to be ttk buttons instead of the entire window having to be ttk buttons or not.
Popups need to use the right settings too. It works for the default, but there needs to be a system-wide setting of whether or not to use ttk buttons too so that popups choose the right one.
For now I'm thrilled I've got SOMETHING for Mac people to try that may fix the button problems once and for all!! THAT would be quite a Christmas present!
PySimpleGUI
on 24 Nov 2019
Demo Program -Demo_Cursor_Changed_To_Hand.py (Extending PySimpleGUI-tkinter)
New demo program!
Not long ago I saw someone extend the tkinter PySimpleGUI by changing the cursor that is shown when the mouse is placed over one of the Elements. It's a handy thing to be able to change the cursor (mouse pointer) into a hand when the mouse is over a clickable link.
As usual when extending PySimpleGUI it involves accessing the tkinter Widget directly. In this case you call the config method for the tkinter widget and pass in a string for the parameter cursor.
Rather than post the entire program, here is the line of code to add to change an element's cursor / mouse pointer.
# This is a line from the layout
[sg.Text('www.PySimpleGUI.org', font=('default 12 underline'), text_color='blue', enable_events=True, key='-LINK-')],

# This line changes the cursor for that Text Element
window['-LINK-'].Widget.config(cursor='hand2')
The result is that when the mouse pointer is moved over the Text it is changed into a hand.

There are a shocking number of cursor's available.

I found that the 'watch' cursor animates on Windows as the "spinning donut of death".
PySimpleGUI
on 24 Nov 2019
Tip - Use popup_quick_message before long operations
It's no fun to have a GUI that takes a long time to start before you're able to show the main window. For programs that take a long time to startup, I never quite know if the program was started or not. Some of these tkinter based applications with a lot of button or input fields can take several seconds to build and show the window. In the meantime, the user sits wondering if they need to double click again.
Rather than sit wondering, instead display a message using a popup. You don't want to use a normal blocking popup window. What you need is something that will not block and will also auto-close once the main window finishes loading. The popup call that will do this exact thing for you is the popup_quick_message.
This popup displays a message without a titlebar and will automatically close after a certain amount of time. Regardless of how much time is being requested for the autoclose, the autoclose will not happen until the long operation completes. The reason for this is that tkinter is not threaded and so until you make another tkinter call, the autoclose won't be able to run.
The result is that the message stays on the screen for as long as your operation takes.
This line of code:
sg.popup_quick_message('Building your table... one moment please...', background_color='red', text_color='white', font='Any 14')
creates this window which will close when your real window is created:

So, the next time your program is taking a long time to start, throw a line of code like this onto the start of your program. It makes for a better user experience, even if that user is you.
PySimpleGUI
on 25 Nov 2019
Release Candidate 4.6.0.66 - ttk buttons and themes/styles - Almost ready for PyPI
I'm ready to post to PyPI but want a Mac person to try this new release first. There's no posting to PyPI if it doesn't work on the Mac.
Windows and Linux users are going to want to get this release too as all of the ttk Element have their colors and styles working correctly now, perhaps for the first time. The secret is to not attempt to mix themes across elements/widgets or even across windows. Pick a theme and stick with it.
This release feels like a significant one in many ways and really hope that it brings Mac folks back into the tkinter tent rather than being forced out and over to PySimpleGUIQt as the only other option.
It also gives windows users a lot more styling options for Tables, Trees, Comboboxes, Progressbar, and Buttons. There are other ttk widgets that are worth look over now that I know how to configure them.
I'm working on release notes now. Hoping to hear from a Mac user tonight as a quick verification so that I can post to PyPI.
PySimpleGUI
on 26 Nov 2019

4.7.0 PySimpleGUI 26-Nov-2019
TTK WIDGETS! Welcome back Mac Users!
- Significant progress on using ttk widgets properly
- Added ttk buttons - MACS can use colored buttons again!! (Big damned deal)
- The existing ttk based Elements are now correctly being colored and styled
- Ability to set the ttk theme for individual windows or system-wide, but no longer on a single Element basis
- Ability to use ttk buttons on a selective basis for non-Mac systems
- port variable == 'PySimpleGUI' so that your code can determine which PySimpleGUI is running
- InputText new parameter - use_readonly_for_dsiable defaults to True enables user to switch between a true disable and readonly setting when disabling
- Rework of progress bar's ttk style name
- Button - new parameter use_ttk_buttons - True = force use, False = force not used, None = let PySimpleGUI determine use
- Macs are forced to use ttk buttons EXCEPT when an image is added to the button
- TabGroup - can no longer set ttk theme directly
- Window new parameters
- ttk_theme - sets the theme for the entire window
- use_ttk_buttons - sets ttk button use policy for the entire window
- More Window layout error checking - checks that rows are iterables (a list). If not, an error popup is shown to help user find error
- Fixed progessbars not getting a key auto assigned to theme
- New Window method - send_to_back (SendToBack) - sends the window to the bottom of stack of all windows
- Fixed normal tk button text - was left justifying instead of centering
- Fixed table colors - wasn't setting correctly due to bad ttk styling
- Fixed tree ccolors - wasn't setting correctly due to bad ttk styling
- TabGroups now function correction with colors including currently selected tab color and background color of non-tab area (next to the tabs)
- New set_options parameters
- use_ttk_buttons - sets system-wide policy for using ttk buttons. Needed for things like popups to work with ttk buttons
- ttk_theme - sets system-wide tth theme
- progress_meter_style parameter no longer used and generates a warning
- list_of_look_and_feel_values now sorts the list prior to returning
- Removed Mac restriction on Button colors from look and feel calls. Now can set button colors to anything!
- popup_scrolled new parameters - all popups need more parameters but these are for sure needed for the scrolled popup
- background_color
- text_color
- no_titlebar
- grab_anywhere
- keep_on_top
- font
- Test harness changes to help test new ttk stuff (want to shrink this window in the future so will fit on Trinket, Pi, etc
Why the big fuss about Mac users?
Button colors now work on the Mac when running the tkinter port of PySimpleGUI (plain PySimpleGUI).
At the moment Mac users either pass on the package or use PySimpleGUIQt.
Now Mac users can enjoy all of the more advanced / early features of PySimpleGUI that they miss if only running PySimpleGUIQt.
Upgrade!
Be sure and delete any PySimpleGUI.py files you have laying around that you downloaded from GitHub. The bug fixes have been rolled into this PyPI release so you should no longer need the version you download.
There are plenty of other reasons to upgrade including that ALL ttk widgets should operate properly now - Table, Tree, Combo, Button, ProgressBar,Tab/TabGroup. That's a LOT of elements that were affected. The colors should work where they were broken before. The THEMES will also now properly work, BUT, you should be aware of the new way themes work.
ttk Theme have not been properly documented
Previously ttk themes were selectable on a per Element basis... at least that's what was being attempted, with the result being utter failure. They no longer are.
Themes are set at the Window and System Levels. Note that mixing themes in a multi-window application is dicey.
To set a window's theme, use the ttk_theme parameter when you create your Window. You can also change the theme system-wide so that all windows created will be the same theme. This is done via set_options
sg.set_options(ttk_theme='default')
ttk Buttons
The Mac will use ttk buttons by default. If the button has an image, then it'll use the older buttons. On Window/Linux, you can use ttk buttons, but again, normal buttons will be used when buttons with images are shown.
The parameter use_ttk_buttons is a tri-state boolean:
None - use default algorithm. on Windows non-ttk buttons are used. On Mac ttk buttons are used
True - use ttk buttons for all normal buttons
'False' - do not use ttk buttons for any buttons (Including on the Mac)
You can specify use of ttk buttons at the individual button level, for an entire window, or for all windows. For example, to switch over to 100% ttk buttons you call set_options
sg.set_options(use_ttk_buttons=True)
More docs soon
The readme has been updated but more updates are needed this week for sure!
The priority was to get the calls documented and get the code shipped ASAP! Wanted to get these Buttons out to Macs users ASAP.
PySimpleGUI
on 27 Nov 2019
Unicode Character Demo
Added a new demo (Demo_Unicode_Characters.py) that spotlights the use of Unicode characters in PySimpleGUI programs.
These made great arrows for buttons for example.
You can use the demo to dump out ranges of the characters, copy and paste individual characters for use in your code, etc.

You can directly paste these characters straight into your code. Want an right arrow button? No problem:
sg.Button('►')
Which results in:

There are a couple of other tricks in this demo such as:
- changing the font size of a multiline output element on the fly using a spinner.
- using an animated popup for long-running operations
- calling refresh while updating a multiline so that the GUI doesn't appear to freeze and the user sees the updates immediately
Enjoy!
PySimpleGUI
on 28 Nov 2019
Thankful for awesome users!
Hope everyone has a great holiday
Wanted to take a moment and thank everyone for creating a great community here on GitHub. It's been a good year and so many of you are patient and show your appreciation even when reporting problems that are holding up your progress. It's honestly appreciated and makes it easy to work on this package.
Hoping to get quite a bit done with the time left in 2019.
This month marks my second year using Python and it's been a ton of fun. I learn from every PySimpleGUI program I read.
PySimpleGUI
on 28 Nov 2019
Any other PySimpleGUI users that work with pen and paper? Digging back through the old notes to get the feature matrices for the ports. There's been a significant detour over the summer to deal with the project infrastructure (documentation, the Trinket online Cookbook, etc).
Here are a few of the notebooks that were used to create PySimpleGUI. For me it's gotta work on paper before it works on the computer.

To get back on track with the ports I need the feature matrices put onto a Kanban board so they can be prioritized and worked along with the Issues and Enhancement requests.
"If you don't know where you're going, any road will get you there"
PySimpleGUI
on 30 Nov 2019
New Custom Color Chooser Demo Program
This demo you can use to make your own color picker instead of the builtin one.
The demo is called Demo_Color_Chooser_Custom.py. It consists of a function and a test harness.
With VERY minimal changes I was able to get the code to run on all four ports of PySimpleGUI!
Here's the test harness which is essentially the user code that would use the chooser button.
if __name__ == '__main__':
    sg.change_look_and_feel('Light Brown 4')
    layout = [[sg.In(key='-CHOICE-'), sg.B('Color Picker')],
              [sg.Ok(), sg.Cancel()]]
    window = sg.Window('My application', layout)
    while True:
        event, values = window.read()
        if event in (None, 'Cancel'):
            break
        if event.startswith('Color'):
            window.hide()
            color_chosen = color_chooser()
            window['-CHOICE-'].update(color_chosen)
            window.un_hide()
When you run the code, this is your user's window:

When you click on the Color Picker button:

After choosing a color:

Here are the different ports of PySimpleGUI and the window that was built


PySimpleGUI
on 30 Nov 2019
Warning # 1 - PySimpleGUI27 will be _deleted_ on Dec 31, 2019
December is upon us and that means the countdown until the end of life for Python 2.7.
As stated a number of times, PySimpleGUI27 will be removed from this GitHub on Dec 31 of this year. If you want a copy of the 2.7 code, now is the time to make the copy because it's going to disappear.
I'll send out a number of warnings between now and the 31st.
PySimpleGUI
on 30 Nov 2019
New and Improved "Theme Maker" Posted
One thing I want to encourage all users to do is USE COLOR for your windows! _Please_ no more gray windows. If I thought there wouldn't be a revolt I would make the default window be one of the look and feel themes, but I don't want to go that far. It's already a stretch using the blue buttons as the default.
To make it easier for people to create their own themes using the 1700+ color palettes downloaded from colorhunt https://colorhunt.co/palettes I've reworked the Theme Maker program that I used to create the latest batch.
This new version is much more user friendly as it has an initial popup window that lets you select how many candidate themes to see per window (not everyone has enormous monitors evidently) as well as enable you to jump into the middle of the palette table.

Those settings will create a single row of "candidate themes" based on a single palette entry, starting at palette #500. The resulting window was this:

(I kinda like the far right one! But will refrain from adding more at this point)
I started hunting at the beginning of the palette table when creating the last batch of themes. I didn't make if very far into the 1,700. Even starting at 500 should give you a fresh batch of themes to choose from.
So, next time you're really stumped for a good color theme, you can always download the theme maker and see if something it creates catches your eye.
If you do come up with another awesome theme then post it as an enhancement and I'll consider adding it to the standard list available to all users.
New variable - CURRENT_LOOK_AND_FEEL
The current look and feel is now saved so that you can change the look and feel and then set it back again. This was used in the recent custom color chooser demo. It's written as a popup what allows you to pass in a look and feel to use. It will use the supplied look and feel and then will set it back to the one that was previously in use.
PySimpleGUI
on 1 Dec 2019
TTK Buttons With Images
Checked in changes today that enable you to:
- specify buttons for ttk Buttons when you create them
- perform updates to ttk Buttons to change the images
I believe this will put ttk Buttons at the same level as normal buttons.
I'm waiting for confirmation from Mac users that the images work before I release to PyPI. Once I get some feedback, I'll release it beyond GitHub.
background = sg.LOOK_AND_FEEL_TABLE['LightBrown1']['BACKGROUND']

layout = [  [sg.Text('My Window')],
            [sg.Button('test', image_data=sg.DEFAULT_BASE64_ICON, border_width=0, use_ttk_buttons=True, button_color=('black',background)),
             sg.Button('Exit')]  ]

PySimpleGUI
on 1 Dec 2019
Multiline Element - Can Output Multicolored Text
Damned happy to say that this monkey is finally off my back!
The Multiline element can now be updated with text that has a text and background color of your choosing.
It was released to GitHub for both PySimpleGUI and PySimpleGUIQt. I expect to release a new release today to PyPI for PySimpleGUI so this change will likely make it into that release.
Here's a demo program that was also created and posted in the demo section to give you a jump start.
import PySimpleGUI as sg
# import PySimpleGUIQt as sg

"""
    Demonstration of how to work with multiple colors when outputting text to a multiline element
"""

sg.change_look_and_feel('Dark Blue 3')

MLINE_KEY = '-MLINE-'+sg.WRITE_ONLY_KEY
layout = [  [sg.Text('Demonstration of Multiline Element\'s ability to show multiple colors ')],
            [sg.Multiline(size=(60,20), key=MLINE_KEY)],
            [sg.B('Plain'), sg.Button('Text Blue Line'), sg.Button('Text Green Line'),sg.Button('Background Blue Line'),sg.Button('Background Green Line'), sg.B('White on Green')
             ]  ]

window = sg.Window('Demonstration of Multicolored Multline Text', layout)

while True:
    event, values = window.read()       # type: (str, dict)
    print(event, values)
    if event in (None, 'Exit'):
        break
    if 'Text Blue' in event:
        window[MLINE_KEY].update('This is blue text', text_color_for_value='blue', append=True)
    if 'Text Green' in event:
        window[MLINE_KEY].update('This is green text', text_color_for_value='green', append=True)
    if 'Background Blue' in event:
        window[MLINE_KEY].update('This is Blue Background', background_color_for_value='blue', append=True)
    if 'Background Green' in event:
        window[MLINE_KEY].update('This is Green Backgroundt', background_color_for_value='green', append=True)
    if 'White on Green' in event:
        window[MLINE_KEY].update('This is white text on a green background',  text_color_for_value='white', background_color_for_value='green', append=True)
    if event == 'Plain':
        window[MLINE_KEY].update('This is plain text with no extra coloring', append=True)
window.close()

PySimpleGUI
on 1 Dec 2019
Debug Print Goes Multi-Colored
Riding on the new capability of being able control the color of characters output in a Multiline element, I've added the ability to control the output when you call Print or EasyPrint.
These are the calls that produce a debug window. You call Print just like you would a normal print, but instead of outputting to your console, the characters are output to the "Debug Print Window".
The idea of a Debug Window came about so that instead of seeing your print statements being output on a console (that may be not visible or particularly ugly), they would be output to a window that you have a lot of control over. For example, it will match your application's look and feel settings.
There are a number or parameters to the Print calls and tonight 2 more were added - text_color and background_color.
Here's a Debug Print Window that's produced when you run PySimpleGUI without importing it, or you run PySimpleGUI.main().

What is being printed is the variable event and values. To make it easier to see the event it is blue on a white background. This is achieved with 2 print statements because one has color and the other uses the default colors of the look and feel settings. Like normal print statements, this is done by setting the parameter end='' in the call to Print.
Here are those 2 prints.
Print(event, text_color='green', background_color='white',  end='')
Print(values)
Note that the colors will only be used when the Debug Window is created without setting the parameter to use re-routed stdout. The default is to not use re-routed stdout. In other words, the default is that colors will work.
PySimpleGUI
on 3 Dec 2019
Python in the Classroom
PySimpleGUI has always had Education as one of the major motivators and reasons for the project. Enabling kids to write GUIs sooner is the goal.
There was a Discord server set up recently for people interested in using Python for education named "Python in Education". If you want to join the fun, the server is here https://discord.gg/gKnKqZf
One of the ways I've been exploring how to go about getting further into the classroom was to order some books written about teaching Python to kids.
One of those books, Coding Project in Python, arrived today. I didn't know what to expect in the way GUIs. Wasn't sure if this book even covered them. I totally cracked up when I saw the cover.

It all looks normal, typical programming kind of words and symbols. Quick and easy to understand that it's got the basics covered. And then there's the statement in the upper left corner. It would appear that indeed GUIs are being taught. Of all things to choose to put on the cover, I'm not sure this would be the one I would have chosen to reach out and grab a kids attention. This should be interesting 😏
PySimpleGUI
on 3 Dec 2019
More from "Coding Projects in Python"
One of the fun games presented is a memory matching game using buttons. Because of the way button callbacks are specified, Lambda expressions needed to be explained. How kids are expected to learn Lambda beats me.

PySimpleGUI
on 4 Dec 2019
New ANSI Color output Demo Program
A new demo released
It will output the results of the script in color if ANSI color codes are returned.
There is a potential problem however. It seems like the popen call strips out these codes. The parser code does work as strings with ANSI codes have been run through it and the multiline updates correctly with the right colors.
If you have trouble and are able to figure out a different call to make to run the script so that the ANSI codes are properly returned, please say something so the demo can be updated!
PySimpleGUI
on 4 Dec 2019
4.8.0 PySimpleGUI 4-Dec-2019
Multicolored multiline text! Often asked for feature going way back
ttk Buttons can have images
Print in color!
- Multiline Element got 2 new parameters to the update method
- text_color_for_value - color for the newly added text
- background_color_for_value - background color of the newly added text
- New Print/EasyPrint parameters and capability
- text_color, background_color - control the text's color and background color when printing to "Debug Window"
- Must be done only when used in mode where stdout is not re-routed (the default)
- Wouldn't it be really nice if normal print calls had this parameter?
- Print(event, text_color='green', background_color='white', end='')
- ttk Buttons
- can have images. No longer forces Buttons with images to be the old tk Butons. Now you can choose either
- can update the button color
- can update the button image
- Set warning filter so that warnings are repeated
- New global variables:
- CURRENT_LOOK_AND_FEEL - The current look and feel setting in use. Starts out as "Default"
- BROWSE_FILES_DELIMITER - Defaults to ";" It is the string placed between entries returned from a FilesBrowse button
- TRANSPARENT_BUTTON - Depricated - was being used incorrectly as it was a relic from the early days. It's value was a color of gray
- Window - gentle reminder if you don't choose a look and feel for your window. It's easy to stop them. Add a change_look_and_feel line
- Test harness uses a debug window so don't be shocked when 2 windows appear when running PySimpleGUI by itself
- Prints the "Event" in Green on White text
- Prints the "values" normally
PySimpleGUI
on 5 Dec 2019
An impressive user application!
@JitsuP created a multi-window, multi-threaded application using PySimpleGUI. The GUI portion took 3 days in total. You can find all of the screens in the "User Screenshots" issue.
Here's a GIF of the main window where you can see both text output as well as a progress meter running that are fed by a thread. Coming from a complete newcomer to Python, this is an amazing creation!

PySimpleGUI
on 6 Dec 2019
Tab colors and visibility!
Cracking the ttk nut has resulted in the gift that keeps on giving. This time the winner is tabs.
While coloring of individual tabs isn't a possibility in PySimpleGUI at this point, tabs in a general way are! This is a huge improvement. The selected background color also works correctly.
Previously the only color that you could change was the tab text color and the color of the text for selected tabs.
These new changes add:
- Tab background color
- Selected tab background color
- Tab visibility
- Enable/Disable tabs (not sure if this was working correctly before)
Windows went from this

To this:

and this when making the tab visible

One thing I've noticed is that you cannot make the first tab start out as invisible. If you want that then you'll need to finalize the window first and then perform an update to make it invisible.
It's possible to make all of the tabs invisible.

Because TabGroup does not have an update method yet it's not possible to make the entire TabGroup invisible. I was surprised to see it missing. I guess no one else has noticed either.
These capabilities need to be cross-ported to PySimpleGUIQt as some parameters are new and it appears that because the main PySimpleGUI port didn't support the colors neither did the PySimpleGUIQt port.
I will be making one additional change which is to set the default tab background color to match the look and feel theme. Perhaps making them the same color as the buttons is a good default. I dunno yet but not-gray is a good guess as to what they will be, unless you're using the "default" look and feel. More thought needed....
For now, just really happy to be able to deliver this capability.
You can expect a rapid release to PyPI!
Here is the demo code that was posted to the Demo Programs and was used to make the screenshots above
#!/usr/bin/env python
import PySimpleGUI as sg

# Simple example of TabGroup element

sg.change_look_and_feel('Dark Brown 1')

tab1_layout = [[sg.Text('Tab 1')],
               [sg.Text('Put your layout in here')],
               [sg.Text('Input something'), sg.Input(size=(12,1), key='-IN0-')]]

tab2_layout = [[sg.Text('Tab 2')]]
tab3_layout = [[sg.Text('Tab 3')]]


tab_group_layout = [[sg.Tab('Tab 1', tab1_layout, key='-TAB1-'),
                     sg.Tab('Tab 2', tab2_layout, visible=False, key='-TAB2-'),
                     sg.Tab('Tab 3', tab3_layout, key='-TAB3-')]]

layout = [[sg.TabGroup(tab_group_layout,
                       selected_title_color='blue',
                       selected_background_color='red',
                       tab_background_color='green',
                       enable_events=True,
                       key='-TABGROUP-')],
          [sg.Text('Make tab number'), sg.Input(key='-IN-', size=(3,1)), sg.Button('Invisible'), sg.Button('Visible')]]

window = sg.Window('My window with tabs', layout)

tab_keys = ('-TAB1-','-TAB2-','-TAB3-')
while True:
    event, values = window.read()               # type: str, dict
    print(event, values)
    if event is None:
        break
    if event == 'Invisible':
        window[tab_keys[int(values['-IN-'])-1]].update(visible=False)
    if event == 'Visible':
        window[tab_keys[int(values['-IN-'])-1]].update(visible=True)
window.close()
New YouTube Video! It teaches PySimpleGUI rather than showing a project
Check out this new video by one of our long-time users.
https://www.youtube.com/watch?v=cLcfLm_GgiM
There have been a number of videos produced lately, but they's all been project focused, not focused solely on PySimpleGUI and how to use it.
It's an interesting blend and different than the series of videos made early on that go through each Element one by one.
It's really well produced!
PySimpleGUI
on 7 Dec 2019
More Tab Color Changes
Now that PySimpleGUI has the ability to set tab color and the text color, it's time to put it to use.
In the upcoming 4.9 release (already on GitHub as 4.8.0.6, the tab colors will be automatically set for you based on the current look and feel.
If you don't have any look and feel defined, you'll get the same gray window as always....

In release 4.8 if you set a look and feel, the tabs looked like this:

The text color was being set correctly, but it was the same for both selected and non-selected tabs.
In release 4.9, the same code look like this:

As far as "defaults" go, I think that's a pretty attractive window! Stuff matches really well.
4.9 is being shoved out the door ASAP today. Working on changes to the documentation still, but it should be finished soon.
PySimpleGUI
on 7 Dec 2019
4.9.0 PySimpleGUI 7-Dec-2019
The "Finally Nailed Tabs" release
- Colors for Tabs!
- When creating TabGroup can now specify
- Text & Background color of all tabs
- Text & Background color of selected tab
- If nothing is specified then the Look and Feel theme will be used (which turned out GREAT)
- Tab visibility - Can finally control individual tab's visibility using update and when creating
- More "Look and Feel" Themes! There's no excuse to be grey again. There are now 126 themes to choose from
DefaultNoMoreNagging
DarkBlack1
DarkBlue12
DarkBlue13
DarkBlue14
DarkBlue15
DarkBlue16
DarkBlue17
DarkBrown5
DarkBrown6
DarkGreen2
DarkGreen3
DarkGreen4
DarkGreen5
DarkGreen6
DarkGrey4
DarkGrey5
DarkGrey6
DarkGrey7
DarkPurple6
DarkRed2
DarkTeal10
DarkTeal11
DarkTeal12
DarkTeal9
LightBlue6
LightBlue7
LightBrown12
LightBrown13
LightGray1
LightGreen10
LightGreen9
LightGrey6 - preview_all_look_and_feel_themes now has a columns parameter to control number of entries per rows
- also made each theme display smaller due to large number of themes
Here are the new themes

The complete set that's in 4.9

PySimpleGUI
on 8 Dec 2019
PyDroid3 Revisited
Until I saw a post on Reddit about PyDroid3 the other day I had completely forgotten about PySimpleGUI's ability to run there. So, I gave it another try to see what's changed.
Either I didn't know it, or (more likely) forgot about it, but OpenCV runs on PyDroid3 too. This meant that the Demo Programs that use OpenCV should also run. And, run they did!


I made a new folder under the Demo Programs to put the demos that have been modified for PyDroid3. Generally speaking you need to make 2 changes.
- add
import tkinterto the top of the demo to tell PyDroid3 your app has a GUI - add
location=(0,0)to yourWindowcreation so the window is visible. The auto-centering doesn't seem to do the right thing.
For the OpenCV Demos, if you want the forward facing camera, change the camera to 1 instead of 0.
It helps to enlarge your controls too. Sizes meant for a mouse don't work so well with fingers. They work, but are a little too small for my fingers. Changing the font or the size of elements the layout took care of that.
Was able to simply Pip install PySimpleGUI and it picked up the 4.9 release. Awesome stuff if you want to run your code on your phone!
PySimpleGUI
on 8 Dec 2019
PyDroid3 + OpenCV + PySimpleGUI = FUN!
Posted more information, a GIF, images, instructions for installation, in this Reddit post
https://www.reddit.com/r/Python/comments/e80m8z/run_opencv_pysimplegui_programs_on_your_phone/
The PyDroid3 folks are to be commended for this rather significant achievement of getting OpenCV running. It's easy to then lay PySimpleGUI on top of that work and end up with a very nice little Android application that uses your phone's cameras.
PySimpleGUI
on 8 Dec 2019
4.10.0 PySimpleGUI 9-Dec-2019
"Oh crap the debugger is broken!" + "Pretty Progress Bars" release
- Fix for built-in debugger not working
- Important due to upcoming educational usage
- Has been broken since 4.5.0 when a change to Finalize was made
- ProgessBar element colors set using Look and Feel colors
- Combination of button color, input element, and input element text are used
I'm taking a chance here and made a sizable change to the Progress Bar color scheme. The always-green color wasn't making sense when all other elements, now including tabs, were being colored based on the Look and Feel Theme. So, now you'll find Progress Bars match the rest of your window.
The formula is that it uses the button's background with the input area's color.... unless the the background color for the window matches the button background in which case it'll use the input element's text color. After looking at 40+ random themes, they all looked great to me so I'm letting it go. If you don't like the colors, you can always set it back to the original color which can be found in the variable:
DEFAULT_PROGRESS_BAR_COLOR_OFFICIAL
The release was uploaded to PyPI and GitHub and the documentation was updated as well. There was additional documentation added for the TTK themes, ttk buttons, running on Android, ...
PySimpleGUI
on 9 Dec 2019
A 24/7 Operation
It's one thing to work on a project constantly, it's another to see other people using it constantly.
I find it amazing to see SO much activity when I check out the different places PySimpleGUI information is posted. Any time of day that I check, someone's recently been doing something with it.
On Trinket it seems like there's always someone discovering PySimpleGUI and going through all of the applications and trying them. Every time I check, someone's run something within the past hour.

I've never done videos on YouTube before, so that's a new experience too. When I checked out the stats there, I was shocked to see so many people watching what I think of as "old, crappy" videos because they were made so long ago and I didn't / don't know how to make a decent video. Regardless, people are watching the damned things and I guess learning as I don't get a ton of simple questions posted here.


It's really rewarding to see that lots of people are now able to create and run GUIs in Python. While there are still a good number of people that dislike PySimpleGUI and can't seem to get on board with it being an alternative architecture, there are even more that do see the value and want to use it. The question of whether or not there's a "there there" is being answered by all these fine users.
PySimpleGUI
on 10 Dec 2019
We Thank you for your Handwork Mike.
I never thought it would of been this simple to make something that we see every day in our life and wondered How the hell they did it. And now we all can do it.
Other than finding bugs and sharing our problems , let us know if we could help any other.
I will make video or gif once I am done my project.
 JitsuP
on 10 Dec 2019
JitsuP
on 10 Dec 2019
4.11.0 PySimpleGUI 10-Dec-2019
The Element & Window bindings release
- Element.bind - New method of all Elements
- Enables tkinter bindings to be added to any element
- Will get an event returned from window.read() if the tkinter event happens
- Window.bind - New method for Windows, just like Elements
- Enables tkinter bindings to be added to Windows
- Will get an event returned from window.read() if the tkinter event happens
- TabGroup fonts - can now set the font and font size for Tab text
Well, sorry about the daily PyPI releases. It's almost the old days where new features ship daily/weekly. There have been some cool things recently is all and they're needed immediately by some applications.
One such application is this Minesweeper game that I stole and quickly reworked to use this new bind. They were getting direct tkinter callbacks.
Here's the original article in Japanese
https://learnku.com/articles/37714
And here is the adapted for release 4.11.0 code running on Trinket
https://pysimplegui.trinket.io/sites/minesweeper
Trinket has tiny number of pixels so it looks huge.
I'll post a Demo Programs version that looks a lot better. Here's what it looks like running on Windows:

There are a number of you that are asking for features that this will help. A recent one was wanting a popup keyboard to show up when an input field receives focus. You could poll for it, but by binding the event you don't need to poll (no timeout on window.read())
Enjoy!
PySimpleGUI
on 10 Dec 2019
"Towards Data Science" article on Medium
Stumbled onto this article that's posted on Medium. I'm not a Medium subscriber (yet) and am not sure how it all works in terms of segmenting into specific fields.
https://towardsdatascience.com/learn-how-to-quickly-create-uis-in-python-a97ae1394d5
What I found mind-blowing is that this is not the first article written by Costas Andreou, the author, but it's his most popular by a long ways.
This article was posted on Dec 6, five days ago. His second most popular Data Science article was posted on July. He's posted 7 articles in the Data Science section and I am measuring "popular" by looking at the "claps" statistic that is posted by Medium with the article.
89 claps for his July 2019 article.
1,505 claps for the PySimpleGUI article
It's nice when someone discovers the purpose and the reason behind PySimpleGUI.
He summarized the reason PySimpleGUI was written in these 3 statements:
There are essentially 3 big Python UI libraries; Tkinter, wxPython and PyQT. While reviewing all three, I realized that everything that I liked about Python was nowhere to be found in using these libraries. _Python libraries, in general, make a very good job of abstracting away the super technical._ If I needed to work with Object Oriented Programming, I might as well have loaded up Java or .Net.
To the point....
everything that I liked about Python was nowhere to be found
I've been searching for the words to describe this difference between almost all other areas that Python covers and GUIs. It's the "get things done in 2 or 3 lines and be done" experience. Want threads, socket communication, queues, semaphores as a first month beginner? It's no problem with Python and in fact _simple_.
The responses written to the article are statistically similar to responses to posts about PySimpleGUI on Reddit....
1 thanking the author for introducing him to an easy way to write GUIs
4 responses recommending other packages or websites.
Loved the "You need to look at Kivy" response as that's all it said.
When it comes to GUIs, people seem to head to the corner belonging to what they know and only what they know. If someone doesn't know any GUI package, then PySimpleGUI has a higher chance of being considered.
I'm glad the author took a look at the other packages first and mentioned this
PySimpleGUI
on 11 Dec 2019
Mac Users - It's Child's Play to Move top Python.org Releases
A new Python for Kids book arrived this week.

I have already been surprised by a few things in the book...
One is that it's SO NEW! The install instructions show downloading version 3.7.
The other surprising thing was the instructions shown for the Mac

I saw no mention of "Homebrew" anywhere.
My takeaway is that if it's good enough for kids then it's likely good enough for you too.
I have heard only good stories so far from the users here that have installed non-Homebrew versions. No nightmares, no disasters so far to report.
I wish I had heard about this capability prior to the rush to get the ttk buttons done. Then again, there wouldn't be all the great coloring of tabs and stuff now if I didn't do the ttk buttons, so maybe it's just as well.
PySimpleGUI
on 13 Dec 2019
Google Trends... the little GUI that could....
Qt's PySide2 and PySimpleGUI launched in the same month, July 2018.
Qt of course has instant name recognition and plenty of searches for PySide2 were happening in July 2018.
Over time PySimpleGUI has been getting more and more Google search hits. It's to the point now that they're tied.

PySimpleGUI
on 13 Dec 2019
A PySimpleGUI IDE
I've been working with teachers a lot lately. One thing that's come up is their use of Adafruit's "Circuit Playground Express" boards.
These are little embedded systems boards that run Circuit Python.

You connect via a serial port to do I/O. It looks like a flash drive to windows.
As a result, I was able to take the Text Editor application that was written by Israel Dryer and adapt it to become an IDE. It's crazy that it's already working after maybe 30 minutes of working on it.

As you can see, there's a sliding pane at the bottom that is showing the serial communications. The code that is running on the board is shown in the editor. I can modify that code, save it and the board will auto-reboot and start running the code. It makes for instant turnaround of code changes.
Next up is an "auto-plotter" feature. The Mu Editor has one of these. The concept is that in your embedded program you print out tuples of data (1,2 3) and it will plot these on a line graph over time. For each item in the tuple is another line. I can output to Matplotlib plots for example or use the PySimpleGUI drawing primitives to do it. LOTS of options available.
The nice thing about this is that it's _150 lines of PySimpleGUI code._ That's it. So anyone that wants a new feature in the IDE can simply make a change to the source code and run it. No need to make a change to the Mu editor which I'm sure is a big deal to do.
PySimpleGUI
on 13 Dec 2019
Reddit needs this added to their website's design
The site learnku.com where I located the amazing Minesweeper code, has a box at the bottom of the page to enter comments. I realize that the translation may be choosing words that aren't exactly correct, but I like the ones they chose.
Reddit could learn a thing or two....

PySimpleGUI
on 13 Dec 2019
Disabled Button Colors
The 4.11.0.5 release on GitHub has an extra feature added to it that was logged long ago. I may have logged it. It's been a long time.
Button and Button.update have a new parameter disabled_button_color.
Here's the definition from the Button DocString
:param disabled_button_color: Tuple[str, str] colors to use when button is disabled (text, background). Use None for a color if don't want to change. Only ttk buttons support both text and background colors. tk buttons only support changing text color
It takes a tuple, just like button color is a tuple. (text, background).
If you don't want to change one of them, then set the value to None (a very rare instance where None is OK in a PySimpleGUI tuple).
This will change your button's color when it is set to disabled.
As you can see from the DocString, only ttk buttons support changing both colors. Normal, Tk Buttons, only support changing the text color.
Enjoy!
PySimpleGUI
on 14 Dec 2019
imwatchingyou Release 2.3.0 14-Dec-2019
- Addition of location parameter to popout window
- Addition of location parameter to main debugger window
- Added version number string
- Changed the REPL to be a single line
- Looks and acts like the built-in debugger inside PySimpleGUI
PySimpleGUI
on 15 Dec 2019
4.12.0 PySimpleGUI 14-Dec-2019
Finally no more outlines around TK Elements on Linux
- Fixed a long-term problem of the mysterious white border around (almost) all TK Elements on Linux
- Ability to set the disabled button colors
- New Button and Button.update parameter - disabled_button_color
- Specified as (Text Color, Background Color) just like button colors
- For Normal / TK Buttons - can set button text color only
- For TTK Buttons - can set both a disabled button and text color
- Either parameter can be None to use current setting
- Removed use of CloseButton from Popups (still have a bug in the CloseButton code but not in popups now)
- Combobox - removed requirement of setting disabled if want to set to readonly using update method
- Fix for cancelling out of file/folder browse on Linux caused target to be cleared instead of just cancelling
- Removed try block around setting button colors - if user sets a bad color, well don't do that
- Now deleting windows after closing them for popup
PySimpleGUI
on 15 Dec 2019
Code Completion Tip
If you're a PyCharm user (and perhaps a VS user too), then I'm sure you enjoy using code completion. You might have noticed in either a demo program or in the PySimpleGUI.py file itself that type hints are done via comments. This was done for potability reasons as the code was used to make the 2.7 version PySimpleGUI as well as PySimpleGUI running on 3.5.
A good example of wanting code completion but not being able to use it is in something like a Graph Element. There are a number of drawing primitives for a Graph Element and they have docstrings for them too.
Let's say you've got a Graph Element in your layout and you want to draw a couple of axis lines prior to the window.read call.
    window = sg.Window('Canvas test', layout, grab_anywhere=True,
                       background_color='black', no_titlebar=False,
                       use_default_focus=False, finalize=True)

    graph = window['graph']

    graph.draw_line((SAMPLES//2, 0), (SAMPLES//2,SAMPLE_MAX),color='white')
    graph.draw_line((0,SAMPLE_MAX//2), (SAMPLES, SAMPLE_MAX//2),color='white')
This code first gets the graph element by looking up with a key and then storing the result in the variable graph. When it comes time to add the draw_line onto the graph variable, you will not see the different primitives available because Python/PyCharm doesn't know what type graph is.
Adding a type is as easy as adding a comment. In this case, to tell PyCharm that graph is a Graph Element, add a comment onto the assignment:
graph = window['graph'] # type: sg.Graph
Now PyCharm knows that the graph variable is a Graph object and code completion will work!

You'l find places in the PySimpleGUI.py code where a variable is assigned to itself.
element = element
This is done so that I can add the type hint as a comment. These statements usually look more like:
element = element # type: Text
The Element.Widget variable always (should always) has a type hint on it so that when you're trying to use it in your code, the correct code completion will take place. For a Text Element in tktinter, this is how Widget is defined in the class definition
self.TKText = self.Widget = None # type: tk.Label
Now in your code when you reference the Element.Widget variable for a Text Element, you'll see the type hints for the tkinter Label widget.
I'm sure there are many more ways of using these type hint comments than what I'm doing. If you know more ways that would be helpful, post them! Open an Issue with a type [Helpful Hints] or something like that.
PySimpleGUI
on 15 Dec 2019
Posted @jason990420 's Minesweeper and Solitaire Games on Reddit today!
https://www.reddit.com/r/Python/comments/eb5dbj/solitaire_and_minesweeper_fun_and_games_with/
Maybe it'll get more people building fun stuff like these. Then again, it's Reddit, so more likely to get boos then anything else 🤔


PySimpleGUI
on 15 Dec 2019
PySimpleGUIQt's Buttons are now 3D
I know that's a weird kinda thing to announce. 3D buttons. Aren't they ALL 3D? Well, not in PySimpleGUIQt evidently. I didn't even notice until someone posted on Reddit and then an Issue here 12 days ago.
As suspected it was a Style Sheet problem. Sheet man! Bitten again and again.
I'm still trying to get the "Default" case to work.
If you use a call to change_look_and_feel then it looks good.
Here's the "Dark Red" theme showing 1 button menu and 2 buttons. I depressed one of the buttons to show that it animates to 3D.

I'll keep looking to try and see why the default settings aren't working. The Style Sheet for the button looks identical to when I'm using a look and feel theme so puzzled what's being set that's outside of the button.
PySimpleGUI
on 16 Dec 2019
Must Change the "Default Button Color" on Qt.
If the default "PySimpleGUI White on Blue" button is used, then the animation for the button is lost when using PySimpleGUIQt.
If you watch how Qt animates buttons, the TEXT of the button stays still. It's only the surrounding rectangle that changes. In the case of a dark blue button, you can't see the animation that Qt is trying to draw. It's there and it's drawing the animation, but it's black on dark blue and cannot be detected using your eyes.
The result is that a NEW button color is needed for PySimpleGUI when no colors are selected. There is a "Default" that has no colors at all, but that setting makes flat buttons. I'm modifying the "Default1" Look and Feel to use my own gray button which does show up as 3D
Here's what it will look like now with "Default1" the supposed "System Settings"

Here's what it looks like if nothing is set, the old "Default1" setting

It does do an interesting highlight of light blue when you mouse over, but there's no animation. I'll look into the highlighting too.
The plan is for now to use these gray buttons and to find a new "Default PySimpleGUI Button" color that is not gray.
Some may not like the Dark Blue button that you get now. I'm not sure as people don't complain. It helps "watermark" applications that are built using PySimpleGUI. One look at a window with this specific color of blue button ("#082567") and white text and you know it's a PySimpleGUI window.

The icon is a bit of a giveaway too :-) It's another one that most people don't notice. I think many/most think it's a Python icon on the windows.
PySimpleGUI
on 16 Dec 2019
An "Official PySimpleGUI Color Theme"
What would you choose? It's getting to be time, at least for Qt and likely the others, to choose an entire look and feel theme for all PySimpleGUI windows.
I would just as soon replace the "Nag" message in the Window call with a default look and feel.
Over the past few weeks "Dark Blue 3" has been winning in all of the new posts I've made.
Here's how the "Everything Bagel" looks using that color theme

And here are the 108 currently available themes

PySimpleGUI
on 17 Dec 2019
PySimpleGUI Charting Era Has Arrived
There were a couple of key drawing primitives that were holding back PySimpleGUI from being able to drag things around on a Graph. You could move them manually but there was no easy way to grab them with your mouse.

There is also a demo program posted that was used to create the GIF:
Now real drawing or flow charting kinds of applications can be made.
The features are starting to pile up again so might to a PyPI release soon.
PySimpleGUI
on 18 Dec 2019
4.13.0 PySimpleGUI 18-Dec-2019
Table and Tree header colors, expanded Graph methods
- Element.expand new parameter - expand_row. If true then row will expand along with the widgets. Provides better resizing control
- Using math.floor now instead of an int cast in Graph Element's unit conversions
- Graph.draw_point - now using caller's graph units for specifying point size
- Graph.draw_circle - converted radius size from user's graph units.
- Graph.draw_circle - added line_width parameter
- Graph.draw_oval - added line_width parameter
- Graph.get_figures_at_location - new method for getting a list of figures at a particular point
- Graph.get_bounding_box - returns bounding box for a previously drawn figure
- Table and Tree Elements
- 3 new element creation parameters
- header_text_color - color of the text for the column headings
- header_background_color - color of the background of column headings
- header_font - font family, style , size for the column headings
- Defaults to using the current look and feel setting
- Uses similar algorithm as Tabs - Input Text background and text colors are used
- 3 new element creation parameters
- Spin element - fixed bug that showed "None" if default value is "None"
- Test Harness sets incorrect look and feel on purpose so a random one is chosen
PySimpleGUI
on 19 Dec 2019
New Names Coming For "Look and Feel"
PySimpleGUI has gone through a number of "name changes". From FlexForm to Window, Read to read, there has always been an evolution underway to make the APIs clearer and easier to use. More SIMPLE.
Look and Feel is becoming simply "Theme".
Just as other name changes, this is an addition, not a replacement. Your old code that calls change_look_and_feel will keep working without problem, just as calling your window a FlexForm continues to work for those ancient applications.
The risk is in confusing ttk themes with PySimpleGUI themes, but I don't think it's a very big risk as the newest ttk parameters that use theme are called ttk_theme for this very reason.
The new functions being added are:
set_theme()
get_theme()
I'm still pondering how to provide access to individual theme settings such as the background color. At the moment, using the new settings you would need to use this expression to print the current background color
print(sg.LOOK_AND_FEEL_TABLE[sg.get_theme()]['BACKGROUND'])
Not a good long-term, Simple interface.
Perhaps something like:
theme_background_color()
This convention, a function starting with theme_, could be extended to all of the various theme settings. theme_text_color(), theme_input_text_color(), theme_input_background_color()
These color themes are climbing in popularity with a number of user programs allowing the user to set their own window theme that is saved in a settings file and used for all future runs of the program.
However, changes to Themes necessitate changes to all of the PySimpleGUI ports simultaneously, so it's a big decision when a change is made like this one.
PySimpleGUI
on 19 Dec 2019
Themes - New calls, New default
The previous post is a little off from what's been changed and checked in.
Where 2 functions were discussed about there is only one now:
theme()
There are 2 ways to call. To set a theme, call with the theme name.
theme('Dark Blue 3')
To get the current theme, call with no parameter
current_theme = theme()
The other calls all start with theme_ so that they'll be easy to search for in the documentation.
These will all be PEP8 compliant calls. No SnakeCase for themes.
New Default Theme == "Dark Blue 3"
I've decided to move forward with Dark Blue 3 being the default theme for all platforms. It's a white text on a blue-gray background. My hope is that the trend I see for darker UIs these days will match this new default. However, it's no so dark as to appear super dark overall. It's just dark enough that white text works better than light.
The input fields remain a light color with black text.
It would be nice to have a "Light" colored default chosen at the ready in case of a user revolt. Anything but gray is my choice in general.
Here's the all-widgets demo

And a popup window

This is what the old default looked like on Windows

PySimpleGUI
on 22 Dec 2019
Lightened the Repo Load....
I forgot that there were movies uploaded with the YOLO machine learning example code. The result was the PySimpleGUI project ZIP was large and the majority of it was those stupid movies! DOH!
It's been moved over to another repo - https://github.com/PySimpleGUI/PySimpleGUI-YOLO
The zip went from 89 MB to 14 MB. -sigh- I'm sorry people... I didn't know it was so large.
14 MB is much better, especially when you consider that is all of the ports and all of the demo programs combined.
PySimpleGUI
on 23 Dec 2019
4.14.0 PySimpleGUI 23-Dec-2019
THEMES!
- theme is replacing change_look_and_feel. The old calls will still be usable however
- LOTS of new theme functions. Search for "theme_" to find them in this documentation. There's a section discussing themes too
- "Dark Blue 3" is the default theme now. All windows will be colored using this theme unless the user sets another one
- Removed the code that forced Macs to use gray
- New element.set_cursor - can now set a cursor for any of the elements. Pass in a cursor string and cursor will appear when mouse over widget
- Combo - enable setting to any value, not just those in the list
- Combo - changed how initial value is set
- Can change the font on tabs by setting font parameter in TabGroup
- Table heading font now defaults correctly
- Tree heading font now defaults correctly
- Renamed DebugWin to _DebugWin to discourage use
PySimpleGUI
on 23 Dec 2019
The New Theme Calls
This is the list of new functions that are used to set, modify, and get information about themes that were just released in 4.14.0
To set the theme, instead of calling change_look_and_feel you now simply call theme
There are a number of other functions to get and set various theme colors and other settings.
theme_background_color
theme_border_width
theme_button_color
theme_element_background_color
theme_element_text_color
theme_input_background_color
theme_input_text_color
theme_progress_bar_border_width
theme_progress_bar_color
theme_slider_border_width
theme_slider_color
theme_text_color
These will help you get a list of available choices.
theme_list
theme_previewer
PyIDM
I would like to spotlight this amazing project.
https://github.com/pyIDM/pyIDM
Here's the project owner's description:
Alternative to IDM (Internet Download Manager):
The main reason for making this application is the lack of free open source download managers which has multi-connection, high download speed, and resume capability, also can download youtube videos, in same time has a good gui design, to achieve that, decision made to use the high speed library 'pycurl', a threading module for multi-connection, youtube_dl, and an easy and beautiful PySimpleGUI module for designing the gui user interface
It's a Python version of the popular "Internet Download Manager". It has a ton of functionality!
A lot of parallel processing is going on. He also used UNICODE characters in a clever way to show arrows, turning text into graphics in the process.
This is a great example of the enabling technology that PySimpleGUI contains. Programmers that didn't feel comfortable creating GUIs using the other frameworks are finding a nice home with PySimpleGUI. Because it makes the GUI stuff easy, more time can be spent on polishing it and working on functionality.


PySimpleGUI
on 23 Dec 2019
PySimpleGUI Debugger in Your Browser!
This is just plain crazy.
You're all aware of Trinket by now, the site where you are able to run PySimpleGUI code in your browser. Make no mistake, the code is running in your browser, not a backend server somewhere.
I was astonished when I pressed the BREAK key and was able to pull up both the debugger popout window and the main debugger window. Both ran as they should. I was able to interact while the program was running in the background.

PySimpleGUI
on 23 Dec 2019
0.31.0 PySimpleGUIQt 24-Dec-2019
Themes and more!
- Added port string so can identify which port is being used (PySimpleGUIQt)
- Removed the Mac speific button and system color settings. Not sure why they existed at all since it's Qt, not tkinter
- Like all PySimpleGUI ports, the default theme is now "DarkBlue3"
- TRANSPARENT_BUTTON redefined as an a string explaining that if you're using it, you're not getting what you thought you were
- BROWSE_FILES_DELIMETER so that it can be changed to something other than ';' for systems that ';' is a valid char for filenames
- Can drag and drop into a Multiline Input Element!
- Colored text output for Multiline (hmmm...but not MultilineOutput.. may have to add it)
- Tree Element
- Support for enable_events
- Returns selected rows when reading
- Window - better error checking and warnings for window layouts
- Button - changes to help with getting animations back
- TabGroup - Tab positions now supporrted
- left, right, top, bottom, lefttop, leftbottom, righttop, rightbottom, bottomleft, bottomright, topleft, topright
- Tables & Trees - text color and background color now work. Don't appear to have worked before
I know it SEEMS like nothing happens with the PySimpleGUIQt port, but there is new things added more frequently than you might realize.
This release, while focused on getting the "themes" APIs all consistent across all the ports, there are a number of good sized features include.d
PySimpleGUI
on 24 Dec 2019
0.34.0 PySimpleGUIWeb 24-Dec-2019
Theses +
- New theme apis that replace the change_look_and_feel call (see primary PySimpleGUI port for more info)
- New default theme is Dark Blue 3
- Added ported string so can tell this is the "PySimpleGUIWeb" port
- Removed platform specific code that was barring Macs from using colors, even for the web
- Changed "TRANSPARENT_BUTTON" string to invalidate it. It was misunderstood and should not bave been inlucded in anything
- Ability to change the files delimeter for browse files to filenames can have ; in them
PySimpleGUI
on 24 Dec 2019
Saving Elements As An Image
I've uploaded a couple of sample programs that have a function that will enable you to save the contents of the element as an image file in PNG, JPG, or GIF format (perhaps others too).
The 2 demos are:
https://github.com/PySimpleGUI/PySimpleGUI/blob/master/DemoPrograms/Demo_Save_Window_As_Image.py
They both contain this function that makes it all possible.
First be sure and import from PIL the function that will be doing the saving:
from PIL import ImageGrab
Then use this function to save the element as an image file. If you want to save an entire window's contents, then you'll want to place your layout into a single Column element and then save that column element.
It's _SUPER SIMPLE_ and easy to do!
def save_element_as_file(element, filename):
    """
    Saves any element as an image file.  Element needs to have an underlyiong Widget available (almost if not all of them do)
    :param element: The element to save
    :param filename: The filename to save to. The extension of the filename determines the format (jpg, png, gif, ?)
    """
    widget = element.Widget
    box = (widget.winfo_rootx(), widget.winfo_rooty(), widget.winfo_rootx() + widget.winfo_width(), widget.winfo_rooty() + widget.winfo_height())
    grab = ImageGrab.grab(bbox=box)
    grab.save(filename)
0.15.0 PySimpleGUIWx 24-Dec-2019
Themes!
- Picked up the new "theme" APIs like all 4 ports got
- Dark Blue 3 is the new official color theme for PySimpleGUI
- Added "port" string so that your code can detect which port of PySimpleGUI is being executed
- Removed restriction on Macs (totally didn't make sense that it was there as it blocked a tkinter problem, not a Wx one)
- Depricated the TRANSPARENT_BUTTON variable as it was being misunderstood by users and was misleading
- BROWSE_FILES_DELIMITER can be changed to change the default ';' delimeter between filenames in FilesBrowse button
- Frame Element! BUT, it's only a partial solution as I am unable to set the background color (need to understand how panels work). It's better than nothing
PySimpleGUI
on 24 Dec 2019
Merry Christmas & Happy Holidays to Everyone... Everywhere...
Well, all 4 ports received their updates in the past 24 hours, so they're all up to date with the big "theme" API changes. They each got some new features in the process too.
Next step is to re-release all of the Demos with the new theme use as well as showcasing some of the more recent additions.
There needs to be more cross-porting from tk to Qt in the near future as some of the color changes need to be expanded there.
I want to take a moment and thank all of the PySimpleGUI users. 🙏 Everyone has been really supportive and helpful over the past 17 months. So many of you have been around from the start and the newcomers are nice too. I get private messages and emails that have been really helpful and very encouraging. It helps keep those releases rolling out knowing PySimpleGUI is making a difference.
I really appreciate the patience in taking the time to fill out the form, check through the materials to try and help yourself. It seems to be working out well for everyone in the end. There are not a lot of questions posted elsewhere so it's enabled prioritization as well as enabling you folks to help each other, which has happened on a number of occasions.
It's an exciting year ahead for PySimpleGUI. 😃
PySimpleGUI
on 24 Dec 2019
No '' Required
A while back the Text and Button elements got a sneaky little addition. Most people don't take advantage of it. For these elements you do not need to enter any text if the text is blank.
If you have an output only element then you can write it:
sg.Text(size=(12,1), key='-OUT-')
No text value of '' required. The same goes with Buttons
InputText / Input elements have always had the default text set to '' so that you don't need to specify it there either. Just use:
sg.Input()
Shortcuts
Since we're talking about shrinking code. There are some very short shortcuts to remember. T is Text, B is Button, I is Input, R is for Radio. The Combo can be specified as a DropDown or DD for short. ListBox is of course LB.
Skipping .update
And for the super lazy, you can drop the word .update when updating elements. To update the Text element I defined earlier, I can write:
window['-OUT-']('This is the new value')
I've seen a few people do this, so if you're reading someone else's code and see that weird construct, that's what's happening... an update is being called.
Not recommended but possible is to drop the .read from window calls. This is a valid construct which calls window.read().
while True:
    event, values = window()
Photo Colorization With PySimpleGUI
Putting the final touches on a new Demo Program.
This time it's a photo colorizer. You can use images or even your webcam for a colorized video.
Check out what it did with this Ansel Adams photo!

It's using a combination of OpenCV and numpy to implement a colorization technique created by Richard Zhang et al that's described here:
http://richzhang.github.io/colorization/
I would like to add a couple more features like saving to disk before releasing it.
The amazing thing, as usual with Python and PySimpleGUI, is that the code required was 60 lines of actual code. That's all.... wow.... what an amazing language.
PySimpleGUI
on 27 Dec 2019
Colorizer Completed And Posted
Wow what a fun little project this ended up being. I was able to make the controls super responsive. As soon as you take an action, something happens. Past a folder path into the input above the listbox and it immediately populates the list. Click an item in the list and it's immediately previewed.
Loads of features like the ability to save the resulting image to a JPG, PNG, GIF, etc.
Posted about it on Reddit
https://www.reddit.com/r/Python/comments/ege02j/a_photo_and_webcam_deep_learning_colorizer_in/
And created a separate project for it on GitHub
https://github.com/PySimpleGUI/PySimpleGUI-Photo-Colorizer
It's SUPER easy to get up and running and it's some amazing AI technology at work.
It's been tested on Windows, Linux and a Mac and is working great.


PySimpleGUI
on 27 Dec 2019
Help PyIDM Get Found...
A while back a lot of kind PySimpleGUI users "voted" to have PySimpleGUI listed in the Vinta Awesome Python Applications. It's seen by a lot of people and it really helps projects that get listed.
They have a voting system to help determine what gets included.
I've been actively using this PyIDM software to do large downloads and it's amazing. It a multi-threaded bit of magic. And it's worthy of being found and used by other people
Python needs more actual applications that get used by end users. Here's an opportunity to have one get noticed.
To vote, go to this link:
https://github.com/vinta/awesome-python/pull/1450
And click to add a 👍 emoji
Here is a detailed bit of instructions.

PySimpleGUI
on 29 Dec 2019
Bye Bye PySimpleGUI27
As promised, the 2.7 version of PySimpleGUI is no longer hosted here.
I want to thank the 114,000 pip installs out there.
Unfortunately there have been over 5,000 pip installs of PySimpleGUI27 in the past month.
I'm trying to determine what to do about PyPI. I really hate to blow up all those installs by deleting all of the releases but I think that's likely the best course of action. Security experts claim that continuing to support 2.7 is basically supporting opening people up to security issues.
PySimpleGUI
on 1 Jan 2020
Demo - PyLab
I didn't know that Matplotlib had multiple sub-packages beyond PyPlot. Today I learned about PyLab
https://www.tutorialspoint.com/matplotlib/matplotlib_pylab_module.htm
Someone asked about embedding PyLab plots so I made a separate demo to show how to embed these plots in the same way that Matplotlib plots are embedded. The technique used for PyLab and Matplotlib are identical.
Here's the demo program
https://github.com/PySimpleGUI/PySimpleGUI/blob/master/DemoPrograms/Demo_Matplotlib_PyLab.py
The actual plotting code I copied from the tutorial page and it looks like this:
import pylab
from numpy import sin
from numpy import cos

x = pylab.linspace(-3, 3, 30)
y = x**2

pylab.plot(x, sin(x))
pylab.plot(x, cos(x), 'r-')
pylab.plot(x, -sin(x), 'g--')
The result is this window.

PySimpleGUI
on 2 Jan 2020
Demo Reddit Searcher
Recently learned about Reddit's APIs. I hadn't paid much attention to them in the past. In the spirit of helping users integrate different technologies with PySimpleGUI I decided to make a little search program that will search for a string in Reddit posts and comments.
It will show you the results in a browser as well.

PySimpleGUI
on 2 Jan 2020
Corporate Users
If you're a corporate user, I would like to hear from you. PySimpleGUI is LGPL3 licensed, so you're allowed to use it for your corporate products as long as your publish any changes you make to the code. Please email [email protected] if you're a corporate user. I hope you're finding a lot of success using PySimpleGUI if you're using it at work. It's meant to be used for both personal and corporate projects.
PySimpleGUI
on 4 Jan 2020
"Dynamic Layouts" Window.extend_layout has arrived
Hopefully this new capability is simple enough to be understood and at the same time has enough depth to be useful.
A new Window method was just added. extend_layout will add a layout onto the end of any PySimpleGUI container element or window. It only takes 2 parameters
def extend_layout(self, container,  rows):
        """
        Adds new rows to an existing container element inside of this window

        :param container: (Union[Frame, Column, Tab]) - The container Element the layout will be placed inside of
        :param rows: (List[List[Element]]) - The layout to be added
        :return: (Window) self so could be chained
        """
The first parameter is container. This is a container element or a window object. Containers are Columns, Frames and Tabs. Additionally you can pass in the window itself as the container and the layout will be added to the end of the window.
The second parameter is rows and is your layout that you wish to add.
If you want to be able to add elements to some location in your window in the future, then create a Column or other container at that location in your window. Then when you're ready to add more to it, pass in that container/window and the list of rows of elements.
This program demonstrates how to use the call
import PySimpleGUI as sg

layout = [  [sg.Text('My Window')],
            [sg.Text('Click to add a row inside the frame'), sg.B('+')],
            [sg.Frame('Frame',[[sg.T('Frame')]], key='-COL1-')],
            [sg.Input(key='-IN-'), sg.Text(size=(12,1), key='-OUT-')],
            [sg.Button('Button'), sg.Button('Exit')]  ]

window = sg.Window('Window Title', layout)
i = 0
while True:             # Event Loop
    event, values = window.read()
    print(event, values)
    if event in (None, 'Exit'):
        break
    if event == '+':
        window.extend_layout(window['-COL1-'], [[sg.T('A New Input Line'), sg.I(key=f'-IN-{i}-')]])
        i += 1
window.close()
Will be adding to the docs soon too.
PySimpleGUI
on 4 Jan 2020
Window.extend_layout Example 2

import PySimpleGUI as sg

layout = [  [sg.Text('My Window')],
            [sg.Text('Click to add a row inside the frame'), sg.B('+', key='-B1-')],
            [sg.Text('Click to add a row inside the Window'), sg.B('+', key='-B2-')],
            [sg.Frame('Frame',[[sg.T('Frame')]], key='-COL1-')],
            [sg.Input(key='-IN-'), sg.Text(size=(12,1), key='-OUT-')],
            [sg.Button('Button'), sg.Button('Exit')]  ]

window = sg.Window('Window Title', layout)
i = 0
while True:             # Event Loop
    event, values = window.read()
    print(event, values)
    if event in (None, 'Exit'):
        break
    if event == '-B1-':
        window.extend_layout(window['-COL1-'], [[sg.T('A New Input Line'), sg.I(key=f'-IN-{i}-')]])
        i += 1
    if event == '-B2-':
        window.extend_layout(window, [[sg.T('A New Input Line'), sg.I(key=f'-IN-{i}-')]])
        i += 1
window.close()
Demo Repositories
Experimenting with posting demos as repos.
The colorization project has been pretty popular and it got me thinking that some of these simple demos are actually interesting by themselves.
I created one for the rainmeter style CPU core monitor.
Posting it by itself offers the opportunity to include a bit more information along with the code.
https://github.com/PySimpleGUI/PySimpleGUI-Rainmeter-CPU-Cores

PySimpleGUI
on 8 Jan 2020
Maybe you forgot to set Text size, (10, 1) ?, so graphs[i].text_display('{} CPU {:2.0f}'.format(i, util)) just display first one or two chars and no usage shown. Wah ~ 20 cores, all I have just 4 ........
 jason990420
on 9 Jan 2020
jason990420
on 9 Jan 2020
DOH! You're right (of course). It looks a lot more impressive with the stats

PySimpleGUI
on 9 Jan 2020
4.15.0 PySimpleGUI 08-Jan-2020
Dynamic windows! Extend your layouts after your window has been created.
Graph Element - change coordinates after created
Fixes for various issues
- Window.extend_layout
- Graph.change_coordinates - realtime change of coordinate systems for the Graph element
- theme_text_element_background_color - new function to expose this setting
- Radio & Checkbox colors changed to be ligher/darker than background
- Progress bar - allow updates of value > max value
- Output element does deletes now so that cleanup works. Can use in multiple windows as a result
- DrawArc (draw_arc) - New width / line width parameter
- RGB does more error checking, converts types
- More descriptive errors for find element
- popup_error used interally now sets keep on top
- Element Re-use wording changed so that it's clear the element is the problem not the layout when re-use detected
- Window.Close (Window.close) - fix for not immediately seeing the window disappear on Linux when clicking "X"
- Window.BringToFront (bring_to_front) - on Windows needed to use topmost to bring window to front insteade of lift
- Multiline Scrollbar - removed the scrollbar color. It doesn't work on Windows so keeping consistent
- Changed how Debug Windows are created. Uses finalize now instead of the read non-blocking
- Fix for Debug Window being closed by X causing main window to also close
- Changed all "black" and "white" in the Look and Feel table to #000000 and #FFFFFF
- Added new color processing functions for internal use (hsl and hsv related)
- popup - extended the automatic wrapping capabilities to messages containing n
- Test harness uses a nicer colors for event, value print outs.
- _timeit decorator for timing functions
PySimpleGUI
on 9 Jan 2020
4.15.1 PySimpleGUI 9-Jan-2020
Jammed out a quick patch to remove a bad change to popup.
PySimpleGUI
on 10 Jan 2020
0.35.0 PySimpleGUIWeb 16-Jan-2020
- Fixed Slider crash caused by latest Remi release
- Brought over latest Theme code from PySimpleGUI-tk (text background color, changed all black and white refs to hex)
- New Graph.change_coordinates method
- Removed check for no image specified in Image.update (so cal specify visibility without changing image for example)
Sorry this took longer to get out than it should have, especially since it was crashing
PySimpleGUI
on 17 Jan 2020
ptoaster - A PySimpleGUI Toaster Window
Just released a new package. I figure, what the heck, why not make some of these interesting demos actual packages. They're good enough, right? I hope so. If not, I'm sure Reddit will tell me if I'm not.
You'll find the GitHub here:
https://github.com/PySimpleGUI/ptoaster
You can pip install it:
pip install ptoaster

It is based on the Demo Program:
https://github.com/PySimpleGUI/PySimpleGUI/blob/master/DemoPrograms/Demo_Notification_Window_Fade_In_Out.py
I did significant reworking of the program to remove all direct tkinter calls as well as r3emoved all of the time.sleep calls. The result is a much more interactive and responsive program.
Oh, the most important part.... it's written using the multi-processing library. You can expect to see a lot more of these multi-processing based demos now that I've discovered how to use them correctly. This enables you to do things like splash windows or other "background windows" that are truly in the background. It is entirely separate from your main program.
While tempting to use this for LOTS of stuff, I want to make sure I don't also abuse it. Or, then again, maybe abuse is exactly what's needed!
I also posted this one on Reddit, so if you want to be a part of the discussion, you'll find it here: https://www.reddit.com/r/Python/comments/eqmikl/ptoaster_a_package_for_displaying_toaster_style/
PySimpleGUI
on 18 Jan 2020
The PySimpleGUI Architecture - More refinement in the explanation...
I've been working on documenting PySimpleGUI at a high level. One key difference between PySimpleGUI and other GUI frameworks is in the handling of "events" and how the code is organized.
This chart shows 3 libraries and how user code interacts with them. Two are GUIs, one is the Standard Library "Queue" library and its interface.

PySimpleGUI is modeled using the same architecture as other Python libraries that receive outside events or data. Rather than user code being executed, the event information is saved until the application asks for it.
PySimpleGUI
on 27 Jan 2020
Side by Side Compares
Whenever possible I try to duplicate the results created by tkinter, Wx, or Qt code.
This part week the Real Python folks published a NEW Tkinter Tutorial! Yes, it's 2020 and for some reason there are not enough basic tkinter tutorials in the world.
Anyway, their first big program example is how to convert from F to C.
Here are the resulting windows when the code below is executed.
tkinter window:

PySimpleGUI window:

Example 1 - Convert temperatures
import tkinter as tk

def fahrenheit_to_celsius():
    """Convert the value for Fahrenheit to Celsius and insert the
    result into lbl_result.
    """
    fahrenheit = ent_temperature.get()
    celsius = (5/9) * (float(fahrenheit) - 32)
    lbl_result["text"] = f"{round(celsius, 2)} \N{DEGREE CELSIUS}"

# Set-up the window
window = tk.Tk()
window.title("Temperature Converter")
window.resizable(width=False, height=False)

# Create the Fahrenheit entry frame with an Entry
# widget and label in it
frm_entry = tk.Frame(master=window)
ent_temperature = tk.Entry(master=frm_entry, width=10)
lbl_temp = tk.Label(master=frm_entry, text="\N{DEGREE FAHRENHEIT}")

# Layout the temperature Entry and Label in frm_entry
# using the .grid() geometry manager
ent_temperature.grid(row=0, column=0, sticky="e")
lbl_temp.grid(row=0, column=1, sticky="w")

# Create the conversion Button and result display Label
btn_convert = tk.Button(
    master=window,
    text="\N{RIGHTWARDS BLACK ARROW}",
    command=fahrenheit_to_celsius
)
lbl_result = tk.Label(master=window, text="\N{DEGREE CELSIUS}")

# Set-up the layout using the .grid() geometry manager
frm_entry.grid(row=0, column=0, padx=10)
btn_convert.grid(row=0, column=1, pady=10)
lbl_result.grid(row=0, column=2, padx=10)

# Run the application
window.mainloop()
The PySimpleGUI version of this code produces a similar, but better looking window, in quite a bit less code. 23 lines of "real code" in the Real Python example.
This PySimpleGUI version is, uhm, 9 lines. Maybe I cheated and did something special in Python to reduce the number of lines? No, I didn't do anything like that. In fact it could have been shortened further but I resisted. There is the added feature that pressing the return key will perform the conversion just as clicking the button does.
from PySimpleGUI import Text, Input, Button, Window

layout = [[Input(size=(5,1), justification='r', key='-TEMP-F-'), Text('°F'), Button('→', bind_return_key=True), Text(size=(8,1), key='-TEMP-C-')]]

window = Window('Temperature Converter', layout)

while True:
    event, values = window.read()
    if event is None:
        break
    window['-TEMP-C-'].update(f"{(5/9) * (float(values['-TEMP-F-']) - 32):.2f}°C")

window.close()
print_to_element added to GitHub in Tk and Qt
Today both PySimpleGUI and PySimpleGUIQt gained a new function:
def print_to_element(multiline_element, *args, end=None, sep=None, text_color=None, background_color=None):
    """
    Print like Python normally prints except route the output to a multline element and also add colors if desired

    :param multiline_element: (Multiline) The multiline element to be output to
    :param args: List[Any] The arguments to print
    :param end: (str) The end char to use just like print uses
    :param sep: (str) The separation character like print uses
    :param text_color: The color of the text
    :param background_color: The background color of the line
    """
Here's a demo program that shows how to make the call
# import PySimpleGUI as sg
import PySimpleGUIQt as sg

"""
    Demonstration of how to work with multiple colors when outputting text to a multiline element
"""

sg.theme('Dark Blue 3')

def main():

    MLINE_KEY = '-MLINE-'+sg.WRITE_ONLY_KEY

    layout = [  [sg.Text('Demonstration of Multiline Element\'s ability to show multiple colors ')],
                [sg.Multiline(size=(60,20), key=MLINE_KEY)],
                [sg.B('Plain'), sg.Button('Text Blue Line'), sg.Button('Text Green Line')],
                [sg.Button('Background Blue Line'),sg.Button('Background Green Line'), sg.B('White on Green')]  ]

    window = sg.Window('Demonstration of Multicolored Multline Text', layout)

    while True:
        event, values = window.read()       # type: (str, dict)
        print(event, values)
        if event in (None, 'Exit'):
            break
        if 'Text Blue' in event:
            sg.print_to_element(window[MLINE_KEY], 'This is blue text', text_color='blue', end='')
        if 'Text Green' in event:
            sg.print_to_element(window[MLINE_KEY], 'This is green text', text_color='green')
        if 'Background Blue' in event:
            sg.print_to_element(window[MLINE_KEY], 'This is Blue Background', background_color='blue')
        if 'Background Green' in event:
            sg.print_to_element(window[MLINE_KEY], 'This is Green Background', background_color='green')
        if 'White on Green' in event:
            sg.print_to_element(window[MLINE_KEY], 'This is white text on a green background', text_color='white', background_color='green')
        if event == 'Plain':
            sg.print_to_element(window[MLINE_KEY], 'This is plain text with no extra coloring')
    window.close()


if __name__ == '__main__':
    main()
It's identical to the Print function that already exists. The difference is that the first parameter is a Multiline element to "print" to. This allows you to "print" to multiple locations a window, not just to Output elements.
Does not work for MultilineOutput elements yet as those do not yet have color support.
Enjoy! Go make some colorful stuff!

PySimpleGUI
on 28 Jan 2020
The Recent Slow Going Explanation and Need to Commercialize
I'm sorry that the Issues have been piling up recently, some not yet responded to. I'm doing my best to get to them all.
The past few months have been spent trying to ensure a future for PySimpleGUI beyond the next few months.
While PySimpleGUI is licensed using an Open Source license, the development of PySimpleGUI has not been an Open Source development effort. The project has been intentionally structured as a high-burn, highly-focused and intense effort at getting a proof of concept built and deployed with the intention of commercializing so that the future is a secure one.
Some may not agree with this approach, but PySimpleGUI would not have been made available publicly if commercializing was not part of the plan. It was initially written as a package used to provide a GUI framework for another product also being commercially developed. A decision to open up the usage of PySimpleGUI to the public as I saw a real need there that could be filled and so in Feb 2018 PySimpleGUI was released.
The problem with this approach is that at some point funding will run out if there is no revenue coming in and and that's exactly what's happened. Two years of full-time development and investment in consulting help has taken its toll.
Thank you to everyone for the support and patience. I'm hopeful that things work out so that project has a future.
PySimpleGUI
on 31 Jan 2020
300,000 Installs of PySimpleGUI-tk and 708,000 Overall
The plain tkinter port of PySimpleGUI has just crossed the 300,000 pip installs mark. Thanks for everyone for making this happen!
A Qt / Pyside2 Comparison
One yard stick that PySimpleGUI can be measured against is Qt, and in particular pyside2. PySimpleGUI and pyside2 were released in the same month in 2018, July.
Pyside2 has 720,000 installs. Of those, some portion of them come from the 112,000 installs of PySimpleGUIQt.
It's pretty remarkable that an unmarketed GUI package can capture the attention that PySimpleGUI has when compared against the efforts of a well-funded effort like Qt's pyside2.
Popularity / Trend
Google Trends shows that while launched at the same time, PySimpleGUI has steadily increased in search popularity as compared to pyside2.

PySimpleGUI
on 31 Jan 2020
Thanks for the support! 3,240 Stars and 400 Public Repos

Again PySimpleGUI has the best user community on GitHub! Very supportive bunch you folks are. The stars really help demonstrate "popularity" to people that aren't familiar with Python GUIs and what's popular with users at the moment. They're personally motivating to see as well as it means people are coming to take a look and like what they see. It's awesome when that happens!
These numbers are some of the better stats to use as they are not computer generated and it's difficult to manipulate them. Pip installs are a stat that's not quite as accurate as they don't represent individuals making discrete actions since a good number of pip installs are not the initial install but instead upgrades, etc.
Building applications using PySimpleGUI is by far the best way to contribute if you're wanting to contribute. Others learn from your code (including yours truly) and are motivating to see as well. They give other people that are considering making a GUI application hope that they too will be successful. Some user programs have been turned into either demos or entire projects. The ptoaster repo is a great example of a user posting some code that turned out to be super-cool stuff.
TIP - If you post a repo on GitHub for your PySimpleGUI project, PLEASE post some screenshots. It's super easy to drop screenshots into your readme. For projects that do this, they get a lot more attention from other people. People like pictures.
PySimpleGUI
on 8 Feb 2020
Thank you for not using import *
Every time I see a tkinter based program with from tkinter import * I'm SO thankful that I never see any of the PySimpleGUI users doing this. I don't recall anyone, at any time, use an import * with PySimpleGUI.
It's like someone posted one example way back when that had an import * and then everyone copied that example and used it as the basis of their code, which was then copied by the next person, and the next, and still today people are copying code that has from tkinter import * at the top.
It's interesting that tkinter is one of the only packages that where I see this import problem. It's rarely done with any other package. Why is that?? (rhetorical question) Whatever the reason, I'm damned glad none of your fine users have done this to PySimpleGUI.
There have been a few demo programs written recently that import individual objects and functions, but that was done to create super-simple appearing code for presentations, etc. It's funny that when a few people saw these simple programs, they complained about importing the individual objects and liked seeing the sg. prefix. Here's an example of one of those demos:
from PySimpleGUI import Window, Text, Button

layout = [  [Text('Look, this is a real window!')],
            [Text('Complete with buttons')],
            [Button('Ok'), Button('Cancel')] ]

window = Window('Window Title', layout)
event, values = window.read()
window.close()
Experimental-ish Window.read(close=True)
Finally got around to adding this enhancement. It touches such a fundamental piece of the system (read) that it makes me quite nervous.
It'll bring back the good old days of being able to write a 1-line GUI.
import PySimpleGUI as sg

event, values = sg.Window('Window Title', [[sg.Text('Enter Something')], [sg.Input(key='-IN-'),],[sg.Button('OK'), sg.Button('Cancel')]]).read(close=True)
In the Enhancement request that was opened last year I specified the parameter as close_window but stayed simple with close
PySimpleGUI
on 8 Feb 2020
System Tray Icon - for tkinter??
I've completed and released to GitHub a version of the SystemTray interface that is currently implemented in PySimpleGUIWx and PySimpleGUIQt. The biggest differences are:
- The icon doesn't actually run in the system tray but instead as an icon near the system tray
- The message balloon doesn't look the same. Instead it's a transparent window that is borrowed from the ptoaster project
- There is no "X" on the message balloon, but clicking it will close it, as well as return a click event to your program. I'll add a separate "X" button soon
I'm blown away that it works, at all, and even more that it looks so similar when the same code is run.
Here's how my Issues Watcher menu looks when run on PySimpleGUIWx

And here's how it looks running the PySimpleGUI version

Even the tooltip looks similar


I'm sure some people will think of this as really clunky and ugly looking, but I know also some will find it an interesting way to be able to interact with their code when they can't install Wx or Qt on their system but still want a system tray feature.
Hopefully I'll be able to release this to PyPI soon-ish. I'm a little spooked by the read with close feature being added, but delaying releasing only means that even more features get jammed into this release. It's already looking pretty full.
PySimpleGUI
on 9 Feb 2020
Case Study - Using the SystemTray Feature on Tkinter
I've started running both my PySimpleGUIWx based GitHub issues watcher application and the new PySimpleGUI based one.
When a new Issue is filed, I get a popup window. I made the tkinter one have a Titlebar so I could tell the difference.
Here is the result of both running and detecting a change in the Issues:

Both programs turned their icons red to indicate the change in addition to the popup window.
Here is the initial state of both icons:

The net is that while not ideal, it's possible to almost completely duplicate the look and feel of a system tray icon. The PySimpleGUI interface is identical either way. The code you see running for the 2 images above are identical, a pretty amazing capability.
Not Tried on Mac / Linux
A quick warning about this interface. The SystemTray code for PySimpleGUI has not been tried on Linux and Mac. It should work just fine, but nothing is for sure at this point. I'll be testing it on Linux today.
PySimpleGUI
on 10 Feb 2020
Printing to Multiline Elements
New print capability is coming to PyPI later today, as version 4.16.0, once the release notes and documentation changes are done.
The Output element is certainly very handy for re-routing your print statements to your GUI window. A new capability is the function print_to_element.
It has a somewhat unusual call structure, but hopefully the sample code will explain how best to use it. A lambda expression or function is an ideal way of handing this call.
Here's the function definition:
def print_to_element(multiline_element, *args, end=None, sep=None, text_color=None, background_color=None):
    """
    Print like Python normally prints except route the output to a multline element and also add colors if desired

    :param multiline_element: (Multiline) The multiline element to be output to
    :param args: List[Any] The arguments to print
    :param end: (str) The end char to use just like print uses
    :param sep: (str) The separation character like print uses
    :param text_color: The color of the text
    :param background_color: The background color of the line
    """
And here is a test harness that shows one way of converting your print statements to use this new capability.
import PySimpleGUI as sg

print = lambda *args, **kwargs: sg.print_to_element(window['-ML-'+sg.WRITE_ONLY_KEY], *args, **kwargs)

# If you prefer using a function over lambda, then here's your function
# def print(*args, **kwargs):
#    sg.print_to_element(window['-ML-'+sg.WRITE_ONLY_KEY], *args, **kwargs)

layout = [
            [sg.Multiline(size=(70,20), key='-ML-'+sg.WRITE_ONLY_KEY)],
            [sg.Button('Go')],
         ]

window = sg.Window('Stdout is rerouted test', layout)

while True:             # Event Loop
    event, values = window.read()
    print(event, values)
    if event is None:
        break
    if event == 'Go':
        print('This is a test of print', end='', text_color='red')
        print('Here is the line that should be on the same line')

window.close()
OK, a few things to notice about this code.... the first one being the lambda that starts us off. This expression is what maps your current print statements to instead of printing to the console, calling PySimpleGUI's multiline output.
You can directly call the print_to_element every time you want to output, but it will make for some ugly code. Better to use a function / lambda expression. Lambda may be unsettling to some as it's being directly called rather than used as a parameter.
There are 2 parameters in the print_to_element call that are also in calls to print - end, sep. The other parameters are used to control the color of the output and which element the output will be routed to.
Here is the result of running the code and pressing the Go button a couple of times:

One final note.... the key for the Multiline element has a modifier added to the string - WRITE_ONLY_KEY. Any element that has this value as part of the key will NOT be included in the return values dictionary. This is why you'll see in the screenshot that the values variable is empty. Normally the Multiline element would return a value but since this one is being used to output only then it's best to exclude it from the return values as the data is meaningless and it could get lengthy.
Note that the "write only indicator" value is a constant variable, in this case the variable is sg.WRITE_ONLY_KEY. This is not the actual string value that is added onto your key.
This new function print_to_element could have easily been part of the user code, but because print functionality is already supported for the output element and the debug window, it made sense to provide a slightly more unified interface that includes printing not just to the debug window but also to any element in your layout.
Providing more GUI options for moving print output from the normal command line seemed like a good addition.
PySimpleGUI
on 20 Feb 2020
Window.read(close=True)
This new feature was already mentioned before but it's worth mentioning again since it's going to be released to PyPI later today.
WAY back in the early days of PySimpleGUI it was possible and easy to create a single-line of code that would display a window, get the data from the user and return the values. With the addition of the close parameter that capability is again available to PySimpleGUI users.
Here's a bit of code to show one way of using this parameter.
import PySimpleGUI as sg

login = sg.Window('Enter your login name',
                  [[sg.Text('Login Name: '), sg.Input()],
                  [sg.Button('Submit', bind_return_key=True)]  ]).read(close=True)[1][0]

print(f'Your login ID is {login}')
The line of code beginning with login is a little tricky... to make it event trickier, the word read can be removed as the default "call" action on a window is to call read. Remember that window() is the same was window.read(). Removing the read you would have this line of code:
login = sg.Window('Enter your login name',
                  [[sg.Text('Login Name: '), sg.Input()],
                  [sg.Button('Submit', bind_return_key=True)]  ])(close=True)[1][0]
Let's leave the read in there however and pull it apart a little.
The layout of the window is included as the second parameter in the Window creation instead of using the typical variable named layout. For a complex layout, I recommend using a variable, but for when you are trying to really compact stuff down, don't be afraid to try these kinds of calls out.
The first part creates your window:
sg.Window('Enter your login name',
                  [[sg.Text('Login Name: '), sg.Input()],
                  [sg.Button('Submit', bind_return_key=True)]  ])
Then we add on the .read to read the newly created window. This is where we add the close parameter so that the window will automatically close when the read returns.
.read(close=True)
Finally, we parse out the values returned from window.read(). Recall that normally the call structure for a read call is:
event, values = window.read()
Looking at our 1-line call, notice two indexes being used.
.read(close=True)[1][0]
The first index is [1] and will give us the values portion of the returned values. Since we did not specify a key in the Input element, the automatic numbering will be used. The first value in the return values will be [0] which is what we're wanting.
You can also use the traditional design pattern you're used to for reads, the variables event and values.
event, values = sg.Window('Enter your login name',
                  [[sg.Text('Login Name: '), sg.Input()],
                  [sg.Button('Submit', bind_return_key=True)]  ]).read(close=True)]

print(f'Your login ID is {values[0]}')
Inline Custom (user defined) popup
The "read with close" construct can also be used to create your own popup functionality quite easily. It removes the need for a call to window.close() and removes the need for a window variable too.
Here's an "in-line" version of popup.
import PySimpleGUI as sg

long_string = '123456789 '* 40

event, values = sg.Window('This is my custom popup',
                  [[sg.Text(long_string, size=(60,None))],
                  [sg.B('OK'), sg.B('Cancel') ]]).read(close=True)

print(f'Button clicked was {event}')
When you run the code, this is the result

There's one trick in this call that's perhaps not documented and that is the ability to choose None for the height in the size parameter. This will cause PySimpleGUI to create a Text element that fits the size of the string. It will use however many rows that are required.
So, the next time you're feeling like popup need more button choices added, make your own instead using this 1-line popup construct.
PySimpleGUI
on 20 Feb 2020
4.16.0 PySimpleGUI 20-Feb-2020
The "LONG time coming" release. System Tray, Read with close + loads more changes
Note - there is a known problem with the built-in debugger created when the new read with close was added
- System Tray - Simulates the System Tray feature currently in PySimpleGUIWx and PySimpleGUIQt. All calls are the same. The icon is located just above the system tray (bottom right corner)
- Window.read - NEW close parameter will close the window for you after the read completes. Can make a single line window using this
- Window.element_list - Returns a list of all elements in the window
- Element.unbind - can remove a previously created binding
- Element.set_size - retries using "length" if "height" setting fails
- Listbox.update - select_mode parameter added
- Listbox.update - no longer selects the first entry when all values are changed
- Listbox.get - new. use to get the current values. Will be the same as the read return dictionary
- Checkbox.update - added ability to change background and text colors. Uses the same combuted checkbox background color (may remove)
- Multiline.update - fix for when no value is specified
- Multiline - Check for None when creating. Ignores None rather than converting to string
- Text.update - added changing value to string. Assumed caller was passing in string previously.
- Text Element - justification can be specified with a single character. l=left, r=right, c=center. Previously had to fully spell out
- Input Element - justification can be specified with a single character. l=left, r=right, c=center. Previously had to fully spell out
- StatusBar Element - justification can be specified with a single character. l=left, r=right, c=center. Previously had to fully spell out
- Image Element - can specify no image when creating. Previously gave a warning and required filename = '' to indicate nothing set
- Table Element - justification can be specified as an "l" or "r" instead of full word left/right
- Tree Element - justification can be specified as an "l" or "r" instead of full word left/right
- Graph.draw_point - changed to using 1/2 the size rather than size. Set width = 0 so no outline will be drawn
- Graph.draw_polygon - new drawing method! Can now draw polygons that fill
- Layout error checking and reporting added for - Frame, Tab, TabGroup, Column, Window
- Menu - Ability to set the font for the menu items
- Debug window - fix for problem closing using the "Quit" button
- print_to_element - print-like call that can be used to output to a Multiline element as if it is an Output element
PySimpleGUI
on 20 Feb 2020
0.36.0 PySimpleGUIWeb 20-Feb-2020
Fixes problem that was triggered by a Remi update
- Allow empty value to be specified when creating Image element
- Fix for Text element crashing following the Remi 2020.2.5 release
- Crash will show trying to use method "set_layout_orientation"
This is the first time I've pinned a PySimpleGUIWeb release directly to a Remi release. There have been a couple of times now where a Remi release has broken PySimpleGUI badly enough that PySimpleGUI failed to run following the Remi upgrade. I need time between Remi releases so that these can be found and fixed prior to users running into trouble.
PySimpleGUI
on 21 Feb 2020
ptoaster-style Notifications Now Builtin
A BONUS for you in the 4.16.0 release.
Part of the new System Tray functionality for the PySimpleGUI tkinter port are the notification windows like from the ptoaster package.
https://github.com/PySimpleGUI/ptoaster
ptoaster is a little different because it runs the notification windows in the background, as a subprocess. The notification windows that are part of the System Tray code do not run as a subprocess. The call does not return until the notification window closes.
The notification window can be directly called using a class method for the SystemTray class.
Because it's a class method, you can call it directly without actually making a SystemTray object.
This code:
sg.SystemTray.notify('This is my title', 'This is the message')
created and showed this little window in the bottom right corner of the screen:

Here is the documentation for class method - SystemTray.notify
SystemTray.notify
Displays a "notification window", usually in the bottom right corner of your display. Has an icon, a title, and a message
The window will slowly fade in and out if desired. Clicking on the window will cause it to move through the end the current "phase". For example, if the window was fading in and it was clicked, then it would immediately stop fading in and instead be fully visible. It's a way for the user to quickly dismiss the window.
notify(title,
    message,
    icon=...,
    display_duration_in_ms=3000,
    fade_in_duration=1000,
    alpha=0.9,
    location=None)
Parameter Descriptions:
|Name|Meaning|
|---|---|
|title|(str) Text to be shown at the top of the window in a larger font|
|message|(str) Text message that makes up the majority of the window|
|icon|Union[bytes, str] A base64 encoded PNG/GIF image or PNG/GIF filename that will be displayed in the window|
|display_duration_in_ms|(int) Number of milliseconds to show the window|
|fade_in_duration|(int) Number of milliseconds to fade window in and out|
|alpha|(float) Alpha channel. 0 - invisible 1 - fully visible|
|location|Tuple[int, int] Location on the screen to display the window|
|||
| return | (int) reason for returning |
There are 4 possible values for the icon parameter. The default is the INFORMATION icon.
SYSTEM_TRAY_MESSAGE_ICON_INFORMATION
SYSTEM_TRAY_MESSAGE_ICON_WARNING
SYSTEM_TRAY_MESSAGE_ICON_CRITICAL
SYSTEM_TRAY_MESSAGE_ICON_NOICON
Or you can specify your own icon using a PNG/GIF image encoded in Base64 or as a filename.
PySimpleGUI
on 21 Feb 2020
SimpleKivy 👀
I want to spotlight an interesting Kivy technology that borrows from the PySimpleGUI layout architecture. The result is a cool hybrid PySimpleGUI and Kivy.
https://github.com/SuperMechaDeathChrist/SimpleKivy
@SuperMechaDeathChrist has been a supporter of PySimpleGUI from way back, bringing video playback to the list of integrations. It's great to see offshoots like this! What a great group of users the PySimpleGUI crowd is, right.... was I right, huh... huh?
PySimpleGUIDroid (the Kivy port) has been in a holding pattern for a bit. Don't expect movement quickly. So, in the meantime....
Take a look at SimpleKivy. It could be a quick way to a Kivy GUI. It looks cool to me. 👍
PySimpleGUI
on 21 Feb 2020
PSG-LookyFeely 👀
And while you're cruising around GitHub looking at the cool PySimpleGUI related things, stop into the LookyFeely repository.
https://github.com/definite-d/PSG-LookyFeely
Themes have been one of the best additions to PySimpleGUI in 2019. This project takes them further, providing tools to make awesome themes.
It's another great example of a user doing some really positive, helpful community oriented things. Awesome stuff to see.
Check out the readme for some nice screenshots. I'm liking the colors!
And, there have been some really advanced tools in the works that I think will be super cool to use so keep an eye open for new stuff too.
PySimpleGUI
on 21 Feb 2020
MosaicMaker When features become applications
An interesting lesson that's emerging from the PySimpleGUI effort. You can take a utility with a feature, add a GUI to it, and you've got yourself an application / product.
This project is a great example of creating a standalone application that's VERY handy using PySimpleGUI.
https://github.com/flipswitchingmonkey/MosaicMaker
It uses ffmpeg to create a contact sheet for your movie. The program runs both as a command line application as well as one with a GUI.


It leverages one small part of ffmpeg. You could take a number of ffmpeg operations and write a nice little application based on them. I hope someone does more of these kinds of utilities.
Python is SO handy for processing stuff and now with PySimpleGUI it's trivial to turn things into applications, perhaps the result will be more applications that can be run by normal people.
PySimpleGUI
on 22 Feb 2020
A Pip Update GUI
On Medium there have been a series of PySimpleGUI articles written by Costas Andreou under the topic of Data Science. They've been quite popular and I like the code he writes.
His latest project enables you to do bulk updates on your pip installed packages, on a selective basis. You can choose the package using checkboxes.
I don't like that these are all on Medium as it's a subscription service.
https://towardsdatascience.com/building-a-python-ui-to-keep-your-libraries-up-to-date-6d3465d1b652

The originally posted code froze the GUI while the pip command is being initially run to get the list of packages. I have a LOT of packages installed so it takes a very long time.
Rather than repeatedly seeing windows offer me the opportunity to close the window, I decided to make an animation instead of freezing.
To do that, all I had to do was run the subprocess as a Thread. This was the async mechanism that I needed in order to keep on executing and showing that animation.
This little window is shown and animates while the pip command runs.

This is the first part of the program that gets the list of packages while running an animation on the screen.
fhandle = open(r'C:\temp\update.txt', 'w')
thread = threading.Thread(target=lambda: subprocess.run('pip list --outdated', shell=True, stdout=fhandle), daemon=True)
thread.start()
while True:
    sg.popup_animated(sg.DEFAULT_BASE64_LOADING_GIF, 'Loading list of packages', time_between_frames=100)
    thread.join(timeout=.1)
    if not thread.is_alive():
        break
sg.popup_animated(None)
fhandle.close()
The addition was to encapsulate the subprocess in a Thread which I cleverly did as a lambda expression (rare victory!)
Here's the full code from the article with the animation added.
import subprocess
import pandas as pd
import re
import PySimpleGUI as sg
import threading

fhandle = open(r'C:\temp\update.txt', 'w')
thread = threading.Thread(target=lambda: subprocess.run('pip list --outdated', shell=True, stdout=fhandle), daemon=True)
thread.start()
while True:
    sg.popup_animated(sg.DEFAULT_BASE64_LOADING_GIF, 'Loading list of packages', time_between_frames=100)
    thread.join(timeout=.1)
    if not thread.is_alive():
        break
sg.popup_animated(None)
fhandle.close()
df1 = pd.DataFrame(columns=['Package', 'Version', 'Latest', 'Type'])
fhandle = open(r'C:\temp\update.txt', 'r')

AnyPackagesToUpgrade = 0
for i, line in enumerate(fhandle):
    if i not in (0, 1): #first two lines have no packages
        df1 = df1.append({
                'Package': re.findall('(.+?)\s', line)[0],
                'Version': re.findall('([0-9].+?)\s', line)[0],
                'Latest': re.findall('([0-9].+?)\s', line)[1],
                'Type': re.findall('\s([a-zA-Z]+)', line)[0]
                }, ignore_index=True)
        AnyPackagesToUpgrade = 1 #if no packages, then don't bring up full UI later on

formlists = []  #This will be the list to be displayed on the UI
i = 0
while i < len(df1): #this is the checkbox magic that will show up on the UI
    formlists.append([sg.Checkbox(df1.iloc[i, :])])
    formlists.append([sg.Text('-'*50)])
    i += 1
layout = [
    [sg.Column(layout=[
        *formlists], vertical_scroll_only=True, scrollable=True, size=(704, 400)
    )],
    [sg.Output(size=(100, 10))],
    [sg.Submit('Upgrade'), sg.Cancel('Exit')]
]
window = sg.Window('Choose Package to Upgrade', layout, size=(800, 650))
if AnyPackagesToUpgrade == 0:
    sg.Popup('No Packages requiring upgrade found')
    quit()
definedkey = []
while True:  # The Event Loop
    event, values = window.read()
    # print(event, values)  # debug
    if event in (None, 'Exit', 'Cancel'):
        break
    elif event == 'Upgrade':
        for index, value in enumerate(values):
            if values[index] == True:
                #print(df1.iloc[index][0])
                subprocess.run('pip install --upgrade ' + df1.iloc[index][0])
                print('Upgrading', df1.iloc[index][0])
        print('Upgrading process finished.')
I may make one more pass at it so that it can be generalized and put into the Cookbook as a recipe for running background processes while showing an animation.
PySimpleGUI
on 22 Feb 2020
A Request for Help With Getting a PySimpleGUI Application Listed 👀
One project that's been a good "portfolio" project to be able to show people what PySimpleGUI is capable of is the PyIDM project (Internet Download Manager functionality written in Python). It's super cool and is mind blowing how well it does many tasks simultaneously.


Getting listed in some of the curated Python lists is one important way projects get found. I know it gave PySimpleGUI a big boost to be listed on Vinta
You may recall the plea for help in getting PySimpleGUI listed?
The PySimpleGUI community can help out one of their own by voting for this hard working open source project on Vinta. It requires 25 votes. So far there are 11. It took months for PySimpleGUI to get there, but it was worth the begging to get there as more people found the project.
PLEASE consider taking a moment and going to this page to upvote. https://github.com/vinta/awesome-python/pull/1450
To vote, look for the little face on the issue (just like this issue has one). Click it and choose a thumbs up.

PySimpleGUI
on 23 Feb 2020
Making Button Images Transparent Using Themes
In order to make a button with an image blend so that it's flush and doesn't have a square around it, you need to set the button color to match the background that it is sitting on.
These buttons from a MIDI player are an example.

For each of the 3 buttons that have images in that portion of the window, they each have their button_color parameter set to:
button_color=(g.theme_text_color(), g.theme_background_color())
This leverages the "theme" function calls to get the color of the background and to set the color of the text to be the same as the window's text color.
Do not try to use the old constant TRANSPARENT_BUTTON as it is being completely removed. It was changed to be a big warning string, but I found that is crashing tkinter when it's passed in, so it's best that it be completely removed in the next PyPI release. It's original value was a color of gray that matched the only-gray-windows that existed way back when PySimpleGUI launched.
PySimpleGUI
on 23 Feb 2020
MIDI Looper Project
PySimpleGUI was and continues to be a means to an end. A way to get a user interface.
OK, so maybe this interface isn't at all pretty and it's pretty klunky, but for what it does, it's fantastic.

I often learn piano pieces using MIDI and a piano hooked up to the computer. This allows me to playback midi files using my piano. Because I'm learning the pieces, I often want to loop on sections of music as I practice it over and over. And of course I need to slow things way down (thus the tempo slider).
This crude program is actually an entire workbench of sorts for learning music in this manner.
I use the slider at the bottom as trims. I roughly mark where I want the looping to occur then I use the sliders to position the exact spot of the beginning and end of the loop.
It's actually a very vert old program that used the call to FlexForm instead of Window. Dusted it off tonight to add the tracks as a listbox so that I can easily skip from one track to the next in a non-sequential way. Using the next and previous track buttons was getting old. And it looks 1,000 times better. Still plenty more to fix on it, but for now, it's good enough and I'm back up and running.
I encourage you to make tools and utilities and stuff like this that you can use. Adding a user interface onto other people's code can do amazing things. That's all that's happening in almost all of the PySimpleGUI demo projects. They're integrating other code with a user interface.
PySimpleGUI
on 24 Feb 2020
Animated Shell Notification
There is nothing more frustrating to every user and programmer for that matter than to have your OS display:

YOU know your program is busy running a shell command... your user MAY know your program is busy running a shell command.
Wouldn't it be nice if the user and the operating system both also knew that you're program is busy, not hung?
Well, this technique will do just that.
Instead of seeing the "you're hung, do you want to kill the program" dialog box, you'll see this animation:

How can this be? 😳
Here's how....this code was posted as a Demo in the demo programs area, but because it's so short, I'm including it here:
import subprocess
import PySimpleGUI as sg
import threading

"""
    Demo - Run a shell command while displaying an animated GIF to inform the user the
    program is still running.
    If you have a GUI and you start a subprocess to run a shell command, the GUI essentually
    locks up and often the operation system will off to terminate the program for you.

    This demo fixes this situation by running the subprocess as a Thread.   This enables
    the subproces to run async to the main program.  The main program then simply runs a loop,
    waiting for the thread to complete running.

    The output from the subprocess is saved and displayed in a scrolled popup.
"""


def process_thread():
    global proc
    proc = subprocess.run('pip list', shell=True, stdout=subprocess.PIPE)

thread = threading.Thread(target=process_thread, daemon=True)
thread.start()

while True:
    sg.popup_animated(sg.DEFAULT_BASE64_LOADING_GIF, 'Loading list of packages', time_between_frames=100)
    thread.join(timeout=.1)
    if not thread.is_alive():
        break
sg.popup_animated(None)

output = proc.__str__().replace('\\r\\n', '\n')
sg.popup_scrolled(output)
Expect to see this construct pop up in PySimpleGUI code more and more. We need to learn ways to run these long-running background operations in the background so that the user experience can be improved. It's much nicer to see an animation playing than a static window.
PySimpleGUI
on 24 Feb 2020
popup_notify
One of the nice things about the popup family of calls is the ability to add as many parameters to display as you wish. It's nice not having to construct a single string to display because an API call only has a single "message" parameter. This is the situation with the call SystemTray.notify.
In the spirit of supplying a popup function for displaying small windows such as the fade in/out notification window I've created a new popup called popup_notify.
Here's the definition for it
def popup_notify(*args, title='', icon=SYSTEM_TRAY_MESSAGE_ICON_INFORMATION, display_duration_in_ms=SYSTEM_TRAY_MESSAGE_DISPLAY_DURATION_IN_MILLISECONDS,
               fade_in_duration=SYSTEM_TRAY_MESSAGE_FADE_IN_DURATION, alpha=0.9, location=None):
    """
    Displays a "notification window", usually in the bottom right corner of your display.  Has an icon, a title, and a message.  It is more like a "toaster" window than the normal popups.

    The window will slowly fade in and out if desired.  Clicking on the window will cause it to move through the end the current "phase". For example, if the window was fading in and it was clicked, then it would immediately stop fading in and instead be fully visible.  It's a way for the user to quickly dismiss the window.

    The return code specifies why the call is returning (e.g. did the user click the message to dismiss it)

    :param title: (str) Text to be shown at the top of the window in a larger font
    :param message: (str) Text message that makes up the majority of the window
    :param icon: Union[bytes, str) A base64 encoded PNG/GIF image or PNG/GIF filename that will be displayed in the window
    :param display_duration_in_ms: (int) Number of milliseconds to show the window
    :param fade_in_duration: (int) Number of milliseconds to fade window in and out
    :param alpha: (float) Alpha channel. 0 - invisible 1 - fully visible
    :param location: Tuple[int, int] Location on the screen to display the window
    :return: (int) reason for returning
    """
Let's see this popup in action. This call:
sg.popup_notify('Check it out... this is a popup!','Part 1', 'Part 2', '1234567890 '*6, title='Looks just like a popup!')
Creates this window and effect in the bottom right corner of the window.

If you don't like the placement, you can set the location parameter. This line will create the window so that the upper left corner is centered in the window.
sg.popup_notify('Check it out... this is a popup!','Part 1', 'Part 2', '1234567890 '*6, title='Looks just like a popup!', location=(sg.Window.get_screen_size()[0]//2, sg.Window.get_screen_size()[1]//2))
Animated Lengthy Shell Commands
A new function was just added.... shell_with_animation.
This is a super-high-level call that you could argue doesn't belong in the PySimpleGUI APIs. But I saw an opportunity to create an interesting capability that may help spur programs that use command line programs to create full applictions.
The recent "Mosaic" project that uses ffmpeg to create a contact sheet of images from videos was the catalyst for this. Some demo code was developed to help show animations while background operations are running. That demo code ended up being pulled into PySimpleGUI itself.
The result is a single function call that you can call that will run a shell command and return a string with that command's output. While the command is running, an animated GIF will be shown until the operation completes. Rather than push a demo onto you to modify it seemed a lot easier to just give you a more complete solution, built right into the APIs.
Here's the function definition:
def shell_with_animation(command, args=None, image_source=DEFAULT_BASE64_LOADING_GIF, message=None, background_color=None, text_color=None, font=None, no_titlebar=True, grab_anywhere=True, keep_on_top=True, location=(None, None), alpha_channel=None, time_between_frames=100, transparent_color=None):
    """
    Execute a "shell command" (anything capable of being launched using subprocess.run) and
    while the command is running, show an animated popup so that the user knows that a long-running
    command is being executed.  Without this mechanism, the GUI appears locked up.

    :param command: (str) The command to run
    :param args: List[str] List of arguments
    :param image_source: Union[str, bytes] Either a filename or a base64 string.
    :param message: (str) An optional message to be shown with the animation
    :param background_color: (str) color of background
    :param text_color: (str) color of the text
    :param font: Union[str, tuple) specifies the font family, size, etc
    :param no_titlebar: (bool)  If True then the titlebar and window frame will not be shown
    :param grab_anywhere: (bool) If True then you can move the window just clicking anywhere on window, hold and drag
    :param keep_on_top:  (bool) If True then Window will remain on top of all other windows currently shownn
    :param location:  (int, int) (x,y) location on the screen to place the top left corner of your window. Default is to center on screen
    :param alpha_channel: (float) Window transparency 0 = invisible 1 = completely visible. Values between are see through
    :param time_between_frames: (int) Amount of time in milliseconds between each frame
    :param transparent_color: (str) This color will be completely see-through in your window. Can even click through
    :return: (str) The resulting string output from stdout
    """
This test harness consists of these 2 lines of code:
output = sg.shell_with_animation('pip', 'list', message='Loading your pip list', background_color='white', text_color='red', font='Helvetica 15')

sg.popup_scrolled(output, font='Courier 10')
The result is this animation is played while the pip list is executed

And then a scrolled popup is used to display the string returned from the command.

It looks like a little extra information is on the front of what's returned from the command. Will have to look into what that is and how to edit it away. In the meantime I think it's highly usable in its current state.
I dunno, maybe this was a terrible idea. We'll see. It seems GUI programs run up against these kinds of concurrency problems often and often programmers are at a loss as to what to do. Most simply go off and do whatever long task needs to be done, letting the user fight with the OS to keep their program running.
It took me a day or two of fiddling with this stuff to figure out a workable solution, so I can only imagine how long a beginner would take. I'm no expert and there is likely a better way to do all of this that someone is likely to point out to me.
Anyway, again the hope is that more command line programs' features can be turned into full-applications using a capability like this one.
PySimpleGUI
on 24 Feb 2020
Image.update_animation_no_buffering()
Do you have a lengthy GIF file that you want to playback but have been unable to use the update_animation code due to the short, 1000 frame, video maximum length?
If so then you'll like the new method for the Image element, update_animation_no_buffering. You call this method in the same way you call the update_animation method. The difference is in the name.... there is no buffering performed. As a result, frames are read and decoded on the fly as they are needed.
The animated popup still uses the older update method as it's assumed these are short little videos. You can easily create your own 'popup' style window that has an Image element in it that you call the update method for yourself.
PySimpleGUI
on 25 Feb 2020
The 1-line Popup
Every couple of weeks someone posts something, somewhere, suggesting an addition to popups. It's highly unlikely to happen as mentioned in the documentation. Here's why...
It's trivial to create your own popup, in-line, using 1 line of code. You might recall a post a few weeks back about the new Window.read(close=True) capability that enables the 1-line compactness. If not, here's a refresher and a great example of it being put to good use.
_ Pay attention to an important fact about how the Text element's sizing works._
OK, so, YOU have a need to show a drop-down in addition to a normal bit of text. Or maybe you want 3 buttons in your popup. Don't take the time to file an enhancement when you can solve the problem yourself in a line of code.
Here's a 3-button example done in 2 lines of code, one for creating a message, the other for showing it.
import PySimpleGUI as sg
# This is an inline custom window like a popup
my_msg = 'This is a multiline bit of text that automatically wraps and adjusts the\nmessage\nThe Text Element automatically adjusts'
event, values = sg.Window('My Popup Title',[[sg.Text(my_msg, size=(40,None))],
                                            [sg.Button('Ok'), sg.Button('Cancel'), sg.Button('Exit')]]).read(close=True)

Here's a true 1-line call that's a bit more crowded.
import PySimpleGUI as sg

event, values = sg.Window('My Popup Title',[[sg.Text('This is a multiline bit of text that automatically wraps and adjusts the\nmessage\nThe Text Element automatically adjusts', size=(40,None))], [sg.Button('Ok'), sg.Button('Cancel'), sg.Button('Exit')]]).read(close=True)
Text Sizes
Note that in this example the height field for the Text element can be set to None to specify the height should be computed. _This is the only element that works this way._ Don't try putting None in other elements' sizes. This capability is specific to the tkinter port of PySimpleGUI, although it would be good to be able to do this in all of the ports.
The Lesson - Don't Be Afraid To Make a Window
For those that are starting with popups and are outgrowing them, there are plenty of simple ways of solving your problem waiting for you to discover. They're simple, quick to learn, documented, and easy to understand & put to use.
The Window is the cornerstone of the PySimpleGUI package. Learn how to make them and it's like busting out the box of color crayons instead of using a pencil. There are not that many more lines of code you need to write than you're writing calling popup. The basic PySimpleGUI one-shot Window program consists of 4 lines of code / sections.
- Layout definition
- Window creation
- Window read
- Window close
That's it and each of those can be a single line. As you saw above, you can combine number 3 and 4 by using the close parameter when you read. And of course they can be crunched down to 1 line of code.
PySimpleGUI
on 2 Mar 2020
Thank you all for trying so hard!!!
I'm seeing better and better PySimpleGUI windows, many of them from users that have not required assistance. That's really encouraging. Your results motivate me to keep adding, fixing and expanding so you can do more stuff. The best way you can help this project is by building stuff that uses it. Oh, and tell everyone you know about it too 😉
Twitter is abuzz from the PyCon presentation
There was a tkinter/PySimpleGUI presentation at a PyCon-Mini in Japan not long ago with the deck and other information circulating around Twitter. Several people were already posting their PySimpleGUI project info on Twitter as well.
PySimpleGUI
on 2 Mar 2020
print_to_element Being Replaced With Multiline.print
If you're using the newly added print_to_element function, then you'll want to change your code soon. You can do it immediately if you're running the GitHub version of PySimpleGUI. It was only released there today. I really want to get some stuff posted to PyPI soon so it shouldn't be long.
To switch over will be trivial because your current code has all of the parameters required already. You simply need to change some syntax around.
Your code may resemble this depending on what parameters you're using.
sg.print_to_element(window[MLINE_KEY], 'This is blue text', text_color='blue', end='')
To switch to using the Multiline.print method, change the function to use print method for the element you specified as the first parameter.
window[MLINE_KEY].print('This is blue text', text_color='blue', end='')
That's it. Normally it would likely be something simpler:
window[MLINE_KEY].print('This is my text', variable1, variable2)
The idea behind this method is that you can go through your program and simply tack on the name of a multiline element to the front of it and you'll be printing to a multiline.
This would have been your initial print using the example above:
print('This is my text', variable1, variable2)
System Tray Icons on Tkinter - Tiny Little Windows
That's what the Tkinter version of a "System Tray Icon" is... it's a tiny little window. The one I'm running that's monitoring these GitHub Issues for changes turns red when one of you leaves a,... present for me.
Here's the size of mine at the moment:

The entire window measures 22 x 21 pixels. The Trashcan icon is considerably larger at 64 pixels. I assume you could make a 1 pixel window if you really wanted it. Your window could even blend into the background of your desktop and big one big invisible hotspot that you can interact with by clicking on it, right clicking, etc.
Because it has no titlebar, windows like this one do not show up on the taskbar. You cannot tell they're even running. It's how I get away with all these cool rainmeter type things running on my desktop all the time without it impacting my taskbar with a ton of icons.
The way the Tray Icon feature works is the little window is a single Graph Element with a right click menu. That's it. Yea, I KNOW, it's STUPID easy. Here's the internal implementation of a System Tray window:
layout = [[image_elem]]
See, just an Image element.
I could have just as easily chosen a Graph Element and placed the image on the Graph. Both accept a right click menu and both can be bound to use a double-click. A Button may have worked as well, but I don't think you can add a right click to a button.
Lesson here is that it's possible to make some interesting, non-traditional windows using PySimpleGUI. And there are multiple ways of doing similar things.
Have fun creating and using some of these titlebar-less windows so that you can keep some interesting utilities running all the time. Try making a little icon application that sits around and monitors the clipboard or does something useful for you.
PySimpleGUI
on 4 Mar 2020
Upgrade From GitHub
Coming SOON, very soon, in release 4.17.0, is the ability to upgrade your previously pip installed version of PySimpleGUI with the version from GitHub. This will allow you to instantly be up to date when a fix is published for an Issue you've filed.
Normally when you get something fixed and uploaded to GitHub, you're instructed to download the file PySimpleGUI.py from GitHub and to place that file in your application's folder. This is the easiest way to upgrade. It's also the easiest way to get confused when you want to go back to using a pip installed version when your fix is finally uploaded to PyPI. When that happens, you need to delete the PySimpleGUI.py file you previously downloaded.
Going forward you'll be able to run the "test harness" that comes with PySimpleGUI. To "run" the PySimpleGUI test harness type:
python -m PySimpleGUI.PySimpleGUI
You will see an animated window that looks like this:

Notice the nice, new, bright red button:

Click it and you'll be asked to verify you really want to upgrade. If you approve, the new PySimpleGUI.py file will be downloaded and put into your installed packages folder. You will then see a red window indicating success:

This is a rather significant improvement as it allows you to run the latest version from GitHub without having to worry about how to download the PySimpleGUI.py file, where to put it, and you won't have to remember to delete it later when a new version is released to PyPI. You will be able to do a simple pip install and it'll be upgraded.
This feature is brought to you by Ruud van der Ham
You can learn about his cool project that is also a single .py file package here -> www.salabim.org
PySimpleGUI
on 5 Mar 2020
Upgrade from GitHub Part 2
You do not have to run the test harness GUI in order to run the upgrade from GitHub utility.
In addition to performing an upgrade using the test harness, you can also perform the upgrade via the command line. You will be shown the same GUI confirmation window.
To upgrade your PySimpleGUI release to the latest on GitHub, type this on the command line (for windows... for LinuxMac the command is python3)
python -m PySimpleGUI.PySimpleGUI upgrade
You will see this confirmation window:

You'll see the same red window shown in the previous post when the upgrade is successful.
This is an exciting development made possible by my friend Ruud who has quietly helped this project countless times in the past. You can thank Ruud for the entire 2.7 support for example.
Now he's bringing us an incredible capability, instant gratification. No more waiting on PyPI for your fix to be officially released. You can get the latest GitHub just as easily as running a pip install.
HUGE.... this is a HUGE thing.
PySimpleGUI
on 6 Mar 2020
PyCon miniShizuoka - Speaker Deck and Supporting Materials
PySimpleGUI has managed to slip onto a presenter's screen at a PyCon recently. In Japan a couple of weeks ago a fantastic presentation was given that discussed creating desktop applications in Python.
The presenter's deck is here:
https://speakerdeck.com/okajun35/pythondedesukutotupuapuriwojian-dan-nizuo-rufang-fa
Here is the GitHub that matches:
https://github.com/okajun35/for_pycon_shizu
@okajun35 Jun okazaki has been a huge supporter of PySimpleGUI in Japan. Jun's single-handedly responsible for introducing Japan to PySimpleGUI. There has been months of Twitter activity leading up to the PyCon, hosting evens where PySimpleGUI is being taught to Python newcomers and club members.
A HUGE THANK YOU to Jun
for all of the help, support and words of encouragement over the many months.
PySimpleGUI
on 6 Mar 2020
New Date Chooser Soon


The more compact look cuts off the text on "Wed".

Finally getting around to looking at re-implementing the Calendar Chooser window so that it's a pure PySimpleGUI implementation instead one directly coded in tkinter. This will enable it to be used on any of the ports, in theory.
It still has a ways to go. It's already taking shape pretty nicely. It should be a better chooser window since you'll be able to locate it anywhere on the screen. It uses your current theme so that it matches your other windows. And other options will be available such as being able to set which day the week begins on.
It would be nice to be able to ship it with the upcoming PyPI release, but it needs a lot of testing first.
Here is the current date chooser window for comparison

I'm sorry this has been so long in the making, but it's just how it worked out. Soon!!
PySimpleGUI
on 6 Mar 2020
PySimpleGUI-Widgets - COVID-19 Widget
A new repo was opened and a new PySimpleGUI design pattern is emerging that is for making rain-meter style Widgets using PySimpleGUI.
https://github.com/PySimpleGUI/PySimpleGUI-Widgets
The first one released today is not the most uplifting I'm afraid. Was hoping that the recent Weather Widget would have made it up there first, but I kinda got focused this morning on making this COVID-19 tracking widget.

I kinda "borrowed" a lot from the Weather Widget.

Here are a couple of older ones.


Putting together a template for you to use to make your own Widgets. The idea is to make it so that you can quickly and easily make Widgets by modifying a template. The Setup Window will be standardized and extendable. The standard settings are for things like alpha-channel. Then the user can add their own settings to that window. Hopefully you'll be able to make your own Widgets
Better Than Rainmeter?
In many ways these PySimpleGUI Widgets are (maybe) better than Rainmeter. Full disclosure, I've never written a rainmeter widget... but I have written a PySimpleGUI program or two.
With PSG Widgets each widget is completely standalone. You don't have to run a master program, although nothing stops you from writing a "Widget Launcher" that remembers the widgets you were running and starts them for you.
Another advantage is that they're written in PySimpleGUI, the easiest GUI library I know of. It took about 4 hours to get the COVID Widget written, started with a command line program that processed the Johns Hopkins data and finished with a nicely polished GUI.
PySimpleGUI
on 9 Mar 2020
COVID Widget Update
What a difference a day makes.... Started on this project this morning. By tonight it's feeling pretty stable and complete.
The latest code can be found here:
https://github.com/PySimpleGUI/PySimpleGUI-Widgets/blob/master/PSG_Widget_COVID19_Distance.py

It's got a more proper "Settings" window. As soon as it was posted this morning I knew I needed to make it more internationalized. It's great that it works for US locations, but PySimpleGUI users and COVID cases are not located in a single country. So, going worldwide was a must. That also meant displaying metric distances in addition to miles.
So the settings were extended and a more complete settings window was created in the process.

Between this widget and the weather widgets I'm hoping to be able to put together a good Widget Template that will make it trivial for anyone to make these kinds of little utility programs. The template will make things like saving settings built-in so that the programmer doesn't have to do anything to save or recall settings. If no settings file is found, one will be created by pulling up the settings window first.
Hope to have a template done in the next week.
PySimpleGUI
on 10 Mar 2020
Slow responding, releases....
Sorry things have slowed down over the past week. The C19 outbreak has had a big impact that's been disruptive to PySimpleGUI support.
The release is on the way. I'm struggling with the new documentation. There are fixes I'm adding to hopefully get the docs done soon. Until the docs are done, the release can't go out.
Widgets
Finally added to the widgets in the new Widget Repository.
CPU Cores
The CPU Dashboard that shows the CPU usage of each of your core's

Current Weather
And a weather widget based on an earlier version of this weather widget made by @israel-dryer

COVID-19 Tracker
Trying to whip this one into shape so it can perhaps be the beginning of a template that can be used by anyone to create a widget.
A little more work is needed to make things like the settings window / file be really easy to make additions to as well as supplying a standard group of settings that all widgets or certain types of widgets will have such as alpha, refresh rate, maybe theme color. The code that loads/saves a settings file is part of the widget already.

PySimpleGUI
on 13 Mar 2020
PySimpleGUI-COVID19 Repo
https://github.com/PySimpleGUI/PySimpleGUI-COVID19
A new GitHub Repository has been set up for COVID-19 tools built using PySimpleGUI. So far there are two with more on the way.
The first one you've seen already, the distance widget.
The second one is a new graphing tool that displays the most recently Johns Hopkins data

It's got a ways to go but is off to a fantastic start.
I've always wanted to make a Tableau style tool using PySimpleGUI and this is a golden opportunity to do just that.
It's important to be able to compare the different counties and regions within countries. A grid of graphs is an excellent way of doing that.
Additional options are being developed now to enable you to choose the countries, and the level of detail. For example, maybe you want to see the graphs for each of the states in the Unites States.
In case it's not apparent to your eyes, the countries that are not taking "draconian measures" all have nearly identical growth curves. They all share that mathematically beautiful, but deadly exponential growth curve. These are turning out to be near perfect curves. Data can be both beautiful and hold a terrible message.
🙏 Please stay safe everyone... these tools are being published as an attempt to help others.
😷 Take care of yourself first. Your employer comes second to you and your family. This is a great time to be reminded of that.
PySimpleGUI
on 13 Mar 2020
Crash Detection
This is one for the Cookbook or Demo Program
If you run any PySimpleGUI programs as a widget, or background task or in the system tray, you're eventually going to hit a situation where your window closes because it's crashed. These types of windows are generally launched so that they do not have a console.
So what are you supposed to do to detect when there's a crash or problem in your script? After all your stdout is missing unless you have an output element.
A Error Catch Technique
Lately I've been running the PySimpleGUI Issues Watcher system tray program and it would periodically crash with the assumption being it's from a "bad read" of the GitHub issues. A request timed out or some other networking type of error.
Place a try block around your entire Event Loop
Use a combination of the Debug Window and a popup_error call
You need some kind of popup call in order for the Debug Window to stay open as it's a non-blocking call.
Continued use of GUI
Note that the GUI is mostly likely still fuctional and capable of showing new popup windows and even the Debug Window will work. This is because the errors are most over in the user code (sorry to make that kind of statement, but it's generally true, my user code included). Because the PySimpleGUI Package itself isn't in a bad state or injured in some way, it's perfectly save to continue on using the GUI calls to display the error information.
Here's a nice template you can follow:
import traceback
import PySimpleGUI as sg

layout = [  [sg.Text('My Window')],
            [sg.Input(key='-IN-'), sg.Text(size=(12,1), key='-OUT-')],
            [sg.Button('Go'), sg.Button('Exit')]  ]

window = sg.Window('Window Title', layout)

try:
    while True:             # Event Loop
        event, values = window.read()
        window.bad()
        print(event, values)
        if event in (None, 'Exit'):
            break
        if event == 'Go':
            window['-OUT-'].update(values['-IN-'])
    window.close()
except Exception as e:
    tb = traceback.format_exc()
    sg.Print(f'An error happened.  Here is the info:', e, tb)
    sg.popup_error(f'AN EXCEPTION OCCURRED!', e, tb)
When an error occurs, in this case it'll trip up at the window.bad() call.
These 2 windows will appear:

Debug Print Output

And the debug window in case you want to copy something from the traceback.
PySimpleGUI
on 14 Mar 2020
Back to "normal" PySimpleGUI coding soon...promise
It's been 11 days since the post of the COVID utilities started. I'm getting close to finishing up the feature set I've been working towards. It's the grid of graphs that's been the program I've been spending all my time on.
My apologies if you've been waiting on the release. Everyone is dealing with the disaster in their own way. For me I needed to get this data displayed, for my own personal consumption. When there's a lack of information that I can easily consume and a lack of where things are headed, I begin to feel really uneasy. Thus, the time spent on making tools that fill that need for me.
The last piece of the program is the "future-cast". I've been holding back a bit on releasing it or integrating it into the released code as it's speculation. But I think now it's helpful to see ONE possible path ahead, even if it's a rather grim one.
To be clear, what I'm talking about is displaying the graph of where things stand in the next 10 to 30 days. I don't know what else to use to plan than those numbers. Example... the USA graph today:

And here's what it looks like if you run things forward 20 days using a growth rate of 1.27X per day

Anyway, I'll be back on the documentation and code effort to address the issues you are facing in your code really soon. I'm sorry for the detour from the primary development.
PySimpleGUI
on 20 Mar 2020
Compressing Complex Layouts (Use Shortcuts and "User Defined Elements")
Will eventually add this to the cookbook, but for now, here's a tip.
The more PySimpleGUI application code I write, the more I learn about techniques that may be helpful to others. It's one of the reasons behind writing as many as possible.
A huge advantage that PySimpleGUI has over other GUIs is the ability to define a window's layout in a single screen of code. 1 line of code = 1 line of GUI display helps achieve that. Putting Element parameters on separate lines, adding extra whitespace to the GUI layout and repeating long lists of element parameters work against you, not for you.
Shortcuts
Once you understand your palette of Elements you can place in your layout definition you can begin to compress your layout code by using the shortened names of Elements. Less characters = more readable code = simpler code = happier developers.
The top 3 most frequently used elements are likely Text, InputText, Button. These can be shorted to T, B, I. There are other aliases you can use for these if you don't want to make them that short. InputText can be written also as Input and In.
The most common Elements have shortcuts... use them if you can. Checkbox can be CBox, Check, CB. You get the idea.
Example - A recently coded Settings window
This "settings" window

was created using this layout definition
    layout = [[sg.T('Color Theme')],
              [sg.Combo(sg.theme_list(), default_value=settings.get('theme', DEFAULT_SETTINGS['theme']), size=(20,20), key='-THEME-' )],
              [sg.T('Display Rows', size=(15,1), justification='r'), sg.In(settings.get('rows',''), size=(4,1), key='-ROWS-' )],
              [sg.T('Display Cols', size=(15,1), justification='r'), sg.In(settings.get('cols',''), size=(4,1), key='-COLS-' )],
              [sg.CBox('Autoscale Graphs', default=settings.get('autoscale',True), key='-AUTOSCALE-'), sg.T('Max Graph Value'), sg.In(settings.get('graphmax',''), size=(6,1), key='-GRAPH MAX-')],
              [sg.B('Ok', border_width=0, bind_return_key=True), sg.B('Cancel', border_width=0)],]

    window = sg.Window('Settings', layout, keep_on_top=True, border_depth=0)
The layout has a number of lengthy default values which makes the lines long. Using the shortcuts for the Elements helps shorten every line.
Some of the lines are long and don't wrap well on GitHub. Here's how they look in PyCharm on my system

For readability it is helpful sometimes to add a line break after elements that have a lot of parameters. This makes it easier to locate the elements since they'll be at the start of the line, but does add to the vertical length.
This row from the window is lengthy in the code:

Adding line breaks after each element helps make that row more readable in the code at the expense of a couple of extra lines.

User Defined Elements
This is covered in a number of places in the documentation and you'll find it in Demo Programs. When you find yourself copying and pasting something like a Text element that has a lot of parameters, consider creating your own element by simply using a function.
Let's say you've got a layout that uses text elements that look like this:
[sg.Text('Description', font=('Arial', 12), pad=(10, 0), background_color=BG_COLOR, text_color=TXT_COLOR, key='-DESCRIPTION-'), sg.Text('Status', font=('Arial', 12), pad=(10, 0), background_color=BG_COLOR, text_color=TXT_COLOR, key='-STATUS-')]
If you've got 20 of these in your layout it's going to quickly fill your screen with these elements alone. You can make your own Text element with these settings by creating a function.
def MyText(text, key):
    return sg.Text(text, font=('Arial', 12), pad=(10, 0), background_color=BG_COLOR, text_color=TXT_COLOR, key=key)
You can then use your function in your layout in place of where you would put the Text elements. Now the row definition that consumed a lot of space in your layout _simplifies_ down to:
[MyText('Description', '-DESCRIPTION-'), MyText('Status', '-STATUS-')]
4.17.0 PySimpleGUI 24-Mar-2020
The "it's been a minute" release
Improved DocStrings and documentation!
Upgrade utility
"Printing" directly to Multiline
- New upgrade utility to upgrade your installed package using GitHub version
- Can invoke from command line. Run
python -m PySimpleGUI.PySimpleGUI upgrade - The test harness GUI has an upgrade button
- Can invoke from command line. Run
- Multiline.print - Add multiline element to the front of any print statement. Also supports color output
- Debug informmation like path and version displayed in test harness GUI
- Added back the TRANSPARENT_BUTTON variable until can find a better way to deprecate
- All elements were losing padding when made invisible. Fixed
- Image.update - fixed crash due to not checking for type before getting size
- Image.update_animation_no_buffering - playback GIF animations of any length
- Graph element - Fixed divide by zero error in convert function
- TabGroup will now autonumber keys if none specified
- Measuring strings more accurately during layout
- Using specific font for measurement
- Used to compute TTK button height
- Used to compute Slider length
- Used to compute header widths in Tables, Trees
- Used to compute column widths in Tables, Trees
- Used to compute row heights in Tables
- Removed padx from row frames. Was using window's margins. Now padx & pady = 0
- Added no_titlebar to one line progress meter
- popup_notify - Creates a "notification window" that is like the System Tray Message window
- shell_with_animation - launch a shell command that runs while an animated GIF is shown
- Fixed problem with debugger not working after the recent close parameter addition to Window.read
I'm sorry this took SO long to get out. There were over 600 changes and the world has been on fire for a while, so it's taken a little longer than usual, but it's DONE.
I'll write up more info on the specifics of some of these.
A HUGE thank you is owed to @nngogol and @salabim.
@nngogol hit another homerun in the docstrings department and making the documentation look even better.
@salabim brought us the upgrade from GitHub feature that's going to REALLY help get fixed out to people in a much better way.
Now that documentation can be generated again and I'm no longer stuck working on the C19 graphing program it should break apart the logjam some and get the releases rolling out easier / faster. There have been a number of things this months that have thrown the timing off. So, I'm sorry if you're waiting on a fix or a feature. Hopefully will be able to focus back on the core code once again as well as making progress on the Cookbook update.
PySimpleGUI
on 25 Mar 2020
4.18.0 PySimpleGUI 26-Mar-2020
An "Oh F**k" Release - Table column sizes were bad
- Fixed bug in Table Element's column size computation
- popup_animated has new title parameter
- Checkbox - update can change the text
I broke the column sizes for Tables. DOH!
Really needed to jam this release out so made the changes, rolled in the other 2 features and popped it up to PyPI.
Hopefully the gates are open such that lots of releases can go out as there is a lot of code that's been waiting to get posted. This has been a good start.
PySimpleGUI
on 26 Mar 2020
popup_get_date
The long awaited replacement for the date-chooser is ready for testing. For the time being it's being released as a popup. If you want to immediately put it to use, you can integrate it into your code prior to the change of the date chooser button.
I should be able to get this integrated into the code as a replacement for the date chooser soon, maybe another day tops. Certainly by the end of the weekend. In the meantime I urge you to give it a try.
Here's the call definition:
def popup_get_date(start_mon, start_day,  start_year, begin_at_sunday_plus=0, location=(None, None)):
    """
    Display a calendar window, get the user's choice, return as a tuple (mon, day, year)

    :param start_mon: The starting month
    :type start_mon: int
    :param start_day: The starting day - optional. Set to 0 if no date to be chosen at start
    :type start_day: int
    :param start_year: The starting year
    :type start_year: int
    :param begin_at_sunday_plus: Determines the left-most day in the display. 0=sunday, 1=monday, etc
    :type begin_at_sunday_plus: int
    :return: Tuple containing (month, day, year) of chosen date or None if was cancelled
    :rtype: None or (int, int, int)
    """
If the user cancels or clicks OK prior to selecting an actual date, then None will be returned. Otherwise it returns a tuple (month, day, year).
The input parameters are the starting month, day and year. If you set the day to 0, then no specific date will be chosen. Only the month/year are shown. You can change which day of the week is shown in the left-most column by setting the parameter begin_at_sunday_plus to a non-zero value. 0 =Sunday, 1=Monday, etc. Default is Sunday (0)
import PySimpleGUI as sg

sg.theme('Dark Red')
print(sg.popup_get_date(3,28,2020))

The default theme

PySimpleGUI
on 28 Mar 2020
popup_get_date Code
A 3D printer capable of printing a 3D printer.
That's how it's felt building this new date_chooser code. At the moment it's a popup, but it'll get added into the button soon. A few more options will get added too.
I'm quite sure the code could be shorter and optimized better. I wouldn't call it one the better PySimpleGUI programs.
The important thing about this code is that anyone is capable of writing it. There are no PySimpleGUI internals being accessed. It's user-level PySimpleGUI code. When it's hooked in as the replacement for the current date chooser button, then it'll need to be tighter integrated, but at the moment, it's plain user code.
If you really really wanted or needed one of these for your application, you can write it yourself. This code would "mimic" the Data Chooser button easily. To do so all that has to happen is when the date is chosen, you call update on your target input field.
Here's the source code. I'll make it into a demo program too.
Sorry about the lack of comments. I'm usually pretty good about that, but I guess I was too focused on getting it working on this one.
import PySimpleGUI as sg
import calendar as cal
import datetime
import itertools


def popup_get_date(start_mon, start_day,  start_year, begin_at_sunday_plus):
    """
    Display a calendar window, get the user's choice, return as a tuple (mon, day, year)

    :param start_mon: The starting month
    :type start_mon: int
    :param start_day: The starting day - optional. Set to 0 if no date to be chosen at start
    :type start_day: int
    :param start_year: The starting year
    :type start_year: int
    :param begin_at_sunday_plus: Determines the left-most day in the display. 0=sunday, 1=monday, etc
    :type begin_at_sunday_plus: int
    :return: Tuple containing (month, day, year) of chosen date or None if was cancelled
    :rtype: None or (int, int, int)
    """

    day_font = 'TkFixedFont 8'
    mon_year_font = 'TkFixedFont 10'
    arrow_font = 'TkFixedFont 8'

    def update_days(window, month, year, begin_at_sunday_plus):
        [window[(week, day)].update('') for day in range(7) for week in range(6)]
        weeks = cal.monthcalendar(year, month)
        month_days = list(itertools.chain.from_iterable([[0 for _ in range(8 - begin_at_sunday_plus)]] + weeks))
        if month_days[6] == 0:
            month_days = month_days[7:]
            if month_days[6] == 0:
                month_days = month_days[7:]
        for i, day in enumerate(month_days):
            offset = i
            if offset >= 6 * 7:
                break
            window[(offset // 7, offset % 7)].update(str(day) if day else '')

    def make_days_layout():
        days_layout = []
        for week in range(6):
            row = []
            for day in range(7):
                row.append(sg.T('', size=(4, 1), justification='c', font=day_font, key=(week, day), enable_events=True, pad=(0, 0)))
            days_layout.append(row)
        return days_layout

    cur_month = start_mon
    cur_year = start_year
    cur_day = start_day

    days_layout = make_days_layout()

    layout = [[sg.B('◄', font=arrow_font, border_width=0, key='-MON-DOWN-'),
               sg.Text('{} {}'.format(cal.month_name[cur_month], cur_year), size=(16,1), justification='c', font=mon_year_font, key='-MON-YEAR-'),
               sg.B('►', font=arrow_font,border_width=0, key='-MON-UP-')]]
    layout += [[sg.Col([[sg.T(cal.day_abbr[i - (8 - begin_at_sunday_plus) % 7], size=(4,1), font=day_font, background_color=sg.theme_text_color(), text_color=sg.theme_background_color(), pad=(0,0)) for i in range(7)]], background_color=sg.theme_text_color(), pad=(0,0))]]
    layout += days_layout
    layout += [[sg.Button('Ok', border_width=0,font='TkFixedFont 8'), sg.Button('Cancel',border_width=0, font='TkFixedFont 8')]]

    window = sg.Window('Window Title', layout, no_titlebar=True, grab_anywhere=True, keep_on_top=True, font='TkFixedFont 12', use_default_focus=False, finalize=True)

    update_days(window, cur_month, cur_year, begin_at_sunday_plus)

    prev_choice = chosen_mon_day_year = None

    if cur_day:
        chosen_mon_day_year = cur_month, cur_day, cur_year
        for week in range(6):
            for day in range(7):
                if window[(week,day)].DisplayText == str(cur_day):
                    window[(week,day)].update(background_color=sg.theme_text_color(), text_color=sg.theme_background_color())
                    prev_choice = (week,day)
                    break

    while True:             # Event Loop
        event, values = window.read()
        if event in (None, 'Cancel'):
            chosen_mon_day_year = None
            break
        if event == 'Ok':
            break
        if event in ('-MON-UP-', '-MON-DOWN-'):
            cur_month += 1 if event == '-MON-UP-' else -1
            if cur_month > 12:
                cur_month = 1
                cur_year += 1
            elif cur_month < 1:
                cur_month = 12
                cur_year -= 1
            window['-MON-YEAR-'].update('{} {}'.format(cal.month_name[cur_month], cur_year))
            update_days(window, cur_month, cur_year, begin_at_sunday_plus)
            if prev_choice:
                window[prev_choice].update(background_color=sg.theme_background_color(), text_color=sg.theme_text_color())
        elif type(event) is tuple:
            if window[event].DisplayText != "":
                chosen_mon_day_year = cur_month, int(window[event].DisplayText), cur_year
                if prev_choice:
                    window[prev_choice].update(background_color=sg.theme_background_color(), text_color=sg.theme_text_color())
                window[event].update(background_color=sg.theme_text_color(), text_color=sg.theme_background_color())
                prev_choice = event
    window.close()
    return chosen_mon_day_year

if __name__ == '__main__':
    sg.theme('Dark Red')

    now = datetime.datetime.now()
    cur_month, cur_day, cur_year = now.month, now.day, now.year
    print(popup_get_date(cur_month, cur_day, cur_year, 0))      # choose 0 for day to show only month and year
CalendarButton - NEW implementation
_Finally_ completed the first pass of the calendar chooser replacement. It's looking great. The localization stuff was more difficult than I thought and it may still have some issues.
So, please TRY it with your code to see if it still operates as expected.
After the initial test, expand to use the new features that many of your have asked for such as being able to re-locate the window and start the week on a particular day.
Here is the Test Harness that was checked in as a demo program (replaced the existing Demo_Calendar.py file)
#!/usr/bin/env python
import PySimpleGUI as sg

"""
    Simple test harness to demonstate how to use the CalendarButton and the get date popup
"""

layout = [[sg.Text('Date Chooser Test Harness', key='-TXT-')],
      [sg.Input(key='-IN-', size=(20,1)), sg.CalendarButton('Cal US No Buttons Location (0,0)', close_when_date_chosen=True,  target='-IN-', location=(0,0))],
      [sg.Input(key='-IN3-', size=(20,1)), sg.CalendarButton('Cal US Monday', close_when_date_chosen=False,  target='-IN3-', begin_at_sunday_plus=1)],
      [sg.Input(key='-IN2-', size=(20,1)), sg.CalendarButton('Cal German Feb 2020',  target='-IN2-',  default_date_m_d_y=(2,None,2020), locale='de_DE', begin_at_sunday_plus=1 )],
      [sg.Input(key='-IN4-', size=(20,1)), sg.CalendarButton('Cal Format %m-%d Jan 2020',  target='-IN4-', format='%m-%d', default_date_m_d_y=(1,None,2020), )],
      [sg.Button('Read'), sg.Button('Date Popup'), sg.Exit()]]

window = sg.Window('window', layout)

while True:
    event, values = window.read()
    print(event, values)
    if event in (None, 'Exit'):
        break
    elif event == 'Date Popup':
        sg.popup('You chose:', sg.popup_get_date())
window.close()
The test creates this window:

The popup for each button will be a little different from each other.
PySimpleGUI
on 30 Mar 2020
Calendar still being worked (locale issues)
Sorry that the calendar code is still being worked on. The GitHub code is struggling with the locale settings and is causing problems on Raspberry Pi's too. It's getting there but not quite there....
PySimpleGUI
on 31 Mar 2020
Calendar Done (enough?)
Calling the new calendar (popup and button) done. (again... almost)
It's not done until the documentation is done, but the functionality is done. The doc strings are all done. It's just not released to PyPI and readme file yet.


Besides looking a LOT LOT LOT better than the old calendar chooser, it's got expanded capabilities as well over the original date chooser:
- Can jump navigate by year in addition to by months
- With / without titlebar
- With / without ok/cancel buttons
- Color theme follows user's settings
- Can set location of the window
- Can set title of window
- Can start at a specific date or a specific month but no specific day
- Locale is used only to get the day abbreviations and even then it's not always what you want... which is why there is also...
- User can specify list of months
- User can specify list of day abbreviations
All of these awesome things, but best feature of all... it's 100% PySimpleGUI based. It is literally a PySimpleGUI application window. Nothing special about it. Any user could have made this window. That's good news to anyone that wants to specialize it further for their specific application. It means you can run the window entirely within user code.
Will port to Qt once a little runtime is on this one in tkinter and has had no changes for a few days.
PySimpleGUI
on 2 Apr 2020
Cookbook Updates
Continuing on in the Cookbook updates. They've been lagging, like eveyine else. But happy to report making new releases of the cookbook now.
Added a few new Recipes including:
- Highly Responsive Inputs (
enable_eventsparameter to elements) - Input validation
Upcoming section is on "printing" which will cover the new Multiline.print and multi-colored output.
PySimpleGUI
on 2 Apr 2020
Cookbook - "Printing"
New printing section added to the Cookbook. https://pysimplegui.readthedocs.io/en/latest/cookbook/#recipe-printing
It discusses the 3 different ways you can use a "print-like" function in PySimpleGUI. Everything from a plain print, re-routed to an Output element, to the latest multi-colored text output using the Muiltiline.print method.
http://Cookbook.PySimpleGUI.org
Note that printing to Multiline edits using 4.18.0 from PyPI does not autoscroll. When you print, it gets added to the end, but the element doesn't move cursor to the end.
The GitHub version corrects this and also adds an autoscroll parameter to the Multline.print and the Print calls. It defaults to True so you shouldn't normally need to touch it.
PySimpleGUI
on 4 Apr 2020
0.32.0 PySimpleGUIQt 4-Apr-2020
The "Jesus it's been way too long since a release" release
Print to Multiline
- Listbox.update fix
- Added Graph.change_coordinates
- Added Image.Widget
- Return correct value when Comboxbox has manual data entered
- Multiline.print - new printing capabilities
- Multiline move cursor to end
- Scrollable columns
- Added Listbox.get
- Fix for visible ignored in Text Element
- Window.read - close parameter (YES! Single line GUIs again)
- Multiline readonly parm on update
- Print fixed sep char to act line normal print
- Print (Multiline) added autoscroll parm
I'm sorry PySimpleGUIQt users that it's been so long between releases.
Trying to get out the door the code that's been sitting waiting to be shipped. The release machinery is getting cranked back up again so that I can releases out more frequently.
Next up are changes that PySimpleGUIWeb users are waiting on.... along with more Recipes.
Enjoy the printing features in this release!!!! Oh, and finally scrollable columns.
PySimpleGUI
on 4 Apr 2020
New Demo / Recipe - A Settings File
Have been making lots of Widgets including working on a generalized "Rainmeter-style" Widgets. One thing they have in common is a "settings" file.
It's been added to the Cookbook as a new Recipe:
https://pysimplegui.readthedocs.io/en/latest/cookbook/#recipe-save-and-load-program-settings
It may be a little large for the CookBook, but it's only 100 lines of code that's very reasonable to ssee
Seems like something a number of user programs could benefit from. So, I made a generalized demo that any program can use. It's JSON based so it doesn't require a PySimpleGUI program be used to utilize it, but if you want to use a GUI to display or edit the settings, you easily can with this short, 99-line program.
It started as a "Recipe" for the cookbook, but kinda got a little large. Got it down to 99 lines of text (63 lines of actual code). The may be on the edge of being too long for a Recipe. I'll add it and see.
The code is posted on Trinket where you can immediately run it:
https://pysimplegui.trinket.io/demo-programs#/demo-programs/settings-file
Here's the entire program in case you're wondering how it's done...
import PySimpleGUI as sg
from json import (load as jsonload, dump as jsondump)
from os import path

"""
    A simple "settings" implementation.  Load/Edit/Save settings for your programs
    Uses json file format which makes it trivial to integrate into a Python program.  If you can
    put your data into a dictionary, you can save it as a settings file.

    Note that it attempts to use a lookup dictionary to convert from the settings file to keys used in
    your settings window.  Some element's "update" methods may not work correctly for some elements.

    Copyright 2020 PySimpleGUI.com
    Licensed under LGPL-3
"""

SETTINGS_FILE = path.join(path.dirname(__file__), r'settings_file.cfg')
DEFAULT_SETTINGS = {'max_users': 10, 'user_data_folder': None , 'theme': sg.theme(), 'zipcode' : '94102'}
# "Map" from the settings dictionary keys to the window's element keys
SETTINGS_KEYS_TO_ELEMENT_KEYS = {'max_users': '-MAX USERS-', 'user_data_folder': '-USER FOLDER-' , 'theme': '-THEME-', 'zipcode' : '-ZIPCODE-'}

########################################## Load/Save Settings File ##########################################
def load_settings(settings_file, default_settings):
    try:
        with open(settings_file, 'r') as f:
            settings = jsonload(f)
    except Exception as e:
        sg.popup_quick_message(f'exception {e}', 'No settings file found... will create one for you', keep_on_top=True, background_color='red', text_color='white')
        settings = default_settings
        save_settings(settings_file, settings, None)
    return settings


def save_settings(settings_file, settings, values):
    if values:      # if there are stuff specified by another window, fill in those values
        for key in SETTINGS_KEYS_TO_ELEMENT_KEYS:  # update window with the values read from settings file
            try:
                settings[key] = values[SETTINGS_KEYS_TO_ELEMENT_KEYS[key]]
            except Exception as e:
                print(f'Problem updating settings from window values. Key = {key}')

    with open(settings_file, 'w') as f:
        jsondump(settings, f)

    sg.popup('Settings saved')

########################################## Make a settings window ##########################################
def create_settings_window(settings):
    sg.theme(settings['theme'])

    def TextLabel(text): return sg.Text(text+':', justification='r', size=(15,1))

    layout = [  [sg.Text('Settings', font='Any 15')],
                [TextLabel('Max Users'), sg.Input(key='-MAX USERS-')],
                [TextLabel('User Folder'),sg.Input(key='-USER FOLDER-'), sg.FolderBrowse(target='-USER FOLDER-')],
                [TextLabel('Zipcode'),sg.Input(key='-ZIPCODE-')],
                [TextLabel('Theme'),sg.Combo(sg.theme_list(), size=(20, 20), key='-THEME-')],
                [sg.Button('Save'), sg.Button('Exit')]  ]

    window = sg.Window('Settings', layout, keep_on_top=True, finalize=True)

    for key in SETTINGS_KEYS_TO_ELEMENT_KEYS:   # update window with the values read from settings file
        try:
            window[SETTINGS_KEYS_TO_ELEMENT_KEYS[key]].update(value=settings[key])
        except Exception as e:
            print(f'Problem updating PySimpleGUI window from settings. Key = {key}')

    return window

########################################## Main Program Window & Event Loop ##########################################
def create_main_window(settings):
    sg.theme(settings['theme'])

    layout = [[sg.T('This is my main application')],
              [sg.T('Add your primary window stuff in here')],
              [sg.B('Ok'), sg.B('Exit'), sg.B('Change Settings')]]

    return sg.Window('Main Application', layout)


def main():
    window, settings = None, load_settings(SETTINGS_FILE, DEFAULT_SETTINGS )

    while True:             # Event Loop
        if window is None:
            window = create_main_window(settings)

        event, values = window.read()
        if event in (None, 'Exit'):
            break
        if event == 'Change Settings':
            event, values = create_settings_window(settings).read(close=True)
            if event == 'Save':
                window.close()
                window = None
                save_settings(SETTINGS_FILE, settings, values)
    window.close()
main()
Hold off on PySimpleGUI GitHub Upgrades For a Couple Days
I blew it.
In my haste to get something released to do Scrolling Columns, a fix I've been trying to get into the code for a very very long time, I released code before thoroughly testing it.
There's been a lot of code coming my way as of late. Some of it I paid for and I let my guard down at the same time. I probably did a bad merge or who knows what happened. It actually doesn't matter in the end as the responsibility is 100% mine. I've been drowning in code lately is my only excuse and it's a poor excuse anyway. I know better. There's only so much time and I tried doing things a different way for a couple of weeks, knowing the risks. I'm sorry if you're one that's paying the cost.
I need a day or two to straighten it all out and get back onto a path that I feel comfortable with. I'm really sorry if you upgraded recently from GitHub and it's causing problems. They're the top priority to get fixed. Hopefully today the remaining problems that have popped up since the last release will stop.
PySimpleGUI
on 7 Apr 2020
GitHub seems OK now.... 4.18.0.19
I believe the current version 4.18.0.19. It literally drives me crazy when there's a serious problem with my code. Bug is filed -> 🤦♂️ first reaction sometimes.
Speaking of crazy. It's a pretty crazy time right now. There's no doubt it's had an impact. I've let that show and if it's impacted you, I'm sorry about that. Really.
This project is about helping people. Everything about it is meant to be that way. The developer is at the center of this package. It's in the documentation and it's meant in more ways than only the API calls and architecture.
To all the other human beings out there... let's build some nice things. Have some fun. It's supposed to be fun (also in the docs 😉) is it's time for me to read the docs for a change.
As for GitHub...there is still a lot of testing that needs to happen so not saying it's perfect code just yet.
PySimpleGUI
on 9 Apr 2020
4.18.1 PySimpleGUI 12-Apr-2020
Emergency patch - f-string managed to get into the code resulting crashes on 3.5 systems (Pi's for example)
4.18.2 PySimpleGUI 12-Apr-2020
The Epic Fail release.... import error on 3.5 for subprocess.
Jammed out 2 "emergency" releases to PyPI last night. It showed that I clearly did not properly regression test 4.18.0 on my Python 3.4 Raspberry Pi.
An ongoing struggle with pre-3.6 Python interpreters is that they give a syntax error if any f-string is found in the code. It doesn't have to execute the code, it just has to find an f-string anywhere in the file for it to barf. I do make liberal use of f-strings in the Demo programs as they're meant to 3.6+ machines generally speaking. But the main PySimpleGUI files cannot contain any f-strings due to these 3.4 environments.
I'm sorry if you got nailed after upgrading your Pi. It should be fine now that 4.18.2 was released.
PySimpleGUI
on 13 Apr 2020
Demo_System_Tray_Reminder.py - A New Demo Program
A new demo program was posted that works on the tkinter, Wx and Qt ports. It shows a reminder popup window repeating every specified number of minutes. Maybe you need to get up and stretch every hour. Use this program to remind yourself to get up once an hour.
https://github.com/PySimpleGUI/PySimpleGUI/blob/master/DemoPrograms/Demo_System_Tray_Reminder.py
For the tkinter port, system tray icons appear as icons on the desktop (sorta).


PySimpleGUI
on 13 Apr 2020
Twitter Announcements
A couple of items that are not related.
There is an @PySimpleGUI account on Twitter if you care to see some of the announcements made there. It's been a good source of information about what other people are building at well. I'll add the Twitter info to the documentation as another place to get PySimpleGUI information. It's been a fun way to connect with the world of users.
Support - StackOverflow, Reddit, etc
While the official PySimpleGUI docs and the sub-Reddit sidebar have been abundantly clear that official "support" for PySimpleGUI will be provided on this GitHub only, there has been some not-so-secretly help given in other locations on the net. It's difficult to watch and hear about people struggling no matter the source, so I've tried to monitor multiple locations of problem posts.
But, time is a limited resource and the reasons behind a single location for support have not changed. You will get higher quality service here, honest. Having a record, in a single location, of bug reports and questions is a good thing too.
This project is being executed as a commercial venture. Other products don't have support engineers that hang out on StackOverflow and answer questions. They generally have a bug-tracker built into their company's site that's used exclusively.
I mistakenly thought that helping on SO while also providing guidance that additional/more thorough support was available here on GitHub would have a positive outcome and change behaviors so that more people come here instead of posting there. I was wrong. It hasn't worked, so I need to stop trying this failed experiment.
I won't bore you with the details of why it's better to get support here. You'll find it in the documentation if you're curious. I would say the biggest frustration is the guidance provided is sometimes incorrect and is often a wild-ass guess at best.
It seems like people are more interested in responding than responding with a correct answer. I can't continue to try and fix these answers by correcting mistakes. If someone's hellbent on posting on SO and going with whatever is posted as a reply, then I've got to be OK with that and move on. So, that's what's happening.
Sorry for the long post. It felt necessary to speak up/explain rather than simply disappear.
PySimpleGUI
on 14 Apr 2020
John Conway (and The Game of Life)
I hope everyone is staying safe and is not experiencing too much loss. Today COVID-19 took another large number of people from us. Among those was Mathematician John Conway, inventor of the inspiring "Game of Life".
If you want to play around with a PySimpleGUI implementation, you can use the program from the Demo Programs area:
https://github.com/PySimpleGUI/PySimpleGUI/blob/master/DemoPrograms/Demo_Conways_Game_of_Life.py
You can also run it online using Trinket:
https://pysimplegui.trinket.io/demo-programs#/games/conways-game-of-life
Everyone has their own personal tragedies and difficult reactions to hearing of losses. This was a particularly difficult one to hear about.
Stay safe everyone! Hug your kids (despite being cooped up with them for weeks).
PySimpleGUI
on 14 Apr 2020
0.37.0 PySimpleGUIWeb 14-Apr-2020
Catching up to latest Remi releases.
- NO LONGER ADDING n TO MULTILINE, MULTILINE_OUTPUT UPDATES
- This may cause some of your problems. Sorry about this, but it's the right thing to do so that prints work correctly
- Multiline.print capability
- MultilineOutput.print capability
- Fix for MultilineOutput not autoscrolling
- Fix for image update flicker
- Printing sep char fixed
- Fix for extra Tab
- Replaced SvgGroup with SvgSubcontainer (Requires Remi 2020.3.10)
- BIG Thank You owed to Remi creator Davide (for this and many other releases too)
It's been a LONG time, or so it feels, since a PySimpleGUIWeb release was sent to PyPI
_A word of warning on this release...._ You will need to modify your call to MultilineOutput.update to add a newline as the update call will no longer add one on for you. This was a painful change to make because it breaks the backwards compatibility rules. It has been incorrectly adding a newline for a very long time. Now that a "real print" method has been added to Multiline elements, it was a required change or else there will be a blank line added after every print.
The Graph drawing is FAST! Check out the ball demo and you'll see what I mean.
There may be another Web release coming later this week.
PySimpleGUI
on 15 Apr 2020
@jason990420 Please open an issue if you believe there's a problem rather than adding something in the announcements. The link I provided to Trinket works when I just tried it.
https://pysimplegui.trinket.io/demo-programs#/games/conways-game-of-life

PySimpleGUI
on 15 Apr 2020
I just tried it on Windows and I can confirm it works perfectly!
On Wed, 15 Apr 2020, 15:02 PySimpleGUI, notifications@github.com wrote:
@jason990420 https://github.com/jason990420 Please open an issue if you
believe there's a problem rather than adding something in the
announcements. The link I provided to Trinket works when I just tried it.https://pysimplegui.trinket.io/demo-programs#/games/conways-game-of-life
[image: image]
https://user-images.githubusercontent.com/46163555/79339970-afd1b700-7ef7-11ea-8d77-acd2754f84f1.png—
You are receiving this because you were mentioned.
Reply to this email directly, view it on GitHub
https://github.com/PySimpleGUI/PySimpleGUI/issues/142#issuecomment-614025817,
or unsubscribe
https://github.com/notifications/unsubscribe-auth/AHHWWC5BSKB2MZVSFQPCKFDRMWV5ZANCNFSM4FTWUH7A
.
 salabim
on 15 Apr 2020
salabim
on 15 Apr 2020
Wow, thank you! Did not expect that verification!
Since I just released PySimpleGUIWeb last night I thought I would give that a show too. I changed the import and miracle of miracles, it ran...

There may be an issue with the slider changing the speed properly after starting up, but the basics of it worked, and it seems to be running faster than the tkinter version. When I spoke with Davide (of Remi fame) yesterday, he had said he did a lot of work to make the drawing routines fast and it really shows! I'm kinda _stunned_ it worked without any modifications.
PySimpleGUI
on 15 Apr 2020
A"Moving Tribute" to John Conway
I want to share this amazing bit of artwork by Randall Monroe of XKCD. It's such a beautifully simple tribute. Says so much by using John's own creation. Art takes on many forms. It's a great time to appreciate simple beauty.

PySimpleGUI
on 15 Apr 2020
Sudoku - Ready for your AI algorithm
OK, so maybe my 1-line Sudoku program got a little out of hand and ballooned up to 85 lines
First you start with a board that has some % of the cells not visible.

At any point you can click the "Check" button and it'll color code things. If you've got a square bad, it's read. If you haven't filled in a number, it's yellow.

If you give up you can click "Solve" and stat a new game.

The point of building out the rest of the program is to have it ready for people ready to try out different AI algorithms.
I'll add a comment at the locations you can slip your algorithms.
You'll find this code in both the Demo Programs area
https://github.com/PySimpleGUI/PySimpleGUI/blob/master/DemoPrograms/Demo_Sudoku.py
as well as on Trinket.
https://pysimplegui.trinket.io/demo-programs#/games/sudoku
The "Published" Trinket version is here:
https://pysimplegui.trinket.io/sites/sudoku
The board creation software (that computed the numbers to place in the squares) was created by Morvan Zhou and is now a part of the demo.
https://github.com/MorvanZhou/sudoku
Thanks Morvan!!
His algorithm was one of the most compact, easy to drop in of any of them.
PySimpleGUI
on 17 Apr 2020
Recording Day - Sorry for the delays
I'm really sorry development ground to a halt over the past week as I put together another video.
This one is a comprehensive, cover it all, video. It's a lecture with 40 pages of notes. I started recording last night and realized that my idea of a 30 minute single video was not going to happen when I was at the 10 minute mark while on page 4.
I really want to get this recorded and released today. The lecture notes are more or less a mini-textbook of sorts. What I can't do is read the damned thing to you which means a different set of "speaking notes."
Anyway, soon! Promise. There's a lot to get through in order to get everything covered and it feels like it all needs covering so that the existing videos are replaced in a single shot.
I have not yet determined if it will be busted up into multiple videos or if an "index" will be supplied in the comments as I first had planned. I'm still hoping that it'll be 1 video with an index/table of contents in the description.
It's a little like teach all of tkinter in a single sitting, including the history and other non-technical aspects of the project.
I appreciate everyone's patience as I work through this. I think it's going to really help a lot of people understand the project in numerous ways, so this week-long investment is worth it.
The notes and the example code will both be released so if I don't touch on every bullet point in the notes it'll be there for you to read. I hope to have my "script notes" done early today so that recording is done today as well.
Thanks for your understanding! Being "brief" isn't my strong-suit. Simple, yes, brief, no.
PySimpleGUI
on 24 Apr 2020
PySimpleGUI 2020 - Video # 1 Uploaded!
Whew! What a day! High speed internet was installed today, just in time for the videos. My upload speed went from 700 KBits to 40 MBits. Now it won't take days per video to upload!!
The first video is rather lengthy at 48 minutes, but I want this series to cover everything, so I started from nothing. I just barely started to show code at the end.
Here is the rough list of topics in Video 1
- The who, what, when, where, why, how, how much and how many of PySimpleGUI.
- IDEs, PyCharm
- Message Passing versus Event Driven architecture
- The "PySimpleGUI System"
- Coding Conventions
- Coding Tips
- Popups & One Line Progress Meter
The pace should pick up nicely now that the groundwork is laid.
The Lesson's Text and the demo programs (so far) are in the docs folder:
https://github.com/PySimpleGUI/PySimpleGUI/tree/master/docs
You'll find a PDF file and a .py file. The .py file is likely going to change one ore more times before the next lesson or as lessons are added.
A new lesson is being planned that reviews the programs released under the PySimpleGUI GitHub account such as the Rainmeter-style Widgets & Reddit scraper.
PySimpleGUI
on 25 Apr 2020
PySimpleGUI 2020 - 5 videos and counting
Today I'll tackling the main portion of the videos.
Your patience with these videos is so appreciated. I'm not good at this. I don't learn from videos so I don't have a lot of time spent looking at good videos. While I did take a week to prepare the "lecture notes" that are followed and I have re-recorded a number of them already, they are still not of high quality.
After seeing the first video stretch into 49 minutes in length, it became immediately apparent that the 2020 series must be broken into chunks like the videos before.
I'm shocked at the number of people watching them already and a little relieved that the responses have been positive. They're done for your benefit, not mine, as I would much rather be coding, but I fully realize that doing "whatever it takes" to get people educated is what has to happen. If that means making videos, then make videos is what I'll do.
Thank you again for being the awesome user community you guys and gals are. None of this would be possible without your support.,
Stay tuned.... it should be a good day for videos!
PySimpleGUI
on 26 Apr 2020
Show off your Work on GitHub! Add You GUI to Your Project's GitHub Page
Several times a week I take a look at the projects that GitHub shows at the top of this screen.

This morning I see 583 of you out there doing cool things,
One reason I request the screenshots is education. I learn something from _everyone_ that uses PySimpleGUI. Complete beginners are sometimes the best to learn from because "they know no better" and do things differently.
I glance at the code and I can tell many of your are pouring a lot of effort into your GUIs. It's _inspiring_!
One trend I see is the lack of screenshots in the readme. This is a disappointing thing because you've spent all this time on your GUI and then no one sees it unless they download your project. This is backwards to what it should be. The better way is to place a screenshot in your readme so that when someone visits your page they WANT to download and try your project because it's cool or it looks like something they want to make.
Over the weekend one YouTube video I made shows you how to embed these screenshots into your readme. It's _trivial_ to do. (Honest). I'm not going to trivialize something that's not trivial.
Watch this video:

TLDR:
To add a screenshot to your readme that will show up on your GitHub's "homepage"
- Open and issue in your project
- Copy and paste an image or drag and drop an image file into the issue
- GitHub will create something that looks like this in your issue:
- Copy this above line of text that the Issue created for you
- Edit your readme.md file in your project
- Paste the line of text from the Issue in your readme.md
- The image will now be embedded in your readme and will show up when someone visits your GitHub page
- You'll look like a rock star!
No GUI is too small to show people. If you've taken the time to post it on GitHub, it's worthy of showing everyone. Trust me here... people LOVE seeing them. There are not many GUIs in the Python world and you are a part of the movement that's changing that!
PySimpleGUI
on 27 Apr 2020
YouTube Analytics
I'm both stunned and not surprised by the analytics of the YouTube videos. What's stunning and a little sad is that 97.7% of my viewers are male. 😥
It make me wonder if there's something wrong with the videos or wrong with the industry as a whole.
We need more female engineers... that's the truth.

PySimpleGUI
on 27 Apr 2020
🎵 900 Icky Bugs on the Wall... 900 Icky Bugs.... 🎵
Another numerical threshold crossed recently. 900 bugs have been closed. The project is only about 630 days old. That averages out to about 1.4 bugs a day that are closed.
I _think_ that's a good thing. Note that they are not all bugs! It appears 101 of those are labelled as bugs. 146 were enhancement requests. Definitely happy that more enhancements were added than bug fixes.
PySimpleGUI
on 27 Apr 2020
YouTube PySimpleGUI 2020 Part 6 "Beautiful Windows"
Just finished the 9th video in the series.
This video was meant to be a "short lesson on making attractive windows". It somehow turned into a 24 minute lesson.
I'm really sorry for the length of these things. I'm doing my best to plan ahead. I've got both the text / slides that accompany the series as well as handwritten notes and yet with all that planning I still fumble around and suck badly enough that the lesson ended being 24 minutes long.
On paper they look like short little tutorials once the camera rolls before I know it 20 minutes have passed.
No one has complained... yet. If I start getting complaints I'll re-record them and try harder to make them crisper. I can't figure out where my plans go so far off course except that it seems to take longer to explain the details behind these concepts than I anticipate.
_Thank you for everyone's patience_ through this whole mess. It's taken significantly longer to write the text and record the videos than I thought. Meanwhile the coding is taking a hit so that I'm not able work on it for a little bit. Soon! I promise.
PySimpleGUI
on 27 Apr 2020
The Sponsor Button

You may have noticed a "Sponsor" button has appeared on the GitHub page. I wanted to say a couple of words about it.
I've received a number of emails over the past couple of years from individuals and corporations asking how they make a contribution or sponsor the project. While there are recurring costs for the PySimpleGUI project (domains, Trinket, read-the-docs, etc) and consultant costs as well, I've not accepted assistance.
Another offer for financial help arrived last week and maybe it was how the message was phrased that made me realize this time that some users find enjoyment in supporting a project in this way. They experience a feeling of satisfaction at helping the project, and perhaps others may feel the same way.
So, I'm providing a mechanism for those that want to provide support to the project in this way.
It's important to me to make clear that I'm not actively seeking donations. The "Sponsor" button is not there because I expect anything nor am I asking for anything. It feels really uncomfortable that it may be sending the wrong message.
I am truly thankful for every user that shows their gratitude in whatever form that may take. A simple "thank you" message goes a very long ways. I've enjoyed your successes as much as you have.
PySimpleGUI
on 28 Apr 2020
Why I Like Writing PySimpleGUI Code
These recent videos have triggered a lot of self-reflection.
Programming previously
95% if my programming life was in building stuff, and while my stuff often included a display driver / frame buffer and the ability to draw in it, sometimes for high end graphics, the only time I put stuff on the screen was to test the display. Stuff with displays weren't on normal Operating Systems so it's not like there was a GUI.
I've written a TON of code, usually as part of startups as we built the product, I rarely built stuff for me. The times that I tried GUI programming it always sucked. I've never gotten into the pages of code usually required. I'm not knocking anything here, but damn, there's a LOT of code you need to write to make a GUI program. In short, it wasn't fun. I'm built for fast, fun & easy. It's like candy for me. Clearly I'm capable of some large sh*t too, like PySimpleGUI, but my programming drug is the fast, fun and easy projects.
Enter PySimpleGUI - This time it's personal
Utilities
I have bought a LOT of software. I'm a heavy user of utilities, most commercial or shareware. Most of them are either informative or make me more efficient. My mouse has 19 buttons. I literally move a finger to minimize a window. The mouse never moves to the little symbols on the window:

Same with moving windows or closing them. It's been years since I've grabbed a titlebar. Everything takes time, and it adds up, and heck, I would rather be making stuff than moving a mouse to minimize a window. Some call it efficient, some lazy. I'm ok with Lazy. I don't want to press control+shift+F10 to run a PyCharm program. That's 3 keys. I like just 1... maybe I should move it to my mouse!
Just for me....
There are 3 parts of writing PySimpleGUI programs that are fun.
- The result is a tool-thingy that I can use every day to be lazier / more efficient or visualize data or ???
- It's trivial to run rings around traditional GUI programs.
- Fast, Fun & Easy
Hoping # 2 isn't arrogant. It's not about showing off. In a way it's why I got into and fell in love with Python. I found I could do SO much, with so much less (I NEVER have to type ; { } to tell the parser something about the code syntax again. Decades of those symbols has left me with C-PTSD. I'm ready for a computer to work for me, damnit. "YOU figure out where a statement ends. YOU'RE supposed to be the smart one" <--- how I feel when forced to write a little C# instead of Python.
The 3rd one is my sugar high. My button that runs the PyCharm program on the screen I press like a rat does a bar to get a food pellet. Write some PySimpleGUI code, run it, see something happen, write a little more, press the food pellet bar.... It's a tad addicting and often a very fast way to work. Before I realize it, not only have I had fun, the result is some little program that I get to use over and over.
Hopefully you're having fun too!
Some of the emails I receive tell me there are lots of you out there enjoying the PySimpleGUI experience.
If you're someone learning and you're struggling to find projects to do, try making _yourself_ some stuff. Be your own customer. Write a utility to make your life better every day on the computer. Make yourself something useful. Doesn't have to be fancy.
Maybe you've got some program that hangs on you from time to time and you're forced to launch task manager to kill it. How about writing a task-killer program that will kill it for you? No need to launch task manager. Just run your code and poof it's gone.
PySimpleGUI
on 28 Apr 2020
600 GitHub Projects Milestone!
Share your work with the world by showing them your GUI window!
One of the activities I enjoy is checking out what people are making with PySimpleGUI. It's easy to do on GitHub because there's a stat located at the top of the page:

Every couple of days I flip through the projects. MOST do not have a screenshot in their readme. This means when you visit the project, you have no idea that it's got an awesome (usually is) GUI. So few Python programs have GUIs that it's super-refreshing and motivating to see when one does. I think it also increases the odds someone is going to check out your program if they see what it does.
Many times I open an Issue and ask the person to add one, giving them instructions how to do it using GitHub issues.
Maybe I should write a program that will do this for me?? But I've already got too many PySimpleGUI programs to write. -sigh- So little time, so much PySimpleGUI code to write.
Anyway, if you're one of these people that are taking the time to post your code on GitHub, take the _TWO minutes_ it will take you to post a screenshot.
Instructions for posting a screenshot in your readme.md (so it's shown on your homepage)
Lucky for you, I've created as part of the new PySimpleGUI 2020 YouTube series a video specifically on this topic:
If you don't want to watch the video, the just do this....
Rather than taking a screenshot and adding it to your repo's files, add it to a GitHub Issue. This is SO much easier (remember, I'm super-lazy).
- Run your program
- Use any "snipping" tool to take a screen shot
- Open an "Issue" for your project
- Paste the image from your clipboard or drag and drop the image file into the Issue you opened
- Copy the "code" that was just added to your Issue
- Click the "Comment" button so that your Issue is saved.
- Paste the code into your readme.md file in your repo
Example....
I just ran a program that did a popup_get_date and it created a little date choose window. I used a snipping program (Snagit, ShareX is a free one) and the image is now on my clip board.
Now I press Control + V right here:
I don't see the image because I've not clicked the "preview" tab in the issue, but I do see that GitHub has added this text to my issue:

You take this code that GitHub made for you and you paste it into your readme.md file. It will embed the image just as it is embedded in this Issue.
PySimpleGUI
on 2 May 2020
4.19.0 PySimpleGUI 5-May-2020
New Date Chooser
Scrollable columns with mousewheel!! (oh please work right!)
WINDOW_CLOSE & WIN_CLOSE events
Long list of stuff!
- Imported from typing again to get correct docstrings
- Print and MLine.Print fixed sep char handling
- New parameter to Muliline.print(autoscroll parameter)
- New autoscroll parameter added to _print_to_element
- popup_get_date
- Complete reworking on Calendar Chooser Button
- Has a LOT more paramteter
- Can set location!
- icon parm popup_animated
- popup button size (6,1) for all popups
- NEW CALENDAR chooser integrated
- Graph.draw_lines - new method to allow for multiline lines that may not be a full polygon
- System Tray fixed the docstrings
- color chooser set parent window (needed for icon?)
- scrollable column scrollwheel fixed
- fixed TabGroup border width (wasn't getting set properly at all)
- Fixed Debug Printing to work like a normal "print"
- Fixed _print_to_element to work like a normal "print"
- Fixed light green 1 theme definition - Text color wasn't being set
- fix for install from GitHub
- fix for Column scrolling with comboboxes
- Added Text.get
- Spin.update fix
- import typing again
- fixes for Pi
- test for valid ttk_theme names
- fix for Text.get docstring
- added tuples to some docstrings
- added code for better tag handling for Multiline elements (fixes a potential memory leak... thanks Ruud)
- WIN_CLOSE & WINDOW_CLOSED constants added. Both are None
- EVENT_TIMEOUT and TIMEOUT_EVENT constants added to both be the same as TIMEOUT_KEY
- Some changes in test harness that tested recent changes (may still need shortening for trinket or others)
- Changed the misleading TRANSPARENT_BUTTON constant with an attempt using themes calls
Delays delays delays
I'm really sorry this release got SO backed up. There are over 30 sizable changes with some that felt huge enough to keep me awake at night. I REALLY hope this goes well for everyone.
The PySimpleGUI 2020 video series also pushed out this release. Lots of long, boring, complex reasons for the delay that I'll spare everyone. I just hope that people like the release and use it.
WIN_CLOSED and WINDOW_CLOSED
Coming soon will be rushed releases of all ports to include the WIN_CLOSED constant along with changes EVERYWHERE to reflect this.... Main doc, cookbook and all demos will need to be modified. I will need to edit the new videos as well. It's time to stop talking about checking for the None event and start checking for the "window closed" event.
Spelling
I also tried to fix a LOT of spelling problems in the docs. I'm sure I didn't catch them all, so my apologies if the ones that drive you crazy to see are still there. I'm trying is my only defense and I had only a little time this morning to begin chipping away.
Scrolling columns with the mouse wheel
This is the biggest thing that happened and what feels like the biggest risk. I hope it goes well and makes a lot of people happy 😀
PySimpleGUI
on 5 May 2020
COVID19 Graph Project Update
"I'm not jut the President of Hair-Club for Men, I'm a client too"
Isn't that how the commercial used to read?
One of the fun things about PySimpleGUI is being able to USE PySimpleGUI. That was the whole purpose of the project to begin with.... to make a GUI program that I needed. Now I do it just for fun and to get the tools I want/need.
The series of COVID19 tools have been an important thing for me personally to deal with what's happening to the world.
As time goes on, the ways of looking at the data have changed too., The cumulative numbers were initially really important. Now, it's the daily number of NEW cases that's important. It's the shapes of those graphs that matter now if you want to know who's "ready to open for business". Not trying to be political, just after the facts so I can make my own life-choices.
Yesterday's changes brought about the ability to look at the world like this:

All graphs have been "normalized" so they all look equally "bad" in terms of severity, but that's far from the truth. They simply show that county's own struggle to get through their "peak".
My "hero country" has been Vietnam for a number of weeks. These people STOMPED on this bug like a cockroach. Their cumulative graph tells the whole story:

They are not a tiny country yet they only allowed a TOTAL of 271 cases. They've been at 0 for some time. It's encouraging. I dunno about you, but I'm looking for encouraging news anywhere in the world I can find it and for me, that little country did something cool.
Anyway, the latest code has been uploaded to the PySimpleGUI-COVID19 GitHub:
https://github.com/PySimpleGUI/PySimpleGUI-COVID19
I hope that everyone is able to be and stay safe. 🙏🏻
PySimpleGUI
on 6 May 2020
How to make/break 500 people's day
Thought I would share the bit of anxiety I feel sometimes when posting PyPI releases. The total number of PySimpleGUI pip installs will reach 1,000,000 sometime this year which is a fun and terrifying number.
The total installs are fun to add up, but it's the daily installs, and the installs when a new release posts that cause the stomach aches. It's especially distressing when the release has a potentially large change or there are a lot of changes. Both are true with 4.19.0 that just "shipped" yesterday.
I've got no illusion that PySimpleGUI is some critical package used by millions of people and embedded in 1,000's of devices, but it's hard/impossible for me to toss aside the "weight" of releasing software. Decades of shipping commercial products coupled with the personal responsibility that goes with those releases hasn't been something I've been able to ditch even though PySimpleGUI is a free product.
Took a quick look at yesterday's installs without recalling that there was a release. This is how it appeared:

I see that chart and immediate wonder how many, if any, of the 541 people that installed 4.19.0 said "Sh*t! It used to work!"
My hope is that many of those were instead waiting on something new or a fix and were thinking "Yea! It finally works!"
Regardless, it IS nice to see computers out there running the code.
Students
Students are my biggest concern over releases that go badly. The nightmare scenario is when something that SHOULD work, DID work, but does no longer and a student spends a lot of time debugging a problem that is not their fault.
Students have been an important focus for PySimpleGUI from the start, so want to be sure and make the experience for these peeps to be nothing but fun and exciting. Frustrating computer situations are magnified when kids are involved.
Edhesive & Others
This morning I learned that a company called Edhesive has PySimpleGUI in their curriculum after a student mentioned it on Discord. EEEK! I thought I was pretty aware of when / where PySimpleGUI was used in education in a formal way.
I was recently contacted from a teacher in a South Dakota school that has been using PySimpleGUI to teach students because it allowed him to teach GUI programming in an introduction to Python class. Python GUIs are typically never taught in an intro course as they require OOP programming which is beyond the scope of most intro courses.
The point is that it's getting more difficult to know when/where PySimpleGUI is being used by students. There's no indicator on the Edhesive site that they use PySimpleGUI. It makes these releases a tad more nerve-racking not knowing who is going to be impacted.
Thank you to the early-warning-indicators
Thankfully a number of you are not shy about opening up an issue when a release is a bad one. Knowing there are people at the ready to quickly say there's a problem that enable me to send these releases out without losing too much sleep.
So, 🤞🏻 hopefully 4.19.0 is going to be a good release for everyone!
PySimpleGUI
on 6 May 2020
0.16.0 PySimpleGUIWx 6-May-2020
- Added constants
- WIN_CLOSED and WINDOW_CLOSED
- EVENT_TIMEOUT and TIMEOUT_EVENT
- Added Graph.change_coordinates method
- Added close parameter to Window.read
0.38.0 PySimpleGUIWeb 6-May-2020
- Added constants
- WIN_CLOSED and WINDOW_CLOSED
- EVENT_TIMEOUT and TIMEOUT_EVENT
0.33.0 PySimpleGUIQt 6-May-2020
- Added constants
- WIN_CLOSED and WINDOW_CLOSED
- EVENT_TIMEOUT and TIMEOUT_EVENT
- Added expansion capabilities
- Element.row_frame - The QHBoxLayout the element is contained within
- Column.vbox_layout - The QVBoxLayout contained in Column element
PySimpleGUI
on 6 May 2020
WIN_CLOSED and WINDOW_CLOSED Events
Whew! Holy-big-bag-of-releases Batman!
Was clearly motivated to begin to use the new event WIN_CLOSED safely. The only way to do it is to make the change to all 4 ports.
While there is a constant called TIMEOUT_KEY that can be used to detect timeouts, two additional aliases exist now for it as you can see. 99.9% of the time the timeout is not tested for so in reality I expect maybe one program in 10,000 will use one of those timeout constants. It's more for clarity that we're talking about EVENTS in the documentation and elsewhere.
Soon the massive change to the Demo Programs and documentation will start to modify event loops to check for WIN_CLOSED instead of None. Checking for None has kinda bugged me since the first release so this is a welcomed change despite the interruption it's causing.
PySimpleGUIQt Expansion
There was a new PySimpleGUIQt capability snuck into the release as well that is not yet documented as I'm not super-thrilled that it's added and that is the ability to add your own widgets to PySimpleGUIQt layouts. In theory you could do something similar to tkinter but it's not something I want to see happen.
I'm still on the fence as to whether to document this ability or not. Using this type of expansion would be a hack of enormous magnitude as both callbacks and the PySimpleGUI message passed architecture would be both used. It quickly turns into code that I don't want to deal with supporting. There are times when it's better to tell someone to move on to using Qt directly as they have hit the limits of what PySimpleGUI is capable of doing.
PySimpleGUI
on 6 May 2020
Demo programs updated - All use WIN_CLOSED now
The main demo programs have all been changed to use the new constant WIN_CLOSED for the window closed event.
You will have to use PySimpleGUI 4.19.0 if you want to use these demos, or change the variable back to testing for None.
PySimpleGUI
on 7 May 2020
The Daily Japanese Tutorials
I have a habit now of checking Twitter every morning to see what new article about PySimpleGUI has been posted. For months almost every day someone overseas writes a PySimpleGUI article / blog post / tutorial. It's CRAZY. Some are really good. OK, they're all really good in their own ways.
It's puzzling why this is happening but hasn't happened in the States or English speaking countries at all.
Here's one posted last night about doing OCR using PySimpleGUI
https://qiita.com//yamacs/items/cebb34227ad7373e9e3b
It's a strange phenomena. Maybe the PySimpleGUI documentation translates easier than other GUIs? Or maybe there's a cultural thing that PySimpleGUI touches on (being simple and elegant?) that resonates with a Japanese programmer more than an English speaking one?
I'll ask the Twitterverse and see what comes back. Someone surely knows why....
PySimpleGUI
on 7 May 2020
No more if event in (None, 'Exit)
There are 2 changes underway. The first was done yesterday to the demo programs which was to replace None with sg.WIN_CLOSED.
I'm working with an author on an article now and I am cleaning up a few demos, it's made me realize that I've made a "too Pythonic" error in my design templates and demos.
I'm pretty sure that the if statement currently used to check for None and 'Exit' ` is the "preferred" Python statement to use. However, a big goal is for PySimpleGUI to be simple enough for a complete beginner to use. Ideally someone with 1 week of Python can understand a basic PySimpleGUI window.
The "problem" is that you're unlikely to see this particular pattern of if towards the start of the class.
It may not ever come up in the class in fact:
if event in (None, 'Exit)
It's "Pythonic", but who knows "Pythonic" in their first month of Python?? I certainly didn't. So it was this combination of thoughts that has led to this new design pattern and new coding convention.
if event == sg.WIN_CLOSE or event == 'Exit:
Yes,. it's super-overly-obvious. Yes, it's not the most "Pythonic" way. But, like _everything_ computers, not all answers are always the right answer to the same question, even when that answer is right 99% of the time. This, BTW, I see as this and the general immaturity of Reddit readers to be the major problem there. There is no "the best" in computers.
Anyway, just a heads-up that yes, more time being wasted poking around at the deck chairs on the titanic, but refinement of the package is just as important as growing it. It's a different kind of growth.
Not sure how long it'll take to make the change nor the speed of the rollout... today will be updating the official design patterns to use so at least people will get a start in that direction.
It's also part of my standard code snippit. In PyCharm I have a Live Template that pastes a small PySimpleGUI program. Gong forward it'll use or instead of in.
Headsup... WIN_CLOSED requires 4.19.0 which means all demos require 4.19.0 now
As warned in the demo readme (or docs somewhere), the demo programs are not meant to be backwards compatible. They will sometimes require you to upgrade.
If you do not care to upgrade and not use the constant WIN_CLOSEDand with to use None, then feel free to change the demo source.
PySimpleGUI
on 8 May 2020
0.34.0 PySimpleGUIQt 10-May-2020
This time for REAL added the constants. I don't know how to changes got lost but they did.
- Added constants
- WIN_CLOSED and WINDOW_CLOSED
- EVENT_TIMEOUT and TIMEOUT_EVENT
Ooops! I don't know what happened, but the newly added constants that were added to all ports, didn't make it into the PySimpleGUIQt release. REALLY weird and kinda upsetting as I blew it in a big way and don't yet understand exactly why it happened.
PySimpleGUI
on 10 May 2020
Two New YouTube "PySimpleGUI 2020" Videos
All of the PySimpleGUI videos are located here:
http://YouTube.PySimpleGUI.org
The "2020 series" are here: https://www.youtube.com/playlist?list=PLl8dD0doyrvFfzzniWS7FXrZefWWExJ2e
Today were a couple of good topics. The first was "Container Elements" the second was about "Generated Layouts". I think you'll find both of them informative. While single-line Sudoku board is a neat parlor trick, it does demonstrate a very powerful difference between PySimpleGUI and the other Python GUI frameworks. Creating windows using a simple list structure enables the use of list comprehensions to make GUI windows, a crazy thing.
PySimpleGUI
on 11 May 2020
YouTube.... don't get it... blown away by it....
I get 80% of my TV time on YouTube. It's on my TV video FireTV. I'm too impatient to watch much normal TV, although do use YouTubeTV too.
I watch the latest about archaeology, science, stuff like "Journey to the Microcosmos", funny stuff, but rarely technical programs unless it's "2-Minute Papers".
Anyway, one reason for making the PySimpleGUI 2020s was the old ones were actively teaching to do things in and older way. There are newer and "better" ways of doing things. So I'm essentially remaking all the old ones.
Here's the part that always stuns me, and I'm TINY compared to most YouTube people. An actual nothing in the YouTube universe.
Here's what the last 48 hours look like for the PySimpleGUI videos

I highlighted the last hour. It shows TEN people watched PySimpleGUI videos in the hour. Or there were 10 videos watched. Or something like that. The fact that 24 hours a day someone, somewhere in the world is watching these and learning PySimpleGUI is WEIRD. That's the only way I can put it.
It really puts into context how many people there are in the world! I think that ten is 0.000000013 % of the world's population.
Anyway, I'm just happy people are finding use for PySimpleGUI and the videos, and are making stuff that's making them happy. See stuff being made using it is an awesome experience. Thanks to everyone that's giving it a try and are posting the results! It's fun to look at the new arrivals. GitHub makes it easy. Just click at the top of the page:

PySimpleGUI
on 11 May 2020
Apologies for being spread so thin - Setting expectations
Despite my best efforts, I sometimes simply come up short. There are only so many hours. Most all of them that I have in a day are given to this project and the users. But sometimes that seems like it's not enough.
I'll be adding a new "expectations" section to the Issues form that will explain how long someone should expect to wait before a support issues. I realized that I've made a mistake by not saying anything at all about turnaround time. Expectations can wildly vary between "Oh, I understand the situation and can wait" to "why am I being ignored" and that's on me for not being clear. When there's a mismatch it becomes overwhelming and bad shit happens as a result, something I certainly want to fix.
I've also made the assumption that by now everyone knows that it's one person doing everything you see. I hire help on some occasions, and there are a couple of close friends that give me a handful of lines of code from time to time, but pretty much every keystroke in the docs and code and issues and trinket and demos and YouTube and ____ came from these pair of hands.
The net is that PySimpleGUI is operated like a 1-person startup.
Anyway, I'll continue to try hard to answer Issues within 24 hours. Just know it may be longer sometimes and that you're not being ignored. I'm simply trying to task-switch among a lot of things. Or maybe I had something come up and am not able to spend any time working that day. Regardless I value all the PySimpleGUI users and the support you've all given me and I'll keep on trying to give back to you in turn.
PySimpleGUI
on 12 May 2020
An Async Chat Application Using PySimpleGUI
There is not currently a good place to "spotlight" achievements like this one (and others) so I'm looking into using the WIKI and other ways to do this.
Async Desktop Chat
For now, I'll post about it here. A long-time user, supporter, friend, @nngogol, has once again developed an impressive piece of work.
I'm working to get a simple sockets based chat demo complete that's "simple".
THIS chat application however is really cool and a much more difficult kind of application to write.
You'll find the code here:
https://github.com/nngogol/async-desktop-chat
It uses Websockets along with true Python async capabilities to implement a chat application with a server that is capable of handling multiple client connections and even has a private message capability between users.
Given the amount of code, it's truly a work of art. The server is 111 lines of actual code and the client 144.... and that includes the GUI.
I'll be the first to say the async/await implementation he's created is above my head at the moment, and I look forward to learning more about that for sure! In the meantime I'm simply in awe and enjoying playing with it and learning from reading the code.
Here's a video of it in action:

FYI - In case you're not familiar with the level of impact he's had on PySimpleGUI, one example is the technique of looking up elements using the notation window[key] was his creation. It's an honor to be around brilliant computer scientists like him. Thank you to all PySimpleGUI users out there making cool stuff!!
PySimpleGUI
on 12 May 2020
Split Readme and Call Reference
I know this will make a number of people happier... or so I hope.
The giant readme has been split into 2 (giant) parts. The Call Reference section now has its own tab at the top of the ReadTheDocs (http://www.PySimpleGUI.org)

The Call Reference tab has signatures for all of the Elements and other Objects and all functions. This should improve the load times for everything.
The project's Readme now fits on the main github page again instead of being truncated. I still need to add a link over to the reference from the readme so that users know to go over there and search for specific call info.
It's my hope this makes the documentation even more useful / usable. I do understand the the "large file" approach is simplistic, but the package is named PySimpleGUI after all and that simplicity mantra isn't limited to the architecture.
If you care to be bored enough to read the logic...
Reason for the large files
I've navigated the tkinter, pyside2, WxPython, and Remi documentation, not to mention many other packages. I personally struggle with the ones that are split up into many separate pages. The "Search" box rarely gives me the result I'm after. Navigating takes time. I end up frustrated.
Just like you look through the docs, so do I. Using Control+F as a simple search and F3 to jump to next reference.

The scrollbar on the right is highlighted with all the locations it finds the words. AND there's a table of contents on the left that also...

Oh, look, my search for ButtonMenu has turned up the primary section it's likely discussed in.
With the new tab, it should make searching for Elements and methods even easier. It too has a table of contents, just as it did in the readme before:

PySimpleGUIQt is coming
Official work on the docstrings in PySimpleGUIQt is underway. That should really help PySimpleGUIQt users and will enable me to make another call reference doc that's Qt specific.
Thanks for the Thanks
I hear from a lot of people about the docs. I do listen to the ones that don't like them, but I also get a lot of people that contact me that do like them... a lot.... so while I am trying to improve them, it's nice to know they are really useful to some people.
"It's not done until the docs are done" has been my mantra for decades and I don't see that changing... so hopefully PySimpleGUI docs will also improve over time.
PySimpleGUI
on 17 May 2020
Unifying The "Element Justification" Mechanism
Big leap forward this week in the way element justification is handled.
The mechanism for the primary PySimpleGUI port is a parameter element_justification that is on the Window, Column, Frame, and Tab elements. They all have the same parameter and it works the same for each of them.
BTW - For justification parameters I've made them in a way that you only need to use the first character.
This code produces this window:
import PySimpleGUI as sg
# import PySimpleGUIQt as sg
# import PySimpleGUIWeb as sg

layout = [  [sg.Text('My Window')],
            [sg.Input(key='-IN-')],
            [sg.Button('Go'), sg.Button('Exit')]  ]

window = sg.Window('Window Title', layout, element_justification='c')

while True:
    event, values = window.read()
    if event == sg.WIN_CLOSED or event == 'Exit':
        break
window.close()

This code produces the exact same window. It uses the trick of taking a window layout, and sticking it into a Column layout that has no padding. The windows look identical
import PySimpleGUI as sg
# import PySimpleGUIQt as sg
# import PySimpleGUIWeb as sg

layout = [  [sg.Text('My Window')],
            [sg.Input(key='-IN-')],
            [sg.Button('Go'), sg.Button('Exit')]  ]

layout = [[sg.Column(layout, element_justification='c', pad=(0,0))]]

window = sg.Window('Window Title', layout)

while True:
    event, values = window.read()
    if event == sg.WIN_CLOSED or event == 'Exit':
        break
window.close()
If you want to place your window in a Frame that centers, the same trick applies but using a Frameelement instead of a Column

Or if you prefer Qt, the same trick works now:

On PySimpleGUIWeb, if you use this track with a Column element, it will center the elements in the Column, which is LEFT justified within the window. This is the effect:

The PySimpleGUIWx port continues to be the red-headed step-child of ports. It will get it added shortly. I wanted to share the good news on the Qt and Web ports today.
I'm _excited about this change_ and will try to get it published to PyPI as quickly as I can for Qt and Web!
PySimpleGUI
on 17 May 2020
Async Chat Client/Server - Part 2
Disclaimer.... allowing anything past your router / firewall is risky business. Understand what risks you're taking and exercise caution.....
Want to share a successful experiment. Maybe you wan to try something like it? I dunno... it's fun to get stuff working sometimes just to know it can be done.
Maybe you want to have a person chat connection with friends but trust no other products or services out there. If so, them maybe this async chat server is your paranoia nirvana. Or maybe it's even riskier? 🤷🏻♂️
Async Chat
A week ago I spotlighted a PySimpleGUI based async chat program.... I think it's pretty incredible what can be done with skilled Python developers. I'll be the first to admit, it's beyond my capabilities. But, like many PySimpleGUI things, it's not beyond my using it.
You'll again find the code here:
https://github.com/nngogol/async-desktop-chat
What I wanted to share was an experiment that worked out really well. I think maybe I'm easily impressed or excited, but I'm good with that. In the end I'm having fun and that's a big part of why we're all here, right?
It was fun to play around with the program on my local network, but what about the outside world? Is it possible to use this program with friends that are on the Internet.
Setting up port forwarding...
I knew that was going to require a bit of port-forwarding in my router to get from my modem to my desktop machine. If you want to provide a chat server for you and your friends, you'll need to do a few things in order to be the server.
Do a little research and poking around in your router and you'll find that you can reserve a specific port # that when the router gets packets for that port, the router is capable of sending them to a specific machine on your network. This is how you will get the chat traffic from the internet to your computer that's safely behind your firewall and all the great protections if offers.
Of course, be really careful and understand you're dropping your shields a little doing this. Choose a port that's obscure and not "dangerous" to let someone through. Something not normally connected to anything.
I managed to setup my router such that traffic on a particular port was routed to my desktop computer.
Informing your pals of where to connect
You can find your external IP address easily enough and hand that out, but it will change when you restart your modem. Some routers connect with services such as noip.com.
noip.com allows you to give out a URL that will resolve to your external ip address of your modem/internet connection. I managed to get my router to work with noip.com and when pinging my noip address, I saw it resolving to the correct address of my modem.
So, up to this point I could give out an address that's not a hard coded IP address and a port number, and my router passed traffic through to my desktop computer.
Punching through your virus protection / firewall.
This is where things really turn a bit risky in my opinion, but it was a test more than something I planned on leaving up, so I was OK with doing it. I again used the special port # that I reserved in my router. I told my computer's firewall to allow traffic into that port and to allow the server.py program to listen on that port.
Run the server and clients
The last step was to run the server on my desktop, run a client on my desktop, and get my friends to run the client and try to connect.
And.....
It worked!
I was able to run a chat server on my desktop and use the client to talk to other clients. It's like having your own discord chat server. If you want to overlay come mega-encryption onto it that exceeds what discord provides, then nothing stopping you from doing that than a bit of python programming.
Extending the capabilities
I already mentioned layering on encryption so go for it if that's your thing. It's also possible to extend the GUI in an interesting way. Because the SystemTray feature is available in PySimpleGUI, it's possible to run the server as a SystemTray program that will popup messages when events happen like people connecting.
Or maybe you want the client interface to minimize down into the system tray. Lots of ways of extending this program using PySimpleGUI that isn't beyond what an intermediate programmer, or perhaps even an advanced beginner programmer, is capable of doing. It's less than 10 lines of code to make a system tray based PySimpleGUI program, so can't be THAT difficult to add it onto the server and/or client.
Keep making stuff!
Every day I see new creations out there. It's awesome to see what people are making. The programs are getting more and more diverse and interesting. They don't have to be long to be interesting. A 25 line stock quote app was posted on Reddit today that's pretty cool.
The advice I get to beginners is to make stuff. It's a craft we're all participating in and the more you practice whatever your craft is, the better you'll get.
PySimpleGUI
on 20 May 2020
Splash Screens
Saw a Reddit post looking for a splash screen with a transparent background..
I could swear this already existed but I don't see anything so I made a new demo application for it

import PySimpleGUI as sg

IMAGE_FILE = r'A:\- TEMP 2019 -\PySimpleGUI_Logo.png'
DISPLAY_TIME_MILLISECONDS = 4000

sg.Window('Window Title', [[sg.Image(IMAGE_FILE)]], transparent_color=sg.theme_background_color(), no_titlebar=True, keep_on_top=True).read(timeout=DISPLAY_TIME_MILLISECONDS, close=True)
I dunno what it is about these 1-line PySimpleGUI solutions that makes them so much fin, but they're fun! It's not that they're 1 line in length, It's more the "logic puzzle" aspect of it all. It like assembling Tinkertoys from capabilities that I know exit. The close parameter is key in these kinds of apps.
PySimpleGUI
on 20 May 2020
Unified Element Justification
The work is finally done on unifying how Elements are justified within Windows and "Container Elements".
All four ports, yes PySimpleGUIWx included, now use the element_justification parameter. Add this parameter to Window and any container (Column, Frame, Tab) and the contents will arrange their elements in this manner. Valid values are 'l', 'r', 'c' or 'left', 'right', 'center'. Or 'larry', roy', 'charlie'. Pick your own element justification word as long as it begins with l, c, or r.
There is one exception. The default justification for PySimpleGUIQt Windows is.... float. This is the justification as the way things are today. One unusual way the PySimpleGUIQt port differs from tk port is that the buttons stretch across the window. If you set the justification to 'left', then it will autosize the buttons so that it looks like you would think. I did not want to use this setting as the "new default" however as it would impact every existing application. Not gonna happen, so, 'float' is the default.
import PySimpleGUIQt as sg


layout = [  [sg.T('*'*(60))],
            [sg.B('Button 1'), sg.B('Button 2')]]

window = sg.Window('Element Justification', layout).read(close=True)

layout = [  [sg.T('*'*(60))],
            [sg.B('Button 1'), sg.B('Button 2')]]
window = sg.Window('Element Justification', layout, element_justification='l').read(close=True)
PySimpleGUIQt's "float" justification

PySimpleGUIQt's 'left;' justification

You can get all of the ports from GitHub. (They're being posted to PyPI tonight/tomorrow. Docs are still being updated.)
PySimpleGUI
on 28 May 2020
Amazing Python Cheat Sheet
I've seen countless cheat sheets. This one is truly amazing. I've created a PDF from it.
https://gto76.github.io/python-cheatsheet/
I am trying to determine if I can integrate into PyCharm somehow or make a single-button launch of a PySimpleGUI front-end to help. Maybe I just launch my PDF viewer. Don't know yet but it sure seems worth sharing. Anything to speed development for us all!
PySimpleGUI
on 30 May 2020
COMING PySimpleGUIQt DocStrings!!!
My hope is to get these released this weekend!
This is a HUGE thing to get done. Finally the PySimpleGUIQt users have a good set of explanations and list of all of the parameters.
I received a lot of help on these from @nngogol , who also created the readme documentation generator so I have an enormous amount of gratitude for him making this available. We are all benefiting greatly!
PySimpleGUI
on 30 May 2020
Running PySimpleGUI code using .pyw extension (on Windows)
I apologize for my ignorance of Python on Linux for this topic. I'm still investigating to see what the scoop is. So, for the purposes of this post, I'm assuming you're a Windows user (sorry other 50% of the PySimpleGUI users)
It dawned on me yesterday that not everyone knows about the pythonw.exe file. I believe by default if you name a program with the .pyw extension rather than .py, it will execute pythonw.exe to run the program when you double click it.
For PySimpleGUI programs, THIS is the experience you want users to have. This is sorta the holy grail of GUI development. You double click a file and up pops a "window" that looks like a "real windows application".
I'm sure you already know that double clicking a .py file results in a console application launching along with your GUI application. Using pythonw removes that pesky console and your experience becomes one much like running an EXE file.
Of course, any prints you do are going to be lost. Crash information will be lost.
This scenario is exactly why the function Print exists. Waaayyyy back in the early days, there was this dream of using running only GUI programs using only GUIs. No consoles.
But what about "print" output? It's THE way to debug for many/most. That's where the "Debug Window" comes to the rescue. You can not only use is with the Print function, but you can re-route stdout to use this window as well.
The "trick" is to make an initial call to Print that using the parameter do_not_reroute_stdout set to False. This causes stdout to be rerouted. Normally it does not reroute stdout.
So, this code:
import PySimpleGUI as sg

sg.Print('This is the first line printed', do_not_reroute_stdout=False)

layout = [  [sg.Text('My Window')],
            [sg.Input(key='-IN-'), sg.Text(size=(12,1), key='-OUT-')],
            [sg.Button('Go'), sg.Button('Exit')]  ]

window = sg.Window('Window Title', layout)

while True:             # Event Loop
    event, values = window.read()
    print(event, values)
    if event == sg.WIN_CLOSED or event == 'Exit':
        break
    if event == 'Go':
        window['-OUT-'].update(values['-IN-'])
window.close()
Creates this window. Notice how the first line is "printed" to the debug window using the sg.Print call at the top of the program.
_But_, all other prints in the program, in this case print(event, values) are also shown in that debug window.

Maybe this should be explicitly be added to the Cookbook? There was recently a large section added devoted to printing and I think this is already mentioned, but perhaps not in this manner.
Anyway, enjoy!!
PySimpleGUI
on 2 Jun 2020
0.35.0 PySimpleGUIQt 6-Jun-2020
Element justification within Window and Containers! Finally a unified justification
- When any Radio element is updated to be False, the entire GROUP is reset so nothing is selected
- Fixed Multiline.get so that it correctly returns the value, was always returning None
- Fixed MultilineOutput.get so that it correctly returns the value, was always returning None
- Notes say I fixed a Frame Element background color bug but I don't see where / how
- element_justification added so that all elements inside these will be justified accordingly.
- For PySimpleGUIQt only, the default is "float" which sets nothing. Buttons will stretch across the window as result
- Valid values are 'l', 'r', 'c'. You can spell it out, but only first letter is used.
- Window
- Frame
- Column
- Tab
- Table Element addition
- Header background color
- Header text color
- Header Font (not yet hooked up)
PySimpleGUI
on 6 Jun 2020
0.17.0 PySimpleGUIWx 6-Jun-2020
Element justification within Window and Containers! Finally a unified justification
- When any Radio element is updated to be False, the entire GROUP is reset so nothing is selected
- element_justification added so that all elements inside these will be justified accordingly.
- For PySimpleGUIQt only, the default is "float" which sets nothing. Buttons will stretch across the window as result
- Valid values are 'l', 'r', 'c'. You can spell it out, but only first letter is used.
- Window
- Frame
- Column
- Tab
PySimpleGUI
on 6 Jun 2020
4.20.0 PySimpleGUI 6-Jun-2020
Fixes and new features... broad range
- Fix for Typing import for Pi (3.4) users. Now "tries" to import typing
- Tooltip fonts - can change the font for tooltips
- Fixed tearoff for Menus. Had stoppped working
- Radio - If element is updated to False, the entire group of radio buttons will be set to false tooltips
- Multiline - fix for colors. Only set tags for output that has specific colors
- Multiline - keeping track of disabled with Disabled mumber variable
- Progress bar
- Added class variable "uniqueness counter" so that every bar will have its own settings
- Needed in case the same key is used in another window
- Fix for stdout being reset if someone sets flush on their call to print
- Mac special case added to tkfiledialog.askdirectory just like on askopenfilename
- Tab - can "update" the title
- Menu update - was not applying font when updating the menu
- Window.set_title - allows you to change the title for a window
- Added searching through Panes when looking for element with focus
- Removed Python 2 Add Menu Item code
- Added font to buttonmenu.
- Added font to the combobox drop-down list (wow what a pain)
- Table now uses the element's padding rather than 0,0
- Tree now uses the element's padding rather than 0,0
- set_options - added ability to set the tooltip font
- Fixed a couple of docstrings
- Reworked main() test harness to dispay DETAILED tkinter info and use bettter colors
PySimpleGUI
on 6 Jun 2020
0.39.0 PySimpleGUIWeb 6-Jun-2020
Element justification within Window and Containers! Finally a unified justification
- Frame support, but without any labels yet.... only makes a frame... hey, it's a start
- element_jutification added so that all elements inside these will be justified accordingly.
- For PySimpleGUIQt only, the default is "float" which sets nothing. Buttons will stretch across the window as result
- Valid values are 'l', 'r', 'c'. You can spell it out, but only first letter is used.
- Window
- Frame
- Column
- Tab
- New main() that shows Remi version and more info
PySimpleGUI
on 6 Jun 2020
Dashboard Demo Program
I saw a nicely designed tkinter window shown on Reddit in this post:
https://www.reddit.com/r/Python/comments/gxsb8v/i_created_a_gui_that_collates_various_interests/
This is the window that the code produces:
Now THAT'S a GUI design worth grabbing and doing something with!
When someone has made tkinter look that nice, you can't let it go to waste. It's one example of how not to design ugly looking tkinter windows.
I wondered how to go about something like that using PySimpleGUI. The big question for me was "how can I make those borders"?
It turned out to be relatively straightforward. There's a new Demo Program located here:
https://github.com/PySimpleGUI/PySimpleGUI/blob/master/DemoPrograms/Demo_Dashboard.py
That makes this window:

Notice that it does not have a titlebar. You can add one back easily enough if you won't mind it by not setting the no_titlebar parameter.
The messy / tricky part of the code is getting the borders to be the right size.
It should come at no great surprise that the layout is just a bunch of Column elements with one of the Columns containing Columns.
layout = [[sg.Column(top_banner, size=(960, 60), pad=(0,0), background_color=DARK_HEADER_COLOR)],
          [sg.Column(top, size=(920, 90), pad=BPAD_TOP)],
          [sg.Column([[sg.Column(block_2, size=(450,150), pad=BPAD_LEFT_INSIDE)],
                      [sg.Column(block_3, size=(450,150),  pad=BPAD_LEFT_INSIDE)]], pad=BPAD_LEFT, background_color=BORDER_COLOR),
           sg.Column(block_4, size=(450, 320), pad=BPAD_RIGHT)]]
The layouts inside the blocks is really typical PySimpleGUI stuff like this:
block_2 = [[sg.Text('Block 2', font='Any 20')],
            [sg.T('This is some random text')],
            [sg.Image(data=sg.DEFAULT_BASE64_ICON)]  ]
This is a great little Demo in search of an application. If you're looking for a clean looking Dashboard interface for a PySimpleGUI program, consider giving it a try.
PySimpleGUI
on 13 Jun 2020
Three More Widgets
In the past couple of days I have dashed out a couple of quick and easy "Rainmeter-style" Desktop Widgets.
The two that were added were a disk partition use viewer and a RAM use viewer.
Drive Usage

RAM Usage

CPU Usage
This one has been around a while, but not really posted as a widget. I'll add it to the Widget Repo that I started that only has some of these PySimpleGUI Widgets (https://github.com/PySimpleGUI/PySimpleGUI-Widgets). I also modified the top CPU usage processes widget to make the exit button into a clickable text X.

PySimpleGUI
on 16 Jun 2020
Reversing the Radio Button Mistake.....
I recently released a change Radio Button that rippled across all of the ports. The change was that clearing a single Radio button cleared the entire bank that the radio button is associated with.
I just learned 2 things today:
- This change broke the "Load from Disk" code
- There was already an API call
Radio.reset_groupthat clears all Radio Buttons in the group
I also learned that the reset_group code only existed for the tkinter port.
So, today I changed the tkinter, Wx and Qt ports. They all now only clear the single radio button when requested. Both the Qt and Wx ports were given a Radio.reset_group method. This makes much more sense. Sorry for the short f-up period.
I'm going to try and push a release of all ports out the door pretty quickly, perhaps in the next 1-2 weeks. There's not a huge rush except that some people will have broken code if they upgrade, so perhaps wait if you're a user of the load from disk code and have radio buttons in your layout.
PySimpleGUI
on 16 Jun 2020
Bye bye Rainmeter
I think I've finally got a set of Widgets running on one of my monitors and can officially uninstall Rainmeter from my computer.
While this looks like a complete mess, it's on one of 4 monitors. Real estate is not an issue so I like to use the space for instrumentation.

The "Launcher" in the bottom left corner get the most interactive use. If I want to launch GitHub, or one of the test programs, or copy a release to GitHub, it's a button click away.
When I'm ready to pop a release up to GitHub, I click on which port to copy and then GitHub to launch the GitHub GUI program (yes, I use the GUI version instead of the command line one)

I think everything else is pretty self-explanatory about the screen. Most of these are posted on the PySimpleGUI-Widgets repo as well as in the Demo Programs area.
PySimpleGUI
on 18 Jun 2020
New Separator Demo
In response to the newly added Horizontal Separator Element (not yet released to PyPI however), I've created a simple demo program that shows how to use the 2 different separators.
This window is produced from the code below:

import PySimpleGUI as sg

"""
    Demo - Separator Elements
    Shows usage of both Horizontal and Vertical Separator Elements
    Vertical Separators are placed BETWEEN 2 elements ON the same row.  These work well when one
        of the elements is a Column or the element spans several rows
    Horizontal separators are placed BETWEEN 2 rows.  They will occupy the entire span of the row they
        are located on. If that row is constrained within a container, then it will spand the widget of
        the container.
    Copyright 2020 PySimpleGUI.org
"""


left_col = sg.Column([[sg.Listbox((1,2,3,4,5,6), size=(6,4))]])

right_col = sg.Column([[sg.Input(), sg.Input()],
            [sg.HorizontalSeparator()],
            [sg.Column([[sg.In()], [sg.HorizontalSeparator()]], pad=(0,0))],])

layout = [
        [sg.Text('Window with some separators')],
        [left_col, sg.VerticalSeparator(), right_col],
        [sg.Button('Go'), sg.Button('Exit')]
        ]

window = sg.Window('Window Title', layout)

while True:             # Event Loop
    event, values = window.read()
    print(event, values)
    if event == sg.WIN_CLOSED or event == 'Exit':
        break
window.close()
Toolsmithing your way to a happier, more productive day
One of the things that I enjoy the most about PySimpleGUI is having the ability to create my own tools. I've done this in the past of course, but never with a full-blown GUI. Now that making GUIs is pretty close to trivial, I don't hesitate to spend a few minutes making a tool to make life easier and waste less time.
There is also the immense satisfaction of using your own software. It's a great little perpetual motion machine where completing one tool leads to creating another so that each is a little more powerful than the last. The time invested (both of these took an afternoon) is usually more than worth it.
Build a PyCharm Favorites Launcher
It's been a "toolsmithing" week for me.
Here's the first one I'll be discussing:
https://github.com/PySimpleGUI/PySimpleGUI/blob/master/DemoPrograms/Demo_PyCharm_Launcher.py
I had a partial crash of my PyCharm environment and so it was an opportunity to examine how I had things setup.
Two activities in particular I find myself doing a LOT are:
- Editing one of the PySimpleGUI ports' .py files
- Copying Demo Programs from my local folder to GitHub
Both of these activities I was doing within PyCharm itself.
Editing - file selection within PyCharm
Normally to edit a file I use the "project file explorer" in the PyCharm window. This is a list of files in the project. Because there are a LOT of files in the project, it takes a bit of scrolling to find PySimpleGUI.py and then click on it.
An alternative is to mark these files as "Favorites"
That's fine, but it requires multiple clicks to open the favorites tab in PyCharm, open another collapsed list and finally choose the item from the list.
Editing - file selection using a desktop widget / launcher
I'm a big fan of widgets on my desktop these days. I have a massive one I use for launching programs, copying files, etc. Basically a button to do my most common activities.
This specific problem, editing the PySimpleGUI.py file, could have been added to the primary launcher.
I settled on a special smaller launcher that sits right above my system tray, like this:

It's always on top of all windows so it's always super-easy to get to.
I don't know how much time I'm saving, but it feels like a LOT
Self-editing Button
Since I've been actively working on this launcher, I decided to add it to the list of programs that I can quickly edit in PyCharm. Thus the last button in the list is "This Program". Now I don't have to remember what I called the program nor where it lives.
GitHub Demo Copier / Editor / Launcher
Another very common activity is creation and updating the demo programs. Just like editing the PySimpleGUI.py file, it required me to scroll through the many project files to find and edit them. I was also copying the file from my local folder to my GitHub folder when I was ready to check in changes.
This too seemed like a great candidate for optimizing, so I wrote this little tool. I'm not posting it as a demo as it's somewhat specialized.

With this tool I can copy demos, run them both locally and from the GitHub folder as well as edit them in PyCharm. Like the PyCharm launcher above, I added a button to edit the program in PyCharm at the click of a button. It's made life SO MUCH more efficient.
PySimpleGUI
on 26 Jun 2020
4.21.0 PySimpleGUI 27-Jun-2020
Horizontal Separator, cprint, docstrings
- New color printing function cprint - enables easy color printing to an element
- Tons of docstring fixups (300+ changes)
- Removed old Python2 checks
- Added Element.set_vscroll_position - scroll to a particular % of the way into a scrollable widget
- Input Text - new parameters
- border_width
- read_only (for tkinter will have to be disabled OR readonly. Cannot be both)
- disabled_readonly_background_color
- disabled_readonly_text_color
- Radio - Backed out the change that cleareed all buttons in group because already have that ability using reset_group
- Graph drag mouse up events returned as either a string + "+UP" (as before) or as a tuple with "+UP" being added onto a tuple key
- Vertical separator - added key and color - color defaults to text color
- Horizontal separator! (FINALLY). Color defaults to text color
- Fix for Table and Tree elements not automtically getting a key generated if one wasn't supplied
- Made key parameter for one_line_progress_meter have a default value so don't have to specify it when you have only 1 running
- theme_add_new - adds a new theme entry given a theme name and a dictionary entry. This way you don't have to directly modify the theme dictionary
- Added initial_folder to popup_get_folder when there is no window
- Added default_path to popup_get_file when there is no window
- Fix for removing too many PySimpleGUI installs when using the GitHub upgrade tooltip
PySimpleGUI
on 27 Jun 2020
New k parameter == key parameter
While creating the new cprint function it dawned on me that tkinter uses multiple keywords for the exact same parameter so I might as well do the same with PySimpleGUI, particularly for parameters that are often used, such as key.
So, for the tkinter port, at least for now, I've created an experimental release where every element has a parameter k. The element will use either key or k for the element's key. key will take precedence should both be specified.
This will be particularly helpful for layouts that are very complex and the length of the layout lines become long. Combined with the shortened element names, you can make compact programs such as this:
import PySimpleGUI as sg

layout = [  [sg.T('My Window')],
            [sg.In(k='-IN-'), sg.T(size=(12,1), k='-OUT-')],
            [sg.B('Go'), sg.B('Exit')]]

window = sg.Window('Window Title', layout)

while True:             # Event Loop
    event, values = window.read()
    print(event, values)
    if event == sg.WIN_CLOSED or event == 'Exit':
        break
    if event == 'Go':
        window['-OUT-'].update(values['-IN-'])
window.close()
This is not ideal for beginners of course as it's difficult enough to initially learn the concept of a key and seeing this k thing all over the place isn't very descriptive. But, it's not a beginner feature. The plain key parameter remains and always will remain there. It'll be used for most of the Demo Programs.
It it turns out well, then expect to see it ported across the other 3 ports.
PySimpleGUI
on 30 Jun 2020
4.23.0 PySimpleGUI 3-Jul-2020
Table Colors Fix - workaround for problems with tables and tree colors in Python 3.7.2 to 3.9+
Mac crash fixed - tkinter.TclError: expected boolean value but got "" (hopefully)
New shortcut "k" parameter for all elements that is the same as "key" - may be experimental / temporary if not well received
More error checks
popup extensions
- Fix for missing Table and Tree colors created in tk 8.6.9
- This is a problem in all versions of Python 3.7.2 - 3.9.0 with no target fix date published
- As a result of no fixes in sight, added a fix in PySimpleGUI if the tk version is 8.6.9
- New Element creation parameter "k" - exact same thing as "key" but shorter. Helps with complex layouts
- New error reporting on all element.update calls - checks to see if element has been fully created
- set_options - new option to supress popup_errors coming from PySimpleGUI.py
- Mac specific crash fix - if on a Mac, no longer calling wm_overrideredirect as it crashes the Mac now
- Additional error checking (shows error instead of asserting:
- Check for Widget creation before widget operations like bind, unbind, expand
- Check for window finalize / read before some window operations like maximize, hide, etc
- docstrings - more added. Fixed up a number of missing / erroneous ones
- Tree element - caches images so that will not create new ones if previously used on another Tree item
- popup - two new options
- any_key_closes - bool. If True, any key pressed will close the window
- image - can be a bytes (base64) or string (filename). Image will be shown at top of the popup
- all popups - new image parameter (base64 or string)
- a few new built-in icons
PySimpleGUI
on 3 Jul 2020
4.24.0 PySimpleGUI 3-Jul-2020
Selective control over tk 8.6.9 treeview color patch
- Disabled the code that patched the problem with background colors for Tree and Table elements
- Can enable the patched code by calling set_options
- To enable set parameter enable_treeview_869_patch = True (defaults to false)
PySimpleGUI
on 3 Jul 2020
The Latest Status....
Milestones
There's been quite a bit happening over the past 30 days. A number of milestones reached including topping 1,000,000 pip installs, 4,000 GitHub stars, and an article written by my favorite Python author, Mike Driscoll, that was published at RealPython.com.
Next week, July 11th, marks the 2 year anniversary of the launch of PySimpleGUI. That first release didn't have all of the elements. There was only about 3/4 of them running at that point and of course it only supported tkinter.
YouTube
I just took down all of the PySimpleGUI videos except for the newest 2020 series. While the older videos all contained techniques, concepts, and syntax that continues to run, they used older calls which were not PEP8 compliant among other things. This has led to a number of posts where people are claiming that PySimpleGUI does not have PEP8 compliant interfaces (which is not true).
It's better to have less material that is more accurate than more that isn't as good. I'll go back through the ones taken down and remake those videos using the latest and greatest PySimpleGUI coding conventions.
I've also hired a professional to create a proper intro video. It uses the information presented in the "PySimpleGUI for Impatient People" video.
Cross porting of newer features
There are a number of features recently added to the tkinter port that I'm porting over to the other releases. These include:
- The
cprintfunction - The
kparameter for all elements (same askeybut shorter) - The new Button Color format (single string - "white on red")
- This format was introduced with the
cprintfeatures - Decided to allow the new format to be used when creating buttons and updating buttons
- This format was introduced with the
- Changes to popups that include the image and anykey parameters, and a newly added wrapping technique
The new button color format
[sg.Button('Go', button_color='white on red'), sg.Button('Exit')]
Results in a GUI that has these buttons:

More Demos
There have been a number of new demo programs released. Some are tools being used to help create additional documentation. A Window screenshot tool is a good example of one of these.

Note the nicely colored multiline status area. All thanks to the new cprint function.

sg.cprint('Saving:', end='', c='white on red')
sg.cprint(' ', title, c='white on green')

# The parameter "c" can also be written as "colors".  "c" is simply a short-cut/alias for colors
sg.cprint('Wrote image to file:')
sg.cprint(filename, colors='white on purple')
There was also a recent addition of a more general purpose image viewer that uses PIL. This really needs to be better promoted so that people can get JPGs into their PySimpleGUI programs easily.
More Recipes
There are a number of new areas that need to be added to the Cookbook
- Element Justification - I've discovered much easier ways to get justification to work!!
- Adding a "PyCharm Me" button so that programs are capable of editing themselves
- Taking snapshots of windows
- Using PIL to make working with images easier and enable JPG use
- Horizontal Separator Element - pointing out that one exists and how to use it
It feels like there are a LOT of really powerful recent additions that have not been very well communicated. Sorry it's taking a while to get the documentation updated so that these features are fully explained.
Focusing on PySimpleGUIWeb This Week
The current focus is on PySimpleGUIWeb... in particular getting Matplotlib working with it as well as support for drawing images on Graph elements.
And the cross-porting already mentioned needs to happen to PySimpleGUIWeb so that the calls will be portable across all of the ports.
Special thanks to @nngogol and @jason990420
I want to send a special "thank you" message to these 2 gentlemen. They've both generously given a lot of their rime to the project and it's helped a LOT.
Jason's been on the front line fielding Issues as they come in, often solving problems before I have a chance to even look at them. It's been really nice having an extra hand dealing with incoming issues.
nngogol has continued the documentation aid. The read-the-docs documentation and the docstrings work were completed with a huge amount of help. You guys don't directly see the kind of work he's done, only the results. For example, when I'm pulling together a new release or am writing new documentation, his readme generator tool has been a massive help. It takes the PySimpleGUI source file and creates the documentation you see http://www.PySimpleGUI.org and http://Calls.PySimpleGUI.org

PySimpleGUI
on 5 Jul 2020
Finally Matplotlib on PySimpleGUIWeb
Yeah!! Matplotlib now showing in a browser near you thanks to PySimpleGUIWeb!
What's extra special about this new feature is that it doesn't require any changes to PySimpleGUIWeb. It's all accomplished with existing PySimpleGUIWeb code using an Image element.
You'll find several demo programs in the PySimpleGUIWeb specific demo programs area:
https://github.com/PySimpleGUI/PySimpleGUI/tree/master/PySimpleGUIWeb/Demo%20Programs
This is the function that made it all possible:
def draw_figure(fig, element):
    """
    Draws the previously created "figure" in the supplied Image Element

    :param fig: a Matplotlib figure
    :param element: an Image Element
    :return: The figure canvas
    """

    plt.close('all')        # erases previously drawn plots
    canv = FigureCanvasAgg(fig)
    buf = io.BytesIO()
    canv.print_figure(buf, format='png')
    if buf is None:
        return None
    buf.seek(0)
    element.update(data=buf.read())
    return canv
To make a matplotlib drawing in your window, create a Window with an Image Element in it. Just like all of the other matplotlib PySimpleGUI demos, you'll create a "figure" that is then displayed.
Here's a very minimal program that creates a plat and shows it in the window:
import PySimpleGUIWeb as sg
import numpy as np
from matplotlib.backends.backend_tkagg import FigureCanvasAgg
import matplotlib.pyplot as plt
import io


def draw_figure(fig, element):
    """
    Draws the previously created "figure" in the supplied Image Element

    :param fig: a Matplotlib figure
    :param element: an Image Element
    :return: The figure canvas
    """

    plt.close('all')  # erases previously drawn plots
    canv = FigureCanvasAgg(fig)
    buf = io.BytesIO()
    canv.print_figure(buf, format='png')
    if buf is None:
        return None
    buf.seek(0)
    element.update(data=buf.read())
    return canv


def main():
    layout = [[sg.Text('Matplotlib Simple Plot', font='Any 20')],
              [sg.Image(key='-IMAGE-')],
              [sg.Button('Exit')]]

    window = sg.Window('Matplotlib Example', layout, finalize=True)

    fig = plt.figure()
    x = np.arange(0, 5, 0.1)
    y = np.sin(x)
    plt.plot(x, y)
    draw_figure(fig, window['-IMAGE-'])

    window.read(close=True)


if __name__ == "__main__":
    main()

PySimpleGUI
on 6 Jul 2020
New YouTube Introduction to PySimpleGUI Animated Video

I'm really pleased with how this professionally produced video turned out.
It explains this simple demo program which touches on all aspects of PySimpleGUI.... layout, window creation, event loop, updating things in your window. All of that in under 4 minutes of video.
If you think about the other Python GUI frameworks and what you can explain in 4 minutes, you're unlikely to be able to cover a program that do this much and is this simple/easy to understand. Hopefully it'll get the point across as to just how simple of a framework it is to use.
# http://www.PySimpleGUI.org
# import
import PySimpleGUI as sg

#layout
layout = [[sg.Text('Enter something:'), sg.Input(key='-IN-')],
          [sg.Text('Out output will go here',key='-OUT-', size=(30,1) )],
          [sg.Button('Ok'), sg.Button('Exit')]]

# window
window = sg.Window('Title', layout)

# event loop
while True:
    event, values = window.read()

    if event == 'Exit' or event == sg.WIN_CLOSED:
        break
    window['-OUT-'].update(values['-IN-'])

#close
window.close()
Auto-Refreshing
Coming soon to PyPI (already up on GitHub) are changes to the Output element and Multiline elements, at least on the PySimpleGUI port.
These auto-refresh capabilities will make programs that do not have a traditional event loop possible.
The idea is to move from a plain command line program to one with a window. In order to keep Windows from complaining that your application has locked up, you need to call Window.refresh on an ongoing basis. With these new changes, the refresh will happen automatically every time you call print for an Output element and if you update a Multiline that has the 'auto_refresh' parameter set.
This enables a _migration_ of a command line application to a GUI application.
Re-routing
In addition to this auto-refresh capability, there was also an additional method added to Multiline - reroute_stdout_to_here. This method will do exactly that, re-route the stdout output to that multiline element. After making this call, all of your print calls will output to that Multiline element. This opens up the flexibility to use print immensely. You can print to any window and any Multiline element within a window.
To make it even easier to route stdout to a Multiline, there's a new cool parameter reroute_stdout that will cause stdout to be rerouted to go to that Multiline element instead of the console.
Extending this concept further, I decided to add the ability to specify that not only stdout, stderr should go to a specific Multiline Element when it's created, but you can also specify that cprint output should also be routed to this element. This removes the need to call the cprint setup call cprint_set_output_destination and makes for some really clean looking code.
What This Means
The implications of all this re-routing and auto-refreshing of stuff are that existing applications can be converted to GUI based applications very easily and can be done in stages.
You can start by simply outputting your text to a window. When you're ready to begin taking in user input, then you can add new Elements to your window so that they can be read in addition to your outputting to Multiline elements.
Demos demo demo are coming
I'll be putting together a series of demos that shows how to build these migratory applications.
The idea is a series of demos the demonstrate how programs can evolve from a command line application into a GUI application in a gradual, evolutionary way rather than a big re-write revolutionary way.
PySimpleGUI
on 9 Jul 2020
HEADS-UP --- Changes coming.....
I've been checking in some changes this weekend that will impact your code. Things will either look or behave differently.
They are only on GitHub at this point, but will eventually hit PyPI of course. So, if you're concerned, you should try the GitHub version soon.
I rarely do this with the PySimpleGUI project.... but these 2 changes are good ones to have automatically added to everyone's code. If you don't like them, there are options to turn them off.
Table and Tree Row Highlight Colors
Due to the bug in tkinter for Python version 3.7.2 = 3.9+ , there needed to be changes to the Table and Tree code to work around this problem of table colors disappearing. Part of that process included choosing colors for the highlights.
I decided to make the highlight color match the theme being used. So, if you've got a red theme of some kind, then your highlight won't be the standard blue, it'll match your theme colors.
Specifically, the highlight color is the same color as the background and text color of your buttons.
It turned out to look fantastic.
There is also a new parameter added to the Table and Tree elements - selected_row_colors (colors because there is the text and the background colors)
All Popups (blocking type) are now MODAL
I re-discovered a technique described by @SuperMechaDeathChrist that will make a Window behave like a modal window.
You can make your windows modal by calling the method Window.make_modal(). You need to make sure your window is finalized first. I may make a parameter at some point.
As a result of this new capability, I've decided to make _all popups modal by default_.
This means if your popup blocks, you will not be able to interact with your other windows until you close the popup. The modal parameter controls this. So if you want to turn it off, you can. If your popup is non-blocking, it will not be modal regardless of how you set the parameter.
Hopefully these will all be taken as upgrades!
If you have trouble with these, by all means open an Issue!
PySimpleGUI
on 12 Jul 2020
Release coming today
Heads-up that there's a more impactful than usual release coming out today for the tkinter port of PySimpleGUI.
It's unusual to make changes that impact existing applications. This release has more than 1 of those kinds of changes. Hopefully it'll work out for the best in the long run.
I usually make these kinds of releases just before or over a weekend so that I can fix any problems over the weekend when usage is likely to be lower than during the week (i.e. less people will be negatively impacted in theory).
There are over 300 changes to the code and I review each change while creating the release notes, so these tend to eat through a day pretty quickly.
If you're waiting on an Issue to be fixed, I'm sorry if it didn't make it into this release and that working on your Issue is likely being pushed out a little while this release is finished. My only defense here is that I'm honestly doing the best I can.
PySimpleGUI
on 17 Jul 2020
4.25.0 PySimpleGUI 17-Jul-2020
Biggest / most impactful set of changes in a while (fingers crossed)
Modal windows
Multithreaded Window.write_event_value method
stdout re-route to any Multiline
table/tree highlights
k element parameter
- New "k" parameter for all elements.
- Same as "key"
- Created so layouts can be even more compact if desired
- New docstring for keys (basically anything except a list)
- Popups
- New text wrap behavior. Will wrap text between n in user's string
- All popups are now "modal" unless they are non-blocking (can be turned off using new parameter)
- New button color and table/tree highlight color format
- Colors can still be tuple (text, background)
- Can also be a single string with format "text on background" (e.g. "white on red")
- Multiline
- Automatically refresh window when updating multiline or output elements
- For cprint use Multiline's autoscroll setting
- New autoscroll parameter in Multiline.print
- New parameters to make the print and cprint stuff much easier
- write_only=False (so that it's not returned when read)
- auto_refresh=False
- reroute_stdout=False
- reroute_stderr=False
- reroute_cprint=False (removes need to call the cprint cprint_set_output_destination function)
- Table / Tree Elements
- Re-enabled the tk 8.6.9 background color fix again
- selected_row_colors=(None, None) - tuple or string
- Automatically sets the selected row color based on the theme colors! (uses the button color)
- Can use 2 other constants for colors
- OLD_TABLE_TREE_SELECTED_ROW_COLORS - ('#FFFFFF', '#4A6984') the old blueish color
- ALTERNATE_TABLE_AND_TREE_SELECTED_ROW_COLORS - (SystemHighlightText, SystemHighlight)
- Tree image caching happens at the element level now
- Window
- make_modal - new method to turn a window into a modal window
- modal parameter when window is created. Default is False
- write_event_value - new method that can be called by threads! This will "queue" an event and a value for the next window.read()
- Display an error popup if read a closed window 100+ times (stops you from eating 100% of the CPU time)
- was_closed method added - returns True if a window has been closed
- Combo - don't select first entry if updated with a new set of values
- Tooltip - fix for stuck-on tooltips
- New theme_previewer with scrollbars. 3 new parameters
- cprint - now has all parameters shown in docstring versus using args *kwargs
- New global variable __tclversion_detailed__ - string with full tkinter version (3 numbers instead of 2)
- Warning is displayed if tcl version is found to be 8.5.
PySimpleGUI
on 17 Jul 2020
Cross-porting Ahead
I know this message is going to not be popular with a number of people that have open Issues. I'm really sorry that physics and reality have an impact on this project, but they do.
I have no more than 7 days a week that I can put into this project. They're maxed out and have been since the start 2 year ago. Despite my best efforts I don't always get resolutions to problem to a satisfactory level for the submitter, and it's certainly not done in a timely enough manner from the feedback I get, so I thought this time I should at least give a heads up to maybe try and set expectations a little.
The past several releases have had significant new additions and changes to the TKINTER PORT. For most of you, that's awesome, but for the other roughly 1/2 of the users, that's not so great, yet. They're waiting on these features be added to their PySimpleGUI port. I'm talking about the Qt, Web/Remi, and WxPython users.
Without porting these changes to the other PySimpleGUI platforms, users programs become tied to a specific GUI framework, something PySimpleGUI was developed to not have happen.
I'll be the first to admit that porting / rewriting the same code 3 more times isn't a lot of "fun". So please understand that while you're waiting on your particular Issue to be addressed, I'm not off having the time of my life at your expense. I'm simply busily doing what I think is the right thing for the project.
Last set of updates
Of course, this assumes I make it through getting all these changes moved over. My plan is on getting them done, but there's a chance that they may not all get there by the time I've finally had enough of the project.
The social media attacks on the project, and the more personal attacks have taken their toll. They started the month of the first release and have been unrelenting for 2 years. It's taken this project from something I've been proud of and turned it into a dread.
It is difficult to make conscious and personal sacrifice of ones time and resources only to have it result in being accused of intentionally harming junior engineers and those wishing to learn. I know it's not true, but no one else does. The readers that are considering using PySimpleGUI don't know this and while I hate to admit defeat to cyber bullies and people who simply like to destroy, I'm a human being too with all the difficulties that goes along with that.
It's becoming not worth the fight. I'm sorry if this will leave anyone in a difficult spot. It's not my intention. I saw a bright future ahead for PySimpleGUI, but there are more opponents with agendas that don't fit with PySimpleGUI existing, and I'm afraid they're winning the war of words and perception of what's good for programmers and what's bad, and PySimpleGUI has been deemed as being not just bad, but atrocious and harmful.
I'll do my best to get all these updates into the other ports as quickly as I can.
PySimpleGUI
on 18 Jul 2020
Hi,
If you need an ear, I can listen. I just discovered this project a short time ago, and I think it’s amazing.
==========
Jim Homme
Skype: jim.homme
FreeChess: jhomme
Twitter: jimhomme https://twitter.com/jimhome
Facebook: jimhomme
Website: jimhomme.com https://www.jimhomme.com/
From: PySimpleGUI notifications@github.com
Sent: Saturday, July 18, 2020 8:45 AM
To: PySimpleGUI/PySimpleGUI PySimpleGUI@noreply.github.com
Cc: Jim Homme jhomme1028@gmail.com; Manual manual@noreply.github.com
Subject: Re: [PySimpleGUI/PySimpleGUI] Announcements (#142)
Cross-porting Ahead
I know this message is going to not be popular with a number of people that have open Issues. I'm really sorry that physics and reality have an impact on this project, but they do.
I have no more than 7 days a week that I can put into this project. They're maxed out and have been since the start 2 year ago. Despite my best efforts I don't always get resolutions to problem to a satisfactory level for the submitter, and it's certainly not done in a timely enough manner from the feedback I get, so I thought this time I should at least give a heads up to maybe try and set expectations a little.
The past several releases have had significant new additions and changes to the TKINTER PORT. For most of you, that's awesome, but for the other roughly 1/2 of the users, that's not so great, yet. They're waiting on these features be added to their PySimpleGUI port. I'm talking about the Qt, Web/Remi, and WxPython users.
Without porting these changes to the other PySimpleGUI platforms, users programs become tied to a specific GUI framework, something PySimpleGUI was developed to not have happen.
I'll be the first to admit that porting / rewriting the same code 3 more times isn't a lot of "fun". So please understand that while you're waiting on your particular Issue to be addressed, I'm not off having the time of my life at your expense. I'm simply busily doing what I think is the right thing for the project.
Last set of updates
Of course, this assumes I make it through getting all these changes moved over. My plan is on getting them done, but there's a chance that they may not all get there by the time I've finally had enough of the project.
The social media attacks on the project, and the more personal attacks have taken their toll. They started the month of the first release and have been unrelenting for 2 years. It's taken this project from something I've been proud of and turned it into a dread.
It is difficult to make conscious and personal sacrifice of ones time and resources only to have it result in being accused of intentionally harming junior engineers and those wishing to learn. I know it's not true, but no one else does. The readers that are considering using PySimpleGUI don't know this and while I hate to admit defeat to cyber bullies and people who simply like to destroy, I'm a human being too with all the difficulties that goes along with that.
It's becoming not worth the fight. I'm sorry if this will leave anyone in a difficult spot. It's not my intention. I saw a bright future ahead for PySimpleGUI, but there are more opponents with agendas that don't fit with PySimpleGUI existing, and I'm afraid they're winning the war of words and perception of what's good for programmers and what's bad, and PySimpleGUI has been deemed as being not just bad, but atrocious and harmful.
I'll do my best to get all these updates into the other ports as quickly as I can.
—
You are receiving this because you are subscribed to this thread.
Reply to this email directly, view it on GitHub https://github.com/PySimpleGUI/PySimpleGUI/issues/142#issuecomment-660477877 , or unsubscribe https://github.com/notifications/unsubscribe-auth/ABRUZJIT5H5367QASD5QL7DR4GKL3ANCNFSM4FTWUH7A .
 jhomme
on 18 Jul 2020
jhomme
on 18 Jul 2020
4.26.0 PySimpleGUI 18-Jul-2020
- Multi-threaded tkvar initialization location changed so that thread doesn't intialize it now
- Removed thread key - no longer needed
- Window.write_event_values - now requires both parms
- Upgrade button typo
Didn't like how the initialization was happening within the thread's context. Is better to do the init from the mainthread so moved the init code over to the mainthread.
PySimpleGUI
on 18 Jul 2020
Window.write_event_value
This is likely the most impactful change of the release. While it's only 1 new API call, it causes a LOT fof things to happen in the background (the PySimpleGUI ways of doing things).
This information will be working its way into the Cookbook soon, but until then, this will have to do.
The concept is SO much simpler than before.
Previously, if you wanted a thread and a PySimpleGUI program to communicate, you needed to create a thread and a queue that can be used to exchange information through. The logic to make this happen required you to run your window.read() call with a timeout so that you can poll for new messages from the thread. window.read(timeout=100)
This new call changes all of that and simplifies it down to where your read call remains: window.read(). Rather than polling for a change to the queue you pend for an event via the read. A queue is automatically set up for you so that you no longer need that step either.
This leaves the question:
How can a thread signal a window that it has information?
The answer is the inverse of event, values = window.read()
Instead of reading an event and a dictionary of values, you write an event and a value that will be placed into a dicitonary of other items.
The call is defined as:
write_event_value(key, value)
If a thread wanted to cause an event "-THREAD-" and an associated value of 1234 to be part of the values dictionary, then the call would be:
window.write_event_value('-THREAD-', 1234)
You can see how all this works on this trinket page:
https://pysimplegui.trinket.io/demo-programs#/multi-threaded/multi-threaded-write-event-value
It has a very simple demo that allows you to create multiple threads that all communicate using this simple mechanism.

Here's a simplified version of the code (less comments):
import threading
import time
import PySimpleGUI as sg

THREAD_EVENT = '-THREAD-'

def the_thread(window):
    """
    The thread that communicates with the application through the window's events.

    Once a second wakes and sends a new event and associated value to the window
    """
    i = 0
    while True:
        time.sleep(1)
        window.write_event_value('-THREAD-', (threading.current_thread().name, i))      # Data sent is a tuple of thread name and counter
        i += 1


def main():
    """
    The demo will display in the multiline info about the event and values dictionary as it is being
    returned from window.read()
    Every time "Start" is clicked a new thread is started
    Try clicking "Dummy" to see that the window is active while the thread stuff is happening in the background
    """

    layout = [  [sg.Text('Output Area - cprint\'s route to here', font='Any 15')],
                [sg.Multiline(size=(65,20), key='-ML-', autoscroll=True, reroute_stdout=True, write_only=True, reroute_cprint=True)],
                [sg.T('Input so you can see data in your dictionary')],
                [sg.Input(key='-IN-', size=(30,1))],
                [sg.B('Start A Thread'), sg.B('Dummy'), sg.Button('Exit')]  ]

    window = sg.Window('Window Title', layout)

    while True:             # Event Loop
        event, values = window.read()
        sg.cprint(event, values)
        if event == sg.WIN_CLOSED or event == 'Exit':
            break
        if event.startswith('Start'):
            threading.Thread(target=the_thread, args=(window,), daemon=True).start()
        if event == THREAD_EVENT:
            sg.cprint(f'Data from the thread ', colors='white on purple', end='')
            sg.cprint(f'{values[THREAD_EVENT]}', colors='white on red')
    window.close()


if __name__ == '__main__':
    main()
Headsup on print performance
Hopefully this risk will be a payout rather than a big problem. I'm giving it a try.
Normally, when you perform an update to an Element, you must wither call read or refresh for the element.
The 4.25.0 release has 2 changes.
- The Multline has an option that controls this auto-refresh. It is DISABLED by default
- The Output element, however has this option always turned out. Hopefully this won't cause problems. If it does, then I will add some controls over enable/disabling.
The hope is that you won't have to call .refresh anymore for these "common operations". It's common operation here is adding a new line to be output in a multiline. So, there's an option to auto-refresh and you can remove your calls to refresh as a result. This is not true for other elements, but would consider it. This is going to require some cross porting.
The short version - start using Multiline elements for your print command.
THREAD
SO FAR I've been lucky and have been able to call both print and cprint from threads without having a crash.
I've careful about the order of operations and hoping this capability remains.
You can modify the above example and end up with this code, which does function despite the cprint being called from the thread. Likely sheet luck so proceed with caution.
def the_thread(window):
    """
    The thread that communicates with the application through the window's events.

    Once a second wakes and sends a new event and associated value to the window
    """
    i = 0
    while True:
        time.sleep(1)
        window.write_event_value('-THREAD-', (threading.current_thread().name, i))      # Data sent is a tuple of thread name and counter
        sg.cprint('This is cheating from the thread', c='white on green')
        i += 1
Cookbook Main Docs Update #1
The first of some cookbook updates was started and some of it completed today.
stdout & cprint routing
The expanded cprint and stdout routing capabilities were explained further. The hope is that people will start to move to using the Multiline Element for doing text output.
Several of the sections were updated including this one:
https://pysimplegui.readthedocs.io/en/latest/cookbook/#recipe-printing-34-print-to-multiline-element
There were a lot of things added so hopefully enough examples were cprovided.
Threading - Long operations
A new Recipe was added that addressed the classic problem of having an operation that takes too long to do inline in your GUI. Through the magic of the Window.write_event_value method these long-running operations are now very easy (borderline trivial) to handle.
Modal windows
Modal Windows were added to the main docs under the Window section. More info needs to be expanded throughout the documentation.
There will certainly be a number of changes in the call reference as well.
'
PySimpleGUI
on 19 Jul 2020
PySimpleGUI
on 22 Jul 2020
PySimpleGUI
on 22 Jul 2020
PySimpleGUI
on 22 Jul 2020
PySimpleGUI
on 24 Jul 2020
PySimpleGUI
on 24 Jul 2020
PySimpleGUI
on 26 Jul 2020
PySimpleGUI
on 27 Jul 2020
PySimpleGUI
on 28 Jul 2020
PySimpleGUI
on 30 Jul 2020
PySimpleGUI
on 2 Aug 2020
PySimpleGUI
on 3 Aug 2020
PySimpleGUI
on 3 Aug 2020
PySimpleGUI
on 3 Aug 2020
PySimpleGUI
on 3 Aug 2020
PySimpleGUI
on 3 Aug 2020
PySimpleGUI
on 5 Aug 2020
PySimpleGUI
on 6 Aug 2020
PySimpleGUI
on 7 Aug 2020
PySimpleGUI
on 12 Aug 2020
PySimpleGUI
on 12 Aug 2020
PySimpleGUI
on 12 Aug 2020
PySimpleGUI
on 13 Aug 2020
PySimpleGUI
on 14 Aug 2020
PySimpleGUI
on 17 Aug 2020
PySimpleGUI
on 17 Aug 2020
PySimpleGUI
on 17 Aug 2020
PySimpleGUI
on 18 Aug 2020
salabim
on 20 Aug 2020
PySimpleGUI
on 20 Aug 2020
PySimpleGUI
on 21 Aug 2020
PySimpleGUI
on 21 Aug 2020
PySimpleGUI
on 21 Aug 2020
PySimpleGUI
on 22 Aug 2020
PySimpleGUI
on 22 Aug 2020
PySimpleGUI
on 23 Aug 2020
PySimpleGUI
on 23 Aug 2020
PySimpleGUI
on 24 Aug 2020
PySimpleGUI
on 25 Aug 2020
 elguaxo
on 25 Aug 2020
PySimpleGUI
on 25 Aug 2020
PySimpleGUI
on 26 Aug 2020
PySimpleGUI
on 28 Aug 2020
elguaxo
on 25 Aug 2020
PySimpleGUI
on 25 Aug 2020
PySimpleGUI
on 26 Aug 2020
PySimpleGUI
on 28 Aug 2020
 Zain-Bin-Arshad
on 29 Aug 2020
PySimpleGUI
on 29 Aug 2020
PySimpleGUI
on 31 Aug 2020
PySimpleGUI
on 3 Sep 2020
PySimpleGUI
on 8 Sep 2020
PySimpleGUI
on 8 Sep 2020
PySimpleGUI
on 8 Sep 2020
PySimpleGUI
on 9 Sep 2020
PySimpleGUI
on 12 Sep 2020
pamoroso
on 12 Sep 2020
PySimpleGUI
on 12 Sep 2020
PySimpleGUI
on 13 Sep 2020
PySimpleGUI
on 13 Sep 2020
salabim
on 13 Sep 2020
PySimpleGUI
on 13 Sep 2020
PySimpleGUI
on 13 Sep 2020
PySimpleGUI
on 14 Sep 2020
PySimpleGUI
on 17 Sep 2020
PySimpleGUI
on 18 Sep 2020
PySimpleGUI
on 22 Sep 2020
PySimpleGUI
on 26 Sep 2020
PySimpleGUI
on 28 Sep 2020
PySimpleGUI
on 4 Oct 2020
PySimpleGUI
on 7 Oct 2020
PySimpleGUI
on 9 Oct 2020
PySimpleGUI
on 10 Oct 2020
PySimpleGUI
on 11 Oct 2020
PySimpleGUI
on 12 Oct 2020
PySimpleGUI
on 14 Oct 2020
PySimpleGUI
on 14 Oct 2020
PySimpleGUI
on 15 Oct 2020
PySimpleGUI
on 15 Oct 2020
PySimpleGUI
on 15 Oct 2020
PySimpleGUI
on 16 Oct 2020
PySimpleGUI
on 17 Oct 2020
PySimpleGUI
on 20 Oct 2020
PySimpleGUI
on 25 Oct 2020
PySimpleGUI
on 25 Oct 2020
PySimpleGUI
on 26 Oct 2020
PySimpleGUI
on 26 Oct 2020
PySimpleGUI
on 27 Oct 2020
PySimpleGUI
on 28 Oct 2020
PySimpleGUI
on 31 Oct 2020
PySimpleGUI
on 31 Oct 2020
PySimpleGUI
on 1 Nov 2020
PySimpleGUI
on 2 Nov 2020
PySimpleGUI
on 3 Nov 2020
PySimpleGUI
on 8 Nov 2020
PySimpleGUI
on 13 Nov 2020
PySimpleGUI
on 13 Nov 2020
PySimpleGUI
on 13 Nov 2020
PySimpleGUI
on 15 Nov 2020
PySimpleGUI
on 17 Nov 2020
PySimpleGUI
on 17 Nov 2020
PySimpleGUI
on 21 Nov 2020
PySimpleGUI
on 22 Nov 2020
PySimpleGUI
on 23 Nov 2020
PySimpleGUI
on 24 Nov 2020
PySimpleGUI
on 24 Nov 2020
PySimpleGUI
on 26 Nov 2020
PySimpleGUI
on 26 Nov 2020
PySimpleGUI
on 26 Nov 2020
PySimpleGUI
on 27 Nov 2020
PySimpleGUI
on 27 Nov 2020
Zain-Bin-Arshad
on 29 Aug 2020
PySimpleGUI
on 29 Aug 2020
PySimpleGUI
on 31 Aug 2020
PySimpleGUI
on 3 Sep 2020
PySimpleGUI
on 8 Sep 2020
PySimpleGUI
on 8 Sep 2020
PySimpleGUI
on 8 Sep 2020
PySimpleGUI
on 9 Sep 2020
PySimpleGUI
on 12 Sep 2020
pamoroso
on 12 Sep 2020
PySimpleGUI
on 12 Sep 2020
PySimpleGUI
on 13 Sep 2020
PySimpleGUI
on 13 Sep 2020
salabim
on 13 Sep 2020
PySimpleGUI
on 13 Sep 2020
PySimpleGUI
on 13 Sep 2020
PySimpleGUI
on 14 Sep 2020
PySimpleGUI
on 17 Sep 2020
PySimpleGUI
on 18 Sep 2020
PySimpleGUI
on 22 Sep 2020
PySimpleGUI
on 26 Sep 2020
PySimpleGUI
on 28 Sep 2020
PySimpleGUI
on 4 Oct 2020
PySimpleGUI
on 7 Oct 2020
PySimpleGUI
on 9 Oct 2020
PySimpleGUI
on 10 Oct 2020
PySimpleGUI
on 11 Oct 2020
PySimpleGUI
on 12 Oct 2020
PySimpleGUI
on 14 Oct 2020
PySimpleGUI
on 14 Oct 2020
PySimpleGUI
on 15 Oct 2020
PySimpleGUI
on 15 Oct 2020
PySimpleGUI
on 15 Oct 2020
PySimpleGUI
on 16 Oct 2020
PySimpleGUI
on 17 Oct 2020
PySimpleGUI
on 20 Oct 2020
PySimpleGUI
on 25 Oct 2020
PySimpleGUI
on 25 Oct 2020
PySimpleGUI
on 26 Oct 2020
PySimpleGUI
on 26 Oct 2020
PySimpleGUI
on 27 Oct 2020
PySimpleGUI
on 28 Oct 2020
PySimpleGUI
on 31 Oct 2020
PySimpleGUI
on 31 Oct 2020
PySimpleGUI
on 1 Nov 2020
PySimpleGUI
on 2 Nov 2020
PySimpleGUI
on 3 Nov 2020
PySimpleGUI
on 8 Nov 2020
PySimpleGUI
on 13 Nov 2020
PySimpleGUI
on 13 Nov 2020
PySimpleGUI
on 13 Nov 2020
PySimpleGUI
on 15 Nov 2020
PySimpleGUI
on 17 Nov 2020
PySimpleGUI
on 17 Nov 2020
PySimpleGUI
on 21 Nov 2020
PySimpleGUI
on 22 Nov 2020
PySimpleGUI
on 23 Nov 2020
PySimpleGUI
on 24 Nov 2020
PySimpleGUI
on 24 Nov 2020
PySimpleGUI
on 26 Nov 2020
PySimpleGUI
on 26 Nov 2020
PySimpleGUI
on 26 Nov 2020
PySimpleGUI
on 27 Nov 2020
PySimpleGUI
on 27 Nov 2020
Related issues
 lucasea777
·
3Comments
lucasea777
·
3Comments
 yogesh-aggarwal
·
3Comments
yogesh-aggarwal
·
3Comments
 thelou1s
·
4Comments
thelou1s
·
4Comments
 ECOM-Klaus
·
4Comments
MikeTheWatchGuy
·
6Comments
ECOM-Klaus
·
4Comments
MikeTheWatchGuy
·
6Comments
Most helpful comment
2,200 ⭐ 503,000 Installs
Hit 2 milestones today! (or close to today)
Thankfully stars are not downvotable 🙄
Have also been waiting for a while to hit the 500,000 total installs mark, both seemed to have happened this week or thereabouts.
Here is how each port contributes to the total:


THANK YOU PySimpleGUI users!! You're the BEST GitHub community ever!