Meshroom: Add option to export dense point cloud to other formats (Workaround here)
Describe the bug
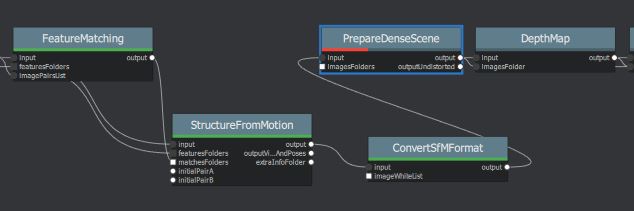
PrepareDenseScene node fails for ConvertSfMFormat input in .ply, so i can only export .ply of low density point clouds
 miquelrosell99
All 54 comments
You can simply change the Inter File Extension from abc to ply in the StructureFromMotion node (Advanced settings enabled) so you don´t need the ConvertSfMFormat node in this case.
 natowi
on 2 Nov 2019
natowi
on 2 Nov 2019
You can simply change the Inter File Extension from abc to ply in the StructureFromMotion node (Advanced settings enabled) so you don´t need the ConvertSfMFormat node in this case.
But what if I need the dense point cloud? Meshing node only outputs .abc file, and I can't manage to use ConverSfM node there. It only exports the camera dots inside the .ply. No actual object points
Your suggestion was very useful for SfM node. thank you very much. I would really appreciate any help in the issue mentioned above. It's for a final degree project.
miquelrosell99
on 2 Nov 2019
You can export the Raw Dense Point Cloud by enabling the advanced settings in the Meshing node. You might also want to enable "Colourize Output" to get a coloured point cloud. The output is saved as abc file.
natowi
on 2 Nov 2019
You can export the Raw Dense Point Cloud by enabling the advanced settings in the Meshing node. You might also want to enable "Colourize Output" to get a coloured point cloud.
But the raw file is in .abc too. I need .ply
Edit: I need .ply cuz I work with CloudCompare and a Blender plugin that only works with ply. No alembic support in any of the two software
miquelrosell99
on 2 Nov 2019
Let me check a few things
natowi
on 2 Nov 2019
ConvertSfMFormat at the moment only supports the internal sfm filetype
Meshing node output filetype for the pointcloud can not be changed at the moment - in the GUI!
Run the Meshing node (only, delete data if necessary) in the GUI with selected settings, then go to the CLI in the background and copy the parameters to a text file (select+enter). Then change abc extension to ply.
Open the Meshing folder and delete the files.
By running the Meshing node now from the CLI we will get our renamed file extension:
Start new CLI, navigate to ..\Meshroom-2019.2.0\aliceVision\bin
then type:
aliceVision_meshing.exe (paste your changed parameters set + enter to run)
Example:
C:\Users\user>D:\Meshroom\Meshroom-2019.2.0-win64\Meshroom-2019.2.0\aliceVision\bin\aliceVision_meshing.exe --input "C:/Users/user/AppData/Local/Temp/MeshroomCache/StructureFromMotion/5893adbb9647185e705e57e98007c459ebb29091/sfm.abc" --depthMapsFolder "C:/Users/user/AppData/Local/Temp/MeshroomCache/DepthMap/79bd8b4b35079d2c5a60be3b5302399952760ed5" --depthMapsFilterFolder "C:/Users/user/AppData/Local/Temp/MeshroomCache/DepthMapFilter/47bbddab7c0b3ee1c10675095772b16e22db6a01" --estimateSpaceFromSfM True --estimateSpaceMinObservations 3 --estimateSpaceMinObservationAngle 10 --maxInputPoints 50000000 --maxPoints 5000000 --maxPointsPerVoxel 1000000 --minStep 2 --partitioning singleBlock --repartition multiResolution --angleFactor 15.0 --simFactor 15.0 --pixSizeMarginInitCoef 2.0 --pixSizeMarginFinalCoef 4.0 --voteMarginFactor 4.0 --contributeMarginFactor 2.0 --simGaussianSizeInit 10.0 --simGaussianSize 10.1 --minAngleThreshold 1.0 --refineFuse True --addLandmarksToTheDensePointCloud False --colorizeOutput True --saveRawDensePointCloud False --verboseLevel info --outputMesh "C:/Users/user/AppData/Local/Temp/MeshroomCache/Meshing/709cfa61758574b425bb17aecfc577ca493193c3/mesh.obj" --output "C:/Users/user/AppData/Local/Temp/MeshroomCache/Meshing/709cfa61758574b425bb17aecfc577ca493193c3/densePointCloud.ply"

Monstree 3 images dense point cloud demo
natowi
on 2 Nov 2019
- ConvertSfMFormat at the moment only supports the internal sfm filetype
- Meshing node output filetype for the pointcloud can not be changed at the moment - in the GUI!
Run the Meshing node (only, delete data if necessary) in the GUI with selected settings, then go to the CLI in the background and copy the parameters to a text file (select+enter). Then change abc extension to ply.
Open the Meshing folder and delete the files.By running the Meshing node now from the CLI we will get our renamed file extension:
Start new CLI, navigate to ..\Meshroom-2019.2.0\aliceVision\bin
then type:aliceVision_meshing.exe (paste your changed parameters set + enter to run)
Example:
C:\Users\user>D:\Meshroom\Meshroom-2019.2.0-win64\Meshroom-2019.2.0\aliceVision\bin\aliceVision_meshing.exe --input "C:/Users/user/AppData/Local/Temp/MeshroomCache/StructureFromMotion/5893adbb9647185e705e57e98007c459ebb29091/sfm.abc" --depthMapsFolder "C:/Users/user/AppData/Local/Temp/MeshroomCache/DepthMap/79bd8b4b35079d2c5a60be3b5302399952760ed5" --depthMapsFilterFolder "C:/Users/user/AppData/Local/Temp/MeshroomCache/DepthMapFilter/47bbddab7c0b3ee1c10675095772b16e22db6a01" --estimateSpaceFromSfM True --estimateSpaceMinObservations 3 --estimateSpaceMinObservationAngle 10 --maxInputPoints 50000000 --maxPoints 5000000 --maxPointsPerVoxel 1000000 --minStep 2 --partitioning singleBlock --repartition multiResolution --angleFactor 15.0 --simFactor 15.0 --pixSizeMarginInitCoef 2.0 --pixSizeMarginFinalCoef 4.0 --voteMarginFactor 4.0 --contributeMarginFactor 2.0 --simGaussianSizeInit 10.0 --simGaussianSize 10.1 --minAngleThreshold 1.0 --refineFuse True --addLandmarksToTheDensePointCloud False --colorizeOutput True --saveRawDensePointCloud False --verboseLevel info --outputMesh "C:/Users/user/AppData/Local/Temp/MeshroomCache/Meshing/709cfa61758574b425bb17aecfc577ca493193c3/mesh.obj" --output "C:/Users/user/AppData/Local/Temp/MeshroomCache/Meshing/709cfa61758574b425bb17aecfc577ca493193c3/densePointCloud.ply"
Monstree 3 images dense point cloud demo
Wow thanks so much. Tomorrow I'll look into it and report back
miquelrosell99
on 2 Nov 2019
- ConvertSfMFormat at the moment only supports the internal sfm filetype
- Meshing node output filetype for the pointcloud can not be changed at the moment - in the GUI!
Run the Meshing node (only, delete data if necessary) in the GUI with selected settings, then go to the CLI in the background and copy the parameters to a text file (select+enter). Then change abc extension to ply.
Open the Meshing folder and delete the files.By running the Meshing node now from the CLI we will get our renamed file extension:
Start new CLI, navigate to ..\Meshroom-2019.2.0\aliceVision\bin
then type:aliceVision_meshing.exe (paste your changed parameters set + enter to run)
Example:
C:\Users\user>D:\Meshroom\Meshroom-2019.2.0-win64\Meshroom-2019.2.0\aliceVision\bin\aliceVision_meshing.exe --input "C:/Users/user/AppData/Local/Temp/MeshroomCache/StructureFromMotion/5893adbb9647185e705e57e98007c459ebb29091/sfm.abc" --depthMapsFolder "C:/Users/user/AppData/Local/Temp/MeshroomCache/DepthMap/79bd8b4b35079d2c5a60be3b5302399952760ed5" --depthMapsFilterFolder "C:/Users/user/AppData/Local/Temp/MeshroomCache/DepthMapFilter/47bbddab7c0b3ee1c10675095772b16e22db6a01" --estimateSpaceFromSfM True --estimateSpaceMinObservations 3 --estimateSpaceMinObservationAngle 10 --maxInputPoints 50000000 --maxPoints 5000000 --maxPointsPerVoxel 1000000 --minStep 2 --partitioning singleBlock --repartition multiResolution --angleFactor 15.0 --simFactor 15.0 --pixSizeMarginInitCoef 2.0 --pixSizeMarginFinalCoef 4.0 --voteMarginFactor 4.0 --contributeMarginFactor 2.0 --simGaussianSizeInit 10.0 --simGaussianSize 10.1 --minAngleThreshold 1.0 --refineFuse True --addLandmarksToTheDensePointCloud False --colorizeOutput True --saveRawDensePointCloud False --verboseLevel info --outputMesh "C:/Users/user/AppData/Local/Temp/MeshroomCache/Meshing/709cfa61758574b425bb17aecfc577ca493193c3/mesh.obj" --output "C:/Users/user/AppData/Local/Temp/MeshroomCache/Meshing/709cfa61758574b425bb17aecfc577ca493193c3/densePointCloud.ply"
Monstree 3 images dense point cloud demo
I've seen the commits. Can't build meshroom at the moment, so if you do and share via link I'd appreciate it a lot. This way we can test it too. Thanks
miquelrosell99
on 3 Nov 2019
@miquelrosell99 you don´t need to build Meshroom, you can use the CLI for now as I described.
natowi
on 3 Nov 2019
@natowi Yes, that works. Thanks! Eager to see it implemented in GUI too!
miquelrosell99
on 3 Nov 2019
Ok here is a work around with gui support
in meshroom/nodes/alicevision/meshing.py add
desc.File(
            name="output",
            label="Output Dense Point Cloud",
            description="Output dense point cloud ('abc', 'ply', 'json', 'xml', 'baf', 'bin').",
            value='',
            uid=[],
        ),
as last entry within inputs = [ ]
This allows for a custom path to be defined for the dense point cloud.
This is how you get the required environment for this to work:
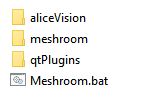
- download the meshroom repository zip from https://github.com/alicevision/meshroom/
- *download the pre-compiled meshroom zip from https://github.com/alicevision/meshroom/releases
- paste the pre-compiled aliceVision and qtPlugins folders in the meshroom folder and use this script to start the meshroom gui (*or use your own compiled versions)
- create a .bat file in the meshroom folder:
:: start meshroom bat
set MESHROOM_INSTALL_DIR=%cd%
set PYTHONPATH=%CD% && python meshroom/ui
Double click on bat to start meshroom
natowi
on 8 Nov 2019
@natowi I get this error. I installed the python scripts it told me to install... First command works well btw
C:\Program Files\Meshroom Dev>set PYTHONPATH=%CD% && python meshroom/ui
WARNING:root:== The following plugins could not be loaded ==
- simpleFarmSubmitter: No module named 'simpleFarm'
Attribute Qt::AA_EnableHighDpiScaling must be set before QCoreApplication is created.
WARNING:root:QQmlApplicationEngine failed to load component
WARNING:root:file:///C:/Program Files/Meshroom Dev/meshroom/ui/qml/main.qml:2 plugin cannot be loaded for module "QtQuick.Controls": No se puede cargar la biblioteca C:\Users\Miquel\AppData\Local\Packages\PythonSoftwareFoundation.Python.3.7_qbz5n2kfra8p0\LocalCache\local-packages\Python37\site-packages\PySide2\qml\QtQuick\Controls.2\qtquickcontrols2plugin.dll: No se puede encontrar el m?dulo especificado.

Edit: I also get this error:
ERROR: Could not find a version that satisfies the requirement PySide2 (from versions: none)
miquelrosell99
on 9 Nov 2019
Navigate in the extracted meshroom-develop folder,
then install the requirements using
cd meshroom-develop
pip install -r requirements.txt
or manually install
pip install PySide2==5.13.0
You might need to install pip first.
You missed to copy the qtPlugins folder. The best way to put all folders together is to create a new folder and copy paste in the alicevision and qtplugins folders from the binary release and then the meshroom folder from the github repository download.
natowi
on 9 Nov 2019
I'm using Python 3.8. Maybe that's the issue. But I can't seem to get pip to install on 3.3
pip install PySide2==5.13.0 doesn't work on 3.8...

miquelrosell99
on 9 Nov 2019
Do you have pip installed? https://pip.pypa.io/en/stable/installing/
natowi
on 9 Nov 2019
Yes... Comes preinstalled on 3.8
miquelrosell99
on 9 Nov 2019
Can you try pip install PySide2 ?
natowi
on 9 Nov 2019
The error is the same

PySide install well. But not PySide2
miquelrosell99
on 9 Nov 2019
Try running your cli as admin.
natowi
on 9 Nov 2019
Okay, using Python 3.7.5 works. I guess PySide2 is not yet compatible with Python 3.8.0
Everything installed now. I'll try again
Edit: GUI works! Thanks
miquelrosell99
on 9 Nov 2019
You need to remove the same code from the outputs = [ section at the end of the file
Basically we move the filepath gui part from output to the input class. (Only the input class allows path modification for now.)
natowi
on 9 Nov 2019
You need to remove the same code from the
outputs = [section at the end of the file
Basically we move the filepath gui part from output to the input class. (Only the input class allows path modification for now.)
I've taken a different approach to this. I modified the code so it has a .ply file type, but left everything else as is. This way it should work as always, but with .ply file output. After that I use a Publish node, so everything is in the same place if I need to export more stuff
I'll add it to the input section as you say so I can modify the file type, but it still ends up in default folder

miquelrosell99
on 9 Nov 2019
Yes, this is the easiest solution for your problem
natowi
on 9 Nov 2019
Thanks for all the help. With this I can continue working on my project!
Also, any way to get the point could to more than 1 million points? Increasing FeatureExtraction to Ultra generates a denser sparse cloud, but final dense cloud is still 1 million points, same as using FeatureExtraction on Normal
miquelrosell99
on 9 Nov 2019
You could try setting downscale to 1 in the DepthMap node and increase the Max Points in Meshing.
(~x3 more points with the monstree demo dataset, 3 images)

natowi
on 9 Nov 2019
@natowi Using your commit for adding a proper menu works great!
This one: https://github.com/alicevision/meshroom/commit/984e76e09ae54e45768083f7dc84de716fd94c33
Will try your suggestion for increasing point count

miquelrosell99
on 10 Nov 2019
@natowi This error appears when using commits from your branch to add the file type selection:

Using the one from my previus comment alone works fine
miquelrosell99
on 10 Nov 2019
I have changed the code since (check the PRfor details).
At the moment there is the problem left, that
class Meshing(desc.CommandLineNode):
    commandLine = 'aliceVision_meshing {allParams}'
calls all Params name=(...) but my file type selector is not a valid param
desc.ChoiceParam(
            name='outputDensePointCloud',
...
I think this can be fixed using all supported params, leaving out outputDensePointCloud:
class Meshing(desc.CommandLineNode):
    commandLine = 'aliceVision_meshing --input {inputValue} ...
I did not test this yet.
natowi
on 10 Nov 2019
I'll test just to check. What do you mean by the PR? Latest commit is from 2 days ago
Could you send an example for the "commandLine = 'aliceVision_meshing --input {inputValue} ..."?
miquelrosell99
on 10 Nov 2019
PR=Pull request
My last update was value=desc.Node.internalFolder + 'densepointcloud.{outputDenseFileTypeValue}',
commandLine = 'aliceVision_meshing --input {inputValue} was my example.
commandLine = 'aliceVision_meshing starts the CLI and aliceVision_meshing.exe with the following parameters (by default {allParams}). allParams will look for all desc.???Param( and adds the name and value this way to the cli: aliceVision_meshing.exe --input c:\sfm.abc ...
By adding
desc.ChoiceParam(
            name='outputDenseFileType',
and leaving {allParams} --outputDenseFileType value is added to the cli, but the command does not exist. I think this can be fixed by listing only the supported commands instead of {allParams}.
Here is a working example for a new node: https://github.com/natowi/meshroom_external_plugins/blob/master/InstantMeshes.py
natowi
on 10 Nov 2019
I see. So we would need to add all parameters manually?
miquelrosell99
on 10 Nov 2019
After adding this :
commandLine = 'aliceVision_meshing --input {inputValue} {depthMapsFolderValue} {depthMapsFilterFolderValue} {estimateSpaceFromSfMValue} {estimateSpaceMinObservationsValue} {estimateSpaceMinObservationAngleValue} {maxInputPointsValue} {maxPointsPerVoxelValue} {minStepValue} {partitioningValue} {repartitionValue} {angleFactorValue} {simFactorValue} {pixSizeMarginInitCoefValue} {pixSizeMarginFinalCoefValue} {voteMarginFactorValue} {contributeMarginFactorValue} {simGaussianSizeInitValue} {simGaussianSizeValue} {minAngleThresholdValue} {refineFuseValue} {addLandmarksToTheDensePointCloudValue} {colorizeOutputValue} {saveRawDensePointCloudValue} {verboseLevelValue} --output {outputValue} {outputMeshValue}'
I get this error @natowi

miquelrosell99
on 10 Nov 2019
{depthMapsFolderValue} will only add the /value/, so you need to look up all the --params and add them like this --input {inputValue}
natowi
on 10 Nov 2019
I dont understand... HEre you use it like this

In my last comment you have all the parameters in the node. Could you tell me what to add ro remove? I dont understand how to program Meshroom. I've only used intuition
miquelrosell99
on 10 Nov 2019
Yes, for Instant Meshes the expected CLI command is
<inputpath> -S <smoothvalue> --output <outputpath>
natowi
on 10 Nov 2019
And for Meshing?
miquelrosell99
on 10 Nov 2019
Required parameters:
-i [ --input ] arg SfMData file.
-o [ --output ] arg Output Dense SfMData file.
-o [ --outputMesh ] arg Output mesh (OBJ file format).
Optional parameters:
--depthMapsFolder arg Input depth maps folder.
--depthMapsFilterFolder arg Input filtered depth maps folder.
--maxInputPoints arg (=50000000) Max input points loaded from images.
--maxPoints arg (=5000000) Max points at the end of the depth maps
fusion.
--maxPointsPerVoxel arg (=6000000) Max points per voxel.
--minStep arg (=2) The step used to load depth values from
depth maps is computed from
maxInputPts. Here we define the minimal
value for this step, so on small
datasets we will not spend too much
time at the beginning loading all depth
values.
--simFactor arg (=15) simFactor
--angleFactor arg (=15) angleFactor
--partitioning arg (=1) Partitioning: 'singleBlock' or 'auto'.
--repartition arg (=1) Repartition: 'multiResolution' or
'regularGrid'.
--estimateSpaceFromSfM arg (=1) Estimate the 3d space from the SfM.
--addLandmarksToTheDensePointCloud arg (=0)
Add SfM Landmarks into the dense point
cloud (created from depth maps). If
only the SfM is provided in input, SfM
landmarks will be used regardless of
this option.
--colorizeOutput arg (=0) Whether to colorize output dense point
cloud and mesh.
Advanced parameters:
--universePercentile arg (=0.999) universe percentile
--estimateSpaceMinObservations arg (=3)
Minimum number of observations for SfM
space estimation.
--estimateSpaceMinObservationAngle arg (=10)
Minimum angle between two observations
for SfM space estimation.
--pixSizeMarginInitCoef arg (=2) pixSizeMarginInitCoef
--pixSizeMarginFinalCoef arg (=1) pixSizeMarginFinalCoef
--voteMarginFactor arg (=4) voteMarginFactor
--contributeMarginFactor arg (=2) contributeMarginFactor
--simGaussianSizeInit arg (=10) simGaussianSizeInit
--simGaussianSize arg (=10) simGaussianSize
--minAngleThreshold arg (=0.10000000000000001)
minAngleThreshold
--refineFuse arg (=1) refineFuse
--saveRawDensePointCloud arg (=0) Save dense point cloud before cut and
filtering.
Log parameters:
-v [ --verboseLevel ] arg (=info) verbosity level (fatal, error, warning,
info, debug, trace).
natowi
on 10 Nov 2019
There are a lot parameters, this is why I have not tested this yet.
natowi
on 10 Nov 2019
But I already have all these parameters added. outputMesh is there in the code

miquelrosell99
on 10 Nov 2019
Tag me when you test it please
miquelrosell99
on 10 Nov 2019
You added only the value variables {???Value}. They also need the --command prefix as listed above.
--??? {???Value}
natowi
on 10 Nov 2019
Okay now it works. I'll put all the proper names to optional parameters
miquelrosell99
on 10 Nov 2019
Do not modify the full pipeline to use another file format, just use ConvertSfMFormat node where you need to convert your Alembic file to something else.
Most of the file formats are not able to store all the information we need: cameras, visibilities, etc.
For instance, PLY is only able to deal with point clouds without extra-attributes.
 fabiencastan
on 10 Nov 2019
fabiencastan
on 10 Nov 2019
@fabiencastan
miquelrosell99
Meshing node only outputs .abc file, and I can't manage to use ConvertSfMFormat node there. It only exports the camera dots inside the .ply. No actual object points
(I assumed ConvertSfMFormat would only work with StructureFromMotion since the node was not called ConvertPointCloudFormat ;) )
StructureFromMotion sfm.abc -> ConvertSfMFormat will convert the whole pointcloud
Meshing densePointCloud.abc -> ConvertSfMFormat will only convert the cameras and dismiss the pointcloud
When comparing .json conversions, the whole "structure": [ ] class is missing when converting from a meshing .abc file. Maybe there is something wrong with the meshing node .abc files?
natowi
on 10 Nov 2019
Yep, problem is it only converts camera locations
Processing meshing node rn, but its been stuck here for about 2h, with 100% ram usage
With depth map downsample to 2 it works great
miquelrosell99
on 10 Nov 2019
@natowi gonna push the commit if you want to use it ;) Will be in my fork of Meshroom
Edit: https://github.com/miquelrosell99/meshroom/commit/3479de9920ad0f6aec555883c93d8ddb385ab3b8
miquelrosell99
on 10 Nov 2019
@natowi @fabiencastan Hi, how can I add these changes to official meshroom repo? Now I have them on my own fork.
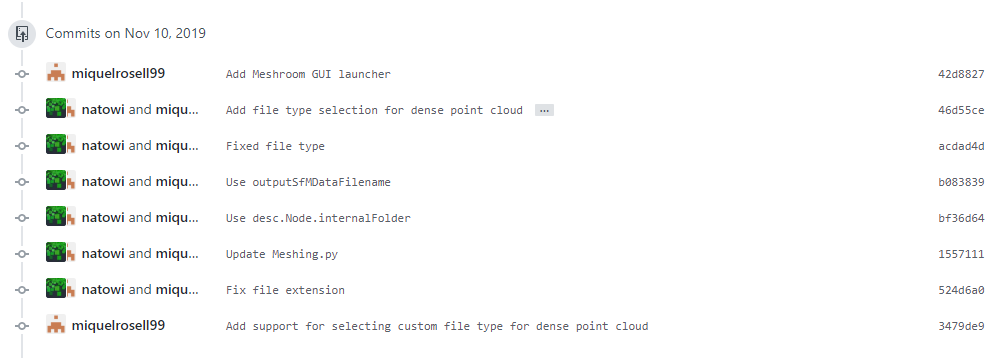
I fixed what was discussed here and it works great
I have changed the code since (check the PRfor details).
At the moment there is the problem left, that
class Meshing(desc.CommandLineNode):
    commandLine = 'aliceVision_meshing {allParams}'
calls all Params name=(...) but my file type selector is not a valid param
desc.ChoiceParam(
            name='outputDensePointCloud',
...
I think this can be fixed using all supported params, leaving out outputDensePointCloud:
class Meshing(desc.CommandLineNode):
    commandLine = 'aliceVision_meshing --input {inputValue} ...
I did not test this yet.
miquelrosell99
on 16 Nov 2019
@miquelrosell99 Good that the workaround works for you. I closed the issue, since ConvertSfM should work, and modifying all the parameters is only a workaround and ply is not supported by the Texturing node and 3D viewer.
We can use ConvertSfM but need to disable SIFT and enable unknown Describer Types
*Note: not available in the 2019.x binaries, option recently added
natowi
on 16 Nov 2019
Nice! Gonna download latest files then
miquelrosell99
on 16 Nov 2019
@miquelrosell99 unknown Describer Type should allready be available in your downloaded dev version of MR
natowi
on 16 Nov 2019
@miquelrosell99 Good that the workaround works for you. I closed the issue, since ConvertSfM should work, and modifying all the parameters is only a workaround and ply is not supported by the Texturing node and 3D viewer.
We can use ConvertSfM but need to disable SIFT and enable unknown Describer Types
*Note: not available in the binaries, option recently added
Any place I can get info on describer types?
miquelrosell99
on 16 Nov 2019
@miquelrosell99 unknown Describer Type should allready be available in your downloaded dev version of MR
Yes it is. But I'll download latest official one, since the only change I added was to get ply files, and i can do that with official. Better for future updates
miquelrosell99
on 16 Nov 2019
Any place I can get info on describer types?
They are feature detection algorithms. SIFT for example: https://en.wikipedia.org/wiki/Scale-invariant_feature_transform https://www.researchgate.net/publication/323561586_A_comparative_analysis_of_SIFT_SURF_KAZE_AKAZE_ORB_and_BRISK
natowi
on 16 Nov 2019
Resolved. Will be available in the upcoming release. Added to the documentation.
natowi
on 28 Jan 2020
Related issues
 robertguetzkow
·
43Comments
robertguetzkow
·
43Comments
 GJPfaff
·
25Comments
GJPfaff
·
25Comments
 SugoiShades
·
28Comments
SugoiShades
·
28Comments
 Rimasson
·
55Comments
Rimasson
·
55Comments
 Valouleloup
·
52Comments
Valouleloup
·
52Comments
Most helpful comment
You could try setting downscale to 1 in the DepthMap node and increase the Max Points in Meshing.
(~x3 more points with the monstree demo dataset, 3 images)