Irremoteesp8266: Help on adding support Duux Blizzard HVAC
Hello @crankyoldgit,
Thank you for this great piece of work!!!
Recently I bought a mobile air conditioner which I like to control from Tasmota on a Wemos D1 mini. After a few hours of trail and error, I managed to find a vendor which works with the hvac.
By means it responses to most common commands from vendor TROTEC, but my guess is that the actual IR codes of TROTEC are slightly different from the original remote control, since the IOS app that comes with the hvac doesn't respond on any command from TROTEC, while with the original remote control does.
So this gave me the idea to add the support for my hvac, based on vendor `TROTEC. However after reading the documentation how to add support for a new device, I am stuck on how to proceed and hope you are willing to help me pointing in the right direction.
Below you find the specification of the hvac and the different IRSend, IRRecvDump and IRhvac (TROTEC based) commands per remote control button. I was thinking to duplicate the TROTEC module and modify the IR codes with codes of the Duux Blizzard, but I just can't find and figure out which values need to be changed.
Your help is very much appreciated.
Regards,
Ray
Duux Blizzard - HVAC
Specifications
- Model: DXMA04
- Rate Voltage: 220-240V
- Rated frequency: 50Hz
- Rating power input: 1150W/5.1A
- Refrigerant: R290 (14g)
- Suction/Discharge: 0.85/2.2Mpa
- Max. Pressure of coil: 9.6MPa
- Manufacturer: Duux BV - P.O. Box 145, 5400 AC, Uden, The Netherlands
- Website: https://duux.com/en/
- Product page: https://duux.com/en/product/blizzard-smart-10k-btu/
- IR Remote control: https://duux.com/en/product/blizzard-afstandsbediening/
Power
Power Toggle
IRsend
IRsend {"Protocol":"NEC","Bits":32,"Data":"0x007F20DF","DataLSB":"0x00FE04FB","Repeat":0}
IRRecvDump
Timestamp : 000676.773
Library   : v2.7.7

Protocol  : NEC
Code      : 0x7F20DF (32 Bits)
uint16_t rawData[71] = {8964, 4508,  514, 590,  542, 590,  592, 536,  516, 562,  570, 588,  592, 536,  492, 612,  542, 586,  594, 536,  518, 1716,  594, 1642,  570, 1692,  490, 1744,  540, 1672,  594, 1692,  516, 1718,  514, 590,  570, 534,  624, 1666,  546, 534,  596, 558,  516, 614,  570, 534,  598, 532,  516, 1720,  598, 1664,  570, 508,  624, 1664,  570, 1664,  568, 1664,  600, 1664,  570, 1664,  594, 40946,  8992, 2216,  596};  // NEC 7F20DF
uint32_t address = 0xFE00;
uint32_t command = 0x4;
uint64_t data = 0x7F20DF;
IRhvac
Power on
IRhvac {"Vendor": "TROTEC", "Power": 1}
Power off
IRhvac {"Vendor": "TROTEC", "Power": 0}
Operation Mode
Modes: automatic, cooling, fan, dehumidify
Change Operation Mode
IRsend
IRsend {"Protocol":"NEC","Bits":32,"Data":"0x007F00FF","DataLSB":"0x00FE00FF","Repeat":0}
IRRecvDump
Timestamp : 001401.508
Library   : v2.7.7

Protocol  : NEC
Code      : 0x7F00FF (32 Bits)
uint16_t rawData[71] = {9044, 4450,  622, 508,  542, 562,  622, 484,  648, 508,  542, 590,  594, 508,  622, 508,  568, 562,  570, 534,  622, 1640,  594, 1640,  594, 1640,  596, 1666,  594, 1642,  594, 1640,  596, 1666,  542, 562,  594, 536,  594, 536,  542, 538,  566, 588,  618, 512,  542, 562,  568, 564,  618, 1618,  540, 1720,  542, 1694,  594, 1644,  538, 1720,  490, 1744,  594, 1642,  518, 1744,  492, 41022,  8992, 2242,  516};  // NEC 7F00FF
uint32_t address = 0xFE00;
uint32_t command = 0x0;
uint64_t data = 0x7F00FF;
IRhvac
Auto
IRhvac {"Vendor":"TROTEC","Power": 1,"Mode":"Auto"}
Cooling
IRhvac {"Vendor":"TROTEC","Power": 1,"Mode":"Cool"}
Dehumidification
IRhvac {"Vendor":"TROTEC","Power": 1,"Mode":"Dry"}
Ventilation
IRhvac {"Vendor":"TROTEC","Power": 1,"Mode":"Fan"}
Fanspeed
Modes: low, medium, high
IRsend
IRSend {"Protocol":"NEC","Bits":32,"Data":"0x007FA05F","DataLSB":"0x00FE05FA","Repeat":0}
IRRecvDump
Protocol  : NEC
Code      : 0x7FE01F (32 Bits)
uint16_t rawData[67] = {8936, 4534,  516, 616,  568, 538,  594, 534,  516, 616,  570, 534,  596, 534,  514, 618,  566, 536,  596, 534,  514, 1722,  594, 1668,  568, 1666,  514, 1722,  594, 1668,  568, 1666,  516, 1722,  592, 1666,  570, 1642,  540, 1722,  592, 536,  516, 616,  566, 540,  592, 536,  516, 616,  566, 538,  592, 562,  490, 616,  568, 1668,  516, 1722,  568, 1692,  568, 1668,  514, 1722,  566};  // NEC 7FE01F
uint32_t address = 0xFE00;
uint32_t command = 0x7;
uint64_t data = 0x7FE01F;
IRhvac
Fanspeed Low
IRhvac {"Vendor":"TROTEC","Power": 1,"FanSpeed":"Low"}
Fanspeed Medium
IRhvac {"Vendor":"TROTEC","Power": 1,"FanSpeed":"Medium"}
Fanspeed High
IRhvac {"Vendor":"TROTEC","Power": 1,"FanSpeed":"High"}
Temperature
IRsend
Temerature Up
IRsend {"Protocol":"NEC","Bits":32,"Data":"0x007FA05F","DataLSB":"0x00FE05FA","Repeat":0}
IRRecvDump
Timestamp : 001175.682
Library   : v2.7.7

Protocol  : NEC
Code      : 0x7FA05F (32 Bits)
uint16_t rawData[71] = {8994, 4454,  592, 534,  572, 536,  594, 536,  568, 588,  544, 534,  598, 532,  518, 614,  568, 536,  570, 560,  516, 1720,  570, 1692,  544, 1690,  516, 1720,  570, 1690,  546, 1690,  514, 1720,  572, 1690,  570, 534,  598, 1662,  546, 532,  626, 532,  516, 614,  572, 508,  624, 532,  542, 588,  572, 1662,  570, 560,  572, 1664,  594, 1640,  598, 1664,  568, 1666,  594, 1640,  596, 40968,  8966, 2244,  514};  // NEC 7FA05F
uint32_t address = 0xFE00;
uint32_t command = 0x5;
uint64_t data = 0x7FA05F;
Temperature Down
IRsend {"Protocol":"NEC","Bits":32,"Data":"0x007F609F","DataLSB":"0x00FE06F9","Repeat":0}
IRRecvDump
Timestamp : 001208.983
Library   : v2.7.7

Protocol  : NEC
Code      : 0x7F609F (32 Bits)
uint16_t rawData[71] = {8914, 4532,  596, 560,  544, 562,  570, 534,  596, 560,  516, 586,  572, 508,  622, 534,  568, 562,  570, 534,  596, 1690,  544, 1692,  568, 1666,  570, 1690,  546, 1690,  568, 1642,  594, 1666,  568, 536,  596, 1666,  568, 1668,  592, 536,  570, 534,  596, 534,  596, 534,  570, 536,  622, 1662,  518, 562,  594, 536,  594, 1640,  570, 1718,  516, 1692,  592, 1644,  568, 1668,  568, 40972,  9018, 2216,  592};  // NEC 7F609F
uint32_t address = 0xFE00;
uint32_t command = 0x6;
uint64_t data = 0x7F609F;
IRhvac
IRhvac {"Vendor":"TROTEC","Power": 1,"Temp": 19}
Timer
IRsend
IRsend {"Protocol":"NEC","Bits":32,"Data":"0x007F807F","DataLSB":"0x00FE01FE","Repeat":0}
IRRecvDump
Timestamp : 001261.802
Library   : v2.7.7

Protocol  : NEC
Code      : 0x7F807F (32 Bits)
uint16_t rawData[71] = {9016, 4480,  570, 560,  592, 538,  544, 536,  594, 562,  592, 510,  544, 562,  570, 586,  620, 512,  518, 586,  544, 1718,  542, 1692,  568, 1666,  546, 1716,  518, 1690,  594, 1594,  620, 1688,  572, 1692,  514, 614,  570, 534,  598, 506,  570, 586,  598, 506,  624, 506,  596, 536,  596, 482,  648, 1640,  596, 1638,  596, 1616,  622, 1664,  544, 1690,  568, 1644,  568, 1718,  492, 41018,  9044, 2192,  568};  // NEC 7F807F
uint32_t address = 0xFE00;
uint32_t command = 0x1;
uint64_t data = 0x7F807F;
IRhvac
- unknown
Night Mode
IRsend
IRsend {"Protocol":"NEC","Bits":32,"Data":"0x007FC03F","DataLSB":"0x00FE03FC","Repeat":0}
IRRecvDump
Protocol  : NEC
Code      : 0x7FC03F (32 Bits)
uint16_t rawData[71] = {9020, 4450,  598, 510,  566, 588,  596, 508,  622, 484,  568, 614,  568, 508,  624, 506,  544, 588,  596, 510,  622, 1640,  568, 1666,  594, 1640,  596, 1668,  540, 1694,  618, 1642,  542, 1696,  540, 1720,  592, 1644,  516, 588,  620, 512,  566, 538,  542, 590,  590, 540,  514, 588,  542, 588,  592, 538,  492, 1746,  566, 1668,  544, 1744,  516, 1720,  488, 1746,  518, 1718,  518, 40994,  9020, 2216,  568};  // NEC 7FC03F
uint32_t address = 0xFE00;
uint32_t command = 0x3;
uint64_t data = 0x7FC03F;
IRhvac
- unknown
 RaymondMouthaan
All 78 comments
Are the IRRecvDump parts here from IRRecvDumpV2 when using the original remote for the Hvac?
Do you have any model number for the remote? And does the remote have any kind of display?
 NiKiZe
on 7 Jun 2020
NiKiZe
on 7 Jun 2020
@NiKiZe,
Thanks for your response!
Indeed the dumps are made using IRRecvDumpV2 using the original remote (see image below). I couldn't find any model number on the remote, on the pcb the YJ-A081TR is printed, but Google didn't give anything useful on that.

RaymondMouthaan
on 7 Jun 2020
Many AC remotes has "internal state" which keeps temperature, fan speed, mode etc. And on each button press this full state is sent to the AC.
In your case it seems that the 7 buttons are only sent as "key press" and there is no state at all.
And it seems to be standard NEC protocol.
Getting "full AC support" with this seems hard.
Does the app send IR codes as well, and if so, what do you get if you try to capture those?
NiKiZe
on 7 Jun 2020
Yes, I guess the remote doesn't keep states. The hvac keeps its states, for instance when the fan speed is set to high, turning it off and back on the fan speed remains high.
Further more the hvac has WiFi and an app which can control the hvac and get its state, but is goes via WiFi.
The goal eventually is to control the hvac via Homebridge -> Node-RED -> Wemos (Tasmota). On the Wemos a temp/hum sensor to measure ambient temp/hum and based on these controlling the hvac. The idea is based on https://www.tado.com/gb-en/smart-ac-control-overview.
RaymondMouthaan
on 7 Jun 2020
The pcb of the remote looks like this and the chip used is SC6121-001

RaymondMouthaan
on 7 Jun 2020
So emulating the original remote is probably of limited use? But you can do that by using sendNEC. Don't know how to use that in tasmota tho. Maybe it is better to try and breakdown the WiFi protocol? But that is out of scope for this lib.
NiKiZe
on 7 Jun 2020
In regards to Trotec, could it be that it is similar in timings to NEC and the AC is just confused? Or does it switch to specific/same settings each time you send the same message?
NiKiZe
on 7 Jun 2020
A quick way to confirm if the A/C unit holds the state vs. the remote (also) holds the state is to use IRrecvDumpV2 to record two sequential "+" button/temps presses. If they are the same, then it's a _dumb_ remote, and you will need just send the codes as-is. If they are different codes, then there is a hope of adding it to the library similar to most other A/C units. i.e. Able to construct arbitrary states for the A/C unit.
 crankyoldgit
on 7 Jun 2020
crankyoldgit
on 7 Jun 2020
Fanspeed
Modes:
low,medium,highIRsend
IRSend {"Protocol":"NEC","Bits":32,"Data":"0x007FA05F","DataLSB":"0x00FE05FA","Repeat":0}IRRecvDump
Protocol  : NEC
Code      : 0x7FE01F (32 Bits)
uint16_t rawData[67] = {8936, 4534,  516, 616,  568, 538,  594, 534,  516, 616,  570, 534,  596, 534,  514, 618,  566, 536,  596, 534,  514, 1722,  594, 1668,  568, 1666,  514, 1722,  594, 1668,  568, 1666,  516, 1722,  592, 1666,  570, 1642,  540, 1722,  592, 536,  516, 616,  566, 540,  592, 536,  516, 616,  566, 538,  592, 562,  490, 616,  568, 1668,  516, 1722,  568, 1692,  568, 1668,  514, 1722,  566};  // NEC 7FE01F
uint32_t address = 0xFE00;
uint32_t command = 0x7;
uint64_t data = 0x7FE01F;
Let's take the above for example.
You're getting a single NEC code (0x7FE01F) here. Yet you seem to indicate that the A/C unit supports high, medium, & low for speeds. If it's the same code (0x7FE01F) for each button press, then the remote doesn't store the state of the A/C. It's a dumb/simple remote, like a typical/old TV remote etc. If that code changes, then yes, we can do something about it.
Otherwise, you're going to probably be stuck blinding sending that code to toggle/change fan speeds when want to, and have to rely on proximity to the A/C device to tell what mode it's in.
As for how to send NEC codes via Tasmota, please check here: https://tasmota.github.io/docs/Tasmota-IR/
They use our library, but we don't explicitly know the ins & outs of their interface the provide to users, you really need to talk to them if you have usage problems (with Tasmota). We can help, but I'll be googling just as much as you would be. ;-)
crankyoldgit
on 7 Jun 2020
All IRSend commands in my first post are commands send through Tasmota web command:

Same goes for all IRhvac TROTEC commands. Using these commands in more details this means:
For example consider the following scenario:
1) Initial state: hvac is turned off
2) IRhvac {"Vendor":"TROTEC","Power": 1,"FanSpeed":"Low"}
- Turns 'on' the hvac and sets the fan speed to 'Low'
3) IRhvac {"Vendor":"TROTEC","Power": 1,"FanSpeed":"Medium"}
- sets the fan speed to 'Medium'
4) IRhvac {"Vendor":"TROTEC","Power": 1,"FanSpeed":"High"}
- sets the fan speed to 'High'
5) IRhvac {"Vendor":"TROTEC","Power": 1,"FanSpeed":"Low"}
- sets the fan speed to 'Low'
6) IRhvac {"Vendor":"TROTEC","Power": 1,"FanSpeed":"High"}
- sets the fan speed to 'High'
When all commands starts with an initial state turn off, the expected behaviour happens as well.
So somehow the TROTEC code "knows" the state of the hvac somehow so basically the TROTEC works, but sending these commands do not make the IOS app respond. The app "thinks" the hvac is still off.
So I think the IR codes defined in the TROTEC code are slightly different from the original codes. Modifying them in such way that it sends the Duux codes might work perfectly?
RaymondMouthaan
on 7 Jun 2020
@crankyoldgit, thanks for your reply!
I'll try as you suggested, but please have a look at my previous post, especially from step 5 to 6.
RaymondMouthaan
on 7 Jun 2020
So somehow the TROTEC code "knows" the state of the hvac somehow so basically the TROTEC works, but sending these commands do not make the IOS app respond. The app "thinks" the hvac is still off.
I know nothing of this IOS app you speak of. How does it work? I'm assuming via WIFI?
Is there a "refresh" or "reconnect" etc to get what ever the current state of the A/C unit is?
FYI, please avoid screen shots where possible (unless asked), text is much better as it allows us to cut-n-paste if need be. etc.
crankyoldgit
on 7 Jun 2020
@crankyoldgit, thanks for your reply!
I'll try as you suggested, but please have a look at my previous post, especially from step 5 to 6.
From what I can gather, yes, it seems like there are distinct codes/messages for each "mode" for your A/C unit at least.
TROTEC seems to control the device correctly. It seems the issue you're reporting boils down to: "My IOS app doesn't reflect the same state as the actual A/C unit is now in after I send it IR commands" is that correct?
crankyoldgit
on 7 Jun 2020
I know nothing of this IOS app you speak of. How does it work? I'm assuming via WIFI?
Is there a "refresh" or "reconnect" etc to get what ever the current state of the A/C unit is?
Yes, the app comes with the hvac and when controlling the hvac with it's original IR remote the app gets updated (my guess the app requests an update from the hvac through WiFi, or the hvac pushes an update to the app).
TROTEC seems to control the device correctly. It seems the issue you're reporting boils down to: "My IOS app doesn't reflect the same state as the actual A/C unit is now in after I send it IR commands" is that correct?
Yes, exactly ... to be more precise .. non of the TROTEC commands make the app respond.
RaymondMouthaan
on 7 Jun 2020
Also which version (and build type) of Tasmota are you using? i.e. there are several different builds for each version. e.g. standard, minimal, full IR support etc etc Paging @s-hadinger who (I think) looks after the IRremoteESP8266 integration in Tasmota.
crankyoldgit
on 7 Jun 2020
Also which version (and build type) of Tasmota are you using? i.e. there are several different builds for each version. e.g. standard, minimal, full IR support etc etc Paging @s-hadinger who (I think) looks after the IRremoteESP8266 integration in Tasmota.
I am compiling a custom firmware based upon 'tasmota-ircustom', which is based on the latest dev branch of Tasmota and tried all hvac vendors listed, the only one which works is TROTEC.
RaymondMouthaan
on 7 Jun 2020
Please correct me if I'm wrong, but it seems that you have tested different protocols, and it just happens that it responds to Trotec, it might be a leftover from firmware development, and not really intended to work?
NiKiZe
on 7 Jun 2020
Yes, exactly ... to be more precise .. non of the TROTEC commands make the app respond.
Does your IOS app respond if you send it via the "NEC" codes? We need to confirm that to test my theory (below). Note: It's just a theory.
As far as I can tell from the data you've collected, IRrecvDumpV2 indicates the codes are NEC codes. (Correct?)
Look at the rawData you've provided they look like NEC codes to me. The Trotec protocol we support uses a different frequency and different header timings. So, if Trotec is working for you, it's not technically by design. Thus the A/C unit _might_ actually support two different protocols, NEC & Trotec. It could be the wifi-connected part is only expecting NEC codes (produced by the actual remote) and talks to the "main" A/C logic/control system via another method, where as the A/C unit itself probably accepts the Trotec codes directly, bypassing the "wifi part".
If the IOS app responds to you replaying the "NEC" codes to it, then that would support this theory.
If that theory is true/is the case, then there is not a lot we can do to get your IOS app to stay in sync.
e.g. Imaging, if you will, that there is a tiny ESP8266/wifi-ir-connected microcontroller already on your A/C unit. It accepts commands via wifi (IOS app) and via a "dumb"/simple IR remote using NEC protocol "button only" messages. It converts it's own internal state in to a "Trotec" IR message (maybe even using this library, who knows) and sends it to the non-wifi part of the A/C to control it. What you _might_ be doing is bypassing their "smart" wifi-ir-controller hardware, and talking directly to the dumb(er) hardware. In that scenario, the "smart" part of the A/C unit doesn't know what the actual state is of the "dumb" part of the A/C. It works because it assumes only it is talking to the A/C unit, not someone with another full functionality/detailed (trotec) remote etc.
crankyoldgit
on 7 Jun 2020
I am compiling a custom firmware based upon 'tasmota-ircustom', which is based on the latest dev branch of Tasmota and tried all hvac vendors listed, the only one which works is TROTEC.
Cool. Thanks for the info. I suspected as much, but wanted to be sure.
crankyoldgit
on 7 Jun 2020
The unit itself does have a display (and maybe buttons as well)? If so, does that display update according to what you send when using Trotec?
NiKiZe
on 7 Jun 2020
Please correct me if I'm wrong, but it seems that you have tested different protocols, and it just happens that it responds to Trotec, it might be a leftover from firmware development, and not really intended to work?
Yes, I started to flash the Wemos with Tasmota irremote firmware and tried all vendors, just to see whether one of them makes the Duux respond. After trying all of them, the only vendor that seems to work was TROTEC, but the IOS app doesn't respond on these commands (as explained above).
RaymondMouthaan
on 7 Jun 2020
The unit itself does have a display (and maybe buttons as well)? If so, does that display update according to what you send when using Trotec?
Yes, the hvac itself has similar buttons (7x) as the remote and a display and several indicators displaying the state of the hvac. This display (with temperature) and indicators do respond on the TROTEC commands as well on the IRSend commands.
What if you send a Trotec message, and then press something on original remote, would that get you correct state in the app?
NiKiZe
on 7 Jun 2020
Yes, the hvac itself has similar buttons (7x) as the remote and a display and several indicators displaying the state of the hvac. This display (with temperature) and indicators do respond on the TROTEC commands as well on the IRSend commands.
That is still consistent with my theory. i.e. Wifi support is a bolted-on extra, without direct integration (i.e. feedback) to the A/C unit.
I have 2 Internet Points riding on my bet that I'm right. ;-) (because it's a very cheap way to add app/wifi support to an existing A/C unit for <$5 of hardware and use a cheaper remote too) so they can sell it to punters for more $$$.
crankyoldgit
on 7 Jun 2020
For the record, technically "Help, my IOS app doesn't update" really is outside of the remit of us providing support from the Library's perspective. I'm helping as much as we can so a) we learn more, and b) try to see if they is any way to improve your situation, because it's always nice when things co-operate. (We are all frustrated end-consumers too! ;-P)
TL;DR: We may not be able to fix/workaround your devices fundamental design decisions, but we will if we can.
crankyoldgit
on 7 Jun 2020
The unit itself does have a display (and maybe buttons as well)? If so, does that display update according to what you send when using Trotec?
Yes, the hvac itself has similar buttons (7x) as the remote and a display and several indicators displaying the state of the hvac. This display (with temperature) and indicators do respond on the TROTEC commands as well on the IRSend commands.
What if you send a Trotec message, and then press something on original remote, would that get you correct state in the app?
A few more tests:
Scenario 1
1) Initial state: hvac off
2) IRhvac {"Vendor":"TROTEC","Power": 1}
- turns on hvac, but IOS app remains off
3)IRsend {"Protocol":"NEC","Bits":32,"Data":"0x007F00FF","DataLSB":"0x00FE00FF","Repeat":0} - changes operation state on the hvac AND updates IOS app goes to state on and displays identical state and indicators as shown on the display of the hvac itself.
Scenario 2
1) Initial state: hvac off
2) IRsend {"Protocol":"NEC","Bits":32,"Data":"0x007F20DF","DataLSB":"0x00FE04FB","Repeat":0}
- turns on hvac AND IOS app goes on with the same state and indicators as displayed on the hvac itself
3)IRhvac {"Vendor":"TROTEC","Power": 1,"Mode":"Dry"} - changes operation state on the hvac to dry mode, but does NOT update the IOS app.
Scenario 3
1) Initial state: hvac off
2) IRhvac {"Vendor":"TROTEC","Power": 1}
- turns on hvac, but IOS app remains off
3) Pressing fan speed button on the remote, makes the hvac change the fan speed AND update the app update accordingly.
RaymondMouthaan
on 7 Jun 2020
IRsend {"Protocol":"NEC","Bits":32,"Data":"0x007F00FF","DataLSB":"0x00FE00FF","Repeat":0}
[Q] What button press does this code represent?
- Pressing fan speed button on the remote, makes the hvac change the fan speed AND update the app update accordingly.
Do you mean the just the fan speed updates accordingly, or the entire state of the A/C updates according on the IOS app?
crankyoldgit
on 7 Jun 2020
For the record, technically "Help, my IOS app doesn't update" really is outside of the remit of us providing support from the Library's perspective. I'm helping as much as we can so a) we learn more, and b) try to see if they is any way to improve your situation, because it's always nice when things co-operate. (We are all frustrated end-consumers too! ;-P)
TL;DR: We may not be able to fix/workaround your devices fundamental design decisions, but we will if we can.
still try to understand your theory, while I am doing tests as above and building the circuit for IRRecvDumpv2. But your help is very much appreciated 👍
RaymondMouthaan
on 7 Jun 2020
still try to understand your theory, while I am doing tests as above and building the circuit for IRRecvDumpv2. But you help is very much appreciated 👍
It could also be "The wifi part only update/fetches the state of the A/C from the A/C when it sees an NEC message, not a TROTEC" message.
crankyoldgit
on 7 Jun 2020
Hmm .. maybe what we need is a Neutral/No-OP/do nothing NEC code that the A/C sees .. which does nothing, but forces it to update the WIFI/App status.
i.e.
Send a "don't change anything" NEC message after every IRhvac Trotec message.
crankyoldgit
on 7 Jun 2020
IRsend {"Protocol":"NEC","Bits":32,"Data":"0x007F00FF","DataLSB":"0x00FE00FF","Repeat":0}[Q] What button press does this code represent?
Change Operation Mode
IRsend
IRsend {"Protocol":"NEC","Bits":32,"Data":"0x007F00FF","DataLSB":"0x00FE00FF","Repeat":0}
- Pressing fan speed button on the remote, makes the hvac change the fan speed AND update the app update accordingly.
Do you mean the just the fan speed updates accordingly, or the entire state of the A/C updates according on the IOS app?
I mean when pressing the fan speed button on the remote, makes the havc change its fan speed and the app shows that the hvac is turned on + all other indictors like operation mode, fan speed etc are update in the app accordingly. Basically the IRsend command makes the app 'active' again.
RaymondMouthaan
on 7 Jun 2020
Ta. That goes with what my latest idea is. The wifi-side/part only fetches the status info from the non-wifi A/C side when it gets an NEC message. And that the non-wifi part of the A/C also accepts TROTEC protocol.
Try this:
- Initial state: hvac off
- IRhvac {"Vendor":"TROTEC","Power": 1}
- IRsend {"Protocol":"NEC","Bits":32,"Data":"0x00FF00FF","Repeat":0} // Which is a effectively a '0' NEC code.
or
IRsend {"Protocol":"NEC","Bits":32,"Data":"0x7E817E81","Repeat":0} // Which happens to be a valid NEC code for "Power on" on my stereo. ;-)
Maybe we will get lucky and either of those codes won't cause an action on the A/C unit, but force the wifi/app-side to update.
crankyoldgit
on 7 Jun 2020
3. IRsend {"Protocol":"NEC","Bits":32,"Data":"0x7E817E81","Repeat":0}
Both IRsend commands do nothing, not even a beep on the hvac to indicate that it "understood" the IR code.
RaymondMouthaan
on 7 Jun 2020
Just because I used a different format (i.e. no DataLSB clause)
Does the shortened IRsend {"Protocol":"NEC","Bits":32,"Data":"0x007F00FF","Repeat":0} cause a beep?
i.e. Did I produce a valid Tasmota command.
I assuming that we did, that means it probably needs a "valid" existing code from your remote.
Is there a button you can press on the remote that doesn't (significantly) change the A/C much?
If so, try that maybe instead?
crankyoldgit
on 7 Jun 2020
Just because I used a different format (i.e. no DataLSB clause)
Does the shortenedIRsend {"Protocol":"NEC","Bits":32,"Data":"0x007F00FF","Repeat":0}cause a beep?
i.e. Did I produce a valid Tasmota command.I assuming that we did, that means it probably needs a "valid" existing code from your remote.
Is there a button you can press on the remote that doesn't (significantly) change the A/C much?
If so, try that maybe instead?
Just to clarify things:
Power toggle (without DataLSB):
IRsend {"Protocol":"NEC","Bits":32,"Data":"0x007F20DF","Repeat":0}
and
IRsend {"Protocol":"NEC","Bits":32,"Data":"0x007F20DF","DataLSB":"0x00FE04FB","Repeat":0}
both work and makes the hvac beep, once it receives it.
In contrast to
IRsend {"Protocol":"NEC","Bits":32,"Data":"0x7E817E81","Repeat":0}
and
IRsend {"Protocol":"NEC","Bits":32,"Data":"0x007F00FF","Repeat":0}
which both do nothing with the hvac (no beep).
RaymondMouthaan
on 7 Jun 2020
Power toggle (without DataLSB):
IRsend {"Protocol":"NEC","Bits":32,"Data":"0x007F20DF","Repeat":0}
and
IRsend {"Protocol":"NEC","Bits":32,"Data":"0x007F20DF","DataLSB":"0x00FE04FB","Repeat":0}
both work and makes the hvac beep, once it receives it.
Ta. It was a long shot, but worth a try just in case to rule out that as a possible cause of a problem.
crankyoldgit
on 7 Jun 2020
Slightly off topic:
Our TROTEC implementation has a "Sleep" setting (on or off), which is probably your "Night" mode.
I have no idea how you access that via IRhvac on Tasmota. If they use our common A/C api (which I think they do, a value of Sleep: -1 would be off, and >=0 would be on.
e.g.
https://github.com/crankyoldgit/IRremoteESP8266/blob/117f0ed6bad30f6f7b5523abbd708f5e92a1093a/src/IRac.cpp#L1748
Looking back at your earlier data, the NEC code you have for Timer (0x007F807F) might be a good candidate for sending after a Trotec message to trick the wifi part to update. It probably doesn't change the operation noticeably. Perhaps you can send it twice, if it is a simple Timer on/off toggle operation etc.
FYI the common A/C api (that I think tasmota uses) does NOT support timers. i.e. there is no way from the IRhvac interface to twiddle with that setting. It is available via direct use of this library however.
e.g.
https://github.com/crankyoldgit/IRremoteESP8266/blob/117f0ed6bad30f6f7b5523abbd708f5e92a1093a/src/ir_Trotec.cpp#L146-L149
crankyoldgit
on 7 Jun 2020
I placed the IR receiver circuit close to the IR receiver of the hvac, so that when I press a button on the remote, both hvac and the circuit receive the same code. The Wemos is flashed with IRrecvDumpv2.
1) Initial state of the hvac is off, also the app shows off.
2) Pressing Power ON on the original remote
Timestamp : 001180.902
Library   : v2.7.7

Protocol  : NEC
Code      : 0x7F20DF (32 Bits)
uint16_t rawData[71] = {8940, 4508,  514, 590,  566, 564,  538, 592,  540, 564,  566, 592,  538, 566,  514, 592,  540, 588,  514, 618,  514, 1722,  488, 1748,  514, 1772,  462, 1746,  514, 1726,  514, 1746,  488, 1748,  514, 616,  514, 590,  540, 1722,  514, 588,  542, 588,  542, 590,  514, 590,  542, 588,  542, 1694,  568, 1694,  518, 586,  620, 1642,  516, 1718,  568, 1666,  570, 1694,  516, 1718,  566, 40974,  8990, 2220,  590};  // NEC 7F20DF
uint32_t address = 0xFE00;
uint32_t command = 0x4;
uint64_t data = 0x7F20DF;
- Turns on the hvac
- App show the state and indicators identical to the hvac
3) Pressing fan speed button
Timestamp : 001211.183
Library   : v2.7.7

Protocol  : NEC
Code      : 0x7FE01F (32 Bits)
uint16_t rawData[71] = {8994, 4478,  570, 534,  596, 534,  568, 564,  568, 534,  596, 536,  592, 536,  570, 534,  596, 534,  594, 536,  570, 1668,  592, 1642,  594, 1668,  566, 1668,  592, 1644,  568, 1696,  540, 1698,  588, 1646,  568, 1694,  540, 1694,  566, 564,  540, 564,  568, 564,  564, 566,  540, 540,  564, 590,  538, 592,  514, 590,  540, 1722,  512, 1748,  488, 1722,  516, 1746,  488, 1746,  488, 41052,  8966, 2242,  568};  // NEC 7FE01F
uint32_t address = 0xFE00;
uint32_t command = 0x7;
uint64_t data = 0x7FE01F;
- sets fan speed from
highto 'medium' on the hvac and updates the app likewise
Sometime while doing these tests I get protocol UNKNOWN of 37 bits:
Timestamp : 001394.285
Library   : v2.7.7

Protocol  : UNKNOWN
Code      : 0x21FB5199 (37 Bits)
uint16_t rawData[73] = {8940, 4504,  544, 560,  654, 478,  564, 590,  518, 562,  568, 558,  654, 478,  546, 562,  568, 562,  644, 488,  544, 1690,  568, 1670,  570, 1690,  546, 1692,  566, 1696,  544, 1690,  544, 310,  86, 1296,  566, 564,  544, 564,  568, 1690,  544, 562,  544, 586,  564, 564,  544, 564,  568, 562,  540, 1698,  568, 1692,  544, 562,  568, 1692,  544, 1718,  516, 1722,  542, 1666,  570, 1692,  540, 41002,  8940, 2270,  542};  // UNKNOWN 21FB5199
And sometimes after a protocol NEC I get:
Timestamp : 001393.001
Library   : v2.7.7

Protocol  : NEC (Repeat)
Code      : 0xFFFFFFFFFFFFFFFF (0 Bits)
uint16_t rawData[3] = {8940, 2244,  570};  // NEC (Repeat) FFFFFFFFFFFFFFFF
uint64_t data = 0xFFFFFFFFFFFFFFFF;
Not sure if means something useful?
RaymondMouthaan
on 7 Jun 2020
Slightly off topic:
Our TROTEC implementation has a "Sleep" setting (on or off), which is probably your "Night" mode.
I have no idea how you access that via IRhvac on Tasmota. If they use our common A/C api (which I think they do, a value of Sleep: -1 would beoff, and >=0 would beon.
e.g.Looking back at your earlier data, the NEC code you have for Timer (
0x007F807F) might be a good candidate for sending after a Trotec message to trick the wifi part to update. It probably doesn't change the operation noticeably. Perhaps you can send it twice, if it is a simple Timer on/off toggle operation etc.
FYI the common A/C api (that I think tasmota uses) does NOT support timers. i.e. there is no way from the IRhvac interface to twiddle with that setting. It is available via direct use of this library however.
e.g.
When the hvac is in operation state cooling then this command works:
IRhvac {"Vendor": "TROTEC", "Power":"On", "Sleep": 1}
- set the sleep indicator on the hvac, but after few seconds it goes back to operation mode 'Auto'.
RaymondMouthaan
on 7 Jun 2020
Some more IRRecvDumpv2 dumps:
1) hvac has initial state: Cooling, Fan speed low and temperature 18 degrees.
2) Pressing Temperature UP on the original remote:
Timestamp : 000390.121
Library   : v2.7.7

Protocol  : NEC
Code      : 0x7FA05F (32 Bits)
uint16_t rawData[71] = {8966, 4504,  568, 564,  572, 532,  598, 534,  566, 562,  572, 520,  610, 532,  596, 536,  570, 532,  598, 534,  594, 1642,  596, 1642,  592, 1666,  594, 1616,  594, 1692,  568, 1666,  568, 1668,  570, 1694,  542, 540,  592, 1692,  542, 538,  592, 564,  540, 590,  540, 566,  566, 562,  540, 592,  514, 1724,  536, 590,  490, 1746,  488, 1724,  538, 1746,  488, 1746,  488, 1746,  516, 41024,  8966, 2270,  518};  // NEC 7FA05F
uint32_t address = 0xFE00;
uint32_t command = 0x5;
uint64_t data = 0x7FA05F;


Timestamp : 000390.226
Library   : v2.7.7

Protocol  : NEC (Repeat)
Code      : 0xFFFFFFFFFFFFFFFF (0 Bits)
uint16_t rawData[3] = {8964, 2268,  522};  // NEC (Repeat) FFFFFFFFFFFFFFFF
uint64_t data = 0xFFFFFFFFFFFFFFFF;


Timestamp : 000396.802
Library   : v2.7.7

Protocol  : UNKNOWN
Code      : 0xA7C5D5C7 (36 Bits)
uint16_t rawData[71] = {8988, 4506,  570, 562,  540, 566,  540, 590,  540, 590,  538, 592,  514, 564,  542, 614,  514, 618,  488, 616,  516, 1720,  514, 1748,  488, 1748,  514, 1746,  488, 1746,  488, 1722,  540, 1746,  490, 1746,  486, 616,  516, 1746,  490, 640,  514, 590,  542, 588,  514, 614,  518, 562,  568, 560,  568, 1668,  570, 586,  542, 1694,  570, 1692,  544, 1666,  570, 1668,  570, 1716,  542, 40972,  8968, 2266,  544};  // UNKNOWN A7C5D5C7


Timestamp : 000396.899
Library   : v2.7.7

Protocol  : NEC (Repeat)
Code      : 0xFFFFFFFFFFFFFFFF (0 Bits)
uint16_t rawData[3] = {8964, 2270,  516};  // NEC (Repeat) FFFFFFFFFFFFFFFF
uint64_t data = 0xFFFFFFFFFFFFFFFF;
- this sets the temperature on the hvac to 19 degrees, please note I had to press the button twice, since the first press shows blinking 18 deg to indicate current set temperature. The second press actual increases the current temp from 18 deg to 19 deg.
3) Pressing Temperature UP again on the original remote:
Timestamp : 000516.013
Library   : v2.7.7

Protocol  : UNKNOWN
Code      : 0xBA7DAD95 (37 Bits)
uint16_t rawData[73] = {80, 6480,  8936, 4560,  540, 590,  512, 566,  542, 616,  488, 642,  488, 616,  516, 614,  488, 642,  490, 588,  542, 614,  490, 1720,  542, 1746,  490, 1744,  490, 1722,  542, 1744,  490, 1746,  488, 1722,  568, 1720,  516, 588,  542, 1720,  516, 588,  544, 586,  516, 614,  518, 562,  570, 560,  568, 588,  542, 1694,  540, 590,  542, 1692,  544, 1692,  544, 1718,  544, 1690,  544, 1692,  570, 40970,  8968, 2268,  544};  // UNKNOWN BA7DAD95


Timestamp : 000516.119
Library   : v2.7.7

Protocol  : NEC (Repeat)
Code      : 0xFFFFFFFFFFFFFFFF (0 Bits)
uint16_t rawData[3] = {8964, 2268,  520};  // NEC (Repeat) FFFFFFFFFFFFFFFF
uint64_t data = 0xFFFFFFFFFFFFFFFF;


Timestamp : 000517.137
Library   : v2.7.7

Protocol  : NEC
Code      : 0x7FA05F (32 Bits)
uint16_t rawData[71] = {8990, 4480,  568, 588,  516, 588,  544, 562,  570, 564,  564, 590,  516, 586,  544, 586,  544, 588,  518, 562,  570, 1694,  542, 1718,  544, 1694,  544, 1716,  542, 1692,  544, 1666,  596, 1692,  518, 1716,  544, 588,  544, 1692,  568, 562,  544, 536,  596, 560,  568, 536,  570, 560,  570, 560,  568, 1666,  572, 558,  568, 1642,  596, 1692,  518, 1714,  570, 1642,  570, 1716,  520, 40996,  8968, 2266,  544};  // NEC 7FA05F
uint32_t address = 0xFE00;
uint32_t command = 0x5;
uint64_t data = 0x7FA05F;
- this sets the temperature on the hvac to 20 degrees, please note I had to press the button twice, since the first press shows blinking 19 deg to indicate current set temperature. The second press actual increases the current temp from 19 deg to 20 deg.
Hope this gives more insight :-)
RaymondMouthaan
on 7 Jun 2020
Not really. The NEC (Repeat) code(s) are just how the protocol works. i.e. think "It sends this special code to indicate the button is still held down" etc.
The UNKNOWN ones are also red-herrings. They are just NEC messages that for some reason (I'm not going to look into why) are not matching the spec correctly.
All the data you've provided thus far points to:
- The physical IR remote uses the NEC protocol, and it has simple (dumb) button operation. (same code for each press/button)
- The A/C accepts both NEC and Trotec protocols.
- The A/C only updates it's wifi status/info when it receives a known NEC message or a physical button press on the A/C unit.
- You can set the A/C's settings via Trotec.
- The A/C unit maintains the "state" of the settings when using the NEC/Remote messages. i.e. NEC/remote message are "simple". Where as Trotec allows the remote to control the entire state in a single message.
So, I don't think there is anything we can do to force your A/C unit's wifi component to update using the TROTEC protocol. It has to be one of the pre-defined NEC messages. Thus the only way it seems you can get it to update your app after using tasmota to change the A/C via trotec, is to send at least one pre-defined NEC messages.
So, you've got few options as far as I can see it at the moment:
If you want your iPhone etc to be up-to-date:
- Send a IRhvac Trotec message, and then follow it up with at least one pre-existing IRsend NEC message.
or - Send only the NEC messages just like you would be if pressing the physical buttons on the actual remote. (i.e. No easy way set arbitrary values like temp etc). Just a sequence of +1's or -1's effectively .. or "change to the next mode" etc.
or If you don't care about the iPhone being in sync:
- Just use IRhvac/Trotec and that's it.
The library does not support a IRhvac interface for "simple"/dumb protocols that operate like how they are using the NEC protocol. It could be done with your own program/project, where you emulate the A/C's on-board controller/state engine etc, but we won't add it to the library directly.
Other things you could try that are out of scope for this library & support etc.:
1) See if there is some URL, TCP, or UDP protocol message you can send the A/C to force/trigger an update of it's state from the other half of it's brain.
2) See if there is a URL/TCP/UDP to control the settings directly avoiding IR totally. That would be more reliable than using IR. e.g. Just like your app does. Look into tools like tcpdump or wireshark etc to see if you can work out how that app & a/c communicate over the network.
3) Try to send semi-random NEC commands to the A/C unit hoping to find a command that does nothing and causes it to update it's wifi part. (For point "1." earlier)
(EDIT: Clean up some poor English and typos)
crankyoldgit
on 7 Jun 2020
Hope this gives more insight :-)
Nope. Sadly, the data just adds more support for my last update/explanation/theory etc.
crankyoldgit
on 7 Jun 2020
To add on to what crankyoldgit said above, does setting e.g. temp via Trotec, and then temp button once also update the WiFi part? If not send one degree higher or lower, and then 2 temp presses to change it one degree to the correct, not as reliable, but maybe a workaround for you.
NiKiZe
on 7 Jun 2020
To add on to what crankyoldgit said above, does setting e.g. temp via Trotec, and then temp button once also update the WiFi part? If not send one degree higher or lower, and then 2 temp presses to change it one degree to the correct, not as reliable, but maybe a workaround for you.
I did think of that, but they'd have to track what the desired temp is and do some pre-processing.
e.g.
"I want 20C, so send 19C using trotec, then send the "temp up/+1" NEC code."
But they would have to handle the corner cases. i.e. You can't set the lowest temp that way.
Assuming "16C" is the lowest temp. You'd have to send "16C", and then "temp down/-1", or "17C" and then "temp down/-1" to achieve 16C. Because sending 15C (which would convert to 16C at the A/C) or 16C, then temp up/+1 would result in 17C etc.
Either way, I'm not going to add that sort of horrible hack to the library to support a manufacturers poor design decisions on how their WIFI interface works. i.e. We have to draw a line somewhere ;-)
crankyoldgit
on 7 Jun 2020
Sigh, it would be even worse. Mode changes and power changes would require that you send a temp up then down to maintain a neutral overall change, assuming those commands don't cause the unit to turn on (if it was off etc) and you would have to track what the existing temp was because of the boundary conditions described above if you're at the end of the temp spectrum.
I.e. It gets uglier and uglier the more I think about it. :-P
crankyoldgit
on 7 Jun 2020
@RaymondMouthaan PS, you might be able automate sending the subsequent NEC command (if you find a suitable one/sequence) using Tasmota's rules. I've done some pretty awesome/advanced stuff using that, but it's not trivial or intuitive sometimes.
crankyoldgit
on 7 Jun 2020
Thanks guys for all the time it took for helping me out here!
I guess it's not so easy I was hoping for to simple duplicate the implementation of TROTEC and modify the raw data with the once of the Duux, so that it sends the codes which also interacts with app. The app is not mandatory for me, so can live without it.
Using TROTEC might be the solution (with possible some additional IRSend command) but I need to do some more testing on that part.
Like you suggested, even better / nicer is to communicate with the api via WiFI of the hvac instead of using IR. I need to do some more investigation on this.....
RaymondMouthaan
on 7 Jun 2020
I guess it's not so easy I was hoping for to simple duplicate the implementation of TROTEC and modify the raw data with the once of the Duux
Alas no. Trotec (and most other A/Cs) send the whole config of the A/C in each message.
e.g. "On, cool, 19C, Low Fan" all in one 32-bit message for example. We work out what (figurative and literal) bits of the message mean "cool" and "19C" etc so we can construct a new code the A/C understands with all that info in it. You remote's messages are things like "add one to the temp". Similar to a traditional TV remote for volume/channel change etc. There is no single state/message/code we can construct to tell the a/c to do "On, cool, 19C, Low Fan".
e.g. On "normal" ac remotes, pressing the "temp up" button twice, results in different numeric codes because they contain the actual desired temperature. Not a relative command.
crankyoldgit
on 7 Jun 2020
To add on to what crankyoldgit said above, does setting e.g. temp via Trotec, and then temp button once also update the WiFi part? If not send one degree higher or lower, and then 2 temp presses to change it one degree to the correct, not as reliable, but maybe a workaround for you.
...
Either way, I'm not going to add that sort of horrible hack to the library to support a manufacturers poor design decisions on how their WIFI interface works. i.e. We have to draw a line somewhere ;-)
Want to be clear that I did not want it to sound like a suggestion of adding that to the official code. ;)
NiKiZe
on 7 Jun 2020
Want to be clear that I did not want it to sound like a suggestion of adding that to the official code. ;)
Haha. It was mostly clear... Mostly. :-P
crankyoldgit
on 7 Jun 2020
out-of-scope of this project ...
But after some further digging, I just found out that the Duux hvac has an Espressif Inc device build-in, perhaps an ESP8266? and it uses Tuya cloud. So far only one port on the device is open, but map is still scanning:
Starting Nmap 7.60 ( https://nmap.org ) at 2020-06-07 19:00 CEST
Nmap scan report for 10.0.10.220
Host is up (0.0086s latency).
Not shown: 999 closed ports
PORT     STATE SERVICE VERSION
6668/tcp open  irc?
|_irc-info: Unable to open connection
It seems all other 65535 are closed and port 6668 is used by Tuya Api ...
RaymondMouthaan
on 7 Jun 2020
Haha. Called it! You all owe me Two Internet Points! Pay up! :-)
crankyoldgit
on 7 Jun 2020
I'm thinking of closing this issue as I think we've worked out there is a) nothing wrong with the library, and b) There is no easy/clean way to get the iOS app to update automatically using Tasmota IRhvac interface.
That a good/correct summary?
crankyoldgit
on 12 Jun 2020
Hi @crankyoldgit
Yes, I think this one can be closed.
FYI: I found out that the hvac has an esp onboard, which has Tuya firmware installed. Several libraries are able to communicate with the TuyaApi, but so far no luck yet controlling the hvac in a workable way.
Either way, thanks for all the help and discussion 👍
Regards,
Ray
RaymondMouthaan
on 12 Jun 2020
Thanks for updating/closing the issue.
crankyoldgit
on 12 Jun 2020
out-of-scope of this project ...
But after some further digging, I just found out that the Duux hvac has an Espressif Inc device build-in, perhaps an ESP8266? and it uses Tuya cloud. So far only one port on the device is open, but map is still scanning:
Sorry for bumping this thread and it's indeed out-of-scope, but this A/C indeed has an ESP8266. I dumped its firmware with tuya-convert, and I was ready to flash tasmota onto it, but decided against it because I didn't want to end up with a pretty expensive brick.
Maybe someone will find the GPIO pin layout for it so tasmota can support it in the future, but I myself am not too sure where to start.
 strikernl
on 25 Jun 2020
strikernl
on 25 Jun 2020
That's pretty wise not to flash it. :-) However, you can "backup" the existing firmware on an ESP8266. e.g. The Tasmotizer tool and esptool.py etc offer this feature. You'll need to do it directly (with wires), not via tuyaconvert etc.
That would give you an exit strategy.
My _guess_ is the tuya software probably talks over serial directly to the A/C.
crankyoldgit
on 25 Jun 2020
@strikernl, great to read that you installed Tasmota on the Duux. But I assume you reverted back to the original firmware?
I was thinking to do the same, but until. now I didn't take the ris, because of unknowing how to configure Tasmota to control the hvac. I guess I need to open up the Duux and see how the esp is wired, but for now I will think it over, because guarantee will drop once I open it up ...
RaymondMouthaan
on 25 Jun 2020
@strikernl, great to read that you installed Tasmota on the Duux. But I assume you reverted back to the original firmware?
I was thinking to do the same, but until. now I didn't take the ris, because of unknowing how to configure Tasmota to control the hvac. I guess I need to open up the Duux and see how the esp is wired, but for now I will think it over, because guarantee will drop once I open it up ...
I wouldn't do if it was me, unless I could super-easily swap out the "working" Tuya ESP8266 and put in a fresh one to play with ... all without voiding your warranty.
crankyoldgit
on 25 Jun 2020
@crankyoldgit, if I am right, when flashing with Tuya-convert, first it creates a backup of the original firmware right? .. once we have that and Tasmota is installed, we could do a revert with Tuya-convert ... right?
So far guarantee wouldn't be dropped, but the thing is that we need to know the wiring and therefore there is no other way than opening up the device ..
RaymondMouthaan
on 25 Jun 2020
first it creates a backup of the original firmware right?
I don't know. I've never used Tuya-convert. Last time I looked at the software, it did it by pretending to be an tuya firmware update server on your local network, and it tricked it into downloading/installing a new firmware file.
As it was done across the network (not via directly controlling/connecting to the ESP) I don't think it performed a "backup" of the existing firmware. So unless you are very sure it does make a backup (and I'd take that backup and test it on another ESP8266 before I over-wrote the original firmware to see if I can get it to work, so I could revert if I need to.
i.e. Trust the wires Luke, let them guide your actions! :-)
And yes, without knowing how it talks to the A/C, and what the commands/protocol etc it uses (over serial, gpio etc) I wouldn't bother. Unless you have & can use the appropriate Oscilloscope/logic probe tools to reverse engineer it ... or the skill to de-compile the tuya firmware to see exactly what it's doing etc.
Living with your "my app doesn't update" and not modifying anything is a much safer bet. ;-)
crankyoldgit
on 25 Jun 2020
@crankyoldgit, if I am right, when flashing with Tuya-convert, first it creates a backup of the original firmware right? .. once we have that and Tasmota is installed, we could do a revert with Tuya-convert ... right?
Correct, it creates a backup, which I have sitting on my laptop now. However reverting with tuya-convert is (_AFAIK_) not possible, for that you need to get access to the serial header, probably solder it and write directly to it (using a FT232 for example). I've done this with other devices before like smart power plugs. Not that worried if I void warranty for one of those anyway, they're like 10 euros ;)
Accessing the serial header will almost certainly void your warranty though because you will almost definitely need to open the A/C. Maybe they don't have warranty stickers, I haven't looked yet. I'd be really surprised if they didn't though ;)
So to summarize, without opening up the unit you can:
- run tuya-convert
- create a firmware backup
- abort the process ('revert to original firmware', it's not really reverting because up until here I believe nothing is written). I went up to this point.
- flash tasmota or espurna (point of 'no return' for OTA)
You cannot (again, _AFAIK_) revert to stock firmware once you've flashed tasmota/espurna without accessing the header.
strikernl
on 25 Jun 2020
So in essence you'd not really end up with a brick, but you may end up voiding your warranty because you'll need to open the unit to flash the stock back onto it. Which was my worry.
Also an interesting tidbit is that while I was in the intermediate firmware of tuya-convert, the A/C kept working as normal and all the buttons worked. This leads me to think that the 'smart' bit is actually completely separate from the manual control and inner workings of the unit (as @crankyoldgit pointed out above). It seems as though it's just another avenue of input, so you have the manual buttons, IR remote and a wifi controller.
My guess is that all you'd probably end up 'bricking' is the smart bit of the A/C. This is all conjecture though ;)
Also, once Tasmota is running, I think this can conceivably be used to determine the correct way of controlling the A/C: https://tasmota.github.io/docs/Configuration-Procedure-for-New-Devices/ -- you may not necessarily need to open it up for that.
strikernl
on 25 Jun 2020
Hi @strikernl and @crankyoldgit,
Thanks for the clear description!
Not sure to proceed discussion in this thread, since it is not related to this project, but if @crankyoldgit doesn't mind, I'll like to update you guys with my findings.
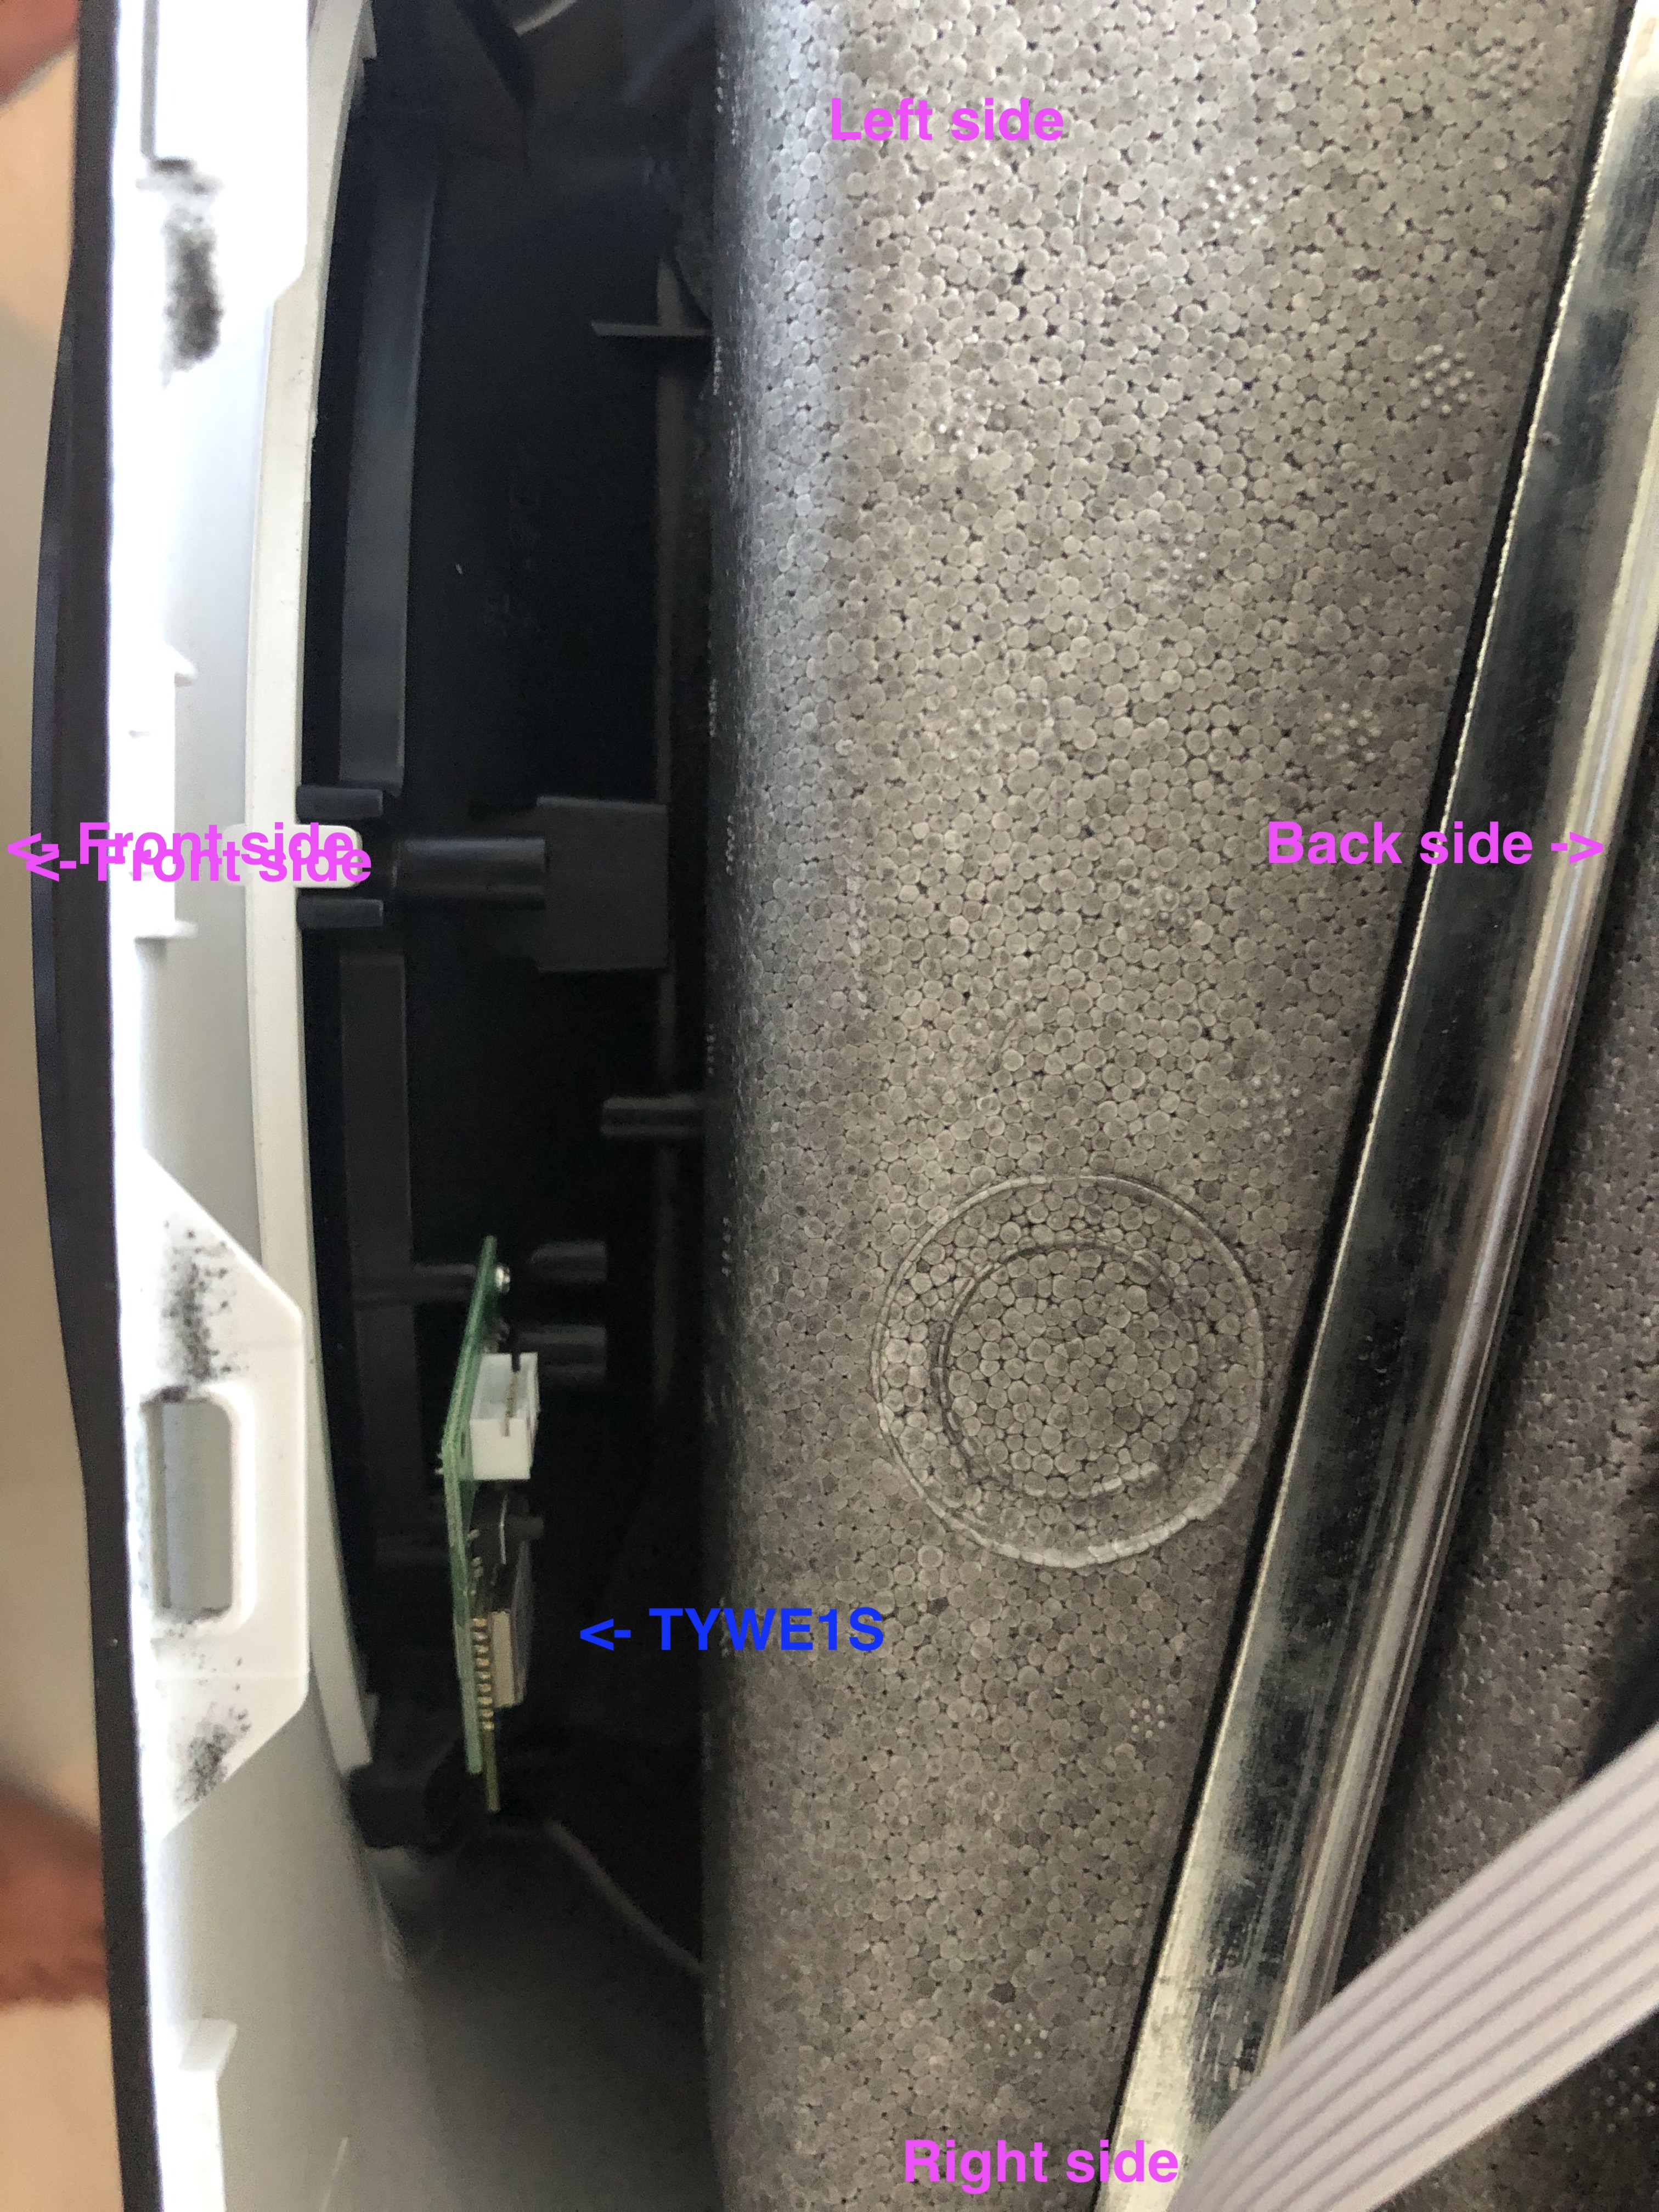
Just 5 minutes ago I opened up the Duux and found out that a separate small pcb is mounted, which has a chip with a label TYWE1S. After a quick google search I came across this page TYWE1S.
Regards warranty, to open up the device, only the top screws on left, right and back side need to be removed, then the black cover can easily be removed from the device. The skews are covered by a small rubber cup which can be removed with a tweezers. There are no warranty seals or anything like that, so no one will ever notice if the device has been opened.
One challenge to face is to remove the pcb from the device, in case we need to reflash it. The board is mounted by 2 tiny screws which are difficult to reach with a screwdriver.
From the pcb a flat cable with 4 pins go to the main pcb, which is located directly under the controls.
RaymondMouthaan
on 26 Jun 2020
If there are only 4 pins/wires connecting the device, then I'd guess two are power (vcc or 3v3, & GND), the other two are probably serial (RX & TX).
You can use this issue as much as you like, just as long as no "requests" for help are probably here. I.e. create a new issue, otherwise I'm going to assume there is nothing here I _need_ to look at.
crankyoldgit
on 26 Jun 2020
Nice, well done. I believe that's quite a common board, should be fairly easy to work with, once you can reach it, that is. Maybe using something like an angle screw driver?
This means you always have a way of going back though, so I think flashing tasmota is not that risky, as long as you make sure you have a backup there's always a way back to stock.
By the way did you remove the flat cable from the PCB to take that picture? It looks like maybe the white plastic thing with the pins may be the serial header itself, in which case you wouldn't even need to solder to access it.
strikernl
on 26 Jun 2020
@strikernl, do you have plans and take a shot to install Tasmota on your Duux?
RaymondMouthaan
on 26 Jun 2020
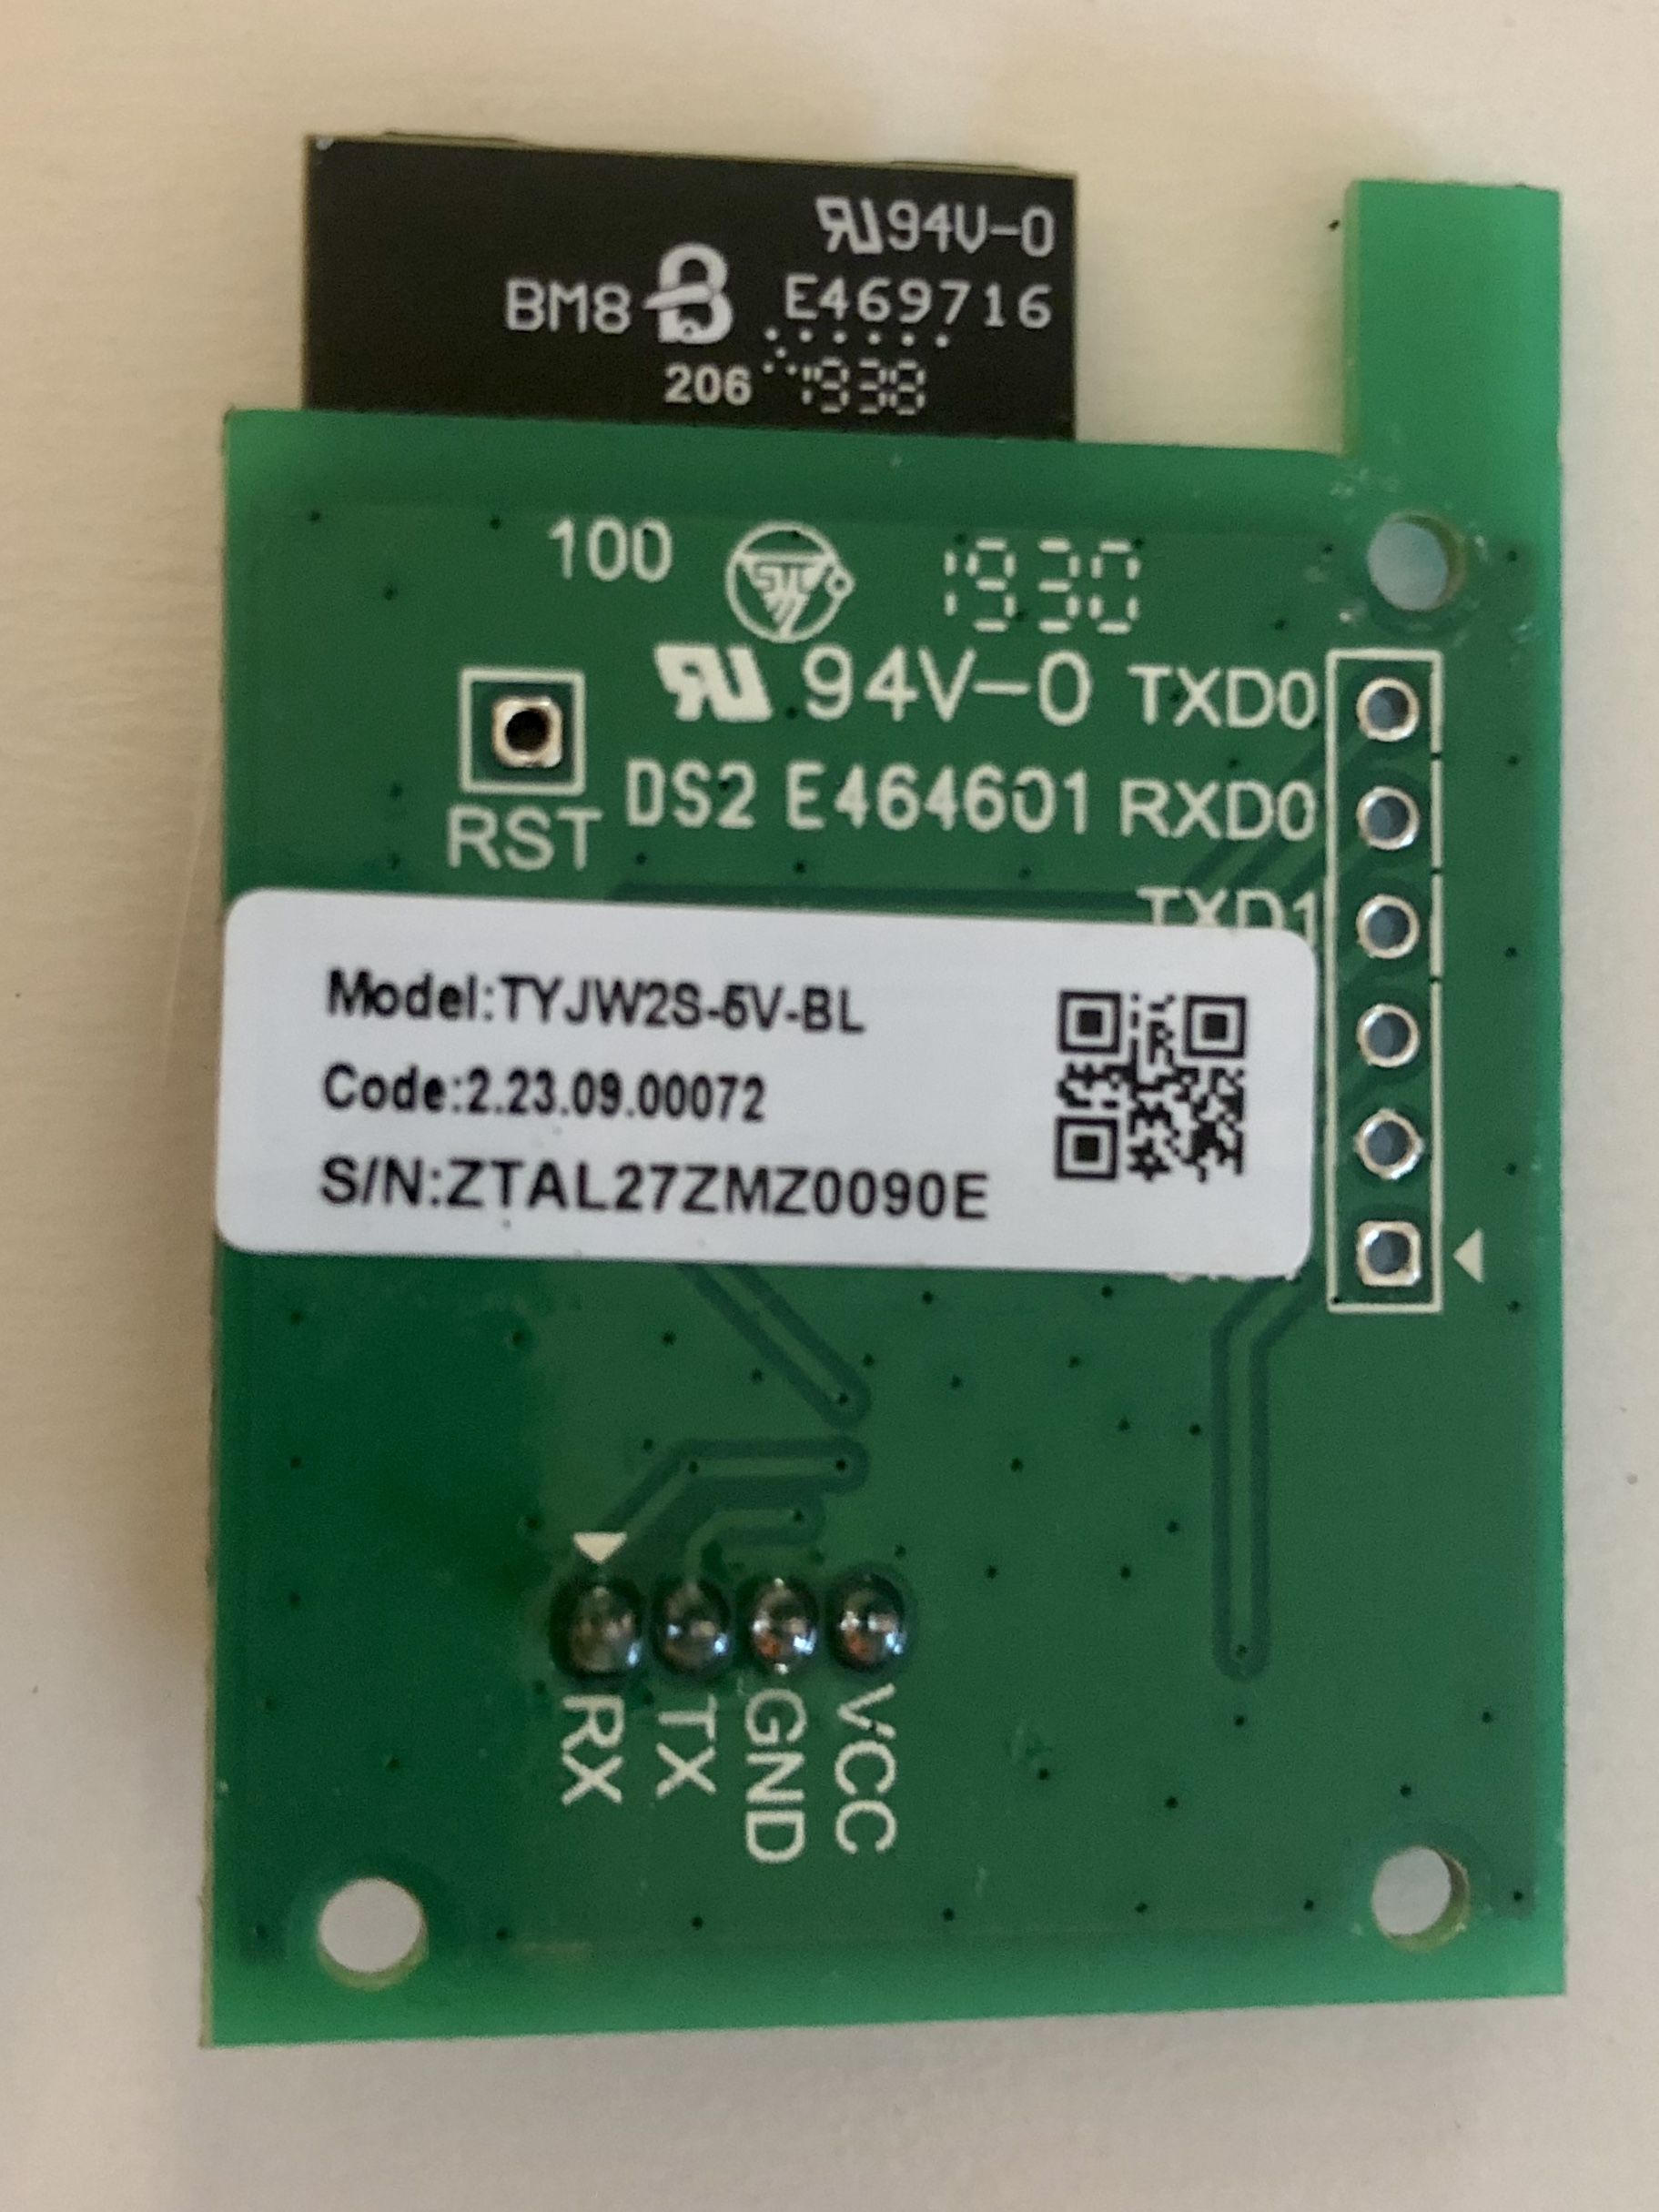
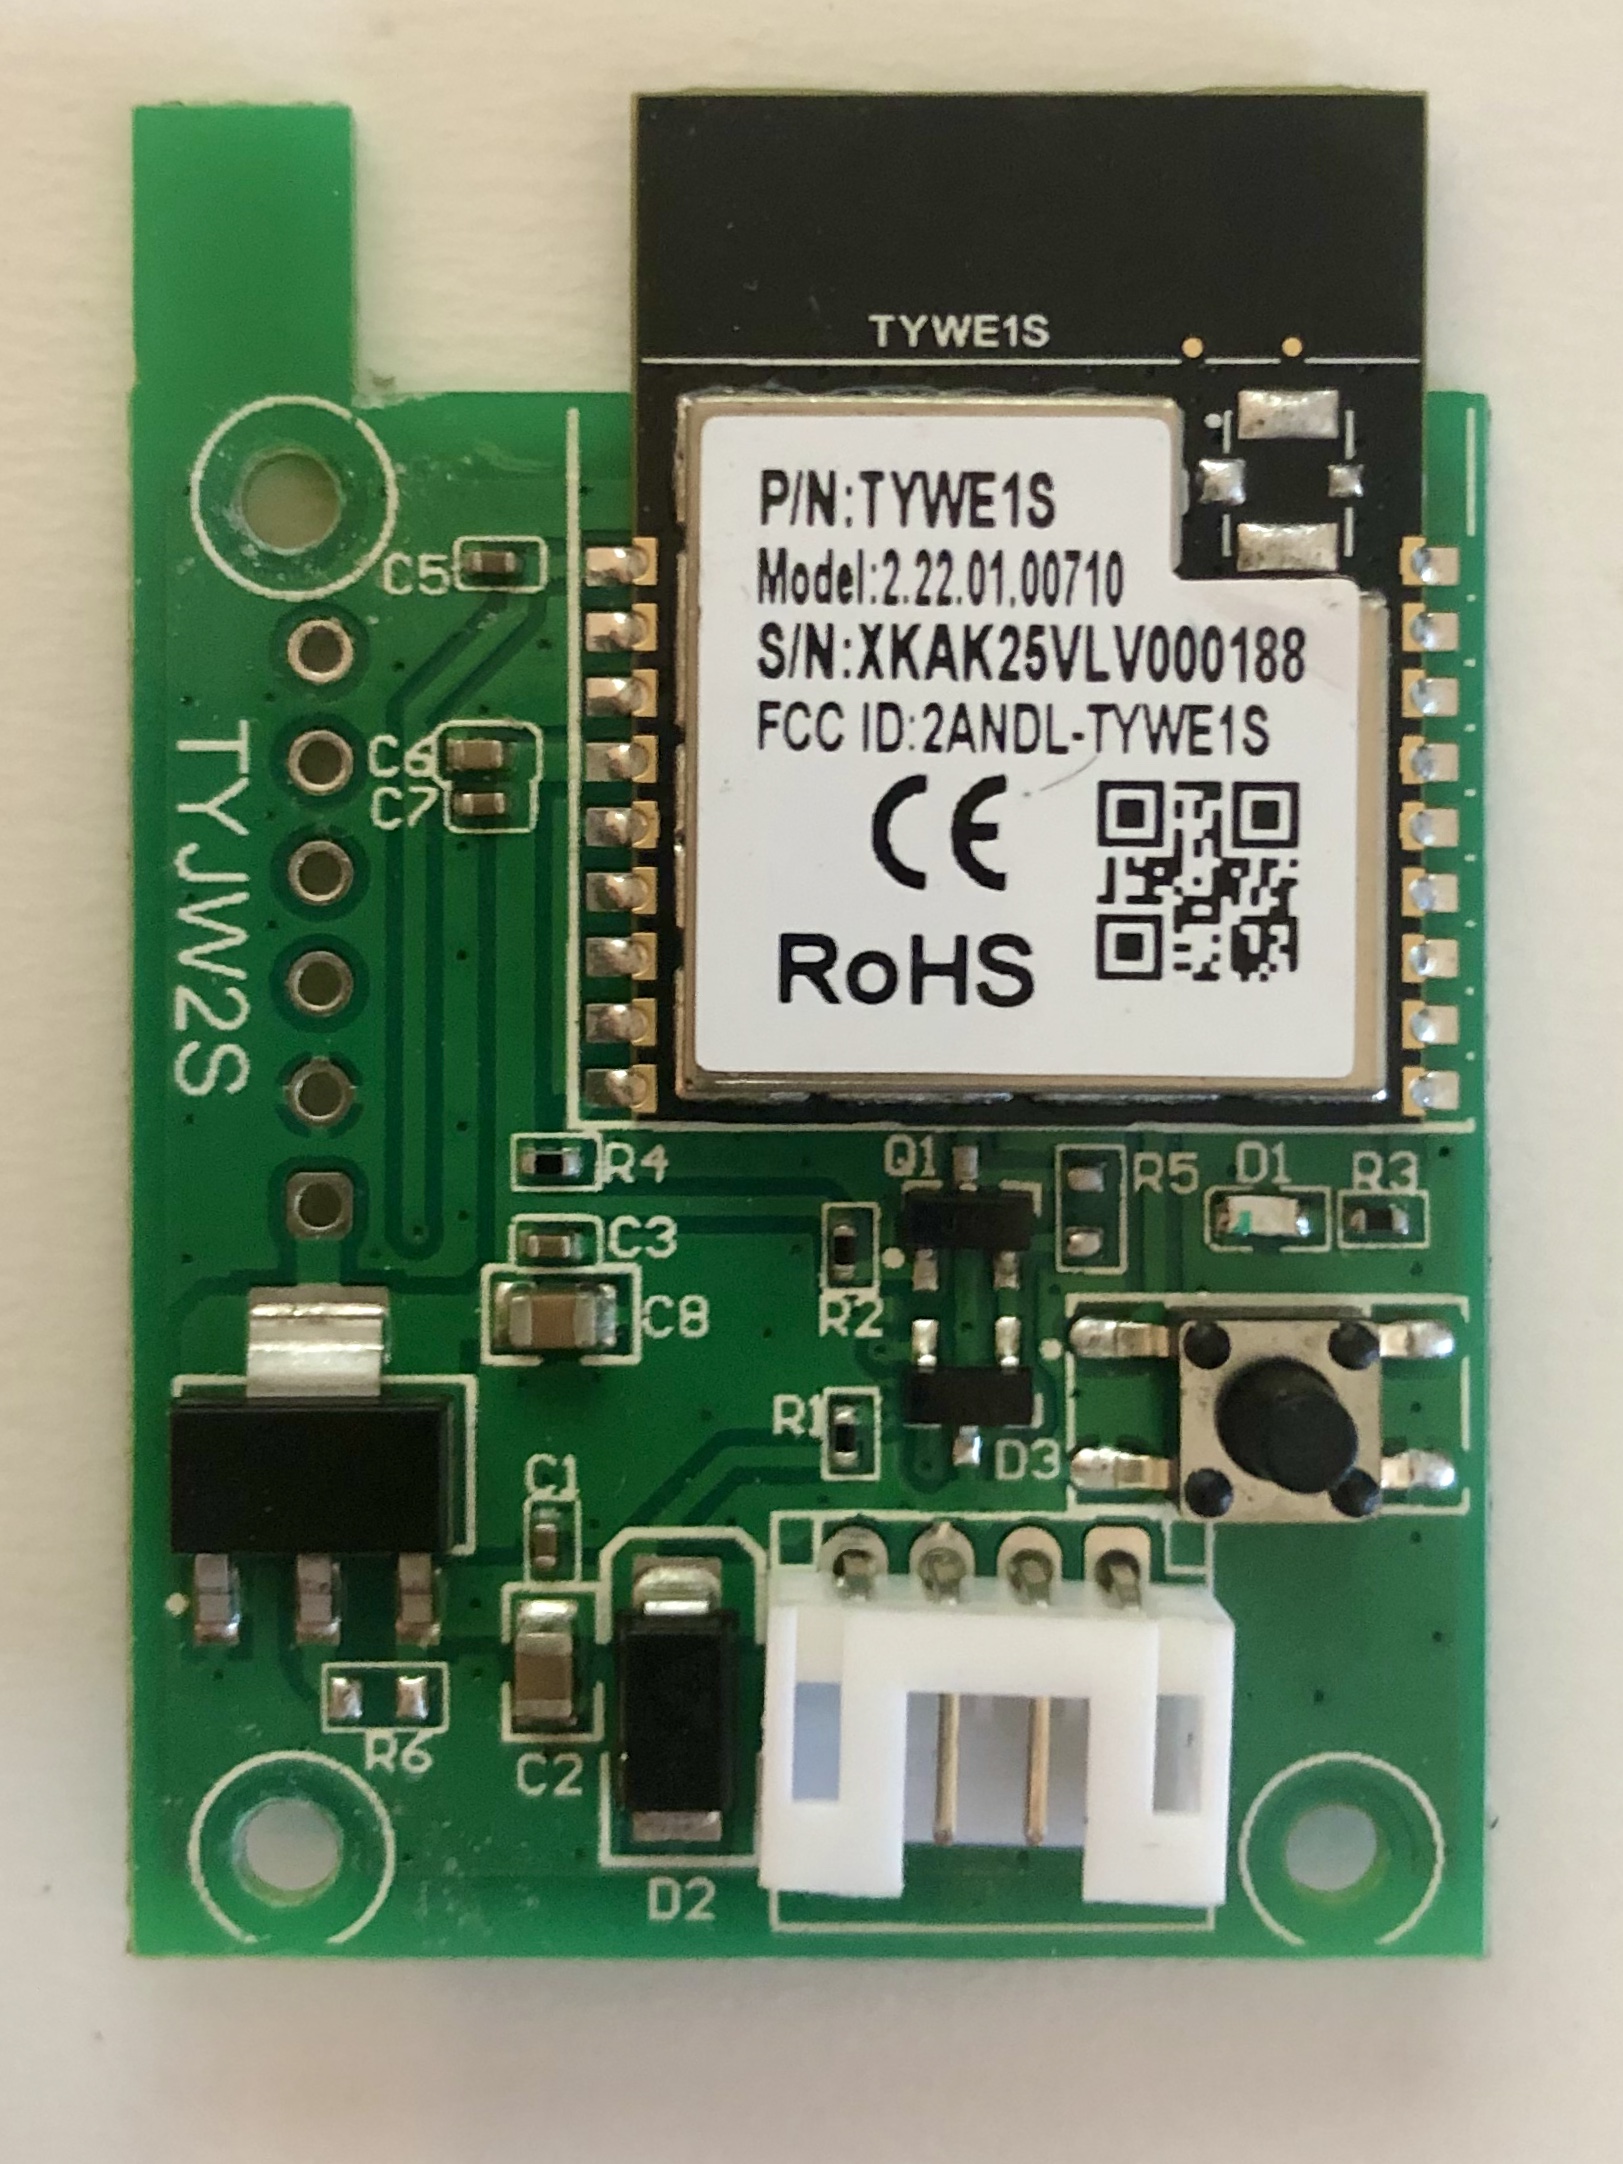
Update 2 - _Sometimes a man needs to take some risk in life_ ;)
Below the front and back of the pcb of type TYJW2S and the chip TYWE1S.
Like @crankyoldgit guessed, indeed the 4 pin header has VCC (3.3V), GND, TX and RX, this is connected to the main board, right behind the contols and display. Also the Duux remains to work even when the module is removed. It still operates via the buttons on the panel and via IR remote.
I guess backing up the stock firmware will be done by Tuya-convert, flashing Tasmota wouldn't be a problem either, like you said (did it on a light bulb earlier and was amazingly easy). Only thing that concerns me, is how to configure Tasmota, but the link of @strikernl Configuration-Procedure-for-New-Devices might help.
RaymondMouthaan
on 26 Jun 2020
I was able to connect the HVAC with Tuya-convert and create a backup, just like @strikernl did earlier. Next is to flash another esp8266 with the backup and see if can be replace the original board.
RaymondMouthaan
on 28 Jun 2020
@strikernl, do you have plans and take a shot to install Tasmota on your Duux?
I was a bit hesistant, but your work makes it more likely that I would. However I seem to be having issues with it (it's not functioning correctly). I have a replacement unit which has the same problem, so I'm considering just returning it under warranty. It's a bit of a shame because it's a nice device. But it's a bit expensive to have these kind of quality issues imo.
I'm waiting to hear from their customer support before deciding what to do.
strikernl
on 29 Jun 2020
@strikernl, I have been able to flash another esp8266 (esp12) with the stock firmware and using the monitor (baudrate 74880) I could see that the esp reboots all the time and the build-in led constantly flashes.
load 0x40100000, len 2592, room 16
tail 0
chksum 0xf3
load 0x3ffe8000, len 764, room 8
tail 4
chksum 0x92
load 0x3ffe82fc, len 676, room 4
tail 0
chksum 0x22
csum 0x22

2nd boot version : 1.7(5d6f877)
SPI Speed : 40MHz
SPI Mode : QIO
SPI Flash Size & Map: 32Mbit(512KB+512KB)
jump to run user1 @ 1000

OS SDK ver: 2.0.0(e8c5810) compiled @ Jan 25 2019 14:26:04
rf_cal[0] !=0x05,is 0x00

 ets Jan  8 2013,rst cause:2, boot mode:(3,6)
Not sure how to proceed.
RaymondMouthaan
on 29 Jun 2020
I'm finding people mentioning that this is a problem which can be caused by not erasing flash first (or by erasing it and not writing the defaults back, I'm not really sure). After that you may also need to flash esp_init_data_default.bin to the correct address before flashing the backup image. More info here: https://www.reddit.com/r/esp8266/comments/4yy2b4/nodemcu_issues_with_flashing_flast_blinking_led/
strikernl
on 29 Jun 2020
l'll give that a try later, however flashing a blink sketch works perfectly fine ...
RaymondMouthaan
on 29 Jun 2020
l'll give that a try later, however flashing a blink sketch works perfectly fine ...
It might depend on the image, but who knows. Worth a shot ;)
strikernl
on 29 Jun 2020
Like the link I installed esp_init_data_default_v08.bin first and then the stock firmware. At least the esp doesn't reboot all the time. I tried to add the esp with stack firmware to the Duux app but unfortunately that did not work (yet).
esptool.py --port /dev/cu.usbserial-00000000 --baud 460800 write_flash --flash_size=4MB -fm dio 0x0 firmware-564b2a.bin 0x3fc000 esp_init_data_default_v08.bin

esptool.py v2.8
Serial port /dev/cu.usbserial-00000000
Connecting........_
Detecting chip type... ESP8266
Chip is ESP8266EX
Features: WiFi
Crystal is 26MHz
MAC: 5c:cf:7f:13:51:53
Uploading stub...
Running stub...
Stub running...
Changing baud rate to 460800
Changed.
Configuring flash size...
Flash params set to 0x0240
Compressed 1048576 bytes to 512851...
Wrote 1048576 bytes (512851 compressed) at 0x00000000 in 12.0 seconds (effective 697.1 kbit/s)...
Hash of data verified.
Compressed 128 bytes to 75...
Wrote 128 bytes (75 compressed) at 0x003fc000 in 0.0 seconds (effective 70.3 kbit/s)...
Hash of data verified.

Leaving...
Hard resetting via RTS pin...
Followed by the command below to make sure the stock firmware was flashed.
esptool.py --before default_reset --after hard_reset --chip esp8266 --port "/dev/cu.usbserial-00000000" --baud 115200

write_flash 0x0 firmware-564b2a.bin
esptool.py v2.8
Serial port /dev/cu.usbserial-00000000
Connecting........_____....._____....._____....._____.....____
Chip is ESP8266EX
Features: WiFi
Crystal is 26MHz
MAC: 5c:cf:7f:13:51:53
Uploading stub...
Running stub...
Stub running...
Configuring flash size...
Auto-detected Flash size: 4MB
Flash params set to 0x0040
Compressed 1048576 bytes to 512851...
Wrote 1048576 bytes (512851 compressed) at 0x00000000 in 45.6 seconds (effective 184.0 kbit/s)...
Hash of data verified.
Monitoring the esp gives the lines below when I reboot it:
ets Jan  8 2013,rst cause:2, boot mode:(3,6)

load 0x40100000, len 2592, room 16
tail 0
chksum 0xf3
load 0x3ffe8000, len 764, room 8
tail 4
chksum 0x92
load 0x3ffe82fc, len 676, room 4
tail 0
chksum 0x22
csum 0x22

2nd boot version : 1.7(5d6f877)
SPI Speed : 40MHz
SPI Mode : QIO
SPI Flash Size & Map: 32Mbit(512KB+512KB)
jump to run user1 @ 1000

OS SDK ver: 2.0.0(e8c5810) compiled @ Jan 25 2019 14:26:04
Well it's another step in the right direction it looks like. Did it clone the Mac address too? I'm not sure, never used a dev board. If it did that would obviously cause problems.
What if you try to pair it with the TuyaSmart app? I don't use the duux app (disclaimer: android user)
- Set the device to pairing mode
- Add device => large home appliance => air conditioner
- Follow the steps
Who knows...
strikernl
on 29 Jun 2020
Question is, how to set the cloned esp in pairing mode ?
With the original board, the device gets into pairing mode when pressing the wifi button on the front for about 5 seconds. This main board is connected via serial, so my guess is, somehow the serial connection tells the esp to go pairing mode? ...
RaymondMouthaan
on 29 Jun 2020
You are right of course. If I do recall, out of the box, the device starts unpaired and immediately goes into pairing mode. No button press required.
Did you dump the firmware when it was paired with your WiFi? You could try unpairing and then dumping the fw. I know for a fact the WiFi credentials are stored plaintext in the fw dump. Try running strings yourfirmwarebackup to verify.
Alternatively temporarily change your ssid?
strikernl
on 29 Jun 2020
Related issues
 MehranMazhar
·
5Comments
MehranMazhar
·
5Comments
 ilyasrois
·
3Comments
ilyasrois
·
3Comments
 saikhurana
·
5Comments
saikhurana
·
5Comments
 andreimos
·
3Comments
crankyoldgit
·
3Comments
andreimos
·
3Comments
crankyoldgit
·
3Comments
Most helpful comment
If there are only 4 pins/wires connecting the device, then I'd guess two are power (vcc or 3v3, & GND), the other two are probably serial (RX & TX).
You can use this issue as much as you like, just as long as no "requests" for help are probably here. I.e. create a new issue, otherwise I'm going to assume there is nothing here I _need_ to look at.