Dietpi: NanoPi M4 V2 installation failed, no wifi hardware detected.
Creating a bug report/issue
Required Information
I'm sorry, I can't get to the command prompt.
DietPi version v6.29.0 (MichaIng/dev)
NanoPi M4v2 (aarch64) (ID=58)
5.4.20-rockchip64 #20.02.1 SMP PREEMPT Mon Feb 17 04:45:00 CET 2020 aarch64 GNU/Linux
buster (ID=5)
ping -c 1 -W 10 9.9.9.9
Exit code 2
DietPi-Login
SD card: Sandisk ultra
Power: USB-USBc (i.e. from laptop)
- DietPi version |
cat /boot/dietpi/.version - Distro version |
echo $G_DISTRO_NAMEorcat /etc/debian_version - Kernel version |
uname -a - SBC model |
echo $G_HW_MODEL_NAMEor (EG: RPi3) - Power supply used | (EG: 5V 1A RAVpower)
- SDcard used | (EG: SanDisk ultra)
Additional Information (if applicable)
First-run DietPi Config (installation)
Steps to reproduce
- downloaded, unzipped, sha256sum OK
- dd to a (reliable) SD card
- insert into nanopi m4, power button.
- (press power button more than once, due to lag; may or may not be intermittently responsive)
- green LED blinking, watch screen (Dell monitor, miniHDMI-VGA connection, known to work with other images/devices), but it only displays an error message, something like: cannot drive this display.
- Screen blanks, green LED blinks, endlessly...
- Change monitor (-DVI connection, Dell) and boot
- shimmering grainy image appears, runs through lines until login, but that fails on searching for network (wifi, not preconfigured)
- system offers a dialogue to rerun a step that failed, entered into a settings panel.
- Could not find any way to enter network details. Closed out of dialogue.
Expected behaviour
- it should be able to drive an old VGA monitor (Armbian can, Raspbian can, etc...)
- resolution on DVI monitor should be much much better.
- why does a local login to THIS device require an internet connection to the world?
- why is there no possibility to enter those details in the first-run process?
Actual behaviour
- Screens fail: 1. VGA monitor fails to display on boot; 2. DVI monitor image is grainy, shimmery and hard to look at.
- First login fails, complaining about no network but fails to offer chance to enter network details.
- DietPi-Config says it cannot find wifi hardware (tried on two boots now)
Extra details
- additional logs - "connect: Network is unreachable"
- I have no ethernet connection to test with, unfortunately
- have tried several Armbian installations. They have wifi problems too - the cellphone hotspot has to be within inches of the device to establish connectivity.
- there's a possibility of bad hardware, BUT, why does wifi work (poorly) with Armbian? EDIT - Openmedia forum report of issues.
- there's no first-run log file. Maybe I screwed it by pulling the power cable, sorry.
- EDIT: dietpi-firstboot.log in next comment.
 nosyaardvark
All 38 comments
got it:
nosyaardvark
on 5 Jun 2020
Hi,
many thanks for your report. Yes indeed a valid network connection is needed to complete first initial setup. During the initial boot the system will do a software package update and install latest DietPi script's. Without a working internet connection, you are not able to complete the first run. If you need WiFi, it can be configured right from the beginning before booting the system. For this, pls follow our install guide Step2 (Optional (Wifi).
 Joulinar
on 5 Jun 2020
Joulinar
on 5 Jun 2020
@nosyaardvark
I can confirm that the M4v2 behaves sometimes a bit strange: Long time to boot (with SDCard and also with eMMC module), I also had problems with the WiFi at the first run resp. at reboot. I am not aware of all issues and how I got around, but see below what I recognize.
What may be countermeasures?
- Long time to boot: Wait and take a tea... booting takes up to 1.5 minutes
- WiFi does not appear: Option 1: Reboot. Option 2: dietpi-update to v6.30. This also helped often, due to a more stable network (WiFi) setup within dietpi-config.
- Strange HDMI output: Check your power cable whether this gives a stable voltage level. Sometimes too long cheap cables or cables with power switches did make problems at my setups.
Another workaround: Do the setup via ssh (e.g. putty in Windows). With this I never had display problems.
Sometimes the initial boot procedure did not work correctly so that I needed to power cycle the M4v2 again. But as far as I know, since DietPi v6.30 things became more stable.
@Joulinar: You could add lables FriendlyARM (and/or Firefly RK3399 or RK3399).
 StephanStS
on 6 Jun 2020
StephanStS
on 6 Jun 2020
I can confirm that wifi is not working at first-time boot and system also take a long time to boot up
 FusionPlmH
on 7 Jun 2020
FusionPlmH
on 7 Jun 2020
Hello @MichaIng,
as far as I recognize, you did some changes to this in v6.30, or?
If yes, we should do two tests investigating this, one with 6.29 and one with 6.30 to check whether there are differences.
I could do this with my M4v2, if you find this useful.
StephanStS
on 7 Jun 2020
Hi
Sorry for late reply.
@Joulinar Tried pre-setting wifi settings. This time, before login prompt, the boot process acknowledged it had an available network, but drops straight into Error handler (network unreachable) after login.
@StephanStS
- No idea how to update to 6.30. Can't see an option on the website, and I guess I am very limited on GitHub skills because I can't see it obviously there. (Sorry, my skill level). And
dietpi-updatefacility isn't useful without connectivity (I'm _just_ limited to a phone hotspot), or indeed, stuck on first boot. - That voltage supply and (all) monitors have worked just fine with other OSs on this board, and with other boards for that matter. I'd have to say its a flaw with DietPi.
Also, there is a setting for Wifi country-code. I played with that (GB, AU, US) without knowing exactly what that is affecting. Nevertheless, no effect.
Not clear I can help more. Interested in progress, though.
nosyaardvark
on 8 Jun 2020
@nosyaardvark
pls can you be a little bit more specific what error you are facing exactly after login?
Joulinar
on 8 Jun 2020
Well, I hit enter at the prompt, login (root, nanopi), and instantly I am shown a large grey dialogue box, red border and lettering saying something like "DietPi FirstRun - Error Handler".
It shows below that the details of a connection attepmt to ping quad9, and declares a network connection error (or something). There may or may not be a few more lines (this is from memory, I've overwritten the card), but under that there are 3 options:
- retry
- enter set-up settings
- send an error report.
Option 1. gets me right back to this page.
Option 2. yields another list of options, and something like 6 and 7 refer to network stuff, but nothing there (that I can see) allows me to view or modify SSID or passwords or anything useful. All my tries of tweaking something here have been useless.
I think that somewhere in there there were a couple of network options, one of which was wifi. When I first tried the installation without a modified .img (as per your instructions), the wifi was unsurprisingly switched off. Switching on and retrying did nothing. After I had preset the wifi, this setting showed "on", but still disconnected.
Option 3. moot point.
That's as about as specific as I can be, I'm sorry. This is the same for all my attempts. However, note that (as I said in last post), once I pre-set the wifi, there was a line in the boot process that said it had found the network - just a few lines before it asked me to press return to login as root. But it still got me to the grey error panel (above).
nosyaardvark
on 8 Jun 2020
ok, once you hit by the error, can you pls check if there was an ip address assigned by using ip a
Joulinar
on 8 Jun 2020
New image is up: https://dietpi.com/downloads/images/testing/DietPi_NanoPiM4v2-ARMv8-Buster.7z
Might speed up boot time.
 MichaIng
on 8 Jun 2020
MichaIng
on 8 Jun 2020
I made tests with the fresh DietPi v6.30 image from @MichaIng (the image was somehow warm, seems to be a veeery fresh one from the bakery). :-)
WiFi
- At first boot I was able to activate WiFi, change language to DE and login into my WLAN network. Perfect.
- In the past I had some problems doing this at the first boot see above. This now seems to be fixed.
- Also using LAN and WLAN (changing between the two): Both worked.
Boot time
- Older tests showed these boot durations:
- NEO4: Start -> green LED blinking: 53 sec
- M4v2: Start -> green LED blinking: 68 sec
- Now:
- M4v2: Start -> green LED blinking: 13 sec
General tests with the image were made. That means only installing the software via dietpi-software and checking the start of the application (i.e. an integration test):
- Node-RED
- phpsysinfo
- WebMin
All installed apps worked fine.
StephanStS
on 8 Jun 2020
Great, many thanks for doing these tests, also great to have the much lower boot times black on white 👍.
MichaIng
on 8 Jun 2020
Ok, sorry for the period of silence.
@Joulinar
ip -a address gives (excerpt; hand-copied from the screen):
3. wlan0: <NO-CARRIER,BROADCAST,MULTICAST,UP> mtu 1500 qdisc pfifo_fast state DOWN group default qlen 1000
        link/ether cc:4b:73:84:e9:d0 brd ff:ff:ff:ff:ff:ff
Also, very curiously, I've noticed that the dietpi-wifi.txt file just doesn't always copy over. I use either/both dd and my fedora system's image writer. This time, for example, I had to manually add it to the SD card. Weird.
Generally, boot time is much quicker - that's great.
The screen resolution is brighter, and that's great, but its still quite wavery. I have no idea what it would be like with a desktop, of course.
As constructive feedback, I'd like to suggest the facility to set-up a wifi connection within the set-up process. Having to edit a file (with permissions changes) seems needlessly complicated, and isn't reflected in other OSes.
I need to point out here that I've tried about 5 or 6 different OSes on this card now (including Friendly Arm's own bionic image) and NONE of them show healthy wifi performance. The phone/hotspot needs to be within an inch of the device for any connectivity and data flow; 2 feet away and there's no dataflow, connection soon drops out.
However, in DietPi, there is ABSOLUTELY no wifi function. Right from the get-go.
I guess the board has a defective wifi module. (I have a wifi dongle somewhere, but damned if I can find it.) But there is something else with your image.
I'll be honest, I'm at my limit with testing here. I want to set this board up and running, and besides I have to pull apart my workstation to use the main monitor every time I use DietPi (just tried again with my intended monitor, and its just dead on boot).
If you've got something you're really confident of, let me know, otherwise I'll come back with a different board in future.
Cheers.
 ghost
on 11 Jun 2020
ghost
on 11 Jun 2020
Well DietPi is working completely headless. There is no need to attach a screen or keyboard. That's exactly the reason having dietpi-wifi.txt available.
Joulinar
on 11 Jun 2020
@MondayPeople: Just to be sure, sorry for this simple question: You have installed at least one WiFi antenna to the connector (see there: Connector IXP ANT X2)?
You mentioned The phone/hotspot needs to be within an inch of the device for any connectivity and data flow; 2 feet away and there's no dataflow, connection soon drops out.: With this, your WiFi seems to be somehow defective or you don't have an antenna installed.
At my M4v2 (also with my NEO4, M1+) this works fine. No problems with many meters of WiFi distance.
I setup the WiFi mostly via dietpi-config by first connecting the board via LAN to my system. Then the first time install runs fine and your get rid of all connection drops due to WiFi reconfigurations.
StephanStS
on 11 Jun 2020
@StephanStS Brilliant. My nanopim4 arrived as China/Wuhan locked down for the virus, and just before we had to. Its was chaotic there for a while - I completely forgot about the external antennae required for this board. With them installed my signal goes to Quality 70/70 Signal level=-38 dBm.
However, I just tried again, and that _still doesn't solve the problem_.
The 6.3 version will boot, Wifi is on, but its still not connecting. Its still boot > login > error Network is unreachable.
I have just double-checked the contents of dietpi.txt and dietpi-wifi.txt, and booted again: all is as instructed with no workable result.
It still I don't have a LAN set up (that's the next project). (I won't connect another device to my main computer directly ever again, having been badly hacked that way in the past.)
Other matters, the screen resolution: booting Armbian with this monitor does get similar grainy, wavery image (from boot to desktop), but its about half as intense as with DietPi. There _is_ a faint ripple when the laptop drives this monitor, but almost imperceptible.
In contrast, booting Armbian on the other monitor yields a perfect image. DietPi still won't display on that monitor.
Thanks for your help, all.
ghost
on 12 Jun 2020
@MondayPeople: Could you please post the contents of your dietpi.txt and dietpi-wifi.txt?
Please put in a different WiFi password entry in dietpi-wifi.txt (we all are not interested in your passwords). :-)
I took the newest NEO4 image and edited in dietpi.txt the entries:
- AUTO_SETUP_NET_WIFI_ENABLED=1
- AUTO_SETUP_NET_WIFI_COUNTRY_CODE=DE
In dietpi-wifi.txt I put - aWIFI_SSID[0]='myWiFiSSIDxxxxx'
- aWIFI_KEY[0]='myWiFiPasswordxxxxx'
The entries for SSID and KEY you have to use the ' in front and behind the SSID and the KEY. Did you also do this?
StephanStS
on 12 Jun 2020
dietpi.txt
note that I have played with the wifi country codes (US,AU,GB), but no use. Haven't touch anything else except AUTO_SETUP_NET_WIFI_ENABLED=1.
# IMPORTANT:
# - This is intended for advanced users, unless you know what you are doing, do not edit this file. Please use the DietPi programs instead.
# - Do not remove uncommented lines, as the items are scraped by DietPi programs, on demand.

#------------------------------------------------------------------------------------------------------
# D I E T - P I
# DietPi-Automation settings, applied on first boot of DietPi only, ONCE!
#------------------------------------------------------------------------------------------------------
##### Language/Regional Options #####
# Locale: eg: "en_GB.UTF-8" / "de_DE.UTF-8" | One entry and UTF-8 ONLY!
AUTO_SETUP_LOCALE=C.UTF-8

# Keyboard Layout eg: "gb" / "us" / "de" / "fr"
AUTO_SETUP_KEYBOARD_LAYOUT=gb

# Timezone eg: "Europe/London" / "America/New_York" | Full list (TZ*): https://en.wikipedia.org/wiki/List_of_tz_database_time_zones
AUTO_SETUP_TIMEZONE=Europe/London

##### Networking Options #####
# Enable Ethernet or WiFi adapter: 1=enable | 0=disable
# - If both Ethernet and WiFi are enabled, WiFi will take priority and Ethernet will be disabled.
# - If using WiFi, please edit dietpi-wifi.txt to pre-enter credentials.
AUTO_SETUP_NET_ETHERNET_ENABLED=1
AUTO_SETUP_NET_WIFI_ENABLED=1

# Force ethernet speeds: 0=automatic speed | 10 = 10Mbit | 100 = 100Mbit etc
# - This is mainly aimed at Pine A64 which may have an HW issue that causes unstable 1Gbit link.
AUTO_SETUP_NET_ETH_FORCE_SPEED=0

# WiFi country code: 2 uppercase character value (e.g. GB US DE JP): https://en.wikipedia.org/wiki/ISO_3166-1_alpha-2
AUTO_SETUP_NET_WIFI_COUNTRY_CODE=GB

# Enter your Static Network details below, if applicable.
AUTO_SETUP_NET_USESTATIC=0
AUTO_SETUP_NET_STATIC_IP=192.168.0.100
AUTO_SETUP_NET_STATIC_MASK=255.255.255.0
AUTO_SETUP_NET_STATIC_GATEWAY=192.168.0.1
AUTO_SETUP_NET_STATIC_DNS=9.9.9.9

# Hostname
AUTO_SETUP_NET_HOSTNAME=DietPi

##### Misc Options #####
# Swapfile size to generate: 0=disable | 1=auto (2GB-RAM = size) | 2+=manual (MB)
AUTO_SETUP_SWAPFILE_SIZE=0
# Swapfile location
AUTO_SETUP_SWAPFILE_LOCATION=/var/swap

# Disable HDMI output (and GPU/VPU where supported) for supported devices: RPi, Odroid C1, Odroid C2
AUTO_SETUP_HEADLESS=0

# Unmask (enable) systemd-logind service, which is masked by default on DietPi
AUTO_UNMASK_LOGIND=0

# Custom Script (pre-networking and pre-DietPi install)
# - Allows you to automatically execute a custom script before network is up on first boot.
# - Copy your script to /boot/Automation_Custom_PreScript.sh and it will be executed automatically.
# - Executed script log: /var/tmp/dietpi/logs/dietpi-automation_custom_prescript.log

# Custom Script (post-networking and post-DietPi install)
# - Allows you to automatically execute a custom script at the end of DietPi install.
# - Option 0 = Copy your script to /boot/Automation_Custom_Script.sh and it will be executed automatically.
# - Option 1 = Host your script online, then use e.g. AUTO_SETUP_CUSTOM_SCRIPT_EXEC=https://myweb.com/myscript.sh and it will be downloaded and executed automatically.
# - Executed script log: /var/tmp/dietpi/logs/dietpi-automation_custom_script.log
AUTO_SETUP_CUSTOM_SCRIPT_EXEC=0

##### Software Options #####
# SSH Server Selection: 0=none/custom | -1=Dropbear | -2=OpenSSH
AUTO_SETUP_SSH_SERVER_INDEX=-1

# File Server Selection: 0=none/custom | -1=ProFTP | -2=Samba
AUTO_SETUP_FILE_SERVER_INDEX=0

# Logging Mode Selection: 0=none/custom | -1=RAMlog 1h clear | -2=RAMlog 1h save clear | -3=rsyslog + logrotate
AUTO_SETUP_LOGGING_INDEX=-1
# RAMlog max tmpfs size (MB). 50MB should be fine for single use. 200MB+ for heavy webserver and access log etc.
AUTO_SETUP_RAMLOG_MAXSIZE=50

# Webserver Preference Selection: 0=Apache2 | -1=Nginx | -2=Lighttpd
# - This will be ignored if you have manually selected any webserver stack.
AUTO_SETUP_WEB_SERVER_INDEX=-2

# DietPi-Autostart: 0=Console | 7=Console autologin | 1=Kodi | 2=Desktop autologin | 16=Desktop | 3=RetroPie | 4=OpenTyrian | 5=DietPi-Cloudshell | 6=Amiberry fast boot | 8=Amiberry standard boot | 9=DDX-Rebirth | 10=CAVA Spectrum | 11=Chromium kiosk | 14=Custom autostart service
# - This will be effective on 2nd boot, after firstrun update and installs have been done.
# - Related software titles must be installed either on firstrun installs or via AUTO_SETUP_AUTOMATED=1 + AUTO_SETUP_INSTALL_SOFTWARE_ID (see below).
AUTO_SETUP_AUTOSTART_TARGET_INDEX=0
# Autologin user name
# - This user must exist before firstrun installs, otherwise it will be reverted to root.
# - Applies to all autostart options but: 0, 6, 14 and 16
AUTO_SETUP_AUTOSTART_LOGIN_USER=root

##### Non-interactive Firstrun Setup #####
# On first login, run update, initial setup and software installs without any user input
# - Setting this to "1" is required for below settings to take effect
# - It is HIGHLY recommended to also set CONFIG_BOOT_WAIT_FOR_NETWORK=2, to force infinite wait for network connection during boot and prevent connection timeout errors.
AUTO_SETUP_AUTOMATED=0

# Global Password to be applied for the system
# - Affects user "root" and "dietpi" login passwords, and, all software installed by dietpi-software, that requires a login password
# - WARN: Passwords with any of the following characters are not supported: \"$
AUTO_SETUP_GLOBAL_PASSWORD=dietpi

# Software to automatically install
# - List of available software IDs: https://github.com/MichaIng/DietPi/wiki/DietPi-Software-list
# - Add as many entries as you wish, one each line.
# - DietPi will automatically install all pre-reqs (e.g. ALSA/X11 for desktops etc)
# - E.g. the following (without the leading "#") will install the LXDE desktop automatically on first boot:
#AUTO_SETUP_INSTALL_SOFTWARE_ID=23

#------------------------------------------------------------------------------------------------------
# D I E T - P I
# Misc DietPi program settings
#------------------------------------------------------------------------------------------------------
# DietPi-Survey: 1=opt in | 0=opt out | -1=ask on first call
# - https://dietpi.com/phpbb/viewtopic.php?p=34#p34
SURVEY_OPTED_IN=-1

#------------------------------------------------------------------------------------------------------
# D I E T - P I
# DietPi-Config settings
#------------------------------------------------------------------------------------------------------
# CPU Governor: powersave | conservative | ondemand | performance
CONFIG_CPU_GOVERNOR=ondemand
# Ondemand Sampling Rate | Min value: 10000 microseconds (10ms)
CONFIG_CPU_ONDEMAND_SAMPLE_RATE=25000
# Ondemand Sampling Down Factor: Samling Rate * Down Factor / 1000 = ms (40 = 1000ms when sampling rate is 25000)
CONFIG_CPU_ONDEMAND_SAMPLE_DOWNFACTOR=40
# Throttle Up Percentage: Percentage of average CPU usage during samling rate at which CPU will be throttled up/down
CONFIG_CPU_USAGE_THROTTLE_UP=50

# CPU Frequency Limits: Disabled=disabled
# - Intel CPUs use a percentage value (%) from 0-100, eg: 55
# - All other devices must use a specific MHz value, eg: 1600
# - Has no effect on RPi, please set "arm_freq" and "arm_freq_min" in config.txt instead.
CONFIG_CPU_MAX_FREQ=Disabled
CONFIG_CPU_MIN_FREQ=Disabled

# Disable Intel-based turbo/boost stepping. This flag should not be required, setting <100% MAX frequency should disable Turbo on Intel CPUs.
CONFIG_CPU_DISABLE_TURBO=0

# System-wide proxy settings
# - Do not modify, you must use dietpi-config > "Network Options: Adapters" to apply
CONFIG_PROXY_ADDRESS=MyProxyServer.com
CONFIG_PROXY_PORT=8080
CONFIG_PROXY_USERNAME=
CONFIG_PROXY_PASSWORD=

# Delay boot until network is established: 0=disabled | 1=10 second wait max (default) | 2=infinite wait
CONFIG_BOOT_WAIT_FOR_NETWORK=1

# Connection timeout in seconds, before G_CHECK_URL assumes the URL is dead. Increase if you have a "flaky" connection or slow DNS resolver.
# - Set this to "0" to allow unlimited time, however this is not recommended to avoid unlimited hanging background scripts, e.g. daily DietPi update check.
# - A negative or non-integer value will result in the default of 10 seconds.
CONFIG_G_CHECK_URL_TIMEOUT=10
# Connection attempts with above timeout each, before G_CHECK_URL is giving up and prompts an error.
# - Any value below "1" or a non-integer value will result in the default of 2 attempts.
CONFIG_G_CHECK_URL_ATTEMPTS=2
# General connection and DNS testing
# - IP to ping when checking network connectivity. Default: 9.9.9.9 (Quad9 DNS IP)
CONFIG_CHECK_CONNECTION_IP=9.9.9.9
# - Domain to ping when checking DNS resolver. Default: dns9.quad9.net (Quad9 DNS domain)
CONFIG_CHECK_DNS_DOMAIN=dns9.quad9.net

# DietPi checks for updates: Allows DietPi to check for updates on a daily basis and boot using a less 1 KiB file download.
CONFIG_CHECK_DIETPI_UPDATES=1

# Network time sync: 0=disabled | 1=boot only | 2=boot + daily | 3=boot + hourly | 4=Daemon + Drift
CONFIG_NTP_MODE=2

# Serial Console: Set to 0 if you do not require serial console.
CONFIG_SERIAL_CONSOLE_ENABLE=1

# Soundcard
CONFIG_SOUNDCARD=none

# LCD Panel addon
# - Do not modify, you must use dietpi-config to configure/set options
CONFIG_LCDPANEL=none

# IPv6
CONFIG_ENABLE_IPV6=1

# Prefer IPv4 with APT and wget, NB: This has no effect if IPv6 is disabled anyway!
CONFIG_PREFER_IPV4=1

# APT mirrors which are applied to /etc/apt/sources.list | Values here will also be applied during 1st run setup
# - Raspbian: https://www.raspbian.org/RaspbianMirrors
CONFIG_APT_RASPBIAN_MIRROR=http://raspbian.raspberrypi.org/raspbian
# - Debian: https://www.debian.org/mirror/official#list
CONFIG_APT_DEBIAN_MIRROR=https://deb.debian.org/debian/

# NTP mirror, applied to /etc/ntp.conf
# - For a full list, please see: https://www.ntppool.org/zone/@
# - Please remove the initial integer and full stop from the value (removing "0."), eg: debian.pool.ntp.org
CONFIG_NTP_MIRROR=debian.pool.ntp.org

#------------------------------------------------------------------------------------------------------
# D I E T - P I
# DietPi-Software settings
#------------------------------------------------------------------------------------------------------
# Enter your EmonCMS.org write API key here. It will be applied automatically during EmonPi/Hub install.
# - Eg: SOFTWARE_EMONHUB_APIKEY=b4dfmk2o203mmxx93a
SOFTWARE_EMONHUB_APIKEY=

# VNC Server
SOFTWARE_VNCSERVER_WIDTH=1280
SOFTWARE_VNCSERVER_HEIGHT=720
SOFTWARE_VNCSERVER_DEPTH=16
SOFTWARE_VNCSERVER_DISPLAY_INDEX=1
SOFTWARE_VNCSERVER_SHARE_DESKTOP=0

# ownCloud/Nextcloud
# - Optional username for admin account, the default is 'admin', applied during install
SOFTWARE_OWNCLOUD_NEXTCLOUD_USERNAME=admin
# - Optional data directory, default is "/mnt/dietpi_userdata/owncloud_data" respectively "/mnt/dietpi_userdata/nextcloud_data", applied during install
#   NB: This option is for advanced users. For full compatibility, please keep this options defaults, and, use dietpi-drive_manager to move the DietPi user data location.
SOFTWARE_OWNCLOUD_DATADIR=/mnt/dietpi_userdata/owncloud_data
SOFTWARE_NEXTCLOUD_DATADIR=/mnt/dietpi_userdata/nextcloud_data

# WiFi Hotspot
SOFTWARE_WIFI_HOTSPOT_SSID=DietPi-HotSpot
# - Key requires a minimum of 8 characters
SOFTWARE_WIFI_HOTSPOT_KEY=dietpihotspot
SOFTWARE_WIFI_HOTSPOT_CHANNEL=3

# X.org
# - DPI 96(default) 120(+25%) 144(+50%) 168(+75%) 192(+100%)
SOFTWARE_XORG_DPI=96

# Chromium
SOFTWARE_CHROMIUM_RES_X=1280
SOFTWARE_CHROMIUM_RES_Y=720
SOFTWARE_CHROMIUM_AUTOSTART_URL=https://dietpi.com

# Home Assistant
# - Optional Python build dependencies and modules, possibly required for certain HA components
#   Space separated list (no quotation!), will be installed together with Home Assistant automatically, if present
SOFTWARE_HOMEASSISTANT_APT_DEPS=
#   Add Python modules with version string at best, e.g.: firstModule==1.2.3 secondModule==4.5.6
SOFTWARE_HOMEASSISTANT_PIP_DEPS=

#------------------------------------------------------------------------------------------------------
# D I E T - P I
# Dev settings
#------------------------------------------------------------------------------------------------------
DEV_GITBRANCH=master
DEV_GITOWNER=MichaIng

#------------------------------------------------------------------------------------------------------
# D I E T - P I
# Settings, automatically added by dietpi-update
#------------------------------------------------------------------------------------------------------
`
```
nosyaardvark
on 12 Jun 2020
dietpi-wifi.txt, with fictitious wifi details.
#---------------------------------------------------------------
# Entry 0
# - WiFi SSID: required, case sensitive
aWIFI_SSID[0]='vortexofdoom'
# - WiFi key: If no key/open, leave this blank
aWIFI_KEY[0]='astringofterriblecursewords'
# - Key type: NONE (no key/open) | WPA-PSK | WEP | WPA-EAP (then use settings below)
aWIFI_KEYMGR[0]='WPA-PSK'
# - WPA-EAP options: Only fill if WPA-EAP is set above
aWIFI_PROTO[0]=''
aWIFI_PAIRWISE[0]=''
aWIFI_AUTH_ALG[0]=''
aWIFI_EAP[0]=''
aWIFI_IDENTITY[0]=''
aWIFI_PASSWORD[0]=''
aWIFI_PHASE1[0]=''
aWIFI_PHASE2[0]=''
# - Path to the certificate file, e.g.: /boot/mycert.cer
aWIFI_CERT[0]=''
#---------------------------------------------------------------
# Entry 1
# - WiFi SSID: required, case sensitive
aWIFI_SSID[1]=''
# - WiFi key: If no key/open, leave this blank
aWIFI_KEY[1]=''
# - Key type: NONE (no key/open) | WPA-PSK | WEP | WPA-EAP (then use settings below)
aWIFI_KEYMGR[1]='WPA-PSK'
# - WPA-EAP options: Only fill if WPA-EAP is set above
aWIFI_PROTO[1]=''
aWIFI_PAIRWISE[1]=''
aWIFI_AUTH_ALG[1]=''
aWIFI_EAP[1]=''
aWIFI_IDENTITY[1]=''
aWIFI_PASSWORD[1]=''
aWIFI_PHASE1[1]=''
aWIFI_PHASE2[1]=''
# - Path to the certificate file, e.g.: /boot/mycert.cer
aWIFI_CERT[1]=''
#---------------------------------------------------------------
# Entry 2
# - WiFi SSID: required, case sensitive
aWIFI_SSID[2]=''
# - WiFi key: If no key/open, leave this blank
aWIFI_KEY[2]=''
# - Key type: NONE (no key/open) | WPA-PSK | WEP | WPA-EAP (then use settings below)
aWIFI_KEYMGR[2]='WPA-PSK'
# - WPA-EAP options: Only fill if WPA-EAP is set above
aWIFI_PROTO[2]=''
aWIFI_PAIRWISE[2]=''
aWIFI_AUTH_ALG[2]=''
aWIFI_EAP[2]=''
aWIFI_IDENTITY[2]=''
aWIFI_PASSWORD[2]=''
aWIFI_PHASE1[2]=''
aWIFI_PHASE2[2]=''
# - Path to the certificate file, e.g.: /boot/mycert.cer
aWIFI_CERT[2]=''
#---------------------------------------------------------------
# Entry 3
# - WiFi SSID: required, case sensitive
aWIFI_SSID[3]=''
# - WiFi key: If no key/open, leave this blank
aWIFI_KEY[3]=''
# - Key type: NONE (no key/open) | WPA-PSK | WEP | WPA-EAP (then use settings below)
aWIFI_KEYMGR[3]='WPA-PSK'
# - WPA-EAP options: Only fill if WPA-EAP is set above
aWIFI_PROTO[3]=''
aWIFI_PAIRWISE[3]=''
aWIFI_AUTH_ALG[3]=''
aWIFI_EAP[3]=''
aWIFI_IDENTITY[3]=''
aWIFI_PASSWORD[3]=''
aWIFI_PHASE1[3]=''
aWIFI_PHASE2[3]=''
# - Path to the certificate file, e.g.: /boot/mycert.cer
aWIFI_CERT[3]=''
#---------------------------------------------------------------
# Entry 4
# - WiFi SSID: required, case sensitive
aWIFI_SSID[4]=''
# - WiFi key: If no key/open, leave this blank
aWIFI_KEY[4]=''
# - Key type: NONE (no key/open) | WPA-PSK | WEP | WPA-EAP (then use settings below)
aWIFI_KEYMGR[4]='WPA-PSK'
# - WPA-EAP options: Only fill if WPA-EAP is set above
aWIFI_PROTO[4]=''
aWIFI_PAIRWISE[4]=''
aWIFI_AUTH_ALG[4]=''
aWIFI_EAP[4]=''
aWIFI_IDENTITY[4]=''
aWIFI_PASSWORD[4]=''
aWIFI_PHASE1[4]=''
aWIFI_PHASE2[4]=''
# - Path to the certificate file, e.g.: /boot/mycert.cer
aWIFI_CERT[4]=''
Finally I switched off my M4v2 cloud server for a test with this issue.
I flashed this file and set up dietpi.txt and dietpi-wifi.txt.
What happened:
- First boot: No dietpi was able to be seen in my Fritz Box address setting.
- Second boot: I switched offf (hard reset) the M4v2 and rebootet again doing the second boot. Then the M4v2 could be seen in the Fritz Box address setting:

But no login (e.g. via putty) was possible. I do this many times with other NanoPi devices, so there should be no PEBCAC problem. Also connecting via the IP address did not work. - Third boot: Same as second boot, no change
- Connecting the LAN cable and reboot: Did not work, because DietPi uses WiFi instead of LAN in case of a WiFi connection
- Editing the dietpi.txt and changing AUTO_SETUP_NET_WIFI_ENABLED=0, rebooting the system with LAN connected: Did not work
- Re-Flashing the system, leaving dietpi.txt unchanged (i.e. AUTO_SETUP_NET_WIFI_ENABLED=0), booting the system with LAN connected:
[FAILED] DietPi-Software | Free space check: path=/ | available=109 MiB | required=500 MiB
[FAILED] DietPi-Software | Install aborted due to insufficient free space
In this case df gives:
root@DietPi:~# df
Filesystem     1K-blocks   Used Available Use% Mounted on
udev             1909448      0   1909448   0% /dev
tmpfs             396188   5320    390868   2% /run
/dev/mmcblk1p1    687980 547740    110948  84% /
tmpfs            1980932      0   1980932   0% /dev/shm
tmpfs               5120      0      5120   0% /run/lock
tmpfs            1980932      0   1980932   0% /sys/fs/cgroup
tmpfs            1980416      0   1980416   0% /tmp
tmpfs              51200      8     51192   1% /var/log
... coincidentally the tests were done with a 8 GB SDCard.
A test with a 64 GB SDCard worked fine, with WiFi as well as with LAN.
df shows:
root@DietPi:~# df
Filesystem     1K-blocks   Used Available Use% Mounted on
udev             1909448      0   1909448   0% /dev
tmpfs             396188   5340    390848   2% /run
/dev/mmcblk1p1  61512208 643624  60222212   2% /
tmpfs            1980932      0   1980932   0% /dev/shm
tmpfs               5120      0      5120   0% /run/lock
tmpfs            1980932      0   1980932   0% /sys/fs/cgroup
tmpfs              51200      0     51200   0% /var/log
tmpfs            1980416      0   1980416   0% /tmp
Also a test with a 16 GB SDCard and an older M4v2 image from 03/2020 worked fine.
@nosyaardvark: Which size is the SDCard you use?
... and now I can switch back my M4v2 to my nextcloud cloud server. :-)
StephanStS
on 12 Jun 2020
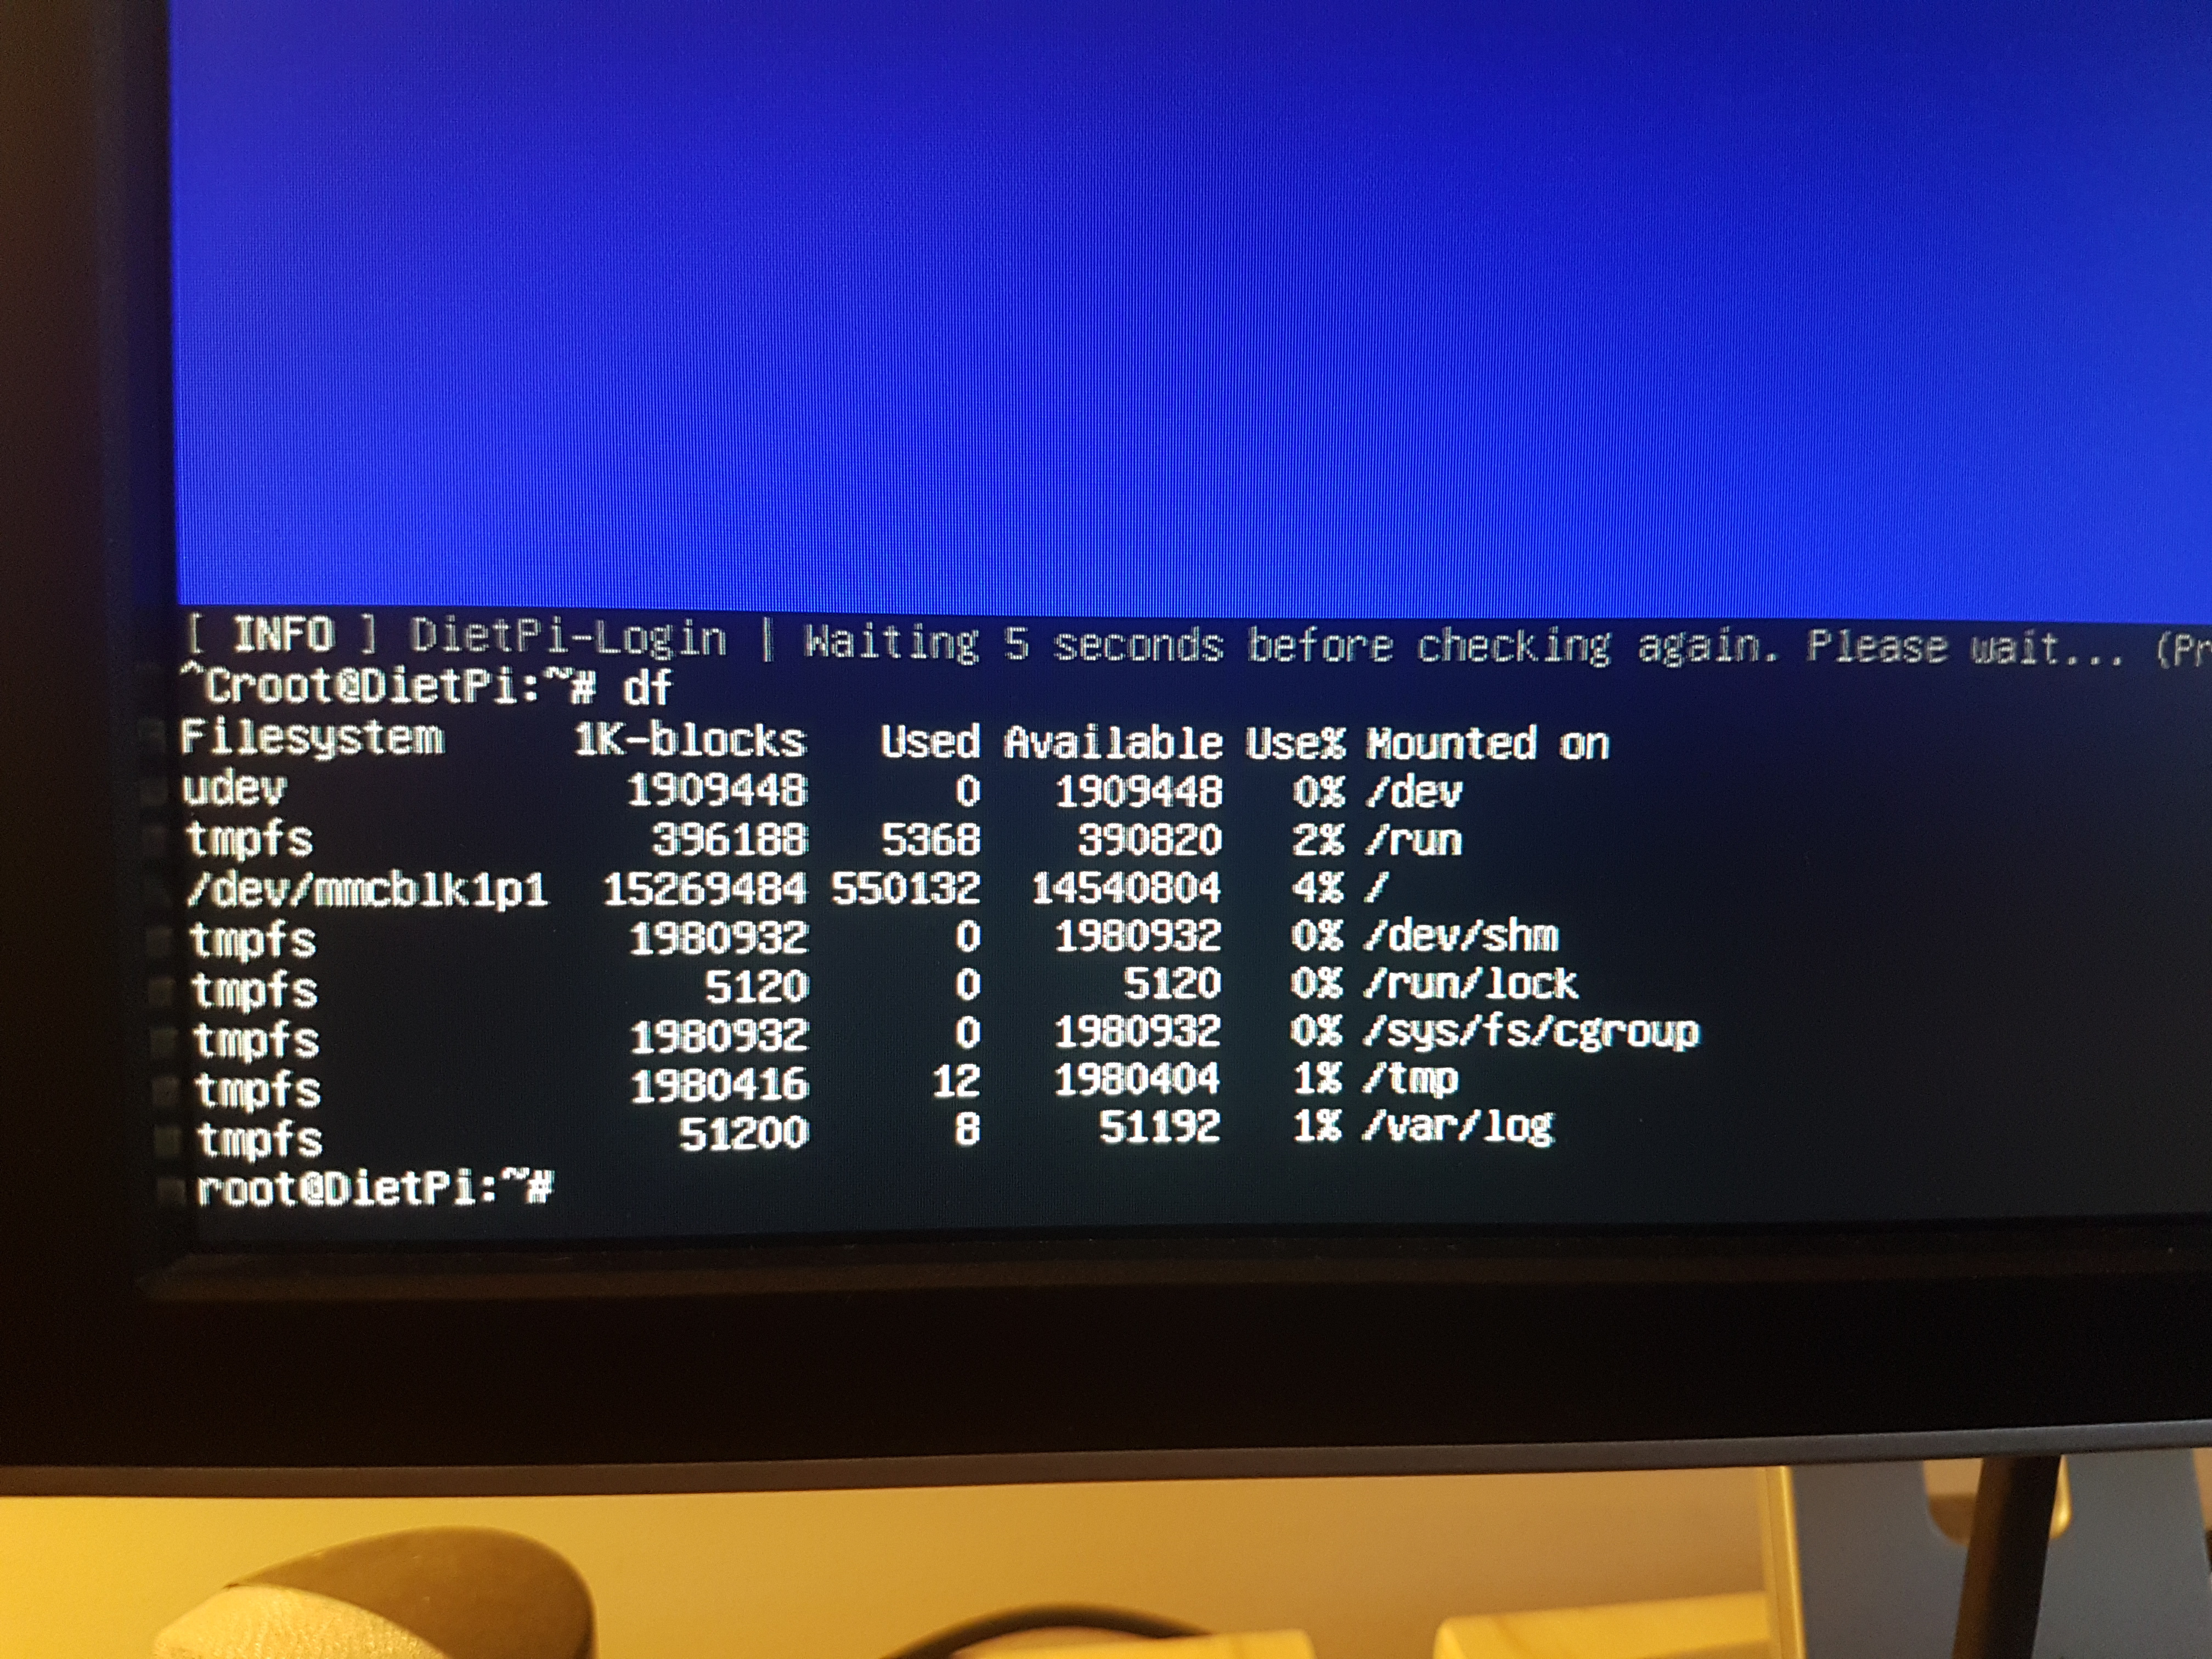
@StephanStS, Thanks for your efforts. Unfortunately its a 16GB card. (I also have a 64GB card that I _might_ have used, but it makes not difference, really). See my df in attached photo.
This is wasting too much time for me, I have to leave it now.
Thanks again, and I'll check back in with DietPi when I have a different board and/or LAN for headless applications.
PS - opening a subshell from the DietPi-Login initially doesn't work. It gets caught in some kind of loop until you hit ctl+C; _then_ it gets you a command line. The exit command successfully returns you to the Login.
nosyaardvark
on 13 Jun 2020
Many thanks for reporting and testing efforts guys.
@StephanStS
On your first attempt the file system was not expended as expected. The log file can give a hint in such case:
cat /var/tmp/dietpi/logs/fs_partition_resize.log
AUTO_SETUP_NET_WIFI_ENABLED is only applied on first boot, afterwards one needs to toggle/switch between WiFi and Ethernet manually indeed. If WiFi credentials were definitely correct, then the firstboot logs can give a hint what went wrong:
cat /var/tmp/dietpi/logs/dietpi-firstboot.log
We should merge all those logs into a single one to have everything related to first boot, update and installs in a single place 😄.
Possibly the 8 GiB SD is not too healthy anymore, just to keep in mind when you use it at a later time.
@nosyaardvark
I see that opening a subshell for debugging from error prompt during firstrun setup leads to a concurrent firstrun setup call. The subshell calls the same script which recognises that is it called from another shell already. Generally it is not good to call dietpi-login at all as a child of itself. I'll check for a good solution, however CTRL+C will do it for now.
The issue you faced on initial prompt was failed network connection check, right? Note that this does not necessarily mean that WiFi connection is down. Check ip a if the wlan0 (or wlan1) interface is present with an IP that fits to your routers DHCP range. Based on the exact connection check error message it could be:
- Your network does not support IPv6. In this case from the originating error prompt open
dietpi-config> Network Options: Adapters > IPv6 to Off, exit and retry. - Your network/routers/ISP somehow does not allow connections to the IP or domain that is used for default connection checks. This can be easily checked by using the "Change command" option from the error prompt and replace the ping IP or domain which a different one. To not break the intention behind the connection checks, assure that it is a www-reachable IP/domain so that the check indeed verifies www connectivity.
- If indeed WiFi failed to connect or the adapter/interface failed in the first place, you can as well setup WiFi via
dietpi-config> Network Options: Adapters > WiFi from the initial error prompt, which allows you to scan for available SSIDs, enter credentials manually and get a direct result.
Fixed nested script calls
- The bashrc script only calls dietpi-login if the G_DIETPI_LOGIN variable has not been set (with non-empty value): https://github.com/MichaIng/DietPi/commit/40ad8d3b40397c8ab4a11aa492ce48ba58e1f610
- The error handler exports this variable before calling the subshell to prevent dietpi-login call completely. This prevents the login banner as well, but this has been shown on initial login already and the error handler subshell should be clean with less overhead anyway. Only if the variable was not set before, it is unset after the subshell exits: https://github.com/MichaIng/DietPi/commit/4224ad6f8f982f54562aaf5f0d27d5f8d9ffefb5
- DietPi-Login itself exports the variable as well to prevent nested calls from any subshell, to include not only error handler subshells. This is more a failsafe step to include any subshells from custom user scripts/programs as well: https://github.com/MichaIng/DietPi/commit/7b3633ed91d6d811bf14e8e1beccd8dbd33ae1e4
- Changelog: https://github.com/MichaIng/DietPi/commit/d56c027510b34116a39357e7a50f220ff34df486
MichaIng
on 14 Jun 2020
So I have to apologize, I've just reassembled the board and its case, and my main desktop monitor. My desk has been a mess for almost 2 weeks with this. I'd have to disassemble everything to get the eMMC out (Armbian; boot-order preference) and boot from an SD card with dietpi. Just too much work, too much mess. Basically I'm not going to be testing this anymore.
However, thanks for your response. I've tried some of this before, so let me give you what info I can.
ip -a address gives (excerpt; hand-copied from the screen):
3. wlan0: <NO-CARRIER,BROADCAST,MULTICAST,UP> mtu 1500 qdisc pfifo_fast state DOWN group default qlen 1000 link/ether cc:4b:73:84:e9:d0 brd ff:ff:ff:ff:ff:ff
This was the only wlan listing, iirc.
(That's from a post above, user listed as "ghost" - my password manager prompted an old github account. Sorry, thought I'd reposted under nosyaardvark).
The IPv6 thing is interesting. I have now tried dietpi on two different wifi networks. Testing from my phone, one handles IPv6 (the last network, a 4G wifi dongle), the other (cellphone hotspot, different carrier) doesn't. So arguably IPv6 it should have been accessible from the last few boots, but wasn't.
It pings quad9, right? All devices close to hand ping that just fine (quad9.com and 9.9.9.9).
Re setting up wifi via the adapters option in config. You know, I entered that option several times when things first started going wrong, and I _completely_ missed the option to enter/search for SSIDs. And I was looking for that, specifically. Its up to you, but this represents feedback from a naieve user. I can't go back and check it now. Perhaps more obvious wording in that dialog? That could have saved a bit of frustration.
Thanks for the prompt action on the script calls issue.
Regards.
nosyaardvark
on 14 Jun 2020
Perhaps more obvious wording in that dialog?
The plan is to move some options right into the error handler dialog based on the error, so basically the IPv6 toggle when any IPv6 connection fails, direct link to network options when any network connection fails etc.
I'm testing the above mentioned changes and by this reviewing WiFi setup during first login.
MichaIng
on 14 Jun 2020
A new release is coming out , it seem to find the wifi problem on m4v2
FusionPlmH
on 23 Aug 2020
Nice, it seems to be the armbian-firmware package only, however apt update && apt upgrade should hence fix it. But since functional WiFi in case is the basis for even doing this upgrade, of course we need to redo our image.
MichaIng
on 23 Aug 2020
I could test it out when you finish redo the image as my m4v2 is available for testing😁
FusionPlmH
on 23 Aug 2020
@MichaIng: I executed apt update && apt upgrade which kept the actual kernel version at 4.4.213.
On armbian.com this is marked as legacy, the version referenced above contains kernel version 5.7.15.
So I thought about updating the kernel version via apt install linux-image-....
A search for other kernels showed only kernel versions 4.4.x:
root@necl:~# apt-cache search linux-image | grep rk3399
linux-image-legacy-rk3399 - Linux kernel, version 4.4.213-rk3399
linux-image-rk3399 - Linux kernel, version 4.4.192-rk3399
Q1: Why do I not find a kernel version 5.5.x? Is the grep filter wrong?
Q2: Is there an easier way to come from 4.4.x to 5.5.x instead of generation of a new image based on armbian 5.5.x?
I then used the new armbian image (kernel 5.5.17) to generate a dietpi image. Testing the WLAN login via dietpi.txt resp. dietpi-wifi.txt showed that I could connect via WiFi (and not via cable). dietpi-firstboot.log also shows no problems.
Q2: Shall I provide the new image?
StephanStS
on 23 Aug 2020
You're on the "legacy" kernel/firmware package tree, that is how Armbian keeps maintaining (moreless) the original manufacturer kernel versions. You need to install the "current" version packages.
dpkg -l | grep legacy
That should give you four packages: kernel, dtb, u-boot, root
Mark them as auto installed: apt-mark auto ...
Then install the "current" packages:
apt install linux-buster-root-current-nanopim4v2 linux-dtb-current-rockchip64 linux-image-current-rockchip64 linux-u-boot-nanopim4v2-current
The package names should indeed be the same, only "legacy" replaced by "current".
Then autoremove the obsolete packages (that have not been removed due to conflicts yet):
apt autopurge
While Armbian offers mainline kernel (Linux 5.X) images for nearly all boards, the main (places at top) download sometimes still ships the legacy Linux 4.X version, e.g. when the mainline kernel still lacks some major features with this boards, or at least proper GPU support that has been implemented with the manufacturers kernel tree. For M4V2 indeed the mainline kernel with Debian Buster natively has no GPU support.
MichaIng
on 23 Aug 2020
I understand htis: I.e. my filter with rk3399 (from the actual kernel) showed the legacy one, I should go to rockchip64.
BTW: When starting from the actual armbian using dev-scripts the same remount issue arises like there: https://github.com/MichaIng/DietPi/issues/3689#issuecomment-667590492
Doing your recommendation with mount -t tmpfs none /tmp within a subshell and rerun the command works.
StephanStS
on 23 Aug 2020
@MichaIng Btw I forgot to ask it is ok to use the nand-sata-install in diepi without any modifications ?
https://github.com/armbian/build/blob/master/packages/bsp/common/usr/sbin/nand-sata-install
FusionPlmH
on 23 Aug 2020
@StephanStS
Strange, does the Armbian image come with /tmp tmpfs mount? DietPi-PREP does now exactly what you did in case there is no /tmp mount yet: https://github.com/MichaIng/DietPi/commit/401a70f89c6450586b72aca238e6512b9cb969f9
And even if the mount is lost for some reason, dietpi-set_swapfile does not attempt to remount it anymore: https://github.com/MichaIng/DietPi/blob/dev/dietpi/func/dietpi-set_swapfile#L74
This means you need to tell me exactly which script at which step failed with that, at best the log outputs around the failure 🙂.
Ah indeed, Armbian mainline package names do not differentiate between RK3399 and other 64-bit RockChips anymore, I remember we stumbled over this change already 😄.
@FusionPlmH
It should work, but I never tested it. Generally I recommend to flash the image directly to the desired target drive. Even if its an eMMC that you cannot attach to an external PC. Instead of booting via SDcard and using nand-sata-install to clone the currently running system to the internal drive, flash a fresh DietPi image from there. Of course this is only applicable on a fresh install.
The good thing is that nand-sata-install does not touch the current system, so there is no risk. Simply try it, either it boots or you stay with the current system or use a different method 😉.
MichaIng
on 23 Aug 2020
@MichaIng: Thanks for the instructions updating the kernel to 5.5.x (described above). That worked at my M4v2 which I now converted from 4.4.x to 5.5.x (it's running a nextcloud instance).
Additionally I generated a "fresh" M4v2 image based on the armbian with 5.5.17 kernel. You may retrieve it like always and put it in the testing directory. Basic manual tests seemed that this version runs quite well and the WiFi problem of this issue # 3583 is gone.
StephanStS
on 23 Aug 2020
I updated the M4V2 image, now Linux 5.7.17: https://dietpi.com/downloads/images/DietPi_NanoPiM4V2-ARMv8-Buster.7z
Generating a Bullseye image now as well to test GPU acceleration/~Kodi~ support.
MichaIng
on 2 Sep 2020
Just a init test with both'Buster' and 'BULLSEYE', wifi is working at a startup , it can auto-connect to my router .
FusionPlmH
on 3 Sep 2020
@FusionPlmH
It should work, but I never tested it. Generally I recommend to flash the image directly to the desired target drive. Even if its an eMMC that you cannot attach to an external PC. Instead of booting via SDcard and usingnand-sata-installto clone the currently running system to the internal drive, flash a fresh DietPi image from there. Of course this is only applicable on a fresh install.
The good thing is thatnand-sata-installdoes not touch the current system, so there is no risk. Simply try it, either it boots or you stay with the current system or use a different method .
well i think we cant diretly run this script , but if we can implement this kind of function in dietpi for other single board computer it will be very nice
FusionPlmH
on 3 Sep 2020

I updated the M4V2 image, now Linux 5.7.17: https://dietpi.com/downloads/images/DietPi_NanoPiM4V2-ARMv8-Buster.7z
Generating a Bullseye image now as well to test GPU acceleration/Kodi support.
Kodi missing package
FusionPlmH
on 3 Sep 2020
Ah yes, I bet there are still some cases where package names have been changed to Bullseye, let me fix this.
EDIT: Ah lol there is simply no kodi package available yet on Bullseye at all: https://packages.debian.org/kodi
Okay so much for Kodi testing. I fixed the dependencies but of course that only makes sense if there is a package build against those Bullseye libraries.
Let's check for other sources: https://kodi.wiki/view/HOW-TO:Install_Kodi_for_Linux
- PPA for Ubuntu only x86.
- Only way I see so far is compiling from source: https://github.com/xbmc/xbmc/blob/master/docs/README.Linux.md
MichaIng
on 3 Sep 2020
Related issues
 Fourdee
·
3Comments
Fourdee
·
3Comments
 mok-liee
·
3Comments
mok-liee
·
3Comments
 pfeerick
·
3Comments
pfeerick
·
3Comments
 and09
·
3Comments
and09
·
3Comments
 k-plan
·
3Comments
k-plan
·
3Comments
Most helpful comment
I made tests with the fresh DietPi v6.30 image from @MichaIng (the image was somehow warm, seems to be a veeery fresh one from the bakery). :-)
WiFi
Boot time
General tests with the image were made. That means only installing the software via dietpi-software and checking the start of the application (i.e. an integration test):
All installed apps worked fine.