Dietpi: Image Request | Native PC x86_64: eg Intel NUC or Gigabyte Brix
Download Image + Info:
- https://github.com/Fourdee/DietPi/issues/1007#issuecomment-312442384
First of all thank you for making DietPi, it is fantastic and makes life much easier dealing with single board computers. So much so, I'm wondering if I can use it with x86 barebones like https://www.gigabyte.com/Mini-PcBarebone Brix?
I especially like the ability to just flash an image onto a disk and have it auto resize the partition and set everything else up automatically on first login.
 tetherit
All 31 comments
@xanview
Love those mini PC's, had a Acer Revo years back, would love to get my hands on these new beasts :)
We'd had a few requests for a general native PC install, i'll take a look and see what we can do. The main issue will be the initial install/image procedure, i'll need to investigate best/simple method to achieve this.
Just bear in mind:
- we won't be able to support GPU features like we do for RPi/Odroid. As the devices will vary. Although, for GPU it will be a simple case of copying a
xserver.conffor the required GPU (X -configure?). Kodi should then run fine on most hardware. - Soundcard support will be limited to the default device on system. Should be find on most boards, but unknown results at this time.
- In terms of server usage, should be perfect.
 Fourdee
on 12 Jun 2017
Fourdee
on 12 Jun 2017
Image available under BETA status:
- http://dietpi.com/downloads/images/DietPi_NativePC-x86_64-(Stretch).7z
Notes:
- x86_64 (64bit CPU required)
- Simply DD/write image to USB or Sata drive. Select as boot device in BIOS.
- EXT4
/bootpartition. Debian 9 installer would not allow for FAT 👎 - MBR non-UEFI
- User: Sensor modules with
sensors-detect: https://superuser.com/a/25199
ToDo:
- 🈯️ v153: intel/amd-microcode and amd GPU firmware
apt-get install firmware-linux-nonfree -y - 🈯️ v153: DietPi-Config > Display options: add support for Nvidia drivers?
- DietPi-Config > Display options: add support for Radeon/AMD drivers?
- DietPi-Config > Display options: add support for Intel drivers?
- 🈯️ v154: DietPi-Config > Add support for soundcard detection
Fourdee
on 1 Jul 2017
My Tests (v153):
- AMD FX 6200
- Nvidia 1050 Ti
DietPi-Software installs:
- 🈯️ LXDE
- 🈯️ Chromium OpenGL
Other:
- 🈯️ DietPi-Config | Nvidia driver install
- 🈯️ DietPi-Drive_Manager: basic mount/unmount tests
- 🈴 Sound: default device index
3. May need to implement auto detect sound card feature.
root@DietPi:~# aplay -l
**** List of PLAYBACK Hardware Devices ****
card 0: NVidia [HDA NVidia], device 3: HDMI 0 [HDMI 0]
  Subdevices: 1/1
  Subdevice #0: subdevice #0
card 0: NVidia [HDA NVidia], device 7: HDMI 1 [HDMI 1]
  Subdevices: 1/1
  Subdevice #0: subdevice #0
card 0: NVidia [HDA NVidia], device 8: HDMI 2 [HDMI 2]
  Subdevices: 1/1
  Subdevice #0: subdevice #0
Notes:
- 🈴 Lightdm installed by default with LXDE (even with
-no-install-recommends, renders dietpi-autostart useless.
Lets disable it by defaultsystemctl disable lightdm, and add option todietpi-autostartfor lightdm.
🈴
root@DietPi:~# systemctl enable lightdm
Synchronizing state of lightdm.service with SysV service script with /lib/systemd/systemd-sysv-install.
Executing: /lib/systemd/systemd-sysv-install enable lightdm
The unit files have no installation config (WantedBy, RequiredBy, Also, Alias
settings in the [Install] section, and DefaultInstance for template units).
This means they are not meant to be enabled using systemctl.
Possible reasons for having this kind of units are:
1) A unit may be statically enabled by being symlinked from another unit's
   .wants/ or .requires/ directory.
2) A unit's purpose may be to act as a helper for some other unit which has
   a requirement dependency on it.
3) A unit may be started when needed via activation (socket, path, timer,
   D-Bus, udev, scripted systemctl call, ...).
4) In case of template units, the unit is meant to be enabled with some
   instance name specified.
🈯️ v153: Lets avoid the service and give DietPi control, launching /usr/sbin/lightdm if selected in DietPi-Autostart.
Fourdee
on 2 Jul 2017
@Fourdee Thanks for all the hard work. Will there be a 32 bit distribution so I can run it on an older netbook? And an option to install to harddrive. Otherwise it only runs from USB. I might be able to close the partitions from USB to harddrive but unsure if that will work.
 Invictaz
on 4 Jul 2017
Invictaz
on 4 Jul 2017
@Invictaz
Will there be a 32 bit distribution so I can run it on an older netbook?
Possibly we might do that in the future. However, with help from our users, test this image first, iron out the bugs then i'll look into it.
Fourdee
on 4 Jul 2017
@Invictaz
And an option to install to harddrive. Otherwise it only runs from USB. I might be able to close the partitions from USB to harddrive but unsure if that will work.
You can write the image directly to a Harddrive, with a USB > Sata converter.
Fourdee
on 4 Jul 2017
Completed.
Fourdee
on 5 Jul 2017
Reopened for testing.
Fourdee
on 5 Jul 2017
@Fourdee but then I have to open a sealed laptop, take out the drive and then write the image to that drive... Bit weird.
Invictaz
on 5 Jul 2017
@Invictaz
but then I have to open a sealed laptop, take out the drive and then write the image to that drive... Bit weird.
Yep, not ideal, but we lack the code currently in DietPi for a USB/ISO installer. Depending on how popular the image is, we may look at creating a easy to use USB/ISO installer for Native PC image.
Fourdee
on 5 Jul 2017
I will see if I can test it from a USB stick.
Invictaz
on 5 Jul 2017
@Fourdee
I commenced testing on an i7 2670qm laptop.
Has a lot of failed and other errors but seems to work fine. How to send you the bootup log?
Also it's downloading a lot of amd64 stuff when I have an Intel processor... bit weird
The rest is quite fine. How to increase the font size? The resolution back to 720p is a bit weird...
Wifi works. Sound needs to be tested and Bluetooth. Also on the first bootup there were some CPU governor problems but now it's on performance.
ACPI is still a failure and NTPD is slow. Saw also some SSH errors.
Everything's fresh out of the box so only console.
For now I plan to run without desktop.
Fn + F2 brightness control is working.
Keyboard works
Nvidia drivers are now being installed.
I might turn this thing into a Steam Machine. Will do a feature request later.
For now testing goes on. Will report later if any casualties appear
Cheers
Invictaz
on 7 Jul 2017
Oh before I forget the images by Splashtop for ASUS are much and much faster. Only 7 seconds to a minimized desktop. Dietpi takes about 35 only to boot to console (on Pi Zero double that time)
Invictaz
on 7 Jul 2017
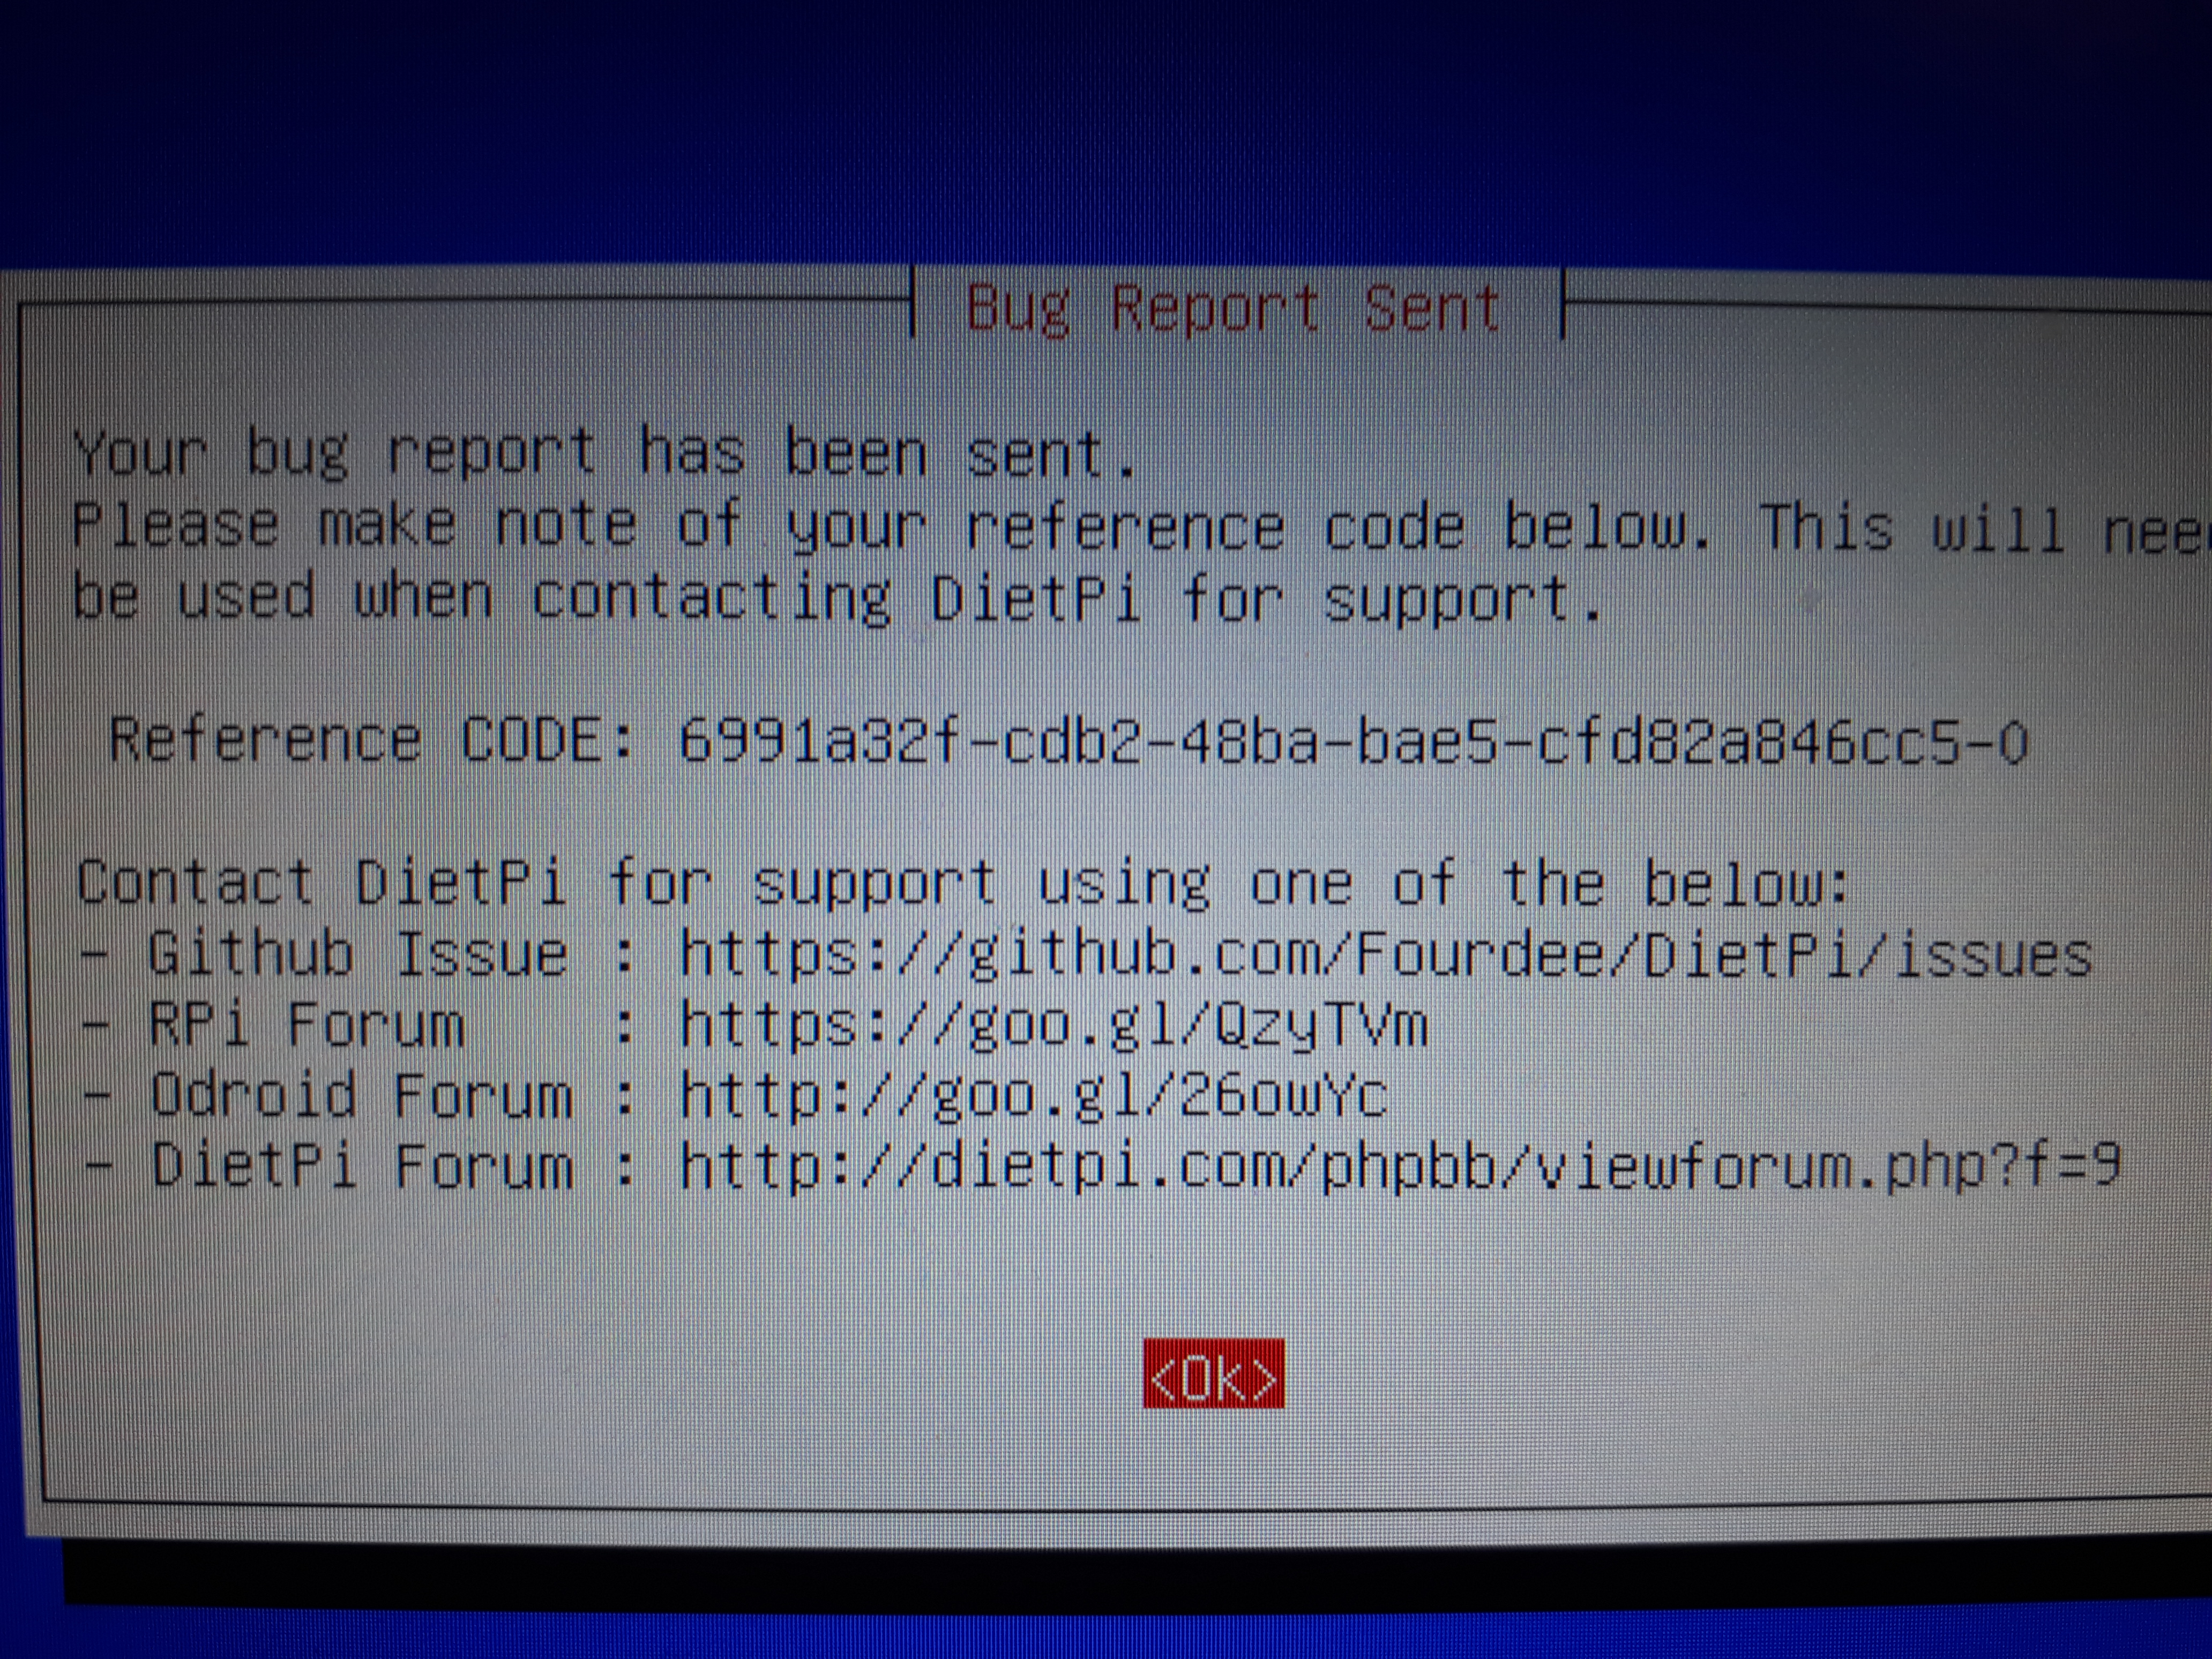
Filed the first bug report
Also GPU problems in Chrome after installing the Nvidia driver 379.55
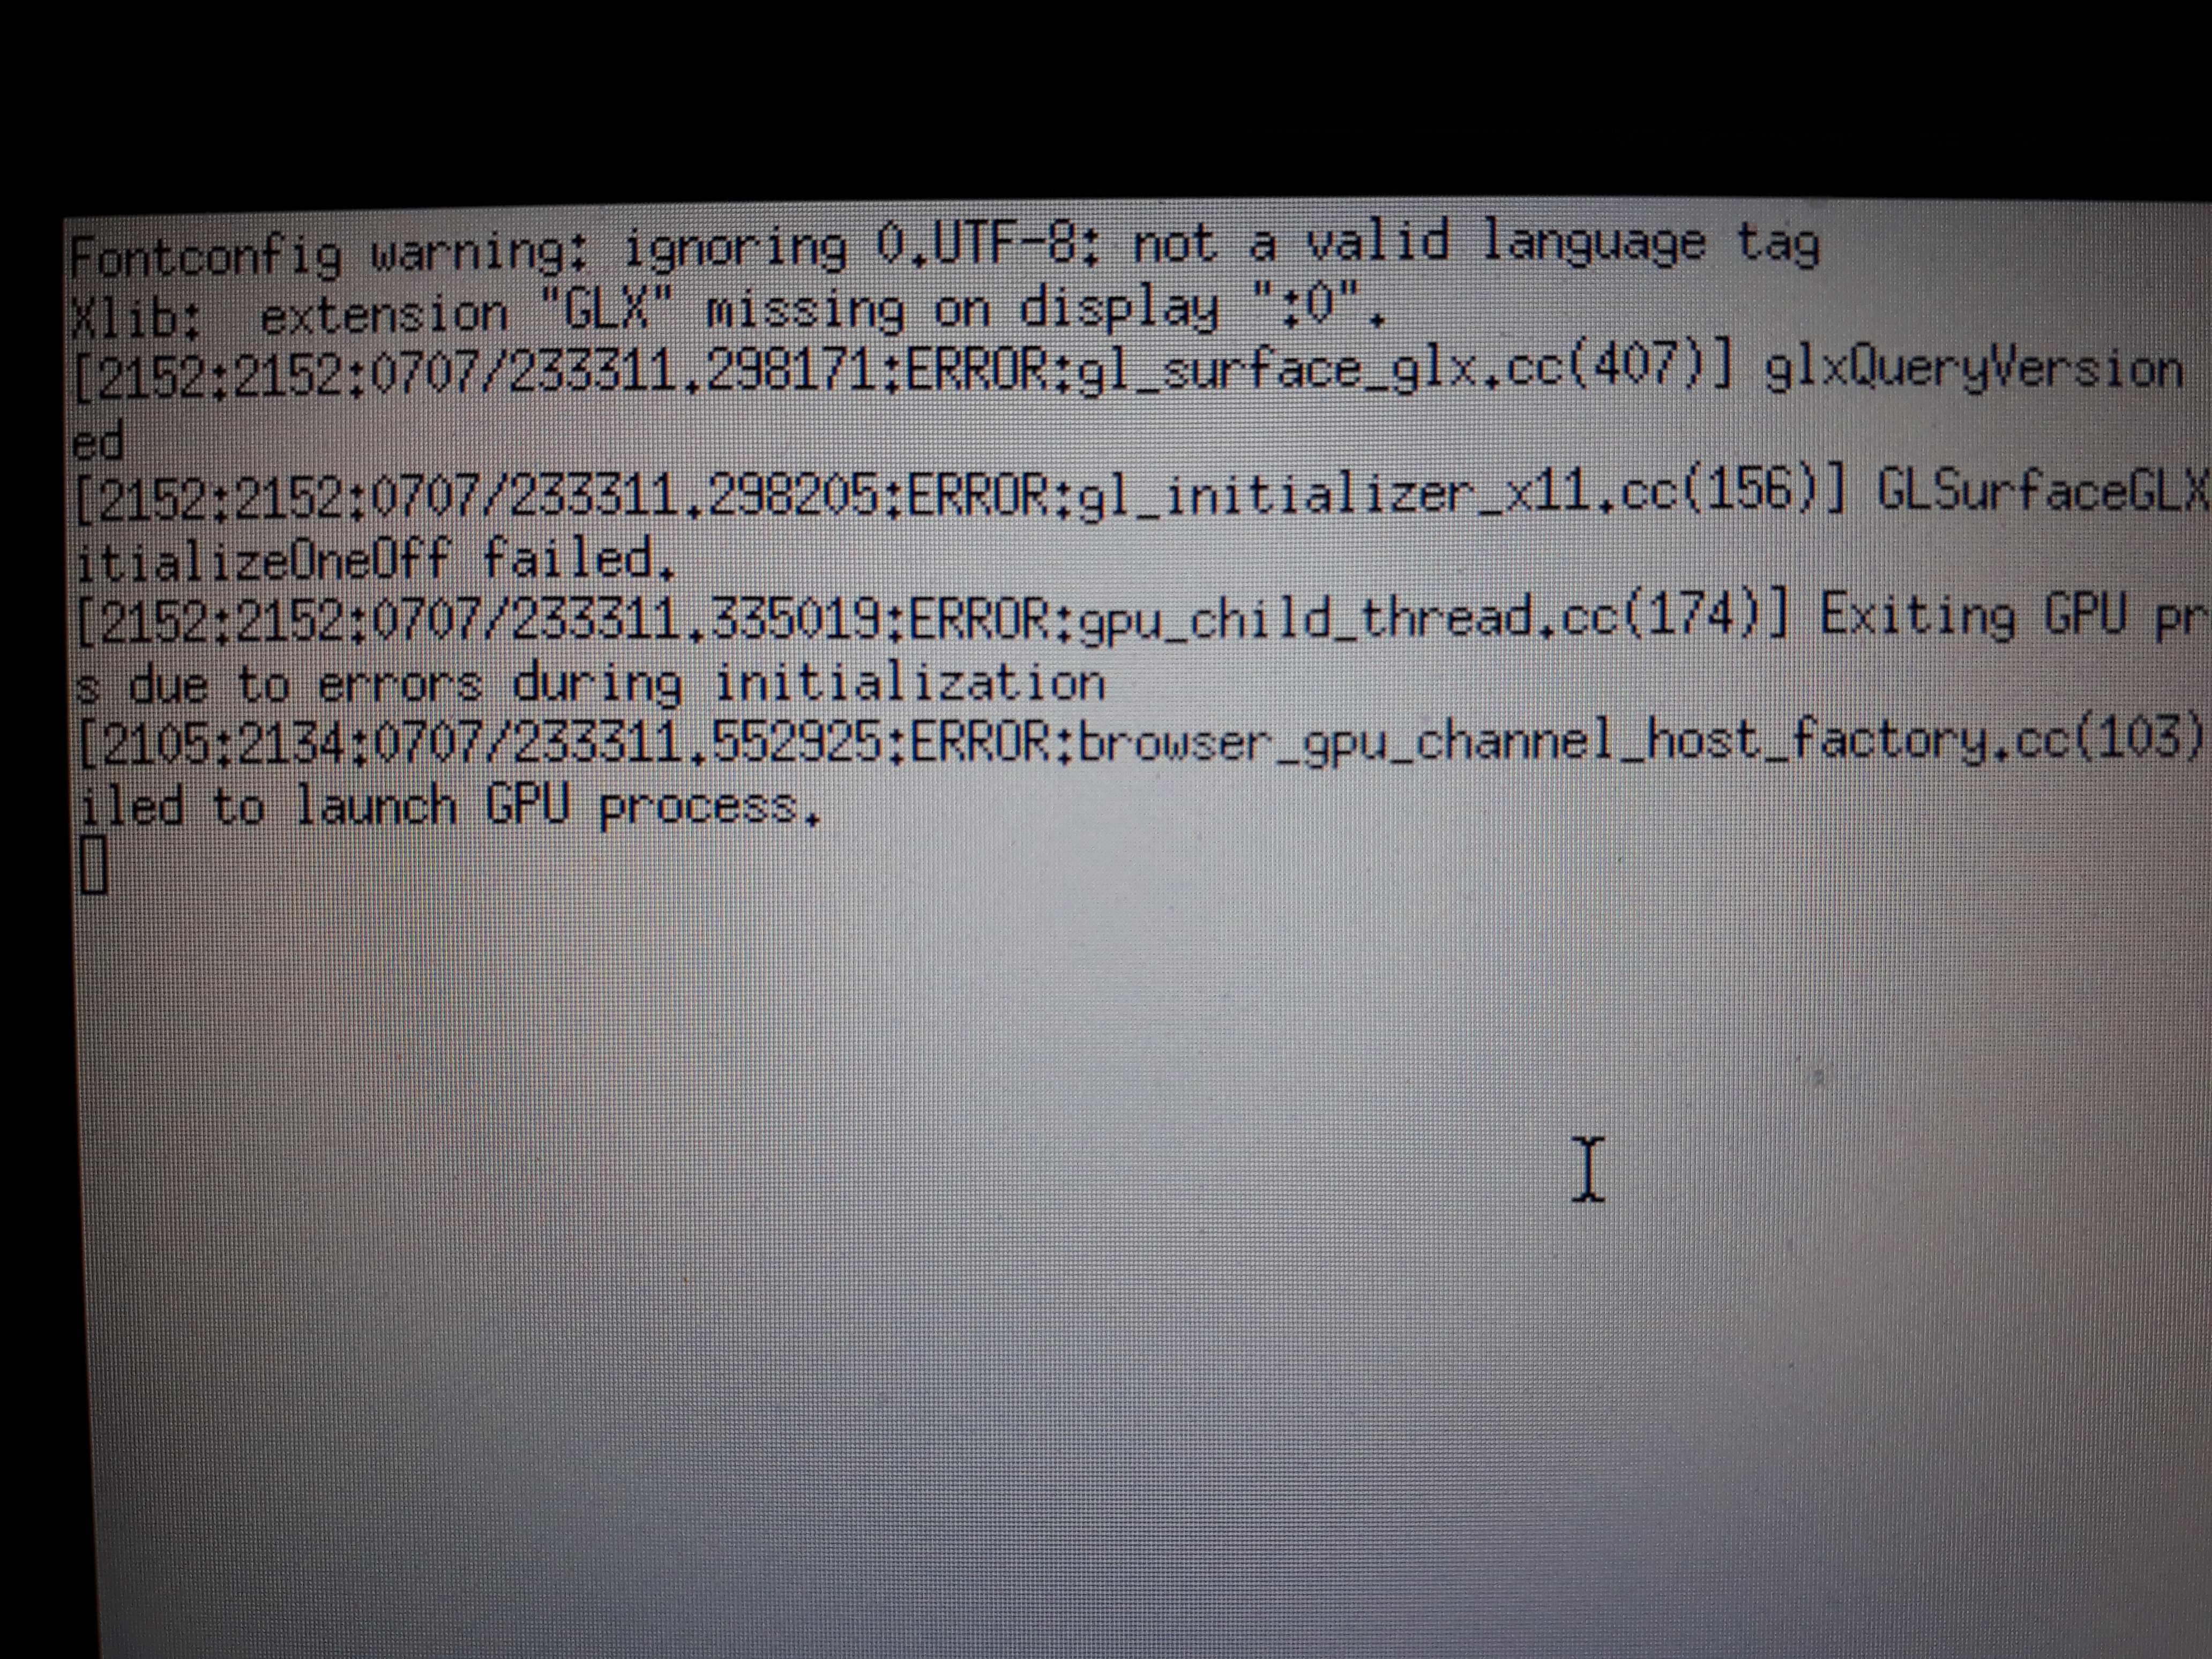
Plus after reboot to Chromium the wifi isn't connecting. I have no serial connection to restart it.
Invictaz
on 7 Jul 2017
Sound works although not detected in dietpi-config
After uninstalling Nvidia drivers I tested the HDMI out, didn't work. Maybe later reinstalling them and retesting.
Tested NZBGet: works fine
Filed another bug report. Hopefully you can work some bugs out.
For now it's quite okay :+1:
Invictaz
on 8 Jul 2017
@Invictaz
Thanks for report 👍
Which GPU model are you running?
Fourdee
on 8 Jul 2017
@Fourdee
Internal: Intel HD3000
Dedicated: Nvidia GT555M
Invictaz
on 8 Jul 2017
@Invictaz
In your BIOS, is there an option to disable the onboard intel HD GPU, and force Nvidia? Might be worth a shot.
Fourdee
on 12 Jul 2017
@Fourdee No. BIOS is locked on laptops with Optimus dual gpu solution.
Flashing an unlocked bios isn't really an option for me right now.
There are some mods but I won't go into it
https://www.bios-mods.com/forum/Thread-ThinkPad-T410-T510-Intel-IGP-Optimus-Unlock-Request
From what I know the Intel HD3000 is always used, it offloads tasks to the dedicated Nvidia GPU which renders it and drops the result to the framebuffer of the Intel.

Invictaz
on 13 Jul 2017
@Invictaz
We'll need to do some research: https://wiki.debian.org/NvidiaGraphicsDrivers#Configuration
Mention of BumbleBee project for Nvidia Optimus: https://wiki.debian.org/Bumblebee
Fourdee
on 15 Jul 2017
Yes I saw Bumblebee this week. Might test it later.
Also there is the option (somewhere in Linux) to disable the dedicated graphics and run only on Intel HD graphics. This saves energy which is one of the Key aspects of DietPi. So might need to be included.
Invictaz
on 16 Jul 2017
@Fourdee Bumblebee is last updated in 2013. We might use the proprietary Nvidia Driver from non-free plus the newest Xorg 1.19.2, that is used in DietPi v154
It needs nvidia_drm.modeset to have PRIME synchronization to remove the tearing
http://www.phoronix.com/scan.php?page=news_item&px=Xorg-PRIME-Sync-Double-Buffer
https://devtalk.nvidia.com/default/topic/957814/prime-and-prime-synchronization/?offset=169
https://askubuntu.com/questions/900286/with-nvidia-optimus-xorg-1-19-3-kernel-4-10-0-15-and-still-having-screentear
https://www.gamingonlinux.com/articles/how-to-an-update-on-fixing-screen-tearing-on-linux-with-an-nvidia-gpu.8892/page=3
We might also have the 32bit driver needed if Steam is coming in Dietpi v154 or v155
Invictaz
on 16 Jul 2017
Issues with NV audio, manual unmute may be required in alsamixer:

Fourdee
on 17 Jul 2017
As for how to write the image to the HD, can I suggest Clonezilla?
You don't need to open your laptop/PC, you just boot out of a USB/CD and flash the image.
Here you can find instructions to make a bootable USB flash drive.
Basically it all boils down to:
- Unzip Clonezilla to the USB flash drive.
- Copy the DietPi image to the USB flash drive.
- Tweak two text files (one for UEFI boot, one for BIOS boot).
- Only for BIOS boots, run a script already in the flash drive so syslinux is installed.
I have some experience with that. Drop me a line if I can be of any help.
 sal666
on 26 Jul 2017
sal666
on 26 Jul 2017
@sal666
I have tried to tweak the two text files as you mentioned in step 3. It seems I am not experienced enough, because it did not work for me. :(
Could you describe the necessary steps (3-4) in detail?
Thanks
 belabelabela
on 9 Aug 2017
belabelabela
on 9 Aug 2017
Intel GPU driver install (tested with HD520, should work for all):
NB:
- No Xserver must be running (eg: exit desktop and return to terminal)
G_AGI xserver-xorg-video-intel libgl1-mesa-dri
Xorg -configure
mv $HOME/xorg.conf.new /etc/X11/xorg.conf
reboot
Thanks! It is either NVIDIA or Intel in Optimus situation. Best advice is if you have such a dual GPU setup run everything on the NVIDIA while this copies everything into the Intel framebuffer (which is connected to LVDS display).
If you have only an Intel card (or don't care about the additional performance of the NVIDIA) do as @Fourdee suggested.
Invictaz
on 10 Aug 2017
@belabelabela
For step 3, refer to GRUB documentation:
-GRUB
-tips about theming
-more about theming
Step 4 is explained here (step #5)
I've prepared a quick demo. Do the following:
- Install Clonezilla live to your USB flash drive (full instructions here):
- download alternative stable version from here.
- extract it to your pendrive.
- Make your pendrive bootable (step #5).
- Unzip this file to your pendrive: DietPi-Clonezilla.zip.
- Edit grub.cfg, isolinux.cfg and syslinux.cfg and replace 'sda' with the name of your target hard disk.
- Copy Clonezilla's image files to
/home/partimag/DietPi/ - Boot from your pendrive.
- You should see this boot screen:

- WARNING: Choosing "Install DietPi" will restore DietPi to your first hard disk (sda or whatever your chose at step 4).
sal666
on 8 Sep 2017
@sal666
This is awesome, great work and thanks for sharing 👍
Fourdee
on 9 Sep 2017
@sal666
Thanks a lot, I will give it a try!
belabelabela
on 10 Sep 2017
Marking as closed. Image is now available for MBR and EFI.
Fourdee
on 6 Jan 2018
Related issues
 mok-liee
·
3Comments
mok-liee
·
3Comments
 oshank
·
3Comments
oshank
·
3Comments
 MichaIng
·
3Comments
Fourdee
·
3Comments
Fourdee
·
3Comments
MichaIng
·
3Comments
Fourdee
·
3Comments
Fourdee
·
3Comments
Most helpful comment
@belabelabela
For step 3, refer to GRUB documentation:
-GRUB
-tips about theming
-more about theming
Step 4 is explained here (step #5)
I've prepared a quick demo. Do the following: